ALTE DOCUMENTE
|
||||||||||
VCD UTILITY - DETAILED SETUP INSTRUCTIONS
Please read this entire document prior to using the utility
During the course of the Windows "Codename" Whistler beta, we will be releasing builds via the WindowsBeta website in ISO format in addition to CAB files. This tool is being provided as a method for performing a supported upgrade to new builds that are released during the course of the beta. We have typically provided only CAB files, which are extracted to a folder on the hard drive from which the upgrade or installation is performed. 919v2117j Many problems can arise when using this method and there is no easy way of insuring the quality of the files after they have been extracted from the CAB files.
The CD image utility outlined below allows for reading the ISO images on a Windows 2000 or Windows Whistler based operating system. Once installed, the utility will create a virtual CD drive with the contents of the image file and in effect, will appear and operate as though it were a standard physically attached CDROM drive.
Note - DOS, Win9x, Win ME, and Windows NT 4.0 will not work with this tool. Please see the "Additional Resources" section at the bottom of this document for information regarding options for these Operating Systems.
Necessary Files: VCDControlTool.exe VCdRom.sys
Installation:
You may place the file VCDControlTool.exe on the desktop or another location of your choice where it can be conveniently launched. The file VcdRom.sys should be placed within your %SystemRoot%\System32\Drivers folder with other driver files. From this point, the installation / configuration is really just a few straight forward steps as outlined below:
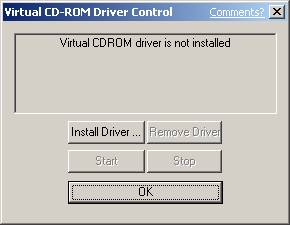
Launch VCDControlTool.exe and you will be presented with the following screen:

Click the "Driver Control ." button, as we need to tell the utility where the vcdrom.sys driver is located.
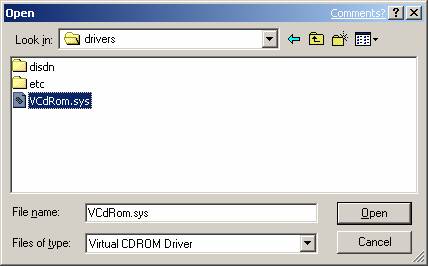
Click the "Install Driver ." button and browse to the location for the vcdrom.sys file and click the "Open" button. In the example below, the file is located within the %SystemRoot%\System32\Drivers folder
You should then see a window similar to the following though the location of the files may be different:
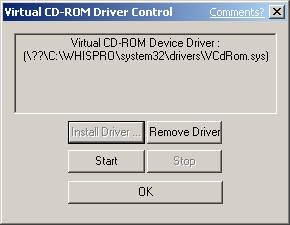
Click the "Start" button. This should now enable the driver and the Start button should be grayed out as shown below:
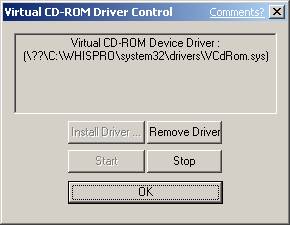
Click the "OK" button. The driver should now be installed properly! You should now proceed to the Features overview below.
Features:
Mounting an Image
Mounting an ISO CD image is accomplished through a two-step process as listed below:
Adding a drive
The first step involves assigning a new drive letter which will be treated as a CDROM drive by the system. To perform this step, click the "Add Drive" button as shown in the following window:
Once you have clicked "Add Drive" you will see a newly created drive similar to what is shown below. Note that the drive letter may be different.

Mounting an image
Now that we have assigned a drive letter, we simply need to point to the appropriate image file. Click the "Mount" button and browse for the appropriate image file on your system. In the example below, the image file resides in an Images folder.
Note - You cannot use a UNC path to an image file. If you wish to point to an image file on a network drive, you must establish a connection to the share using a mapped drive letter assignment. If you attempt to mount an image via a UNC path, you will receive the error "Mount Failed!"
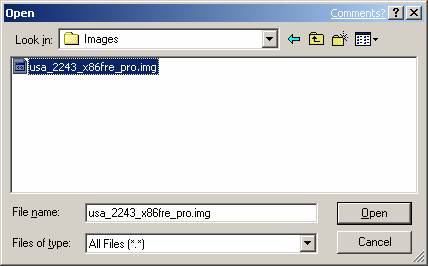
Once you locate the image file and select it, click the "Open" button to continue.
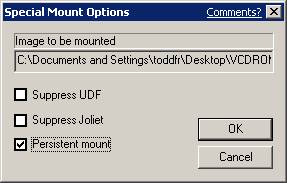
In the following window, Click the option "Persistent mount" and click "OK".
Click "Ok" to the next three dialog boxes that popup.
You should be presented with a window similar to the following:

At this point, simply click "OK" and you're done!
The drive letter, which was assigned to the virtual CDRom, will not appear in Explorer until you reboot. This is a known issue and will be fixed in a future build of Whistler. Due to this issue, you MUST reboot before continuing with the following steps.
Now if you open "My Computer" via the desktop you should see your newly mounted CD drive and the image should appear to be a real CD within the drive.
You can drag and drop individual / groups of files or start a complete installation or upgrade just as you would from a real CDROM Drive.
Note - Because the CD Drive is a virtual drive, setup MUST be run from the command prompt so that a special switch can be used. Typically, setup from a CD drive would copy some basic files over and then reboot allowing for the remainder of the files to be read directly from the CD as necessary. With the Virtual CD driver, this is not possible. Please see the "Starting Windows Whistler Setup" section later in this document for the specific steps to be taken when starting setup from your virtual CD.
This option is used to remove the drive letter associated with a virtual CDROM drive. Once you are done using an image, you should use this option to remove the drive letter if it will no longer be used.
Used for mounting a previously mounted image without having to specify the path
and location of an image file. Used after using the eject option.
For use with multiple CD images where you're typically asked to insert another CD.
Operates just as Eject would on a normal CD drive. Once the "image" is ejected, you
would mount another image to the same drive letter.
Starting Windows Whistler Setup
It is necessary to start Whistler setup from a cmd session so that we can force all necessary files to be copied to the hard disk before rebooting. This is similar to a 'Network' install where files must be available locally as the network share won't be available during setup. The necessary driver for the Virtual CD will not be loaded during setup so we must make sure all the files have been copied from the image.
You may start setup from a cmd prompt or from the start menu - run selection by using the following syntax:
X:\i386\winnt32 /makelocalsource
Where X is the drive letter associated with your Virtual CD Drive
Once setup starts, everything should proceed normally.
After Setup Is Completed
Once Setup has completed, your Virtual CD drive won't be present but the driver will still be installed and started. You may leave the driver running for use with your next ISO Image upgrade or stop the driver from running and remove it by performing the following steps:
Launch VCDControlTool.exe
Click the "Driver Control ." button
Click the "Stop" button
Click the "Remove Driver" button and click "OK"
Click "OK" to close the application
Troubleshooting:
Q: When attempting to mount an image, why do I receive the error "Mount Failed"?
A:
Make sure that you have added a drive letter prior to mounting
Make sure that there isn't already an image assigned to the drive (use eject option to remove assigned image)
If attempting to mount an image on a network share, make sure you are accessing it via a mapped drive letter and not a UNC path.
Q: When I attempt to add a drive, why do I receive the error "Add Failed"?
A: Make sure you have gone through the process of adding and starting a driver first via the
"Driver Control" button. If you have failed to install or start the driver this error would occur.
Additional Resources:
The preferred method for upgrading from Windows9x, Windows ME, or Windows NT4.0 is through the use of a CD. If you find the need to upgrade one of these operating systems using an ISO image, which you have downloaded, there are some third party shareware applications, which you can download and use. We have yet to locate a utility that will allow you to perform an installation from the Virtual CD when using these Operating Systems. You can however use a utility to simply extract the files to a folder on your hard disk where setup can be run similarly to using the CAB files method of installation or upgrading.
One such utility is WINIMAGE. You may find information about this utility at the following website. https://www.winimage.com.
You may be able to find other utilities by searching the web for "Virtual CD" or "Fake CD".
|
