Part 1: Britannia
This document is copyright
of Rachel McFadden (frogbeastegg).
Welcome to the first part of a four part
series covering the campaigns of Medieval II: Total War: Kingdoms. The aim of
this guide is, as you may have guessed, to cover the Britannia campaign in
detail. As this is a guide to an expansion it will be assumed that the reader
has a basic knowledge of how to play the game.
This guide is
based on the release edition of Kingdoms, version 1.4. All of the information
is correct to the best of my knowledge. I regret to say this is the final
version of the guide; there will be no updates or addendums.
Index
Introduction to the campaign
Vital statistics 1
Culture! 2
Religion 3
Welsh uprisings 4
The Baron's Alliance 4
William Wallace 4
The Norwegian
reinforcements 4
Prince Edward's
Crusade 5
Stone forts 5
The factions
England
Scotland
Ireland
Wales 22
Appendix 1: Events 25
Appendix 2: Culture requirements for units 26
Credits 27
Introduction to the campaign
Each of the four Kingdoms' campaigns has a
unique twist on the standard gameplay formula. This section will outline
Britannia's unique aspects and give advice on them.
Vital statistics
Turn limit: 272 turns
Number of provinces: 46
Number of playable factions: 5 - English,
Welsh, Scottish, Irish, Norwegian.
Number of unplayable factions: 2 - the
rebels and the Baron's Alliance
Culture!
Seven letters,
one big change to the way the game plays. It can loosely be described as an
alteration to religion in the standard game. I find it to be the most appealing
aspect of the campaign. Each of the five main factions possesses its own unique
culture. The level of the various cultures present in a settlement will
determine what units are available to build, and will have dramatic effects on
public order.
Over time
culture will naturally drift towards the owner of the settlement. If the Scots
capture an English border town the Scottish culture stat will slowly rise while
all others decrease. The conversion can be influenced by several factors.
Governors are your most effective tool in spreading your culture. The greater
their management attribute the faster the spread of your culture in the
province they are running. High management ratings will result in the fastest
possible conversions. For this reason I recommend you keep a high management
governor ready to rush in and take charge of newly captured settlements which
have low amounts of your culture.
Building a
structure from the church family (chapel, cathedral, etc) will add a modifier
to your faction's cultural influence. At lower level buildings this influence
is still quite small, but once you have seen the effects of high levels of a
different culture you may well be grateful for the puny 5% boost.
Culture spreads
across borders. If your Irish province has an English neighbour you may well
see English culture slowly gaining representation inside your settlement. This
can make your newly captured border settlements more bothersome to bring under
control; it can also work in your favour if you have provinces with high
amounts of your culture as neighbours.
If you are
allied with a faction their culture will cause a little less unrest in your
settlements.
Certain
provinces are cultural homelands for a faction. These settlements have a higher
rate of conversion to that one culture than usual.
When you capture
an enemy settlement you may find a factor called insurgents having a negative
effect on public order. Insurgents are directly linked to culture: unless your
culture is dominant you will find citizens from the other cultures marching up
and down with placards declaring "Down with foreigners!" outside your
governor's front door. A handful of peasants chucking rotten cabbages is not
much of a problem. Half a city chucking rotten cabbages is a riot, and it
smells pretty bad too. Do not underestimate the power of the regular peasant in
the street - a high level of insurgents can make a province all but impossible
to hold, requiring you to bring in a huge garrison, a skilled governor, spies,
lower taxes to rock bottom, and start flinging money about building churches
and anything which increases either law or happiness. If you think this sounds
expensive then you are correct; a single troublesome province can be a money
pit which rivals the Millennium Dome. The effect on your fighting manpower
should not be underestimated either; for most of the game having to keep nearly
a full stack in a city will leave you short elsewhere.
If you're a
brutal sort you can reduce your troubles by slaughtering the inhabits of
captured settlements when offered the choice to occupy/loot/massacre. The fewer
people there are the easier it is to keep them under control. This is not an
entirely beneficial choice, and it's one I avoid most of the time. Why? Money -
slaughtering is counterproductive to the generation of it. Unlike the loot
option you gain very little cash on taking control of a settlement in this way.
The impact continues far into the future too; the fewer people there are the
less money your settlement will be bringing in once it starts to behave.
Technological advance is tied to population levels; slaughtering will add many
turns on to the time it will take for the settlement to reach the next level
and all the benefits thereof. Massacring can also give your general bad traits.
Generally
speaking it is in your very best interests to get your culture dominant in
every settlement you own, and to get it dominant as soon as humanly possible.
The governor's management attribute will help to lessen the effect insurgents
have on public order. Spies have a similar, if lesser, effect, but only when
stationed inside a settlement which belongs to their parent faction. Therefore
both should play a key part in your strategy upon taking control of a new
province. Use these guys, and churches, to tilt culture in your favour while
your garrison and law/happiness buildings stop the natives from driving you
out.
Having said that
there is one bonus to having foreign culture in your settlement: you can
recruit enemy units. In Kingdoms' each unit has two build requirements. First
is the technology level of the settlement; this functions identically to the main
Medieval II campaign. Second is the culture percentage. A unit will not be
available unless the required amount of culture is present in the settlement,
even if the necessary buildings are in place. The better a unit is the higher
its cultural requirement; your faction's best units will require cultural
dominance. If both cultural and technological requirements are met then the
unit is available to whoever owns the settlement. Once culture drops below the
required threshold the unit will disappear from the recruitment page until the
percentage becomes high enough to meet the requirement once more. This means
that for a short time after conquest you can recruit your enemy's units. On
conquest the settlement's unit pool is emptied entirely, so you will have to
wait a minimum of one turn before you can recruit anything. The cultural
requirements are displayed in appendix 2.
Overall, then,
culture can be summed up as a force which prevents you from expanding too
quickly. Each new conquest needs to be consolidated; each army needs a proper
line of supply for reinforcements.
Religion
Religion is not present in the Britannia
campaign. There are no priests, no Pope, no heretics or witches. Governors do
not possess the 'piety' attribute; it has been replaced by 'management'. The
church family of buildings is still present; it now affects culture instead of
religion. There are no crusades, with the exception of one special event. You
may conquer whomever you like without a man in a pointy hat objecting and arranging
for you to be crusaded off the map.
Welsh uprisings
Whether player or AI controlled the
Welsh benefit from a unique series of mini events as the campaign progresses.
Assuming Wales
owns less than 10 provinces and it is still before turn 20 armies of
reinforcements will spawn when certain conditions are met.
If any of the
following Welsh owned provinces are captured by the English an army will spawn
to help regain them: Pembroke, Montgomery, Caernarfon.
If the Welsh
manage to capture any of the following English border settlements an army will
spawn to help continue the conquest: Cardiff, Gloucester, Shrewsbury, Chester.
The size and
quality of the spawned army varies depending on what has triggered it to
appear.
Note: It appears that in the release
version there is a bug which prevents the reinforcements from spawning when the
Welsh take control of the English border cities. I include the information in
the hopes it will be made functional in a future patch.
The Baron's Alliance
England is 'blessed' with this unique set of rebels. They act like a proper
faction, and can re-emerge multiple times if they are totally defeated. The
Baron's Alliance are most likely to appear if England's king
has low authority, if an army or city rebels, or when a king dies. Of these the
first two are the most common triggers, therefore effort should be expended on
prevention. Make sure all armies consisting of more than a few units are led by
a general, and that the general's loyalty is good. Keep your settlements happy.
Let your king stretch his martial muscles from time to time; medieval lords
don't respect a man who hides at home when there are battles to be fou 424b18e ght.
Perhaps you are
not playing as England,
perhaps you're one of their smaller neighbours struggling for survival. In
which case you should do everything in your power to encourage the emergence of
this faction! Send in your spies to cause unrest, sabotage their law and
happiness buildings, assassinate governors and generals, try to kill their
kings.
The Baron's Alliance can put an overstretched England into a precarious position; act
accordingly, whether playing as England
or one of its enemies.
William Wallace
On a random turn number William Wallace
will spawn on the map with a large army. The turn number is influenced by how Scotland is faring in the game, and by England's
actions towards its neighbour. Typically a weak Scotland
faced by an aggressive England
will see Wallace appear sooner than one which experiences peaceful co-existence
or successful expansion. Wallace will not spawn before a certain turn number;
if you wish to know which turn please check the table in appendix 1.
The Norwegian
reinforcements
Like Wales
and Scotland, Norway also has
a set of spawning reinforcements, to the tune of two armies. These appear on
set turns, and the second one contains the Norwegian king, Haakon Haakonsson.
The Norwegian faction is granted an increased king's purse (bonus sum of money
each turn) for a time to help pay for these extra troops.
Prince Edward's
Crusade
England's
prince Edward will be called upon by the Pope to join a crusade at a certain
point. The player (or AI if England
is not the player faction) will have to choose whether to let him go, or
whether to turn down the request. This is a one-time opportunity; it will never
come again. After a period of time the results of Edward's crusading will be
announced. If he survived he will spawn on the map with an army filled with
Crusader units, sporting a few new traits to reflect his experiences. If he
died he doesn't come back, unsurprisingly. An army of crusaders will appear led
by a different general. There is no need to worry about what will happen if
King Henry dies while his heir is off the map crusading; the game has been set
up to cope with this. Edward will become king when he reappears. If you wish to
know the turn numbers these events occur on please check the table in Appendix
1.
Stone forts
Stone forts are different to the wooden
forts your generals can construct. They are placed on the map before the game
begins, and no more can be constructed. Each fort can support 2 units for free
in the same way a city can provide free upkeep for militia. There is no limit
on the kinds of units a fort can support, and the two most expensive units
garrisoned inside will always bee the free ones. Stone forts are harder for an
attacker to take; they are much like miniature stone castles, right down to the
fact you can position units on the walls during defence. An aggressor who
controls a fort in enemy territory will cause more devastation than the normal
amount, meaning that the province's owner loses more money. Stone forts should
be used to pin down areas of enemy territory. Capture them and fill them with a
decent small garrison, such as four quality archer units and two elite
infantry.
The Factions
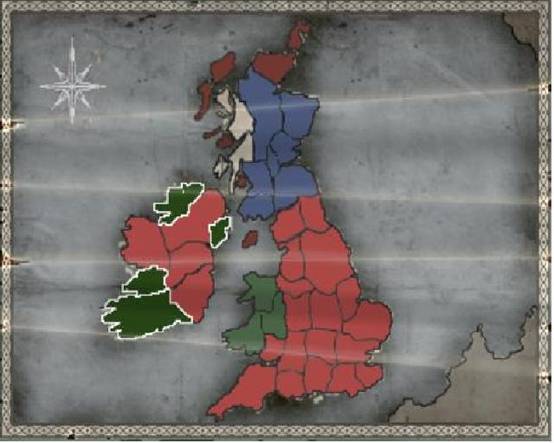
Map 1: The starting lands of each faction.
Please note that each faction's guide
will build on the foundations of the one before it. It's not terribly fun to
repeat the same basic concepts of building and conquering over and over. As the
first faction on the list England
gets most of the mechanical detail, so you shouldn't be missing anything if you
read that one and then skip to the faction you are most interested in.
England
Short campaign victory: hold 46 provinces
Long campaign victory: hold 35 provinces, including Caernarfon, Dublin,
Edinburgh.
Eliminate faction: Wales
England. On the select-a-faction screen it all looks so easy. This is by
far the biggest faction on the map; it holds a whopping 22 provinces. That
gives England
a vast head start in terms of income and production ability. Furthermore some
of those provinces are the richest on the map. Its very position blocks the
expansion of three of its four adversaries; Wales,
Scotland and Ireland must all take on England if they
wish to expand much.
There's a fly in
the ointment. Several flies, actually. England is big, and big comes with
its own set of problems. You've got borders with Wales
and Scotland to cover on the
mainland and over in Ireland
you're sandwiched, meaning you are threatened to the north east, north west and
south. Collectively that's a lot of ground to defend. Reinforcements produced
in your more developed core lands will take some time to reach the borders.
This situation is not helped by the lack of roads and infrastructure at the
beginning of the game.
You are blocking
the routes to expansion for three out of the four rival factions. This means
that they will come into conflict with you whether you wish it or not. The game
opens with Wales and Ireland at war with England,
and Scotland
held in an uneasy truce by royal marriage. Scotland
will probably leave you in peace as it tangles with Norway, the other two most
definitely will not. You may expect screaming hordes of variously shaded green
to be causing trouble from the off-set. Ireland in particular poses a
problem; your culture level is low in all your settlements there, and they are
ready to throw you out.
England is, to put it politely, technologically backwards. Many places
don't have dirt roads or basic farming. Two settlements are so puny they don't
have the first level city wall/castle buildings! This means that you're not
making much money despite the size of your holdings. Worse yet it means you
need to spend a fortune to get the realm up and running, and you need to spend
that fortune soon. You don't have a fortune. The initial starting money is a
drop in the ocean of what you need. Your profits each turn are negligible. Your
armies are not positioned to do a spot of quick conquering, so raising funds
that way is out. A solution must be found, and fast.
The final fly is
your army. It's massive. It's scattered all over the place. It's made up of a
combination of poor fighters and units with expensive upkeep. Collectively it's
costing you two arms and a leg, and doing you very little good.
Not quite so
easy as it looks at first glance, is it?
At the start of
an England
campaign your immediate goals are simple: get some money coming in, consolidate
your position, bring your superior force to bear in a way which will improve
your overall position.
I suggest you
abandon Ireland
entirely. This may seem drastic but there are sound reasons and equally sound
benefits from doing so. You can lower the taxes in every settlement, build
extra garrison forces, and slap in public order improving buildings, but it
will not make enough of a difference - Ireland wants you out. You will
spend resources you do not have trying to hold it, retarding your development
on the mainland and ultimately little will change in Ireland itself. The culture effect
is just too much when combined with the other miscellaneous penalties like
distance to capital and squalor. If you destroy every last building in your
Irish holdings you will recoup roughly 5,000 florins to spend immediately. This
is enough to build roads in every English province which starts without them,
with sufficient left over to buy some first level farm upgrades in several
other settlements. These structures are fast to build, so you're looking at a
tangible increase in your income by turn 3. Kick starting your development this
way makes big difference. After destroying all your buildings you want to
examine your army in Ireland.
You have a single general, some good units and a lot of poor ones. Forge a
single army under your general using all of the good units and enough of the
poorer ones to fill out the stack, then disband every unit which is not part of
this army. Bingo, you just saved a few thousand florins per turn on upkeep and
can plough this into developing England,
boosting you further up the economic hill. The army you just made needs to be
placed on a ship and sent back to the mainland; I suggest landing it in Wales. You
could try pillaging around Ireland,
but it isn't particularly lucrative and you'll most likely end up spending more
on maintaining the army than you will gain. Another alternate strategy is to
keep hold of a single province in Ireland,
stuffing it full of soldiers and working to settle the culture issue so it
becomes a passive base for you to re-take Ireland from. I find this to be
less beneficial than a complete withdrawal as it means Ireland is still tying up a lot of resources and
I don't gain the second general-led army to attack Wales with.
Sorting out Ireland should
be the first act of turn 1. The second should be a province by province tour of
England.
I split this tour into two passes, each dealing with a separate problem. The
first is devoted to economics. Raise taxes everywhere you can to the maximum
possible; the goal is to get cash into your hands so you can spend it on
getting more. More long-term economic development, the kind based on large
populations, can begin later. When you come to the two tiny settlements which
still haven't hit the required population for basic walls/castle lower them to
the minimum so they grow faster. If a settlement doesn't have roads order some
to be built; they give both money and faster movement for your armies. If a
settlement does have roads then go with farms. All of this applies to castles
too; without a decent income you won't be able to raise new armies. Speaking of
castles, England
starts out with a lot of them. You may wish to convert one or two into cities
for added income. Do remember that England's best units come from
castles and some of the starting castles are much more advanced than others, so
don't accidentally undermine your ability to produce solid troops.
The second pass
I devote to slimming down and reorganising my military. I want two armies out
of all those units scattered about the country. One army is for prince Edward,
and heads to the Welsh border. The other goes under whichever general I like,
and goes to guard the border with Scotland. The Irish army is my
third and final army. I disband any units I do not want, saving myself the
upkeep costs. Check garrisons carefully; there are several places with militia
units which are not eligible for free support, and so it's best to build new
units which can be supported for free and disband the more expensive originals.
This general
principle should tick along for the early turns. When your first round of
buildings complete continue to spend on your infrastructure and basic income.
Consolidating the scattered units into armies and getting them into position
will take time. If all goes well you may be able to afford a couple of units of
your choice to add to those armies, but be careful not to get too much more in
the way of upkeep costs. The more money you have coming in each turn the faster
you can get this country turned into the powerhouse you expected to be
controlling on turn 1. Level 1 docks are as good a buy as in the main game, so
build them wherever you can and reap the benefits of sea trade.
As Scotland is
peaceful with you it's a good idea to try and get a trade treaty. Norway will
probably ignore you for a long time to come, so once your diplomat finishes
arranging the Scottish deal another, Norse, trade treaty beckons. Your lone
merchant should stand on a resource somewhere and make you some cash.
By turns 5-7 you
should be finding your feet. Your armies should be ready to go, your realm
pulling together. By this point the scramble should slow and your approach
gradually shift to one with a longer view. You may begin to buy select military
buildings in carefully chosen locations to support your military ambitions;
your income will still be shaky, so you will need to be select. The
scattergun approach to upgrading settlements should come to an end now. If you
right click on the city tab on the interface it will bring up a sheet listing
all of your provinces. Click on the header for the income column. This will
sort the list so the most profitable provinces are at the top. These are the
ones you want to focus on upgrading now. Try to strike a balance between what
you bring in and what you spend; it can be better to buy two cheaper upgrades
in two lesser cities than to buy a single expensive one in London. Check your detailed city report to
see how much you will gain from each building option in each candidate province
before coming to a decision.
As you are going
about your restructuring of your realm keep an eye on your generals' loyalty
and your settlements' happiness. An ounce of prevention is worth a few thousand
gallons of curing bloodshed when considering the Baron's Alliance.
Your current
military goal has more than likely been made itself known to you. If Ireland is abandoned and Scotland is peaceful this leaves Wales, and
quite probably they've been making aggressive moves in your direction.
Conquering them is a sound strategy, as it leaves you with a single border in England: the one you have with Scotland. This
will leave you freer to choose your next target. If you followed the advice to
abandon Ireland you should have
two large armies to bring to bear against Wales, and you will need them. As
you will know if you read the prior section on Welsh uprisings, Wales gets a
lot of free reinforcements via events. This, combined with culture slowing your
advance and making it harder to repair your battle-worn armies, makes the war
an ugly one.
Wales has some very nasty units. Their top end longbowmen, the Saethwyr,
are better than any you can field; they have slightly better range and come
with more men in each unit. You should not attempt to outshoot them. The Welsh
unit roster features plenty of archers and skirmishers, spear units both with
and without armour, and heavy infantry. The area where Wales lacks is
heavy cavalry. This is your best opening. You should know that cavalry are the
best way to deal with skirmishers and archers if a missile duel is not an
option, and as there is no good enemy cavalry to oppose you there is absolutely
no reason why your knights should not use the advantage of mobility to the full
to pick apart vulnerable elements of the enemy army. Mailed knights are not as glamorous as their
more advanced counterparts; they are cheaper, and easier to get thus making
them more widely available. They are more than capable of inflicting
devastating casualties on a Welsh army if you use them correctly. A single good
charge followed by a couple of seconds fighting can wipe out most of a unit of
Saethwyr. Getting your knights an armour upgrade is a nice idea, as it makes
them that bit more durable.
I found a front
line of heavy infantry and spears supported by four or five longbows a solid
platform for my knights to work from. The longbows shot up the enemy and kept
their attention while my cavalry deployed on both flanks, waiting for an
opportunity. If the Welsh had cavalry then they were the target of choice for
my archers, especially those nasty general's bodyguard units. As soon as an
enemy unit exposed itself in went the knights. One of three things would then
happen. The AI might react to the threat, and I'd have to pull my knights back.
The knights might crush their target but find no more opportunities, and so
pull back to wait for their next chance. The AI might commit more forces
creating extra vulnerabilities, at which point in went more of my waiting
knights. At no point should the knights be left to engage in melee; charge,
pull back, charge again. It was comparatively rare for my infantry to engage in
more than a token melee. It was also rare for my poor knights to end the battle
with more than half the original number remaining; bearing the brunt of the
fighting did tend to take its toll. Mailed knights are easier to replace;
attempting the same with feudal or better will lead to problems replacing the
losses.
On the strategic
level the idea is to keep a steady pressure on Wales. Drain its units, inch your
way forwards, take a province, consolidate by increasing your cultural presence
and replacing the losses incurred in its capture, then get back out into the
field and repeat. Two armies make this strategy workable, three would be nice
in the event you can support the extra strain on your economy. I don't
recommend going for three; better to spend the money on improving your English
provinces. Above all the key to the Welsh war is patience: don't overstretch
yourself. After the original Medieval II campaign it may seem strange to talk
about overstretching while fighting a three province faction, but in the
original campaign factions did not have reinforcements generated spontaneously
when set conditions were met, nor was there culture to slow your advance.
Once Wales is dead
you can pause for a bit to further build up your lands, or you can launch
straight into the next round of fighting. This is going to depend on your own
preference.
If you want more
advanced armies than mailed knights, levy spears and basic longbows a pause
will probably be necessary. During this time you should grow your settlements,
possibly going so far as lowering taxes in some locations so they reach the
upgrade threshold faster. Building stone roads is a sound idea if you plan to
take on Scotland
next; it will cut a significant amount of time off your overall travel time
from the more developed south to the embattled north.
If, on the other
hand, you think you are ready for the next war then you only need to decide who
is next: Scotland or Ireland. There
are advantages to both. Taking down Scotland will bring you one step
closer to owning all of the main island, leaving you with no border to defend.
Tackling Ireland means you will be fighting an enemy who is most likely going
to struggle to attack your own homelands, and once your conquest is completed
you will have 8 provinces which will be very easy to defend and so will bring
in lots of cash in return for minimum outlay on troops. Unfortunately both have
disadvantages too. Scotland
will have (at some random point) William Wallace, their lands are mostly on the
poorer side of the florin, and unless something shocking has happened you will
find yourself toe to toe with Norway.
If diplomacy has remained stable since the start of the game both Scotland and Norway are likely to be your trade
partners, meaning you will lose money attacking either. Ireland is a
war fought overseas, making it that much harder to get reinforcements to the
front. As you may recall from the start, Ireland is very high in Irish
culture, making it hard to hold on to anything you gain. Thus any campaign
there will necessarily be slow and methodical. My own preference is to go back
to Ireland.
Serves them right for laughing at me as I run away - er, advance backwards to
reorganise my offensive.
The first steps
of Ireland's
conquest are the most difficult part. You need to transport your invading
forces over for a start. Until you set up a base of recruitment reinforcements
will come via sea too, meaning they will take several turns to arrive at the
minimum. Three full stack armies is a good beginning to your invasion, but two
will suffice if you are willing to take things more slowly. At least one of your
armies should have some artillery so you can knock down any walls you
encounter. Due to their ability to counter insurgents it is an excellent idea
to bring a few spies with you for the specific purpose of sitting in newly
captured settlements, helping to keep the natives under control while you
spread your culture. Any spies you wish to use for scouting should be
considered separate to this secret police. Likewise, if you have any
particularly high-management governors you may wish to send them over to
control captured settlements. In this case I recommend giving them an army made
up of decent garrison troops; this will enable your battle armies to get back
into the field and carry on the fight sooner. It is necessary to take these
extra steps because Ireland
is isolated. Unless you own a province there then your culture cannot reach it.
When fighting on the mainland your culture will have some limited spread into
enemy lands due to 'neighbouring lands' effect, and that effect will be
magnified once you take control. Your task of subduing Ireland will
become easier once you have at least one high culture foothold.
Ireland's unit roster is varied, and it gets some very dangerous units when
it reaches higher levels of technology. This means the armies you will be
facing can be hard to predict. You could come up against something with
striking similarity to a rabble - or you could wander into a bristling hedge of
guns supported by heavily armoured infantry and strong heavy cavalry. The best
recommendation I can give is to build balanced armies whose units possess
whatever armour upgrades you can give them. Send spies on ahead to get an idea
of what you face, then tailor your invading forces to suit. Generally longbows
will be useful regardless of Ireland's
technological level, and the old adage "If they can't reach you then they can't
hurt you!" is good. Even if Ireland
has reached its most deadly units your longbows should cause devastation if you
bring enough of them and keep them protected.
You don't need
to worry about any unexpected reinforcements or events aiding the Irish during
your war. Ireland
is unique in that it is the only faction in the campaign which gets no outside
help.
Scotland are a nice
foe for England.
They don't have much cavalry and it's generally average at best. They barely
have any ranged units, one only of which, the noble Highland archers, is worth
note. What they do have is infantry, lots and lots of infantry for you to shoot
to bits as it attempts to close into melee range. Pack six units of longbows
when fighting the Scots and enjoy the porcupine effect. The rest of your army
should be balanced: heavy infantry to hold the line, a few spears or bills to
take care of enemy cavalry, and some cavalry of your own. Do make it a goal to
keep your own cavalry away from the Scottish pikes; pikes are made for killing
cavalry and when they coordinate themselves properly they do it very well
indeed. Nothing can reduce a hardened general to tears quite like the sight of
several thousand florins worth of elite cavalry turned into horse kebabs.
Scotland itself is quite a poor collection of regions, and they tend to
spend a lot of resources fighting Norway, so it's unlikely that you
will meet too many big armies. With this in mind the war is 'merely' a matter
of patiently wearing the Scots down, taking their homelands and converting them
to your culture. William Wallace is their only boost; once he's gone it should
be plain sailing.
When Scotland is gone you will be toe to toe with Norway. Norway's unit
roster is varied and solid, and their strength will vary considerably based on
what has happened during the course of your game. They could have overrun Scotland and set up an enclave in Ireland, or
they could have failed miserably to expand and be a puny, bankrupt little
faction. Their main tricks will be long since passed; King Haakon will have
arrived, fought, and died of old age. An army of the kind outlined above for
combat with the Scots should fare well against the Norse with few, if any,
adjustments to the line up. The only thing you may need to add to your new
campaign is a navy. Norway
starts the game in control of numerous little islands, so you will need ships
to carry invasion forces over to pay a visit. It may also be necessary to suppress
Norway's
own naval capabilities if the faction has thrived; sea battles, patrols and
blockades will enable you to keep control of the seas.
Alternate way
to way: All this sound too easy? Were you hoping
for something closer to the Viking campaign in the original Medieval: Total
War's expansion pack? Diplomacy is the answer! Simply send your diplomats to
your rival factions and give them land. Gift all of Ireland
to the Irish, an assortment of northern provinces
to Scotland, and some of
your western border provinces to Wales. You might also like to give
parts of Cornwall to Wales.
Scotland
Short campaign victory: hold 25 provinces including Edinburgh,
Castle Town,
Glasgow, Kirkwall,
Skye, Isle of Isley.
Long campaign victory: hold 35 provinces including Edinburgh,
Castle Town,
Glasgow, Kirkwall,
Skye, Isle of Isley.
No guide to Scotland can be
complete without a section on pikes, as this unit type forms the unique aspect
of the Scottish roster and is amongst the less intuitive in the game to use.
The pike in this
game is designed as an anti-cavalry unit. It does not fare so well against
other infantry; it is capable of holding the line and keeping the enemy tied up
for a time, but another unit is usually needed to deliver the coup de grace and
start the rout. This is the first thing you need to remember when using them.
The second thing is that they need to be frequently checked to see if they have
dropped their pikes and are fighting with their swords instead. This is the
major issue with pikemen. Their sword is a poor secondary weapon, far less
lethal than the pike, and units which fight using it tend to die nasty deaths
in relatively short order. Thus the usage of pikemen revolves around forcing
them to use their pikes.
So far the most
reliable way discovered to do this requires a lot of micromanagement. Unless
standing stationary receiving a charge guard mode should be turned off, and
when taking a charge it should be turned off once the lines are joined as this
will allow your men to fight instead of focus on dressing their lines and
leaving half the soldiers out of fighting range. The attack should be ordered
with a single click; this should begin combat with your pikemen stabbing away
with their primary weapons. As time passes more and more men will swap to using
their swords because individual enemy soldiers have made it past the pike
points. When you see this you should turn off spear wall formation, immediately
re-engage it, and reissue the single click attack order on the target. The majority
of your men will magically produce pikes and start stabbing away once again.
It's usually necessary to do this multiple times with each unit during the
course of a melee, adding up to a lot of micromanagement. If your pikemen are
engaged against infantry you will need to coordinate some flanking forces
whilst doing this, and it can all get very fiddly. Practice is the key, and
custom battle mode offers unlimited amounts of it for those willing to invest
the time.
The Scots can
field an army without a single pike if that is your wish. Dismounted feudal
knights and, later, noble swordsmen can make a solid infantry line, and unlike
pikes these units are designed to kill other infantry. For dedicated
anti-cavalry capability you can use spear militia with as many armour upgrades
as you can pile on, or send in your own knights to mob the enemy cavalry.
As long as we
are discussing the Scottish unit line up it may as well be noted that their
cavalry and missile lines are particularly weak. There are three archer units,
and only the third unit, the noble Highland archer, is worth much. You should
build your way up the tech tree towards this one as soon as possible. In terms
of cavalry Scotland
fares marginally better; you have four units. Border horse are decent light
cavalry. Mailed and feudal knights are the standard units used by many factions
throughout Medieval II: Total War and Kingdoms, so you should know them by now.
The fourth unit is merchant militia cavalry, a somewhat poor unit which can
only be recruited in cities with merchant's guilds. Depending on the areas you
fight in you may be able to find some mercenaries which plug the gaps in your
line up. Mercenary crossbowmen, in particular, are plentiful and a sound
addition to your forces.
At the start of
the game Scotland
has two factions neighbouring it, and a pocket of rebel lands to the west. Norway holds part of what is traditionally
considered Scotland,
and it will have reinforcements granted to it by events. England starts out at peace with you, and will
be busy battling Wales and Ireland. The
Baron's Alliance may appear at any point and
weaken England
still further. This makes Norway
the first factional target for Scotland;
it represents the bigger danger.
It should be
possible to establish trade treaties with England,
Wales and Ireland.
Alliances with one or all of these parties may also be possible. Get your
diplomatic units out there and busy. Your merchant should go and stand on
either the weapons or the wool near Dumfries
within his starting radius, as they are the most profitable things within quick
reach. Once he has gained a few extra points of acumen he can move out into the
wider world and prey on weaker merchants.
If you take a
tour of your realm on turn one you will notice that many of your provinces lack
basic roads. Building them should be your first priority. Glasgow should have the first level of
farming queued up instead, as it already has basic roads. Every city you own
can be moved up to very high taxes without public order problems.
I specified Norway as the
first factional target because you have the option of conquering the two rebel
provinces first. You may take them and then send an army on to kick Norway off the mainland, or you may aim to
remove Norway
quickly and then tidy up the rebel lands at leisure. Being a tidy player I aim
to get the rebel lands first; this gives me with only two small borders to
guard instead of one small and one large. This also prevents Norway from
capturing the rebel provinces and setting up a second front. You can assemble a
rather random army from units taken from Perth, Sterling,
Edinburgh and Glasgow. Withdrawing units from Perth may cause the city
to drop to a blue face, in which case you should queue up a brothel as this
represents the quickest boost to public order without spending more on troops.
Remember to take the two catapult units as part of your army!
Your improvised
army should be able to take one of the two rebel settlements. Unless you enjoy
using mauled armies to assault fortifications the other is best done with a
more organised force which can then be patched up and sent on to take care of
the Norwegians. Inverlochly can be reached with less difficulty than
Dunstaffnage and it is in a better position to receive reinforcements from your
most advanced castle (Inverness) to form your
first proper army. Capturing the two rebel settlements will take some time as
your armies can only travel a short distance each turn though the highlands
without the benefit of a road. This time can be used to begin preparing the
units you will send on to join your improvised army to reform it into a proper
fighting force.
Once your roads
have finished I recommend building basic farms everywhere. Stirling should
upgrade to a stone castle instead, and Inverness
should begin work on military buildings like the armourers and assorted troop
producing buildings; your best units come from your castles and you need to get
them into production quickly. If you wish to make future sieges less painful
you may like to build a siege works in Perth
so you can recruit trebuchets. The third round of buildings I again like to
focus on growth and income in most places, so I choose the next level of farm
upgrades. The sooner my population grows to the requires thresholds the sooner
I can use better units and benefit from increased income. As long as you are
careful with your spending and don't add too many extra unit maintenance costs
you should find yourself able to keep a delicate balance between income and
expenditure. When you are not building much on a turn you should gain a profit,
so think hard before you build anything which has a cost lasting beyond a
single turn.
When the two
rebel provinces are captured begin building them up. It's a good idea to turn
the castle into a city to boost your income; Scotland may require castles in
order to field a good army but you already have two better ones and more
presently represents overkill.
Your border with
England
is adequately guarded by the units in the southern-most settlements and fort. A
dedicated army will be a sound idea - later.
It is advisable
to send a spy into Norwegian territory before invading. Make sure your army can
handle whatever is present there - do not forget that Norway receives
two sets of free armies at set points early in the game. Ousting Norway is a
case of winning a single province so it aught not take you more than a couple
of turns once you declare war. When thrown off the mainland Norway tends to
be open to peace offers, so you can set them up as a trading partner if you
wish, or you can continue to hound them one island after another until they are
dead and gone.
Whether you
pause to build up or keep on attacking, now is a good time to put together an
army to guard your English border.
If you wish to
field an army which doesn't use pikes then you will need to stop and build up.
Your first priority should be to build anything which adds to population
growth, especially inside your two castles. If you have any governors with
chivalry send them to govern the settlements you want to grow quickly, again
probably the castles. When you have no growth promoting buildings left to
construct inside a settlement you should pursue the more specialised buildings,
such as troop producing and upgrading structures in castles, or income and
happiness boosters in cities. Once you are satisfied with your realm you will
need to choose between Norway
and England, or perhaps go
for the outlandish option of conquering Ireland. Norway you should be able to finish
off quickly, mopping up island after island and setting each up as a city
focused on bringing you wealth. Ownership of certain of the islands are
required victory conditions for you. England will be a longer project,
though how long depends on how the AI has fared against the many elements which
batter away at that unlucky kingdom. Ireland is the oddball option for
those who want to do something different and slightly crazy; it will leave you
in control of a nice rich island once conquest is complete.
Taking the
outlaying islands from Norway
is, as mentioned above, mostly easy mop up work. Provided you land an army with
catapults or trebuchets you should be able to attack and take each settlement a
single turn after landing on the island. A brief pause while you build up some
culture and settle in a garrison, then off your army sails to the next in the
chain. Medieval II's AI is generally bad at attacking islands, so you may take
advantage of this by transforming any island bound castles into cities. This
will gain you more money, and a good city garrison should be more than adequate
to hold the island, with the advantage that at least some of the garrison units
will be supported free of charge. Norway is blessed with some
excellent navies. Yours will have a difficult time challenging them for control
of the seas, so weight of numbers is going to be the order of the day in any
naval encounters. Because of this you should move your armies across the sea in
locations where they can board at the start of the turn and disembark onto dry
and at the end of it. That way you will not lose precious men if the Norwegians
catch up with you and send your ships to the bottom.
Once the
assorted islands are yours you should be all set to fulfil your victory
conditions. It is merely a matter of choosing which direction to expand to make
up the required number. It's the same choice as before, now minus one option: England or Ireland. Thanks to Scotland's
limited unit line-up the army you're likely to field against either will be
much the same as the one you'd take against the other, which in turn is much
the same as the one you've been using so far.
Norway
Short campaign victory: hold 25 provinces including London, Perth, Dublin, Caernarfon, Castle Town.
Long campaign victory: hold 35 provinces including London, Perth, Dublin, Caernarfon, Castle Town.
This faction is
spoiled for choice! There are so many directions you can go in the early part
of the game, yet they are all driven by the same basic need: money. What can
you do as Norway?
You can conquer Scotland, or
raid England and Ireland, or
relocate your entire faction to a different part of the map, or dig in and wait
for your reinforcements, or run across the map conquering all before you in a
tide of blood. Quite the set of options, no?
The game rates Norway as the
hardest faction to play as in the game. So, too, do most players. There is a
single reason for this, and it's one I've already mentioned. Money. This word
is going to be the driving influence for all that you do until comparatively
late in your campaign. Your starting lands are poor and have limited
development. Worse, quite a few of your starting lands are tiny little islands,
making it hard to use them for recruitment.
At two points in
the game you will receive some free reinforcements. I say free because you
don't have to pay for their construction. You do have to pay for their
upkeep. The second set of reinforcements is led by King Haakon Haakonsson, a
fearsome general and mighty leader - who starts at the advanced age of 59 and
tends to die mere turns later. Your king's purse is increased to help you pay
for all these 'free' units; it doesn't give you enough to make you financially
secure, and it's only a temporary boost. Navies are expensive. Norway is the
only faction forced into supporting a strong one right from the start, due to
its ownership of mainland and island provinces.
Your victory
conditions are spread out all over the map. You need to own the capitals for
each of the other four factions. This means you will have to impose order over
a sprawling, spread out realm. It may actually be easier for you to play in a
similar manner to England
and conquer everything so you have a solid realm incorporating these provinces,
rather than do surgical strikes which conquer the named province and leave it
adrift in a sea of another faction's land.
On the positive
side you do get a nice faction colour. In the end isn't that all which matters?
Alright, there
is more than that single piece of good news for those who would play this
faction. Your unit line-up is filled with fine units and, despite the in-game
blurb to the contrary, it boasts at least one good unit in every major
category. Lacking good heavy cavalry? Pah! Tell that to the chivalric knights,
but stand well back when you do so. I think Norway has the widest range of
units in this campaign, edging out the English thanks to its ability to field a
mounted missile type and axe types. As there are only a handful of poor to
average units - generally the generic types like spear militia - it's hard to
go wrong when assembling an army with this faction. Get yourself a nice large
collection of solid armoured infantry, a couple of infantry units with high
attack and charge ratings to lead flanking efforts and assaults, around four
missile units, and some heavy cavalry to guard your flanks and support, and
you're good to go against everything. In the early, financially tight turns cut
down on the heavy cavalry, and make smaller armies based around the line/missile/assault
infantry formula as it is considerably cheaper.
A tour of your
kingdom, will reveal nothing much of interest. You have a variety of low level
settlements, one rubbish castle (Mull), one ok castle (Wick), and one good
castle (Castle Town). Your garrisons have little fat
from you to trim away. The exception to this dreariness is Castle Town.
Your best castle has a set of units which will form the basis of a good army,
and it's ideally placed to raid western Scotland,
eastern Ireland or the north
of England.
There's even a handy navy positioned nearby.
Did I say raid?
I did. Traditional means are not going to solve your money problems; you cannot
conquer and build up quickly enough to off-set your costs. The only way to make
vast sums of money quickly is to use your one starting advantage (good units!)
and live up to your Viking heritage. Let's be sure the meaning of the word
'raid' is clear. You are not going to conquer anything. You will stay in a
province for a maximum of a couple of turns, with the idea of leaving the very
turn you conquered it if at all possible. You do not want to be trapped inside
the walls of a looted place by an angry mob eager to avenge the damage you just
did. On entering the city you will select the loot option, no other. On leaving
the settlement you will sell every last building to wring the maximum possible
profit from the venture. Exception to that rule: if you plan to conquer a city
in the future you may choose to leave certain structures intact to make your life
a bit easier when you come to take permanent control. Anything which adds to
culture conversion, law, happiness or income will help later. With a handful of
specific exceptions your targets will be cities, not castles because they are
easier to take and worth more money. You will aim for more advanced areas as
they bring in more money; you will ignore the ignorant little backwaters. You
will not seek out enemy armies to do battle, to the contrary you will avoid
battle wherever possible unless it will get you inside the walls of a place you
can loot. Losses represent a reduction in the effectiveness of your fighting
force, and this in turn harms your chances of making money. On the occasions
you need to retrain your units and replace losses it is best to withdraw to
your own troop producing homelands than stick it out in enemy territory waiting
for the necessary men to enter the recruitment pool. Siege engines are a must;
you do not want to be sitting outside the walls waiting for battering rams to
build. A pair of catapults should be enough in the beginning. Ideally you will
attack, capture and leave the city all on the same turn you arrive in the area.
You need to save
every last florin and pump it into units, not structures. A few simple farm and
road upgrades won't help you; an army of raiders will. There is one exception
to this rule. It is a good idea to build a drill square in Wick, as this makes
the castle into a second base for recruiting solid raiding armies. Recruit some
more front line infantry in Castle
Town with the aim of
boarding ship and setting off on turn 2. A single unit of swordsmen and two of
dismounted huscarls will serve well to compliment the units already present in
the castle's garrison. Note the Sami axemen; these units make great flankers
and shock troops due to their high attack and charge. Up in the north I
recommend you build a few units to round out your garrison in case the Scots
attack. Mull is a pointless little castle, so
convert it into a city for the marginal boost to income.
You begin with
three merchants. Move the one near Stornoway onto the cloth resource. The pair
near Wick should go on the cloth and the wool within their starting fields of
movement. Your spy should head south towards Perth, and should then sit outside and keep a
loose eye on the garrison levels. The Scottish capital is the most lucrative
target in the north and you will want to hit it as soon as its opportune. As
you won't be attacking the Welsh it's useful to set up a trade treaty with
them.
Your assorted
island garrisons can either be disbanded or converged into yet another raiding
army. In this case you will make more money by disbanding or putting to use
your garrisons than by leaving them in place and raising taxes.
In the rare
event someone attacks one of your islands they will likely capture it. This
doesn't matter much. The income they provide is so small compared to the amount
you need, and there is the danger of becoming obsessed with guarding or
recovering these islands and squandering resources. You can even survive the
loss of Wick, though this hurts more as it is your secondary troop producing
centre. The only place you absolutely cannot afford to lose is Castle Town,
your primary recruitment base. This is looking at the singular; the loss of
multiple settlements, however small, will make you squeal. Put that navy of
yours to use keeping the seas clean of enemy fleets. If they don't have boats
Wick is the only place they can reach, and Wick is the easiest to defend
because it is a castle. There is a fort nearby too.
Now you are
ready to begin raiding all that remains is to choose your first target. Ireland is torn by war between the locals and England,
something you can potentially take advantage of. Northern
England is quite lightly defended by a faction which will shortly
have its hands full; it is also quite poor. Scotland has a couple of high-yield
targets. Whichever areas you raid you will benefit from later on, as they will
be severely weakened when you come along to conquer them. If you raid a
particular faction carefully enough you can hobble them, then use the money
gained by raiding them to pay for permanent conquest. If you are planning to go
this way Scotland and Ireland promote
themselves as better targets. Scotland
because it borders on your starting lands, Ireland because you can establish a
self-contained cash generating powerhouse which the AI will generally ignore.
Raiding only
remains a viable source of money for so long. Once you have hit the best
targets you will have to make do with lesser ones. Eventually you will no
longer be making enough to cover your bills. Furthermore it is an unreliable
source at best; some turns you can make thousands of florins, others you may be
haemorrhaging money, a state of affairs which can last for multiple turns and
threaten to shove you into the pit. It is in your best interests to convert
from a raiding economy to a traditional one as soon as is feasible.
Scotland is my choice. I want to conquer the entire realm as soon as I can
to ground my economy once and for all, and to secure my borders. I find
retarding the development of the only faction which is in a position to attack
me to be strategically sound. With several key strikes Scotland can be
all but crippled, reducing its threat and making it ready for future conquest.
A subtler advantage prompts me to this course; the early Norwegian units
outclass the early Scottish units. Your army from Castle
Town should strike at Glasgow. When your first set of
reinforcements appears you can either go for Perth
or you can hit Inverness castle which shares a
border with Wick. I recommend the latter; it reduces the threat to your border.
Burn everything in this castle to the ground and Scotland loses its best recruitment
centre. When King Haakon appears on the scene with his battle Zimmer frame you
should definitely hit Perth
if you have not already. That city has a comparatively large population and is
quite advanced. Edinburgh
should appear on your raider's shopping list. Haakon is a great general with a
short lifespan; use him while you can and try not to feel that all the rushing
around the map is what did the old man in. Once you have hit the easy city
targets and built up your armies a bit you should hit the two castles if you
have not already been presented with a golden opportunity to do so.
If your council
of nobles offer you a mission to capture a rebel settlement you can gain some
nice rewards for completing them. Under no other circumstances should you
attack the rebel territories at this time; they are not worth raiding and you
cannot support keeping them at this point. If the council offers you money or
some units you need take the mission, otherwise ignore it. There is no point in
spending manpower and passing up better opportunities in order to gain two
units of rubbish spearmen.
Scotland may be my target of choice but this does not mean I need to limit
myself to it. When there are no appealing Scottish targets I will begin to look
wider afield. Dublin is a nice, as are the better
developed English settlements like York and Canterbury. London is quite possibly
the best target on the map if you manage to pull a raid off, something which is
no mean feat.
The money raised
from raiding should be split three ways. First and most vital is paying your
bills. Second is keeping your armies in fighting trim. Third is improving the
income of the provinces you own. Invest in farm upgrades for the dual
population/money boost, roads, ports, and all the usual structures. Spend
carefully! Weigh every last florin and buy nothing unless you are completely
positive you need it. Better to have money saved up then spent unwisely. You
must keep a sizeable cash reserve to bridge the gap between raids.
William Wallace
is a pain. When he appears you will have to use your best army to destroy him.
The most basic thing in this battle is to ensure your army is up to the job.
Don't send a piddly little half-stack of random units after him and expect to
win. Try to fight the battle as a defensive one on terrain which is to your
advantage, such as on a hilltop. If you can't manage that then attack when his
army is not positioned on ground which is to his advantage.
Timing the
switch from raiding to conquering is difficult. Leave it too late and you will
flounder into bankruptcy. Too early and you will not be able to support it.
Generally speaking the time is right when the faction you wish to conquer is
weakened, you have two or more armies able to attack and hold settlements, and
you have enough money stored up in your treasury to cover the expenses of
upkeep and construction. Remember that because of culture it is not enough to
dump a medium-sized garrison in a newly taken settlement and wander off to the
next area. You will have to invest in churches, happiness and law buildings to
keep public order at an acceptable level during the cultural conversion. The
more armies you have to take and hold settlements the better. The income of
three new settlements will cover a big chunk of your unit upkeep and help you
turn away from raiding; the income from one will force you to keep on raiding,
something which splits your attention and resources and is thus detrimental. At
this point your earlier slash and burn raiding can hurt you if you weren't
discriminating enough and the AI hasn't done some rebuilding. You'll need to
make sure the essential buildings are in place in each conquered settlement. I
would not construct anything too advanced at this point, as higher level
buildings cost a lot of money and generally offer a repeat of the boost gained
by the basic buildings. A 50 florin return for 600 florins spent is far better
than a 60 florin return for 2400. When your economy is running in the black you
can invest in niceties like higher level markets, not before. It's useful to
put a couple of spies into each newly taken city to counter the effects of the
insurgents. When a settlement is secure move your army on to take the next.
While you literally cannot afford to drag your heels do not let the pressure
push you into moving too quickly; having your fledgling empire implode will
finish you off for good. I hope it goes without saying that you should conquer
the best settlements first.
I did mention Ireland as an alternate target to Scotland, and
it is perhaps the easier route of the two. Dublin gives you a lot of money when you loot
it, as does the nearby Downpatrick. The island is split between the English and
the Irish and you can take advantage of that by conquering the Irish faction's
isolated northern provinces.
Until they get a land border with you they can't attempt to re-take them
without trudging through English territory, and if you're lucky the English
might attack them and save you some bother. With a bit of work Ireland can be
built up into a trade centre of considerable wealth. If every settlement but
one is a city you'll make a small fortune via taxes and trade. Place merchants
on the good resources to gain a boost in the secure knowledge that the AI very
rarely sends merchants over to compete with yours.
If you're going
the Irish route then you should send your Castle
Town army over to Dublin
instead of Glasgow.
Don't destroy the buildings when you withdraw from these settlements!
This strategy is reliant on eventually taking control of fully functional trade
bases. They should then continue to ravage the island with the primary aim of
getting you money and adding to the chaos of the war between England and Ireland. Your second army, when you
have one, still goes after Scotland
or England.
You need the money places like Perth and York can provide. Feel
free to burn everything to the ground as you leave, since you won't be staying
until much later. Typically you will attempt to make the switch from raider to
conqueror sooner when aiming for Ireland. Once every worthwhile
place in Ireland
has been raided you only need the money and manpower to back your bid for
control. I like to keep one army raiding while two others perform the first
phase of the conquest, taking Dublin
and Downpatrick. When you take control of each settlement for the second time
you may want to loot it again if it will give a decent amount of cash without
sending the place right back to the stone age. Choose a location for your
castle, and convert any others you take into cities to boost your cash flow.
Once you own
either Scotland or Ireland your
economy should be in the black without any raiding. The game can then play out
according to the standard ways. If you've reached this point then no further
advice from a guide is necessary.
It can take a
few failed goes at the Norwegian campaign before you find success, especially
if you play on very hard. Don't lose heart. There's nothing like experience for
learning the tricky timing of when to swap from raiding to conquering, or which
places are best to raid and when.
Ireland
Short campaign victory: hold 25 provinces including Dublin,
Trim
Long campaign victory: hold 35 provinces including Dublin,
Trim
After seeing all
the unique advantages the other factions get you may be a tad disappointed with
Ireland.
You don't get special rebels or free reinforcements. You get . um . Oh well,
being the only faction without a unique feature makes you special too, right?
Ireland are a bit of an odd fish. Once they unite their island they lose much
of their focus. There are no victory provinces outside of the island, no land
borders to base a new war around, and the AI tends to ignore them. Their best,
most unique units turn up quite some way into the game with the gunpowder
event. There are no unique events or spawned army stacks. Ireland is a
faction which derives a lot from the person playing it. The lack of direction
is a boon to some and a bane to others. It doesn't lend itself terribly well to
a guide.
Turn 1 opens
with the English sprawled across the middle of Ireland like a big red blob. If you
play your cards correctly you can own the entire place within seven turns. England's hold
on their provinces here is shaky; high Irish culture is making maintaining
public order a nightmare for them. As an overall faction England is
overstretched, poor and under attack from too many sides.
Have you noticed
the assassins you start with? Put them to use; sabotage happiness and law
buildings inside the English holdings.
At this point in
the game the quality of your troops leaves a lot to be desired. The best way to
overcome the English is to swarm them with every last male of fighting age in
the entire country! Recruit, recruit, recruit! Don't be picky, take anything
which holds a pointy implement. Hire mercenaries too. You start with enough
money to raise a human tide to wash that red blob away, and when you control
the entire island you'll have more than enough coming in to build up.
Derry will be the first target.
It's a city, and so easier to take than Athenry. After the usual opening tour
to adjust tax rates and whatnot get King Brian and his army out of his fort,
move them up towards Derry and send him all
the units you can from the nearby fort and city. Buy some mercenaries, and take
notice of the availability of Galloglaich. This powerful axe unit is identical
to the unit of the same name you'll be able to recruit when your technology
advances. For now snap up any mercenary version you see. Queue up new units
inside of Lifford, and add them to your army as it marches past on turn 2.
Queue up whatever you can inside Downpatrick too. Because King Brian has two
catapults in his army you aught to be able to attack and capture Derry on the very turn your army comes into range. It has
a high Irish culture level and shouldn't be too much trouble to hold. Send the
troops trained in Downpatrick over to join Brian. Install a garrison and send
the king south to Athenry as soon as his reinforcements catch up with him.
Meanwhile in the
south you want to recruit everyone you can, blob them - and the garrisons of
your forts - together into an army, and then send them on to say hello to Dublin. They don't have
catapults so you can either wait the siege out, or build some engines and
assault. Be aware that any assault will be a bloodbath due to the poor quality
of your troops.
The army from
Athenry or Dublin,
whichever falls first, then heads on over to Trim as soon as it's in fighting
shape.
When the final settlement falls to you
all that remains is cleaning up. Take back any forts the English still control,
and dispose of any stray units wandering the countryside. Job done.
Now is a good
time to pause and consolidate. Reform your mess of forces into a proper army,
and get building in your settlements. Send a general or two off to build watch
towers until there is no fog of war left on the island and the coasts have the
best visibility you can manage. The Irish need both cities and castles to field
their best units, so pick two of your castles to keep and then convert the
others into cities. Foreign merchants don't often venture into your lands,
meaning your own can operate without threat. Build enough of them to cover all
of the good resources and wait for the merchant's guild to fall over itself as
it offers you guilds and their upgrades.
Advanced units
of special note include the lord's retinue, arguably the best heavy cavalry
unit in the campaign; calivermen, mounted gunners; and the muire heavy armoured
infantry. Some of these units are the ultimate evolutions of the lines Ireland is
strong in, namely heavy infantry and cavalry, while others represent weaknesses
being improved, mainly from the uninspiring missile line up. Ireland is a
faction which will always thrive on tackling the enemy up close and personal
with ranged weapons, including guns, in support of this. Having a unit or two
of guns run around and fire a volley or two at the flanks of an engaged melee
will do terrible things to enemy morale. Before you develop guns javelins can
be used to similar effect; the weapon itself may lack gunpowder's ability to
cause fear but the casualties tend to be greater and that has its own fear
effect.
A united Ireland is
economically strong and militarily secure. It all gets rather easy, and your
choices are quite uninspiring. You can invade the main island, conquer the
little islands, or sit around until you develop the ability to use your
gunpowder troops and then invade the main island. Whichever you go for no one
is likely to threaten your homeland, and thus you will always be assured of
having the money and troops necessary to back your ambitions on the mainland.
There's nothing really left for me to say other than remind you that the
difficulties faced by other factions invading Ireland now apply to you. Take your
invasions slowly and pay attention to culture, and all will turn out well.
Wales
Short campaign victory: hold 25 provinces including Caernarfon, Dublin,
London.
Eliminate faction: England
Long campaign victory: hold 35 provinces, including Caernarfon, Dublin,
London.
Eliminate faction: England
This faction
takes Norway's poverty, England's ability to shoot people full of pointy
sticks, and Ireland's
green theme, and forges them together under a banner with a nice red dragon on
it. Wales is not quite as
desperately poor as Norway.
It is better with pointy-stick launchers than England. The green is lighter in
shade.
You have three
(3) provinces meaning you are the smallest faction on the map. England has
twenty-two (22!) and wants you dead. At least life won't be boring. Your task,
then, is to expand into a position where you can thwart England's
ambitions to grind you under its armoured boot.
A note on the
assorted javelin units: many of them don't skirmish. For some reason the option
is not available to them in battle, meaning you must manually pull them back
each time an enemy gets too close. This is as much work as it sounds and simply
unfeasible in a large scale battle. Until and unless a patch changes this I
recommend avoiding them and sticking with your assorted archers instead.
Your assorted
archers are well worth sticking with. The saethwyr is the best of the bunch. At
first glance they may not look intimidating - they wear skirts which can't be
mistaken for a macho manly kilt however kind you are - then you realise they
are like England's
awesome longbow units but with slightly better range and more men per unit.
They can plant stakes too. Skirts or no, saethwyr are the kings of pointy-stick
death. With enough of them in your army you will be able to watch the enemy
line evaporate as it marches towards you only to rout as it comes into contact
with your infantry, at which point you can send in the light cavalry to bring
you a haul of prisoners and prevent the enemy from rallying.
There's gold
near Pembroke; get your merchant onto it ASAP as it's worth 182 florins per
turn. Your diplomat should head to Scotland in the hopes of getting
trade rights. Norway and Ireland won't
bother you, so they also make good targets for treaties and maybe an alliance
or two.
As you have two
castles and one city your income is limited but you recruit good units easily.
The close positioning of your settlements mean you can fling together units
from all three sources to make an army quickly. It is unfortunate that your
single city is the settlement closest to the English; the defensive boost of
having a castle at the front would have been handy. Forts make up for this
deficiency; all three of them are well placed to hamper an invading army.
Pembroke needs roads; build them on turn 1 so your armies have maximum
mobility. Other than this you do not want to be building any structures at
present. Units must be your focus.
England begins the game with a handful of relatively weak garrisons along
the border you share. Numerically limited and comprised of a lot of militia or
levy spear units. They have few of their more dangerous units in the area;
longbows and knights will begin to head your way when the AI gets hold of its
military reorganisation. England
will send army after army after you, and sooner or later you will be worn down
into nothing. This means a quick strike is very much in your favour.
Llewellyn is a
very good general and he has bonuses when fighting the English. He begins the
game in your city with a nice little army; get him and those troops out onto
the field at once. Hire all the mercenaries you can. The units in the fort to
the west of your city are best sent forwards to guard the city itself. Shrewsbury is weakly
garrisoned and only protected by a wooden wall. Cardiff is also quite weak and it prevents
your realm from having a neat border. Pick one and take it. Now the English are
angry! They're about to get angrier.
You should have
been recruiting all the soldiers you can from the very first turn. Combining
these additional forces should give you a second army. Now take whichever of
the pair named above you didn't attack first.
Keep on building
troops and recruiting mercenaries. The more of the border you capture now the
more money you will have to withstand England's vengeance, buying
yourself time to build up a bit. Shuttle units forward to your newly captured
areas so your armies can head out to attack the remaining English border
settlements, Chester and Gloucester.
Depending on how
quickly you move, and on the AI, you may find yourself under attack before you
complete your conquests. In this case there is nothing for you to do but hold
on as best you may, and try to take those remaining border settlements while
defending your gains. If the AI is particularly aggressive you may need to
adopt an entirely defensive stance and leave further expansion until later.
Just hold on, keep the troops flowing to your frontline forces and keep an eye
on your economy so you don't bankrupt yourself. The more settlements you
captured in the opening phase the more you can afford to spend now, and if you
were particularly successful you might have the money left to engage in some
careful economical build up. The superior Welsh archers show their worth during
this difficult time; they will take out large portions of attacking armies,
saving you some losses during the melee and making the enemy more inclined to rout. Incidentally, the
point I made in the England
section about mowing down enemy archers with your cavalry applies every bit as
well to the Welsh here. Keep in mind that Welsh cavalry is more fragile than
the English knights.
In the event of
things going pear shaped remember that you gain free reinforcements the first
time any of your starting three provinces are captured by the English provided
this happens within the first twenty turns. This can turn an otherwise
devastating loss into a salvageable situation.
If the English
AI feels like playing with boats it will blockade your ports, taking chunks out
of your income. Pay the support costs of the navy required to keep your ports
clear or lose money to the blockade - it's your choice. If the blockades are
intermittent it can be cheaper to forego the navy.
Sooner or later
the Baron's Alliance will emerge and England will be
torn into two. Regroup and finish your acquisition of the border provinces if
you do not already own them all. Begin to look for weak targets you can take
and hold without overstretching yourself. The Baron's Alliance does not emerge in a set place or
with set units, so you will have to see what happens before you can best take
advantage of it. It may be that you find yourself with an ideal new ally, or
they could land somewhere which leaves you little option but to engage them. If
it all possible do nothing to critically weaken either the Barons or England, as that will lead to one eliminating
the other and reunite England.
Keep on nibbling
away and building up. Open up a second front in Cornwall by shipping over an army. Work your
way up to the east until you form a continuous border line with your other
provinces. Eventually you will become strong enough that the nibbling can turn
into biting, and once you are biting chunks out of England it all becomes very
straightforward.
If you take
every province which traditionally belongs to England you will be well on your
way to meeting your victory conditions. Control of Dublin is required. This can mean as much or
as little as you please. Pick the province up late in the game, or head on over
in the mid-game and make a goal out of establishing yourself an Irish enclave;
it doesn't matter much which.
Appendix 1: Events
Warning! This appendix features a full list of the events in the Britannia
campaign and the turn numbers they occur on. If you do not wish to know please
ignore the table below.
|
Turn
|
Event
|
|
|
Baron's Alliance
Emerges
|
|
|
King Haakon Arrives!
|
|
|
Edward Leaves on
Crusade! (players choice when playing England)
|
|
|
Edward Returns from
Crusade! (alternatively Edward Dies on Crusade)
|
|
|
Time Machine Made
|
|
|
Lucid Visions
|
|
|
William Wallace Rises
the Defend Scotland!
|
|
|
A Deadly New Weapon!
|
|
|
Baron's Alliance
Re-Emerges! (can occur multiple times)
|
|
|
Football Denounced
|
|
|
The Forest
is Conquered!
|
|
|
Time for Everyone
|
|
|
Bold Predictions
|
|
|
Plague (Canterbury, London,
Arundel, Winchester, Oxford,
Norwich)
|
|
|
Plague (Canterbury,
London, Arundel, Winchester, Oxford, Norwich, Nottingham, Shrewsbury,
Gloucester, Shaftsbury, Launceston, Cardiff, Pembroke, Montgomery,
Caernarvon, Chester, Lincoln, York, Lancaster, Newcastle Upon Tyne, Carlisle,
Dumfries, Edinburgh, Glasgow, Stirling, Perth, Aberdeen, Inverness, Wick,
Kirkwall, Castle Town, Derry, Trim, Dublin, Cork, Athenry)
|
|
|
Man-made Inferno!
|
|
|
Plague (Canterbury,
London, Arundel, Winchester, Oxford, Norwich, Nottingham, Shrewsbury,
Gloucester, Shaftsbury, Launceston, Cardiff, Pembroke, Montgomery,
Caernarvon, Chester, Lincoln, York, Lancaster, Newcastle Upon Tyne, Carlisle,
Dumfries, Edinburgh, Glasgow, Stirling, Perth, Aberdeen, Inverness, Wick,
Kirkwall, Castle Town, Derry, Trim, Dublin, Cork, Athenry)
|
|
|
Plague (Canterbury,
London, Arundel, Winchester, Oxford, Norwich, Nottingham, Shrewsbury,
Gloucester, Shaftsbury, Launceston, Cardiff, Pembroke, Montgomery,
Caernarvon, Chester, Lincoln, York, Lancaster)
|
|
|
Plague (Canterbury, London,
Arundel, Winchester, Oxford,
Norwich, Nottingham, Shrewsbury,
Gloucester, Shaftsbury, Launceston, Cardiff, Pembroke)
|
|
|
The Great Drowning of
Men
|
|
|
Portable Pipe Organ?
|
|
|
Pioneer of Paint
|
|
|
Of Learned Ignorance
|
|
|
The Mechanical Scribe!
|
|
|
The Hammer of Witches!
|
|
|
Machines that Fly?
|
|
|
Portable Clock
|
Appendix 2: Culture requirements for units
