Adding Custom NPC's to the Partners Basic Mod v.1.4
The greatest feature of the Partners Mod is the
ability to easily add your own custom designed NPC's complete with all the
dialogue and scripting of the other Partner NPC's in your own custom Partners
Mod. If you have even the crudest familiarity with the editor, you can add
more partners easily and quickly using the same methods. The following are the instructions for
creating a customized Partner NPC in a separate mod:
- The Partners Mod is
now divided into three files: CM Partners.esm, CM Partners.esp, and CM
Partners NPC.esp. This has been
done so you can create your own Partners NPC mod quickly and easily
without fear of damaging the existing mod which is safely locked in an esm
file. Do not edit the CM
Partners.esp or CM Partners NPC.esp files or make them active in the TES
Construction Set. If you plan using
the CM Partners.esp, do not alter, change, or add existing Partner NPC's
to your own mod. Otherwise, you are
free to add the existing Partner NPC's to your own mod and change them to
your heart's content. Please follow
the rest of these instructions carefully to create your own separate
Partners Mod.
- Open the TES editor and
choose Oblivion.esm, CM Partners.esm, and CM Partners.esp without making any
of them the active file. When you
try to launch the editor, a dialogue box will pop up telling you that you
have not made a file active. Click
to continue anyway. When the editor
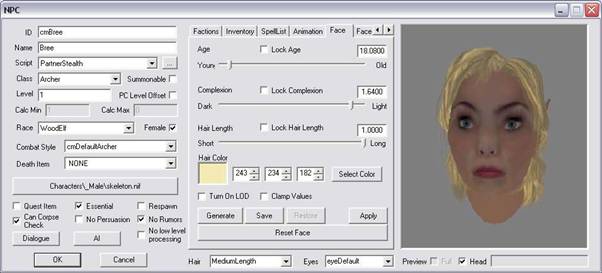
has loaded up, click on the NPC tab and then on the list of NPC's. Type "D" and the list will scroll down
to the beginning of the NPC's beginning with the letter D. The Partner NPC's will be listed just
above this with the prefix "cm": cmBree, cmRandi, and cmWinden, for example. Bree is a Stealth character, Randi is a
Magic character, and Winden is a Combat character. Choose one of these depending on the
type of character you want to create and double click the NPC ID to launch
the NPC character window. I chose
Bree.
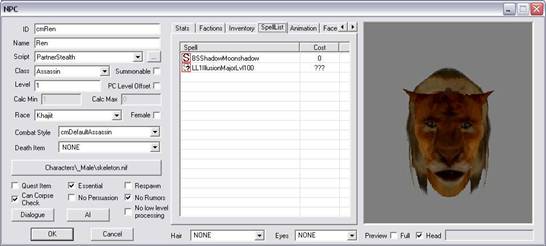
- Choose a new name for
your character, type it into the name text box, and then change the NPC ID
to cmName, where name is the one you've chosen. I've created a new character with the
name Ren, and his ID is cmRen. Now,
click OK in the lower left hand corner. A small window will pop up saying that you have created a new ID
for the NPC and asking if you want to create a new form, i.e. a new NPC.
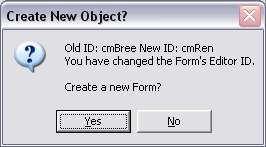
- Answer "Yes", and the
window will close and your new character will appear in the list along
with the other Partner NPC's. Save
the mod by clicking on the little computer disk icon on the tool bar at
the top of the TES editor and choose a new name for your mod, like CM
Partners MyMod.esp. You've just
created your very own plugin for Oblivion. Your mod includes your new NPC and now has all the dialogue, topics,
and scripting of the Partners Basic Mod. Any new NPC's you create or any changes you make to the CM Partners
Basic Mod will now be stored in your own mod and you can even post them on
one of the download sites to share with others.
- Now you'll want to
customize your new character. Double click on the new NPC ID to reopen the NPC character
w 434c24e indow. Change the Class, Race,
and Sex of your new character as you like.
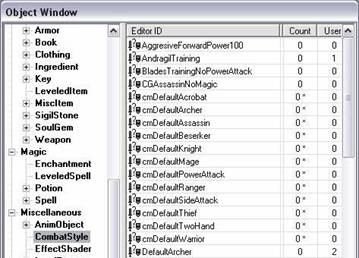
- Click on Combat Style,
and choose a more appropriate one for your new character. You can always choose the DEFAULT, if
you're unsure. I tried to include
some standard ones to choose from with "cm" prefix. The Combat Styles can be changed by
clicking the Combat Styles item in the Editor File Window on the left in
TES Editor.
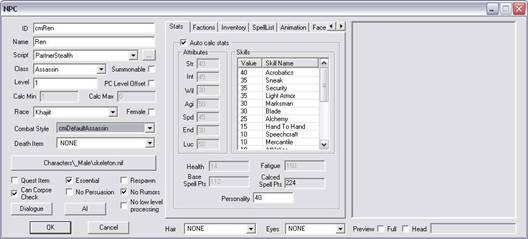
- The Partner NPC's are
set up with PCLevel Offset checked. This setting will automatically cause the NPC to level up when the
Player levels, so that Partners will always keep up with the Player. You can uncheck this temporarily to
uncheck the Auto-calc stats box in the Stats Tab and then recheck the
box. Since you've made some changes,
you need to do this to cause the stats to be recalculated for your new
race, class, &sex.
- Partner NPC's have
been made Essential. The box is
checked on the lower left hand side. If you uncheck this, the NPC can be killed. Otherwise, they are only knocked
unconscious, and will get up again. You decide how you want to play.
- When you are done with
the stats, click OK again to close the NPC window and save the mod
again. It's always a good idea to
save your work like this in two stages to avoid trouble. If you don't, the next step could cause
the editor to crash to desktop, and you'd lose your work and time.
- Let's create a new
face for your character. Reopen the
NPC character window again, and click on the Face tab. Click on the Generate button at the
bottom center of the window and see how the face changes. You can do this repeatedly until you get
a face that you like. If you get an
old face, you can always use the slider control for Age to make the NPC
younger. It might improve the
appearance. Once you find a base
face you want, adjust the sliders, and change the hair style and eyes if
you like. Then click on the Face
Advanced Tab to make any other adjustments that you might want. When you are finished, click on the Face
Tab again, and press the Save button. Then click OK to close the window and save the mod again. When you play the mod, you'll be able to
see how your new NPC looks in game, and you may see some things you want
to change. What you see in the NPC
creation window looks different than what you actually see in game. Sometimes it's an improvement, sometimes
not. Just go back and rework the
face again and save as before if you need to.

- Time to put the
finishing touches on your new character. Reopen the NPC character window and click the Spells tab. You'll see the spells that belonged to
the character that you used as a base for your character. You can delete these or use them,
whichever you want. I used the
Leveled List spells for a particular class for the NPC's I created and you
can too. These simply add some
random spells that are normally used by this particular class. This way, they will have different
spells in every game you play. Leave your NPC character window open, and click on the Leveled
Spells list in the editor. Type "L"
to scroll down to the beginning of the L's in the list. Scroll down the list until you find one
with your NPC's class, and drag it and drop into the NPC character's Spell
List. And you can add a birthsign
or other spells in the Spell list by dragging and dropping.
- Now click on the
Inventory Tab and delete any unwanted items. Several items you should not delete
because the NPC will need them for some of the animations to play. These are Bread, Pewter Mug, Ponder Item,
any books or apparatus. You can
change books if you like, as long as there is a book available for those
characters with a Read AI Package. Now
find the armor, weapons, clothing, and miscellaneous items on the list in
the editor, and drag and drop any new items you need into your character's
inventory. Click OK again and save
the mod.
- Reopen the NPC
character window, and click on the AI button. First of all, look at the four boxes
across the top labeled AI Attributes. Be sure to leave Aggression set between 10 and 30. Any higher, and the NPC's tend to get
into arguments with others which sometimes lead to armed combat. Responsibility should be 70 or higher to
keep your NPC's from stealing and getting into big trouble. If you like playing a thief, don't be
too alarmed by this. The scripting
is setup so that when the Player sneaks, Partner NPC's also sneak, and
their Aggression and Responsibility are both reduced to zero. This way, they won't attack anything if
the Player is sneaking up on someone or give the alarm if the Player
steals something. Don't forget to
come out of sneak when attacked, so your Partner NPC's will fight.
- Now look at the list
of all the AI packages assigned to your character and you'll be able to
see that they are arranged in order of a daily schedule. The last package is a Wander
package. Be sure you always leave
this one last, so that the NPC will default to the Wander package if
something happens to stop another package before its time is up. You can use the left and right arrow
keys to move AI Packages up and down in the NPC AI Package List. You can leave these as they are, or you
can delete the ones you don't want.
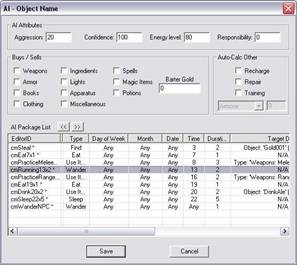
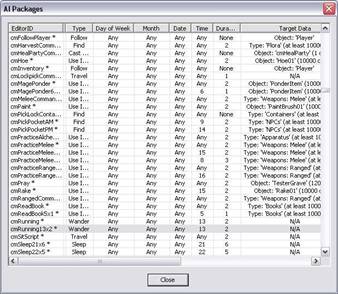
- Open the AI Package
window from the Character Topic on the Menu bar at the top of the
editor. All of the Partner AI
Packages start with "cm", so hit the "D" key to scroll the list down, and
then scroll up to find them. You
can change them by double clicking a package, altering the settings, change
the ID name, and save with new ID. Do
not choose any AI Packages with "Command" in the name, since these are
used with the various menu commands. Only choose AI Packages with numbers in the name like "cmEat7x1",
which means the NPC will eat at 7 AM for 1 hour. This type of package is scheduled for a
particular time of day and duration. You can double click one of these, change the time of day and
duration, change the numbers in the name to match, and then save as a new
AI package. Drag and drop your new
packages you want to add into the NPC's AI list. When you are done, click OK, and save
the mod.
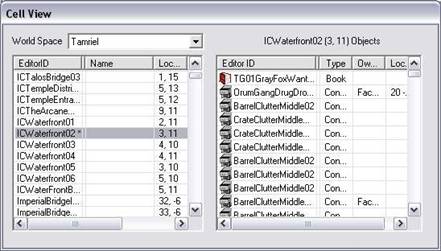
- Now let's place your
NPC on the map. To open the area on
the map you wish to place your new NPC, choose any interior you like from
the second list from the right at the bottom right side of the
editor. Or choose Tamriel and
locate an exterior cell in the list below. Double click on the cell you want in the list, and when the cell
has loaded in the map window above, then click on your NPC filename and drag
it onto the map to the spot you want, and drop it. Your new NPC will appear floating in
space. Just press F to drop him/her
in place. You can move him/her
around a bit if you want, but be careful of the elevation. You can press Z while clicking on the
npc, holding, and dragging up or down to change elevation. Save the mod.
- Test your new custom
NPC in the game to see if he/she actually works. I would suggest you download and use the
Quick Start mod, to skip the beginning tutorial and begin the game just
before you exit the sewers for testing.
- Congratulations,
you've just created your first custom Partners NPC in your very own mod. Now you can create more NPC's if you
like and add them anywhere you want.
Warning
- If you add large numbers of NPC's in any one cell, performance will go down
substantially, since large numbers of NPC's have already been added to Oblivion. Also, if you try to assemble a large force of
NPC's there is likely to be a huge hit on frame rate at some point. Combat will also slow everything down in
proportion to the number of combatants.
Caution - Also,
you must realize that the more Partners you have in your Party, the more
powerful you will become. If you take a
large force with you, the game will cease to be a challenge and you will become
bored. I only take one or two usually;
because it is easier to keep track of a small number, they can carry quite a
bit of loot, and they are not terribly overwhelming.
Creating Beast Race NPC's
There is a problem with creating
and placing beast companions in the game world. But it is not due to
anything that I have done. I've changed nothing on the race setups or the
graphics. This is a TES Construction Set bug. It doesn't
automatically assign the right skeleton for the Argonian or the Khajitt.
There are two things you can try:
The easier method: Once you have set up
your Argonian or Khajitt, close its NPC window, and then reopen
it. Now close the window again and save your mod. This
should set the proper skeleton. Now try placing the Argonian in the
game world. It should work fine. If not, check the skeleton listed on the long
button on the left lower NPC screen and make sure that SkeletonBeast.NIF is
selected.
If for some reason #1 doesn't work, find a
likely existing game Argonian, change its name and ID, click the OK button at
the bottom, and when the message box opens, choose "Save as a new
form". Now you'll have to change the AI packages, scripting, and
faction to Partner equivalents (see the instructions below for creating new
mods for details on setting up an NPC from scratch).
Creating or Using Hated Races
If you decide to create or use a hated race like the Dremora,
either as companions or as the Player, you will have to do a little extra work
in the TESCS, Hated races do have an
effect on relationships because they lower disposition. This can cause
NPC's to not want to talk to the Player, or in extreme cases, even attack. There are a couple of things you can
do. Set the NPC's Aggression to 5. The setting is located at the
top of the AI window. Then he will only attack if someone or something
attacks him. That will stop the attacks, but he still won't talk to you.
Also, you can make him a member of the Player Faction. That
will make him like you a lot more, so that you'll be able to talk to him
and get him to join your party. Open the NPC window and click on the
Faction Tab. You'll see the Partners Faction listed there. Now open
the Faction window from the top Menu bar listed under Character. Click
anywhere on the list of Factions and type "P", and the list will
scroll down to Partners, and just one or two below it will be the
PlayerFaction. Just click on this, hold it, and drag the PlayerFaction to
the NPC Faction window, and release it. Click OK to close both windows,
and save your mod. Your NPC will now be a member of the Player's faction
with a boost of 30 in Disposition. That should make even the most
disagreeable, your friend and partner.
Using Custom Faces/Races
1.
You will need to download TES4 Plugin Utility, Wrye Bash, or another utility
that creates master files, that is, files with the esm extension. Use the utility to convert Ren's Beauty esp
for example (or another face/race mod) into an esm file. Let's call it Rens Beauty.esm.
2.
Open the TES Construction Set, select Oblivion.esm, CM Partners.esm, Rens
Beauty.esm, CM Partners.esp, and make your custom NPC mod the active file.
3.
Change the faces and save.
4.
Now convert that Rens Beauty.esm to an esp. Use Wrye Bash to change your mod's dependency
from the esm to the esp. Then DISABLE
the esm and ACTIVATE the esp. Should
work now.
Creating New Mods
If you decide to
create a new mod using the Partners Mod or change the Partners Quest, Dialogue,
and Scripting, there are some things that you need to be aware of. Click on the large Q icon on the menu bar and
use the Quest list. Select the cmPartnersQuest, and click on the
Topics Tab. That's were all the dialogue is listed for the Partners
Mod. Look at the Quest Data Tab. In the middle of the screen is a
text box entitled Quest Conditions. You'll see that there is only one
condition for the Partners Quest, and that's the Partners Faction. The
NPC's must be Rank 1 in the Partners Faction. That's what gives each NPC the
Partners Quest and Dialogue. To assign an NPC to the Partners Faction, open
the NPC setup screen, open the Faction screen from the Character menu at the
top of the editor, find the Partners Faction in the list, and drag it into the
NPC's Faction Tab. Then change the Rank to 1. Then you assign the
Partners script to the NPC, and you've completed the basic setup for a Partners
NPC. It's fast, it's easy, and it works.
Partner NPC's use
the PC Level Offset so that they level along with the Player. Check the PC Level Offset box and enter -1
for the Offset. Change Calc Min to 1 and
Calc Max to 0. They will always be at
least Level 1 but have no maximum set, so they will level up as long as the
Player does. You can also add the Combat
Style and drag and drop AI packages from the AI Package screen to the NPC's AI
screen. Be sure to place the WanderNPC AI package last in the AI list. If
it's at the end, the NPC will default to the wander package if it can't decide
which AI package comes next. You will need to add the following items to
the NPC's inventory for these AI Packages to work: MiddleClassPewterMug01 for
Drunk, Breadloaf for Eat, any apparatus for Alchemy, PonderItem for Pondering,
any book for Read Book, spells for Practice Magic, and appropriate weapons for
Practice Melee or Ranged. See the instructions above if you need more
detailed instructions.
If you change the
dialogue and/or topics in the Partners Mod you can end up with doubled entries
when using the mod with other custom NPC mods, depending on how these are
setup, combined, etc. I would suggest that if you want to add or change
dialogue for the Partners Mod that you first create a new mod using CM
Partners.esm and CM Partners.esp as base. Be sure and give your new mod a unique name because you don't want
conflicts with other mods created for the Partners Mod. Once you have your new mod, create a new
quest and a new faction. Use the Partners Quest and
dialogue for the basic companionship requirements for your mod, and your
new quest and dialogue for new features, quests, friendship, romance, etc. that
you wish to add. All you'll need to do is assign the NPC's to the new
faction, and they will instantly pick up the new dialogue. If you have to
change the scripting, then you'll just have to alter the Partners Script, but
I'd create a copy of the script with a new name, before changing the script
itself, and then you can do anything you need to, and just assign it to the
NPC's. This way there won't be any conflicts with other Partner esp's
that you might want to use and all of them will retain the basic Partners
dialogue and scripting. But your mod
will have new NPC's, new features, new quests, and new dialogue and menu
topics, anything you want to customize or add.
