ALTE DOCUMENTE
|
||||||||||

Application Compatibility Testing and Mitigation Guide for Windows XP Service Pack 2
Abstract
Windows® XP Service Pack 2 introduces a number of security features and technologies to help protect against attacks on computers running Windows XP. This service pack enables administrators to implement new security configurations that affect the operation of the computer as a whole.
The enhanced security features in Service Pack 2 require you to plan and test your deployment to ensure application compatibility. If application compatibility issues arise, however, it may not be possible in the short term to reconfigure, redevelop, or upgrade the application to operate successfully with the enhanced level of security. The Application Compatibility Testing and Mitigation Guide for Windows XP Service Pack 2 describes the enhanced security features, potential application incompatibilities, and methods of mitigating issues that may arise.
1.The information contained in this document represents the current view of Microsoft Corporation on the issues discussed as of the date of publication. Because Microsoft must respond to changing market conditions, it should not be interpreted to be a commitment on the part of Microsoft, and Microsoft cannot guarantee the accuracy of any information presented after the date of publication.
2.This White Paper is for informational purposes only. MICROSOFT MAKES NO WARRANTIES, EXPRESS OR IMPLIED, AS TO THE INFORMATION IN THIS DOCUMENT.
3.Complying with all applicable copyright laws is the responsibility of the user. Without limiting the rights under copyright, no part of this document may be reproduced, stored in or introduced into a retrieval system, or transmitted in any form or by any means (electronic, mechanical, photocopying, recording, or otherwise), or for any purpose, without the express written permission of Microsoft Corporation.
4.Microsoft may have patents, patent applications, trademarks, copyrights, or other intellectual property rights covering subject matter in this document. Except as expressly provided in any written license agreement from Microsoft, the furnishing of this document does not give you any license to these patents, trademarks, copyrights, or other intellectual property.
5.Unless otherwise noted, the example companies, organizations, products, domain names, e-mail addresses, logos, people, places and events depicted herein are fictitious, and no association with any real company, organization, product, domain name, email address, logo, person, place or event is intended or should be inferred.
6.© Microsoft Corporation. All rights reserved.
7.Microsoft, Active Directory, ActiveX, Authenticode,
Outlook, Windows, and Windows NT are either registered trademarks or trademarks
of Microsoft Corporation in the
8.The names of actual companies and products mentioned herein may be the trademarks of their respective owners.
Contents
TOC \o "1-5" \h \z \t "Head4,5,Head3,4,Head2,3,Head1,2,ChapTitle,1,PartTitle,1" Chapter 1 - Introduction
Multicast and Broadcast Support
Distributed Component Object Model and Remote Procedure Calls
Miscellaneous Compatibility Issues
Microsoft .NET Framework Languages
Chapter 2 - Application Compatibility Testing
Implementing a Deployment Roadmap
Prioritizing Systems for Upgrade
Determining High Value Computers
Creating or Obtaining Baseline Images
Testing Applications Individually and Together
Implementing a Mitigation Strategy
Using the Windows Application Compatibility Toolkit
Understanding Compatibility Issues
Chapter 3 - Mitigating Application Compatibility Issues
Using the Security Settings Dialog Box
Creating and Executing a RegFile
Implementing Active Directory Group Policy
ActiveX Components Blocked Due to Security Settings
Interface Specific Configuration
Programmatically Opening Ports
Disabling DEP for an Application
Enabling DEP for an Application
Distributed Component Object Model\Remote Procedure Call
Distributed Component Object Model
Chapter 4 - Deploying Mitigation Fixes
Implementing Service Pack 2 on New Deployments
Slipstreaming the Service Pack into the Installation Media
Using Remote Installation Services Images
Upgrading Existing Windows XP Clients
Using Manual Deployment and Configuration
Implementing Automatic Administrator Logon
Deploying with Remote Desktop Tools
Deploying with Active Directory
Distributing the Service Pack using Group Policy
Using Group Policy to Assign Application Compatibility Scripts
Deployment with Systems Management Server
Checking Non-Microsoft Management Tools
Implementing a Rollback Strategy
How to Create a .REG File for Use with the Accompanying Scripts
Chapter 1 - Introduction
With the release of Windows XP Service Pack 2, Microsoft® has tackled head-on customer security concerns, thus making Windows XP a more secure platform, ready to meet today's business challenge. Microsoft has developed resources, such as this guide and accompanying scripts, to help you understand and deploy Windows XP Service Pack 2. Links to additional resources appear throughout this guide.
The benefits of Internet connectivity to organizations have resulted in networks becoming open to hostile actions increasingly beyond the control of an individual. To counter this rising threat, IT administrators must maintain a secure environment in which their computer systems can work. To achieve a suitable level of security, desktop computers running Windows XP need protection against abuse and misuse.
Microsoft has dealt with security issues in the past by providing individual security updates for system components and applications. While this methodology is successful, it requires continuous monitoring and regular deployment of updates, whereas system-wide security features protect the computer as a whole, and minimize risk for each individual component. Windows XP Service Pack 2 implements system-wide security features that provide a protection layer above existing security update technologies. Windows XP Service Pack 2 also implements more restrictive default configurations for security and communication-related features.
Viruses and hackers are limited to the same communication protocols and functionality as network-based applications, so increasing security in the network environment can result in legitimate applications or features not operating as expected. Finding the correct balance between functionality levels and adequate security is a continuous administrative challenge. Microsoft has always provided feature-rich software, but the need to secure the operating environment has become paramount. The security features in Windows XP Service Pack 2 can make Windows XP a more secure environment. However, applications that were not designed to meet these higher security requirements may experience some compatibility issues.
Scope
This Application Compatibility Testing and Mitigation Guide for Windows XP Service Pack 2 provides information on how to ensure that applications operate with Windows XP Service Pack 2. It includes process roadmaps and guidance on how to identify and mitigate compatibility issues and how to deploy mitigation fixes. This guide describes the security technologies implemented by Windows XP Service Pack 2 and provides guidance for mitigating application compatibility issues that were identified by extensive testing of Microsoft and non-Microsoft applications. This guide also includes details about changes and enhancements to the following features in Windows XP:
Internet Explorer. Windows XP Service Pack 2 implements many important changes to the features and functionality of Internet Explorer, including download controls, attachment and Authenticode® enhancements, add-on management, zone elevation blocks, and pop-up handling.
Windows Firewall. This is an updated version of the Internet Connection Firewall (ICF). The purpose of the Windows Firewall is to block unsolicited attempts to communicate with a computer running Windows XP Service Pack 2. The Windows Firewall does not prevent communication originating from the computer.
Data Execution Prevention. This is a feature that can prevent unwanted, unexpected, or malicious code execution on a computer running Windows XP Service Pack 2.
Distributed Component Object Model / Remote Procedure Calls. Windows XP Service Pack 2 includes the option to make Remote Procedure Calls (RPC) and Distributed Component Object Model (DCOM) network communications more secure. The enhancement to DCOM security gives the option to implement system-wide security requirements, and RPC connections can be configured to require authentication and not accept an anonymous context. This, with some exceptions, is the default with Service Pack 2.
Attachment Management. E-mail is a major entry point for attacks on organizational networks, and the distribution of viruses using e-mail attachments is increasingly common. Windows XP Service Pack 2 introduces the Attachment manager with enhanced protection against potentially unsafe file attachments.
Figure 1.1 identifies the key points of this guide and how they relate to each other.
Figure 1.1
Flowchart showing key points for Application Compatibility Testing and Mitigation Guide for Windows XP Service Pack 2
The process of checking for application compatibility includes the following elements:
1. Understand the security technologies, the reasons for implementation, the methods of implementation and the likely impact.
2. Test applications for compatibility with the security technologies.
3. Reconfigure, upgrade, or redevelop any incompatible applications to work with the technologies.
4. Mitigate application compatibility issues if required with short term fixes that make the security configuration less restrictive.
If it has been necessary to apply short term fixes, repeat this process until all applications are compatible with the new security technologies.
Audience
The information contained in this guide is targeted at IT professionals and administrators in roles ranging from support to application testing, security configuration and network administration. The guide does not assume a particular size or complexity of network, and covers peer-to-peer, domain and Active Directory® environments. The security information is relevant even for networks that do not have Internet access.
Security Enhancements
Windows XP Service Pack 2 is more than a roll-up of security updates - it introduces a number of new features together with enhancements for existing technologies. These changes cover:
Internet Explorer
Windows Firewall
Data execution prevention
Distributed Component Object Model/Remote Procedure Calls
Attachment Manager
Miscellaneous enhancements
Internet Explorer
Internet Explorer is one of the most frequently used system components, and has grown beyond a simple Web browser to a front end for databases and intranet applications. Internet Explorer operates in an environment that often requires automation. Downloading applications, files and ActiveX® controls, opening additional Web pages, and installing add-on features are just a few of the automated functions that support dynamic and user friendly Web pages and Web applications. While these automated features are extremely useful in providing a rich user experience they can also cause harm if used maliciously.
To help prevent attacks, Windows XP Service Pack 2 uses a structured security model that allows an administrator to configure layered security using security zones. Configuration of security features can be different for each zone, so when designing an overall security policy, developers must be aware of what is allowed in each zone, and create applications that conform to the security model for the zone. Windows XP Service Pack 2 also implements a more restrictive executing environment, which requires application developers to be conscious of security when writing applications for a Web-based environment.
New or enhanced features in Internet Explorer include the following:
Feature control
UrlAction security
Binary behaviors
Local machine lockdown
Multipurpose Internet Mail Extensions (MIME) handling
Object caching
Windows restrictions
Zone elevation blocks
Information bar
Pop-up management
Add-on management
This section discusses each of these features in turn.
Feature Control
Windows XP Service Pack 2 includes registry settings permitting specific processes to opt in or out of relevant security features. Once Feature Control is enabled, configuration of security features can be separate for each security zone. You can configure Feature Control settings using Active Directory Group Policy, through the Security tab on the Internet Options applet in Control Panel or by editing the registry.
To view additional information regarding this technology in the guide, click the following links:
Application Compatibility Testing for Feature Control
Application Compatibility Issue Mitigation for Feature Control
UrlAction Security
UrlActions are automated features that are incorporated into Web Applications to provide additional functionality. UrlAction settings are configurable on the Security tab of the Internet Options user interface. Windows XP Service Pack 2 introduces the ability for an administrator to use Group Policy for the configuration of these settings, which increases flexibility compared to using the Internet Explorer Administration Kit of previous versions.
Some of the UrlAction settings are invalid until the corresponding Feature Control is enabled. A number of the features covered in this guide are configured using Feature Control and UrlAction security.
To view additional information regarding this technology in the Guide, click the following links:
Application Compatibility Testing for UrlActions
Application Compatibility Issue Mitigation for UrlActions
Binary Behaviors
Binary behaviors allow Internet Explorer to use a specific Hypertext Markup Language (HTML) element. For example, Microsoft Office uses binary behaviors to create the same look and feel when it saves application-specific files, such as a spreadsheet with a graph in it, as a Web page.
Previous versions of Internet Explorer allowed binary behaviors, which can potentially be harmful even when running in the Restricted Sites zone. With Windows XP Service Pack 2, an administrator can enable or disable binary behaviors on a zone by zone basis. Binary behaviors are disabled by default in the Restricted Sites zone.
To view additional information regarding this technology in the Guide, click the following links:
Application Compatibility Testing for Binary Behaviors
Application Compatibility Issue Mitigation for Binary Behaviors
Local Machine Lockdown
When Internet Explorer opens a Web page, it places restrictions on the capabilities of the page dependent on the security zone that the page came from, for example, the Internet zone or the intranet zone. A page from the Internet zone is more restricted than one from a local intranet. Although the Internet Options user interface does not show the option, Internet Explorer also uses Local Zone. Previously, content held locally was assumed to be secure and had no zone-based security applied to it. Content in the Local Zone also had fewer restrictions, which resulted in attackers attempting to use the Local Zone to gain elevated privileges and compromise the computer. Windows XP Service Pack 2 applies greater security to the Local Zone by default and provides the administrator the ability to apply Local Zone Lockdown to make this zone even more restrictive.
To view additional information regarding this technology in the Guide, click the following links:
Application Compatibility Testing for Local Machine Lockdown
Application Compatibility Issue Mitigation for Local Machine Lockdown
MIME Handling
Multipurpose Internet Mail Extensions (MIME) provide a standard for identifying file types and file handlers. If Internet Explorer tries to download and execute a file from a Web server, it also receives a MIME type for the file that identifies the file type and the default handler of the file. Internet Explorer uses this information to identify which application to use to run the file. Previously it was possible to use Internet Explorer to download a file and save it to disk using MIME information. When the file was executed at a later date, a different handler could be used. This arrangement allowed an attacker to identify an executable file as text (and therefore safe) when being downloaded. When the file was run at a later date, the MIME information was not used and the file executed, either in an application or in the Windows shell, without prompting the user.
Windows XP Service Pack 2 strengthens the use of MIME as a method of identifying file types. Internet Explorer then uses the following information to decide how to handle the file:
File extension and ProgID of registered handler
MIME type and the ProgID of the registered handler
Content-Disposition from the HTTP header
MIME sniff
If the MIME type does not match the file extension Internet Explorer attempts to rename the file to match the content type. If this cannot be done Internet Explorer will not execute the file.
MIME sniffing allows Internet Explorer to recognize the bit signature of a file, potentially identifying the file type. If a Web server does not include correct Content-type information, a HTML file may be viewed as plain text and will not load any active content.
To view additional information regarding this technology in the Guide, click the following links:
Application Compatibility Testing for MIME Handling
Application Compatibility Issue Mitigation for MIME Handling
Object Caching
Windows XP Service Pack 2 prevents a cached object from being available if a user navigates to another domain (as specified by a fully qualified domain name), or if the context changes due to navigation within a domain. This restriction prevents a cached object from providing access to the contents of a Web page from another domain. Therefore, an attacker cannot use a script to check for events in another Internet Explorer frame or window, such as, checking for credit card numbers as they are being entered.
To view additional information regarding this technology in the Guide, click the following links:
Application Compatibility Testing for Object Caching
Application Compatibility Issue Mitigation for Object Caching
Window Restrictions
Windows XP Service Pack 2 allows Internet Explorer to restrict where scripts can place newly opened windows and also prevents hiding of the title bar, status bar or address bar. This restriction prevents an attacker from executing a script that opens a window off-screen and hides malicious content or activity, or places a small window over a dialog box to change its meaning.
To view additional information regarding this technology in the Guide, click the following links:
Application Compatibility Testing for Window Restrictions
Application Compatibility Issue Mitigation for Window Restrictions
Zone Elevation Blocks
Windows XP Service Pack 2 blocks Web pages from navigating to a less restrictive security zone. Zone Elevation Blocking prevents the overall security context for any link on a page from being higher than the security context of the root URL. This approach prevents attackers from scripting page navigations into less restrictive zones and then executing malicious code.
To view additional information regarding this technology in the Guide, click the following links:
Application Compatibility Testing for Zone Elevation Blocks
Application Compatibility Issue Mitigation for Zone Elevation Blocks
Information Bar
Windows XP Service Pack 2 replaces many of the pop-up dialog boxes, which the user sees currently, with the Information Bar. This Information Bar shows a short text message relating to the event, and appears under the Internet Explorer toolbars and above the Web page. Clicking on the Information Bar shows additional information relevant to the event. If more than one event is blocked the text is more generic with the detail of the events appearing in a list. The Information Bar shows a range of events, including:
Prompts to install add-ons
Notification of blocked pop-up windows
Prompts to carry out automatic downloads
Notification of ActiveX control prompts that have been blocked
To view additional information regarding this technology in the Guide, click the following links:
Application Compatibility Testing for Information Bar
Application Compatibility Issue Mitigation for Information Bar
Pop-up Management
Windows XP Service Pack 2 enables pop-up blocking by default. If a Web page attempts to automatically create another Internet Explorer window, the new window is suppressed and a message appears in the Information Bar. The user can allow the pop-up window by clicking the Information Bar if required. This feature does not apply to windows that open because the user clicked on a link or to pop-up windows within the intranet zone.
To view additional information regarding this technology in the Guide, click the following links:
Application Compatibility Testing for Pop-up Management
Application Compatibility Issue Mitigation for Pop-up Management
Add-on Management
Internet Explorer add-ons are programs that add functionality to the browser. Add-on installation occurs as a download from a Web page, an application installation, or as part of the operating system, often without the user being aware of the add-on functionality, or even of its existence.
This presents a potential security risk. Windows XP Service Pack 2 allows the tracking of installed add-ons through a list, and an administrator can disable add-ons if necessary through the Add-on Manager interface.
To view additional information regarding this technology in the Guide, click the following links:
Application Compatibility Testing for Add-on Management
Application Compatibility Issue Mitigation for Add-on Management
Windows Firewall
Windows Firewall is a software firewall that provides stateful inspection and filtering of incoming network communication. An administrator must open a Transmission Control Protocol (TCP) or User Datagram Protocol (UDP) port to allow inbound communication to take place. After installation of Windows XP Service Pack 2, Windows Firewall is switched on by default.
If a non-Microsoft firewall is present, Windows Firewall is still enabled by default. However you may experience performance degradation. An administrator may chose to disable the Windows Firewall.
Enabling Ports
An administrator can allow inbound communication through the firewall by specifying the relevant port, or by placing an application executable in an exception list. A specifically opened port remains open all the time, whereas an executable placed in the exception list opens any ports that the application requires, but only for as long as the application is running.
It is also possible to limit access to a communications port to the local subnet. In a workgroup environment this happens by default when enabling file and printer sharing. Therefore, ports UDP 137 and 138, TCP 139 and 445, and the Universal Plug and Play (UPnP) service on UDP 1900 and TCP 2869 can only be accessed by computers on the local subnet.
It is possible to configure Windows Firewall to allow no exceptions. This places the Windows XP system into a client-only mode and prevents any incoming communication.
Multicast and Broadcast Support
When using multicast and broadcast-based protocols and services, the computer may receive communication responses from unknown hosts. To prevent Windows Firewall from filtering this traffic, the outgoing port used by the broadcast or multicast stays open for 3 seconds to receive responses from any system.
Boot-Time Policy
To prevent malicious attacks while the computer boots, Windows Firewall implements a static boot-time policy. This policy allows the computer to perform basic network tasks such as Domain Name System (DNS) host resolution, Dynamic Host Configuration Protocol (DHCP) requests and to communicate with a domain controller. There are no configuration options for the boot-time policy, but if the Windows Firewall/Internet Connection Sharing (ICS) service is disabled, or set to manual, the policy is not applied.
Run-Time Policy
Windows Firewall takes effect when the Windows Firewall/Internet Connection Sharing service starts, at which time the run-time policy is applied. An administrator in an Active Directory environment can then configure two run-time policies, called Domain Policy and Standard Policy, which allow different configurations for mobile computers when disconnected from the domain.
Windows Firewall allows the configuration of a Global Policy, as well as policies for individual network interfaces. The Global Policy configuration automatically applies to any new connection in the Network Connections interface, including non-Microsoft dialers.
To view additional information regarding Windows Firewall in the Guide, click the following links:
Application Compatibility Testing for Windows Firewall
Application Compatibility Issue Mitigation for Firewall
Data Execution Prevention
Data execution prevention (DEP) is a set of hardware and software technologies that perform additional checks on memory to help protect against malicious code exploits. In Windows XP Service Pack 2, DEP is enforced by both hardware and software.
Hardware-enforced DEP
Hardware-enforced DEP marks all areas of memory as non-executable unless the area explicitly contains executable code. This feature of Windows XP Service Pack 2 relies on processor hardware support to mark the memory locations with an attribute that indicates that code should not be executed from that memory location. DEP functions on a per-virtual memory page basis, usually changing a bit in the page table entry (PTE) to mark the memory page.
The actual hardware implementation of DEP and marking of the virtual memory page varies by processor architecture. However, processors that support hardware-enforced DEP are capable of raising an exception when code is executed from a page marked with the appropriate attribute set.
Both Advanced Micro DevicesT (AMD) and Intel® Corporation have defined and shipped Windows-compatible architectures that are compatible with DEP.
Beginning with Windows XP Service Pack 2, the 32-bit version of Windows utilizes the no-execute page-protection (NX) processor feature as defined by AMD or the Execute Disable bit feature as defined by Intel. To use these processor features, the processor must be running in Physical Address Extension (PAE) mode.
Software-enforced DEP
An additional set of data execution prevention security checks have been added to Windows XP Service Pack 2. These checks, known as software-enforced DEP, are designed to mitigate exploits of exception handling mechanisms in Windows. Software-enforced DEP runs on any processor capable of running Windows XP Service Pack 2. By default, software-enforced DEP only protects limited system binaries, regardless of the hardware-enforced DEP capabilities of the processor.
Additional DEP Information
By default, DEP only protects system applications and services. However, applications that extend Windows functionality may encounter problems with DEP. Applications may also encounter problems with DEP if the system DEP configuration has changed from the defaults.
If you believe you are experiencing problems with DEP, it is possible to apply a compatibility fix named "DisableNX" using the Application Compatibility Toolkit.
For more information about Windows Application Compatibility, see the Microsoft Web site at
https://www.microsoft.com/windows/appcompatibility/default.mspx
To view additional information regarding both hardware and software-enforced DEP in the Guide, click the following links:
Application Compatibility Testing for DEP
Application Compatibility Issue Mitigation for DEP
Distributed Component Object Model and Remote Procedure Calls
Changes to DCOM and RPC have significantly enhanced the security of network communications and remotely executing applications.
DCOM
The Microsoft Component Object Model (COM) is a platform-independent, distributed, object-oriented system for creating binary software components that can interact. DCOM is an evolution of COM, which allows the logical distribution of applications across locations. Windows XP Service Pack 2 allows an administrator to configure system-wide security settings for DCOM, which enforces a specific minimum level of security that is applied to all COM applications. Configurations of these security settings takes place on the server component, and are relevant only if your Windows XP system is serving the application.
Figure 1.2 shows the new DCOM architecture.
Figure 1.2
DCOM components in Service Pack 2, showing client and server components
For earlier versions of Windows, permissions on a DCOM application were Launch and Access. For a request to be made to the COM server, COM on the client makes a request to the Remote Procedure Call Session Service (RPCSS) to communicate with the remote system. RPCSS communicates with RPCSS on the remote system, which forwards the request to the COM server. RPCSS on the remote system then launches the COM server if it is not already running, for which the user requires Launch permissions. To access a running COM server the user needs Access permissions. To obtain an initial pointer to a COM server, the user also needs Activate permissions. However, before Windows XP Service Pack 2 this was not a separately configurable permission. There was also no permission differentiation between launching and accessing COM components locally or remotely.
Windows XP Service Pack 2 augments these application-specific permissions by adding Activate as a separate permission right, and also by differentiating between accessing the COM server locally or remotely. It also adds a new layer of system-wide security. An administrator can configure Launch Access and Activate permissions, both Local and Remote, for the system as a whole. This is a separate access control list (ACL) and does not change the application-specific ACL. To gain access to the COM server the user must have correct permissions in both ACLs.
By default, this security model prevents COM applications from permitting unauthenticated remote access to the system, which makes the system more resistant to attack.
To view additional information regarding this technology in the Guide, click the following links:
Application Compatibility Testing for DCOM/RPC
Application Compatibility Issue Mitigation for DCOM/RPC
Remote Procedure Calls
Applications and services use Remote Procedure Calls (RPCs) for remote communication. Windows XP Service Pack 2 allows an administrator to modify the behavior of all RPC interfaces to require security.
Note: The named pipes protocol cannot be restricted in this way due to backward compatibility issues.
The RestrictRemoteClients registry key forces RPC to perform additional security checks for all interfaces and can have one of three values:
RPC_RESTRICT_REMOTE_CLIENT_NONE (0). This causes the system to bypass the new RPC interface restriction. It is entirely the responsibility of the server application to impose appropriate RPC restrictions. This setting is equivalent to the behavior in previous versions of Windows.
RPC_RESTRICT_REMOTE_CLIENT_DEFAULT (1). This restricts access to all RPC interfaces. It is the default value in Windows XP Service Pack 2. All remote anonymous calls are rejected by the RPC runtime. If an interface registers a security callback and provides the RPC_IF_ALLOW_CALLBACKS_WITH_NO_AUTH flag, then this restriction does not apply to that interface. If the key does not exist (default), the system assumes this value for the key.
RPC_RESTRICT_REMOTE_CLIENT_HIGH (2). This is the same as the RPC_RESTRICT_REMOTE_CLIENT_DEFAULT value, except that the RPC_IF_ALLOW_CALLBACKS_WITH_NO_AUTH flag no longer exempts an interface. With this value, a system cannot receive any anonymous remote calls using RPC. Applications that use DCOM might not work correctly if this value is set.
This new security model allows an administrator to limit the system attack surface for the RPC protocol.
To view additional information regarding this technology in the Guide, click the following links:
Application Compatibility Testing for DCOM/RPC
Application Compatibility Issue Mitigation for DCOM/RPC
Attachment Execution Service
Windows XP Service Pack 2 implements a new application programming interface (API) called the Attachment Manager Execution Service (AES). New applications developed to use this API, including Outlook® Express, Windows Messenger, and Internet Explorer, use AES to present additional information relating to attachments and downloads to the user. With AES, the application manages the downloading of attachments and can require signatures for executable files. The Attachment Execution Service maintains the same security for attachments saved to the hard disk, as these attachments are marked and treated as a downloaded file.
To view additional information regarding this technology in the Guide, click the following links:
Application Compatibility Testing for Attachment Execution Service
Application Compatibility Issue Mitigation for Attachment Execution Service
Miscellaneous Compatibility Issues
Deploying Windows XP Service Pack 2 could possibly result in compatibility issues in other areas as well. These issues may be varied in cause and display no specific symptoms. Some of these issues require changes to applications either additional development work or an upgrade of the software. The following examples of issues are fixable without development work.
Microsoft .NET Framework languages
Rich Text Format converters
Microsoft .NET Framework Languages
Windows XP Service Pack 2 adds additional languages to Windows XP, such as Welsh. Version 1.0 and 1.1 of the Microsoft .NET Framework do not support these new languages and so applications written with these versions cannot use the new languages.
If you believe you are experiencing this problem, you should update the affected systems to the latest version of the Microsoft .NET Framework.
For more information about NET Framework 1.0 SP3 and 1.1 SP1, see the Microsoft Web site at
https://msdn.microsoft.com/netframework/downloads/updates/sptechpreview/default.aspx
Rich Text Format Converters
Windows XP Service Pack 2 disables the RTF converters in Windows XP. The function of these converters was to convert older Word 95 file types to current RTF formats, allowing viewing in WordPad or Notepad. Without these converters the document shows unrecognized formatting information as garbled characters together with the text.
If you experience this problem you can edit the registry and add the following value to enable the converters; the key may not already exist.
HKEY_LOCAL_MACHINE\SOFTWARE\Microsoft\Windows\CurrentVersion\Applets\Wordpad\EnableLegacyConverters=dword:00000001
These converters were removed to reduce the attack surface; re-enabling them reintroduces potential security issues.
Summary
Microsoft Windows XP Service Pack 2 includes changes that significantly enhance the security of computers running Windows XP. These enhancements need to be considered for a successful deployment. The next chapter covers procedures for checking application compatibility.
For more information about Changes to Functionality in Microsoft Windows XP Service Pack 2, see the Microsoft Web site at
https://www.microsoft.com/technet/prodtechnol/winxppro/maintain/sp2chngs.mspx
Chapter 2 - Application Compatibility Testing
Introduction
Chapter 1 of this guide covered the new security features that Windows XP Service Pack 2 implements. This chapter describes an approach to testing for specific application incompatibilities that these new features may bring.
Implementing a Deployment Roadmap
Figure 2.1 provides a recommended path for deploying Windows XP Service Pack 2. The first section of this chapter covers these phases in order.
Figure 2.1
Application testing for compatibility with Service Pack 2 involves a number of phases
Prioritizing Systems for Upgrade
Initially an organization must decide on how to prioritize the computers that require the service pack. This prioritization process uses one of two approaches:
Deploy the service pack to the most valuable systems first. The most valuable systems are running the most critical applications to the business, so application compatibility issues on these systems are crucial.
Deploy the service pack to the most common or generic systems in the organization. These computers run standard business applications and are therefore likely to have fewer application compatibility issues.
The second approach allows an organization to deploy Windows XP Service Pack 2 more quickly to a larger number of systems and so reduces the overall attack surface of the organization in a shorter time. Using inventory management software, such as Microsoft System Management Server (SMS), may help with this process.
Determining High Value Computers
The easiest way to define the most valuable computers is to consider the cost to the organization from system downtime. For example, every minute that a trading application for a financial institution is unavailable may cost the business hundreds of thousands of dollars. Large organizations understand this and usually have backup systems in place. However, a small law firm may have a single computer running the accounting software or the business-critical case management and billing application. The loss of these systems could force the company out of business. For more statistics on data loss and business failure, see the Boston Computing Web site, at https://www.bostoncomputing.net/consultation/databackup/statistics/.
The vulnerability to attack of these high value systems needs to be assessed. For example, they may not be connected to the Internet or they may already be locked down with restricted physical access and so may be less vulnerable. However, any system with e-mail and Internet access is vulnerable and benefits from Windows XP Service Pack 2.
Carefully managing the deployment of Windows XP Service Pack 2 to high value computers is critical to minimize downtime. Unless these systems are tested to ensure application compatibility, a Windows XP Service Pack 2 deployment may cause disruption to the business if applications do not meet the more stringent security settings.
Determining Generic Systems
An organization may specify the goal of deploying Windows XP Service Pack 2 to as many seats as possible in a short time frame. This approach ensures that the majority of desktop computers enjoy the enhanced security features of Windows XP Service Pack 2 within a short timeframe, which reduces the overall attack surface of the organization. These generic systems are more likely to have access to the Internet, run e-mail software and have fewer security-aware users. Hence, targeting generic systems first is the recommended approach for most organizations.
Prioritizing Applications
When you have prioritized your computers you need to identify the applications these systems are running. Microsoft Systems Management Server (SMS) 2003 can provide this information and is particularly suitable for larger organizations. An alternative approach is to use the Application Compatibility Toolkit (ACT), because ACT can identify the applications installed on networked computers and can create and distribute custom compatibility fixes.
After application identification is complete, you can consider the order for testing systems. There are a number of different factors to consider when prioritizing applications for compatibility testing. These factors are:
Importance to business
Number of users
Likelihood of compatibility issues
Vulnerability of the application to attack
Note: Many vendors have worked with Microsoft and have tested the effects of Windows XP Service Pack 2 on their applications. Microsoft advises you to contact your vendor(s) and check if they have any information concerning their applications and compatibility with Windows XP Service Pack 2.
Selecting Test Systems
Organizations with a defined methodology for deploying software always test software updates, such as service packs or hotfixes, before deploying them to production computers. Because Windows XP Service Pack 2 implements a significant number of new security features, this pre-deployment testing is essential to identify deployment options and compatibility issues.
Note: It is recommended that organizations that do not have a test procedure implement one prior to deploying Windows XP Service Pack 2, even if testing means installing on a single computer prior to deploying across the network of the organization. This recommendation applies even to smaller organizations because it is a valuable investment that can be easily used again in the future.
Testing of each application would ideally take place on each system configuration within your organization. To do this, a test system is created for each client configuration. The application is then tested in the same local environment in which it is to be used.
Many organizations have a pilot or test lab where they test system deployments and create baseline standards. Remote Installation Service (RIS) or disk imaging software can then be used to deploy those baseline systems.
For more information about Remote Installation Services, see the Microsoft Web site at:
If an image of each client build is not available, you have to build the client system manually for testing purposes. This build process must be repeated for each client configuration.
Organizations that do not currently have a testing environment can use virtual machine software such as Microsoft Virtual PC 2004. A single host computer can run multiple virtual PCs to create several application test environments. Virtual PC also gives the option to accept or reject writes to the disk, which enables simple rollbacks at the end of the test run. Whether you use disk images or Virtual PCs, maintain a read-only copy of the disk image for quick duplication and rollback.
For more information about Microsoft Virtual PC 2004, see the Microsoft Web site at:
https://www.microsoft.com/windows/virtualpc/default.mspx
Table 2.1 shows the suitability for the various testing mechanisms for Windows XP Service Pack 2 with different sized organizations.
Table 2.1 Suitability matrix for application test options
|
Platform |
Small |
Medium |
Large |
|
Remote installation Services (RIS) |
P |
P |
|
|
Non-Microsoft disk imaging software |
P |
P |
P |
|
Microsoft Virtual PC 2004 |
P |
P |
Creating or Obtaining Baseline Images
Many organizations use baseline disk images in conjunction with RIS to deploy desktop operating systems. Organizations that use this technique are well placed to test the effect of Windows XP Service Pack 2 in their environment, because it is likely that they have only a few possible operating system configurations. Companies that do not use baseline images or any disk imaging system need to test a representative range of system configurations for application compatibility.
The Microsoft Solution Accelerator for Business Desktop Deployment includes information on deploying systems using imaging technology.
For more information about Microsoft Solution Accelerator for Business Desktop Deployment, see the Microsoft Web site at:
https://www.microsoft.com/technet/itsolutions/techguide/mso/bdd/default.mspx
Testing Applications Individually and Together
It is recommended that the initial testing platform has Windows XP with Service Pack 2 installed together with relevant applications. The platform should, where possible, mirror systems deployed in your organization with regard to processor speed and memory configuration.
It may also prove useful to mirror the testing on a representative pre-Windows XP Service Pack 2 computer to clarify that the issue does not exist on a pre-Windows Service Pack 2 build.
When the test environment is set up and configured you can run a series of tests. First, run each application separately, identifying and documenting any issues. Then, secondly, run the applications together in typical combinations and identify and document any issues caused by multiple applications.
Note: When testing multiple applications, monitor memory usage on the test platform, because low free memory can cause spurious application errors that are not related to Service Pack 2 compatibility.
Creating a Recovery Process
During the testing phase you should plan and test a recovery process for deploying Service Pack 2. This recovery process is most important when you deploy the service pack onto your high value computers. Windows XP Service Pack 2 includes a rollback option that uninstalls the service pack. However, your recovery process planning should cover scenarios where the computer fails to reboot after the upgrade, which would make a restore from a backup or rebuild necessary. Although this is an unlikely outcome, you should be able to perform a full system restore in the event of an unsuccessful upgrade. For more information about Back up and Restore, see the Microsoft Web site at
Implementing a Mitigation Strategy
When testing applications with Windows XP Service Pack 2, it is recommended to test applications with all the default security features enabled. If all the applications work correctly in the test environment, then you can proceed to the deployment phase. However, if applications do not work, you may need to redevelop, reconfigure, or upgrade applications to operate successfully with the new security technologies. However, in the short term it may be possible to apply fixes to computers or applications to allow these applications to run with Service Pack 2 installed. These fixes may reduce the security of the operating system, so you should only apply them where you have a full understanding of the effects, and you should ensure you track these carefully for later removal, so you can achieve the full security benefits of Windows XP Service Pack 2.
Using the Windows Application Compatibility Toolkit
Version 3 of the Application Compatibility Toolkit (ACT) is currently available from the Microsoft Web site, with a new version targeted for beta release later this year. The ACT provides the following functionality:
Application inventory collection
Application issue detection
Application inventory and issue data analysis
Application compatibility fix deployment via Compatibility Administrator
ACT can be used in all phases of application compatibility testing and deployment.
Figure 2.2
Using ACT in application compatibility testing and deployment
For more information about Using the Application Compatibility Toolkit, see the Microsoft Web site at
https://www.microsoft.com/windows/appcompatibility/default.mspx
For a preview of the upcoming Windows Application Compatibility Toolkit 4.0, see the Microsoft Web site at
https://www.microsoft.com/windows/appcompatibility/act4.mspx
Understanding Compatibility Issues
The introductory chapter of this guide, Chapter 1, described the new features in Windows XP Service Pack 2 and how these features enhance the security of a computer by making it more resilient to attack. This section looks at these technology areas in detail and discusses how an application incompatibility issue may appear to the end user.
Internet Explorer
Internet Explorer is the application in Windows XP that benefits the most from the security enhancements in Service Pack 2. The use of Internet Explorer as an application front end makes it an important component of any test plan.
For more information about Internet Explorer, see Part 5: Enhanced Browsing Security in the Changes to Functionality in Microsoft Windows XP Service Pack 2 guide at:
https://www.microsoft.com/technet/prodtechnol/winxppro/maintain/sp2brows.mspx
Feature Control
Feature control provides the means to control the security features in Internet Explorer. Windows XP Service Pack 2 creates new registry settings that apply the security features to specific processes or security zones. This approach allows greater configuration flexibility in Internet Explorer than was possible with previous versions of Windows XP, even using the Internet Explorer Administration Kit (IEAK).
Application developers must always be aware of the security zone in which their application runs, so that they know the security configuration that is applied.
To view additional information regarding this technology in the Guide, click the following links:
Introduction to Feature Control
Application Compatibility Issue Mitigation for Feature Control
For more information about Internet Explorer Feature Control Settings in Group Policy, see the Microsoft Web site at
UrlAction Security
UrlActions are configurable features of Internet Explorer and are found on the Security tab of the Internet Options applet in Control Panel. Developers must be aware of the zone in which their application executes and what actions are allowed in that zone. An application may fail if it attempts to use features that an administrator has disabled. This failure then generates messages in the Information Bar.
To view additional information regarding this technology in the Guide, click the following links:
Application Compatibility Issue Mitigation for UrlActions
For more information about Internet Explorer UrlAction Security Settings in Group Policy, see the Microsoft Web site at
Binary Behaviors
You can use feature control to configure Binary Behaviors for a specific process or security zone. Because the Binary Behaviors automation can also be put to malicious use, Windows XP Service Pack 2 disables Binary Behaviors in the Restricted Sites zone by default. This restriction reveals itself during application testing as a failure to render HTML documents correctly.
To view additional information regarding this technology in the Guide, click the following links:
Introduction to Binary Behaviors
Application Compatibility Issue Mitigation for Binary Behaviors
For more information about Internet Explorer Binary Behaviors Security Settings in Group Policy, see the Microsoft Web site at
Local Machine Lockdown
Prior to Windows Service Pack 2, the Local Zone had less restrictive security settings and was not configurable. Any application that uses the lower security settings in the Local Zone may display compatibility issues after a Service Pack 2 installation.
Because content on the local file system is no longer assumed to be safe, Local Machine Lockdown is even more restrictive than the Internet Zone. Scripts and ActiveX® Controls are blocked when Local Machine Lockdown is applied.
If an application downloads content from the Internet Zone and accesses it locally, the page may not load and the warning message in Figure 2.3 appears in the Information Bar.
![]()
Figure 2.3
An application attempts an unsafe action with Local Machine Lockdown applied
The same issue can also occur when running active content from a CD.
To view additional information regarding this technology in the Guide, click the following links:
Introduction to Local Machine Lockdown
Application Compatibility Issue Mitigation for Local Machine Lockdown
For more information about Internet Explorer Local Machine Zone Lockdown, see the Microsoft Web site at
MIME Handling
Internet Explorer no longer executes files if there is a mismatch between the MIME type and the file extension. This restriction protects the user from executing a dangerous file that was previously downloaded as another file type. If the server misreports MIME type information the application may fail and display the message in Figure 2.4.
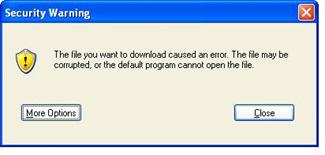
Figure 2.4
When a server incorrectly reports MIME type, Internet Explorer prevents the file from executing
Windows XP Service Pack 2 users may also experience additional file download prompts due to file types being defined by AssocIsDangerous, such as, .exe or .bat files.
MIME sniffing in Windows XP Service Pack 2 identifies the content type using a bit signature. Web servers that do not include the correct Content-Type header with files and that use non-standard file name extensions for HTML pages may now have those pages rendered as plain text rather than HTML.
To view additional information regarding this technology in the Guide, click the following links:
Application Compatibility Issue Mitigation for MIME Handling
For more information about Internet Explorer MIME Handling Enforcement, see the Microsoft Web site at
Object Caching
Object caching is unlikely to cause application compatibility issues because it is likely that applications that exhibited this class of vulnerability previously made the browser unstable. Object Caching is not turned on by default, but application developers should be aware of this greater security restriction and not develop applications that use objects from other Web sites because they may cause problems for the user interface.
To view additional information regarding this technology in the Guide, click the following links:
Introduction to Object Caching
Application Compatibility Issue Mitigation for Object Caching
For more information about Internet Explorer Object Caching, see the Microsoft Web site at
Window Restrictions
Applications that create windows using scripts may experience some compatibility issues. Windows cannot be created off screen (for example, to hide background processing) and must have the status, address and title bars viewable. This requirement may affect the user interface of the application, because previously hidden windows may now be displayed.
To view additional information regarding this technology in the Guide, click the following links:
Introduction to Window Restrictions
Application Compatibility Issue Mitigation for Window Restrictions
For more information about Internet Explorer Window Restrictions, see the Microsoft Web site at
Zone Elevation Blocks
Elevation of privilege is one of the most common exploits with Internet Explorer. Windows XP Service Pack 2 prevents navigation from a less to a more privileged zone. Applications that need to switch zones only function with user interaction. Navigation to the Local Zone is blocked and navigation to other zones is preceded by a warning message that the user can choose to bypass.
To view additional information regarding this technology in the Guide, click the following links:
Introduction to Zone Elevation Blocks
Application Compatibility Issue Mitigation for Zone Elevation Blocks
For more information about Internet Explorer Zone Elevation Blocks, see the Microsoft Web site at
Information Bar
The Information Bar significantly changes the users' browsing experience. Messages that normally appear in dialog boxes now display in the Information Bar. Windows XP Service Pack 2 may block content that is necessary to complete specific tasks, and the Information Bar provides the notification area in these instances.
Applications that automatically navigate users to pages for add-on install, or content download, may experience issues. Navigation may be halted until the user allows it through the Information Bar menu. This change can cause compatibility issues because processing could occur out of order.
The Information Bar options vary, and depend on the original blocked feature. These options include allowing a download to continue or a pop-up window to display.
The first time the Information Bar displays any messages, a dialog box appears that explains the purpose of the Information Bar. Users can elect not to receive further notifications. Figure 2.5 shows this dialog box.
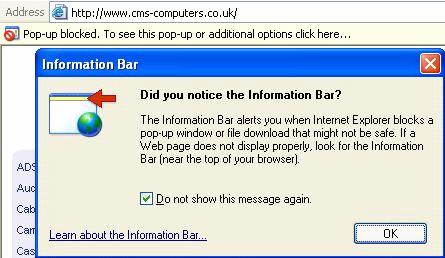
Figure 2.5
Dialog box informing the user about the Information Bar
To view additional information regarding this technology in the Guide, click the following links:
Introduction to the Information Bar
Application Compatibility Issue Mitigation for the Information Bar
For more information about Internet Explorer Information Bar, see the Microsoft Web site at
Pop-up Management
The Pop-Up blocker blocks pop-up windows by default, unless the user is in the intranet zone. Otherwise the user specifically allows the pop-up to appear. The Information Bar then shows when a pop-up is blocked. Applications or sites that use pop-up windows are blocked unless specifically allowed from the Information Bar. If the pop-up window performs data processing, for example, this processing may now occur out of order and cause the application to fail. Alternatively, if the user does not allow the pop-up to appear the application may function as previously experienced.
![]()
Figure 2.6
Information bar showing Pop-up has been blocked
Introduction to Pop-up Management
Application Compatibility Issue Mitigation for Pop-up Management
For more information about Internet Explorer Pop-up Blocker, see the Microsoft Web site at
Add-on Management
If an application installs add-ons for Internet Explorer they appear in the Add-on Management interface. It is possible that the add-ons could make the application running in Internet Explorer unstable. Windows XP Service Pack 2 includes Add-on Crash Detection that can identify and allow a user to disable problematic add-ons. Disabling an add-on does not remove it from the computer. If an attempt is made to instantiate a blocked ActiveX control, a Yellow Shield icon appears in the Internet Explorer status bar. Clicking the icon displays the manage add-ons dialog. Applications that attempt to access disabled ActiveX controls may not operate as expected.
To view additional information regarding this technology in the Guide, click the following links:
Introduction to Add-on Management
Application Compatibility Issue Mitigation for Add-on Management
For more information about Internet Explorer Add-on Management and Crash Detection, see the Microsoft Web site at
Windows Firewall
The default setting for Windows Firewall is to block any inbound communication. External applications that initiate contact with the client computer, such as management systems, fail. Applications that receive initial contact from the client but then attempt to open an additional port on the client, such as active FTP, also fails. This behavior means that remote system management and automated downloading of content to the client, such as virus updates, may fail.
The following Knowledge Base (KB) article, KB 884130, provides information about Programs that may behave differently in Windows XP Service Pack 2, can be found at
https://support.microsoft.com/default.aspx?kbid=884130
In addition, the following KB article, Some programs seem to stop working after you install Windows XP Service Pack 2, can be found at
https://support.microsoft.com/default.aspx?kbid=842242
Client computers may also not be able to act as Web or file and
print servers without further configuration. Testing network connectivity by
sending
The dialog box that Windows Firewall generates to indicate an application is attempting to allow inbound communication is shown in Figure 2.7.
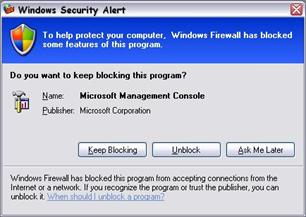
Figure 2.7
Dialog box informing an administrator that an application attempted to allow a connection from an external source
If the user is an administrator the dialog gives the option of unblocking the application, otherwise the message is informational. A user with administrative privileges can allow an end user to suppress further notifications for attempts to open a port by the same program, as shown in Figure 2.8.
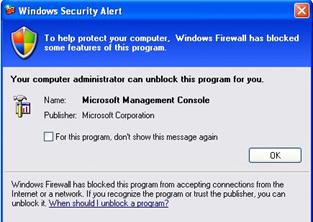
Figure 2.8
Dialog box informing a user that an application attempted to allow a connection from an external source. This dialog box allows the user to suppress further notifications from this application
The Windows Firewall has a Default Boot Policy applied when the system starts up. This allows DHCP, DNS and Domain logon operations to perform normally. Once the system is up and running, the Run-time Policy is applied and any configuration is set, such as enabling remote management or a local server component, for example, as an FTP or HTTP server. Administrators should be aware that if the Windows Firewall Service fails to start, the Boot Policy remains in effect and no incoming communication is accepted, which makes remote diagnostics difficult.
To view additional information regarding this technology in the Guide, click the following links:
Introduction to Windows Firewall
Application Compatibility Issue Mitigation for Windows Firewall
For more information about Windows Firewall, see the Microsoft Web site at
For more information about Deploying Windows Firewall Settings for Microsoft Windows XP Service Pack 2, see the Microsoft Web site at
For more information about Troubleshooting Windows Firewall in Microsoft Windows XP Service Pack 2, see the Microsoft Web site at
Data Execution Prevention
Data execution prevention (DEP) is a set of hardware and software technologies that perform additional checks on memory to help protect against malicious code exploits.
By default, DEP is configured to only protect core Windows applications and services. In this default configuration, application compatibility issues are limited to applications that extend core Windows components or run in host processes that are a core part of Windows.
Some application behaviors are expected to be incompatible with DEP. Applications that perform dynamic code generation (such as Just-In-Time code generation) and that do not explicitly mark generated code with Execute permission might have compatibility issues with DEP. Applications that are not built with SafeSEH must have their exception handlers located in executable memory regions.
Another application compatibility concern is physical address extension (PAE) mode. Processors that support hardware-enforced DEP are required to run in PAE mode in order for hardware-enforced DEP to be functional. Although some drivers may have compatibility issues with PAE mode, PAE mode in Windows XP Service Pack 2 has been changed to minimize impact to driver compatibility.
For more information on compatibility issues with DEP, see "Changes to Functionality in Microsoft Windows XP Service Pack 2" at
https://www.microsoft.com/technet/prodtechnol/winxppro/maintain/sp2chngs.mspx
If a program that is a core component of Windows encounters a problem with DEP, the user sees a dialog similar to the one shown in Figure 2.9.
Figure 2.9
User warning when a core Windows component encounters a problem with DEP
However, if an application that is not a core component of Windows encounters a problem with DEP and the current user is a member of the Local Administrators group, the user sees a dialog similar to the one shown in Figure 2.10.
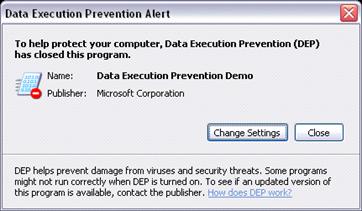
Figure 2.10
Administrator warning when an application encounters a problem with DEP
To view additional information regarding DEP in this Guide, click the following links:
Application Compatibility Issue Mitigation for DEP
DCOM/RPC
The changes to DCOM and RPC may cause problems if the Windows XP system is an application server. When a system is upgraded, all application-specific permissions are maintained but the new system-wide permission limits are added. Table 2.2 shows the default system-wide permission limits.
Table 2.2 DCOM Access Permissions Matrix
|
Permission |
Administrator |
Everyone |
Anonymous |
|
Launch and Activation |
Local Launch |
Local Launch | |
|
Access |
Local Access |
Local Access |
These new permission limits allow the Everyone group to have Local Launch, Activation and Access permissions. The remote permissions for the Everyone group are limited to Access. Therefore, the remote COM application must already be launched and activated for a non-administrative user to access it.
For more information, see:
https://msdn.microsoft.com/library/en-us/com/htm/reg_1166.asp
https://msdn.microsoft.com/library/en-us/com/htm/reg_1226.asp
Table 2.3 shows the default permissions for a pre Service Pack 2 Windows XP computer.
Table 2.3 Default Permissions for a Pre Service Pack 2 Windows XP Computer
|
Permission |
Administrator |
Interactive |
System |
|
Launch |
P |
P |
P |
|
Access |
P |
Local access scenarios should not incur compatibility issues. Because of the inclusion of the system wide security, you may experience compatibility issues if you have a COM server application that meets one of the following criteria:
The application is not normally launched through COM, and the access permission for the application is less stringent than the launch permission.
The application is usually activated on a computer running Windows XP by a remote COM client without using an administrative account.
The application uses unauthenticated remote callbacks on a computer running Windows XP, by default.
For these applications, the user experience depends on the network implementation. Applications should be tested for errors before rolling out Windows XP Service Pack 2 and any issues mitigated by changing the default DCOM access permissions or rewriting the application. To identify compatibility issues the System and Application event logs can be queried and CallFailureLogging can be implemented by creating the following registry value:
HKEY_LOCAL_MACHINE\SOFTWARE\Microsoft\Ole\CallFailureLoggingLevel
Set the value data to:
1 - Always log event log failures during a call in the COM Server process
2 - Never log event log failures during a call in the call server process
This registry key is not present by default; however a missing key or value is interpreted as 2.
Call failure is not logged by default. If you change this value to 1 to start logging this information to help you troubleshoot an issue, be sure to monitor the size of your event log as this is an event that can generate a large number of entries.
For more information, see:
https://msdn.microsoft.com/library/en-us/com/htm/reg_0t9o.asp
https://msdn.microsoft.com/library/en-us/com/htm/reg_3gks.asp
https://msdn.microsoft.com/library/en-us/com/htm/reg_3p9o.asp
RPC applications may also fail if the client attempts to make anonymous calls to remote computers. Windows XP Service Pack 2 includes the RestrictRemoteClients registry key that modifies the behavior of security applied to RPC interfaces. If an application makes remote anonymous calls to the Windows XP Service Pack 2 computer the application may fail with network errors.
To view additional information regarding this technology in the Guide, click the following links:
Application Compatibility Issue Mitigation for DCOM/RPC
For more information about DCOM Security Enhancements, see the Microsoft Web site at
For more information about RPC Interface Restriction, see the Microsoft Web site at
Changes to DCOM and Windows Firewall directly affect deployments of SMS.
For more about SMS Clients Frequently Asked Questions information, see the Microsoft Web site at
https://www.microsoft.com/technet/prodtechnol/sms/sms2003/techfaq/tfaq03.mspx
Windows Firewall may also affect applications based on SQL Server.
For more information about How Windows XP Service Pack 2 (SP2) Affects SQL Server and MSDE, see the Microsoft Web site at
https://www.microsoft.com/sql/techinfo/administration/2000/security/winxpsp2faq.asp
Attachment Execution Service
Attachment Execution Service (AES) is a new feature for Service Pack 2 and because applications have to be written specifically to interact with AES, there will not be any direct application compatibility issues. Users receive more informative download dialog boxes in Outlook® Express and Internet Explorer and the list of blocked file types is extended. Executable attachments sent from publishers who have been blocked in the Add-on Management console are not available for download.
Outlook Express blocks certain attachments types by default. The user sees the attachment and its size, but the file itself is unavailable. Figure 2.11 shows an example of a blocked attachment.
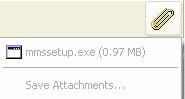
Figure 2.11
Blocked attachment. Attachment Manager is preventing the user from saving an unsafe attachment
If the Administrator chooses to allow users to download
attachment types, such as, .exe and .hta, AES handles the attachment and warns
the user. The attachment or application is handled slightly differently if it
has a digital signature. If the application has a digital signature that
verifies the publisher, then you see the dialog box shown in
Figure 2.12.
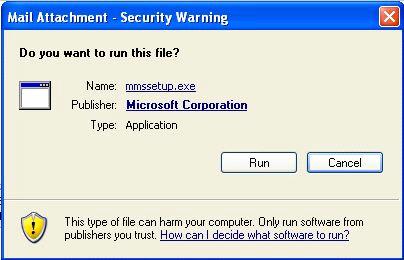
Figure 2.12
AES informs the user that a mail attachment has a digital signature
The Publisher link allows the user to check the signature and
decide if they want to run the program. The Digital Signature Details dialog
box then appears, as shown in
Figure 2.13

Figure 2.13
The user checks the publisher details to decide if the attachment is from a trustworthy source
If the application does not have a digital signature the dialog in Figure 2.14 appears.
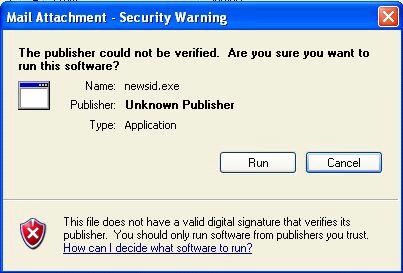
Figure 2.14
This attachment does not have any publisher information to assist the user
This dialog box warns the user against running the application. Ultimately the choice and responsibility is still with the user.
The Attachment Execution Service also protects the user if they save the attachment locally and then try to run the application. In this case, the user also receives a warning message.
Figure 2.15 shows the warning when trying to run a downloaded file.
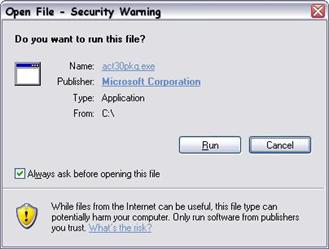
Figure 2.15
Warning message when trying to run a downloaded file
Introduction to Attachment Execution Service
Application Compatibility Issue Mitigation for Attachment Execution Service
For more information about Internet Explorer Download, Attachment, and Authenticode Enhancements, see the Microsoft Web site at
Outlook Express
Outlook Express specifically uses the additional enhancements in Windows XP Service Pack 2, for downloading pictures and running in plain text mode.
For more information about Changes to Functionality in Microsoft Windows XP Service Pack 2, Part 4: E-mail Handling Technologies, see the Microsoft Web site at
Picture Downloads
Outlook Express now has picture handling facilities similar to Outlook 2003. This prevents senders of spam e-mail from determining whether a recipient opens a message. It does this by preventing the automatic display of pictures from Internet servers. The user is presented with place holders and the Information Bar gives the user the option to display the picture. Figure 2.16 shows the prompt that the user receives.
![]()
Figure 2.16
Blocking picture downloads in Outlook Express now matches Outlook 2003
Plain Text Mode
Plain text mode is now the default setting with Outlook Express in Windows XP Service Pack 2. In plain text mode, Outlook Express uses the rich edit control rather than the MSHTML control. This avoids some security issues that result from the use of MSHTML by using the rich edit control. You can reduce the attack surface by operating in Plain Text Mode.
The following Outlook Express features are not available when running in plain text mode:
Changing text size
Full text searching through the body of a mail message
Windows Messenger
Windows Messenger is another application to use the Attachment Manager, which brings security improvements to Windows Messenger, such as blocking file transfers with certain file types. You are now prompted before opening the following file types:
Microsoft Office files, such as .doc, .ppt, .xls
Files from other applications, such as, .zip, .wpd, and .pdf
Computer applications, programs, or any file that contains software code or script, including macros, executables, and JavaScript
Files with extensions .exe, .cmd, .wsh, .bat, .vb, .vbs; .pif, .scr, and .scf
Windows Messenger no longer allows the display name and e-mail address of the user to be identical. Users are unable to log on until they change their display names.
Summary
You have now covered how to test for and identify the effects that installing Windows XP Service Pack 2 can have on application compatibility. You have reviewed the recommended approach for application compatibility testing and covered the detailed issues that this service pack can introduce. In the next chapter you are now going to examine methods of mitigating Application Compatibility issues.
Chapter 3 - Mitigating Application Compatibility Issues
Introduction
Now that you have finished testing applications and identified any compatibility issues, your next step is to overcome these incompatibilities. The best approach is to redevelop or upgrade the incompatible software to make it compliant with the better security baseline provided by Service Pack 2 A short term fix, however, is often required until a more permanent solution can be implemented. This short term approach allows the applications to operate by selectively reducing the security settings that Windows XP Service Pack 2 implements.
This chapter describes mitigation techniques that use a combination of the user interface, scripts and Active Directory Group Policy. Mitigation includes implementing a compatibility timeline to track the deployment of mitigation fixes. Once full application compatibility has been achieved through rewriting or upgrading applications, the reduced security settings can be removed.
For more detail on changes and enhancements to Group Policy settings for Windows XP Service Pack 2, see the Microsoft Web site at
Applying Mitigation Fixes
Applying mitigation fixes to computers running Windows XP Service Pack 2 requires a cautious approach with full awareness of the implications of making any changes. Changes to security settings in Service Pack 2 should be carried out only in response to specific application compatibility issues and should weaken security only to the extent required to maintain application functionality.
Internet Explorer
Internet Explorer has the largest number of improvements in Windows XP Service Pack 2. Because Internet Explorer is a popular front end for Web applications, these new
features are likely to affect application functionality. This section contains mitigation techniques for the following Internet Explorer features:
Feature Control
UrlAction security
Binary behaviors
Local machine lockdown
MIME handling
Object caching
Windows restrictions
Zone elevation blocks
Information bar
Pop-up management
Add-on management
Feature Control
Feature Control controls many of the security features in Service Pack 2 that affect Internet Explorer by specifically enabling or disabling security configurations. If the Feature Control setting is enabled then security features can be controlled using Service Pack 2 functionality.
Feature Control does not directly configure the security setting for the individual features, but allows the configuration to take effect. It is possible to use Feature Control to enable individual applications to opt in or out of implementing security settings. This flexibility allows administrators to lessen security in specific areas that may cause incompatibility and provides a simple switch for security configurations.
Note: If the Feature Control setting is disabled then Internet Explorer behavior reverts to that in Windows XP Service Pack 1.
There are several ways to configure Feature Control in Service Pack 2. These are:
Using the Security Settings dialog box.
Creating and executing a RegFile.
Running a script.
Implementing Active Directory Group Policy.
These options give you the ability to select the most appropriate method for your environment.
Using the Security Settings Dialog Box
You can configure the features within the user interface, through Control Panel, on the Internet Options applet and the Security tab in the Internet Options dialog box. The Custom Level button displays the Security Settings dialog shown in Figure 3.1.
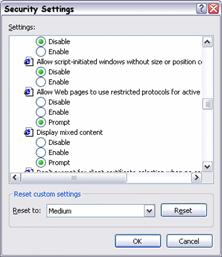
Figure 3.1
Internet Explorer Security Settings dialog box
On the same tab you can configure zone membership by selecting the relevant zone and the Sites button. Figure 3.2 shows an example of the Restricted sites dialog box for adding sites to this security zone.
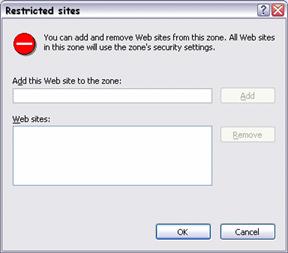
Figure 3.2
Restricted Sites configuration interface
The combination of these interfaces enables manual configuration of security zones and the features in each zone.
Using Registry Editor
You can configure security features directly using Regedit, the Windows XP registry editor, although, using Regedit is not a recommended method of configuration. Use a script or .reg file to make the necessary changes once the required registry locations are identified. Start Regedit then navigate to the following key:
HKEY_LOCAL_MACHINE\SOFTWARE\Microsoft\Internet Explorer\Main\FeatureControl
This key contains a child key for each feature. Figure 3.3 shows the contents of the Feature Control registry key.
Figure 3.3
Feature Control Registry Key and Subkeys
Each feature-specific key contains values for individual settings. Entering a value of 1 enables the Service Pack 2 security configuration for the relevant feature. A value of 2 configures the feature to behave as with Service Pack 1. The "*" value provides a default configuration for all processes that are not specifically defined.
The values for each individual feature key are similar to the ones shown in Figure 3.4.
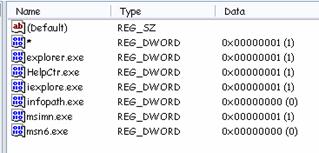
Figure 3.4
Feature specific registry key values showing configuration for individual processes
Creating and Executing a RegFile
You can use Regedit to export a specific feature key to a .reg file. This file can be edited using any text editor and then imported to the registry on the target computer by executing the .reg file. Figure 3.5 shows the contents of a typical registry export file.
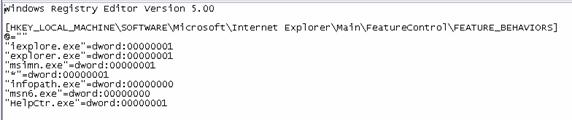
Figure 3.5
The contents of a .reg file exported from the Feature Behaviors registry key
A good method of producing the .REG file is for an administrator to configure a test computer before exporting the relevant key(s).
Running a Script
Alternatively you can write a script to edit the registry and implement the required configuration. The following listing provides an example of a suitable script.
Set WshShell = CreateObject("Wscript.Shell")
WshShell.RegWrite "HKEY_LOCAL_MACHINE\SOFTWARE\Microsoft\Internet Explorer\Main\FeatureControl\FEATURE_BEHAVIORS\MyApp.exe", "1", "REG_DWORD"
Implementing Active Directory Group Policy
Active Directory Group Policy provides an easy way for administrators to roll out security settings to multiple computers. The Feature Control settings for Internet Explorer are in both Computer and User configurations under the following path:
Administrative Templates\Windows Components\Internet Explorer\Security Features
Figure 3.6 shows the Feature Control settings in Group Policy.
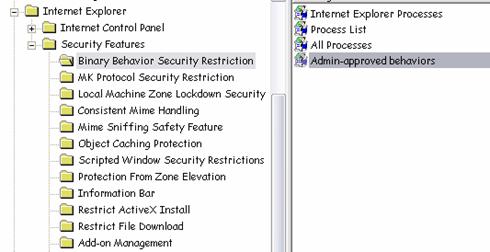
Figure 3.6
Active Directory Group Policy Settings for Feature Control
Here you can specify whether Service Pack 2 secure configuration applies to specific processes for each feature. For some features, Group Policy provides additional feature-specific configuration. For example, Binary Behaviors allows a list of Admin-approved Behaviors, Add-on Management provides a specific add-on list and the Network Protocol Lockdown can be configured for each Internet Explorer Security Zone.
To view additional information regarding this technology in the Guide, click the following links:
Introduction to Feature Control
Application Compatibility Testing for Feature Control
UrlActions
A number of the features that this guide covers are configured using UrlAction security. Prior to Service Pack 2 these features were configurable on a zone-by-zone basis, but required the Internet Explorer Administration Kit (IEAK) to deliver configuration settings to multiple systems as part of a security policy. In Windows XP Service Pack 2 this functionality is now included in the Group Policy Management Console (GPMC), though configuration is still possible through the user interface, using scripts, or by importing .reg files.
Like the Feature Control settings, you can configure UrlActions from the Security tab in the Internet Options interface. Figure 3.7 shows the Internet Explorer Security Settings dialog box for a specific security zone
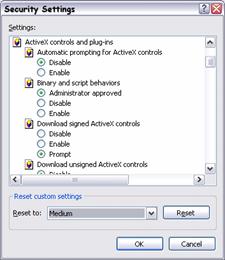
Figure 3.7
Internet Explorer Security Zone Settings
From this interface it is possible to enable or disable different UrlActions in each zone. Using the Security Settings and the Sites dialog boxes you can organize UrlActions and site memberships to provide fewer compatibility issues.
You can also configure UrlActions by direct access to the registry using scripts or .reg files. The registry defines each security zone at the following key:
HKEY_LOCAL_MACHINE\SOFTWARE\Microsoft\Windows\CurrentVersion\Internet Settings\Zones
The Zones key has 5 child keys, numbered 0 to 4 that contain the configuration for each security zone:
0 - Local Machine
1 - Intranet
2 - Trusted Sites
3 - Internet
4 - Restricted Sites
You can use the following registry key to configure Local Machine Lockdown:
HKEY_LOCAL_MACHINE\SOFTWARE\Microsoft\Windows\CurrentVersion\Internet Settings\Lockdown-Zones\0
Each zone key contains every configurable action for that zone. Figure 3.8 shows the registry keys and values that store Security Zone configuration.
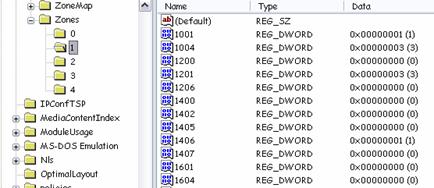
Figure 3.8
Security Zone Configuration Stored in the Registry
UrlActions are represented by a numerical value in the registry. Table 3.1 links the UrlAction name with the numbers displayed in the registry.
Table 3.1 UrlActions and Associated Numeric Identifier
|
URLaction Flag Name |
Security Setting User UI |
Numeric Identifier |
|
URLACTION_DOWNLOAD_SIGNED_ACTIVEX |
Download signed ActiveX controls |
1001 |
|
URLACTION_DOWNLOAD_UNSIGNED_ACTIVEX |
Download unsigned ActiveX controls |
1004 |
|
URLACTION_ACTIVEX_RUN |
Initialize and script ActiveX controls not marked as safe |
1200 |
|
URLACTION_ACTIVEX_OVERRIDE_OBJECT_SAFETY |
Run ActiveX controls and plugins |
1201 |
|
URLACTION_SCRIPT_RUN |
Active scripting |
1400 |
|
URLACTION_SCRIPT_JAVA_USE |
Scripting of Java applets |
1402 |
|
URLACTION_SCRIPT_SAFE_ACTIVEX |
Script ActiveX controls marked safe for scripting |
1405 |
|
URLACTION_CROSS_DOMAIN_DATA |
Access data sources across domains |
1406 |
|
URLACTION_SCRIPT_PASTE |
Allow paste operations via script |
1407 |
|
URLACTION_HTML_SUBMIT_FORMS |
Submit non-encrypted form data |
1601 |
|
URLACTION_HTML_FONT_DOWNLOAD |
Font download |
1604 |
|
URLACTION_HTML_USERDATA_SAVE |
Userdata persistence |
1606 |
|
URLACTION_HTML_SUBFRAME_NAVIGATE |
Navigate sub-frames across different domains |
1607 |
|
URLACTION_HTML_META_REFRESH |
Allow |
1608 |
|
URLACTION_HTML_MIXED_CONTENT |
Display mixed content |
1609 |
|
URLACTION_SHELL_INSTALL_DTITEMS |
Installation of desktop items |
1800 |
|
URLACTION_SHELL_MOVE_OR_COPY |
Drag and drop or copy and paste files |
1802 |
|
URLACTION_SHELL_FILE_DOWNLOAD |
File download |
1803 |
|
URLACTION_SHELL_VERB |
Launching applications and files in an IFRAME |
1804 |
|
URLACTION_SHELL_POPUPMGR |
Use Pop-up blocker |
1809 |
|
URLACTION_NETWORK_MIN |
Logon |
1A00 |
|
URLACTION_CLIENT_CERT_PROMPT |
Do not prompt for client certificate selection when no certificates or only one certificate exists |
1A04 |
|
URLACTION_JAVA_PERMISSIONS |
Java permissions |
1C00 |
|
URLACTION_CHANNEL_SOFTDIST_PERMISSIONS |
Software channel permissions |
1E05 |
|
URLACTION_BEHAVIOR_RUN |
Script and Binary Behaviors |
2000 |
|
URLACTION_MANAGED_SIGNED |
Run .NET Framework-reliant components signed with Authenticode |
2001 |
|
URLACTION_MANAGED_UNSIGNED |
Run .NET Framework-reliant components not signed with Authenticode |
2004 |
|
URLACTION_FEATURE_MIME_SNIFFING |
Open files based on content, not file extension |
2100 |
|
URLACTION_FEATURE_ZONE_ELEVATION |
Web sites in less privileged Web content zones can navigate into this zone |
2101 |
|
URLACTION_FEATURE_WINDOW_RESTRICTIONS |
Allow script-initiated windows without size or position constraints |
2102 |
|
URLACTION_AUTOMATIC_DOWNLOAD_UI |
Automatic prompting for file downloads |
2200 |
|
URLACTION_AUTOMATIC_ACTIVEX_UI |
Automatic prompting for ActiveX controls |
2201 |
|
URLACTION_ALLOW_RESTRICTEDPROTOCOLS |
Allow active content over restricted protocols to access my computer |
2300 |
Table 3.2 combines the UrlAction numeric identifiers with possible configuration values.
Table 3.2 UrlAction Number Names and Configuration Options
|
Name |
UrlAction policy setting options |
|
1001 |
"Enable"=0x00000000 "Disable"=0x00000003 "Prompt"=0x00000001 |
|
1004 |
"Enable"=0x00000000 "Disable"=0x00000003 "Prompt"=0x00000001 |
|
1200 |
"Administrator approved"=0x00010000 "Enable"=0x00000000 "Disable"=0x00000003 "Prompt"=0x00000001 |
|
1201 |
"Enable"=0x00000000 "Disable"=0x00000003 "Prompt"=0x00000001 |
|
1400 |
"Enable"=0x00000000 "Disable"=0x00000003 "Prompt"=0x00000001 |
|
1402 |
"Enable"=0x00000000 "Disable"=0x00000003 "Prompt"=0x00000001 |
|
1405 |
"Enable"=0x00000000 "Disable"=0x00000003 "Prompt"=0x00000001 |
|
1406 |
"Enable"=0x00000000 "Disable"=0x00000003 "Prompt"=0x00000001 |
|
1407 |
"Enable"=0x00000000 "Disable"=0x00000003 "Prompt"=0x00000001 |
|
1601 |
"Enable"=0x00000000 "Disable"=0x00000003 "Prompt"=0x00000001 |
|
1604 |
"Enable"=0x00000000 "Disable"=0x00000003 "Prompt"=0x00000001 |
|
1606 |
"Enable"=0x00000000 "Disable"=0x00000003 |
|
1607 |
"Enable"=0x00000000 "Disable"=0x00000003 "Prompt"=0x00000001 |
|
1608 |
"Enable"=0x00000000 "Disable"=0x00000003 |
|
1609 |
"Enable"=0x00000000 "Disable"=0x00000003 "Prompt"=0x00000001 |
|
1800 |
"Enable"=0x00000000 "Disable"=0x00000003 "Prompt"=0x00000001 |
|
1802 |
"Enable"=0x00000000 "Disable"=0x00000003 "Prompt"=0x00000001 |
|
1803 |
"Enable"=0x00000000 "Disable"=0x00000003 |
|
1804 |
"Enable"=0x00000000 "Disable"=0x00000003 "Prompt"=0x00000001 |
|
1809 |
"Enable"=0x00000000 "Disable"=0x00000003 |
|
1A00 |
"Anonymous logon"=0x00030000 "Automatic logon only in Intranet zone"=0x00020000 "Automatic logon with current user name and password"=0x00000000 "Prompt for user name and password"=0x00010000 |
|
1A04 |
"Enable"=0x00000000 "Disable"=0x00000003 |
|
1C00 |
"High safety"=0x00010000 "Medium safety"=0x00020000 "Low safety"=0x00030000 "Custom"=0x00800000 "Disable Java"=0x00000000 |
|
1E05 |
"High Safety"=0x00010000 "Medium Safety"=0x00020000 "Low Safety"=0x00030000 |
|
2000 |
"Enable"=0x00000000 "Administrator approved"=0x00010000 "Disable"=0x00000003 |
|
2001 |
"Enable"=0x00000000 "Disable"=0x00000003 "Prompt"=0x00000001 |
|
2004 |
"Enable"=0x00000000 "Disable"=0x00000003 "Prompt"=0x00000001 |
|
2100 |
"Enable"=0x00000000 "Disable"=0x00000003 |
|
2101 |
"Enable"=0x00000000 "Disable"=0x00000003 "Prompt"=0x00000001 |
|
2102 |
"Enable"=0x00000000 "Disable"=0x00000003 |
|
2200 |
"Enable"=0x00000000 "Disable"=0x00000003 |
|
2201 |
"Enable"=0x00000000 "Disable"=0x00000003 |
|
2300 |
"Enable"=0x00000000 "Disable"=0x00000003 "Prompt"=0x00000001 |
To configure security zones, use a .reg file from an exported zone key and edit as necessary or use a script to edit the registry directly as shown previously.
For more information about How to Add, Modify, or Delete Registry Subkeys and Values by Using a Registration Entries (.reg) File, see the Microsoft Web site at
https://support.microsoft.com/default.aspx?kbid=310516
You can also use Group Policy to edit the configuration of UrlActions on a zone by zone basis. The UrlAction settings for Internet Explorer are in both Computer and User configurations under the following path:
Administrative Templates\Windows Components\Internet Explorer\Internet Control Panel\Security Page
Figure 3.9 shows the Security Zones configuration in the Group Policy console.
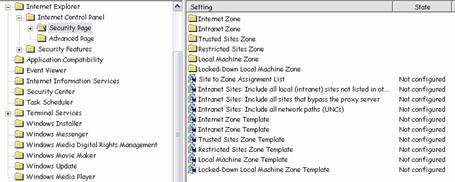
Figure 3.9
Security Zone Configurations in Group Policy
Zone templates can also be configured through the registry or by using Group Policy. These templates allow standard configurations to be applied easily to groups of computers. You can apply the template through the Internet Explorer Security Settings dialog box by selecting the setting you wish to apply and using Reset.
Figure 3.10 shows where to apply a Security Zone template.
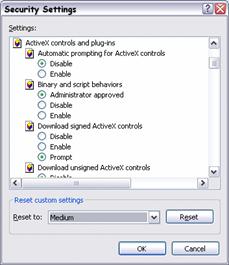
Figure 3.10
Applying a Security Zone Template using the User Interface
The registry holds the template settings in the following key:
HKEY_LOCAL_MACHINE\SOFTWARE\Microsoft\Windows\CurrentVersion\Internet Settings\TemplatePolicies
Again, you can make configuration changes using a .reg file or script. Alternatively use Active Directory Group Policy to configure zone templates at:
Administrative Templates\Windows Components\Internet Explorer\Internet Control Panel\Security Page
Table 3.3 lists the configurable numerical values for these templates.
Table 3.3 Configurable Values for Security Zone Settings
|
Value |
DWord |
Setting |
|
0 |
0x00000000 |
enable |
|
1 |
0x00000001 |
prompt |
|
3 |
0x00000003 |
disable |
|
65536 |
0x00010000 |
high safety |
|
131072 |
0x00020000 |
medium safety |
|
196608 |
0x00030000 |
low safety |
Table 3.4 shows the default configuration for each Security Zone.
Table 3.4 Default Security Zone Settings
|
UrlAction Numeric Name |
High Security Template Restricted Zone |
Medium Security Template Internet Zone |
Medium-Low Security Template Intranet Zone |
Low Security Template Trusted Zone |
Local Machine Zone (LMZ) |
Locked-down LMZ * |
|
1001 |
3 |
1 |
1 |
0 |
0 | |
|
1004 |
3 |
3 |
3 |
1 |
1 |
3 |
|
1200 |
3 |
0 |
0 |
0 |
0 |
3 |
|
1201 |
3 |
3 |
3 |
1 |
1 |
3 |
|
1400 |
3 |
0 |
0 |
0 |
0 |
3 |
|
1402 |
3 |
0 |
0 |
0 |
0 | |
|
1405 |
3 |
0 |
0 |
0 |
0 | |
|
1406 |
3 |
3 |
1 |
0 |
0 | |
|
1407 |
3 |
0 |
0 |
0 |
0 | |
|
1601 |
1 |
1 |
0 |
0 |
0 | |
|
1604 |
1 |
0 |
0 |
0 |
0 | |
|
1606 |
3 |
0 |
0 |
0 |
0 | |
|
1607 |
3 |
0 |
0 |
0 |
0 | |
|
1608 |
3 |
0 |
0 |
0 |
0 | |
|
1609 |
1 |
1 |
1 |
1 |
1 | |
|
1800 |
3 |
1 |
1 |
0 |
0 | |
|
1802 |
1 |
0 |
0 |
0 |
0 | |
|
1803 |
3 |
0 |
0 |
0 |
0 | |
|
1804 |
3 |
1 |
1 |
0 |
0 | |
|
1809 |
0 |
0 |
3 |
3 |
3 | |
|
1A00 |
65536 |
131072 |
131072 |
0 |
0 | |
|
1A04 |
3 |
3 |
0 |
0 |
0 |
3 |
|
1C00 |
0 |
65536 |
131072 |
196608 |
196608 |
0 |
|
1E05 |
65536 |
131072 |
131072 |
196608 |
196608 | |
|
2000 |
3 |
0 |
0 |
0 |
0 |
65536 |
|
2001 |
3 |
0 |
0 |
0 |
3 |
3 |
|
2004 |
3 |
0 |
0 |
0 |
3 |
3 |
|
2100 |
3 |
0 |
0 |
0 |
0 |
3 |
|
2101 |
0 |
0 |
0 |
1 |
3 |
3 |
|
2102 |
3 |
3 |
0 |
0 |
0 |
3 |
|
2200 |
3 |
3 |
0 |
0 |
0 |
3 |
|
2201 |
3 |
3 |
0 |
0 |
0 |
3 |
|
2300 |
3 |
1 |
1 |
1 |
1 |
N/A |
Use Feature control and UrlActions together to configure security settings in Internet Explorer security zones. If you experience compatibility issues with applications, try changing security settings for the specific zone without softening security for the computer as a whole. If necessary, use feature control to disable or enable a security feature for specific processes only.
To view additional information regarding this technology in the Guide, click the following links:
Application Compatibility Testing for UrlActions
Binary Behaviors
Binary Behaviors can either be enabled or disabled using Feature Control and UrlAction security, as described earlier in this guide.
To view additional information regarding this technology in the Guide, click the following links:
Application Compatibility Issue Mitigation for Feature Control
Application Compatibility Issue Mitigation for UrlActions
As well as allowing binary behaviors in specific zones, it is possible to also configure an Admin-approved list of specific behaviors using the following registry key:
HKEY_LOCAL_MACHINE\SOFTWARE\Microsoft\Windows\CurrentVersion\Internet Settings\Allowed Behaviors\#%Namespace%#%Behavior%=DWORD:00000001
Replace the Namespace and Behavior variables as appropriate. It is then possible to use the Admin-approved setting rather than to enable or disable all binary behaviors.
To view additional information regarding this technology in the Guide, click the following links:
Introduction to Binary Behaviors
Application Compatibility Testing for Binary Behaviors
Local Machine Lockdown
Applications that host local HTML files in Internet Explorer are likely to be affected by local machine security. Local machine lockdown can be configured using feature control and UrlAction security as explained earlier in this guide.
To view additional information regarding this technology in the Guide, click the following links:
Application Compatibility Issue Mitigation for Feature Control
Application Compatibility Issue Mitigation for UrlActions
For Internet Explorer the feature is enabled by default. You can use Active Directory Group Policy to allow active content from CDs to run without being prompted.
Figure 3.11 shows the location of the setting in Group Policy.

Figure 3.11
Using Group Policy to allow active content from CD
Developers may previously have expected to be able to use the local zone to run active content, such as scripts and ActiveX controls. With Windows XP Service Pack 2 this approach may now fail. Use the following mitigation techniques to allow the application to continue to function.
Because the local machine zone is now more restrictive than other zones, applications can use the "mark of the Web" comment in HTML files. This feature of Internet Explorer allows HTML files to be forced into a security zone other than the local zone, so that scripts or ActiveX components can run based on a different security policy. This setting works on Internet Explorer 4 and later.
To identify HTML as downloaded from a specific domain (and therefore have the security settings of the zone containing the domain applied to it) add the following comment with the relevant domain name:
<!--saved from url=(0022)https://www.microsoft.com-->
The number in parentheses relates to the length of the URL.
To make sure the page is always treated as part of a specific zone, add the following comment with the relevant zone name:
<!--saved from url=(0013)about:internet-->
To view additional information regarding this technology in the Guide, click the following links:
Introduction to Local Machine Lockdown
Application Compatibility Testing for Local Machine Lockdown
MIME Handling
To work with the new MIME handling security, Web servers must define consistent content-type headers and file name extensions. An alternative to this is to add the Content-disposition=attachment: HTTP header. This element sends the file directly to its extension handler rather than to the MIME handler. If an application uses Internet Explorer to execute files that the MIME handler rejects, you can change this behavior programmatically so that the MIME handler is capable of handling the file.
If this approach is not possible, then you can make Internet Explorer ignore the MIME handler in the event of a MIME/Extension mismatch, by adding the ProgID of the MIME handler to the following area of the registry
HKEY_CLASSES_ROOT\PROG_ID_OF_MIMEHANDLER_TO_IGNORE\PreferExecuteOnMisMatch=DWORD:00000001
If the ProgID of the MIME handler and the extension handler are mismatched, a developer can remove the MIME handlers' ProgID registration. In this event if the MIME handler and the extension handler come from the same CLSID, even if the MIME handler rejects the file, Internet Explorer allows the file to execute in the extension handler.
To prevent additional file download prompts due to the MIME handler being associated with a file in the AssocIsDangerous list, register the relevant MIME handler as secure at:
HKEY_LOCAL_MACHINE\Software\Microsoft\Windows\CurrentVersion\InternetSettings\Secure_MIME_Handlers
This key should contain a value where the value name is the ProgID of the MIME handler and value data of 00000001 and type DWORD.
If MIME sniffing causes use of inappropriate file type handlers, turn the feature off for the relevant zone, if possible, as described earlier in this guide.
MIME sniffing is controlled by the Open files based on content not file extension setting.
To view additional information regarding this technology in the Guide, click the following links:
Application Compatibility Testing for MIME Handling
Object Caching
The more restrictive object caching model can cause compatibility issues for applications. In this case, you can use Feature Control to disable the Service Pack 2 configuration of this feature or use UrlAction security to configure object caching on a zone by zone basis, as described in earlier sections in this guide.
Alternatively the developer can rewrite the application code to re-cache the object before the object is accessed.
To view additional information regarding this technology in the Guide, click the following links:
Introduction to Object Caching
Application Compatibility Testing for Object Caching
Window Restrictions
If the restriction on script-initiated windows causes application compatibility issues, you can use Feature Control to disable the Service Pack 2 configuration of this feature, or use UrlAction security to configure Windows Restrictions on a zone by zone basis, as described in earlier sections in this guide.
To view additional information regarding this technology in the Guide, click the following links:
Introduction to Window Restrictions
Application Compatibility Testing for Window Restrictions
Zone Elevation Blocks
If zone elevation blocks cause application compatibility issues in trusted Web pages you can use Feature Control to disable the Service Pack 2 configuration for the feature, or use UrlAction security to disable the feature on a zone by zone basis, (or site by site), as described in earlier sections in this guide.
To view additional information regarding this technology in the Guide, click the following links:
Introduction to Zone Elevation Blocks
Application Compatibility Testing for Zone Elevation Blocks
Information Bar
The Information Bar displays information relating to a number of events.
Add-on Install Prompts
Many Web pages or applications rely on users installing code to function correctly. If the Information Bar causes users to miss installation options, developers should ensure that the page the users are redirected to provides the installation ActiveX control. Table 3.5 summarizes the information that the add-on install prompt provides.
Table 3.5 Information Provided by the Add-on Install Prompt
|
Information Bar Element |
Message Text |
|
Information Bar Text |
To help protect your security, Internet Explorer stopped this site from installing software on your computer. Click here for more options. |
|
Short Text |
Software Install Blocked |
|
Menu Options |
Install Software. What is the risk? |
Pop-up Blocked Notification
This feature identifies any blocked pop-up windows in the Information Bar. Table 3.6 summarizes the notification options for pop-up blocking.
Table 3.6 Pop-up Blocking Options for the Information Bar
|
Information Bar Element |
Message Text |
|
Information Bar Text |
Pop-up blocked. To see this pop-up or additional options, click here. |
|
Short Text |
Pop-up Blocked |
|
Menu Options |
Show Last Pop-up Allow Pop-ups for this Site Allow Pop-ups Show Information Bar for Blocked Pop-ups(Checked) Pop-up Window Options. |
Automatic Download Prompts
Notifications of automatic downloads that commence without user interaction now appear in the Information Bar rather than in a pop-up dialog. Web pages should include a link, ideally specifying the URL for the content, for users to initiate the file download process. If a script is used to navigate to the resource then this script should run synchronously within the context of the OnClick event handler. Table 3.7 summarizes the notification options for automatic downloads.
Table 3.7 Automatic Download Options for the Information Bar
|
Information Bar Element |
Message Text |
|
Information Bar Text |
To help protect your security, Internet Explorer blocked this site from downloading files to your computer. Click here for more options. |
|
Friendly Notification Text |
File Download Blocked |
|
Menu Options |
Download Software What's the Risk? |
Active Content Blocked
Windows XP Service Pack 2 may block some active content that is required for applications to function. If this occurs, an explanation appears in the Information Bar. Table 3.8 summarizes the notification options for blocking active content.
Table 3.8 Active Content Blocked Options for the Information Bar
|
Information Bar Element |
Message Text |
|
Information Bar Text |
To help protect your security, Internet Explorer has restricted this file from showing active content that could access your computer. Click here for options... |
|
Short Text |
Active Content Blocked |
|
Menu Options |
Allow Blocked Content What's the Risk? |
ActiveX Components Blocked Due to Security Settings
Any information that relates to blocked ActiveX components now shows in the Information Bar. Table 3.9 summarizes the notification options for blocking ActiveX components.
Table 3.9 ActiveX Component Blocking Options for the Information Bar
|
Information Bar Element |
Message Text |
|
Information Bar Text |
Your security settings do not allow ActiveX controls to run on this page. This page may not display correctly. Click here for more options. |
|
Short Text |
Software Blocked |
|
Menu Options |
Allow this site to run ActiveX controls What's the risk? |
Web pages should provide file download prompts for the user to click. Any pages to which a user is redirected should also display information on installing required add-ons. If an upgrade to an add-on is published then the upgrade should have the same Globally Unique Identifier (GUID) as the original file to prevent the reinstall generating a prompt in the Information Bar.
If any compatibility issues arise, you can configure the Information Bar using Feature Control as described earlier in this guide.
To view additional information regarding this technology in the Guide, click the following links:
Introduction to the Information Bar
Application Compatibility Testing for the Information Bar
Pop-up Management
The pop-up blocker can be configured in the user interface by clicking the Tools menu in Internet Explorer. Figure 3.12 shows the pop-up blocker menu in Internet Explorer.
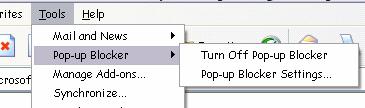
Figure 3.12
Pop-up Blocker Menu in Internet Explorer
Clicking Pop-up Blocker Settings displays the Pop-up Blocker Settings dialog box, as shown in Figure 3.13. This dialog box enables a user to allow pop-ups for specified Web sites.
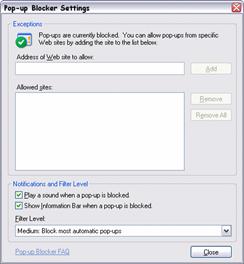
Figure 3.13
Pop-up Blocker Settings User Interface
Note: Pop-ups can be allowed on a temporary basis by holding down the ALT key when clicking a link to the Web page.
The pop-up blocker can be enabled or disabled on a zone by zone basis, by directly editing the registry using methods described earlier in this guide in the section on UrlSecurity.
To view additional information regarding this technology in the Guide, click the following links:
Application Compatibility Issue Mitigation for Feature Control
Application Compatibility Issue Mitigation for UrlActions
You can use Active Directory Group Policy to configure a list of sites that are allowed to use pop-ups even when blocking is enabled using the settings in:
Administrative Templates\Windows Components\Internet Explorer\ Pop-up Allow List
To view additional information regarding this technology in the Guide, click the following links:
Introduction to Pop-up Management
Application Compatibility Testing for Pop-up Management
Add-on Management
You can identify any installed Internet Explorer add-ons using the Manage Add-ons menu option in Internet Explorer. Figure 3.14 shows this menu and the Manage Add-ons dialog box.
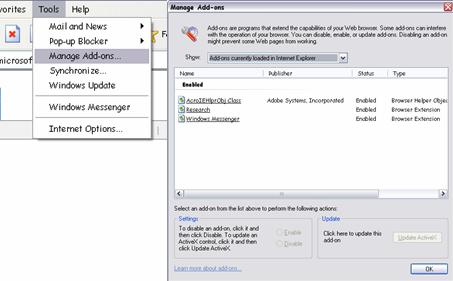
Figure 3.14
Add-on Manager Interface
From the Manage Add-ons interface it is possible to enable or disable add-ons or update ActiveX controls. An administrator can configure three modes for add-on management:
AllowList mode. The administrator specifies allowed add-ons. All others are disallowed and the user cannot change allowed add-ins.
DenyList mode. The administrator specifies disallowed add-ons but all other add-ons can be controlled by the user.
Configuration of these modes can take place through the registry using the following registry key:
Management Mode HKEY_LOCAL_MACHINE\SOFTWARE\Microsoft\Windows\CurrentVersion\Policies\Ext\ManagementMode:DWORD
0 -
1 - AllowList
2 - DenyList
AllowList HKEY_LOCAL_MACHINE\SOFTWARE\Microsoft\Windows\CurrentVersion\Policies\Ext\AllowList
AllowList contains sub keys containing the CLSID of allowed add-ons
DenyList HKEY_LOCAL_MACHINE\SOFTWARE\Microsoft\Windows\CurrentVersion\Policies\Ext\DenyList
DenyList contains sub keys containing the CLSID of denied add-ons.
Alternatively, you can configure add-ons through Active Directory Group Policy using the following path:
Administrative Templates\Windows Components\Internet Explorer\Security Features
To view additional information regarding this technology in the Guide, click the following links:
Introduction to Add-on Management
Application Compatibility Testing for Add-on Management
Windows Firewall
Windows XP Service Pack 2 enables Windows Firewall by default. To allow incoming communication you must open a specific port or place a program in the exception list. If a service or application attempts to listen on a particular port then a dialog box informs the user of this action. If the user has administrative rights the dialog box also provides the option of opening the port.
Global Configuration
You can configure Windows Firewall for all connections from the Properties of any network connection. The Advanced tab gives access to the Settings button. The Windows Firewall dialog box is shown in Figure 3.15.
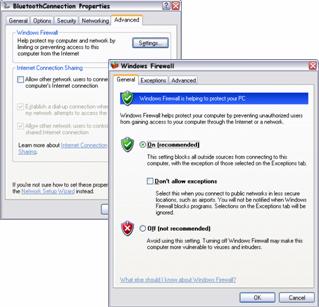
Figure 3.15
Windows Firewall configuration interface
The Windows Firewall dialog box presents several configuration options. On the General tab the firewall can be turned off (not recommended) or put into Don't allow exceptions mode where the exception list is ignored.
The Exceptions tab allows access for a program or to a port on the following basis:
Program. The necessary ports open dynamically when required by the application and close when the application terminates.
Port. The TCP or UDP port remains open while the Windows Firewall or Internet Connection Firewall service is running.
When a program or port is placed in the exceptions list, the scope of access can be defined by clicking the Change Scope button and selecting one of:
Any computer (including those on the Internet)
My network (Subnet) only
Custom list (a list of IP addresses and subnet mask)
Interface Specific Configuration
To configure settings for individual network interfaces, select the Advanced tab, select the required interface and click the Settings button. Figure 3.16 shows the interface-specific configurations for Windows Firewall.
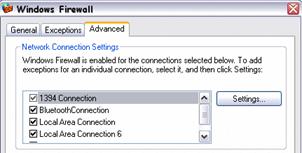
Figure 3.16
Windows Firewall interface specific configuration
To configure Windows Firewall from the command line or scripts use the Netsh Firewall command.
You can configure Windows Firewall settings in Active Directory Group Policy using the settings in the following path:
Administrative Templates\Network\Network Connections\Windows Firewall
Group Policy allows the configuration of the following two profiles, for computers that are members of a domain:
.Domain Policy. This policy takes effect when the computer is logged onto the domain
.Standard Policy. This policy takes effect when the computer is not logged onto the domain
The Standard Policy is useful for mobile workers.
If Windows Firewall causes compatibility issues you may need to open static ports in the firewall or place the application into the exception list. Some useful settings to maintain functionality are:
Prohibit use of Internet Connection Firewall on your DNS domain network. Prevents Windows Firewall from being enabled or configured when connected to the domain that the policy was received from. For example, if a client computer receives a policy from the corp.contoso.com domain, the Windows Firewall will not attempt to filter traffic when connected to the corp.contoso.corp DNS domain.
Windows Firewall: Allow authenticated IPSec bypass. Allows unsolicited incoming traffic from any computer that is authenticated using IPSec. This setting requires IPSec configuration on all relevant computers.
Windows Firewall: Allow remote administration exception. Allows remote administration of this computer using administrative tools, such as the Microsoft Management Console (MMC) and Windows Management Instrumentation (WMI). To do this, Windows Firewall opens TCP ports 135 and 445. Services typically use these ports to communicate using remote procedure calls (RPC) and Distributed Component Object Model (DCOM). This policy setting also allows SVCHOST.exe and LSASS.exe to receive unsolicited incoming messages and allows hosted services to open additional dynamically-assigned ports, typically in the range of 1024 to 1034.
Windows Firewall: Allow file and printer exception. Allows file and printer sharing. To do this, Windows Firewall opens UDP ports 137 and 138, and TCP ports 139 and 445. If you enable this policy setting, Windows Firewall opens these ports so that this computer can receive print jobs and requests for access to shared files. You must specify the IP addresses or subnets from which these incoming messages are allowed. In the Windows Firewall component of Control Panel, the "File and Printer Sharing" check box is selected and administrators cannot clear it.
Windows
Firewall: Allow ICMP exceptions. Defines the set of Internet Control
Message Protocol (ICMP) message types that Windows Firewall allows. Utilities
can use ICMP messages to determine the status of other computers. For example,
Windows Firewall: Allow Remote Desktop exception. Allows this computer to receive Remote Desktop requests. To do this, Windows Firewall opens TCP port 3389. You must specify the IP addresses or subnets from which Remote Desktop requests are allowed. In the Windows Firewall component of Control Panel, the "Remote Desktop" check box is selected and administrators cannot clear it.
Windows Firewall: Define program exceptions and Windows Firewall: Define port exceptions. These two settings allow the pre-configuration of an exception list for deployment to network clients.
Windows Firewall: Allow logging. Allows Windows Firewall to record information about the unsolicited incoming messages that it receives.
Figure 3.17 shows an example of the Windows Firewall log.
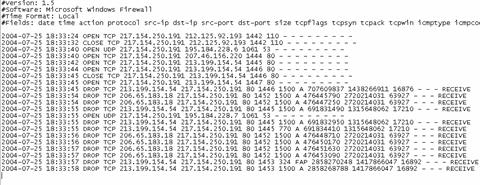
Figure 3.17
Windows Firewall logfile
Programmatically Opening Ports
Independent software vendors (ISV) can place their programs into the exception list during installation by using the INetFWAuthorizedApplication API. ISVs should note that:
An application must be running in the context of a user with Administrator rights to add itself to the Windows Firewall exceptions list.
Ports are automatically opened and closed for allowed Winsock applications, regardless of the user context in which the applications are running.
Applications should get the user's consent before adding themselves to the AuthorizedApplications collection.
Svchost.exe cannot be added to the AuthorizedApplications collection.
For more information about INetFwAuthorizedApplication, see the Microsoft Web site at
https://msdn.microsoft.com/library/default.asp?url=/library/en-us/ics/ics/inetfwauthorizedapplication.asp.
To view additional information regarding this technology in the Guide, click the following links:
Introduction to Windows Firewall
Application Compatibility Testing for Windows Firewall
Data Execution Prevention
Global Configuration
By default, DEP is configured to only protect core Windows applications and services. This configuration policy level is called OptIn. DEP can be configured to use one of four different policy levels as described in Table 3.10.
Table 3.10 The Four Policy Levels of DEP
|
Configuration |
Description |
|
OptIn (default configuration) |
DEP is enabled by default for limited system binaries and applications that "opt-in," With this option, only Windows system binaries are covered by DEP by default. |
|
OptOut |
DEP is enabled by default for all processes. Users can manually create a list of specific applications that do not have DEP applied using System in Control Panel. IT Pros and Independent Software Vendors (ISVs) can use the Application Compatibility Toolkit to opt-out one or more applications from DEP protection. System Compatibility Fixes ("shims") for DEP do take effect. |
|
AlwaysOn |
This provides full DEP coverage for the entire system. All processes always run with DEP applied. The exceptions list for exempting specific applications from DEP protection is not available. System Compatibility Fixes ("shims") for DEP do not take effect. Applications that have been opted-out using the Application Compatibility Toolkit run with DEP applied. |
|
AlwaysOff |
This does not provide any DEP coverage for any part of the system, regardless of hardware DEP support. The processor does not run in PAE mode unless the /PAE option is present in the boot entry. |
Hardware-enforced and software-enforced DEP are configured in the same manner. If the system-wide DEP policy is set to Opt-In, the same Windows core applications and services are protected by both hardware and software-enforced DEP. If the system is not capable of hardware-enforced DEP, the Windows core applications and services are only be protected by software-enforced DEP.
Similarly, if the system-wide DEP policy is set to Opt-Out,
applications that have been exempted from DEP protection are exempted from both
hardware and software-
enforced DEP.
The four system-wide DEP configurations are controlled through boot.ini switches. The Boot.ini settings are as follows:
/noexecute=policy_level
where policy_level is defined as AlwaysOn, AlwaysOff, OptIn, or OptOut.
Any existing /noexecute setting in the Boot.ini file is not changed when Windows XP Service Pack 2 is installed or if a Windows operating system image is moved across computers with and without hardware-enforced DEP support.
During installation of Windows XP Service Pack 2, the OptIn policy level is enabled by default unless a different policy level is specified in an unattended installation. If the /noexecute=policy_level setting is not present in the boot entry for a version of Windows that supports DEP, the behavior is the same as if the /noexecute=OptIn option was included.
End users who are logged on as administrators can manually configure DEP between the OptIn and OptOut policies using the Data Execution Prevention tab inside the System Properties dialog box. The following procedure describes how to manually configure DEP on the computer:
1. Click Start, click Control Panel, and then double-click System.
2. Click the Advanced tab. Then under Performance, click Settings.
3. Click the Data Execution Prevention tab.
4. Click Turn off hardware DEP (software DEP enabled) to select the Opt-in policy.
5. Click Hardware and software DEP enabled for all programs except to select the OptOut policy.
6. Click Add and add the applications that you do not want to use DEP with.
IT professionals can control system-wide DEP configuration with a variety of methods. The Boot.ini file can be modified directly with scripting mechanisms or with the Bootcfg.exe tool that is included as part of Windows XP Service Pack 2.
For unattended installations of Windows XP Service Pack 2, you can use the Unattend.txt file to pre-populate a specific DEP configuration. You can use the OSLoadOptionsVar entry in the [Data] section of the Unattend.txt file to specify a system-wide DEP configuration.
Per-Application Configuration
For the purposes of application compatibility when DEP is set to the OptOut policy level, it is possible to selectively disable DEP for individual 32-bit applications.
End-User Configuration
For end users, the Data Execution Prevention tab in System Properties can be used to selectively disable DEP for an application.
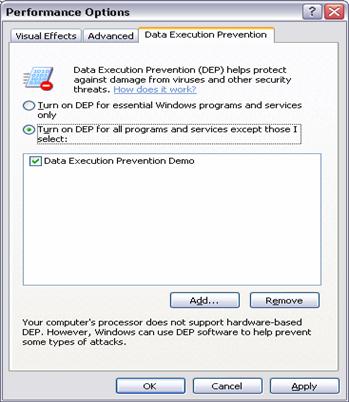
Figure 3.18
Configuring the DEP exception list in System
To add an application to the exceptions list when the DEP policy is set to OptOut, click the Add button and select the program you do not want to use DEP with.
When an application encounters a problem with DEP, the user receives a prompt. If the user is a member of the Local Administrators group, it is possible for the user to exempt the application from DEP protection.
The application that generated the prompt is placed in the DEP exceptions list, but the application is not marked as enabled. Figure 3.19 shows a DEP alert dialog box.
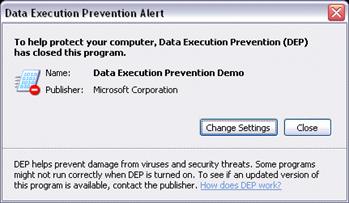
Figure 3.19
Data Execution Prevention Alert
IT Professional Configuration
Disabling DEP for an Application
For Windows XP Service Pack 2 deployments where end-user configuration is not possible or not practical, Windows XP Service Pack 2 provides a new compatibility fix that can be used to disable DEP for a given application. The DisableNX compatibility fix can be applied to an application using the Compatibility Administrator program that is part of the Application Compatibility Toolkit.
Once the DisableNX compatibility fix has been applied to a program using Compatibility Administrator, the resulting Custom Compatibility Database can be deployed to Windows XP Service Pack 2 systems using a variety of methods including logon scripts, Microsoft Systems Management Server (SMS) or Group Policy.
For more information about Using the Application Compatibility Toolkit, see the Microsoft Web site at
https://www.microsoft.com/windows/appcompatibility/toolkit.mspx
Enabling DEP for an Application
It may be desirable to enable DEP protection for several applications beyond core Windows components without setting the system-wide DEP configuration to the OptOut policy level.
In this scenario, the Compatibility Administrator tool can be used to apply the AddProcessParametersFlags compatibility fix to an application to enable DEP protection. The AddProcessParametersFlags compatibility fix must be added with a command line parameter value of "20000".
To specify a command line value for a compatibility fix, the Compatibility Administrator tool must be started with the /x switch.
To apply the AddProcessParametersFlags compatibility fix to an application,
1. Click Fix from the toolbar to create a new compatibility fix.
2. Provide the required information, including the path to the application's executable, and click Next.
3. Apply any necessary compatibility modes or layers. (Note, none are required to enable DEP for an application) Click Next.
4. Check the AddProcessParametersFlags compatibility fix and click the Parameters button.
5. In the Command Line text box, enter "20000" and click OK.
6. Click Next to specify the matching information.
7. After specifying the matching information, click Finish to create the application fix.
Once the application fix has been created, the resulting Custom Compatibility Database can be deployed to Windows XP Service Pack 2 systems using a variety of methods including logon scripts, Microsoft Systems Management Server (SMS) or Group Policy.
To view additional information regarding this technology in the Guide, click these links:
Application Compatibility Testing for DEP
Distributed Component Object Model\Remote Procedure Call
The security that Service Pack 2 applies to DCOM and RPC prevents many network-based exploits that target these services. Therefore, careful consideration is required before changing security settings that affect network communications.
Distributed Component Object Model
Service Pack 2 applies DCOM security to the COM server component to prevent anonymous access. The permissions are split into two access control lists:
Launch and Activate Permissions
Access Permissions
The system-wide access control lists are located in the Component Services management console, under My Computer Properties. Figure 3.20 shows this dialog box, which allows configuration of computer wide and default application DCOM security.
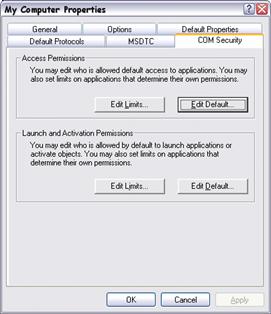
Figure 3.20
DCOM security configuration interface for setting the system-wide configuration
There are two access control lists (ACL) for each permission type:
Edit Limits. Sets computer wide permissions
Edit Default. Defines default application permissions. An administrator can then accept the default application permissions for each separate COM application or customize permissions individually. These permissions can be configured in the specific application properties in the COM services management console.
Figure 3.21 shows the DCOM security configuration interface for a specific application.
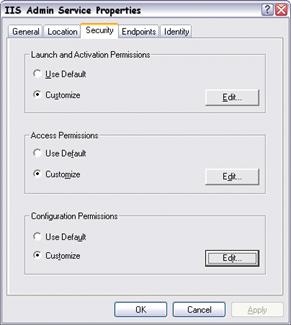
Figure 3.21
DCOM security interface for the IIS Admin Service
The computer wide access control lists are stored in the registry at:
HKEY_LOCAL_MACHINE\SOFTWARE\Microsoft\Ole \MachineAccessRestriction= ACL
and
HKEY_LOCAL_MACHINE\SOFTWARE\Microsoft\Ole \MachineLaunchRestriction= ACL
The computer wide restrictions permission settings can be pushed via Group Policy. You can use Active Directory Group Policy to configure computer-wide settings using the following path:
Windows Settings\Security Settings\Local Policies\Security Options
Figure 3.22 shows Group Policy settings for DCOM Machine Access permissions configuration.
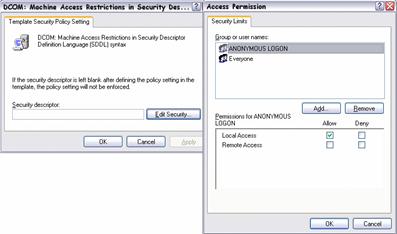
Figure 3.22
Using Group Policy to set computer wide DCOM configuration
When Group Policy is in effect on a machine, it is honored and the local machine computer-wide restriction permission is ignored.
Configuration of the DCOM ACL creates a new security descriptor in the registry.
If you implement a COM server and expect to support remote activation by a non-administrative COM client or remote unauthenticated calls, then you should initially consider whether this is the best configuration. If so, you need to change the default DCOM configuration for machine-wide limits, (Edit Limits).
If you implement a COM server and override the default security settings, you should confirm that the application-specific launch permission ACL grants activation permission to appropriate users. If it does not, you need to change your application-specific launch permission ACL to give appropriate users activation rights so applications and Windows components that use DCOM do not fail.
Caution: If these computer-wide restriction permissions are used incorrectly, it can cause applications and Windows components that use DCOM to fail.
The Deny Access Control Entry (ACE) should be used judiciously; you should carefully assess its implications before you apply it. A Deny ACE could result in unintended results and may lock users out of certain functionality to which they need access. Depending on the security group for which you set the Deny ACE, this restriction could affect administrators on the local computer.
DCOM applications can also be exempted from activation security checks by editing registry at:
HKEY_LOCAL_MACHINE\SOFTWARE\Microsoft\Ole\AppCompat\ActivationSecurityCheckExemptionList
Add a value with a value name of the application ID taken from the DCOM Config section of the Component Services MMC, and a value data of:
0 The application is not exempt from the activation security check
1 The application is exempt from the activation security check
Configure this list using Group Policy at:
Administrative Templates\System\Distributed COM\Application Compatibility Settings
Remote Procedure Call
Windows XP Service Pack 2 provides developers and administrators with the ability to secure RPC communications through the following settings:
RestrictRemoteClients registry key. The path to the key may not already exist but should be created at HKEY_LOCAL_MACHINE\ SOFTWARE\Policies\ Microsoft\Windows NT\RPC. The RestrictRemoteClients registry value accepts three values:
0 - Bypasses the new interface restrictions. Behavior is the
same as Service
Pack 1
1 - (Default) Restricts access to all RPC interfaces. All remote anonymous calls are rejected by the RPC runtime. If an interface registers a security callback and provides the RPC_IF_ALLOW_CALLBACKS_WITH_NO_AUTH flag, then this restriction does not apply to that interface. If the key does not exist (default), the system assumes this value for the key.
2 - Bypasses the new interface restrictions, which is the same as a value of 1, except that the RPC_IF_ALLOW_CALLBACKS_WITH_NO_AUTH flag is no longer exempt an interface. With this value, a system cannot receive remote anonymous calls using RPC. Applications that use DCOM might not work correctly if this value is set. This new security model allows an administrator to limit the system attack surface for the RPC protocol.
EnableAuthEpResolution registry key. The path to this key may not already exist but should be located at HKEY_LOCAL_MACHINE\ SOFTWARE\Policies \Microsoft\Windows NT\RPC. This value must be set on the client to enable authenticated communication with the RPC Endpoint Mapper on the remote computer running Service Pack 2. This configuration is required with the Service Pack 2 default setting of RestrictRemoteClients. The allowed values for EnableAuthEpResolution are:
0 - Disabled
1 - Enabled
RPC interface registration flags Three new interface registration flags have been created that make it easier for an application developer to secure an RPC interface.
RPC_IF_ALLOW_CALLBACKS_WITH_NO_AUTH When this flag is registered, the RPC runtime invokes the registered security callback for all calls, regardless of the call security settings. Without this flag, RPC rejects all unauthenticated calls before they reach the security callback. This flag works only when a security callback is registered.
RPC_IF_SEC_NO_CACHE A security callback is registered for an interface to restrict access to that interface. The typical security callback impersonates the client to determine if the client has sufficient rights to make a call to the interface. If a particular client identity passes a security callback once, it usually passes the same security callback every time. The RPC runtime takes advantage of this pattern by remembering when an individual client identity passes a security callback and skips the security callback for subsequent calls by that client to the same interface. This feature is called security callback caching and has existed since Windows® 2000. For Windows XP Service Pack 2, use the RPC_IF_SEC_NO_CACHE flag to disable security callback caching for a given interface. This configuration is useful if the security check might change, possibly rejecting a client identity that was previously permitted.
RPC_IF_LOCAL_ONLY When an interface is registered with this flag, RPC rejects calls made by remote RPC clients. In addition, local calls over all ncadg_* protocol sequences and all ncacn_* protocol sequences (except for named pipes, using ncacn_np) are also rejected. If a call is made on ncacn_np, RPC allows the call only if it does not come from SVR, which filters out all remote calls. Ncalrpc calls are always allowed through.
The default security configurations in Service Pack 2 may cause some compatibility issues. There are three options to resolve these issues. These options are listed in order of preference.
Require your RPC clients to use RPC security when contacting your server application. This is the best method to mitigate security threats.
Exempt your interface from requiring authentication by setting the RPC_IF_ALLOW_CALLBACKS_WITH_NO_AUTH flag during interface registration. This configures RPC to allow anonymous connections only to the interface of your application.
Force RPC to exhibit the same behavior as earlier versions of Windows by setting the RestrictRemoteClients registry key to "0". RPC then accepts anonymous connections to all interfaces. This option should be avoided if possible, because it reduces the overall security of the computer.
To view additional information regarding this technology in the Guide, click these links:
Application Compatibility Testing for DCOM/RPC
Attachment Execution Service
The Attachment Execution Service (AES) is new functionality in Service Pack 2 and introduces a few application compatibility issues. AES gives a new and consistent look for file and attachment download dialog boxes across applications. These new features include:
A file handler icon
A new information area added to the bottom of the dialog box that provides slightly different information, depending on whether the downloaded file type is of higher or lower risk
All downloaded executable files are checked for publisher information. Once the file is downloaded the Authenticode dialog box displays publisher information. It is possible to configure download and execution of files where the signature is invalid in Internet Options on the Advanced tab or using Active Directory Group Policy at:
Administrative Templates\Windows Components\Internet Explorer\Internet Control Panel\Advanced Page
The user interface has a list of dangerous file types for e-mail file attachment downloads that are more stringent than before, and may result in additional warning prompts. The file type list cannot be edited, but the feature can be turned off for Outlook Express by selecting Options on the Tools menu. You can prevent the use of the dangerous file types list on the Security tab by deselecting the Do not allow attachments to be saved or opened that could potentially be a virus check box.
Figure 3.23 shows the configuration of the dangerous file types list in Outlook Express.
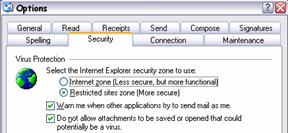
Figure 3.23
Configuration options for dangerous file types list in Outlook Express
AES may prevent an e-mail attachment that a user has downloaded to the local file system from executing. The file is marked so that its source is known, even if it is executed at a later date. If the file is considered dangerous it is blocked. This feature requires NTFS file system (NTFS) on the user's computer. This behavior can be changed for the file on the General tab of the file properties. Figure 3.24 shows how to unblock a downloaded executable attachment.
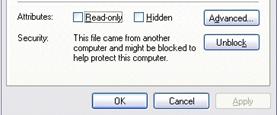
Figure 3.24
Unblocking a downloaded executable attachment in Windows Explorer
To view additional information regarding this technology in the Guide, click the following links:
Introduction to Attachment Execution Service
Application Compatibility Testing for Attachment Execution Service
Removing Mitigation Fixes
So far this chapter has considered applying mitigation fixes to overcome application compatibility issues. The goal of this process is to enable an application to function by reducing security in one or more areas.
If, after careful consideration, you decide to soften the default security and apply mitigation fixes, you should also implement a process and timeframe for removing the fixes and reconfiguring, redeveloping, upgrading, or retiring the problematic applications.
Figure 3.25 shows the options for deploying Service Pack 2 to cope with application incompatibilities.
Figure 3.25
Service Pack 2 deployment paths after application compatibility issues
The process is as follows:
1. After compatibility testing, document any incompatibilities
2. Identify what is necessary to make the application compatible with the configuration of the computer.
3. Make necessary changes for application compatibility.
4. Deploy Service Pack 2.
If Step 2 identifies that mitigation is necessary:
A. Change the configuration of the computer to overcome compatibility issues.
B. Deploy Service Pack 2.
C. Implement a process to remove the mitigation fixes. This should include:
Identifying redevelopment work required
Creating a mitigation removal procedure
Creating a reconfiguration procedure
Setting a timeframe for whole process to complete
D. Make necessary changes for application compatibility.
E. Remove the mitigation fixes that were applied.
F. Re-secure the operating system.
Summary
This chapter has demonstrated the process of reconfiguring the operating system security to allow applications to run successfully after applying Windows XP Service Pack 2. This procedure is not recommended but may be necessary in the short term.
The recommended approach is to maintain security configurations and make changes to the application so that it works with Service Pack 2. If upgrading or modifying the application is not possible, then cautious changes to the security configuration should be made, but only to the extent necessary to ensure correct operation of the application. A defined removal process should also be created to return the operating system to the highest possible security once the application has been upgraded or modified.
The next chapter discusses considers deployment methods for Windows XP Service Pack 2.
Chapter 4 - Deploying Mitigation Fixes
Introduction
When you have thoroughly tested your applications, identified compatibility issues and developed workarounds or fixes, the next stage is to deploy Microsoft Windows XP Service Pack 2. Finally, you implement the mitigation strategy by running any mitigation scripts, configuring the user interface, making changes or altering settings in Active Directory Group Policy.
Deployment of Service Pack 2 broadly fits into two categories; new Windows XP deployments and existing Windows XP deployments. Each deployment scenario requires careful planning and thorough testing. You are advised to read the Microsoft Windows XP Service Pack 2 installation and planning guide. For more information on deploying XP Service Pack 2, see:
After you have deployed Microsoft Windows XP Service Pack 2, in time you will need to deploy further updates and combine these updates with new Windows XP Deployments. For more information about deploying XP updates, see the Microsoft Windows XP Hotfix Installation and Deployment Guide, at:
https://www.microsoft.com/windowsxp/downloads/updates/sp1/hfdeploy.mspx
Implementing Service Pack 2 on New Deployments
If you are including Windows XP Service Pack 2 with new deployments of Windows XP, you can use the normal installation process that your organization currently uses.
Using Manual Installations
This is the least efficient and slowest method of deploying Windows XP and Service Pack 2 except in the smallest of organizations. This process involves installing Windows XP manually, deploying Service Pack 2 manually and finally applying any required application compatibility mitigation scripts. Even with setup scripts this method is time-consuming, repetitious and prone to error. If more than one installation is required, a procedural document and checklist is needed to ensure consistency across the installations.
Running application compatibility scripts after installing the service pack can be simplified by implementing a batch file that chains compatibility scripts together.
It is difficult to find any advantages in this method because any time saved in implementing any of the following procedures is usually spent on the manual install itself.
Slipstreaming the Service Pack into the Installation Media
If a manual installation is necessary, the most efficient approach is to integrate (or slipstream) Service Pack 2 into the original Windows XP source files. To do this, you must first extract the files from the Service Pack distribution executable using the /x switch:
WindowsXP-KB835935-SP2-ENU.exe /x
You are prompted to enter a destination location for the extracted files. The extraction process creates a subfolder called Update in the destination folder containing the setup program Update.exe.
To create an integrated Windows XP and XP Service pack 2 source use the following command:
Update.exe /integrate:<path>
For more information on How to integrate software updates into
your Windows installation source files, see the Microsoft Web site at
https://support.microsoft.com/default.aspx?scid=kb;en-us;828930
Note: The <path> must contain the i386 folder for the Windows XP Source files; you do not need to include the i386 folder in the path. If the Windows XP installation source does not have the i386 folder in this path the slipstream command fails.
One additional benefit of creating a bootable integrated CD is that you can use this CD for system recovery in the future. For more information on integrating Service Packs and hot fixes into a single source, see the Microsoft Windows XP Hotfix Installation and Deployment Guide at the Microsoft Web site at
https://www.microsoft.com/windowsxp/downloads/updates/sp1/hfdeploy.mspx
Using Remote Installation Services Images
Remote Installation Services (RIS) was introduced in Windows 2000 to improve the deployment of client systems.
RIS enables an administrator to install an operating system, together with applications, service packs and hot fixes. This process is accomplished by first building a baseline system, installing the applications, uploading the image to a RIS server and then downloading that image onto un-partitioned client computers.
For more information about Remote Installation Services, see the Microsoft Web site at
Using Other Imaging Software
Many organizations have used non-Microsoft imaging systems for deploying client systems for a number of years. This imaging software takes a snapshot of a system that includes the operating system, applications, service packs, hot fixes and configuration settings. This image can then be distributed on CD, DVD or over the network.
For more information about Desktop Deployment Solutions from Third-Party Companies, see the Microsoft Web site at
https://www.microsoft.com/windows2000/partners/DesktopSolutions.asp
Upgrading Existing Windows XP Clients
Deploying Windows XP with Service Pack 2 in the appropriate configuration onto new PCs is relatively straightforward. However, deploying Service Pack 2 and compatibility scripts onto existing systems requires careful planning, to ensure data integrity and maintain the current functionality level. Deploying to existing clients involves one of two approaches; manual deployment or automated installation.
Using Manual Deployment and Configuration
Manually deploying the service pack and scripts is inefficient in all but the smallest environments. Deployment of Service Pack 2 can take several minutes and administrators are advised to take this into account when calculating the time to complete the upgrade process.
A summary of the deployment process is as follows:
Develop written guide and deployment check list.
Apply Service Pack 2.
Apply Configurations Changes.
Apply Scripts.
Check all applications and configuration is applied.
To initiate the installation, run the Service Pack Setup program Update.exe with relevant switches. As with previous service packs a wizard appears to guide you through the installation process. When you have completed the installation and rebooted the system, run the Application Compatibility Scripts and check that applications work as expected. If your scripts make changes to the registry you need to run the scripts with an account that has Local Administrator privileges. However, checking application functionality should be completed using an account that only has user rights.
Automating the Installation
For all but the smallest environments, automating the update to Microsoft Windows XP Service Pack 2 is the most efficient approach. Time spent developing and testing the automation process enables the organization to reach the greatest number of seats, enhance rates of success and reduce downtime.
The main issues with automated deployment arise when the Windows firewall is enabled, immediately following Microsoft Windows XP Service Pack 2 installation, because this configuration prevents most remote management tools from working until further configuration is applied. This is a key point for administrators who normally perform a two phase update with the service pack deployment; the Service Pack in phase one, and the additional configuration scripts or hotfixes in phase two. After Windows XP Service Pack 2 is installed, and the computer reboots, it is unlikely that you are able to connect and perform additional configuration tasks or run Application Compatibility Scripts.
Therefore the automation process needs to ensure your Application Compatibility Scripts run automatically after Windows XP Service Pack 2 reboots.
Figure 4.1 shows the process logic for the deployment process.
Figure 4.1
Flowchart for automated deployment of Service Pack 2
Using Command Line Switches
The Service pack setup program Update.exe has a number of command line switches to aid the automation process.
For more information about Guide for Installing and Deploying Microsoft® Windows® XP Service Pack 2, see the Microsoft Web site at
https://www.microsoft.com/technet/prodtechnol/winxppro/deploy/spdeploy.mspx
The switches that assist automated installations are /q or /p and /norestart. The /q and /p switches remove the requirement for user intervention and the /norestart enables you to postpone the computer restart until a more suitable time.
Implementing Automatic Administrator Logon
This section contains information about modifying the registry. Before you modify the registry, back it up and make sure that you understand how to restore the registry if a problem occurs.
For more information about and a Description of the Microsoft Windows registry, see the Microsoft Web site at
https://support.microsoft.com/default.aspx?scid=kb;EN-US;256986
Microsoft Windows XP has several registry keys that can aid an automated installation. The AutoAdminLogon registry key is often used for Kiosk type systems or to continue an application installation following a reboot. This setting relies on two other registry keys, the DefaultUserName and DefaultPassword having appropriate user account and the correct password. The AutoAdminLogon settings are located in the Windows registry in the following key:
HKEY LOCAL MACHINE\SOFTWARE\Microsoft\WindowsNT\CurrentVersion\Winlogon
Note: The password value in the DefaultPassword key is stored in clear text. This is a potential security issue because your Application Compatibility Scripts may need to run with local Administrator privileges. If you plan to use a domain account you are advised not to use an account in the Domain Admins security group and enable this account only for a deployment. You are advised to use a strong password and change this password regularly.
For more information about How to turn on automatic logon in Windows XP, see the Microsoft Web site at
https://support.microsoft.com/default.aspx?scid=kb;en-us;315231
Using RunOnce Settings
There are other registry keys that can assist in automating the deployment of Service Pack 2. The most useful of these is the RunOnce key.
The RunOnce key allows an application or script to run once (and only once) following a computer restart. This setting is often used to complete an application installation or to run configuration scripts without user intervention.
You can use the Runonce key to run your Application Compatibility Scripts on the first reboot after installing Service Pack 2.
For more information and a Definition of the RunOnce Keys in the Registry, see the Microsoft Web site at
https://support.microsoft.com/default.aspx?scid=kb;EN-US;137367
Deploying the Service Pack
The combination of Update.exe switches and registry keys provides you with the tools to automate the deployment of Windows XP Service Pack 2 and any required application compatibility scripts. It is important to remember the required security context to write to the registry or perform administrative commands. Your script fails if the script attempts to run a command without the appropriate privileges. It is also important to get the order of the commands correct.
If your scripts need to change registry settings that are only available after the update to Service Pack 2, you need to ensure that this script runs after the reboot using the RunOnce registry key. You can combine the Windows XP Service Pack 2 setup program with the appropriate command line switches, configuration commands and application compatibility scripts, in one batch file, which completes the entire task.
Deploying with Logon Scripts
Many organizations choose to deliver the service pack and the application compatibility scripts using a logon script. The issues with this method revolve around the security context of the user. Application compatibility scripts that make alterations to the registry or execute commands that require local administrator privileges fail unless the user is a member of the Local Administrators security group.
The secondary logon service and the command line tool Runas.exe can provide a workaround, but the secondary logon service prompts the logged on user for a password. Organizations should review the security implications of this approach.
Deploying with Remote Desktop Tools
Remote management tools enable a remote administrator to log on to a computer and run a combined Service Pack 2 and application compatibility scripts installation batch file. However, the application compatibility script must configure the Windows Firewall for remote administration, or you are unable to connect to the remote system once Service Pack 2 has installed and the system has rebooted.
Deploying with Active Directory
Group Policy is one of the key benefits of Microsoft Windows Active Directory. Group Policy makes it easy for administrators to distribute software and make configuration changes to groups of computers. Windows XP Service Pack 2 adds entries to the Group Policy administrative templates to enable configuration of some of the new features.
Distributed File System lets you to create replicas of files across the network.
For more information about the Distributed File System, see the Microsoft Web site at
https://www.microsoft.com/windows2000/techinfo/howitworks/fileandprint/dfsnew.asp
For more information about Distributed File System and File Replication Services, see the Microsoft Web site at
https://www.microsoft.com/windowsserver2003/technologies/fileandprint/file/dfs/default.mspx
Full details of deploying Service Pack 2 and additional configuration changes using Group Policy, are included in "Service Pack 2 Enterprise Implementation Guide."
For more information about the Changes to Functionality in Microsoft Windows XP Service Pack 2, Part 8: Conclusion and Appendices, see the Microsoft Web site at https://www.microsoft.com/technet/prodtechnol/winxppro/maintain/sp2conap.mspx#XLSTsection126121120120
Distributing the Service Pack using Group Policy
Active Directory Group Policy supports software distribution, making this an ideal way to distribute Windows XP Service Pack 2. You can create Group Policy at Site, Domain and Organizational Unit (OU) levels by creating a Group Policy Object and linking it to the relevant container. Most organizations implement an OU structure for computers so they can apply specific computer policies.
For more information about Group Policy Software Deployment Background, see the Microsoft Web site at
Using Group Policy to Assign Application Compatibility Scripts
Group Policy provides an excellent way to configure application compatibility mitigation across groups of computers.
Managing Windows Firewall
Remote management of client computers is a key requirement for many organizations. The default configuration of Windows Firewall blocks all unsolicited incoming network traffic, which prevents the use of remote management tools. Group Policy allows you to configure the Windows Firewall to enable remote communications. Figure 4.2 shows the Group policy settings for the Windows Firewall.
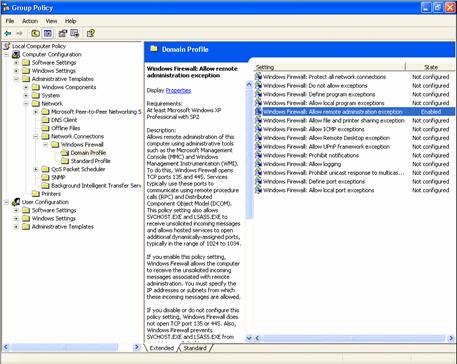
Figure 4.2
Group Policy settings for managing Windows Firewall
You can use Group Policy to configure many of the other application compatibility mitigations that Chapter 3 discusses, such as, settings for Internet Explorer, Outlook Express and DCOM. The additional benefit of using Group Policy is that when you update an application so that compatibility mitigation is no longer required, then you can remove the mitigation fix for multiple computers in one step. Windows Firewall settings with Service Pack 2 are included in "Deploying Windows Firewall Settings for Microsoft Windows XP with Service Pack 2."
For more information about Deploying Windows Firewall Settings for Microsoft Windows XP with Service Pack 2, see the Microsoft Web site at https://www.microsoft.com/downloads/details.aspx?FamilyID=4454e0e1-61fa-447a-bdcd-499f73a637d1&DisplayLang=en
Deployment with Systems Management Server
Using Microsoft Systems Management Server (SMS) 2003 to deploy software and service packs is another option for many organizations. Windows XP Service Pack 2 can introduce some incompatibility issues for customers using SMS, which require additional configuration.
Microsoft recommends that you read the FAQ concerning Windows XP Service Pack 2 and SMS, and all the associated documents.
For more information, see:
https://www.microsoft.com/technet/prodtechnol/sms/sms2003/techfaq/tfaq03.mspx
Most of the incompatibilities involve the Windows Firewall default settings and SMS remote management ports. Information concerning the deployment of Windows Firewall settings in managed environments is included in "Deploying Windows Firewall Settings for Microsoft Windows XP with Service Pack 2."
For more information about SMS Client FAQ, see the Microsoft Web site at
Checking Non-Microsoft Management Tools
Microsoft recommends that organizations using non-Microsofat management and deployment tools should contact the vendor for information on how those products interact with Microsoft Windows XP Service Pack 2.
Implementing a Rollback Strategy
However much you test your deployment process, there may be unforeseen issues that arise through the deployment phase. Whichever deployment method you choose, plan a rollback strategy to ensure business continuity. This may involve uninstalling Windows XP Service Pack 2 or running rollback configuration scripts. Test both the rollback plan and any associated scripts before the deployment process.
Summary
Microsoft Windows XP Service Pack 2 includes many new security features that help organizations create a more secure desktop environment, minimize the attack surface available to intruders, and reduce the threats from e-mail and other vulnerabilities. However, many existing applications may not have been designed to work with these more stringent security settings and therefore thorough testing is required.
Microsoft recommends that before deploying Windows XP Service Pack 2, you should formulate a deployment strategy to:
Decide which systems to update first.
Discover which applications have compatibility issues.
Develop and test application compatibility scripts to mitigate compatibility issues.
Develop and test a deployment process.
Develop a rollback strategy to maintain business continuity.
With careful planning and implementation, organizations can overcome any potential application compatibility issues and enjoy the security benefits that Microsoft Windows XP Service Pack 2 brings to desktop computing.
Acknowledgments
The team that produced Application Compatibility Testing and Mitigation Guide for Windows XP Service Pack 2 came from a wide range of areas within Microsoft. The following people made a substantial contribution to the development, writing, and testing of this content:
Barry Goffe,
Thank you to all the beta testers who signed up to give us feedback on the materials as they were being developed, your efforts were greatly appreciated.
Appendix
Accompanying this white paper are several sample scripts that can be downloaded from:
https://go.microsoft.com/fwlink/?LinkId=33878
Abstract
This appendix provides sample scripts and two scenarios of deploying application compatibility mitigation scripts. Scripts provide a way of making configuration changes on more than one computer, to ensure configuration is identical.
The two scenarios provide sample scripts for deploying Microsoft Windows XP Service Pack 2 and application compatibility configuration scripts. The scripts are provided as samples and may require editing to work in your environment. Each scenario includes a README.TXT outlining which scripts need to be edited. Each script details where changes, such as server name, share name, and user credentials are required.
You need to obtain a copy of Windows XP Service Pack 2 before running any of the scenarios and/or the accompanying scripts. Windows XP Service Pack 2 may be downloaded from:
The accompanying scripts alter settings in the Windows XP registry. The scripts should be thoroughly tested in a test lab environment to ensure they achieve your desired results.
Before modifying the registry, ensure you back up the registry and that you understand how to restore the registry if a problem occurs. For information about how to back up, restore, and edit the registry, see the following article number in the Microsoft Knowledge Base:
For a description of the Microsoft Windows Registry, see:
https://support.microsoft.com/default.aspx?scid=kb;EN-US;256986
For additional information on scripting, visit the
https://www.microsoft.com/technet/scriptcenter/solutions/default.mspx
How to Create a .REG File for Use with the Accompanying Scripts
Several of the scripts accompanying this guide make use of a .REG file for configuration where application compatibility is an issue. The script merges the .REG file into the Windows XP Registry.
Syntax of .Reg Files
A .reg file has the following syntax:
RegistryEditorVersion
Blank line
[RegistryPath1]
"DataItemName1"="DataType1:DataValue1"
DataItemName2"="DataType2:DataValue2"
Blank line
[RegistryPath2]
"DataItemName3"="DataType3:DataValue3"
Where:
RegistryEditorVersion
is either "Windows Registry Editor Version 5.00" for
Microsoft Windows 2000, Windows XP, and Microsoft Windows ServerT 2003, or "REGEDIT4" for Microsoft
Windows® 98, and Microsoft Windows NT® 4.0. The "REGEDIT4" header
also works on Windows 2000-based, Windows XP-based, and Windows Server
2003-based computers.
Blank line is a blank line. This identifies the start of a new registry path. Each key or subkey is a new registry path. If you have several keys in your .reg file, blank lines can help you to examine and to troubleshoot the contents.
RegistryPathx is the path of the subkey that holds the first value you are importing. Enclose the path in square brackets, and separate each level of the hierarchy by a backslash. For example:
[HKEY_LOCAL_ MACHINE\SOFTWARE\Policies\Microsoft\Windows\System]
A .reg file can contain several registry paths. If the bottom of the hierarchy in the path statement does not exist in the registry, a new subkey is created. The contents of the registry files are sent to the registry in the order you enter them. Therefore, if you want to create a new subkey with another subkey below it, you must enter the lines in the correct order.
DataItemNamex is the name of the data item that you want to import. If a data item in your file does not exist in the registry, the .reg file adds it (with the value of the data item). If a data item does exist, the value in your .reg file overwrites the existing value. Quotation marks enclose the name of the data item. An equal sign (=) immediately follows the name of the data item.
DataTypex is the data type for the registry value and immediately follows the equal sign. For all the data types other than REG_SZ (a string value), a colon immediately follows the data type. If the data type is REG_SZ, do not include the data type value or colon. In this case, Regedit.exe assumes REG_SZ for the data type. The following lists the typical data types in .reg:
REG_BINARY hexadecimal
REG_DWORD dword
REG_EXPAND_SZ hexadecimal(2)
REG_MULTI_SZ hexadecimal(7)
Creating the .REG File
From the Application Compatibility Testing and Mitigation Guide for Windows XP Service Pack 2, the location of the Zones registry Key is:
HKEY_CURRENT_USER\Software\Microsoft\Windows\CurrentVersion\Internet Settings\Zones\
The following explains how the .REG file is created for the Zones management script, located in the \scripts\IE folder.
To generate a .REG file,
Configure the appropriate Zone through the Internet Explorer user interface. The script uses the example of the intranet Zone (Zone 1 in the registry).
1. Open the Windows XP Registry editor, REGEDIT.exe.
2. Click Start, and click Run.
3. Type regedit, and then click OK.
4. Navigate to the correct key in the registry.
5. HKEY_CURRENT_USER\Software\Microsoft\Windows\CurrentVersion\Internet Settings\Zones\
6. Right-click the appropriate zone (for example, zone 1), and click Export.
7. Save the .REG file (note the name must match that in the script, for example, Zones.reg).
The process used for creating the other .REG files is similar. In some cases the Class Identifier CLSID is required before the correct part of the registry can be exported. You need to search through the registry for the friendly name to find the CLSID. This needs to be cross checked in conjunction with the registry path provided in the sample scripts.
For more information regarding general scripting practices, see
https://www.microsoft.com/technet/scriptcenter/default.mspx
Extracting the Scripts
On extracting the executable the following folders are created.
Table A.1
|
Folder name |
Contents |
|
DCOM |
Sample script to exempt a DCOM application from DCOM security restrictions. |
|
IE |
Sample scripts for setting Internet Explorer features. |
|
Outlook |
Sample script to alter attachment management within Outlook Express. |
|
RPC |
Sample script to alter call back restrictions in RPC Security. |
|
Scenario1 |
Sample scripts and command files to install Windows XP Service Pack 2 and mitigation scripts with no user interaction. |
|
Scenario2 |
Sample scripts and command files to install Windows XP Service Pack 2 and mitigation scripts with minimal user interaction. |
|
WF |
Sample scripts configure Windows Firewall behavior. |
The Application Compatibility Mitigation Scripts
The following section outlines the functions of the Application Compatibility Scripts.
DCOM Exception
The DCOM folder contains a script to modify the default security behavior. Table A.2 lists the contents in the DCOM Folder.
Table A.2
|
Folder name |
File name |
|
DCOM |
DCOMSec.vbs |
DCOMSec.vbs
The script to exempt a DCOM application from the security applied by Service Pack 2 uses the RegWrite method of WshShell from the Windows Scripting Host object model. RegWrite writes the CLSID of the application to the ActivationSecurityCheckExemptionList value.
HKEY_LOCAL_MACHINE\SOFTWARE\Microsoft\Ole\AppCompat\ActivationSecurityCheckExemptionList
This script uses an input box to allow the user to specify the application ID from the DCOM Config section of the Component Services MMC.
Locating the Application ID
The sample DCOM script prompts you to enter the Application ID/CLSID of the application you are going to exempt. To find the Application ID do the following:
1. Open the Component Services MMC.
2. Navigate to Console Root\Component Services\Computers\My Computer\DCOM Config.
3. Select View, click Detail.
4. Document the Application ID (CLSID).
The following figure shows the Application ID for the application in the DCOM Config section in the Component Services MMC.
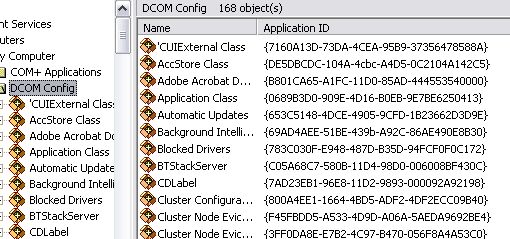
Figure A.1
Locating the Application ID (CLSID) from the Component Services MMC
Internet Explorer
There are several scripts for manipulating Internet Explorer in the IE folder. Table A.3 provides a list of these scripts.
Table A.3
|
Folder name |
File name |
|
IE |
Addon.reg |
|
AddOn.vbs |
|
|
AllowPop.reg |
|
|
AllowPop.vbs |
|
|
LocalMachineLockdown.vbs |
|
|
ZoneElevation.vbs |
|
|
Zones.reg |
|
|
Zones.vbs |
AddOn.vbs
This script merges the Addon.reg file, which contains a list of blocked Internet Explorer add-ins, into the local registry. The Addon.reg file is generated by exporting the list from a test computer. This script can be used to configure several computers using deployment methods discussed in chapter 4.
This script applies a .reg file that edits the registry to disable a specific Internet Explorer add-on.
The .reg file edits the following registry keys:
HKEY_CURRENT_USER\Software\Microsoft\Windows\CurrentVersion\Ext\Settings
HKEY_CURRENT_USER\Software\Microsoft\Windows\CurrentVersion\Ext\Stats
Before this script is used the .reg file must be edited to contain the CLSID of the add-on component to be disabled. To identify the CLSID of an add-on component, search the registry for the add-on name located in the Manage Add-ons interface:
1. Open Regedit.
2. Highlight HKEY_CLASSES_ROOT.
3. On the Edit menu select Find.
4. In the Find What text box type the name the Internet Explorer add-on.
5. Click Find Next.
6. Expand the key "HKEY_CLASSES_ROOT\Add-on Name" that is located by the Find process.
7. Click the CLSID key.
8. In the right hand pane, double-click the default value.
9. Highlight and copy the value data including the "".
10. Paste the CLSID into the .reg file in the following three lines overwriting the existing CLSID only:
[HKEY_CURRENT_USER\Software\Microsoft\Windows\CurrentVersion\Ext\Settings\]
[HKEY_CURRENT_USER\Software\Microsoft\Windows\CurrentVersion\Ext\Stats\]
[HKEY_CURRENT_USER\Software\Microsoft\Windows\CurrentVersion\Ext\Stats\\iexplore]
Multiple edits can be made at the same time using a .reg file though each entry can be edited by writing a script to change a specific value if required.
To disable multiple Internet Explorer add-ons:
1. Manually disable the required add-ons on a test machine.
Export the "HKEY_CURRENT_USER\Software\Microsoft\Windows\CurrentVersion\Ext" key.
2. Apply the exported .reg file to required systems using Add-on.vbs.
.reg files can be imported by directly executing the file if required.
AllowPop.vbs
This script allows pop-ups from selected Web sites. The script merges the allowpop.reg file into the local registry key:
HKEY_CURRENT_USER\Software\Microsoft\Internet Explorer\New Windows\Allow
The accompanying .reg file can be edited to allow additional Web sites by adding additional lines using the format:
"www.website.com"=hex:
ZoneElevation.vbs
The script to allow zone elevation uses the RegWrite method of WshShell from the Windows Scripting Host object model. RegWrite writes to the FEATURE_ZONE_ELEVATION key in the registry to turn off the security feature for the iexplore.exe process.
HKEY_LOCAL_MACHINE\SOFTWARE\Microsoft\Internet Explorer\Main\FeatureControl\FEATURE_ZONE_ELEVATION\iexplore.exe
This script edits the registry to turn off the zone elevation restriction for the iexplore.exe process. The script can also be used to turn on the feature.
1 - Enables the feature
0 - Disables the feature
Zones.vbs
This script configures the Internet Explorer Zones feature. This script should only be used where a Web application requires this feature. It merges the accompanying Zones.reg file into the local computer registry. The Zones.reg file is generated from a test computer with this feature disabled.
The script to change the security zone configuration, applies a .reg file exported from the HKEY_LOCAL_MACHINE\SOFTWARE\Microsoft\Windows\CurrentVersion\Internet Settings\Zones\0 key. Edit the zone configuration in Internet Explorer and then export the registry key. Apply the .reg file using the script to other computers.
The different zones are indicated by numerical values:
0 - Local
1 - Internet
2 - Trusted Sites
3 - Internet
4 - Restricted Sites
LocalMachineLockdown.vbs
This script configures the further restrictions for Local Zone, where a script downloaded from the Internet Zone is saved to the local file system and therefore previously could execute without prompting the user. This feature requires the NTFS.
RegWrite writes to the FEATURE_LOCALMACHINE_LOCKDOWN key in the registry to turn off the security feature for the iexplore.exe process.
HKEY_LOCAL_MACHINE\SOFTWARE\Microsoft\Internet Explorer\Main\FeatureControl\FEATURE_LOCALMACHINE_LOCKDOWN\iexplore.exe
This script edits the registry to turn off Local Machine Lockdown for the iexplore.exe process. The script can also be used to turn on the feature.
1 - Enables the feature
0 - Disables the feature
Outlook Express Scripts
The Outlook folder contains one script for manipulating the Attachment Execution Service. Table A.4 shows the folder and the script.
Table A.4
|
Folder name |
File name |
|
Outlook |
Attachment.vbs |
Attachments.vbs
The script to configure allowed attachments for Outlook Express uses the RegWrite method of WshShell from the Windows Scripting Host object model. RegWrite writes to the Safe Attachments value to turn off the security feature. The path to this registry value is dynamic and varies from computer to computer.
HKEY_CURRENT_USER\Identities\" & IDName & "\Software\Microsoft\Outlook Express\5.0\Mail\Safe Attachments
This script edits the registry to turn off attachment restrictions for Outlook Express. This script can also be used to turn on the feature.
1 - Enables this feature
0 - Disables this feature
Remote Procedure Calls
Table A.5 shows the contents of the RPC folder.
Table A.5
|
Folder name |
File name |
|
RPC |
RpcSec.vbs |
RpcSec.vbs
This script edits the registry to configure RPC security to bypass new restrictions and allow anonymous call back. The script to configure RPC security uses the RegWrite method of WshShell from the Windows Scripting Host object model. RegWrite writes to the RestrictRemoteClients value.
HKEY_LOCAL_MACHINE\SOFTWARE\Policies\Microsoft\Windows NT\RPC\RestrictRemoteClients
The script can have three values:
0 - Bypasses new restrictions
1 - Restricts access to all RPC interfaces but allows anonymous callbacks
2 - Restricts access to all RPC interfaces and does not allow anonymous callbacks
Scenario Examples
Both of the scenarios provide examples of installing Windows XP Service Pack 2 and additional configuration with the minimum of user intervention.
Scenario 1 expects a network share with scripts folder and the service pack source. You need to edit the server names and share names to match your environment.
Scenario 2 expects the Service Pack source and scripts to be copied locally to the client.
To make editing of the scripts easier, variables have been used for paths and computer names. To use a script in a specific environment edit the values of the variables.
Each scenario has an associated Readme.txt file. It is important to read these before implementing the scenarios.
Scenario 1
Contoso Ltd. is a medium-sized international pharmaceutical company with a dedicated IT department. Contoso want to deploy Windows XP Service Pack 2 and configure the Windows Firewall for Remote Management. Contoso intends to use Windows Management Instrumentation (WMI) coupled with Windows Scripting Host (WSH) using VBscripts, and Command (CMD) files to achieve this goal.
Script Summary
Table A.6 lists the scripts used as part of this solution and their function.
Table A.6
|
Script |
Summary/Function |
|
StartRemoteIns.vbs |
Executed on administrative workstation by user with administrative rights on each client and source server. Obtains the client name listed in Computers.txt. Copies the scripts folder from the source server to the client. Uses WMI to execute Install.cmd on the client. Loops to next client name in Computers.txt. |
|
To use StartRemoteIns.vbs |
Copy the WindowsXP-KB835935-SP2-ENU.exe upgrade file into the scripts directory before running script Copy Scenario1 scripts into the scripts folder Edit the path to Computers.txt if required. Edit the scripts source server name if required. |
|
Computers.txt |
Computers.txt is located on the administrative workstation. Lists all client names. |
|
To use Computers.txt |
Edit Computers.txt to list client names. One client name on each line. Do not include double back slashes "\\" before the client name. Note Text file needs linefeed/carriage return after last client name to parse correctly |
|
Install.cmd |
Executes WindowsXP-KB835935-SP2-ENU.exe from the local client. WindowsXP-KB835935-SP2-ENU.exe runs in quiet mode, without restarting and overwrites OEM files. Calls AutoAdmin.vbs. Calls Reboot.vbs. |
|
To use Install.cmd |
Edit the path to WindowsXP-KB835935-SP2-ENU.exe if required. Edit the switches used on WindowsXP-KB835935-SP2-ENU.exe if required. Edit the path to AutoAdmin.vbs if required. Edit the path to Reboot.vbs if required. |
|
AutoAdmin.vbs |
Writes DefaultUserName to the registry. Writes DefaultPassword to the registry. Writes DefaultDomainName to the registry. Sets AutoAdminLogon. Writes RunOnce.cmd to RunOnce registry key. |
|
To use AutoAdmin.vbs |
Edit DefaultUserName value if required. Edit DefaultPassword value if required. Edit DefaultDomainName value if required. Edit the path to RunOnce.cmd if required. |
|
Reboot.vbs |
Uses WMI to reboot the client. |
|
RunOnce.cmd |
Runs from the RunOnce key in the registry when client reboots using AutoAdminLogon. Calls WinFire.vbs. Calls Cleanup.vbs. Calls Reboot.vbs. |
|
To use RunOnce.cmd |
Edit to include relevant configuration scripts if required (See example scripts provided with Guide). Edit the path to WinFire.vbs if required. Edit the path to Cleanup.vbs if required. Edit the path to Reboot.vbs if required. |
|
WinFire.vbs |
Executes Netsh command to open File and Print and RDP ports in Windows Firewall. |
|
To use WinFire.vbs |
Add Netsh command to add relevant ports to the exception list if required. Add Netsh command to add relevant programs to the exception list if required. |
|
Cleanup.vbs |
Removes DefaultUserName from the registry. Removes DefaultPassword from the registry. Removes DefaultDomainName from the registry. Removes AutoAdminLogon configuration. |
Figure A.2 shows the automated deployment process flow diagram and explanation of this process follows.
Figure A.2
Scenario 1: WMI deployment process flowchart
1. An Administrator copies the required scripts to a folder on a network share.
2. An Administrator copies the WindowsXP-KB835935-SP2-ENU.exe upgrade file into the scripts folder on the same network share.
3. An administrator creates a text file of computer names to be parsed by the StartRemoteIns.vbs script, and then uses this script to launch the installation.
Note: The administrator can be logged on at any workstation to initiate the installation. The user at the client does not require administrative privileges because the script runs in the security context of the remote administrator.
4. The script copies the scripts folder also containing the WindowsXP-KB835935-SP2-ENU.exe upgrade executable from the server to the local machine, and then calls Install.cmd.
5. Install.cmd runs the service pack setup program, (WindowsXP-KB835935-SP2-ENU.exe), locally with switches so no user intervention is required. The Command file then calls the AutoAdmin.vbs script and once completed calls the Reboot.vbs script.
Note: This process can take a long time (between one and two hours).
a. AutoAdmin.vbs set the local client to use the AutoAdminLogon sections of the registry with an account that has local admin privileges and configure the RunOnce part of the registry with the configuration command file, RunOnce.cmd. On completion of this script control is returned to Install.cmd.
b. The installation command file, Install.cmd calls Reboot.vbs the client workstation is shutdown and restarted.
6. On reboot the user specified in the AutoAdmin.vbs script is logged on and the configuration file specified in the RunOnce section of the registry is executed. Followed by the cleanup script, Cleanup.vbs and then Reboot.vbs.
a. In our example the configuration script, WinFire.vbs performs the required configuration of the Windows Firewall, opening the necessary ports for remote management. On completion control is returned to RunOnce.cmd.
b. Next the cleanup script, Cleanup.vbs is called and removes the AutoAdminLogon settings including the DefaultUserName, and DefaultPassword settings. On completion control is returned to RunOnce.cmd.
c. Finally the RunOnce.cmd command file call Reboot.vbs and the client workstation is shutdown and restarted.
7. When the client system reboots the logon prompt and user name is blank. The client workstation has a local scripts folder that can be deleted using a logon script or using a script placed in the startup folder.
Scenario 2
Contoso has a small remote subsidiary with several mobile users. They have been instructed to report to the office for one day within a two week period to have Service Pack 2 installed and configured. The user is instructed to run a script from the local server, which uses the runas command to complete the installation. The user is prompted to enter a specific password, with local Administration rights only. The following scripts are used in this scenario.
Script Summary
Table A.7 lists the scripts used as part of this solution and their functions.
Table A.7
|
Script |
Summary/Function |
|
RunSP.cmd |
Executed on each client by user with knowledge of the administrative password. Executes the runas command. Requires knowledge of the administrative password. Executes Install.cmd on the client. |
|
To use RunSP.cmd |
Edit the Administrative name if required. Edit the path to Install.cmd if required. |
|
Install.cmd |
Executes WindowsXP-KB835935-SP2-ENU.exe from the scripts folder. WindowsXP-KB835935-SP2-ENU.exe.runs in quiet mode, without restarting and overwrites OEM files. Calls AutoAdmin.vbs. Calls Reboot.vbs. |
|
To use Install.cmd |
Edit the path to WindowsXP-KB835935-SP2-ENU.exe if required. Edit the switches used on WindowsXP-KB835935-SP2-ENU.exe if required. Edit the path to AutoAdmin.vbs if required. Edit the path to Reboot.vbs if required. |
|
AutoAdmin.vbs |
Writes DefaultUserName to the registry. Writes DefaultPassword to the registry. Writes DefaultDomainName to the registry. Sets AutoAdminLogon. Writes RunOnce.cmd to RunOnce registry key. |
|
To use AutoAdmin.vbs |
Edit DefaultUserName value if required. Edit DefaultPassword value if required. Edit DefaultDomainName value if required. Edit the path to RunOnce.cmd if required. |
|
Reboot.vbs |
Uses WMI to reboot the client. |
|
RunOnce.cmd |
Runs from the RunOnce key in the registry when client reboots using AutoAdminLogon. Calls WinFire.vbs. Calls LogInstall.vbs. Calls Cleanup.vbs. Calls Reboot.vbs. |
|
To use RunOnce.cmd |
Edit to include relevant configuration scripts if required (See example scripts provided with Guide). Edit the path to WinFire.vbs if required. Edit the path to LogInstall.vbs if required. Edit the path to Cleanup.vbs if required. Edit the path to Reboot.vbs if required. |
|
WinFire.vbs |
Executes Netsh commands to open File and Print and RDP ports in Windows Firewall. |
|
To use WinFire.vbs |
Add Netsh command to add relevant ports to the exception list if required. Add Netsh command to add relevant programs to the exception list if required. |
|
LogInstall.vbs |
Writes the computername of the client to a logfile to track Service Pack 2 installed clients. |
|
To use LogInstall.vbs |
Edit the servername where the logfile is located if required. Edit the sharename where the logfile is located if required. Edit the name of the logfile if required. |
|
Cleanup.vbs |
Removes DefaultUserName from the registry. Removes DefaultPassword from the registry. Removes DefaultDomainName from the registry. Removes AutoAdminLogon configuration. |
Figure A.3
Scenario 2: Runas deployment process flowchart
1. An Administrator copies the scripts and WindowsXP-KB835935-SP2-ENU.exe to a folder on the client computers.
2. An administrator deploys RunSP.cmd as a logon script. This launches the Install.cmd using the runas command to initiate the installation.
3. The user is prompted to enter a password, provided by the administrator.
4. Install.cmd runs the Windows XP Service Pack setup program with switches so no user intervention is required. This process can take a long time
5. The command file then calls the AutoAdmin.vbs script and once completed calls the Reboot.vbs script.
a. AutoAdmin.vbs set the local client to use the AutoAdminLogon sections of the registry with an Account that has local admin privileges and configure the RunOnce part of the registry with the configuration command file, RunOnce.cmd. On completion of this script control is returned to Install.cmd.
b. The installation command file, Install.cmd calls Reboot.vbs the client workstation is shutdown and restarted.
6. On reboot, the user specified in the AutoAdmin.vbs script is logged on and the configuration file specified in the RunOnce section of the registry is executed, followed by the cleanup script, Cleanup.vbs and then Reboot.vbs.
a. In our example, the configuration script WinFire.vbs performs the required configuration of the Windows Firewall, opening the necessary ports for remote management. Completion control is returned to RunOnce.cmd.
b. Next, the cleanup script Cleanup.vbs is called and removes the AutoAdminLogon settings including the DefaultUserName and DefaultPassword settings. On completion control is returned to RunOnce.cmd.
c. So the administrator knows the users system has been configured, LogInstall.vbs is called and writes to server located log file.
d. Finally, the RunOnce.cmd command file calls Reboot.vbs and the client workstation is shut down and restarted. On reboot, the user is presented with a logon screen with both the user name and password blank.
Windows Firewall
The Windows Firewall folder (WF) contains several scripts for altering the Windows Firewall default behavior. Table A.8 lists the five scripts.
Table A.8
|
Folder Name |
File name |
|
WF |
ClosePort.vbs |
|
CloseProgram.vbs |
|
|
FirewallLog.vbs |
|
|
OpenPort.vbs |
|
|
OpenProgram.vbs |
OpenPort.vbs
This script uses the Netsh command-line utility to open a specific port in the Windows Firewall.
The Netsh command-line utility also allows the limiting of access
through the port to specific computers or local subnet. In the supplied example,
the
The script to open a port in the firewall uses the WshShell from the Windows Scripting Host object model to run an instance of the Netsh command-line tool. The Netsh tool has additional functionality with Service Pack 2 for configuring the Windows Firewall.
ClosePort.vbs
This script uses the Netsh command-line utility to close a specific port in the Windows Firewall. The script to close a port in the firewall uses the WshShell from the Windows Scripting Host object model to run an instance of the Netsh command-line tool. The Netsh tool has additional functionality with Service Pack 2 for configuring the Windows Firewall.
In the supplied example, the local
OpenProgram.vbs
This script uses the Netsh command-line utility to include a program in the Windows Firewall exception list. The Netsh command-line utility also allows the limiting a program's access to specific computers or local subnet.
In the supplied example, Windows Messenger is the allowed application.
CloseProgram.vbs
This script uses the Netsh command-line utility to exclude a program in the Windows Firewall exception list. The Netsh command-line utility also allows the limiting of access with the program to specific computers or local subnet.
In the supplied example, Windows Messenger is the excluded application.
FirewallLog.vbs
The script to turn on firewall logging for the firewall uses the WshShell from the Windows Scripting Host object model to run an instance of the Netsh command-line tool. The Netsh tool has additional functionality with Service Pack 2 for configuring the Windows Firewall.
This script uses the Netsh command-line utility to configure logging for the Windows Firewall.
The Netsh command-line utility also allows the limiting of access through the port to specific computers or local subnet.
|
