ALTE DOCUMENTE
|
||||||
Vehicle Missions
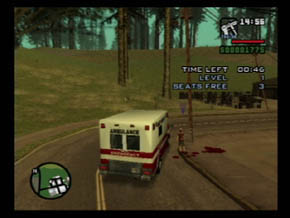
Ambulance Get into this lifesaving vehicle and activate the mission, and you'll see a blip appear on the screen. Drive over to it and pick up the bleeding victim. Make sure you park close, so you don't waste too much time waiting for the injured person to get into your ride. Be careful so that you don't knock down the person, either, as that will waste valuable time.
|
|
|
Once the person is tucked safe into your ambulance, follow the marker on the mini-map back to the hospital. Drive into the indicated marker and you will have delivered one patient safely. In San Andreas, you have several seats in your ambulance, so as you progress in level, you'll have to pick up multiple . As with all vehicle missions, once you deliver your person back to the hospital, you'll get more time to work with. Save as many folks as you can before time runs out. Your reward for finishing the 12th level is a higher max heal 828k1011i th level.
|
Note: It's a good idea to do these kind of missions in small towns, like Angel Pine in the Countryside. The area covered will be less, so it's a little easier to complete them and earn lots of cash in a hurry. |
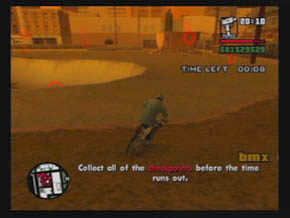 BMX Challenge Go
to Glen Park's skating park and hop on the BMX bike here. You will need to have
your cycling skill fairly high to compete in this challenge. You must collect
all of the checkpoints before the timer runs out.
BMX Challenge Go
to Glen Park's skating park and hop on the BMX bike here. You will need to have
your cycling skill fairly high to compete in this challenge. You must collect
all of the checkpoints before the timer runs out.
With each checkpoint collected, you will receive additional time on the meter. Start out by grabbing the closest ones to build your timer up from the start. Hit the pool to grab all of the checkpoints inside, and bunny hop out to the half-pipe. Use the handbrake and gain speed to collect the checkpoints floating above the half-pipes.
Burglar Once you complete Ryder's "Home Invasion" mission, you will be able to burglarize several houses scattered around the map. You must be driving a black Boxville (like the one used in this particular mission), but the burglaries will work roughly the same. There is a Boxville of this kind parked near the gym in Los Santos. When you get in one of these vehicles at night (between 22:00 and 6:00), press the R3 button and a clock will begin ticking down to daylight. The goal is to steal $10,000 before the sun rises.
Look for places that are lit up at night. If a yellow marker appears near the door, sneak inside, remain steathly (using crouch is the best for this), and watch the noise meter. Take goods out to the truck until the house is cleaned out, and put them inside. When the truck is full, drive it to the lockup (indicated by the familiar yellow marker).
Chiliad Challenge  You will need to
upgrade your cycling skill before attempting this one. We suggest grabbing a
bicycle and going across the entire state a few times.
You will need to
upgrade your cycling skill before attempting this one. We suggest grabbing a
bicycle and going across the entire state a few times.
Race 1 After collecting the first checkpoint, you can hop across the hill to the right for a fast shortcut. Keep following the checkpoints until you reach a sharp turn. Hit the handbrake, which is very important in these races, and remember that you can cut a corner and still collect a checkpoint just by getting near it. Further down the stretch is a hill with no side rail. Get close enough to the checkpoint and take the shortcut. Remember to tap the sprint button as you grow closer towards the end of the race, and cut the corners downhill, to boot.
Race 2 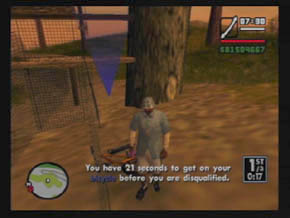 This race will
take you to the path along the other side. As per usual, the handbrake comes in
handy during the first part of the tedious race due to the ultra sharp turns
that you'll encounter. Keep hitting the checkpoints and you will soon find that
the path is straightened out with little to no guard rails. Use this spot to
get ahead of the competition by sprinting to your heart's desire. Watch out for
the very sharp left turn with no guard rail up ahead. Get around this by
handbraking down the hill to the left before you even reach the path. Soon
after this, hit the hill and take the grassy shortcut. You'll likely fall off
of your bike, but it shouldn't be a harsh tumble. After the upcoming bumps, the
land will be a straight-away with a few turns. It stays like this until the
bottom.
This race will
take you to the path along the other side. As per usual, the handbrake comes in
handy during the first part of the tedious race due to the ultra sharp turns
that you'll encounter. Keep hitting the checkpoints and you will soon find that
the path is straightened out with little to no guard rails. Use this spot to
get ahead of the competition by sprinting to your heart's desire. Watch out for
the very sharp left turn with no guard rail up ahead. Get around this by
handbraking down the hill to the left before you even reach the path. Soon
after this, hit the hill and take the grassy shortcut. You'll likely fall off
of your bike, but it shouldn't be a harsh tumble. After the upcoming bumps, the
land will be a straight-away with a few turns. It stays like this until the
bottom.
Race 3 This is a fairly straight-forward race with only a few big turns, although the path itself makes this race the most fun of the three. You will take paths through the wooded areas, and you can even hit a Unique Jump along the way in the center ramp. As stated previously, the path is nearly a dead straight-away, although there are obvious obtacles that will get in your way, such as trees and rocks. Use your handbrake only on the rough turns, as speed is the key to winning this race.
Courier 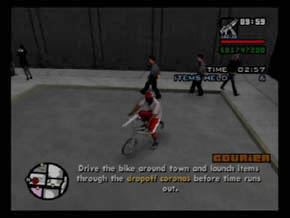 Ever wanted to
play the classic Paperboy in a Grand Theft Auto game? Well, now's your
chance! There are several vehicles scattered around the state that will
activate a Courier Challenge. Once you've boarded the vehicle, you must make
deliveries to certain destinations in certain amounts of time, and to do so,
you must throw the item through a checkpoint ring.
Ever wanted to
play the classic Paperboy in a Grand Theft Auto game? Well, now's your
chance! There are several vehicles scattered around the state that will
activate a Courier Challenge. Once you've boarded the vehicle, you must make
deliveries to certain destinations in certain amounts of time, and to do so,
you must throw the item through a checkpoint ring.
Here are the vehicle locations...
Los Santos Vehicle: BMX Location: Roboi's Food Mart
San Fierro Vehicle: Freeway Location: Hippy Shopper
Las Venturas Vehicle: Faggio Location: Burger Shot (Redsands East)
Firetruck If you can't find a firetruck in town, you can summon one by setting something on fire. Bang up a car until it is toasty, and run it into another car for best effect. When the firetruck comes to put out the blaze, jack it and get inside.
Activate the mission and you will be alerted to a fire nearby. Follow the mini-map to the indicated spot and hose down the fire. Simple as that. When one blaze is put out, go to the next. String as many together as possible. Finish all 12 missions to become fireproof.
 Freight Train You
can board a train at any of the train stations in the big cities. Once you've
jacked the train, hit the R3 button to start the side mission of loading and
unloading things at drop points. This is fairly easy once you get the hang of
it, as it merely consists of hauling items without going too fast, and reaching
your destination within the time limit.
Freight Train You
can board a train at any of the train stations in the big cities. Once you've
jacked the train, hit the R3 button to start the side mission of loading and
unloading things at drop points. This is fairly easy once you get the hang of
it, as it merely consists of hauling items without going too fast, and reaching
your destination within the time limit.
A safe speed to travel at is 44-46 on the meter. If the train is going over 50, you will likely derail on the sharp bends in the tracks. Begin slowing down early, kind of like landing a plane on a runway. Since you have the distance meter, this should become easier as you practice.
Import/Export Loading Docks After completing the "Customs Fast Track" mission, you will unlock the Import/Export business at the Docks in San Fierro. This is convenient due to the main garage being right around the corner, meaning that you can repair anything that you get before you trade it in, buffing up the overall value of the vehicle. Remember, the better condition of the vehicle is the more cash in your wallet. Park the vehicle on the left side of the crane and enter the crane to control. Pick up the vehicle and place it in the red marker.
Upon completing the first five vehicles, you will unlock a new vehicle for import. Another vehicle is awarded at ten. The trend continues until you've completed this sidequest. Look on the chalkboard at the end of the Docks to see where you stand. Most vehicles you've never heard of can be found along the Strip in Las Venturas.
Chalkboard 1:
Chalkboard 2:
Chalkboard 3:
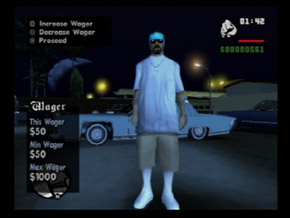
Lowrider After completing Sweet's Cesar Vialpando mission, there will be a dude standing outside of the train station where the first meet occured. Make sure you have a lowrider with hydraulics, get out of the car and speak to the guy near the fence. You'll be directed to the lot where you competed in the CV mission. Go in there and bet on your ability to beat another lowrider. The more you do this, the harder it gets.
The idea here is similar to Parappa, or OG Loc's first mission, if you've played that. The idea is to tweak the right analog in the direction indicated as the string of icons scrolls through the indicator circle. Do it in time to the music and work into a rhythm for best effect. If you're having problems with the timing, try waiting a split-second after each beat to do your move.
|
|
|
You are competing against another lowrider, so your two scores will be tracked on the right side of the screen. All you need to do is edge out your opponent points-wise, and you will win.
NRG-500 Challenge There is a NRG-500 at the Import/Export docks. Hop on to start the missions. You must collect all of the checkpoints in the amount of time given. It looks impossible from the start, but you will gain extra time on the clock with each chickpoint you've went through. Start off by going down the hill of the pool and collecting a few checkpoints, and then turning around to grab the rest inside the pool.
Now, acting as if you were on a skateboard, begin catching air back and forth along the half-pipe to collect the checkpoints that are high in the air above the pool. For the checkpoints along the outer rim, hit the wall where the walkway is to fly over the pool, collecting the outer checkpoints along the way.
Pimping You need to get into a Broadway to trigger these missions. Once inside, press R3 and begin the pimpitude! The idea is roughly the same as a taxi mission. Follow the mini-map to a prostitute (she's a blue marker). Once you get her, another blip will appear... that of the john. Drive the girl over there before time expires. When she's at the john's the other girl will call and ask to be picked up. This is a bit of a juggling act, but the mini-map markers will lead you.
As you get to the higher reaches of the challenge, the johns become violent, and you'll have to protect your girl. Drive over to her location, sort out the john and continue on. After a certain level, you'll start getting a monetary cut of the proceeds, so that's a real bonus of doing these missions. In addition, if you succeed and reach pimp level 10, prostitutes will actually give you money when you invite them into your car.
Quarry Once you play and beat the "Explosive Situation" mission, the quarry will be unlocked for missions of its own. By completing the seven quarry missions, you will make the Hunter Quarry into an asset property that earns you $2000 a day. To do the missions, head out to the desert and go to the large yellow icon on the southeast end. Here's how the missions break down:
Taxi The idea here is to pick people up and take them to their destinations, a la Crazy Taxi. For once, you'll actually have to drive somewhat sane and avoid collisions. Try not to kill anyone in your car, while you're at it. The safer and faster you drive, the more of a tip you will earn.
Like most vehicle missions, this one is about navigating to one point on the map, picking someone up, and driving them elsewhere. Do it with the least amount of bumps and scrapes, and in the fastest times, and you will earn the rewards. You'll earn more rewards by stringing together a bunch of fares delivered in a row. Get fifty fares in one turn and you'll be rewarded with Nitro on any cab-style car.
Triathalon: Beat the Cock! There are two triathalons available, and they are only doable on Saturdays and Sundays. Make sure you build up your Cycling skill by riding a bunch of bikes around (pedal bikes, not motorbikes) before attempting them, or you'll be told to do just that. Head over to one of the two locations and step on the red marker to begin the race. The reason it's called "Beat the Cock"? Because in both cases, your fiercest competitor is a man in a Cluckin' Bell outfit.
Both races are about the same. They will begin with a bit of a swim. Tap X to swim faster and head through the vertical red-lit markers. If you need to know where you're headed next, check out the mini-map to see where the next red marker is, or refer to the arrow that appears within the vertical marker itself. Once you get out of the water, scramble to find a bike (you have limited time). Again, follow the checkpoints until you are told to get off of it. The last portion of the race is all running, so make sure you have a decent stamina rating before even attempting this event (it will help with swimming, too).
Trucking 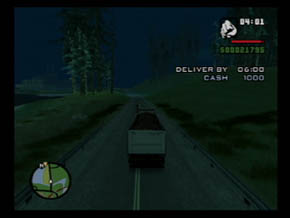 After completing
Catalina's "Tanker Commander" mission, the Trucking vehicle missions
will be available. The truck icon will appear west of Los Santos and you can
head over there at any time and do trucking missions. What are they? Just as
you'd expect, they entail picking up a truckload of something and driving it to
a destination before time runs out. Complete the mission for money.
After completing
Catalina's "Tanker Commander" mission, the Trucking vehicle missions
will be available. The truck icon will appear west of Los Santos and you can
head over there at any time and do trucking missions. What are they? Just as
you'd expect, they entail picking up a truckload of something and driving it to
a destination before time runs out. Complete the mission for money.
Here's how it breaks down:
Valet After you finish the "555 Tip" Mission in San Fierro, you will be able to return to the hotel at any time and do Valet missions. First, you'll need to head to your safe house and change into your valet's uniform. Once you have it on, go back to the hotel to trigger the mission. The idea is simple... park as many cars as possible in the time given. Just like the mission, the idea is to park the cars that arrive in the indicated spot. You'll have to compete with the other valets, but they are relatively lazy. In addition, you will receive a bonus whenever you park a car completely straight in its space.
Like all vehicle challenges, you will go up levels as you are successful, and you'll have to park more and more cars in the 2:00 window. Get up to Level 5 to be the master of the parking domain. This will also make the hotel an asset property, earning you $2000 a day.
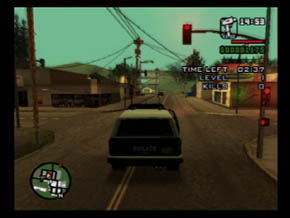
Vigilante Vigilante missions play the same way they always have. Get into any sort of law enforcement vehicle (Police Car, Ranger, HPV1000) and activate a mission. A blip will appear on the map showing the location of a fugitive. Drive to their location and bring that person to justice!
|
|
|
To do so, you'll have to force the person's car into exploding one way or another. It's always handy to have some kind of SMG with you, so that you can use drive-by tactics in order to take out your targets. Each time you complete a Level, you'll be given more time. Run out of time and you're done. Finish level 12 and you'll get more armor.
|