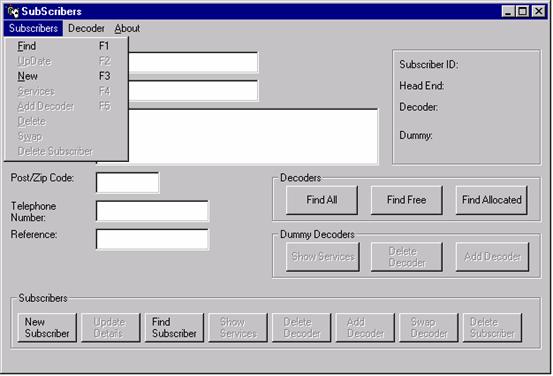
The Subscriber Manager is started using either the icon created on the desktop or via the Windows start menu to launch the Subscriber Manager program.
The Subscriber Manager Starts up with a Splash Screen

Operators have to then enter a Password
The default Password is: OPS
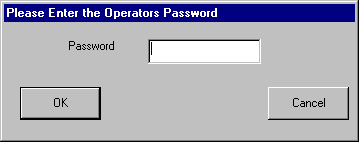
If the operator presses the "Cancel" button then the subscriber application does not start.
If the operator enters the wrong password and presses the "OK" button then the subscriber application does not start.
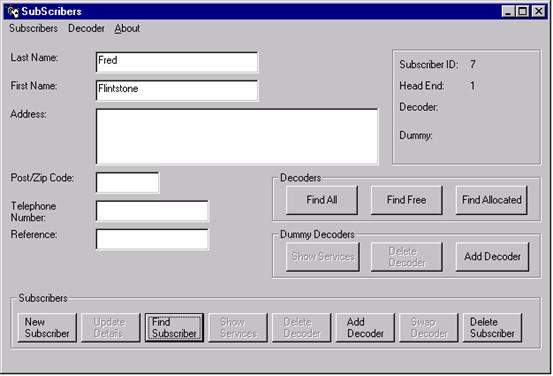
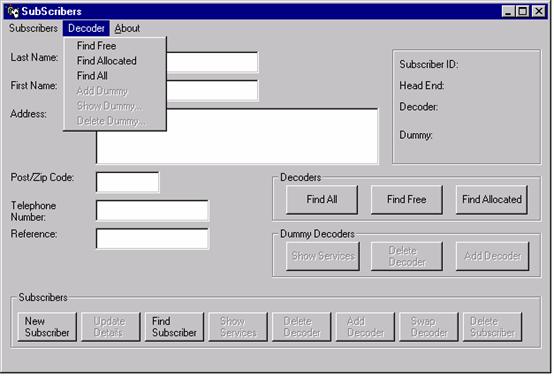
If the correct password is entered and the user presses the "OK" button then the Subscriber Manager Window appears.

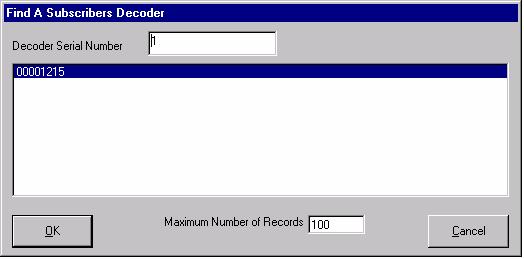
If the operator presses the "Find All" button within the Decoders section then a Window appears showing all the decoders that have either been assigned to a Subscriber or have yet to be assigned
(Used Decoder Serial Numbers are not displayed)
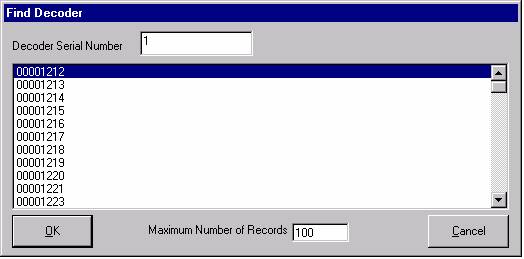
The Serial Numbers of the Decoders are displayed in the list box
The scroll bar on the right of the Window can be used to move the list up and down to view other Decoder Serial Numbers.
The "Decoder Serial Number" Edit Box can be used to find a Decoder Serial Number, type in the Serial Number to be displayed at the top of the List Box
The "Maximum Number of Records" Edit Box can be used to change how many entries can be viewed at any one time in the List Box.
The operator can select a Decoder by clicking on a Serial Number in the List Box, (this will highlight the Decoder Serial Number) and then press the "OK" Button.
The operator can also select a Decoder by double clicking on a Decoder Serial Number in the list box.
If the operator presses the "Cancel" button then this Subscriber Manager Window appears without any changes.
If the selected Decoder has been allocated 757d311h to a Subscriber then the Subscriber's details are displayed on the Subscribers Manager Window.
If the selected Decoder has not been allocated to a Subscriber then the Update Decoder Services Window is displayed
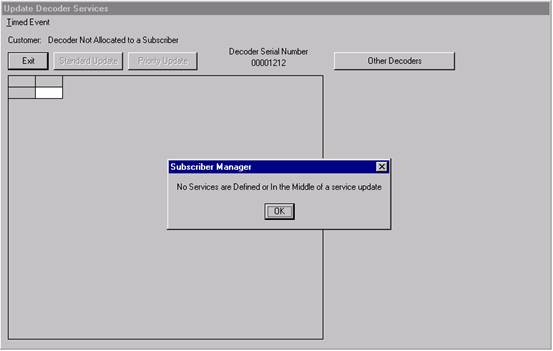
If the operator presses the "OK" button then the message Window disappears.
The operator is able to select a different Decoder by clicking on a Serial Number in the List Box. (This will highlight the Decoder Serial Number) then press the "OK" Button, or alternatively the operator can select a different Decoder by double clicking on a Decoder Serial Number in the list box.
If the operator presses the "Cancel" button then this Subscriber Manager Window appears without any changes.
To return to the Subscribers Manager Window, the operator must press the "Exit" button
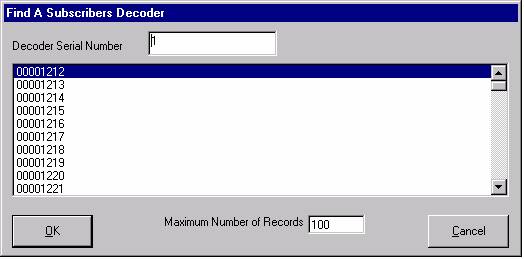
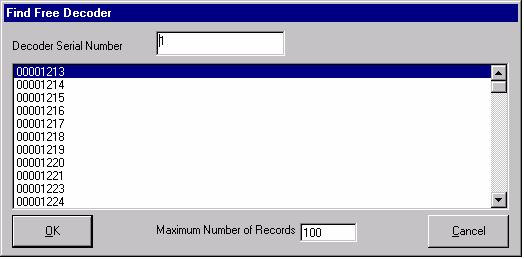
If the operator presses the "Find Free" button in the Decoders section on the Subscriber Managers Window then a Window appears showing all the Decoders that have not been assigned to a Subscriber
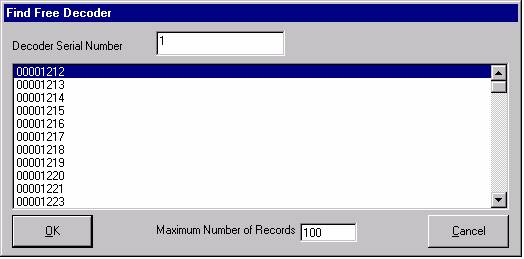
The scroll bar on the right can be used move the list up and down to view other Decoder Serial Numbers.
The "Decoder Serial Number" Edit Box can be used to find a Decoder Serial Number, type in the Serial Number to be displayed at the top of the List Box
The "Maximum Number of Records" Edit Box can be used to change how many entries can be viewed at any one time in the List Box.
The operator can select a Decoder by clicking on a Serial Number in the List Box, (this will highlight the Decoder Serial Number) and then press the "OK" Button.
The operator can also select a Decoder by double clicking on a Decoder Serial Number in the List Box.
If the operator presses the "Cancel" button then this Subscriber Manager Window appears without any changes.
If the operator presses the "Find Free" button in the Decoders section on the Subscriber Managers Window then a Window appears showing all the Decoders that have been assigned to a Subscriber
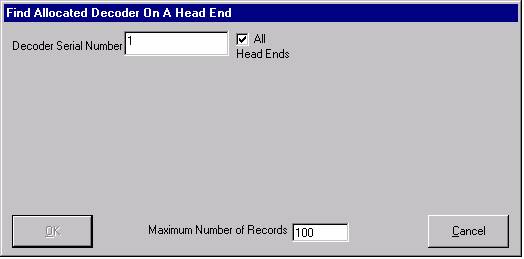
The "Decoder Serial Number" Edit Box can be used to type in the number of the Decoder
The "Maximum Number of Records" Edit Box can be used to change how many entries are in the List Box.
If the Operator unchecked the Tick Box "All Head Ends", a list box appears on the right hand side of the dialogue. This Window displays all the Head Ends allocated to the system.
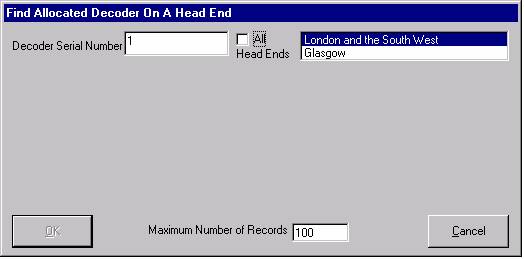
The Decoders assigned to the Head End are displayed in the list box.
The operator can select a Decoder by clicking on the Serial Number (this will highlight the Decoder Serial Number) and then press the "OK" Button.
When the operator presses the "OK" button the Subscribers Details are displayed in the Subscribers Manager Window.
This button is used to allocate a new Subscriber ID into the Database.
All the Subscribers fields are initially blank and the cursor is positioned in the field "Last Name" ready for the operator to type in the Subscribers details

Note: When starting the Subscriber Manager for the first time the Subscriber ID Field will be intentionally left blank. The operator must first select the New Subscriber button before beginning to program any Subscriber details into the Database
The Database runs in an incremental order of Subscribers each time the New Subscriber button is pressed
This button is used to save and update the details entered into the database.
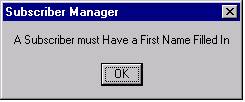
Each Subscriber entry must have at least the "Last Name" and "First Name" ID Fields filled in before being submitted to the Database or the following window appears
To return to the Subscribers Manager Window, the operator must press the "OK" button
After filling in the Subscribers details in the relevant fields and pressing the "Update Details" button the following window appears
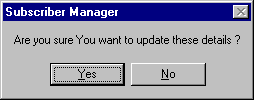
The operator is given the option to cancel the update of the database.
If the operator presses the "No" button then the operation is cancelled and returns to the Subscribers Manager Window
If the operator presses the "Yes" button then the following Window appears

The operator needs to select for which Head End the Subscribers Decoder is to
be assigned to. If more than one head end is configured for the system then the
operator has to select which head end the subscriber will be connected to.
The Head End information is then displayed underneath the Subscriber ID Number in the Subscribers Manager Window
The operator is then is asked if they want to allocate Services to the New Subscriber.

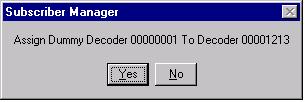
If the operator presses the "Yes" button then a dummy Decoder is assigned automatically to the New Subscriber and the Update Services Window will appear
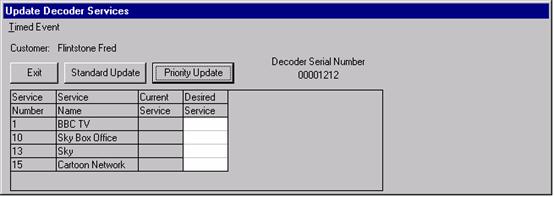
The Operator can now add Services by simply double clicking within the Desired Service Column corresponding to the horizontal row of the Service that the Subscriber has requested.
An "X" indicates that the Service is now allocated to the New Subscriber.
To remove the Service "X" double click on the Service Column
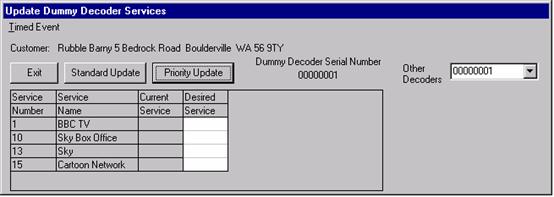
If the Operator presses the "Priority Update" button then the Desired Services are assigned to the Dummy Decoder
If the Operator presses the "Standard Update" button after selecting the Desired Services, then the Desired Services will also be assigned to the Dummy Decoder
If the Operator presses the "Exit" button then the Dummy Decoder by default is left with no Desired Services allocated
The Operator can find a Subscriber using the Find Subscriber Dialogue
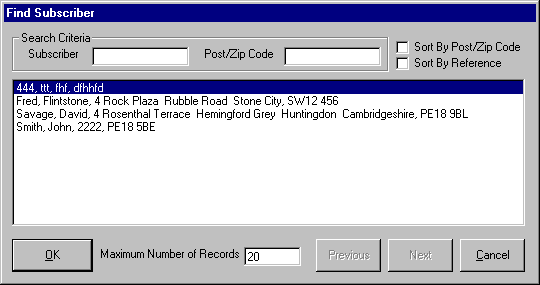
The "Search Criteria" field can be used to reduce the number of matching Subscriber entries shown in the List Box.
When more matching records are available than can be viewed in the list Box, the "Next" and "Previous" buttons come into play. These allow the operator to page through all the matching Subscriber entry records shown in the List Box.
If the "Sort By Post/Zip Code" check box is left unchecked then the search criteria first sorts by the "Subscribers" Edit Box and then secondly by the "Post/Zip Code" Edit Box before finally displaying the matching Subscriber records.
If the "Sort By Post/Zip Code" check box is checked then the search criteria first sorts using the "Post/Zip Code" Edit Box and then secondly by the "Subscribers" Edit Box before displaying the matching Subscriber records.
If the "Sort by Reference" check box is checked then the Window changes to search for Subscribers by their reference only
Note: The reference field can contain any operator specific details
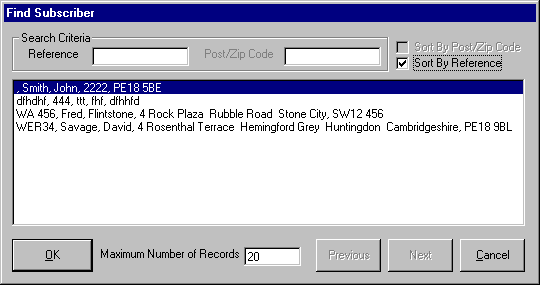
The "Cancel" button returns the operator to the Subscribers Manager Window
The Subscriber List Box contains the Subscribers Reference data before listing the Subscribers details
The "Maximum Number Of Records" Edit Box is used to limit the maximum number of matching records that are returned from the Database to be viewed in the List Box.
The Operator selects a Subscriber by clicking (highlighting) on the Subscriber within the list box and pressing the "OK" button, or the operator can select a Subscriber by double clicking on the Subscriber entry within the list box.
The Subscribers Details are fully displayed for the operator in the Subscribers Manager Window.

The "Add Decoder" button within the Subscribers section is used to add a Decoder to a Subscriber. The following Window appears to allow the operator to choose a Decoder from a list of Free Decoders
The operator can select a Free Decoder from the list by high lighting the Decoder Serial Number and pressing the "OK" button
The operator can also select a Free Decoder by double clicking on the Decoder Serial Number.
The "Cancel" button returns the operator to the Subscribers Manager Window
When the operator has chosen a Decoder Serial Number to be assigned to the Subscriber, if Services have been added to the Subscriber then the ACS will automatically assign a Dummy Decoder. The operator is asked if they want to transfer the Services from the Dummy Decoder onto the new Decoder Serial Number
If the operator presses the "No" button then the Dummy Decoder remains with the Services and the New Decoder Serial Number is added to the Subscriber but without any Services
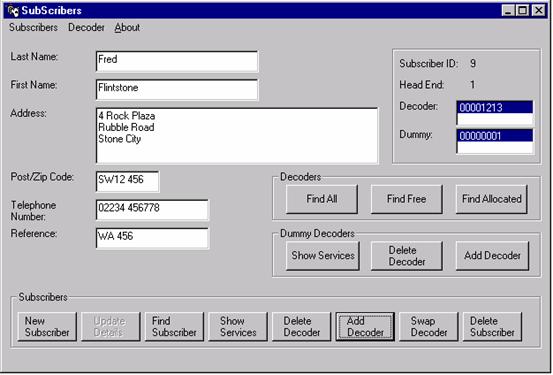
Show Services, Delete Decoder and Swap Decoder buttons are
now available to the operator in the Subscribers section
If the operator presses the "Yes" button then the Dummy Decoders Services are
transferred to the New Decoder Serial Number and the Dummy Decoder is
automatically deleted from the Subscriber
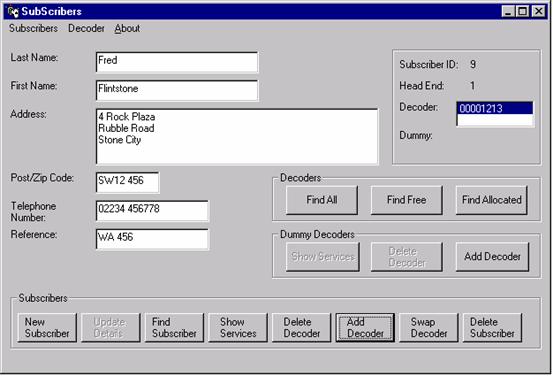
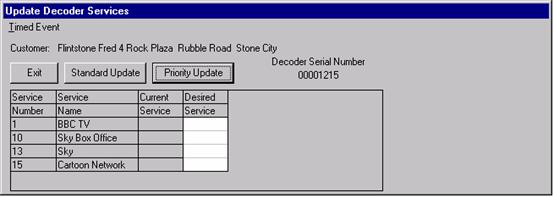
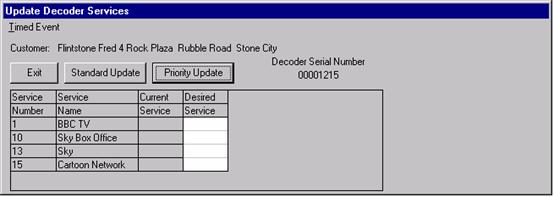
The Services on a Decoder can be displayed by pressing the "Show Services" Button.
If the system is in the middle of a service update or there are no Services defined, then the following Window will appear.
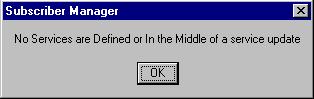
It will not be possible to view these Services until the update is completed or a Service is assigned.
The Subscribers Name and Address are displayed at the top of the Window
If A subscriber has multiple Decoders, then the operator can select between them by using the "Other Decoders" List box on the right hand side of the Window.

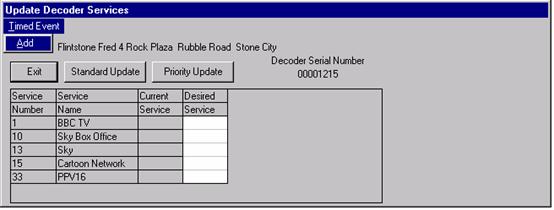
The Operator can select which service to add to the decoder by double clicking in the "Desired Service" column within the row for the Service and an "X" will appear in the intersection,
To remove a Service from a Decoder, the operator must double click in the "Desired Service" column and the "X" will disappear.
Editing the "Desired Services" has no effect until the "Standard or Priority Update" button is pressed. If the Operator presses the "Exit" button then the Services by default have no Desired Services allocated.
Services can be added and removed at specific times by adding a Timed Event to A Decoder.
The operator is able to use the "Timed Event" menu and "Add" sub menu to set a time that the Services will be active on a Decoder.
A Calendar Window will appear to allow the operator to define when the Timed Event will occur.
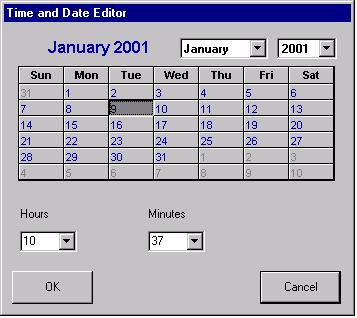
The Operator can select the Year, Month, Day, Hour and Minute for the Timed Event.
If the operator presses the "Cancel" button then the Timed Event is not sent to the Decoder.
If the operator presses the "OK" button then the Timed Event will be sent to the Decoder
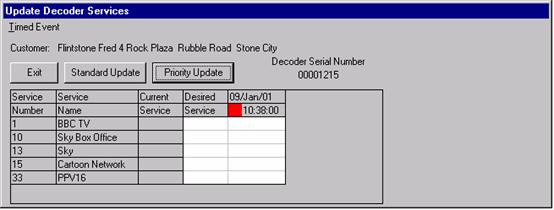
The new column is the Timed Event is the Date and Time at which the Timed Event will occur.
The Red Box next to the Time Box denotes that the Timed Event is not enabled yet.
The operator can assign by double clicking the Timed Event column parallel to the Desired Service column. This defines which Service(s) are turned ON or OFF in the Timed Event

"On" means that the Service will be sent to the Decoder at the time of the Timed Event.
"Off" means that the Service will be removed from the Decoder at the time of the Timed Event.
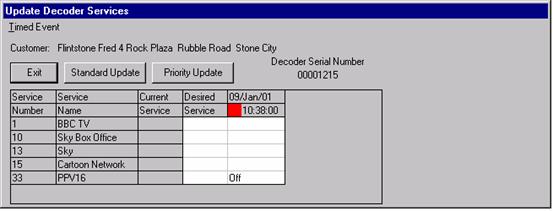
" (Blank) which means that there will be no change at the time of the Timed Event.
The operator is only able to change the Services to be added or deleted when the Timed Event is not enabled (Coloured Red).
The operator can edit the Timed Event by right clicking the mouse whilst on the Timed Event, this will bring up a Popup menu

The Popup Menu allows the operator to edit the Timed Event:
Reschedule The Date and Time Calendar Window will appear.
Delete Deletes the Timed Event from the Update Decoder Services Window
Enable Allow the timed event to happen when the system time exceeds the time of the timed event
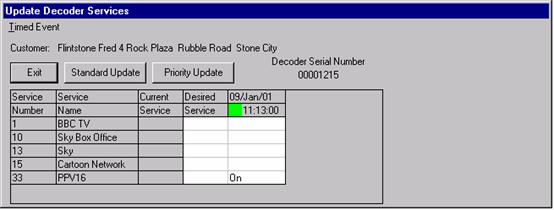
The operator is able to add multiple Timed Events to a Decoder
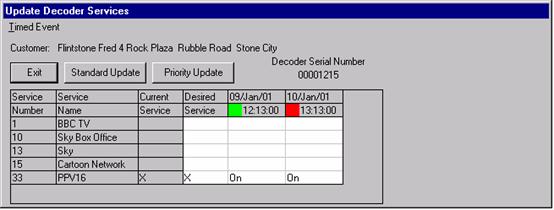
As the Timed Events occur, they are removed from the Decoder
The operator can delete a Decoder from a Subscriber by pressing the "Delete Decoder" button within the Subscribers section of the Subscribers Manager Window.
The operator is asked to select the Decoder to be deleted
If the Operator presses the "Cancel" button then the Decoder Serial Number is not deleted from the Subscriber.
If the Operator selects (Highlights) a Decoder Serial Number and presses the "OK" button then they are asked to confirm if they want to delete the Decoder Serial Number from the subscriber. The Decoder Serial Number can be deleted by double clicking on the highlighted Decoder
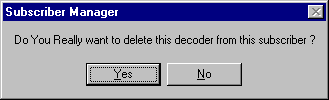
If they press the "NO" button then the Decoder Serial Number is not deleted from the Subscriber.
If they press the "Yes" button then the Decoder Serial Number is deleted from the Subscriber. The Decoder Serial Number is then transferred into the Used Section of the Decoder Database.
The operator can swap a Decoder to and from Subscribers by pressing the "Swap Decoder" button within the Subscribers section of the Subscribers Manager Window.
The operator is asked to select the Decoder to be swapped

The Operator can cancel the operation by pressing the "Cancel" button
If the Operator selects (Highlights) a Decoder and presses the "OK" button
The following Window appears in which they have to select which Free Decoder they want the Service to be swapped to

The Operator can cancel the operation by pressing the "Cancel" button
If the operator selects a Decoder and presses the "OK" button
The following Window appears in which they are asked to confirm if they want to swap the Services from one Decoder to another Decoder.
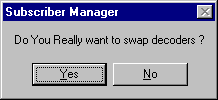
The Operator can cancel the operation by pressing the "No" button and return to the Subscribers Manager Window
If the operator presses the "Yes" button then the Services that are defined on the Decoder allocated to the Subscriber are then transferred to the newly swapped Decoder.
The new Decoder is now allocated to the Subscriber.
The old Decoders Services have been removed and it is then marked as being a Used Decoder.
The operator can delete a Subscriber by pressing the "Delete Subscriber" button within the Subscribers section of the Subscribers Manager Window.
The operator is asked to select the Subscriber to be deleted
The are asked if they really want to do delete the selected (Highlighted) Subscriber currently shown on the Subscribers Manager Window
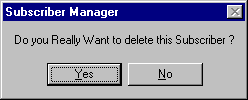
The operator can cancel the operation by pressing the "No" button and return to the Subscribers Manager Window
If the operator presses the "Yes" button, the Subscribers Services are removed and the Decoders that were assigned to the Subscriber are deleted and become Used Decoders. Any Dummy Decoders are also deleted
Note: The Subscribers information still resides in the Subscriber.MDB database File held within the ACS Database
Dummy Decoders can be added to a Subscriber in advance and pre-assigned with the Desired services that the Subscriber has requested before Customer Installation.
At the time of Customer Decoder installation it is possible for the operator to simply swap the pre-assigned Dummy Decoder Services over to the Customer installed Decoder and the Customer will be immediately authorised to view the requested Service package
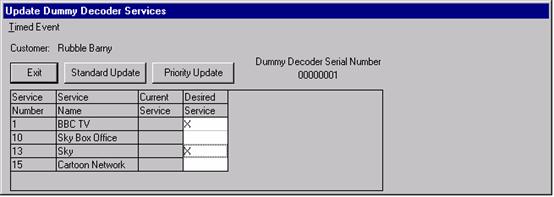
The operator is able to allocate Services to a Dummy Decoder
First select (Highlight) the Dummy Decoder then press the "Show Services" button within the Dummy Decoders section of the Subscribers Manager Window.
The following Window appears.
The Operator can select which service to add to the Dummy Decoder by double clicking in the "Desired Service" column within the row for the Service and an "X" will appear in the intersection,
To remove a Service from a Decoder, the operator must double click in the "Desired Service" column and the "X" will disappear.
Pressing the "Priority Update or Standard Update" button will assign the requested Desired Services to the Dummy Decoder and the Window exits and returns to the Subscribers Manager Window
The operator is able to exit this Window without assigning any Desired Services to the Dummy Decoder by pressing the "Exit" button
The operator is able to delete a Dummy Decoder by pressing the "Delete Decoder" button within the Dummy Decoders section of the Subscribers Manager Window.
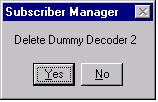
The operator is asked to select (Highlight) the Dummy Decoder to be deleted then the following Window appears.
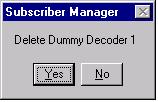
If more than one Dummy Decoder is allocated to the Subscriber then the operator is asked which dummy decoder is to be deleted
The operator is able to add Dummy Decoders to a Subscriber
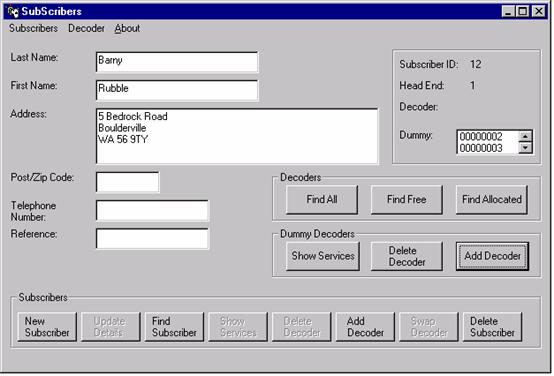
When the operator has allocated more than one Dummy Decoder to a Subscriber the operator is able to view the other Dummy Decoders by using the "Up" and "Down" Arrow keys to the right of the Dummy Decoders in the List Box
Note: A Subscriber can have multiple Dummy Decoders with or without Services assigned to them.
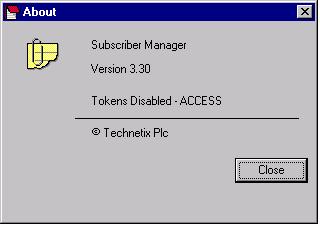
The About item menu in the Subscriber Manager Window, allows the operator to view the current Software release of the ACS and the Installation configuration
END OF SECTION 4
|
