ALTE DOCUMENTE
|
|
 TheArtists Bunting Library
![]()
![]()
|

A STEP-BY-STEP ART INSTRUCTION BOOK
|
|
|
|
|
|
|
P / |
|
>-^ |
I
BY WENDON BLAKE
|
|
(JKrtist's'J^aintinQ library
PORTRAIT DRAWING
BY WENDON BLAKE/DRAWINGS BY JOHN LAWN
WATSON-GUPTILL PUBLICATIONS/NEW YORK
ARN.eBook
Copyrighi 1981 by Billboard Ltd.
Published 1981 in the United States by Watson-Guptill Publications, a division of VNU Business Media, Inc., 770 Broadway, New York, NY 10003 www.watsonguptilLcom
Library of Congress Cataloging In Publication Data
Blake, Wendon Portrait drawing,
(The arlisfs painting library)
Originally published as pt. 3 of the aulhor's The drawing book.
1. Portrait drawing Technique. I. Lawn, John.
II. Blake, Wendon. Drawing book. Ill Title,
IV. Series: Blake. Wendon. Artists painting library,
NC773.B57 1981 743.42 81-11533
ISBN 0-8230-4094-1 AACR2
All rights reserved. No part of this publication may be reproduced or used in any form or by any means graphic, electronic, or mechanical, including photocopying, recording, taping, or information storage and retrieval systems without written permission of the pu 13413x2310n blisher.
Manufactured in U.SA
First Printing, 1961
17/04 03 02
ARN.eBook
CONTENTS 3
Introduction 4 Getting Started 5 Equipment 6 Form and Proportion 8 Drawing the Eye; Front View 10 Drawing the Eye: Three-quarter View 11 Drawing the Eye: Side View 12 Drawing the Eye: Tilted View 13 Drawing the Mouth: Front View 14 Drawing the Mouth: Three-quarter View 16 Drawing the Mouth: Side View 18 Drawing the Mouth: Tilted View 19 Drawing the Nose: Front View 20 Drawing the Nose: Three-quarter View 21 Drawing the Nose: Side View 22 Drawing the Nose: Tilted View 23 Drawing the Ear; Side View 24 Drawing the Ear: Front View 25 Drawing the Head: Front View 26 Drawing the Head: Three-quarter View 30 Pencil Drawing 34 Demonstration 1. Blond Woman 36 Demonstration 2, Brown-Haired Man 40 Demonstration 3+ Black Man 44 Demonstration 4. Dark-Haired Woman 48 Chalk Drawing 52
Demonstration 5. Dark-Haired Man 54 Demonstration 6. Blond Man 58 Demonstration 7, Oriental Woman 62 Charcoal Drawing 66
Demonstration 8. Brown-Haired Woman 68 Demonstration 9. Black Woman 72 Demonstration 10. Gray-Haired Man 76 Lighting 80
ARN.eBook
INTRODUCTION 4
Portrait Drawing. The human face is so endlessly fascinating, so infinitely diverse, so expressive of the most delicate emotional nuances that many artists have devoted their lives to portraiture. Every sitter is different, presenting a new and fascinating challenge to the artist who must capture not only the form and detail of the sitter's face, but also the unique flavor of the sitter's personality. The same face can change radically with a slight turn of the head or a slight difference in the direction of the light. And as the sitter's mood changes, the emotional content of the portrait changes too. Thus, the expressive possibilities of portraiture are so great that drawing the human head can become an obsession- one of life's most delightful obsessions-and you may find this subject so absorbing that other subjects seem tame. Like so many artists throughout the centuries, you may discover that there's nothing more exciting than watching a real human being come to life on paper. For the artist who's fascinated by people, the human face is the ultimate subject.
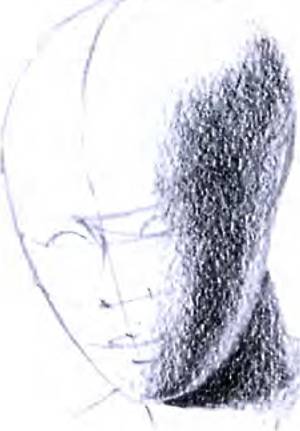
Form and Proportion. In the drawings of the great Renaissance masters, the complex form of the human head is often visualized very simply-as an egg shape with guidelines that wrap around the egg to define the placement of the features. In the first few pages of Portrait Drawing, you'll learn how to put this elementary diagram of the head to work, You'll learn to draw the egg shape in line and then make il three-dimensional by adding light and shade. You'll learn how to convert that "Renaissance egg" into a variety of male and female heads, seen from various angles: front view, side view, three-quarter view, and finally, a view of the head tilted downward. Its important to memorize this egg shape- and the placement of its guidelines-so that you can then adapt it, with subtle changes in proportion, to any head you may draw.
Drawing the Features. One of the best ways to learn to draw is to look over the shoulder of a skilled professional as he draws, then try it yourself. You'll watch noted artist John Lawn draw each facial feature, step by step, from a variety of angles. You'll see him draw male and female eyes-front, three-quarter, and side views, as well as tilted downward. In the same way, you'll learn to draw the male and female nose and mouth as seen in these same four views. And finally, you'll learn how to draw the ear as seen from the front and side of the head.
Drawing the Complete Head. Having mastered the basic form of the head and learned how to draw the fea-
tures, you'll then watch John Lawn put all this information together into demonstration drawings of complete male and female heads. You HI watch him build the overall form of the head and the forms of the individual features, from the first sketchy guidelines to the final drawing, fully realized in light and shade. The step-by-step demonstrations of the features and the complete head all show four fundamental stages in executing a successful drawing: blocking in the forms with simple guidelines: refining the contours: blocking in the tones in broad masses; and completing the drawing by refining the lines and tones and then adding the last touches of detail.
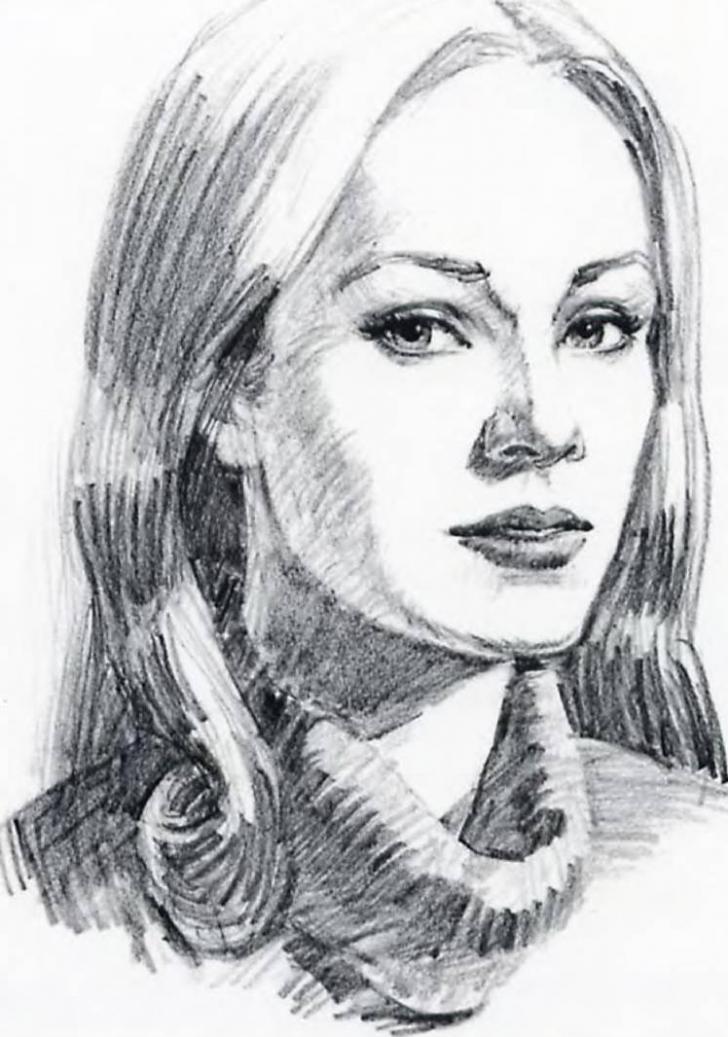
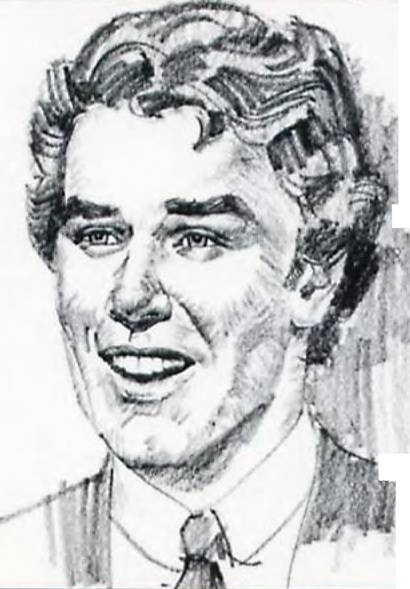
Complete Portrait Demonstrations. After demonstrating the fundamentals. Lawn goes on to demonstrate, step by step, how to draw ten complete portraits of different types of sitters, including various hair and skin tones, ages, racial and ethnic types. The demonstrations also show how to render diverse lighting effects that accentuate the character, beauty, and expressiveness of the individual head. The demonstrations are grouped according to drawing medium. There are pencil drawings of a blond woman, a brown-haired man, a black man, and a dark-haired woman, Chalk drawings include a dark-haired man, a blond man, and an oriental woman. Finally, there are charcoal drawings of a brown-haired woman, a black woman, and a gray-haired man. Each of these step-by-step demonstrations shows every drawing operation, from the first stroke on the paper to the last. The demonstration section concludes with a brief review of four different types of lighting that are particularly effective in drawing portraits: each type is illustrated with a drawing that explains how the specific method of lighting affects the character of the head.
Drawing Media, Each step-by-step portrait demonstration presents a different method of rendering form, texture, and light and shade in pencil, chalk, and charcoal. You1!I see how form is rendered entirely with lines and strokes; how tone can be created by blending, so that penciL chalk, and charcoal handle like paint: and finally, how lines, strokes, and blending can be combined. The demonstrations are executed on a variety of drawing papers to show you how the drawing surface influences the tone and texture of the portrait. These various techniques, drawing tools, and papers are dramatically illustrated by close-ups of sections of finished drawings, reproduced actual size.
ARN.eBook
GETTING STARTED 5
Keep It Simple. The best way to start drawing is to get yourself just two things: a pencil and a pad of white drawing paper about twice the size of the page you Ye now reading. An ordinary office pencil will do-but test it to make sure that you can make a pale gray line by gliding it lightly over the paper, and a rich black line by pressing a bit harder. If you'd like to buy something at the art-supply store, ask for an HB pencil, which is a good all-purpose drawing tool, plus a thicker, darker pencil for bolder work, usually marked 4B, 5B, or 6B. Your drawing pad should contain sturdy white paper with a very slight texture-not as smooth as typing paper. (Ask for cartridge paper in Britain.) To get started with chalk drawing, all you need is a black pastel pencil or a Conte pencil. And just two charcoal pencils will give you a good taste of charcoal drawing: get one marked "medium1' and another marked "soft/1 You can use all these different types of pencils on the same drawing pad.
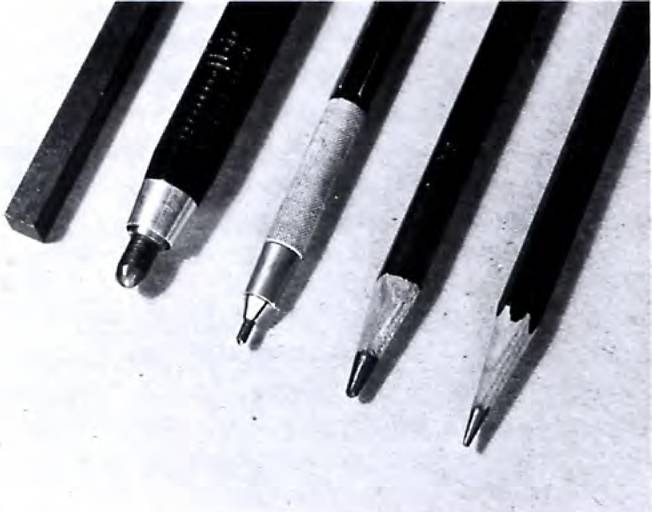
Pencils. When we talk about pencil drawing, we usually mean graphite pencil. This is usually a cylindrical stick of black, slightly slippery graphite surrounded by a thicker cylinder of wood. Artists' pencils are divided roughly into two groupings: soft and hard. A soft pencil will make a darker line than a hard pencil. Soft pencils are usually marked B, plus a number to indicate the degree of softness-3B is softer and blacker than 2B, Hard pencils arc marked H and the numbers work the same way-3H is harder and makes a paler line than 2H. HB is considered an all-purpose pencil because it falls midway between hard and soft. Most artists use more soft pencils than hard pencils. When you're ready to experiment with a variety of pencils, buy a full range of soft ones from HB to 6B + You can also buy cylindrical graphite sticks in various thicknesses to fit into metal or plastic holders. And if you'd like to work with broad strokes, you can get rectangular graphite sticks about as long as your index finger.
Chalk, A black pastel pencil or Conte pencil is just a cylindrical stick of black chalk and, like the graphite pencil, it's surrounded by a cylinder of wood. But once you Ve tried chalk in pencil form, you should also get a rectangular black stick of hard pastel or Conte crayon. You may also want to buy cylindrical sticks of black chalk that fit into metal or plastic holders,
Charcoal Charcoal pencils usually come in two forms. One form is a thin stick of charcoal surrounded by wood, like a graphite pencil. Another form is a stick of charcoal surrounded by a cylinder of paper that you can peel off in a narrow strip to expose fresh charcoal as the point wears down. When you want a complete "pal-
ette11 of charcoal pencils, get just three of them, marked "hard/7 "medium,1' and "soft." (Some manufacturers grade charcoal pencils HB through 6B, like graphite pencils; HB is the hardest and 6B is the softest,) You should also buy a few sticks of natural charcoal, You can get charcoal "leads11 to fit into metal or plastic holders like those used for graphite and chalk.
Paper, You could easily spend your life doing wonderful drawings on ordinary white drawing paper, but you
should try other kinds. Charcoal paper has a delicate, ribbed texture and a very hard surface that makes your stroke look rough and allows you to blend your strokes to create velvety tones. And you should try some really rough paper with a ragged, irregular "tooth" that makes your strokes look bold and granular. Ask your art-supply dealer to show you his roughest drawing papers. Buy a few sheets and try them out.
Erasers (Rubbers). For pencil drawing, the usual eraser is soft rubber, generally pink or white, which you can buy in a rectangular shape about the size of your thumb or in the form of a pencil, surrounded by a peel-off paper cylinder like a charcoal pencil. For chalk and charcoal drawing, the best eraser is kneaded rubber (or putty rubber), a gray square of very soft rubber that you can squeeze like clay to make any shape that's convenient. A thick, blocky soap eraser is useful for cleaning up the white areas of the drawing.
Odds and Ends, You also need a wooden drawing board to support your drawing pad-or perhaps a sheet of soft fiberboard to which you can tack loose sheets of paper. Get some single-edge razor blades or a sharp knife (preferably with a safe, retractable blade) for sharpening your drawing tools; a sandpaper pad (like a little book of sandpaper) for shaping your drawing tools; some pushpins or thumbtacks (drawing pins in Britain); a paper cylinder (as thick as your thumb) called a stomp, for blending tones; and a spray can of fixative^ which is a very thin, virtually invisible varnish to keep your drawings from smudging.
Work Area. When you sit down to work, make sure that the light comes from your left if you Ye right-handed, and from your right if you Ye left-handed, so your hand won't cast a shadow on your drawing paper. A jar is a good place to store pencils, sharpened end up to protect the points. Store sticks of chalk or charcoal in a shallow box or in a plastic silverware tray with convenient compartments-which can be good for storing pencils too. To keep your erasers clean, store them a-part from your drawing tools-in a separate little box or in a compartment of that plastic tray,
ARN.eBook
EQUIPMENT 6
|
|
|
|
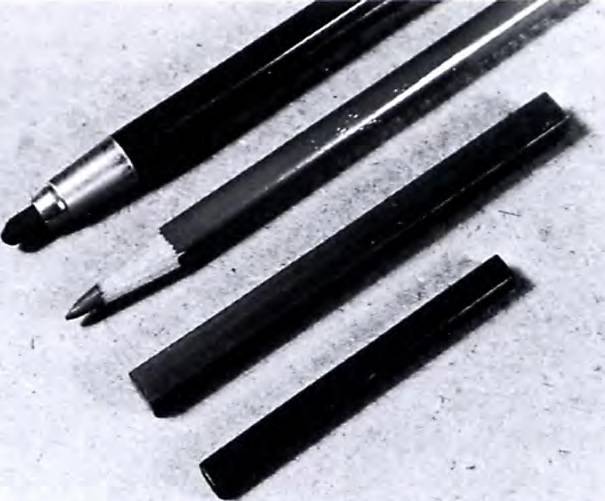
Pencils. The common graphite pencil comes in many forms. Looking from right to left, you see the all-purpose HB pencil; a thicker, softer pencil that makes a broader, blacker mark; a metal holder that grips a slender, cylindrical lead; a plastic holder that grips a thick lead; and finally a rectangular stick of graphite that makes a broad, bold mark on the paper. 11*5 worthwhile to buy some pencils as well as two or three different types of holders to see which ones feel most comfortable in your hand.
Chalk. Shown here are four kinds of chalk. Looking from the lower right to the upper left, you see the small, rectangular Conte crayon; a larger, rectangular stick of hard pastel; hard pastel in the form of a pencil that's convenient for linear drawing; and a cylindrical stick of chalk in a metal holder. All these drawing tools are relatively inexpensive, so it's a good idea to try each one to see which you like best.
|
|
|
|
|
|
|
|
Charcoal. This versatile drawing medium comes in many forms. Looking up from the bottom of this photo, you see a cylindrical stick of natural charcoal: a rectangular stick of the same material; a charcoal pencil; another charcoal pencil-with paper that you gradually tear away as you wear down the point; and a cylindrical stick of charcoal in a metal holder. Natural charcoal smudges and erases easily, and so it's good for broad tonal effects. A charcoal pencil will make firm lines and strokes, but the strokes don't blend as easily.
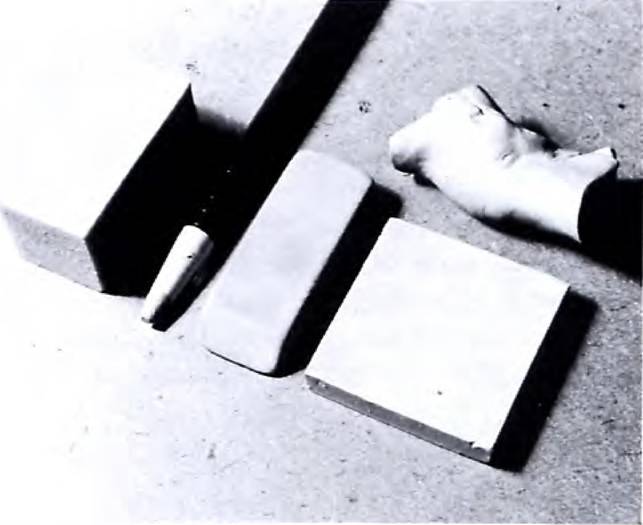
Erasers (Rubbers). From left to right, you see the common soap eraser, best for cleaning broad areas of bare paper; a harder, pink eraser in pencil form for making precise corrections in small areas of graphite-pencil drawings; a bigger pink eraser with wedge-shaped ends for making broader corrections; and a square of kneaded rubber {putty rubber) that's best for chalk and charcoal drawing. Kneaded rubber squashes like clay (as you see in the upper right) and can take any shape you want. Press the kneaded rubber down on the paper and pull away; scrub only when neces-sary,
ARN.eBook
|
|
EQUIPMENT
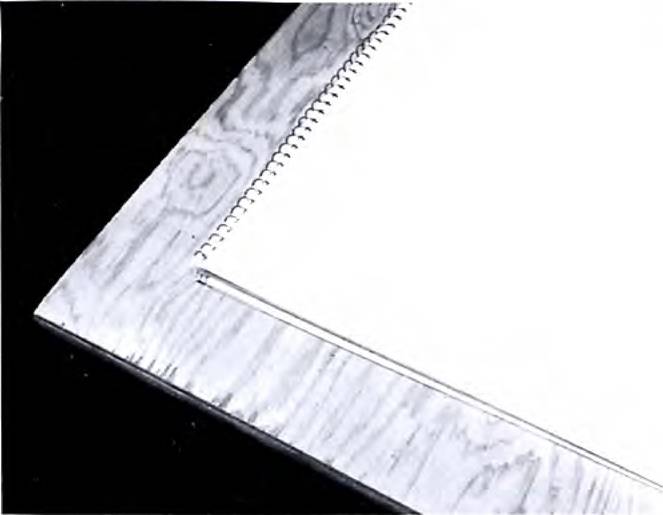
Drawing Board and Pad. Drawing paper generally comes in pads that are bound on one edge like a book. Most convenient is a spiral binding like the one you see here, since each page folds behind the others when you've finished a drawing. The pad won*t be stiff enough to give you proper support by itself, so get a wooden drawing board from your art-supply store-or buy a piece of plywood or fibcrboard. If you buy your drawing paper in sheets, rather than pads, buy a piece of soft fiberboard to which you can tack your paper.
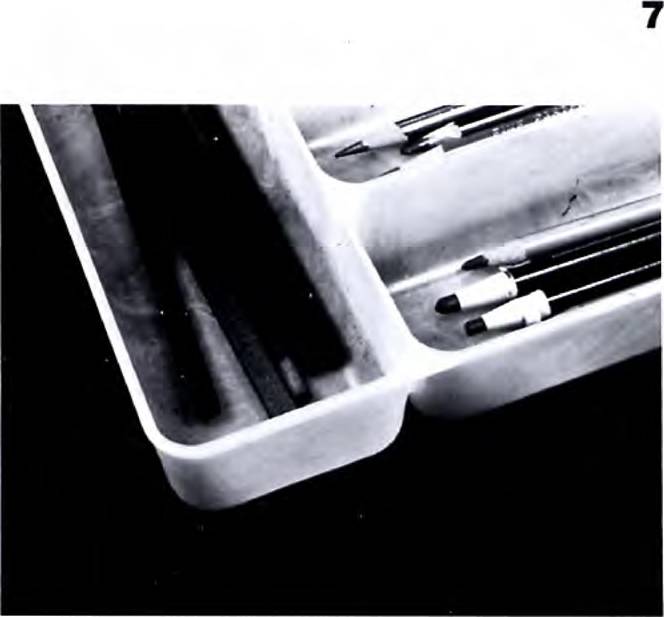
Storage* Store your pencils, sticks of chalk, and sticks of charcoal with care-don't just toss them into a drawer where they'll rattle around and break. The compartments of a silverware container (usually made of plastic) provide good protection and allow you to organize your drawing tools into groups. Or you can simply collect long, shallow cardboard boxes-the kind that small gifts often come in.
|
|
|
|
Knife and Sandpaper Pad, The pencil at the right has been shaped to a point with a mechanical pencil sharpener. The other pencil has been shaped to a broader point with a knife and sandpaper. The knife is used to cut away the wood without cutting away much of the lead. Then the pencil point is rubbed on the sandpaper to give it a broad, flat tip. Buy a knife with a retractable blade that's safe to carry. To the right of the knife you see a sandpaper pad that you can buy in most art-supply stores; it's like a small book, bound at one end so you can tear off the graphite-coated pages.
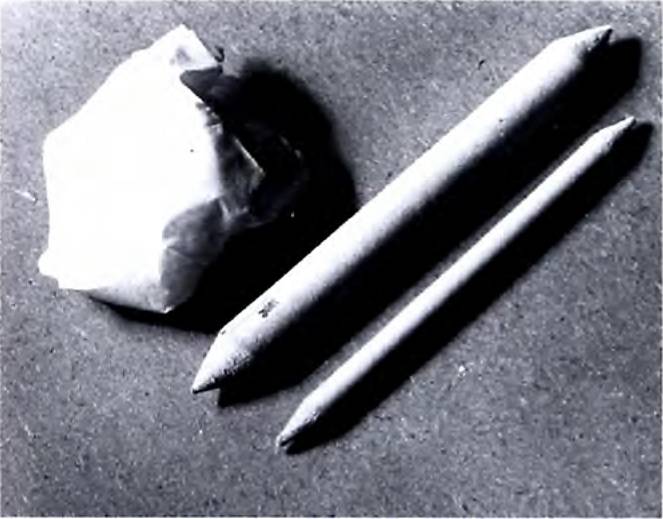
Stomps and Cleansing Tissue. To blend charcoal and push the blended tones into tight corners, you can buy stomps of various sizes in any good art-supply store. A stomp is made of tightly rolled paper with a tapered end and a sharp point. Use the tapered part for blending broad areas and the tip for blending smaller areas, A crumpled cleansing tissue can be used to dust off unsatisfactory areas of a drawing in natural charcoal. (It's harder, however, to dust off the mark of a charcoal pencil.) You can also use the tissue to spread soft tones over large areas.
ARN.eBook
FORM AND PROPORTION
|
|
|
|
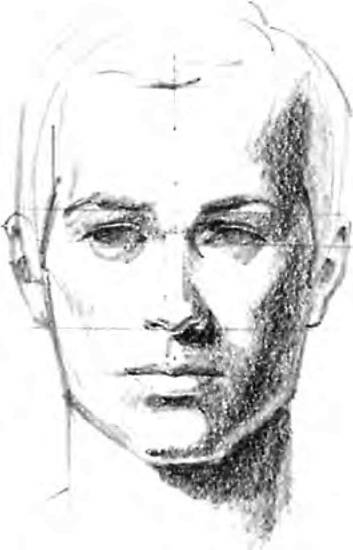
Egg Shape. Seen from the front, the head is shaped like an egg- Many artists actually begin by drawing an egg shape, as you see here. Drawing a vertical center line helps you to place the features symmetrically. It also helps if you draw horizontal guidelines to locate the features on either side of the vertical center line.
Head Shape. The tones on the head follow the same sequence as the tones on the egg. Looking from left to right, you can see four tonal areas that flow smoothly together: light; halftone (or middletone), where the shape begins to curve away from the light; shadow; and reflected light, where the shadow turns paler. The chin casts a shadow on the neck.
|
|
|
|
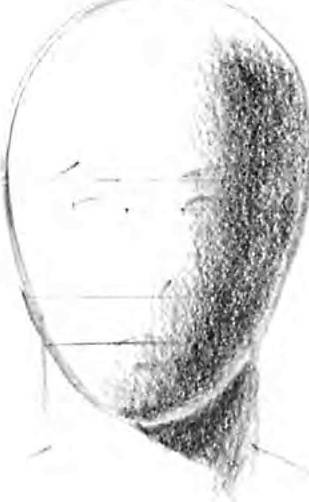
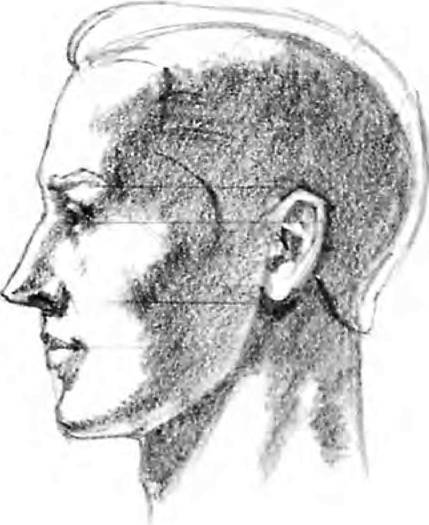
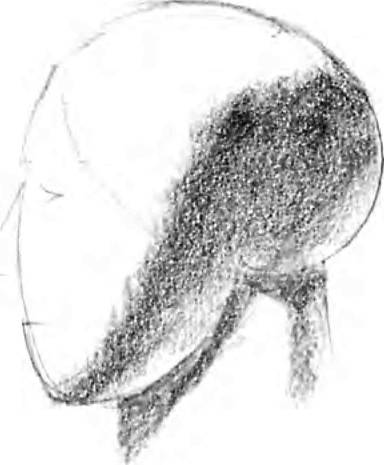
Egg Shapes* When you draw a side view, visualize the head as two overlapping eggs; one vertical and one horizontal, with both tilting a bit. Once again, looking from left to right, you can see the tonal gradations of light, halftone {or middletone), shadow, and reflected light. There's a similar gradation on the right side of the cylindrical neck.
Head Shape. Obviously, the forms of the head are more complex than the egg shape and cylinder, but the gradation of tones is essentially the same. You can see the light, halftone, shadow, and reflected light most clearly on the big shapes of the skullt cheek, and jaw. They also appear in more subtle form on the eye socket, nose, and neck.
ARN.eBook
FORM AND PROPORTION
|
|
Egg Shapes. The head turns until it's midway between a front and side view. This is called a three-quarter view. You stilJ see two overlapping eggs* The vertical egg is obvious, but you see a bit less of the horizontal egg. The gradation of four tones remains essentially the same.
Head Shape. On the egg and on the head, the light comes from the right, and so the gradation of light, halftone, shadow, and reflected light moves from right to left. You can see the gradation most clearly on the shadow side of the face* It's also obvious on the chin and jaw. The nose casts a shadow on the upper lip, while the earlobe casts a shadow behind the jaw.
|
|
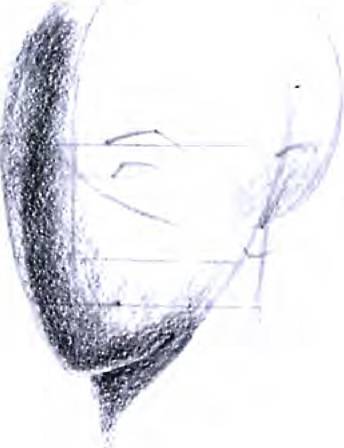
Egg Shapes. When the head tilts downward-or when you're looking at the head from above-you still see the two overlapping egg shapes, but an important change takes place in the guidelines. Note how they curve: the horizontal guidelines wrap around the head in parallel rings. Although the alignment of the features may change, the gradation of four tones remains essentially the same.
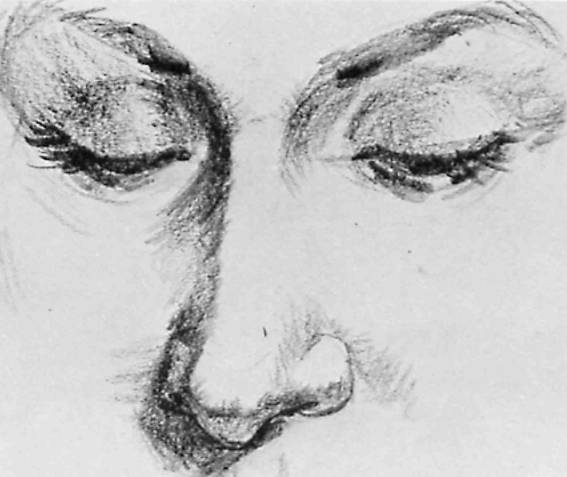
Head Shape. Looking from left to right on the egg and on the real head, you can still see the four interlocking tones: light, halftone, shadow, and reflected light, plus the cast shadow on the neck. The gradation is most apparent on the forehead, cheek, and jaw. You can also see it on the eye sockets and nose. The light comes from the upper left, and so the nose casts a shadow to the right.
ARN.eBook
DRAWING THE EYE: FRONT VIEW
,"
|
|
|
|
|
|

i
■■v
s
|
|
** * _
V V5
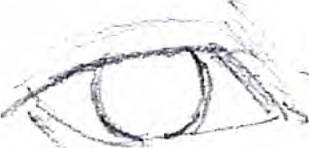
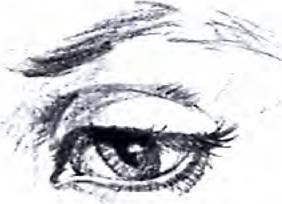
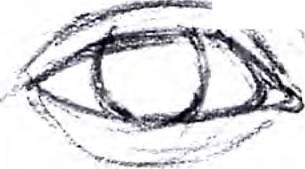
Step 1. The artist hegins to draw the eye by indicating its basic contours with a few casual but carefully placed lines. He suggests the complete upper and lower lids, as well as the eyebrow and the comer of the eye socket at the side of the nose. At this stage the iris is just a circle. Study the contours of the inner edges of the lids. Stinting from the outer corner, the top lid follows a long, flattened curve and turns down a bit at the inside comer. The lower lid does just the opposite, starting from the inside comer as a long, flattened curve and then turning upward at the outside comer,
Step 2, Pressing harder on the point of his pencil, the artist moves back over the casual guidelines of Step 1 to refine the contours. The rather angular lines of Step 1 become rounder and more rhythmic. They eye begins to look more lifelike. The shapes of the lids are more clearly defined. It's particularly important to remember that the upper Lid always overlaps the iris, cutting off part of the circle. The lower lid touches the iris but doesn't overlap it quite so much.
|
|
|
|
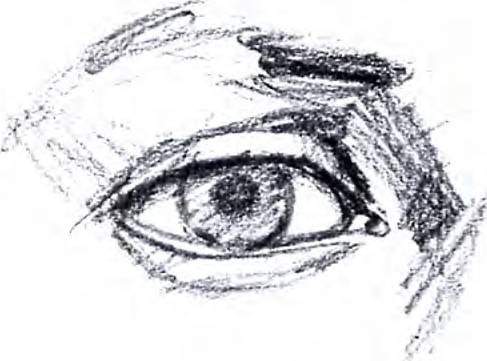
Step 3. Having drawn the contours more accurately, the artist now begins to block in the tones with broad, spontaneous strokes. The tones are actually clusters of parallel strokes, which you can see most clearly in the tone of the iris and the shadow inside the eye socket. The artist suggests the dark spot of the pupil, and he carefully draws the shadow that the upper lid casts across the iris and over the white of the eye. He indicates the shadows at the comers of the lids and on the underside of the lower lid.
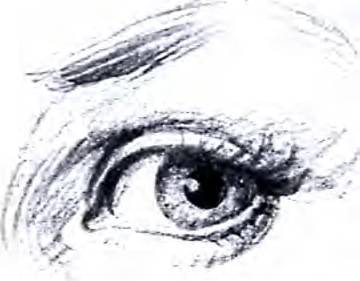
Step 4, In the final stage, the artist strengthens his tones and adds the final details. He darkens the shadowy lines around the eyelids and deepens the shadow cast over the eye by the upper lid, He darkens the iris and the pupil* picking out the highlight on the iris with a quick touch of an eraser. More clusters of parallel lines darken the corner of the eye socket alongside the nose. Scribbly, erratic lines suggest the eyebrow. And using the sharp point of a pencil, he carefully retraces the contours of the upper lid and the tear ducts at the corner of the eye.
ARN.eBook
DRAWING THE EYE: THREE-QUARTER VIEW
|
|
|
|
Step 1. When the head turns from a front view to a three-quarter view, the eye turns too, of course, and its shape changes. If the sitter is looking straight at you, the iris moves to the side, as you see here. Once again, the artist begins with quick, casual lines. He draws the main contours of the eyelids, iris, and eyebrow, with a slight suggestion of the eye socket along the side of the nose. Have you noticed the straight, horizontal line that crosses the eye? That's the guideline that the artist has drawn across the egg-shaped head to locate the eyes.
Step 2* The artist goes over the lines of Step l with darker, more precise lines. The curves of the eyelids are defined more carefully, the disc shape of the iris is drawn more precisely, and the pupil is added. In the three-quarter view, the eye doesn't seem quite as wide as it does in the front view. But the curving shapes of the lids are essentially the same. From the outer corner, the top lid begins as a long, flattened curve and then turns steeply downward at the inside corner. Conversely, the lower iid starts from the inside corner as a long, flattened curve and then turns sharply upward at the outside comer.
|
|
|
|
Step 3. The artist begins to suggest the distribution of tones with clusters of parallel strokes. These broad strokes are made with the side of the pencil lead, rather than with the sharp tip. Notice how the strokes tend to curve around the contours of the eye sockets. The shadowy edges of the lids are drawn carefully. Once again, the artist indicates the shadow that's cast across the eye by the upper lid. The pupil is darkened. The eyebrow is darkened slightly, but the strongest darks are saved for the final step.
Step 4. The artist blackens the pupil, darkens the iris, and strengthens the shadowy edges of the eyelids. More groups of parallel strokes-made by the side of the lead-curve around the eye socket to darken the tones and make its shape look rounder. On the white of the eye, a touch of shadow is added at the corner. Long, graceful lines suggest the hairs of the eyebrow, while short, curving lines suggest eyelashes. An eraser picks out highlights on the pupil. Compare the soft, rounded character of this female eye with the more angular mate eye on the preceding page.
ARN.eBook
DRAWING THE EYE: SIDE VIEW
|
|
|
|
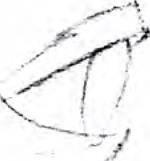
Step 1. The eye is actually a small sphere that rests in the circular cup of the eye socket. It's a good idea to begin by drawing the complete sphere, as the artist does here. Around the sphere, he wraps the eyelids, like two curving bands, and places the iris on the front of the sphere. The eyebrow curves around the edge of the sphere. If you visualize the eye in this way, it looks rounder and more three-dimensional, Later on, you can erase the lines of the sphere, of course.
Step 2. Working with the pencil point, the artist carefully sharpens the lines of the lids, draws the iris more precisely, and adds the pupil. A second line is added to indicate the top of the lower lid. Now you have an even stronger feeling that the eyelids are bands of skin that wrap around the sphere of the eye-although the artist has erased most of the Jines of the sphere that appear in Step 1. The artist begins to strengthen the lines of the eybrow, which has a distinct S-curve. Compare the upper and lower lids: the upper lid has a steeper slant than the lower lid, and juts farther forward.
|
|
|
|
Step 3. Moving the side of the pencil lightly over the paper with parallel strokes, the artist begins to block in the tones. He darkens the eyebrow and indicates the shadow beneath the brow, just above the bridge of the nose. He adds shadows to the edges of the curving eyelids and places a deep shadow in the eye socket, just above the upper lid* The upper lid casts a distinct strip of shadow over the iris and the white of the eye. The artist darkens the iris and the pupil.
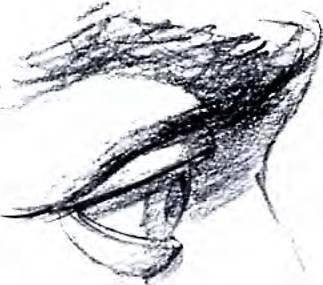
Step 4. Still working with the side of the pencil, the artist darkens the shadows with clusters of broad, parallel strokes. He accentuates the shadows around the eye, making the eye sockets seem deeper. He also darkens the shadowy edges of the eyelids and adds a few dark touches to suggest eyelashes. The iris becomes a darker tone and the pupil becomes darker still-highlighted with a white dot made by the tip of a kneaded rubber eraser. Just above the lower lid, a hint of tone makes the white of the eye look rounder. Rhythmic, curving strokes complete the eybrow.
ARN.eBook
DRAWING THE EYE: TILTED VIEW
|
|
r '
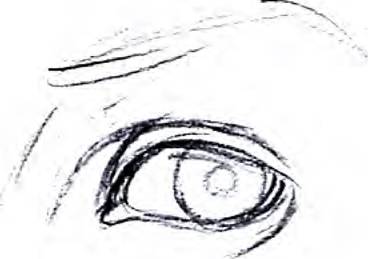
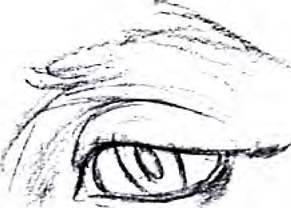
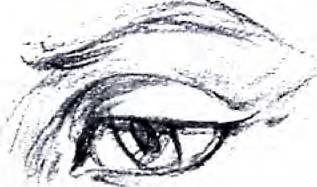
Step 1, When the head tilts downward, the eye tilts downward too. As you can observe in this preliminary sketch, the tilted view of the eye shows you more of the upper lid and less of the lower lid. You also see less of the iris and the white of the eye because the upper lid seems to come farther down. These first sketchy lines define the curves of the eye-lids-wrapping around the ball of the eye-as well as the corner of the eye socket and the typical S-curve of the eye-brow.
Step 2- The artist draws the contours of the eye and the eyelids carefully over the sketchy guidelines of Step I. Because we Ye looking down at the eye from above, we see a lot of the upper lid, and the shape of the eye itself seems more slender than it looks in a front view. The artist sharpens the lines of the iris and draws the pupil. He draws the tear duct more precisely. Then he begins to suggest the inner contours of the eye socket with groups of curving lines that follow the rounded shape of the socket. Note how the upper lid overlaps the lower lid at the outer comer.
|
|
|
|
Step 3. To block in the tones, the artist moves the side of the pencil lightly across the paper. Clusters of curving, parallel strokes suggest the roundness of the eye socket, above the eye and in the corner adjacent to the nose. The shadows on the lids are also executed with curving strokes. The iris is darkened with parallel strokes, and the artist presses harder on the pencil to darken the pupiL Horizontal strokes suggest the shadow cast by the upper lid across the iris and the white of the eye. A deep shadow is placed in the inner corner of the eye< Long, curving, rhythmic strokes suggest the eyebrow,
Step 4. To complete the drawing, the artist builds up the shadow around the eye with thick strokes, using the side of the pencil lead. He strengthens the deep shadow that's cast by the eye socket on the upper lid and then darkens the shadow beneath the lower lid. He darkens the iris and pupil, deepens the shadow that's cast by the upper lid, and adds delicate touches of tone to the white of the eye. Most of the eye is in shadow because it turns downward, away from the light. An eraser picks out just a few areas of light, and the point of the pencil adds the details of the lashes and eyebrow.
ARN.eBook
DRAWING THE MOUTH: FRONT VIEW
Step 1- The artist begins to draw the mouth with straight, simple construction lines. Down the center of the drawing, you can see the vertical center line that helps him construct a symmetrical mouth and chin. The dividing line between the lips is one of the horizontal guidelines that the artist draws across the egg-shaped head. Above this horizontal line, the artist draws four basic lines for the upper lip and three lines for the lower lip, plus a scribble to suggest a shadow beneath the lower lip. Note that he also indicates the groove that travels from the upper lip to the base of the nose.
IHP*"?/^ ;
|
|
|
|
Step 2. The upper lip is actually shaped something like a pair of wings that meet at the center line of the face* The artist redraws the upper lip with firmer strokes to indicate this shape. The lower lip consists of a blocky frontal plane and two triangular side planes. The artist adds lines to indicate these planes. He also strengthens the vertical center line to suggest the slight crease that runs down the center of the lower lip.
%- ^
<Jr'
. tjtfTX.^+r-" *'"'
A
-v
i**"1*1
ARN.eBook
DRAWING THE MOUTH: FRONT VIEW
|
|
|
|
■
'A
Step 3. Turning the pencil to make broad strokes with the side of the lefid, the artist begins to block in the tones with groups of parallel strokes. The upper lip is usually in shadow because it turns downward* away from the light. Between the lips, the artist places a line of deep shadow. And there's a pool of shadow beneath the lower lip. The light is coming from the left, so the artist places shadows on the side planes at the right-away from the light, For the same reason, he begins to indicate a shadow on the right side of the chin and suggests a bit of shadow in the groove above the upper lip.
'r-
|
|
|
|
|
|
|
r |
|
|


.- -
|
|
|
|
![]() /.-.-,:- .
/.-.-,:- .
ft
![]()
Step 4. Having indicated the pattern of light and shade roughly in Step 3, the artist strengthens all these tones in the final step. He darkens the upper lip, which is just a bit lighter at the left-the lighter side of the face. The lower lip is divided into three tonal areas-halftone at the left, light in the center, and shadow at the right-which correspond to the three planes drawn in Step 2, The artist strengthens the dark line between the lips, builds up the shadow beneath the lower lip, strengthens the modeling on the jaw and chin, and adds more tone to the groove above the upper lip, Notice the strong touches of shadow at the corners of the mouth.
ARN.eBook
DRAWING THE MOUTH: THREE-QUARTER VIEW
Step 1. The artist draws the wing shape of the upper lip with curving lines to suggest the softness of the female mouth. He draws the full lower lip with a single curve. The horizontal line between the lips is the usual horizontal guideline that he draws across the egg shape of the head to indicate the placement of the mouth. The head turns slightly to the left and so does the mouth; therefore, the vertical center line is also slightly to the left, and the mouth is no longer symmetrical. We see more of its right side.
|
|
|
|
Step 2. Going back over the sketchy lines of Step 1, the artist draws the shapes of the lips more exactly, Study the intricate contours of the wing-shaped upper lip. Note how the center of the upper lip dips downward over the lower lip. The artist doesn't draw dividing lines for the three planes of the lower lip, but the outer contour is squared slightly to suggest those planes. He also refines the shape of the jaw and chin with additional lines.
' r. * -j ■ j ■
N
ARN.eBook
DRAWING THE MOUTH: THREE-QUARTER VIEW
|
|
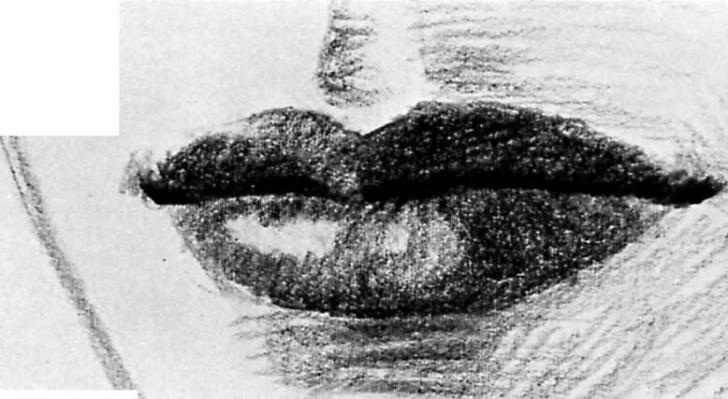
Step 3. The artist begins to darken the upper lip, whieh is normally in shadow, as you've seen in the preceding demonstrations. He darkens the dividing line between the lips, accentuating the shadows at the corners of the mouth. Just above this dark line, he darkens the shadowy upper lip to emphasize its roundness. He places a light tone on the lower lip, which turns upward and receives the light, but he darkens the shadowr plane at the right, Rough strokes darken the pool of shadow beneath the lower lip. He begins to add tone to the side of the chin and jaw. And he adds a heavy shadow to the groove above the upper lip.
|
|
|
|
|
|
|
V- |
|
|
Step 4. The artist continues to darken the shadowy upper lip and strengthens the dividing line between the lips. He adds more tone to the corners of the mouth. Although the lower lip receives more light than the upper one, the lips are darker than the surrounding skin-so lie adds more tone to the lower lip, leaving just a patch of light for a highlight. He darkens the shadow plane of the lower lip at the right and strengthens the shadowy underside of the lip to make the shape look rounder, finally, he adds more tone to the chin and jaw, as well as to the groove above the upper lip. Compare the soft, round female mouth in this demonstration with the more angular male mouth in the preceding demonstration.
ARN.eBook
DRAWING THE MOUTH: SIDE VIEW
![]()
|
![]()
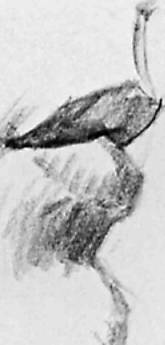
Step 1. Above the horizontal guideline that represents the dividing line between the lips, the artist draws the upper lip with just a lew erisp lines, plus a single line for the curve leading upward to the base of the nose- In the same way, he draws the lower lip with a few angular lines and then carefully draws the shape of the chin with curving strokes. Notice the slanted line that touches the tips of the upper and lower lips at the right, This is an important guideline because it indicates the relationship between the lips: the upper lip normally protrudes farther forward.
Step 2. Working carefully over the sketchy lines of Step I, the artist redefines the shapes of the lips with darker lines. Notice how the upper lip turns down and slightly overlaps the lower lip. The lower lip recedes slightly and is just a bit thicker than the upper lip* The artist also strengthens the lines of the chin and accentuates the shadowy corner of the mouth.
|
|
|
|
. -r
-..■ a
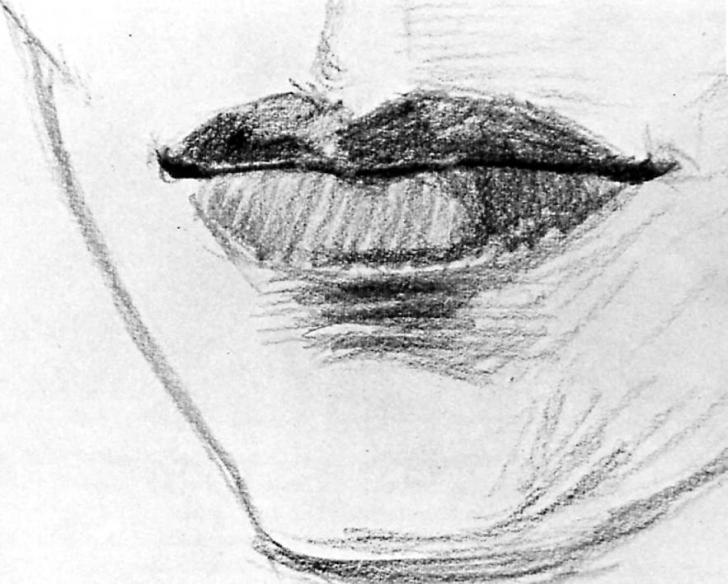
Step 3. The artist adds broad areas of tone with the side of the lead, You can see clearly that the upper lip is in shadow because it slants downward, away from the light. The lower lip is paler because it turns upward and receives the light. The upper lip casts just a hint of shadow across the lower lip; there's also a hint of shadow along the lower edge. Beneath the lower lip is a concave area that curves away from the light and is filled with shadow. The artist adds more shadow at the corner of the mouth and begins to model the tunes of the chin and jaw.
Step 4, The artist darkens the upper lip and accentuates the shadow line between the lips, as well as the dark corner of the mouth. He deepens the pool of shadow beneath the lower lip and adds more strokes to model the entire jaw area, which now becomes rounder and more three-dimensional- Finally, he darkens the forward edge of the lower lip, which receives the shadow cast by the overlapping upper lip* It's interesting to study the pattern of the pencil strokes, which gradually change direction to follow the curving forms of the mouth, chin, and jaw.
ARN.eBook
DRAWING THE MOUTH: TILTED VIEW
|
|
|
|
|
|
|
|
|
|
|
|
|
|
|
A/- |

![]()
f *** d
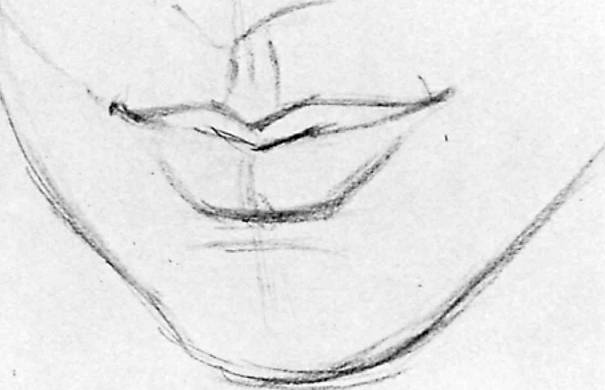
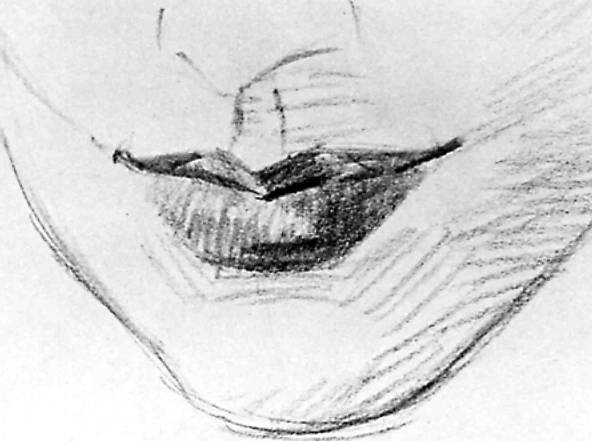
Step 1. When the head turns downward-or when we look at the head from slightly above-we get a different view of the mouth. We see somewhat less of the upper lip and more of the lower lip. (In this drawing, the head is turned slightly to the left, and so we also see more of the right side of the mouth.) As you've seen in previous demonstrations, the preliminary drawing captures the wing shape of the upper lip and the three planes of the lower lip-all with straight, simple lines.
Step 2. The artist redraws the lips with softer, curving lines and gently erases the more angular guidelines of Step 1. Now you see the protruding center of the upper lip, which slightly overlaps the lower lip. The corners of the mouth turn slightly upward and the wing shape of the upper lip becomes more graceful. The artist also strengthens the lines of the chin, the jaw, and the groove between the upper lip and the base of the nose.
|
|
|
|
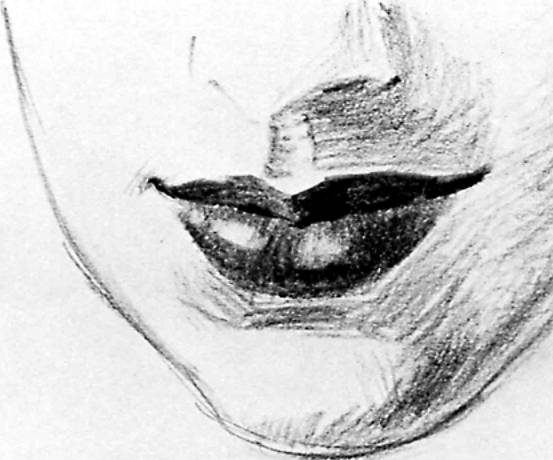
Step 3. The artist darkens the upper Xvp selectively. The upper lip actually has a kind of zigzag shape that's sometimes in light and sometimes in shadow. This is most apparent at the center, where the left plane catches the light and the right plane is in shadow; the artist accentuates the shadow plane to make the shape jut forward. He also darkens the line between the lips, adds tone to the lower lip, darkens the shadow plane at the right, and also darkens the underside of the lower lip to make the shape look rounder. He begins to model the tones on the chin and jaw,
Step 4. As the artist darkens the tones of the lips, it's obvious that the light comes from the left, since the right planes are in shadow. He darkens the right sides of both lips and deepens the shadow line between the lips. He also accentuates the dark corners of the mouth. The shadowy underside of the lower lip is darkened to make the shape look rounder and fuller. An eraser picks out highlights on the rounded lower lip. The artist darkens the shadow area beneath the lower lip and models the soft curves of the chin and jaw+
ARN.eBook
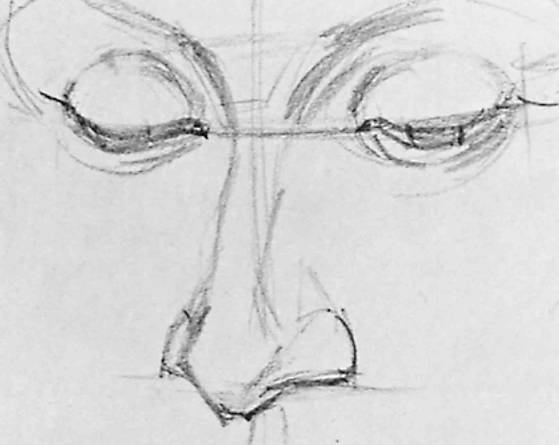
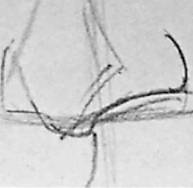
DRAWING THE NOSE: FRONT VIEW
|
|
|
|
|
|
|
|
|
> |
|
|
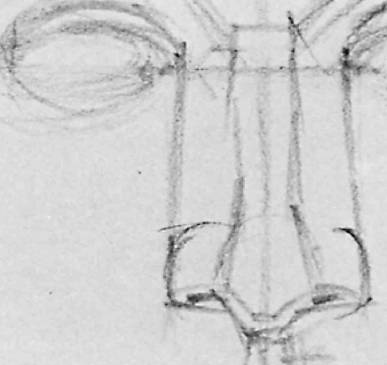
Step 1. The preliminary sketch emphasizes the proportions of the nose in relation to the eyes. The space between the eyes is usually the width of one eye. The artist draws vertical guidelines down from the inner corners of the eyes to indicate the width of the nose-which is about "one eye wide' at the base. These vertical guidelines establish the outer edges of the nostrils. Now study the inner guidelines: the diagonals that connect the brow to the bridge: the verticals that define the bridge; and the diagonals that indicate the tip of the nose. The vertical center line aids symmetry.
Step 2. Over the vertical guidelines of Step L the artist draws curving lines to define the shapes of the nostrils, plus firm, straight lines to define the tip of the nose more precisely. The artist doesn't draw the nose in isolation but works on the other features at the same time. He begins to define the shapes of the eyes more precisely, since the shape of the nose flows into the eye sockets. He also indicates the shape of the groove leading from the nose to the upper lip,
|
|
|
|
Step 3. With the side of the lead, the artist blocks in the tones with broad strokes. The light comes from the left, and so the right side of the nose is in shadow. Since the nose locks into the eye sockets, the artist adds tone to the sockets at the same time. There's a particularly dark patch of tone in the eye socket at the right, just above the bridge of the nose. The nose also casts a shadow downward toward the right, over the upper lip. The artist erases the guidelines of Step 1, adds tone to the underside of the nose, and darkens the nostrils.
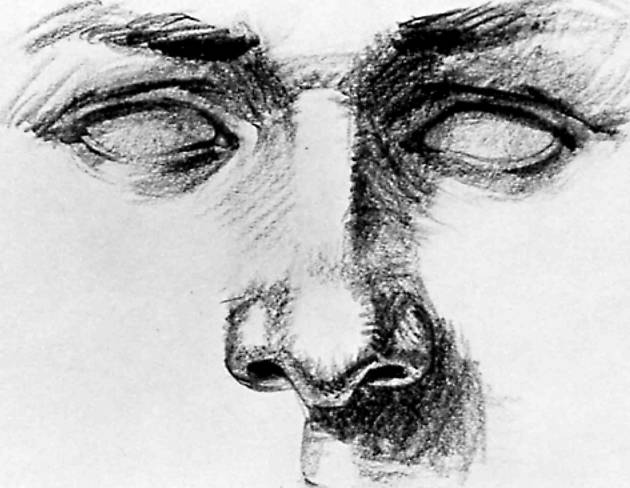
Step 4. The artist now sharpens the contours and builds up the tones, Study the subtle gradation of tone on the shadow side of the nose, as well as the gradations on the tip of the nose and the nostrils. The underside of the nose is in shadow, but there's just enough reflected light within the shadow to define the shapes. Notice how the cast shadow under the nose is paler as the tone recedes downward. There are also deep shadows in the eye sockets on either side of the nose, plus a soft patch of shadow just above the bridge, where the brow slants down, away from the light.
ARN.eBook
DRAWING THE NOSE: THREE-QUARTER VIEW
|
|
|
|
|
|
|
|
|
|
|
|
|
|
|
I |
-/'"
V
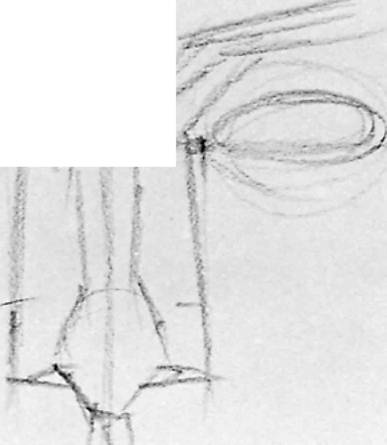
Step 1* When the head turns to a three-quarter view, the nose no longer looks symmetrical; we see more of one .side. In this drawing, the head also tilts slightly upward, and so we see more of the underside of the nose* The artist starts with the slanted lines of the brow, leading downward along the eye sockets to the hridge of the nose. The bridge and side plane arc indicated by vertical lines that lead down to the base of the nose, which is roughly **one eye wide.1 Curving lines indicate the nostrils and the tip of the nose. The artist draws the eyes at the same time,
Step 2* Following the guidelines of Step L the artist refines the curved shapes of the nostrils, the tip of the nose, and its underside. He also refines the shapes of the eyes and the eye sockets that flow into the sides of the nose.
|
|
|
|
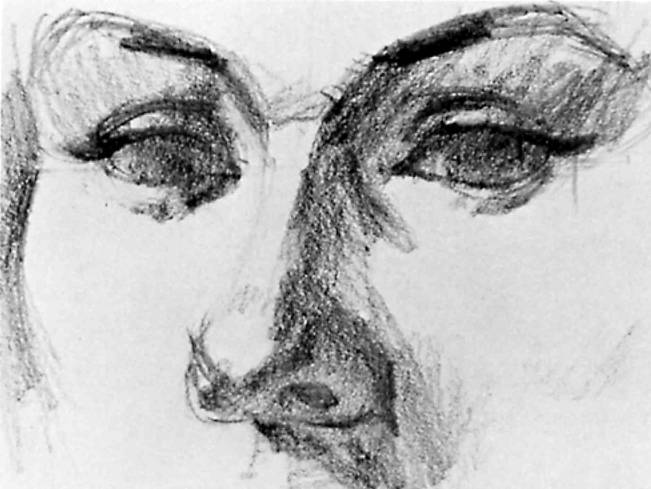
Step 3, The side of the pencil begins to indicate the shapes of the shadows with rough, scribbly strokes. The light comes from the left, and so the right side of the nose is in shadow, So is the underside, which also casts a slanted shadow downward. The artist also begins to model the eye sockets, since their shapes are inseparable from the shape of the nose. You already begin to see the distinction between halftone and shadow on the tip and side of the nose.
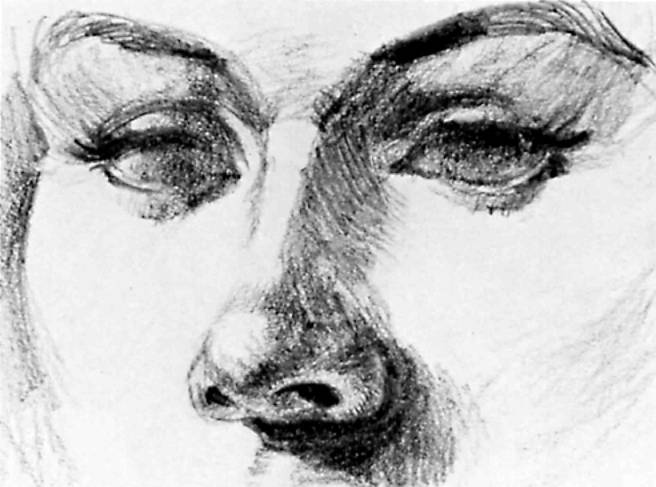
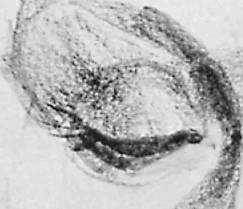
Step 4. The artist continues to build up the tones on the shadow side of the nose and around its tip. The wings of the nostrils are clearly defined by darker strokes, as well as by touches of reflected light. Notice that the rounded lip of the nose is modeled as a separate form, very much like a little balk The artist darkens the eye sockets on either side of the nose to make the bridge stand out more distinctly. He's erased the guidelines of Step I and continues to work on the surrounding features as he works on the nose.
ARN.eBook
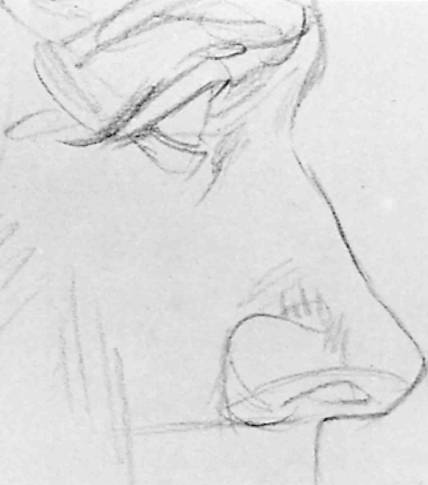
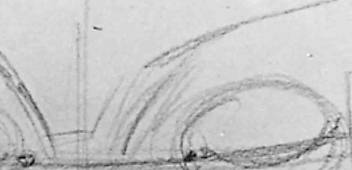
DRAWING THE NOSE: SIDE VIEW
|
|
|
|
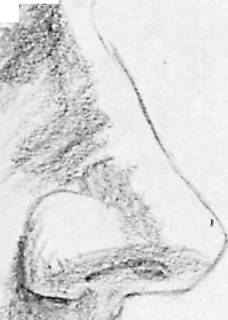
Step 1. Drawing the nose in profile, the artist carefully follows the horizontal guidelines that locate the eye and the base of the nose. He draws the brow and the eye at the same time to establish an accurate relationship between the features. The eye is just above the bridge of the nose and aligns with the concave curve beneath the brow. The back end of the nostril wing lines up roughly with the forward cd^c of the upper eyelid. The nose itself is drawn with just a few straight lines and a few curves.
Step 2. The artist draws the contours more precisely over the guidelines of Step 1-and then erases most of them. Now there's a distinct S-curve from the bridge of the nose down to the tip. The underside of the nose is clearly defined as a separate plane, The curving shape of the nostril wing is more carefully drawn. The artist also refines the curve of the brow and continues to work on the eye as he draws the nose, A few strokes divide the tip of the nose and the nostril into separate shapes-this division will become more important when tone is added in Steps 3 and 4.
|
|
 K si
K si
Step 3. The artist begins to block in the tones with broad strokes, using the side of the pencil lead. The light comes from the left, and so the front plane of the nose is in the light, while the side plane is in shadow. The underside of the nose and the back of the nostril are also in shadow, while the front plane of the nostril catches the light. Notice that a patch of shadow now divides the tip of the nose from the nostril. There's also a patch of deep shadow in the eye socket.
Step 4. As the artist strengthens his dark tones, you begin to see a clear distinction between light, halftone, and shadow on the side of the nose and on its underside. The artist deepens the shadow on the eye socket and darkens the nostriL With the sharp point of the pencil, he draws the contours of the brow, nose, and upper lip more exactly. Notice a hint of shadow where the brow turns downward, away from the light. And observe how the slanted strokes of the pencil accentuate the three-dimensional character of the forms.
ARN.eBook
DRAWING THE NOSE: TILTED VIEW
|
|
|
|
|
|
|
|
■ (
Step 1. In this view of the nose, the head tilts slightly downward, and so we see very little of the underside of the nose. The head is also turned slightly to the left, and so we see more of the right side and very little of the left. In this preliminary sketch, the artist visualizes the tip of the nose as a kind of diamond shape. The undersides of the nostrils look like curves. The outer edges of the nostril wings still align with the inside corners of the eyes,
Step 2, The artist continues to define the rounded shapes of the nostrils more precisely. He sees very little of the nostril on the left and a great deal of the one on the right. The tip of the nose seems to hang downward, since we Ye looking at it from slightly above. The artist redraws the bridge of the nose, which widens slightly just above the eyes. He works on the eyes at the same time that he draws the nose. Because the head and eyes turn downward, we see a great deal of the upper eyelids.
|
|
|
|
|
|
|
|
|
|
|
|
|
-v |
^N*
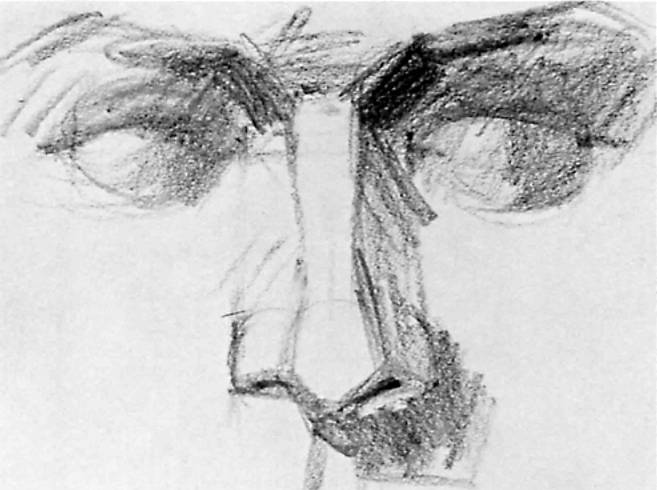
Step 3. The light comes from the right, and so the artist builds up the tones on the left sides of the forms. The left side of the nose is in shadow. So is the underside, which casts a slanted shadow downward toward the upper lip. The artist carefully models the inner curves of the eye sockets, which define the top of the nose. In particular, notice the dark curve of the eye socket at the left, which swings around the bridge of the nose*
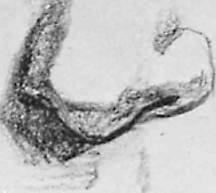
Step 4. The artist continues to darken the inner curves of the eye sockets; these tones make the bridge of the nose seem more three-dimensional. He darkens the tone on the shadow side of the nose; now you see a clear gradation of light, halftone, and shadow. He models the tip of the nose as if if s a little balk He models the nostril at the riizht as a separate shape, surrounded by tone. The pencil point sharpens the contours of the underside of the nose. At the right of the lighted nostril wing, a hint of tone suggests the inner edge of the cheek.
ARN.eBook
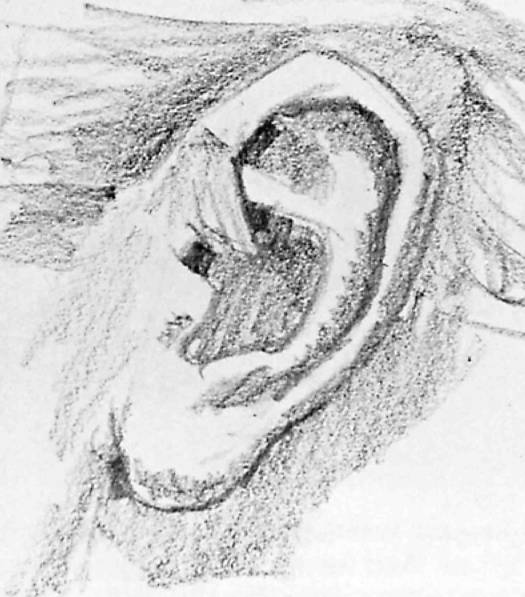
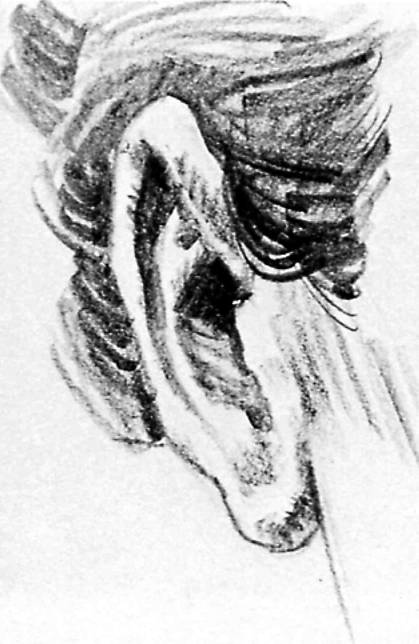
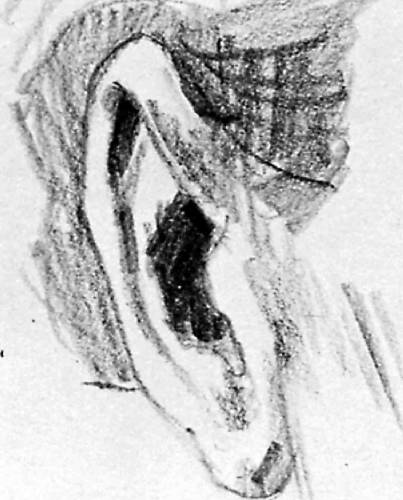
DRAWING THE EAR: SIDE VIEW
|
|
|
|
|
|
>'
; I t
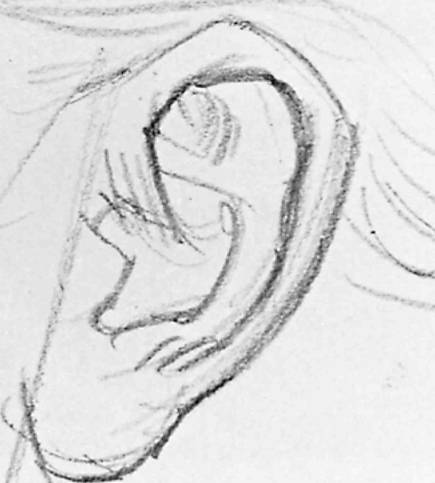
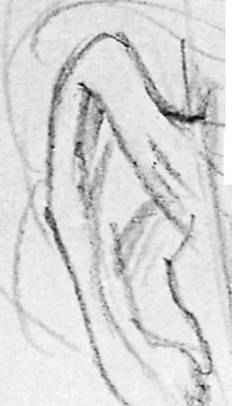
Step 1, The artist begins by drawing a guideline diagonally upward from the jaw. The ear attaches to this line. He draws the top of the ear with two angular lines and then moves downward to draw the back of the ear with a big curve and the lobe with a smaller curve. Carefully observing the inner detail of the ear, he draws the shapes with short, curved strokes.
Step 2. Over the sketchy lines of Step 1, the artist draws the contours of the ear with darker, more precise lines. A dark inner line defines the sinuous shape of the rim, which winds around to the deep "bowl" at the center of the car. The artist draws the inner shape more exactly,
|
|
|
|
|
|
w
m
Step 3. The artist adds the pools of shadow within the car, which is darkest just inside the rim. He moves around the outer edge of the ear and around the lobe, adding touches of shadow that make the shape look three-dimensional. He suggests the hair surrounding the ear and begins to model the cheek and jaw. Notice the tiny pool of shadow where the lobe attaches to the jaw.
Step 4. The pools of shadow within the ear arc darkened with heavy strokes. Small parallel strokes strengthen the tones around the edge of the ear; then an eraser brightens the lighted areas. The car casts a shadow downward on the back of the neck. The artist completes the surrounding hair, making the rounded forms of the car stand out more boldly.
ARN.eBook
DRAWING THE EAR: FRONT VIEW
|
|
|
|
|
y |
|
|
![]()
Step 1. When the sitter faces you, you see much less of the ear. The shape grows slender. The artist begins by drawing the slanted line of the jaw and cheek, to which the ear attaches. He draws the outer shape of the ear with just a few straight lines and curves, and then draws the inner shape with shorter lines. He indicates the hair that surrounds the
Step 2. Step 1 is a highly simplified version of the ear, of course. Now the artist goes back over these sketchy lines to define the shapes more precisely. He draws the intricate curves and angles over the guidelines-which he then erases.
ear.
|
|
|
|
v~
Step 3, With the side of the pencil, the artist blocks in a big pool of shadow at the center of the ear, plus the slender shadow that starts at the top and travels down along the inside of the rim. He begins to model the lobe and the portion of the ear that attaches to the side of the head. The tone of the hair is blocked in to make the lighted edge of the ear stand out.
Step 4, The side of the pencil deepens the inner tones of the ear. Then an eraser lightens the lower half of"the big pool of shadow. A few additional touches of tone appear on the rim and lobe of the ear. The tone of the hair is carried carefully around the ear and helps to define its shape. In this view, we see a minimum of detail; the ear is drawn very simply.
ARN.eBook
DRAWING THE HEAD: FRONT VIEW
It
Xi
i
|
|
|
|
I
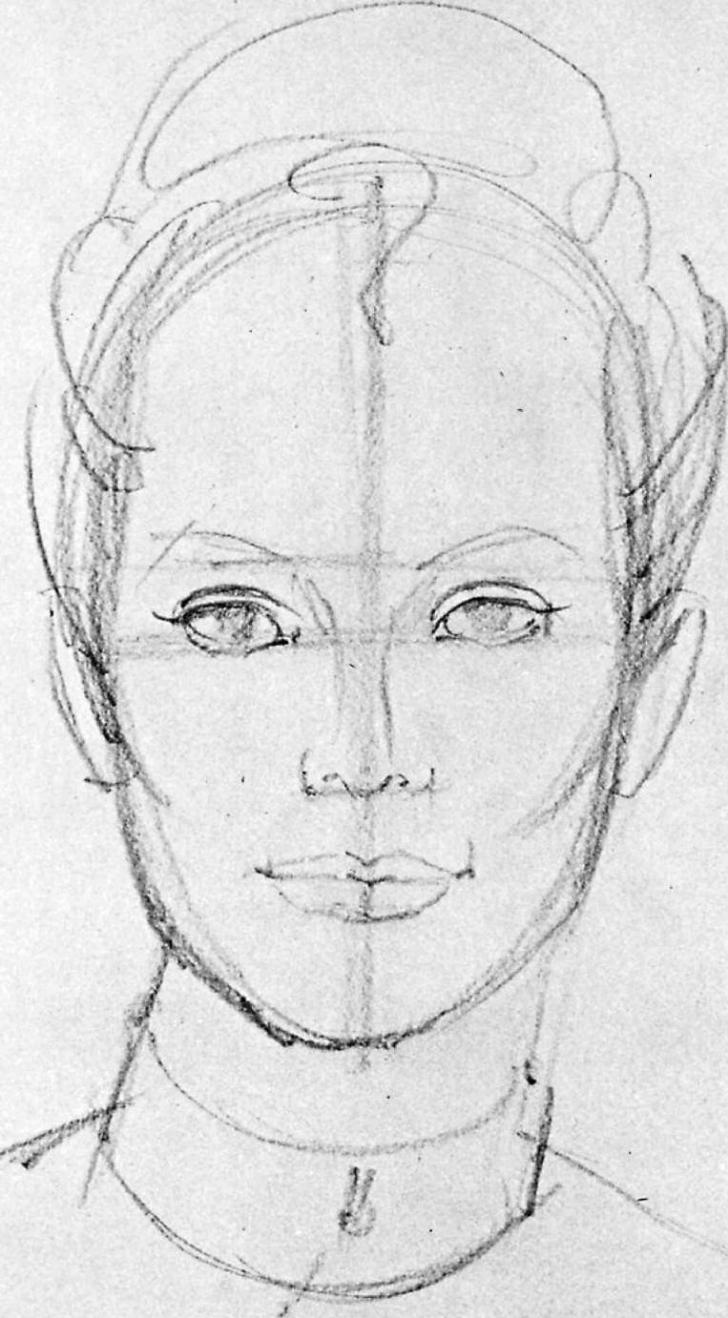
Step 1. Now, to show you how to put together everything you Ve learned so far, the artist draws a front view of a complete head. He starts out with the traditional egg shape and visualizes the neck as a slightly slanted cylinder. For symmetry, he draws a vertical guideline down the center of the egg. Then he adds horizontal guidelines for the brow, eyes,
nose, and mouth. He divides the eye line into five different parts: two of these parts will become eyes, of course, but the space between them is also the width of one eye-and so are the spaces on either side of the eyes. The base of the nose is also '"one eye wide." The mouth is about "two eyes wide,"
ARN.eBook
DRAWING THE HEAD: FRONT VIEW
|
|
Step 2. The first simple sketch of the features goes directly over the guidelines of Step 1. The artist squares up the jaw just a bit, adds the ears-which align with the nose and eyes-and suggests the shape of the hair, which extends beyond the edges of the egg. He draws the lines of the eye-
lids and suggests the shape of the iris. He quickly sketches the bridge of the nose, the shapes of the nostrils, and the tip. He draws the characteristic wing shape of the upper lip and the fuller curve of the lower lip. The sitter's collar curves around the cylinder of the neck.
ARN.eBook
DRAWING THE HEAD: FRONT VIEW
|
|
|
|
|
|
|
* i h |
|
|
Step 3- Switching from the point of the pencil to the side of the lead, the artist begins to darken his tones with broad parallel strokes. The light comes from the left, and so most of the tones are on the right sides of the shapes. He carries the tone downward over the side of Pthe forehead, cheek, jaw, and chin, adding the shadow on the neck. He adds the first
suggestion of tone to each eye socket, iris, and pupil, and then moves downward to add broad, simple tones to the nose and lips. As usual, the upper lip is darker than the lower, and there's a shadow beneath the lower lip- Touches of tone appear on the ears. The hair is visualized as a big, simple mass, lighter on one side than on the other.
ARN.eBook
DRAWING THE HEAD: FRONT VIEW
|
|
Step 4. The artist completes the drawing by darkening the tones with the side of the pencil and sharpening contours and details with the tips. He builds up the modeling on the shadow side of the face* where you can now see a distinct gradation of light, halftone, shadow, and reflected light. On the lighted side of the face, he adds touches of tone where the cheek and jaw turn away from the light. He darkens the
eye sockets, the underside of the nose and nostrils, the lips, the tones within the ears, and the shadow beneath the chin. With the point of the pencil, he sharpens the contours of the ears, emphasizes the detail of the eyes and eyebrows, draws the nostrils more precisely, and suggests the detail of the collar. He completes the hair with broad strokes made with the side of the lead.
ARN.eBook
DRAWING THE HEAD: THREE-QUARTER VIEW
.nit-
![]()
|
|
|
|
tr
i
>;
|
|
|
|
 ■w
■w
V
J
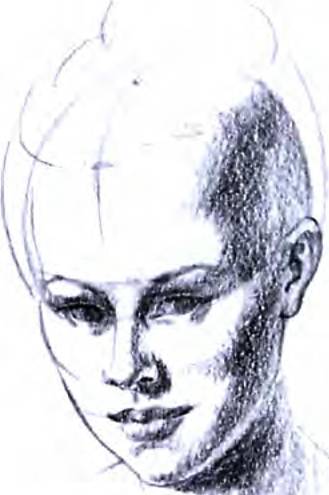
Step 1. The procedure is essentially the same in a three^ quarter view. But now the guidelines are a vertical egg overlapped by a horizontal egg. The center tine moves as the head turns to the side. The horizontal guidelines are still in the same places, of course. Across the eye line, the artist
locates the eyes with tiny touches of the pencil point. Moving down to the line at the base of the nose, he locates the outer edges of the nostrils in the same way. The neck is a slightly slanted cylinder once again. Notice that the back of the head protrudes well beyond the line of the neck.
ARN.eBook
DRAWING THE HEAD: THREE-QUARTER VIEW
|
|
Step 2. The artist reshapes the contours of the head over the original guidelines, adding the angular details of the brow, cheek, chin, andjaw+ The features appear in their correct places on the horizontal guidelines. Although the head is turned to a three-quarter view, the ear still aligns roughly with the eyehrow and nose. Notice how the tip of
the nose and the nostrils are visualized as distinct forms. The eyelids are clearly drawn, as are the dark patches within the eyes. The upper lip has the distinctive wing shape, while the lower lip looks blocky and masculine. The hair starts just below the crown and extends beyond the guidelines of the upper egg shapes.
ARN.eBook
DRAWING THE HEAD: THREE-QUARTER VIEW
|
|
|
|
Step 3* The artist blocks in the tones with rough strokes, First he places the biggest tonal shapes on the side of the brow, cheek, jaw, and chin. Then he moves to the features, adding tone to the eye sockets, eyelids, nose, and lips. The nose casts a slanted shadow downward toward the right. As usual, the upper lip is in shadow, the lower Mp catches the light, and there's a deep shadow beneath the lower lip.
ARN.eBook
DRAWING THE HEAD: THREE-QUARTER VIEW

Step 4. The artist finishes the drawing by building up the darks throughout the face and features, and so now you can see the lights, halftones, shadow, and reflected light distinctly. The point of the pencil sharpens the tines and adds the details. Is this four-step process becoming familiar? Good!
ARN.eBook
PENCIL DRAWING 34
|
|
|
|
Slender Strokes, Working with the sharp point of the pencil, you can build up the tones of your drawing with groups of slender parallel strokes. The halftones and reflected lights arc clusters of fairly pale strokes; the artist has applied only moderate pressure to the pencil. The darker shadows consist of heavier strokes; the artist has pressed harder on the pencil. The strokes are closer together in the shadow areas, while there are more spaces between the strokes in the halftones and reflected lights. Observe how the strokes change direction to suggest the curve of the check.
Broad Strokes. Here's the same subject executed with much broader strokes. The artist holds his pencil at an angle so the side of the lead touches the paper. He presses harder on the pencil to make the darker strokes, which are closer together than the paier strokes. The pencil moves diagonally (with a slight curve) to suggest the roundness of the cheek, Then the pencil moves vertically downward to suggest the squarish shape of the jaw. And the strokes become slanted again as the pencil follows the angle of the jaw down to the chin.
|
|
|
|
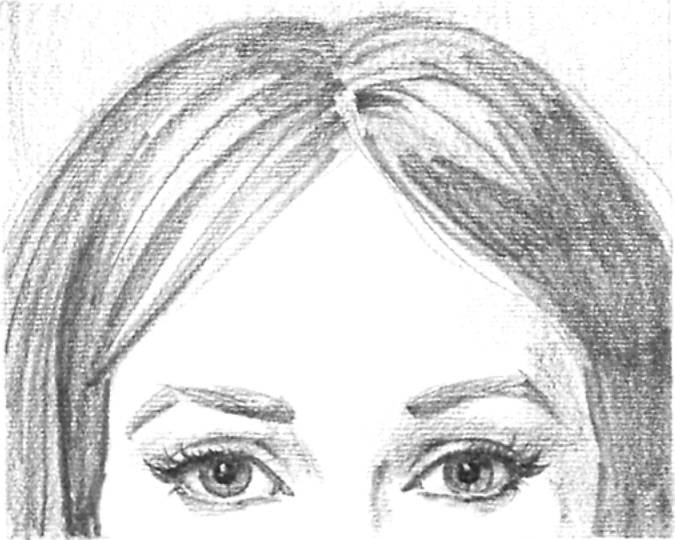
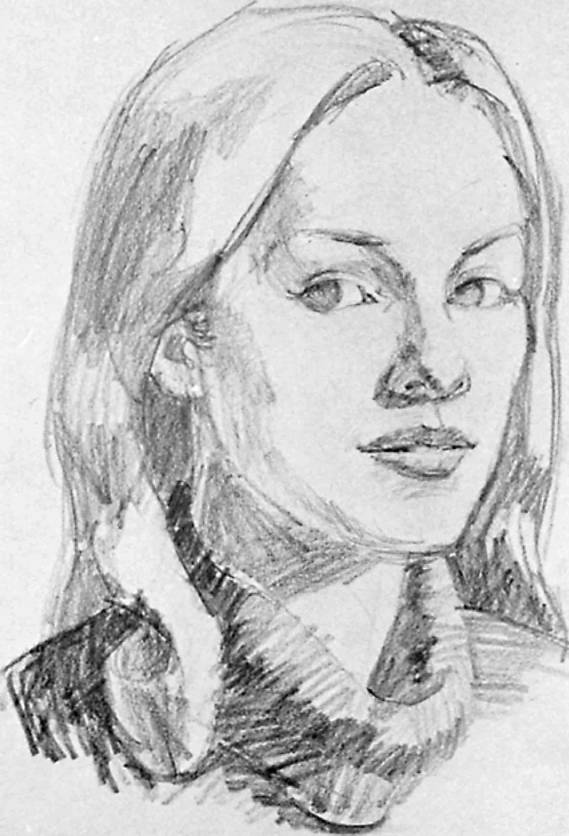
Strokes on Charcoal Paper. Charcoal paper isn't just for charcoal drawing, Its subtle, ribbed surface is equally good for pencil drawing, The delicate tooth (as it's called) of the sheet combines with the pencil strokes to produce a lively texture, In this close-up of a woman's portrait, the thick-and-thin pencil strokes in the hair are softened by the textured surface of the paper: tiny flecks of bare paper pop through even the darkest tones, making the strokes vibrate with a kind of inner light. These tiny flecks of bare paper lend softness and transparency to the tones around the eyes.
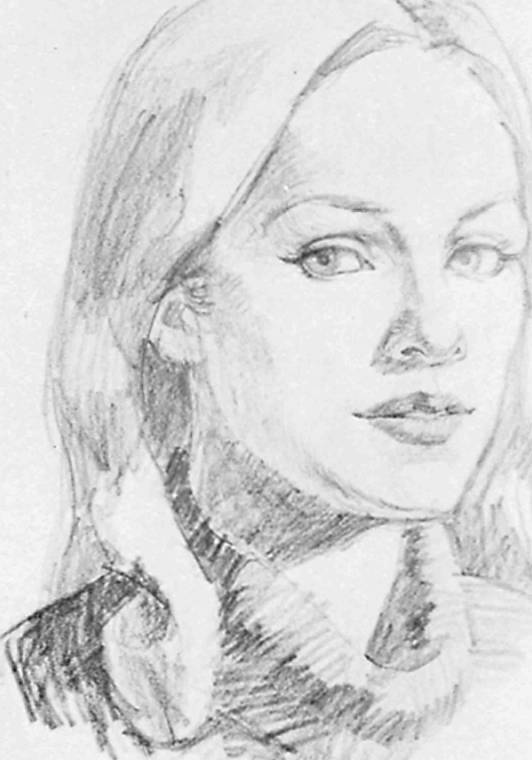
Strokes on Rough Paper. Its worthwhile to try a variety of textured papers, many of which are rougher and more irregular than charcoal paper. In this portrait of the same woman you see on the left, the artist has used a thick stick of graphite in a plastic holder and drawn on extremely rough paper. The thickness of the drawing tool and the irregular surface of the drawing paper combine to make the strokes look bold and ragged. The marks of the graphite stick look granular, with big flecks of bare paper showing through. The strokes are less precise than those on the charcoal paper, but more dynamic.
ARN.eBook
PENCIL DRAWING 35
|
|
|
|
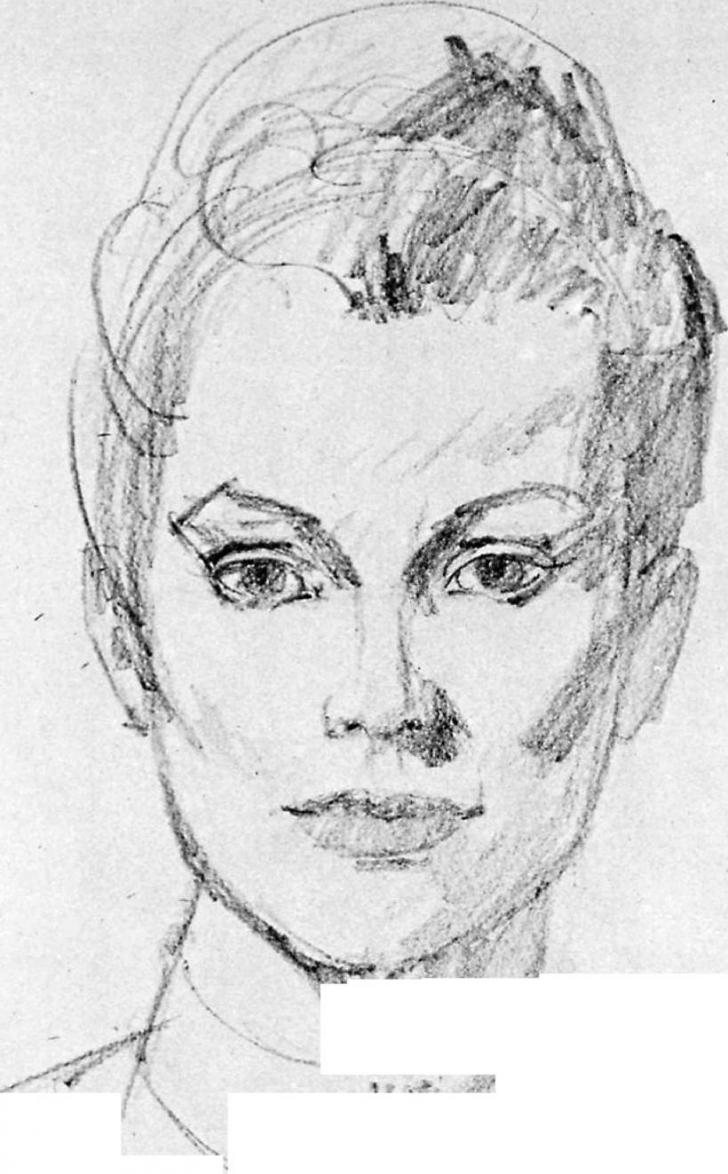
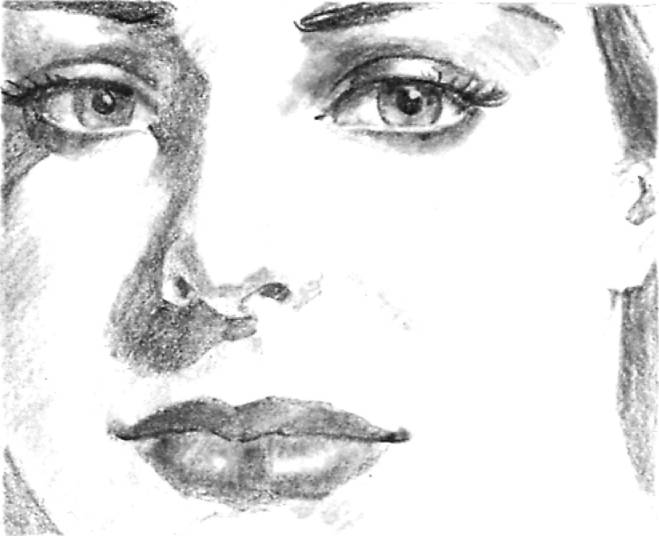
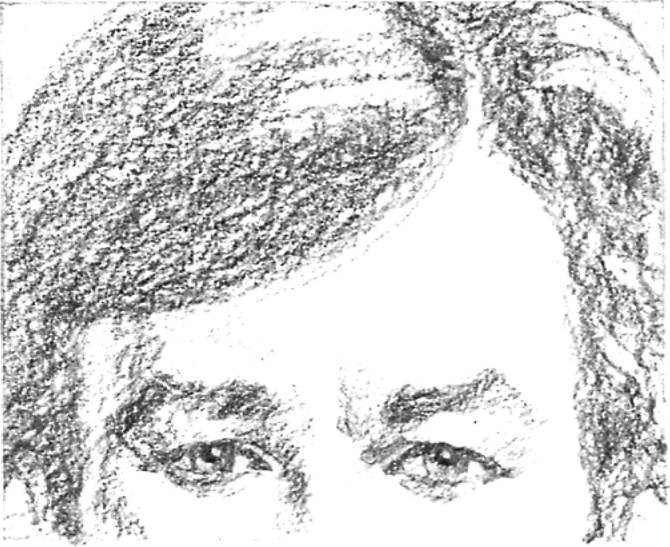
Modeling with Strokes, This woman's face is modeled with delicate strokes that travel carefully over the forms. For example, there are two patches of tone above the right eye socket; each consists of slanted strokes that are carefully angled to express the roundness of the form. Now folJow the route of the strokes that model the cheek on the shadow side of the face. In the pale halftone area under the eye, the lines are delicate diagonals. As the cheek turns away from the light, the strokes curve and darken. The entire face is rendered with carefully planned groups of strokes.
Modeling by Blending. Another way to render tone is by blending the strokes of the pencil (or the graphite stick) with the tip of your finger or a paper stomp. Look carefully at this drawing of the same sitter and you'll see that the artist has started with broad, rather casual strokes-not as neat or careful as the ones in the drawing at your left-and smudged them to create soft, velvety tones. The blending doesn't obliterate the strokes completely, but they melt away into smoky areas that look more like patches of paint, The softer grades of pencil are easiest to blend.
|
|
Continuous Tone on Rough Paper, You can do the
same thing on rough paper, which shaves away the granules of graphite more rapidly-like rough sandpaper-and builds up more ragged, irregular tones. Once again, the artist presses harder and moves his pencil back and forth several times for the dark tones, while he just skims the surface of the paper once or twice for the paler tones. He works with a thick, soft pencil-or a graphite stick in a holder.
ARN.eBook
DEMONSTRATION 1. BLOND WOMAN
|
|
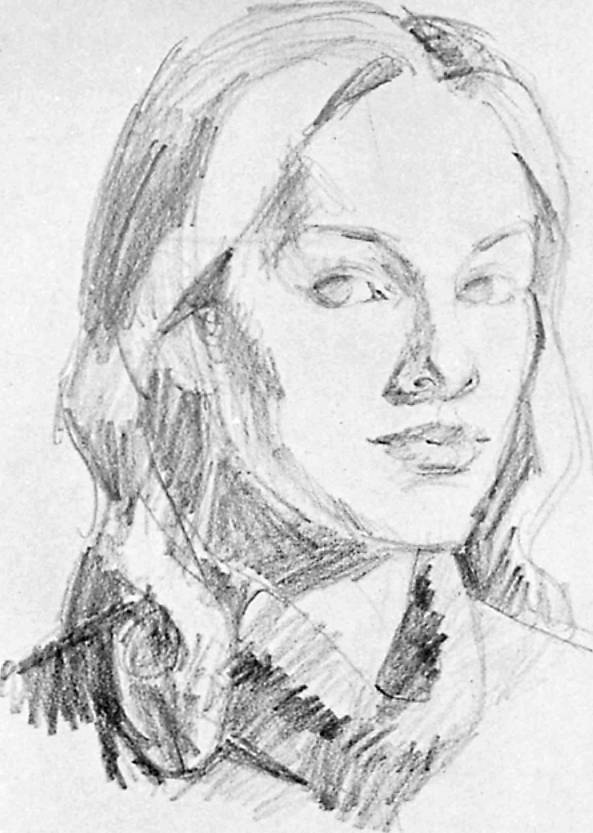
Step 1. For your first pencil portrait, see what you can do with a combination of slender lines and broad strokes on an ordinary piece of drawing paper. Use the sharp point of the pencil to draw the contours with slender lines, Then use the side of the pencil to build up the tones with strokes of various thicknesses. The artist begins this demonstration by drawing the usual egg shape of the head. Within the egg shape, he draws a vertical center line and four horizontal lines to help him locate the features. Over these guidelines, he draws the eyebrows, eyes, nose, and mouth. The neck is a slightly slanted cylinder around which he draws the curved lines of the collar with swift strokes. A few more lines define the curving contours of the hair, which extends above the egg shape and beyond it on either side. At this stage, the artist works entirely with a sharpened HB pencil.
i
Step 2. The artist switches to a 2B pencil and holds it so that the side of the lead strikes the paper and makes broad strokes. Moving swiftly over the paper, the artist blocks in the major areas of lone with scribbly parallel strokes. The light comes from the right, and so the artist indicates areas of tone on the left side of the brow, cheek, jaw, and neck. He also places a tone on the left side of the nose and suggests the darkness of the eyes and lips. He models the hair as just a few big shapes, blocking in big tonal areas and paying no attention to individual strands or curls. Finally, he scribbles in a band of shadow along the underside of the collar and a triangle of tone inside the collar. In this step, the artist's purpose is simply to divide the portrait into /ones of light and shadow. So far, there's no gradation of tone-no distinction between halftone, shadow, and reflected light,
-- L
i .
x
![]()
|
|
s
■ ■
\MJ
ARN.eBook
DEMONSTRATION 1. BLOND WOMAN
|
|
Step 3. Still working with the side of the 2B pencil, the artist begins to darken his tones selectively. He strengthens the shadows on the brow and cheek; around the eyes, nose, and mouth; and on the neck. Now, as usual, the upper lip is in shadow and there's a hint of shadow beneath the lower lip. The tip of the nose casts a small shadow downward toward the corner of the mouth, The artist also darkens some of the tones on the hair and strengthens the tones of the collar. At this point, the artist starts to develop gradations within the tones, and so you begin to see areas of light, halftone, shadow, and reflected light. For example, notice the pale tone at the edge of the juw, where the shadow gets lighter. The artist still pays very little attention to details, although he does sharpen the corners of the eyelids, nostrils, and mouth.
|
|
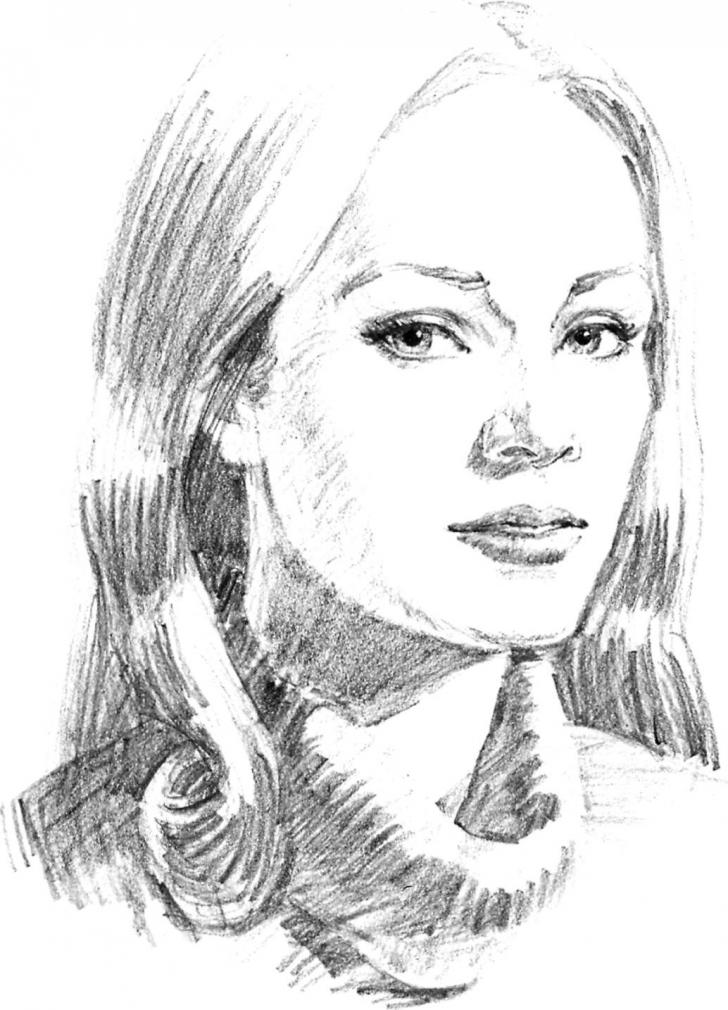
Step 4. Having established the broad distributions of tones in steps 2 and 3, the artist begins to focus his attention on the features. Working with the 2B pencil, he darkens the eyebrows and the eyes, sharpening the lines of the eyelids with the point of the pencil. Moving downward from the eyes, he strengthens the shadow on the side of the nose and the tones around the tip of the nose. He darkens the upper lip and the shadow beneath the lower lip, sharpening the line between the lips. He uses an eraser to pick out a small strip of bare paper to suggest the teeth and the lighted patch at the center of the lower lip. He draws the darkened center of the car and shapes the contour of the ear more precisely. With the point of the pencil, he sharpens the edge of the face at the right and clears away excess lines with an eraser. He draws the contours of the hair more distinctly-particularly where the hair overlaps the brow-and brightens the top of the hair by erasing a whole cluster of lines that existed in Step 3. And he builds up the shadows on the collar and shoulder.
ARN.eBook
DEMONSTRATION 1. BLOND WOMAN
|
|
Step 5- The artist continues to sharpen details and refine tones. With the tip of the pencil, he draws the eyebrows and eyelids more distinctly, adding the pupils and a suggestion of lashes. With clusters of short, slender strokes, he builds up the tones in the eye sockets and along the side of the nose, sharpening the contours of the nose and darkening the nostrils. He defines the shape of the lips more clearly and darkens them with short, slender, curving strokes. With the same type of strokes, he goes over the shadows on the side of the face to make the gradations more distinct; darkens the tone along the chin; and strengthens the shadow on the neck. It's interesting to see how the character of the pencil strokes has changed. In Steps 2, 3, and 4, the artist worked with broad strokes. Now, in Step 5, he goes back over these broad strokes with more delicate, slender touches to refine the tones.
|
|
|
|
Step 6* At this point, the artist concentrates mainly on detail, He continues to sharpen and darken the contours of the eyes, strengthening the irises and pupils, picking out tiny highlights with a touch of a pointed eraser, and suggesting more lashes. The few additional strokes suggest individual hairs within the eyebrows. Traveling down the side of the nose, he darkens the shadow with delicate strokes and then strengthens the tones around the tip of the nose, where the nostrils and the cast shadow are even more distinct. lHc darkens the lips and sharpens the contours, paying particular attention to the slender strips of darkness between the lips. With slim, curving strokes, he carries the half-lone of the jaw farther upward toward the cheek. Switching back to the sharply pointed HB pencil, he goes over the hair to suggest individual strands with crisp strokes.
ARN.eBook
DEMONSTRATION 1. BLOND WOMAN 39
Step 7. The side of the 2B pencil deepens the tones with braid, bold strokes. Clusters of broad strokes move down over the hair to darken the shadow; the strokes are distinct enough to suggest the texture of the hair. The pencil point darkens the contours of the eyes, the tones on the side of the nose, and the tones of the lips; then it picks out more hairs within the eyebrows and more eyelashes. The pupils grow darker, as do the shadows beneath the upper lids. Finally, a kneaded rubber eraser cleans the lighted areas,
ARN.eBook
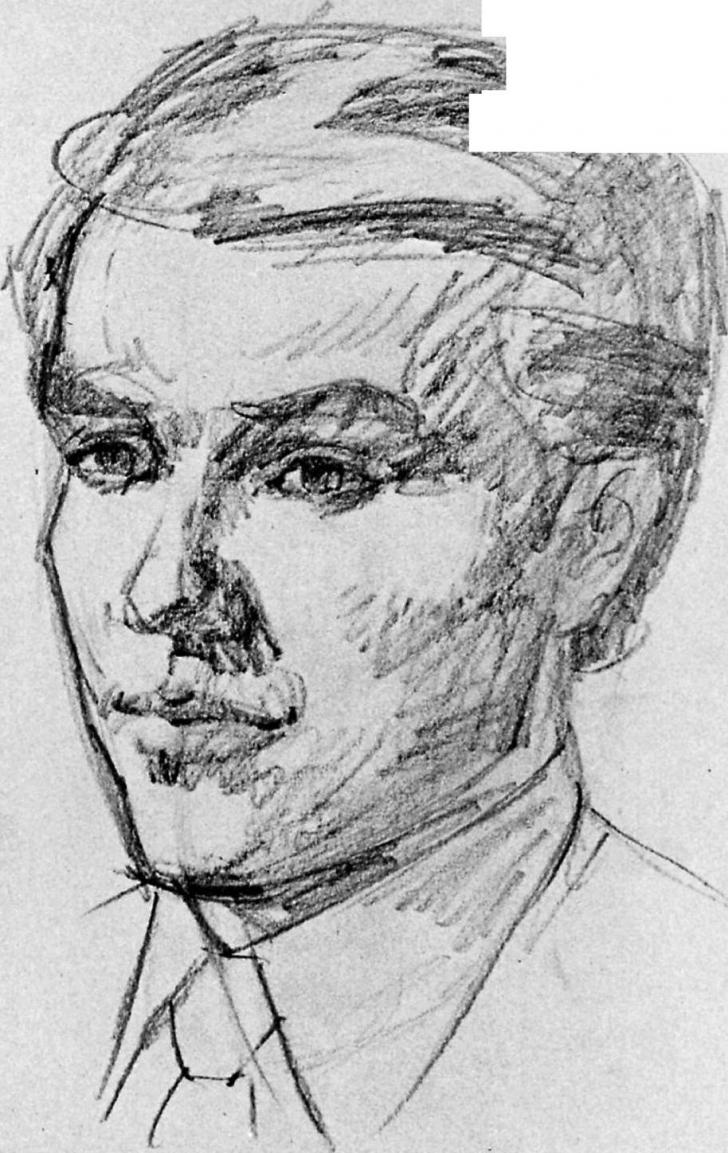
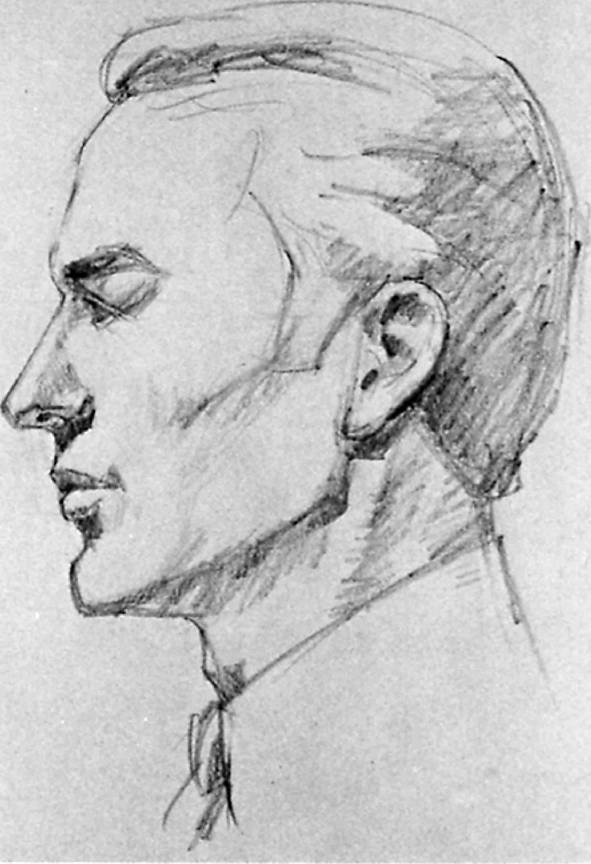
DEMONSTRATION 2. BROWN-HAIRED MAN
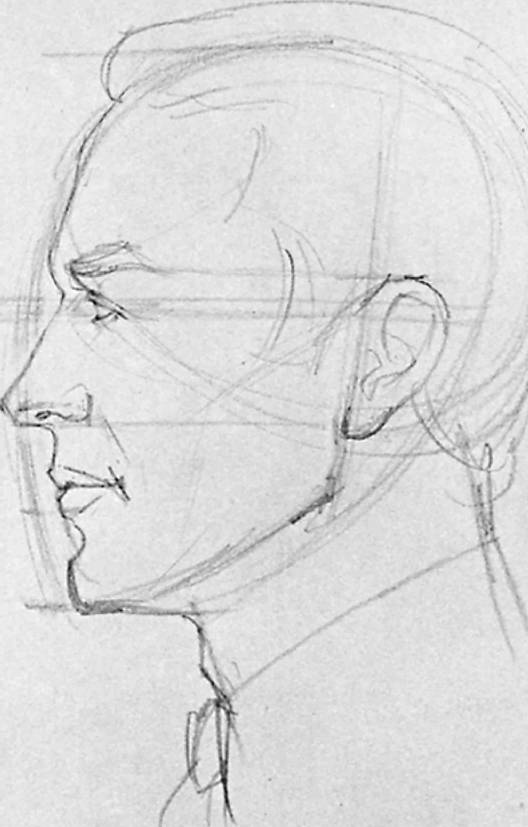
Step 1. Now try drawing a pencil portrait that consists mainly of broad, bold strokes. Use a thick, soft pencil or a thick, soft stick of graphite in a holder. In this first step, the artist begins by drawing the side view of the head with the usual overlapping egg shapes, one vertical and one horizontal. Just two lines define the neck as a slanted cylinder. Horizontal guidelines locate the features. The artist works with the sharpened tip of the thick lead.
|
|
Step 2. Continuing to work with the point of the thick lead, the artist draws the contours of the luce over the guidelines of Step L He begins by drawing the profile; the brow, nose, lips, and chin. Then he steps inside the profile to place the eyebrow, eye, nostril wing, lips, ear, and corner of the jaw. Just two lines suggest the Adam's apple on the front of the neck. The pencil sweeps around the lop and back of the horizontal egg to indicate the shape of the hair, Notice how the ear aligns with the eye and nose, while the sharp corner of the jaw aligns with the mouth.
J.
ARN.eBook
DEMONSTRATION 2. BROWN-HAIRED MAN
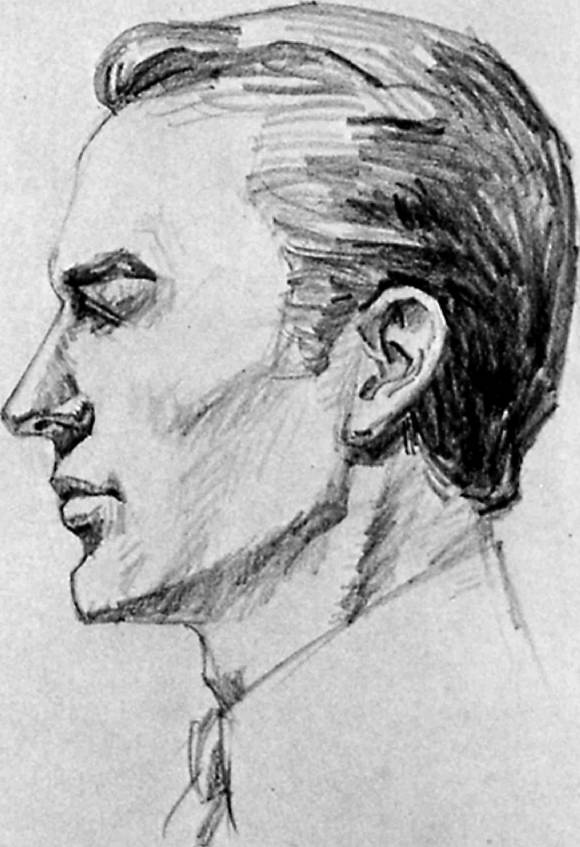
|
|
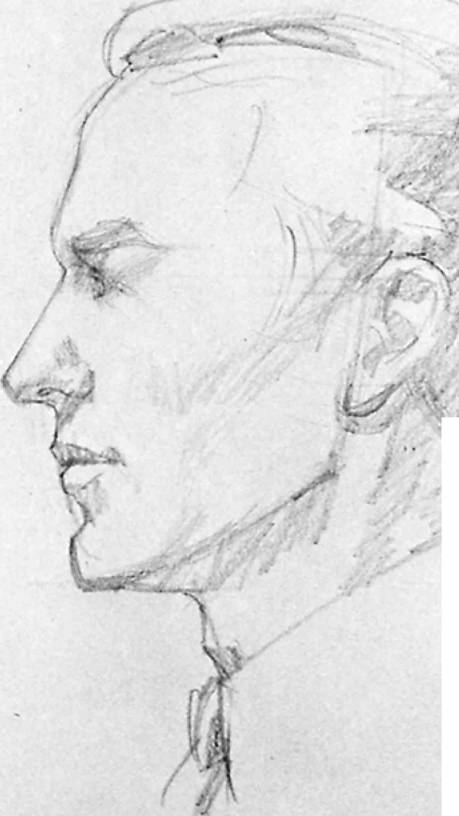
Step 3, Moving more carefully over the lines of Step 2, the artist refines the contours with the tip of the pencil, The sitter has an angular, bony face, which the artist records faithfully. He draws the bulge of the forehead, the sharp brow, the precise S-curve of the nose, the crisp detail til the lips, and the squarish chin. Moving inside the outer edge of the profile, the artist draws the eyebrow, eye, nostril, mouth, and ear with great care. Just a few lines indicate the sideburn and the dividing line between skin and hair on the side of the forehead. Note the inter-nal detail of the ear.
|
|
|
|
-V--
Step 4* With a pink rubber eraser, the artist removes most of the guidelines that appeared in Steps U 2t and 3. Now he can see ihe lines of the proiile and features more clearly and begin to block in the tone. Turning the thick pencil on its side, the artist begins to render the tones surrounding the eyes and nose, the cast shadow beneath the nose, the dark lone of the upper lip. and the pool of shadow beneath the lower lip. Broad, free strokes (ill the underside of the jaw with shadow, indicating the interlocking patches of shadow that move from the underside of the cheek down to the jaw. Patches of shadow are placed on the hair, within the ear. beneath the ear, and at the back of the neck. All the tones are still quite pale, but the purpose of this fourth step is simply to establish the major areas of lieht and shade.
ARN.eBook
DEMONSTRATION 2. BROWN-HAIRED MAN
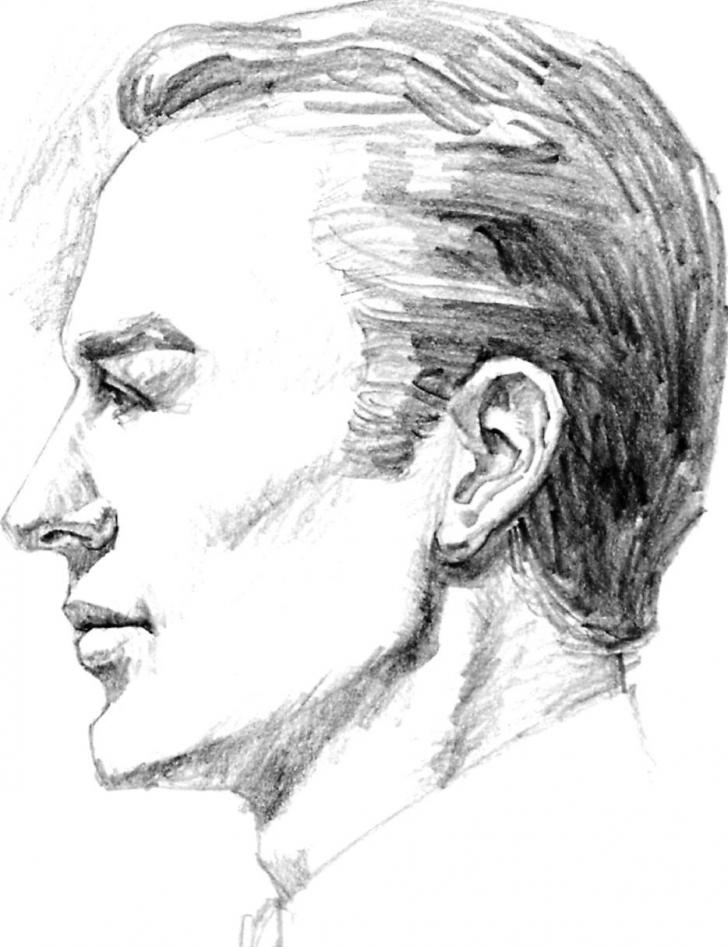
|
|
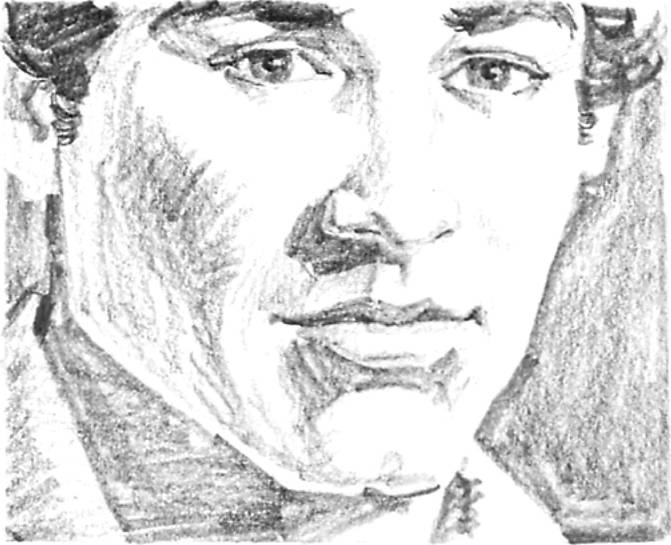
Step 5, The artist begins to build up the gradations within the tones. He darkens the eyebrow and the tones within the eye socket. then moves downward to build up the tones of the nose and lips. He sharpens the nostril and the shadow beneath the nose, and then he strengthens the shadow of the upper lip. He also darkens the tones within and around the ear. Focusing on the larger areas of the face, he strengthens the shadows on the cheek, jaw, neck, and hair. The tip of the pencil defines the contours of the ear more precisely and draws the squarish shape of the sideburn,
|
|
Step 6* Gradually, the strokes of the side of the thick pencil become more distinct as the artist continues to build up the tones. Observe the short, decisive strokes that mode) the eye sockets, the side of the nose, the comer of the mouth, and the tone that travels downward from the cheek to the jaw. The artist darkens the underside of the jaw with broad, distinct strokes that accentuate the squarish, bony shape. The hair is darkened with thick strokes that suggest texture and detail. With the sharp tip of the pencil, the artist begins to emphasize the features. He darkens the eyebrow and sharpens the lines of the eyelids. He adds crisp touches to define the contours of the nostril, lips, and car more precisely. Notice the tiny accents of darkness within the nostril, at the corner of the mouth, between the lips, and within the rim of the car.
ARN.eBook
DEMONSTRATION 2. BROWN-HAIRED MAN
|
|
|
|
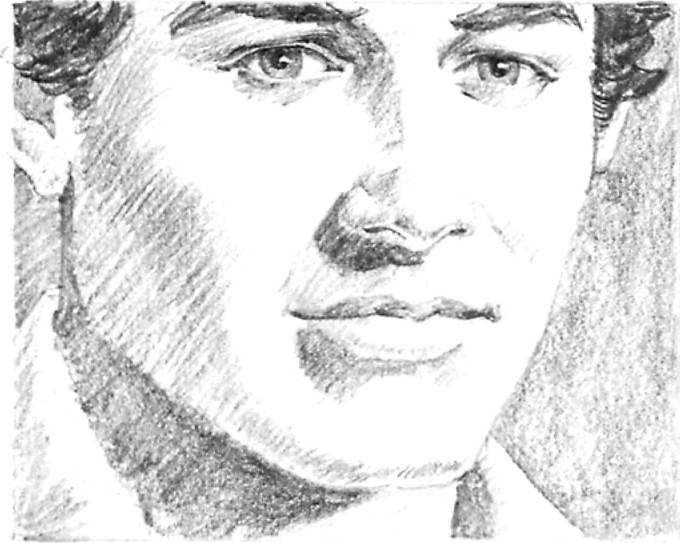
Step 7. The pencil moves over the face, adding clusters of parallel strokes that enrich (he tones of the brow, cheek, jaw, and neck. More strokes darken and model the eye socket, nose, lips, and ear. The sharpened point of the pencil delicately retraces the contour of the profile and sharpens
the eyelids, nostril, lips, and ear. The side of the pencil darkens the hair with thick strokes and adds a hint of tone on the bare paper along the edge of the brow-accentuating the Jight on the sitter's bony forehead.
ARN.eBook
DEMONSTRATION 3. BLACK MAN
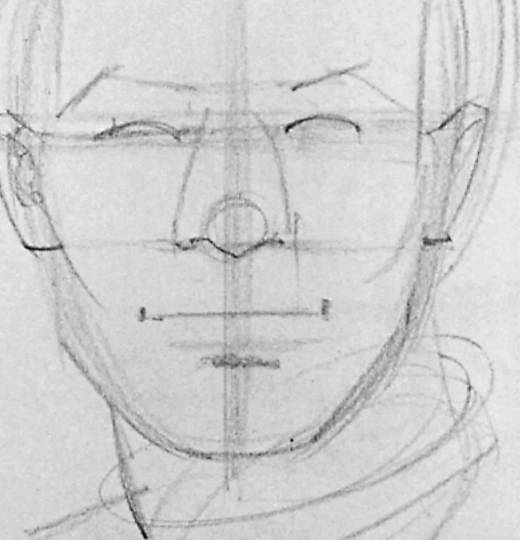
Step 1. The rich skin tones of a black sitter will give you an opportunity to try a pencil-drawing technique that combines strokes with blending-For this technique, a sheet of charcoal paper is particularly suitable, since the delicately ribbed surface softens the strokes and also lends itself beautifully to blended tones executed with a fingertip or a stomp. The artist begins his demonstration with the standard egg shape divided by a vertical center line, plus horizontal lines for the eyes, nose, and mouth. Notice that there's just one horizontal line for the eyes, above which the artist will place the eyebrows. The lowest horizontal line locates the bottom edge of the lower lip, which is halfway between the nose and chim The artist visualizes the neck as a slightly tilted cylinder. Notice that he doesn't hesitate to go over these guidelines several times until he gets the shape exactly right. Because this demonstration requires so much blending, the artist selects a soft, thick 4B pencil.
,f
|
|
Step 2. Working with the sharpened tip of the pencil, the artist locates the eyes on the horizontal guideline that crosses the midpoint of the head, and then he places the brows above this line. On cither side of the vertical center line, he establishes the outer contours of the nose, and then he moves down to locate the tip of the nose and the nostrils on the next horizontal guideline. He places the cars between the guidelines of the eyes and nose. On the lowest horizontal guideline, he makes a dark stroke to indicate the deep valley beneath the lower lip. Then he places the dividing line of the lips roughly one-third of the way down from the nose lo the chin. He squares up the corners of the jaw, indicates the curves of the cheeks, and swings the line of the collar around the cylindrical shape of the neck. Moving outward from the top and sides of the egg, the artist indicates the shape of the hair,
ARN.eBook
n
DEMONSTRATION 3. BLACK MAN
|
|
|
C |
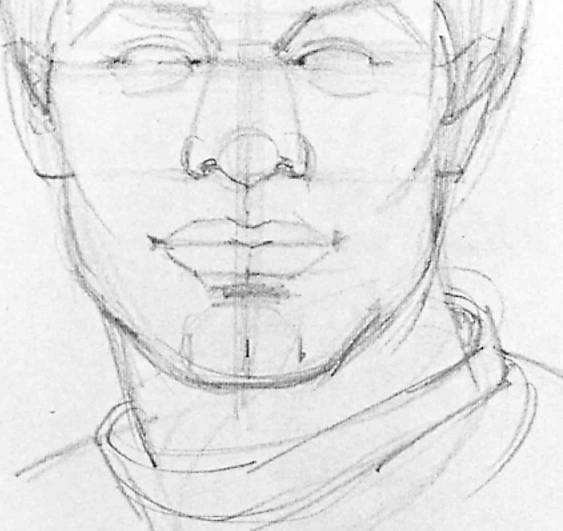
Step 3, With the point of the thick pencil, th artist now defines the shapes of the head and features more exactly. He redraws ihe con lours of the cheeks, jaw, chin, and neck directly over the original guidelines of Steps 1 and 2. The pencil point carefully traces the hairline. Then the artisi focuses on the features; he sharpens the contours of the eyebrows and draws the upper and lower lids; defines the shapes of the nostrils and the tip of the nose; constructs the planes of the lips; and emphasizes small, significant details such as the corners of the eyes, the coiners of the lips, and the cleft in the chin. Finally, he draws the irregular curves of the collar,

u*
"
Step 4. Turning the thick pencil on its side, the artist begins to block in the tones with broad strokes. The light comes from the left, placing most of the head in shadow. This head is an example of what artists call rim lighting. There's a strip (or rim) of light along one edge of the face, neck, nose, and upper lipt but the rest of the face doesn't receive direct light. There's a dark edge where the light and shadow planes meet; the artist accentuates this by pressing his pencil harder at the edges of the lighted areas on the forehead, cheek, jaw, neck, and nose. He covers the shadowy areas of the face with broad horizontal strokes and then emphasizes the strong darks within the shadow areas: the brows, eye sockets, and eyes; the bridge of the nose and the nostrils; the upper lip and the dark tones beneath the lower lip; the chin; and the shadow beneath Xhz neck. The artist also begins to darken the ha r and the shadow side of the collar. By the -id of this step, there s a clear distinction between the Jiizhl and shadow areas.
ARN.eBook
DEMONSTRATION 3. BLACK MAN
|
|
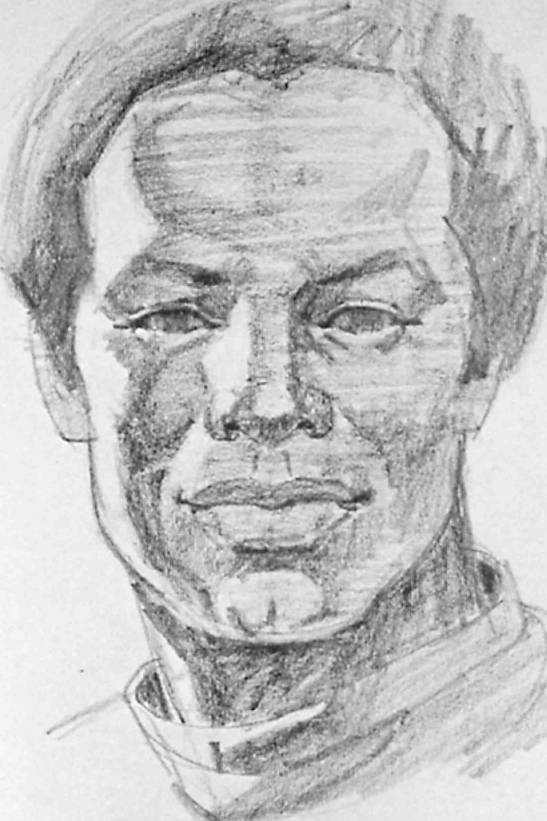
Step 5. The artist begins to deepen the tones by moving the flat side of the pencil back and forth over the face. The broad strokes are most apparent in the forehead and cheek, where you often sec big gaps between the strokes although these gaps will disappear when the artist begins to blend the tones. He strengthens the dark areas where the light and shadow planes meet on the side of the face, nose, and upper lip. He darkens the hair, ihe shadow on the neck, and the shadow side of the collar. Then he moves inside the face to strengthen the contours and to darken the tones of the eyebrows, eyes, nose, and lips, With the point of the pencil, he emphasizes the dark edges of the eyelids, nostrils, and lips.
|
|
Step 6, Pressing still harder and moving the side of the pencil back and forth over the textured paper, the artist strengthens all the darks within the shadow planes of the face, He darkens the tones within the eye sockets, along the bridge of the nose, beneath the nose and cheeks, within the lips, around the chin, and on the neck. With short, curving, scribbly strokes, he darkens the lone of the hair to suggest its curly texture. And with the tip of the pencil he sharpens all the features, indicating such details us the pupils of the eyes, the shadow lines around the nostrils, and the dark line between the lips.
ARN.eBook
DEMONSTRATION 3. BLACK MAN
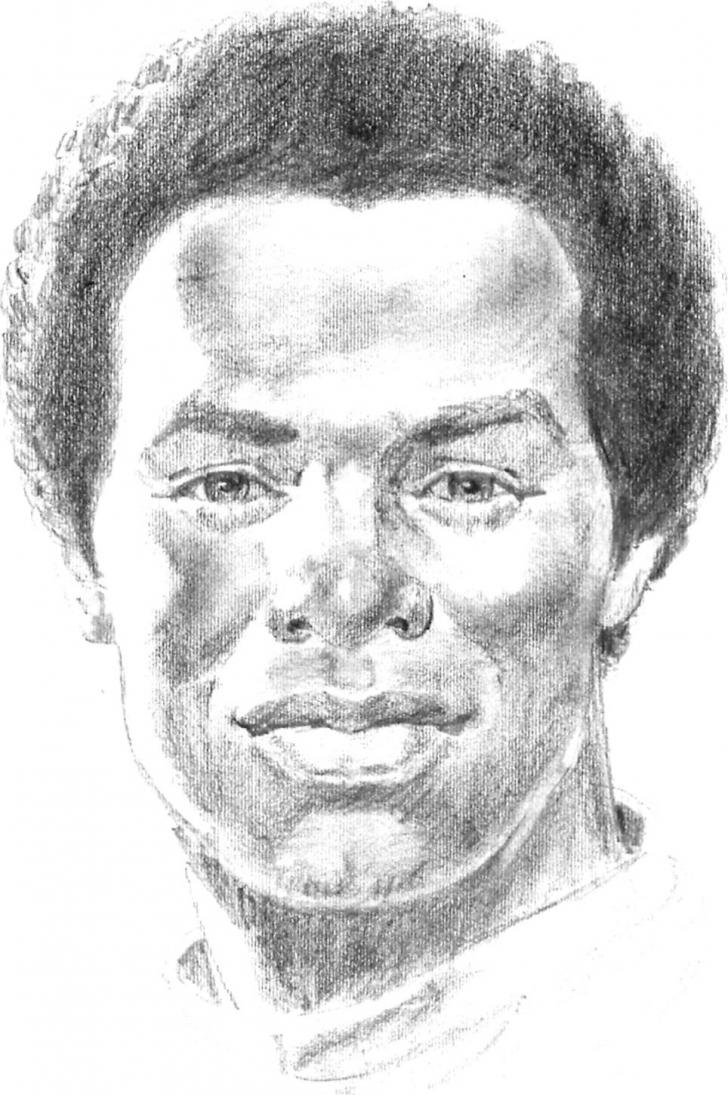
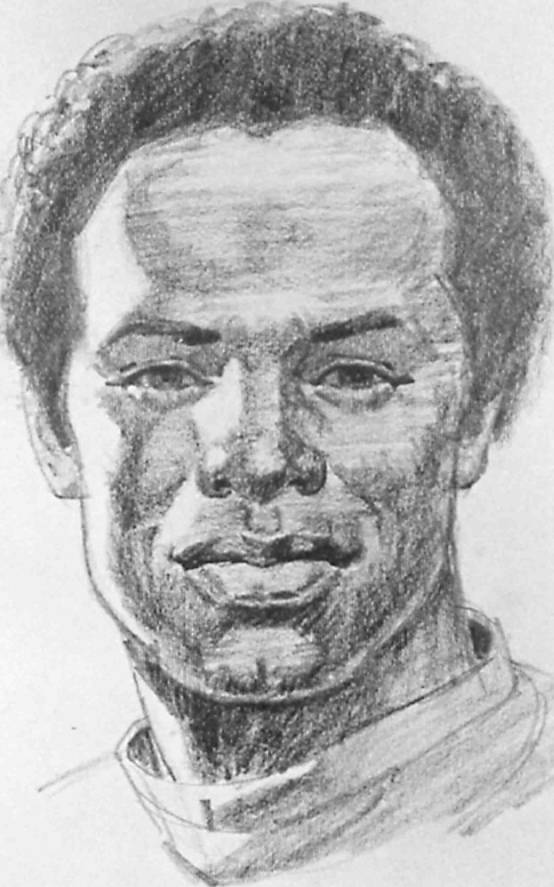
Step 7* The artist moves over the shadow areas with a fingertip, blending the strokes into smooth, glowing tones* The blending is done selectively: the artist concentrates mainly on the forehead, cheeks, noset upper lip, and chin. A kneaded rubber eraser brightens the lighted areas and picks out highlights on the nose and cheek. The pencil
strengthens the darks of the eye sockets and lids, the lips, the undersides of the checks, and the sides of the jaws. The tip of the pencil accentuates the contours of the eyelids, irises, and pupils; the nostrils: and the dark dividing line between the lips.
ARN.eBook
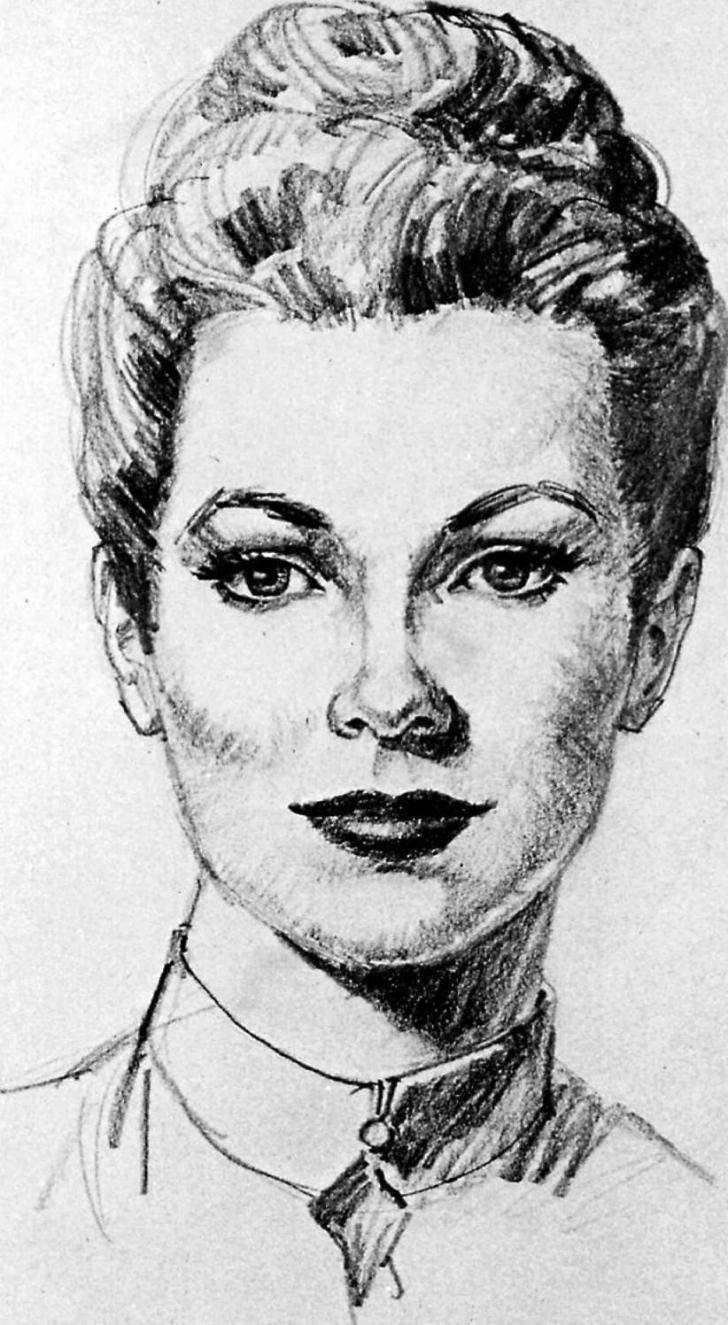
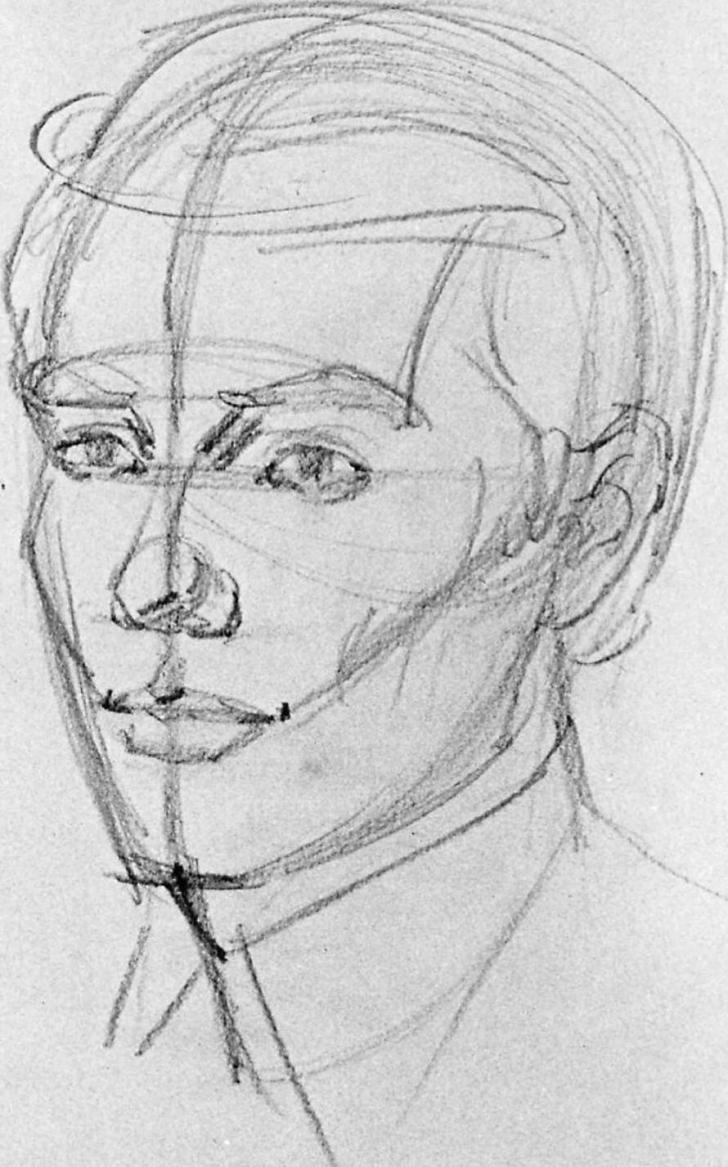
DEMONSTRATION 4. DARK-HAIRED WOMAN
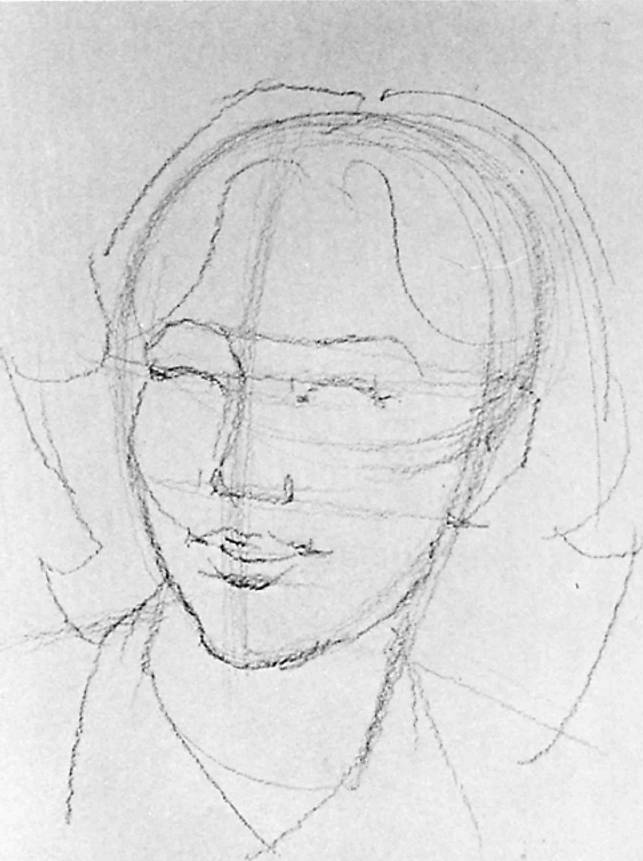
|
|
Step 1. Having discovered how easy it is to blend graphiic on the hard surface of a sheet of textured paper, you know that a pencil drawing can actually begin to look like u ''painting'" in black and white, Now you might like to try a pencil portrait in which nearly all the tones are softly blended, so that the strokes of the pencil virtually disappear. For this drawing, the right tool is a thick, soft pencil-or perhaps a stick of graphite in a holder-that might be 4B, 5B, or even 6BH The artist chaoses a 5B graphite lead in a plastic holder and works on a sheet of very rough paper with a much more pronounced tooth than the charcoal paper used in the preceding demonstration. He begins by drawing the usual compound egg shape and a tilted cylinder for the neck, The head is turned to a three-quarter view, and so the vertical center line is actually off center. Horizontal guidelines locate the features; the artist divides these lines with tiny touches to locate the eyes and the corners of the nose and mouth,
*"-
I
W
i
|
|
|
|
* I |
r |
|
|
■ -r |
|
|
'f |
|
|
- - |
|
|
p"1 |
i
y
|
|
Step 2. The artist draws the outer contours of the face over the egg shape, capturing the curves of the cheeks, jaw, and chin. Swift, curving lines capture the sweep of the hair around the head and over the forehead. He draws the first few lines of the features over the guidelines of Step 1: the curves of the eyebrows and the upper lids: the side and underside of the nose: and the upper and lower lips. The one visible car is aligned with the eye and nose. As you can see, the roughness of the paper breaks up the pencil stroke and produces a ragged line.
ARN.eBook
DEMONSTRATION 4. DARK-HAIRED WOMAN
|
|
Step 3. The artist completes his preliminary line drawing of the outer contours of the head and the .shapes of the features. He strengthens the lines of the jaw and the chin. He draws the ear more precisely and adds the inner contours of the eyes, with a hint of darkness on the irises. He traces the bridge of the nose and constructs the tip of the nose and the nostril wings. He indicates the groove from the base of the nose to the upper lip. As he defines the lips, he darkens the corners of the mouth and indicates the concavity beneath the lower lip with a dark scribble. The outline of the hair is strengthened with quick, casual lines.
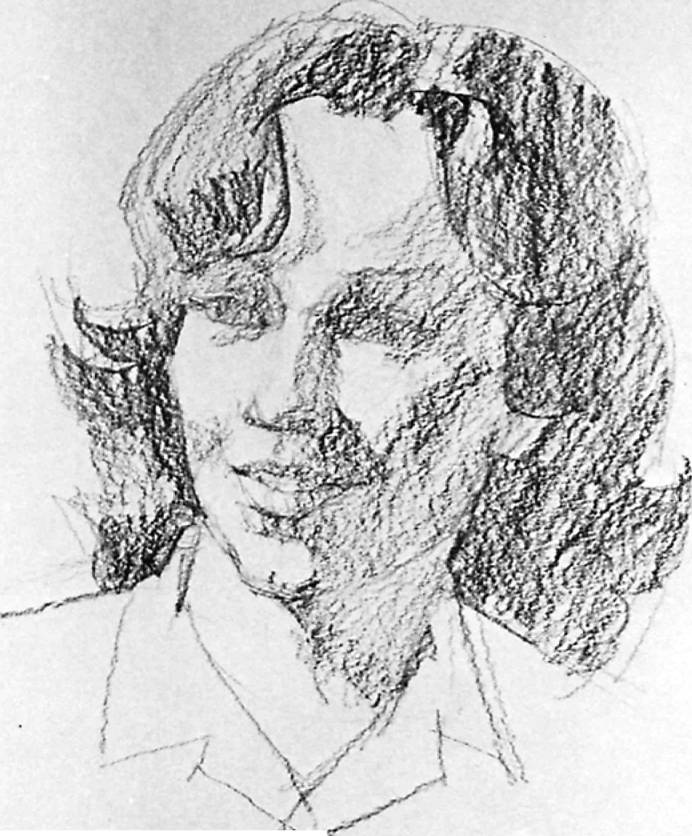 s*
s*
Step 4. Now the artist turns the thick lead on its side and moves it swiftly back and forth over the rough surface of the paper to indicate the big tonal areas. The paper is so rough that you can hardly see the individual strokes-the texture of the paper dominates the tones. The lines of Steps 1, 2, and 3 rapidly disappear under the ragged masses of tone. For the paler tones, the artist moves the drawing tool lightly over the paper, pressing harder and piling up additional strokes for the darker areas-such as the eye sockets, the cheeks, the shadow cast by the nose, and the hair, Most of the original lines have disappeared under the tones, The artist erases the others. The main purpose of Step 4 is to establish a clear distinction between the lights (which are just bare paper), the darks, and the middletones (or halftones).
ARN.eBook
|