Beginner level tutorial
Vases can
be a work of art. I had an ancient, beautiful vase in my home, which drew cries
of admiration from everyone who visited our home. Then one day my big-brother
toppled and broke it. Fortunately, the vase we are going to make in Blender is
virtually indestructible.
Blender is very powerful modeling and animation package and have very efficient
work flow, combination of keyboard shortcuts and the UI make that possible.
Modeling the vase in Blender is pretty simple, and we are going to take you
through the steps to create it. For this lesson we will be using Sub-Surface
modeling. Before we begin lets first explore the Blender interface a bit.
Interface components or tool name are highlighted by this colour.
Keyboard shortcuts are highlighted by this [colour].
Part 1: First crawls
s
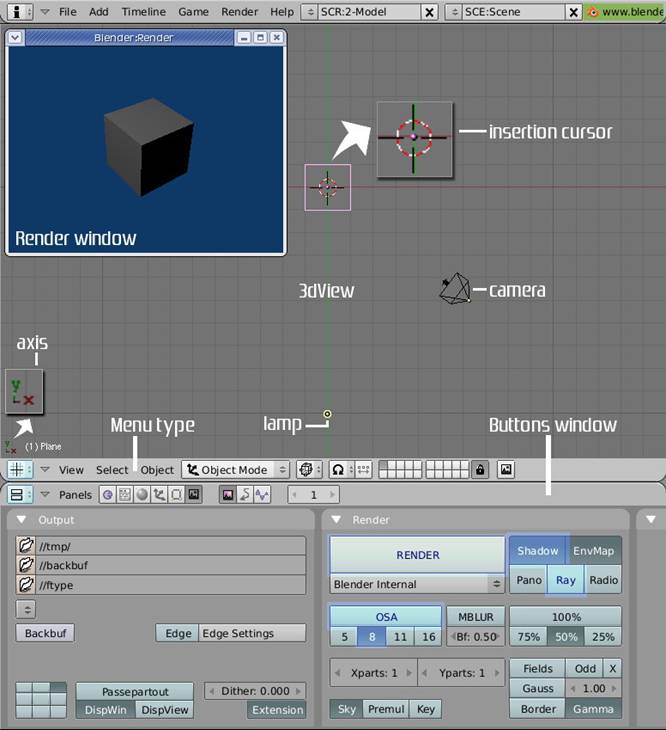
The main interface component in Blender
is called a 'window'. Each feature in Blender has it own window. The window is
highly configurable in fact you can change any 'window type' to other just by
selecting the 'window type' from the menu bar. Blender uses 'windows' as
interface for all feature sets, like the 3dView or workspace, buttons window
(this window houses context sensitive tool & options for the 3dView) and
all other. Each window can be identified by the icon at the left most part on
the menu-panel, for example here how the icons for 3dView ![]() and buttons window
and buttons window ![]() look like.
look like.
Blender uses the mouse cursor as the focus poi 16116p159q nt so all the pop-ups will be at
the cursor position. In 3dView there is an insertion cursor, any object added
to the 3dView will always be at the current insertion cursor position, left
click positions the insertion cursor to desired location.
Blender have two modes of working,![]() and
and ![]() .
In 'edit-mode' you can modify the shape of the model by manipulation its edges,
vertices or faces. To get into 'edit-mode' first select the object(right
click) then press [Tab], press Tab again (toggle) will bring you back to
'object mode'. In 'edit-mode' you the vertices are shown as dots, yellow if selected
pink otherwise.
.
In 'edit-mode' you can modify the shape of the model by manipulation its edges,
vertices or faces. To get into 'edit-mode' first select the object(right
click) then press [Tab], press Tab again (toggle) will bring you back to
'object mode'. In 'edit-mode' you the vertices are shown as dots, yellow if selected
pink otherwise.
Every object have its own pivot point shown by a pink
dot, all operations like rotation, scaling and movement act on the pivot point.
Right click is used for selection either objects in 'object-mode' or editable
vertices, edges or faces in 'edit-mode'.
By default the 'Ray-tracing' is disabled in Blender. Press [F10 Scene) go to
buttons window and on 'Render' panel enable 'Ray' button. Thats
about the very basic primer for your entry in to blender world. We will now
start on your next master piece.
In Blender dragging requires first 'grabbing' the object. To grab the object
select it with right click then press [G] to grab. The accompanying
images will have the setting and options highlighted with light blue where-ever
possible. When ever we mention 'Panel' it always means the option panel in the
buttons window. In the pop-ups you can either press 'Enter' or click to make a
selection.
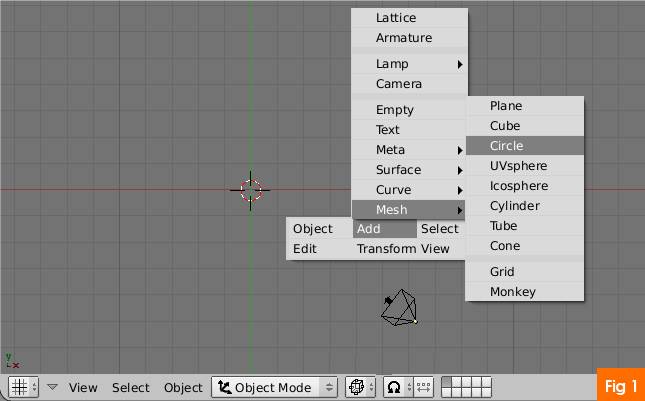
Part2:Modeling Step-1 By default blender 3dView already have some objects, a cube a lamp and a camera, you can press [F12] to see the default scene rendered. We don't need the cube, it is already selected(pink) so go ahead and press [Delete], confirm deletion in the pop-up. To make the vase we will use 'circle primitive'. To add a circle press [Space-bar] to bring up the toolbox. In it go to Add>> Mesh>> Circle, confirm the circle of 32 vertices.
Step-2 Now we will start editing the circle. You will notice upon adding
the circle the circle is in 'edit-mode' by default. First we will scale down
the circle about 5 major grid units. To do that first press [S scale) then
keep pressed [Ctrl](Constrained movement) and bring the mouse towards
the circle pivot, the circle will get scaled down in 'jumps'. While scaling you
can see units or coordinates change in the menu bar. Yes the menu bar gives way
to coordinate readings any time you move objects in 3dView.
Step-3 We will use extrusion for creating
the shape of the vase. Press [Numpad1] to get in to front view. Keep all
the vertices selected(yellow, [A] to toggle),
now press [E](extrusion) select 'Region' from pop-up and start moving
the mouse upwards(Y axis). Just like the major grid jumps you can get smaller
ones by complementing [Ctrl] with [Shift]. Now move it up to 1
small grid unit.
Tip: One small unit = .1000 in blender units or coordinates and one major([Ctrl]) is 1.000.
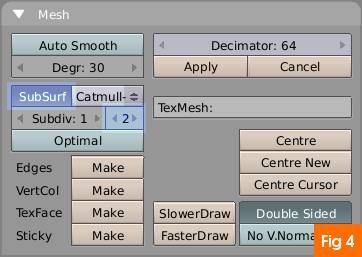
Step-4 Now we will enable Sub-surf on our vase
mesh. Press [F9] (Edit buttons) immediately
you will see the buttons-window will change in options. Now in the
buttons-window go to 'Mesh' panel and press Sub-Surf button to enable
Sub-Surface. SubSurf increases the virtual count of the vertices, edges or
faces in order to achieve smoother angles on the surface faces. Increase the
value of 'Subdiv' to 2 on second spinner button.
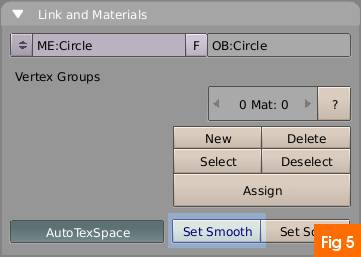
Step-5 We also need to enable smoothing for the
surface itself. In the same buttons-window go to 'Link &
Materials' panel. Press 'Set Smooth' button. Press [Z] (3dView
Shading) once to get 'solid shading' in 3dView. The extruded circle or vase
mesh will be shown in shaded mode.
Tip: For free form view in the 3dView, press and keep MMB while moving the
mouse.
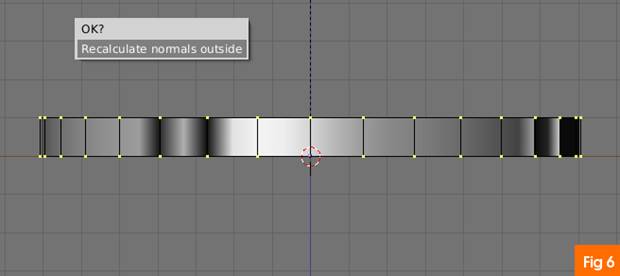
Step-6 In the shaded-mode if you see any artifacts on the surface then,
first select all the vertices by pressing [A] then press [Ctrl+N]
to recalculate surface normals. Before proceeding get back to wire frame view([Z] again). You can now save your work.
Step-7 I am assuming that you haven't changed the front view [Numpad1] and 3dView is in wireframe shading. If you had to go through the step5 then first unselected all the vertices by again pressing [A]. Press [B box selection) the cursor will change to plus, drag and create a box around the topmost vertices in order to select them. Once selected we can proceed to extrude the vase surface. Press [E] then [Y Y axis) to constrain movement vertically, now move it .1000 unit upwards. Scale it down to .600. To scale the selection press [S] then move the mouse, click to commit scaling.
Step-8 No we have to complete the vase by 13 more extrusions. I am providing the extruding and scaling measurement for
each step along with directions. Follow the method of extrusion and/or scaling
procedure on them. Make sure you check the coordinates in the coordinate panel
on the menu bar when you are moving the vertices.
1) .1000 extrude up, scale 1.300.
2) .1000 extrude up, scale 1.200.
3) .3000 extrude up, scale 1.300.
4) .4000 extrude up.
5) extrude and move up 2 big units([Ctrl]) and
then .700 scale inwards.
The image8 shows the result of first set of extrusions for our vase model.
Step-9 Up to now we had created the bulk of the vase and we can see the
process in the shaded view, by pressing [Z]. Before proceeding get back
in wire frame view.
6) .2000 extrude upwards, scale .800 inwards. Next two extrusions will shape
the 'neck' of the vase.
7) .2000 extrude upwards, scale .600 inwards.
8) .1000 extrude upwards.
9) .1000 extrude upwards, 1.400 scale outwards.
10) .1500 extrude upwards.
11) .600 extrude inwards, and lastly
12) .3000 extrude downwards.
Before proceeding get out of edit-mode by pressing [Tab].
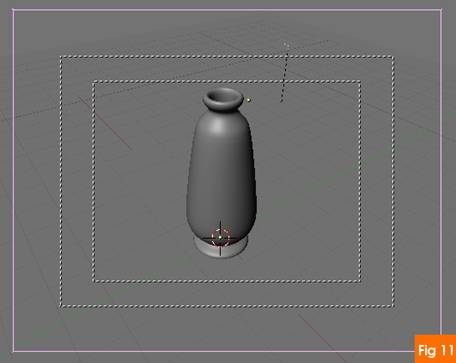
Step-10 If you followed right your work will
look something like in the image-9. We will now add a floor underneath the
vase. Go to top-view [Numpad7]. Press Space bar goto Add>>Mesh>>Plane.
Scale it up to 12 big units. Move the plane left 5 major units and up 5 major
units. The modeling work for our scene is complete and you can view your work
in rendering.
Step-11 Now we need to adjust the camera. Select it by right-click.
Press [Numpad0] to get into camera view. Grab [G] camera,keep pressed the [Ctrl] and move the mouse downwards
one time, the value in the coordinated should Dz 1.0000. This will bring the
vase in full view of the camera. Press [F12] to see the
your modeled vase get rendered. Save the file now.
Part3:Materials&Textures
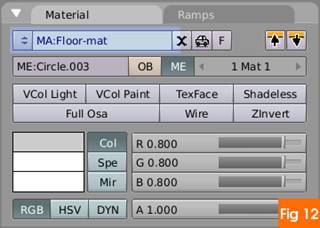
Step-12 Now we are going to apply materials and textures to the vase and
the floor. We will start with floor first. Select the floor in object-mode.
Press [F5] to bring up Shading & Materials features in the
buttons-window. Press 'Add-new' button to assign a material to the floor. As
soon as you assign a new material the 'Add new' button gives way to 'material
name entry-box' click it and type 'Floor-mat' for easier identification.
Step-13 After assigning a material you can now add textures to it. For
floor we are going to add a wood image texture. Press [F6] , the Texture-buttons window
opens. In 'Texture' tab click 'Add new' to add a texture channel. Immediately a
'Texture-type' drop down list appears from it select 'Image'. Again a new tab
called 'Image' tab appears next, click the 'Load Image' button and browse to
the texture wood-tile.jpg, select it and press [Enter]. In Xrepeat: and
Yrepeat: increase both values to 4.
Step-14 After adding the wood image texture, we will now modify the
Shading parameters of the floor material. Press [F5] and got to 'Mirror
Transp' Tab next to Shaders and press 'Ray mirror' and increase the 'RayMir'
slider to .20. And finally Depth 3 (under Ray Mirror button), thats all is needed for the wooden floor material.
Step-15 Following the procedure in step-11 add a material for the vase.
Then add three image textures namely vase-tex.jpg, vase-tex-spec.jpg and
vase-deco.jpg in three different channels. You can rename the texture channels
by entering text in the Add new box which by default will show
Step-16 We had added three image textures for vase and now we will
modify the shading property of the vase material. Press [F5], in
'Shaders' tab change 'Ref' (diffusion property) to .400, next change Spec
(specularity) to 1.700 and Hard to 400 also Depth=3. 'Lambert' and
'CookTorr' are the algorithms user to calculate the
diffusion and specular property of the textures.
Step-17 Now we need to give proper mapping values to the three texture
channels. In the Texture tab(far right) you can see
the three texture channels being visible. The 'Map-input' and 'Map to' tab will
change the value of only the channel which is currently pressed(vase-tex).
So to modify the properties of other channel you have to first select them. Go
to 'Map input' Tab select Tube mapping for all three channels.
Step-18 In Tab 'Map to' the first texture
channel need not be changed. For sec channel disable '
Step-19 For the third and the last channel
change the texture blending mode to 'Multiply' from the default 'Mix' and '
Part4: Scene Lighting
Step-20 For lighting the scene we will add two
more lamps. You can either add new lamp from the Toolbox [Space bar] or
duplicate the original lamp. To duplicate first select the lamp then press
[Shift+D] and move the duplicate object to desired position. Get in
front-view [Numpad1] duplicate lamp once and move it down to nearly
bottom of the original lamp.
Step-21 In top-view [Numpad7], duplicate from the last duplicated
lamp, move it opposite but equi-distance between Camera and the Vase. Keep it
slightly off the straight line with the camera, as this lamp will be used for
highlighting the side of the vase. Save your work.

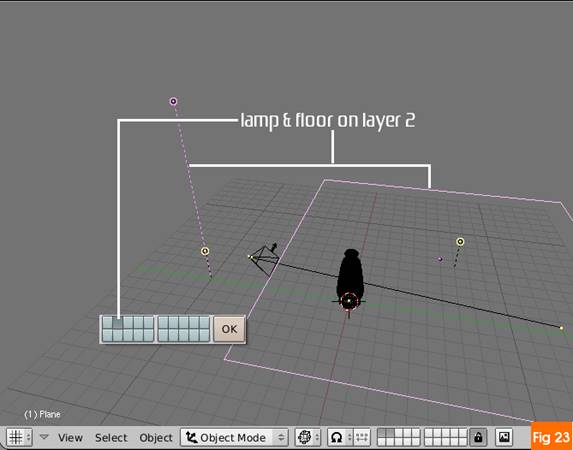
Step-22 If you render the scene now, you will see two bright spots on
the floor, caused by the two duplicate lamps. We don't want that and here is
where Blenders 'Layers' feature comes in. The layers button
are visible on the Menu-panel of the 3dView. Two layers will be
sufficient for our scene, to add a layer keep pressed [Shift] and click
on the second layer.
By default we are always in first layer. Blender includes any layer that is active or layer button pressed in the rendering, just like any 2d paint program. Neat isn't it!.
Step-23 Select the floor and the original lamp then press [M](move to layer), in the layer pop-up push the second layer button as you did in last step. Why you may ask that we are using more than one layer. Well Blender allows lamps to effect either 'local' layer or the whole scene, using this feature we can remove those two bright spots in the render. While we want the two duplicated lamps to affect the highlights of vase.
Step-24 Select the original lamp and in 'Shadow & Spot' tab enable
'Ray shadow' to enable shadow generation, remember shadow casting should be
enabled only for original lamp. Select any duplicate lamp, press [F5],
in 'Lamp' tab click 'Layer' button also click 'No diffuse', repeat that for
other duplicated lamp. Save your work now and if you wish do the test render.
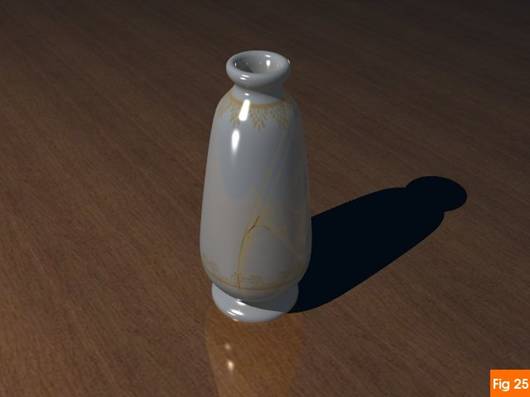
Step-25 If you did a test render you can see the render with nice
shadow. Blender have a GI or global illumination feature called, 'Ambient
Occlusion' this behaves much in the way natural light behaves, i.e. it also
takes into account light bounces among objects, and this makes the scene more
realistic. But for same reasons this make its computation intensive so if you
have slower processor you might have to sit for long time as the rendering
completes.
Step-26 We will now go to World buttons to enable AO. Press [F8]
and in the World buttons goto 'Amb occ' tab and enable the 'Ambient Occlusion'.
Here enable 'Use distances' and increase the 'DistF' value to 2.000.
Press 'Both' button. Set 'Energy' to .80 and 'Bias' to .010. Render the scene.
Most probably you will see noise in the rendering when it is finished.
Depending upon you system capability you can increase the 'Samples' in AO tab.
for this scene it was set to full at 16.
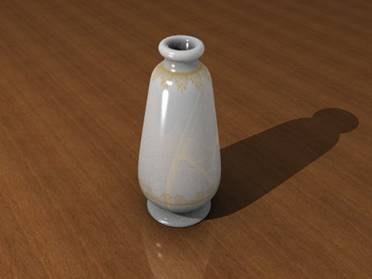
Step-27 Our work is ready for rendering. We
just need to tweak the rendering options to get good results. Press [F10]
and in the 'Render' tab enable OSA and increase the value to 8. The OSA or
oversampling or anti aliasing make the jagged edges in the render smooth and
increase the quality of the image. If you want to increase the size of
rendering then go to 'Format' Tab and input the values manually. Also here you
can change the format for saving the rendered image. After you are done press [F12] for final render. After
rendering press [F3] to save the image, and remember to input the proper
extension, as Blender does not adds the extension automatically.

The scene with AO enabled. The image textures and the source blend file can be
downloaded from the downloads section.
|
