Table of Contents
The Early American Wars Scenario Editor
Introduction
Using the Editor
Placing and Moving Units
Adding and Deleting Reinforcements
Editing A/I Scripts
Menus
File Menu
Scenario Menu
Command Menu
Hexes Menu
Units Menu
Info Menu
Scripts Menu
View Menu
Settings Menu
Help Menu
Dialogs
Header Dialog
Description Dialog
Unit Dialog
Breastworks Dialog
Set Objective Dialog
Reinforce Dialog
Scheduled Dialog
Release Dialog
Add Release Dialog
Strength Dialog
Objectives Dialog
Script Dialog
Order Dialog
Location Dialog
Jump Dialog
Organization Dialog
Find Unit Dialog
Selection Dialog
Parameter Data Dialog
General Data
Time Parameters
Bridge Dialog
Other Features
Hex Info Area
Toolbar
Roaming Mode
Hot Keys
AI
Hot Spot
Parameter Data
Anonymous Major
Move Mode
Place Mode
Hot Key
Highlight
Fixed
Exit Objective
The Early American Wars Scenario Editor can be used to create new scenarios and to modify existing scenarios in the Early American Wars series including Campaign 1776 and others. The Editor has full support for all unit placement and modification (such as strength and fatigue modification) and full support for other scenario features (such as objective placement). The Editor also supports the creation and modification of A/I Scripts in the scenarios.
When the Editor is run, it will normally prompt you for the filename of a scenario to edit. After you select a scenario and click OK, the Editor will display the full-size map associated with the scenario (see the Initial View submenu in the Settings Menu for how to control which map resolution is initially displayed). In addition, in the lower right-hand corner of the screen, the Editor will display the Unit Dialog which displays the units which are available to either be placed on the map or placed as reinforcements (see Display Unit Dialog in the Units Menu to redisplay the Unit Dialog if it becomes closed). If the Prompt for Scenario option in the Settings Menu is not set, then the initial dialog listing the scenarios will not be shown and you will need to select the File New or Open menu item to create or read an existing scenario. Note: you do not want to modify the original scenarios distributed with the game. You should make a copy of the scenario file if you want to modify an original scenario.
At
any given time, the Editor is either in Move Mode
or Place Mode. By default, the Editor is in Place
Mode. When in Place Mode, clicking on the map with the right mouse button causes
the currently selected unit in the Unit Dialog
to be placed on the map. When in Move Mode, right clicking on the map
causes the currently selected units to be moved to the selected hex. When in Place
Mode, the cursor is displayed as a cross ![]() . When in Move
Mode, the cursor is displayed as a circle
. When in Move
Mode, the cursor is displayed as a circle ![]() . The mode of the Editor can be toggled by
clicking on the Mode Button in the Toolbar. Alternatively, the current mode of the Editor can be toggled by holding
down the Control (Ctrl) key.
. The mode of the Editor can be toggled by
clicking on the Mode Button in the Toolbar. Alternatively, the current mode of the Editor can be toggled by holding
down the Control (Ctrl) key.
The Unit Dialog displays all of the units in the Order-of-Battle that have not been placed on the map or placed as a reinforcement. To place a unit on the map, first find the unit in the Unit Dialog and select it. Then, ensuring that the Editor is in Place Mode, click on the hex to place the unit with the right mouse button. After placement, the unit will be selected and can be modified relative to such factors as facing and strength by using the Command Menu or buttons on the Toolbar. To move units from one hex to another on the map, select the selects and, ensuring that the Editor is in Move Mode, click on the hex to move the units to with the right mouse button. Use Remove From Map in the Command Menu to remove unnecessary units from the map.
Note: the facing of Regiment leaders can have an effect on the behavior of the A/I since it tries to align units in the Regiment with their leaders facing. Be sure to double-check the facing of all leaders in the scenario using the 3D graphics mode and Unit List alternate view.
Adding reinforcements to the current scenario is a two step process. First, identify the units to be added as reinforcements in the Unit Dialog and place them on the map at the location of the entry hex. You should ensure that the units have a facing that is appropriate for their entry onto the map and that they are in the appropriate formation such as Line or Column. Second, after selecting all of the reinforcements that are to arrive as one group, select Add Reinforcement from the Units Menu. This will display the Reinforce Dialog so that additional information such as the arrival time can be entered. Having done this, the units will be removed from the map and a reinforcement entry will be generated for the current scenario.
Reinforcements which have been previously defined can be reviewed, modified, and deleted using the Scheduled Dialog.
A/I Scripts are used in the main program to direct the A/I whenever a scenario is played using Automatic A/I. The Editor allows you to edit these Scripts in the scenario files. A scenario may have one or more Scripts. When the scenario is played using Automatic A/I, one of these Scripts will be chosen at random and used to direct the A/I. In addition to Scripts, the A/I also uses the A/I flags in the scenario header information (see the Header Dialog) to generate orders.
A Script consists of one or more Orders. Each Order has an Order Type which is one of the following:
Extreme Defend - this Order causes the organization receiving the Order to defend the given Order objective at all hazards. The organization will not fallback from the Order objective regardless of casualties. If the organization consists of sub-organizations, then they will be positioned about the Order objective with their flanks refused in a defensive formation.
(Normal) Defend - this is a normal Defend Order for an organization. The organization will defend the objective, but if it receives casualties of a certain degree, it will fall back to a safer position. Again, if there are sub-organizations, they will be deployed in a defensive line with flanks refused.
No Order - this Order should always have the objective (-1, -1). This Order indicates that the organization should not move or fire except as a response to an attack on itself. However, if a Regiment has this Order and its leader is currently mounted, then the A/I considers that Regiment to be in reserve and may automatically order it to defend a threatened Objective.
(Normal) Attack - this is a normal Attack Order for an organization. The organization will advance to the objective hex and attack it, but will not press the attack if it receives high casualties. Sub-organizations of the organization will move so as to attack the flanks of the objective position.
Extreme Attack - this Order causes the organization to attack the objective hex, but using the maximum stacking limits allowed and with no possibility of falling back despite casualties. This Order will cause the organization to group so tightly together on the map that it often leaves the flanks of the attack vulnerable.
To review the Scripts and Orders for an existing scenario, select View/Edit from the Scripts Menu. The Orders for the selected Script will be displayed on-map as arrows, Blue for American Orders, and Red for British Orders.
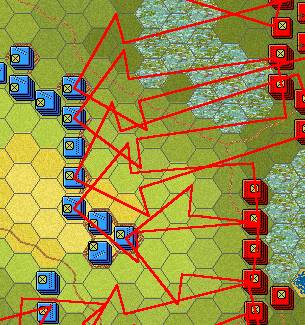 Each
arrow points to the objective hex for the Order. The base of the arrow represents either the
location of the organization's leader or center, if the Order is the first for
that organization in the scenario, or it is based at the objective hex of the
previous order for that organization. For reinforcements, the base of the arrow is placed at the reinforcement
entry hex. Note: as a special case, when
the base of the arrow is the same hex as the objective hex, then a circle about
this hex is drawn instead of an arrow.
Each
arrow points to the objective hex for the Order. The base of the arrow represents either the
location of the organization's leader or center, if the Order is the first for
that organization in the scenario, or it is based at the objective hex of the
previous order for that organization. For reinforcements, the base of the arrow is placed at the reinforcement
entry hex. Note: as a special case, when
the base of the arrow is the same hex as the objective hex, then a circle about
this hex is drawn instead of an arrow.
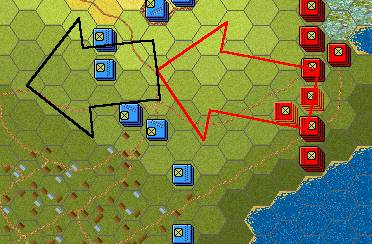
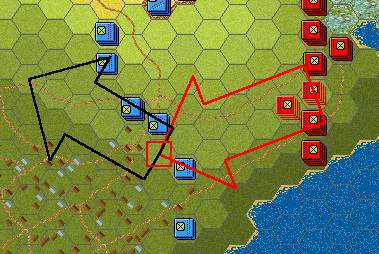 Selecting
an individual order in the Orders list causes only Orders for that organization
to be displayed on the map. The selected
Order is displayed in red and all other Orders for that organization are
displayed in black. Note: you can return
to the full unselected displayed by reselecting the Script in the Scripts
list. Notice that as each Order is
selected, the map is scrolled so that the Order objective hex becomes the Hot Spot.
Selecting
an individual order in the Orders list causes only Orders for that organization
to be displayed on the map. The selected
Order is displayed in red and all other Orders for that organization are
displayed in black. Note: you can return
to the full unselected displayed by reselecting the Script in the Scripts
list. Notice that as each Order is
selected, the map is scrolled so that the Order objective hex becomes the Hot Spot.
 You
can modify the objective of the selected Order by clicking on a new hex on the
map, and then selecting Modify in
the Script Dialog. The new objective will automatically appear
in the Order Dialog. Selecting OK in the Order Dialog will establish the new objective hex and
update the display.
You
can modify the objective of the selected Order by clicking on a new hex on the
map, and then selecting Modify in
the Script Dialog. The new objective will automatically appear
in the Order Dialog. Selecting OK in the Order Dialog will establish the new objective hex and
update the display.
When establishing a new order, it is convenient to go ahead and select the objective hex for the Order on the map before selecting Add in the Script Dialog. This way, the coordinates of the objective hex will be automatically entered in the Order Dialog. Also, if you are adding an Order to an organization that already has an Order in that Script, you may wish to select one of these Orders since the information in that Order such as organization and type of Order will be automatically filled in the Order Dialog when it is displayed (note that the best sequence in this case is to select the existing Order, then select the new objective hex).
In the main program, the Orders that result from A/I Scripts can be viewed while the scenario is being played.
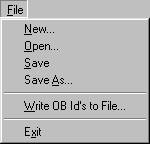
The File Menu is used to read and write scenarios from and to disk and to perform other basic file operations.
 Select
New to clear any scenario currently
in the Editor and to begin a new scenario from scratch.
Select
New to clear any scenario currently
in the Editor and to begin a new scenario from scratch.
Select Open to open an existing
scenario. You will be prompted for the
filename of the scenario. Note: you
should not make changes to original scenarios distributed with the game
software. If you want to make such a
change, you should copy the scenario file to a new filename before editing it.
Select Save to save the current
scenario to a file. If the scenario was
previously read from a file, it will by default be written back to the same
file. If the scenario was started from scratch,
you will be prompted for the name of the file.
Select Save As to save the current
scenario to a different file than the one it was previously read from. You will be prompted for the new filename.
If
you select Write OB Id's to File,
you will be prompted for the name of a file to write the internal codes used
for the current Order-of-Battle. If you
make any changes directly to the scenario files by hand, you will find this
information useful to determine correct organizations and units.
Select Exit to exit the Editor.
The Scenario Menu is used to modify basic information about the current scenario such as scenario length and description.
 Selecting
Header displays the Header Dialog which can be used to edit basic
scenario values.
Selecting
Header displays the Header Dialog which can be used to edit basic
scenario values.
Selecting Description displays the Description Dialog so that the scenario description
can be entered and modified.
Select Restore Units to restore all
units in the current scenario, both on-map and reinforcements, to their nominal
full-strength as given in the Order of Battle.
The Command Menu is used to modify information about units that have been placed on the map. Most operations in the Command Menu are applied to the currently selected units in the Hot Spot.
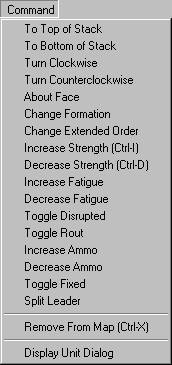 Select
To Top of Stack to move the
currently selected units to the top of the stack.
Select
To Top of Stack to move the
currently selected units to the top of the stack.
Select To Bottom of Stack to move
the currently selected units to the bottom of the stack.
Select Turn Clockwise to turn the
currently selected units one hexside in a clockwise direction.
Select Turn Counterclockwise to turn
the currently selected units one hexside in a counter-clockwise direction.
Select About Face to turn the
currently selected units about face.
Select Change Formation to change
the formation of the currently selected units. For infantry, this means changing between line and column
formation. For cavalry, it means
changing between mounted and dismounted formation. For artillery, it means changing between
limbered and unlimbered formation.
Select Change Extended Order to
change the formation of certain units to and from Extended Order. Extended Order represents a skirmish
formation used by Light and Militia units. Indian units are automatically in Extended Order and cannot be changed.
Select Increase Strength to increase
the strength of the currently selected units by man or gun. Holding down the Alt key while selecting this increases the strength by 10 men or
guns. NOTE: for leaders, this command
causes the leader to be promoted. You
would apply this for example to a Brigade commander that should start the
scenario as leader of his Division due to a previous battlefield casualty of
the default Division leader. Also note
that for a Regiment commander that is to be promoted, there should also be an Anonymous Majorcreated. See the Split
Leader command below for the simplest way to do this.
Select Decrease Strength to decrease
the strength of the currently selected units by man or gun. Holding down the Alt key while selecting this decreases the strength by 10 men or
guns. For leaders, this removes any
promotion status for that leader and returns them to their default command.
Select Increase Fatigue to increase
the fatigue of the currently selected units by one. Holding down the Alt key while selecting this increases the fatigue by 10. This should be used to represent fatigue
accumulated from combat previous to the current scenario.
Select Decrease Fatigue to decrease
the fatigue of the currently selected units by one. Holding down the Alt key while selecting this decreases the fatigue by 10.
Select Toggle Disrupted to toggle
the Disrupted state of the currently selected units on and off.
Select Toggle Rout to toggle the
Rout state of the currently selected units on and off.
Select
Increase Ammo to raise the ammo level
of the selected units. If the selected
units are No-Ammo, this will raise their state to Low-On-Ammo. Likewise, if they are Low-On-Ammo, this will
raise their state to normal ammo levels.
Select Decrease Ammo to lower the
ammo level of the selected units. If the
selected units are at normal ammo levels, this will lower their state to
Low-On-Ammo. If the units are
Low-On-Ammo, this will lower their state to No-Ammo.
Select Toggle Fixed to toggle the Fixed status of the currently selected units on and
off.
Select Split Leader after selecting a Regiment leader to automatically
promote the leader and to create at the same time a Major
Anonymous as his replacement.
Select Remove From Map to remove the currently selected units from the map. Units that are removed from the map will automatically reappear in the Unit Dialog for use elsewhere in the scenario (see Confirm Unit Removals in the Settings Menu).
Select Display Unit Dialog to redisplay the Unit Dialog if it has been closed for whatever reason.
The Hexes Menu is used to modify values associated with map hexes such as breastworks and objectives.
 Select
Add/Remove Bridge to display the Bridge Dialog when the current Hot Spot is a Water
hex to add or modify a Bridge over the water.
Select
Add/Remove Bridge to display the Bridge Dialog when the current Hot Spot is a Water
hex to add or modify a Bridge over the water.
Select Add/Remove Breastworks to
display the Breastworks Dialog to add or
modify the Breastwork hexsides of the current Hot
Spot
Select Add/Remove Objective to
display the Set Objective Dialog so that
Objectives can be added or removed from the current Hot
Spot hex.
The Units Menu is used to display and modify the reinforcements and Fixed unit releases in the current scenario.
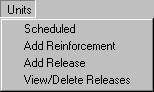 Select
the Scheduled menu item to display
the Scheduled Dialog which allows the list of
reinforcements for the current scenario to be viewed, modified, and deleted.
Select
the Scheduled menu item to display
the Scheduled Dialog which allows the list of
reinforcements for the current scenario to be viewed, modified, and deleted.
To create new reinforcements, first place the units to become reinforcements on
the map at their entry hex. Adjust the
facing of the units so it is appropriate for their entry onto the map. Select
all of the units to make up a reinforcement group, and then select Add Reinforcement to display the Reinforce Dialog. This dialog will allow additional information such as the arrival time
to be entered.
Select Add Release to display the Add Release Dialog so that Releases of Fixed units can be added to the current scenario.
Select View/Delete Releases to
display the Release Dialog so that Releases
can be viewed and deleted.
The Info Menu is used to display summary information about the current scenario such as the strength of on-map units and the ownership of map objectives.
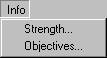 Select
Strength to display the Strength Dialog. This will show the total strength of all on-map units in the current
scenario.
Select
Strength to display the Strength Dialog. This will show the total strength of all on-map units in the current
scenario.
Select Objectives to display the Objectives Dialog to see a complete list of all of
the Objectives associated with the current scenario.
The Scripts Menu is used to create and modify A/I Scripts in the current scenario.
![]() Select
View/Edit to display the Script Dialog in order to view, modify, and delete
the A/I Scripts associated with the current scenario.
Select
View/Edit to display the Script Dialog in order to view, modify, and delete
the A/I Scripts associated with the current scenario.
The View Menu is used to establish display settings such as the map display resolution and the display of various scenario on-map data such as objectives.
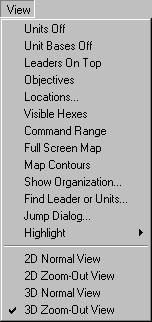 Select
Units Off to hide the units that are
currently on the map. This is used when
you need to see map details that are hidden by the units.
Select
Units Off to hide the units that are
currently on the map. This is used when
you need to see map details that are hidden by the units.
Select Unit Bases Off to hide the
unit bases that are drawn in 3D graphics mode.
Select Leaders On Top to ensure that
leader counters are always displayed on the top of the stack in 2D graphics
mode. Otherwise, leader counters are only displayed in 2D mode when they are in
a hex by themselves or other leaders.
Select Objectives to toggle the
display of Objectives on the main map and the Jump
Dialog.
Select Locations to display the Location Dialog. This displays a list of all the map locations.
Select Visible Hexes to toggle the
display showing all hexes visible from the current Hot
Spot. Hexes which are not visible
will be darkened.
Select Command Range to toggle the
display showing all hexes within the command range of the currently selected
Regiment or Brigade leader.
Select Full Screen Map to toggle the
display of the Hex Info Area. When the Hex Info Area is hidden, more of the
map is displayed.
Select Map Contours to toggle the
display of contours on the map that show elevation changes. This can be used to see elevation changes
more clearly, especially in 3D graphics mode.
Select Show Organization to display
the Organization Dialog in order to display
organizations on the map.
Select Find Leader or Units to
display the Find Unit Dialog. Using this dialog, you can find any leader or
unit that is currently on the map.
Select Jump Dialog to display the Jump Dialog which enables you to quickly go to any
location on the map.
Select Highlight to display the Highlight Submenu described below.
Select
2D Normal View (Hot Key 2) to display the map in normal size 2D
graphics mode.
Select 2D Zoom-Out View (Hot Key 1)
to display the map in reduced size 2D graphics mode.
Select 3D Normal View (Hot Key 4) to
display the map in normal size 3D graphics mode.
Select 3D Zoom-Out View (Hot Key 3)
to display the map in reduced size 3D graphics mode.
Normally the screen is recentered on the Hot Spot hex when you change zoom modes. If you hold down the Alt key when you change zoom modes, the screen will retain the current view.
The Highlight Submenu displays a list of unit types and status values that may be selected to Highlight certain units on the map. Selecting any of these modes turns off any other highlighting mode that has been set. Selecting a mode that has already been set turns that mode off.
 Select
Fixed Units to Highlight units on
the map which are currently Fixed.
Select
Fixed Units to Highlight units on
the map which are currently Fixed.
Select Low on or Out of Ammo to
Highlight units on the map that currently have reduced ammo.
Select Disrupted Units to Highlight
units on the map that are currently Disrupted.
Select High Fatigue Units to
Highlight units on the map that have a Fatigue value of 60 or more.
Select Non-Full Strength Units to
Highlight units on the map whose strength value is less then their nominal
full-strength value.
Select Supply Wagons to highlight
all Supply Wagons currently on the map.
Select Organization to highlight all
units of the same organization as the top selected unit in the Hot Spot. For
example, selecting an infantry unit in a Regiment and then choosing this
Highlight option will cause all units in the same Regiment to be
highlighted. Selecting a leader and then
this option will cause all units under the command of the selected leader to be
highlighted. Holding the Alt key while making this selection
causes the next higher organization to be highlighted.
The Settings Menu is used to establish certain Editor settings that are preserved when the Editor is exited and restored the next time the Editor is run. These options are stored in the Windows Registry.
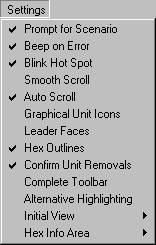 Selecting
the Prompt for Scenario option
causes the Editor to display an Open dialog when it first starts up. This is a quick way of selecting an existing
scenario to edit.
Selecting
the Prompt for Scenario option
causes the Editor to display an Open dialog when it first starts up. This is a quick way of selecting an existing
scenario to edit.
Selecting the Beep on Error option
causes the Editor to generate a beeping sound whenever you perform an invalid
operation.
Selecting the Blink Hot Spot option
causes the red outline in the Hot Spot hex to
blink whenever the map is in a 2D graphics.
Selecting the Smooth Scroll option
causes the map to scroll smoothly from one part of the map to another whenever
the Hot Spot is relocated. With this option
turned off, the map display will immediately relocate resulting in faster
operation.
Selecting the Auto Scroll option
puts the map in a mode where moving the mouse cursor to any edge of the screen
will automatically scroll the map in that direction. When this option is turned off, normal
Windows scroll bars are displayed when the map is larger than the screen area.
Selecting the Graphical Unit Icons
option causes graphical icons to be used in the display of 2D counters ![]() . With this option turned off, schematic icons
are used
. With this option turned off, schematic icons
are used ![]() .
.
Selecting the Leader Faces option
causes leader counters in 2D graphics mode to be displayed using reduced images
of the leader's face ![]() . With this option turned off, a graphical icon
. With this option turned off, a graphical icon
![]() or star symbol
or star symbol ![]() is used depending on the setting of the
Graphical Unit Icons option.
is used depending on the setting of the
Graphical Unit Icons option.
Selecting the Hex Outline option
causes outlines to be drawn around the hexes in both 2D and 3D graphics mode.
Selecting the Confirm Unit Removals
option causes the Editor to prompt before removing units from the map (see Remove From Map in the Command Menu).
Selecting the Complete Toolbar
option causes the Editor to display all available buttons in the toolbar regardless of screen resolution. Under lower screen resolutions, this will
cause the toolbar to wrap thereby reducing the amount of space available to
display the map.
Selecting Initial View displays the Initial View Submenu described below.
The Initial View Submenu is used to establish the initial map view that is displayed when the Editor is run.
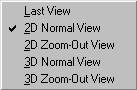 Selecting
Last View causes the Editor to come
up in whatever map display mode it was last in.
Selecting
Last View causes the Editor to come
up in whatever map display mode it was last in.
Selecting 2D Normal View, 2D Zoom-Out
View, 3D Normal View, or 3D Zoom-Out
View causes the Editor to come up in that view.
The Hex Info Area Submenu is used to determine the location of the Hex Info Area on the screen.
 Selecting
Left, Right, Top, or Bottom causes the Hex Info Area to be
displayed in the corresponding location on the screen.
Selecting
Left, Right, Top, or Bottom causes the Hex Info Area to be
displayed in the corresponding location on the screen.
The Help Menu is used to display various help and other information about the Editor including this help file and copyright information.
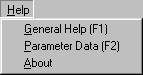 Select
General Help to display the Table of
Contents of this help file.
Select
General Help to display the Table of
Contents of this help file.
Select Parameter Data to display the
Parameter Data Dialog which shows game values
specific to the current scenario.
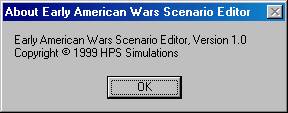 Select
About to display various information
about the Editor such as version and copyright.
Select
About to display various information
about the Editor such as version and copyright.
The Header Dialog is used to modify basic information about the scenario.
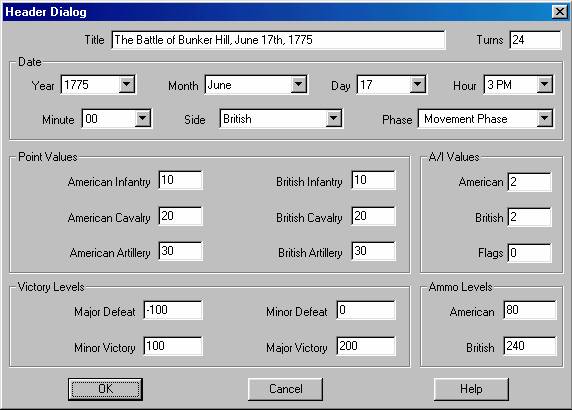
The
Title field is used to enter the
title of the scenario.
The Turns field is used to enter the
number of turns in the scenario. Note:
the number of minutes in each turn is determined by Parameter
Data and by day and night. Typically each day turn will be 5 minutes in length and each night turn
will be 15 minutes in length.
The Year, Month, Day, Hour, and Minute fields are used to enter the starting time of the
scenario. The Side field is used to enter the starting side in the scenario. Note: the first side of each turn is
determined by Parameter Data. Setting the Side field will determine the first side in the scenario, but not
the first side of each turn in the scenario. The Phase field is used to
specify the starting phase of the scenario, usually the Movement Phase.
The Point Values for American and British Infantry, Cavalry,
and Artillery are the Victory Points
awarded for each strength point loss suffered by that side for that type of
unit.
There are four Victory Levels in
each scenario. They are used to
determine victory or defeat for the scenario first side (determined by
Parameter Data). The four values are Major Defeat, Minor Defeat, Minor Victory,
and Major Victory. If the total Victory Points in the scenario
is less than or equal to the Major
Defeat value, then the first side in the scenario suffers a Major Defeat
(and correspondingly the other side wins a Major Victory). If the total Victory Points is greater than
the Major Defeat value, but less
than or equal to the Minor Defeat
value, then the first side suffers a Minor Defeat (and the other side a Minor
Victory). If the total Victory Points is
greater than the Minor Defeat value
and less than the Minor Victory
value, then the scenario has ended in a Draw. If the total Victory Points is greater than or equal to the Minor Victory value, but less than the Major Victory value, then the first
side has won a Minor Victory (and the other side suffered a Minor Defeat). Finally is the total Victory Points is greater
than or equal to the Major Victory
value, then the first side has won a Major Victory (and the other side has lost
a Major Defeat).
The American and British Ammo Values are the amount of
artillery ammo each side has at the start of the scenario.
The A/I Values are used when a side
in a scenario is played using Automatic A/I. An A/I value of 0 indicates that the corresponding side should conduct
an Extreme Defense in the scenario. An
A/I value of 1 indicates that the side should conduct an ordinary Defense. An A/I value of 2 indicates that the side
should not initiate any A/I orders on its own. This value is best used when A/I Scripts are going to be defined for the
scenario (see Editing A/I Scripts). An A/I value of 3 indicates that the side
should conduct an Attack. Finally, an
A/I value of 4 indicates that the side should conduct an Extreme Attack.
If an A/I Value different from 2 is defined for one or both sides, then the Flags value will be important. A value of 1 indicates that the A/I should
not commit the entire side to the Attack or Defense, but should only commit
forces based on opportunities. A value
of 0 will cause the A/I to commit the entire side to the Attack or Defense.
The Description Dialog is used to edit the scenario description associated with each scenario.
 This
description is displayed by Scenario Selection Dialog. The description is used to describe
historical background information about the scenario and to document certain features
such as whether the scenario is Historical or a What-If scenario. The Author
field is displayed so that the name of the scenario author can be entered and
modified.
This
description is displayed by Scenario Selection Dialog. The description is used to describe
historical background information about the scenario and to document certain features
such as whether the scenario is Historical or a What-If scenario. The Author
field is displayed so that the name of the scenario author can be entered and
modified.
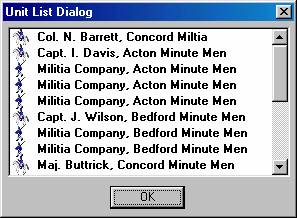
The Units Dialog displays the units which have not been either placed on the map or placed in a reinforcement in the current scenario.
 Under
Available Organizations is an
organization tree showing all of the units not yet placed on the map or placed
as reinforcements. This organization
tree uses the standard Windows Tree Control and may be navigated in a standard
manner (see your Windows documentation for information on this interface).
Under
Available Organizations is an
organization tree showing all of the units not yet placed on the map or placed
as reinforcements. This organization
tree uses the standard Windows Tree Control and may be navigated in a standard
manner (see your Windows documentation for information on this interface).
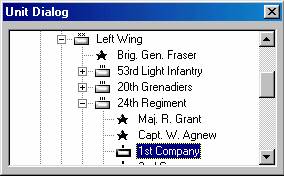 To
place a unit on the map, it must first be found and selected. The picture to the right shows how the Unit
Dialog appears when an individual unit has been selected, in this case the 1st
company 24th Regiment. Most often, you will select individual
companies or leaders for placement on the map. Higher level organizations such as Regiments and Brigades must be placed
one unit at a time. Once you have
selected the unit to place and ensuring that the Editor is in Place Mode (see Placing
and Moving Units), click on the placement hex using the right mouse
button. This will place the unit on the
map and, except for Supply Wagons, remove the unit from the organization tree
and automatically select the next unit in the tree.
To
place a unit on the map, it must first be found and selected. The picture to the right shows how the Unit
Dialog appears when an individual unit has been selected, in this case the 1st
company 24th Regiment. Most often, you will select individual
companies or leaders for placement on the map. Higher level organizations such as Regiments and Brigades must be placed
one unit at a time. Once you have
selected the unit to place and ensuring that the Editor is in Place Mode (see Placing
and Moving Units), click on the placement hex using the right mouse
button. This will place the unit on the
map and, except for Supply Wagons, remove the unit from the organization tree
and automatically select the next unit in the tree.
Except for Supply Wagons, only one copy of each unit may be placed on the map. As many copies of each Supply Wagon may be placed on the map as needed.
If you inadvertently or otherwise close the Unit Dialog, it can be reopened by selecting Display Unit Dialog from the Command Menu.
The Breastworks Dialog is used to add or modify Breastwork hexsides relative to the current Hot Spot
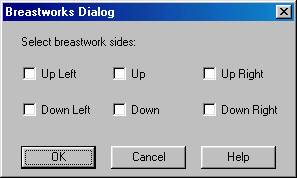 The
Breastworks Dialog contains 6 checkboxes, one for
each hex side. Select the combination of
breastworks you wish for the current Hot Spot
hex and click OK.
The
Breastworks Dialog contains 6 checkboxes, one for
each hex side. Select the combination of
breastworks you wish for the current Hot Spot
hex and click OK.
The Set Objective Dialog is used to place or remove Objectives in the current Hot Spot hex.
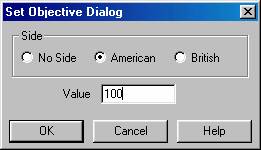 To
establish the current Hot Spot hex as an objective hex, select a side as the
Objective owner and assign a value to the Objective. To delete an Objective, assign it the side No Side and give it a value of 0.
To
establish the current Hot Spot hex as an objective hex, select a side as the
Objective owner and assign a value to the Objective. To delete an Objective, assign it the side No Side and give it a value of 0.
Certain objectives are referred to as Exit Objectives. An Exit Objective is assigned a side and given a value of -1 in the Editor. An Exit Objective should only be placed on the boundary of the map. Exit Objectives award points to the side assigned to them when units are removed from the map while occupying the Objective hex. For example, if an Objective is given the side American and the value -1, then it becomes an Exit Objective for the American side and the American side in the scenario will be awarded points for removing American units from the map while occupying this hex. Note that Exit Objectives never change side.
The Reinforce Dialog is used to define certain data associated with a reinforcement in the current scenario.
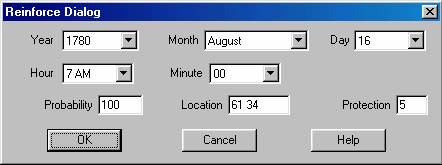 The
Year, Month, Day, Hour, and Minute selections are used to establish
the arrival date for the reinforcement. The Probability value is the
probability, in percent from 1 to 100, that the reinforcement will arrive at
the exact arrival date. If the
probability is 100, then the reinforcement is guaranteed to arrive at the exact
arrival date. Otherwise, the probability
is used to determine if the reinforcement will arrive at the arrival date, and
if not, that it will arrive at each subsequent turn until it is determined to
have arrived. The Location is the hex coordinates of the arrival hex. The Protection
value is an artificial value introduced into the game to protect the
reinforcement from enemy units that are crowding the arrival hex. If the Protection value is non-zero, then at
the moment the reinforcement arrives, any enemy units within the number of
hexes in the Protection value from the arrival hex are automatically
routed. Typically Protection values are
used to protect reinforcements arriving on normal roads, while this value is
set to 0 for leaders and reinforcements arriving at locations such as water
landings (Bunker Hill for example) or across bridges.
The
Year, Month, Day, Hour, and Minute selections are used to establish
the arrival date for the reinforcement. The Probability value is the
probability, in percent from 1 to 100, that the reinforcement will arrive at
the exact arrival date. If the
probability is 100, then the reinforcement is guaranteed to arrive at the exact
arrival date. Otherwise, the probability
is used to determine if the reinforcement will arrive at the arrival date, and
if not, that it will arrive at each subsequent turn until it is determined to
have arrived. The Location is the hex coordinates of the arrival hex. The Protection
value is an artificial value introduced into the game to protect the
reinforcement from enemy units that are crowding the arrival hex. If the Protection value is non-zero, then at
the moment the reinforcement arrives, any enemy units within the number of
hexes in the Protection value from the arrival hex are automatically
routed. Typically Protection values are
used to protect reinforcements arriving on normal roads, while this value is
set to 0 for leaders and reinforcements arriving at locations such as water
landings (Bunker Hill for example) or across bridges.
The Scheduled Dialog can be used to view, modify, and delete the reinforcements defined for the current scenario.
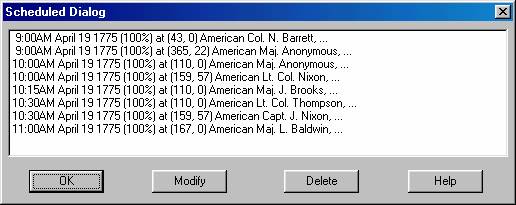
The Scheduled Dialog displays a list of reinforcements scheduled to arrive in the current scenario. Each reinforcement in general consists of several units. Clicking on a reinforcement scrolls the map to the arrival hex. Clicking on Delete will delete the selected reinforcement. Clicking on Modify will display the Reinforce Dialog allowing the selected reinforcement to be modified.
 Double
clicking on a reinforcement entry displays a list of the individual units in
that reinforcement.
Double
clicking on a reinforcement entry displays a list of the individual units in
that reinforcement.
The Release Dialog is used to view and delete existing Releases in the current scenario.
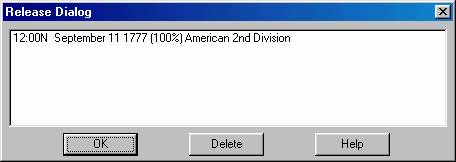 Selecting
a Release entry will cause the organization to which the Release applies to be Highlighted on the map. Double clicking on an entry also causes the
dialog to be closed. Clicking on Delete will delete the selected
Release.
Selecting
a Release entry will cause the organization to which the Release applies to be Highlighted on the map. Double clicking on an entry also causes the
dialog to be closed. Clicking on Delete will delete the selected
Release.
The Add Release Dialog is used to define a Release for Fixed units.
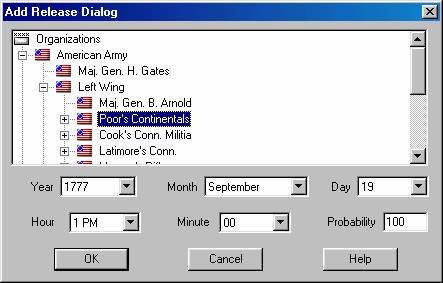 Find
the unit or organization that the Release applies to in the Organizations Tree
Control (this control has the same interface features as the Unit Dialog). A Release may be applied to any unit or organization in the Order of
Battle. The Year, Month, Hour, and Minute
selections are used to establish the date of the Release. The Probability
value is the percent chance, between 1 and 100, that the Release will occur on
the exact Release date. If the
Probability is not 100, then the Probability is used on each turn starting with
the Release date to determine if the Release occurs on that turn. For example, if the Release date is 50, then
there is a 50% chance the Release will occur on the exact Release date. If it does not occur on the Release date,
then there is a 50% chance it will occur on the next turn, and so on for each
turn until it is determined to have occurred.
Find
the unit or organization that the Release applies to in the Organizations Tree
Control (this control has the same interface features as the Unit Dialog). A Release may be applied to any unit or organization in the Order of
Battle. The Year, Month, Hour, and Minute
selections are used to establish the date of the Release. The Probability
value is the percent chance, between 1 and 100, that the Release will occur on
the exact Release date. If the
Probability is not 100, then the Probability is used on each turn starting with
the Release date to determine if the Release occurs on that turn. For example, if the Release date is 50, then
there is a 50% chance the Release will occur on the exact Release date. If it does not occur on the Release date,
then there is a 50% chance it will occur on the next turn, and so on for each
turn until it is determined to have occurred.
The Strength Dialog is used to display the total strengths of all on-map units.
 The
strengths of all on-map units of each side are displayed by the various levels,
Army, Division, Brigade, and Regiment, that make up each side. When a percentage value follows the name of
an organization, it is indicating the percentage of that organization in good
order (not Disrupted or Routed).
The
strengths of all on-map units of each side are displayed by the various levels,
Army, Division, Brigade, and Regiment, that make up each side. When a percentage value follows the name of
an organization, it is indicating the percentage of that organization in good
order (not Disrupted or Routed).
The Objectives Dialog is used to display a complete list of all of the Objectives associated with the current scenario and their assigned owner.
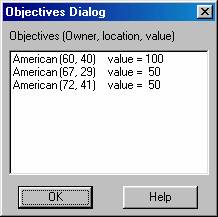 Each
Objective is listed with owner, location in hex coordinates, and value. Selecting an Objective will scroll the map to
the Objective location. Double-clicking
on a selection will also close the dialog. Note: an Exit Objective will initially
be shown with value 0 and will increase in value as units of the owning side
are removed from the map at that location.
Each
Objective is listed with owner, location in hex coordinates, and value. Selecting an Objective will scroll the map to
the Objective location. Double-clicking
on a selection will also close the dialog. Note: an Exit Objective will initially
be shown with value 0 and will increase in value as units of the owning side
are removed from the map at that location.
The Script Dialog is used to view, modify, and delete Scripts associated with the current scenario.
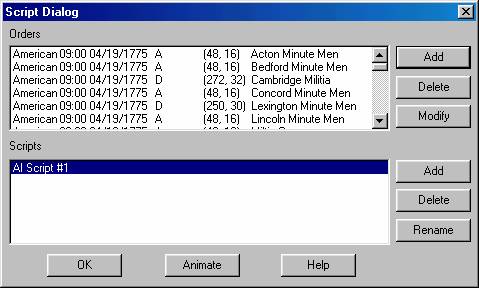 A
scenario may have one or more A/I Scripts. When the scenario is played using Automatic A/I, then one of these
Scripts is chosen at random and used to conduct the A/I for that battle. The Script Dialog displays the Scripts that have
been defined for the current scenario in the Scripts list box. If you
select a Script, then the individual Orders that make up that Script are
displayed in the Orders list
box. Each Order consists of a number of
different fields: the side the Order applies to, the time and date the Order is
to be given, the type of Order (DX
for Extreme Defense, D for Defense, N for No Order, A for Attack, and AX for
Extreme Attack), the objective hex of the Order (or (-1, -1) if none), and the
name of the organization the Order applies to.
A
scenario may have one or more A/I Scripts. When the scenario is played using Automatic A/I, then one of these
Scripts is chosen at random and used to conduct the A/I for that battle. The Script Dialog displays the Scripts that have
been defined for the current scenario in the Scripts list box. If you
select a Script, then the individual Orders that make up that Script are
displayed in the Orders list
box. Each Order consists of a number of
different fields: the side the Order applies to, the time and date the Order is
to be given, the type of Order (DX
for Extreme Defense, D for Defense, N for No Order, A for Attack, and AX for
Extreme Attack), the objective hex of the Order (or (-1, -1) if none), and the
name of the organization the Order applies to.
To add a new Script, click on the Add button next to the Scripts list. This will add a new Script to the end of the list that initially has no Orders. To delete an existing Script, select it in the Scripts list and click on the Delete button next to the Scripts list.
To add a new Order, first ensure that the Hot Spot is located on the objective hex for the new Order. Then click on the Add button next to the Orders list. This will display the Order Dialog so that the remaining information associated with the order can be entered. To modify an existing Order, first select the Order in the Orders list. If you are only changing the objective for the order, it is convenient to select the new objective hex as the Hot Spot hex at this time. Then click on the Modify button next to the Orders list. This will display the Order Dialog with the default information already entered. Notice that the Hot Spot hex is listed as the objective hex. Click on OK in the Order Dialog to complete the modification of the Order. To delete an Order, select it in the Orders List and click on the Delete button next to the Orders list.
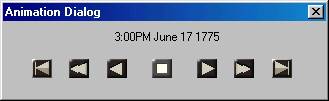 Clicking
on the Animate button will display
the Animation Dialog. This has standard forward, reverse, and stop
controls for viewing on the map the change in Orders over time for the current
Script. The time associated with each
display of Orders is shown in the dialog.
Clicking
on the Animate button will display
the Animation Dialog. This has standard forward, reverse, and stop
controls for viewing on the map the change in Orders over time for the current
Script. The time associated with each
display of Orders is shown in the dialog.
Scripts may be given descriptive names. There is a Rename button next to the Scripts list so that the given name can be modified.
The Order Dialog is used to edit an individual Order in an A/I Script. It is used together with the Script Dialog to write A/I Scripts for scenarios.
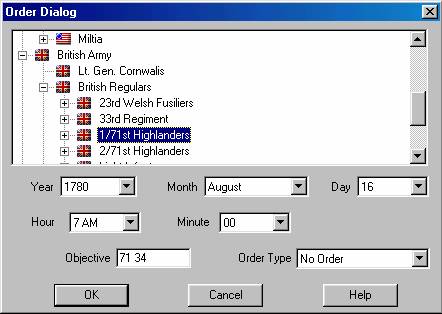 The
Organization Tree at the top of the Order Dialog displays the organizations that
the order can be applied to. If an Order
is applied to a high level organization, it will be applied to each
suborganization under it and so on down the organization hierarchy. For example, an Order applied to a Division
will result in sub-Orders being generated in the game for each Brigade under
that Division. The Year, Month, Day, Hour, and Minute
fields allows the date of the Order to be specified. The Objective
field is used to enter the objective hex coordinates of the Order. Note that by default, this field contains the
Hot Spot coordinates when the Order Dialog is displayed. The Order
Type selection allows the type of order to be selected.
The
Organization Tree at the top of the Order Dialog displays the organizations that
the order can be applied to. If an Order
is applied to a high level organization, it will be applied to each
suborganization under it and so on down the organization hierarchy. For example, an Order applied to a Division
will result in sub-Orders being generated in the game for each Brigade under
that Division. The Year, Month, Day, Hour, and Minute
fields allows the date of the Order to be specified. The Objective
field is used to enter the objective hex coordinates of the Order. Note that by default, this field contains the
Hot Spot coordinates when the Order Dialog is displayed. The Order
Type selection allows the type of order to be selected.
The Location Dialog is used to display a list of all the map locations and to allow going directly to any of these locations.
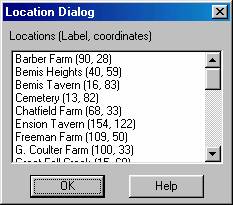 Each
map location is listed with its label description and hex coordinates. Selecting a location causes the map to scroll
to the location's hex coordinate. Double
clicking on a location also causes the dialog to be closed.
Each
map location is listed with its label description and hex coordinates. Selecting a location causes the map to scroll
to the location's hex coordinate. Double
clicking on a location also causes the dialog to be closed.
The Jump Dialog displays a reduced version of the entire map and allows the user to jump directly to any part of the map.
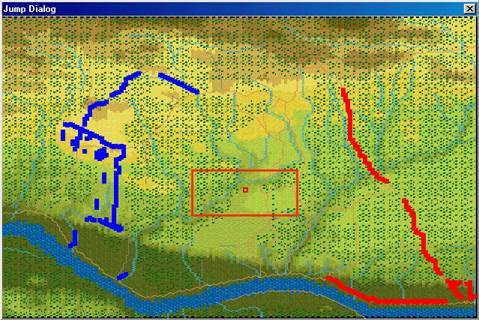 The
visible on-map units are displayed on the reduced map using blue squares for
American units and red squares for British units. The visible portion of the map is shown using
a red rectangle. When the Objectives
option of the View Menu is set, then
Objectives are shown on the map using yellow squares. The current Hot
Spot hex is shown as a red outline square. The current Hot
Spot hex is shown as a red outline square. Clicking on the reduced map area causes the
dialog to be closed and the regular map to scroll to the selected location.
The
visible on-map units are displayed on the reduced map using blue squares for
American units and red squares for British units. The visible portion of the map is shown using
a red rectangle. When the Objectives
option of the View Menu is set, then
Objectives are shown on the map using yellow squares. The current Hot
Spot hex is shown as a red outline square. The current Hot
Spot hex is shown as a red outline square. Clicking on the reduced map area causes the
dialog to be closed and the regular map to scroll to the selected location.
The Organization Dialog is used to highlight an organization on the map.
 All
organizations in the Order of Battle are displayed in a Windows Tree
Control. Selecting an organization
causes the on-board units in that organization to be Highlighted. Clicking OK
closes the dialog while keeping the organization highlighted on the map. Clicking Cancel
closes the dialog and cancels the highlighting.
All
organizations in the Order of Battle are displayed in a Windows Tree
Control. Selecting an organization
causes the on-board units in that organization to be Highlighted. Clicking OK
closes the dialog while keeping the organization highlighted on the map. Clicking Cancel
closes the dialog and cancels the highlighting.
The Find Unit Dialog can be used to find any given unit or leader that is on the map.
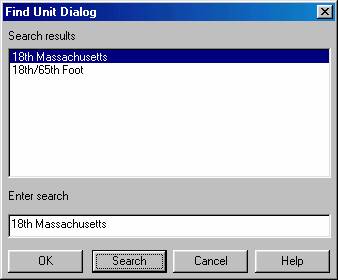 Enter
the name to be searched for in the Enter
search field. Note: the search is
case-sensitive so you must enter your name with the proper capitalization
(Washington not washington for example). If you are confident that your search will produce a single result, you
can hit return after typing the search name. Otherwise, click on the Search
button. This will display a list of
results in the Search results list. Select the result you want and click on OK, or double click on the result you
want, to close the dialog and find the result. In the case of an organization, the organization will be Highlighted on the map. In the case of an individual unit, the map
will be scrolled to the unit's location on the map.
Enter
the name to be searched for in the Enter
search field. Note: the search is
case-sensitive so you must enter your name with the proper capitalization
(Washington not washington for example). If you are confident that your search will produce a single result, you
can hit return after typing the search name. Otherwise, click on the Search
button. This will display a list of
results in the Search results list. Select the result you want and click on OK, or double click on the result you
want, to close the dialog and find the result. In the case of an organization, the organization will be Highlighted on the map. In the case of an individual unit, the map
will be scrolled to the unit's location on the map.
The Selection Dialog is useful when then Editor is in Full Screen mode (see the View Menu).
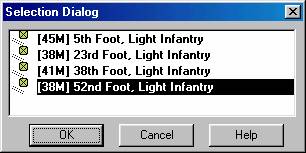 The
Selection Dialog allows the units in
the current Hot Spot to be displayed and
selected. The Selection Dialog is displayed by pressing the Space Bar. You can make extended selections in the list
of units displayed using the normal Windows list selection features. For example, by holding down the Shift key and clicking with the left
mouse button, you can select a range of units. By holding down the Control
(Ctrl) key and clicking with the left mouse button, you can select arbitrary
units.
The
Selection Dialog allows the units in
the current Hot Spot to be displayed and
selected. The Selection Dialog is displayed by pressing the Space Bar. You can make extended selections in the list
of units displayed using the normal Windows list selection features. For example, by holding down the Shift key and clicking with the left
mouse button, you can select a range of units. By holding down the Control
(Ctrl) key and clicking with the left mouse button, you can select arbitrary
units.
The Parameter Data Dialog displays the Parameter Data associated with the current scenario.
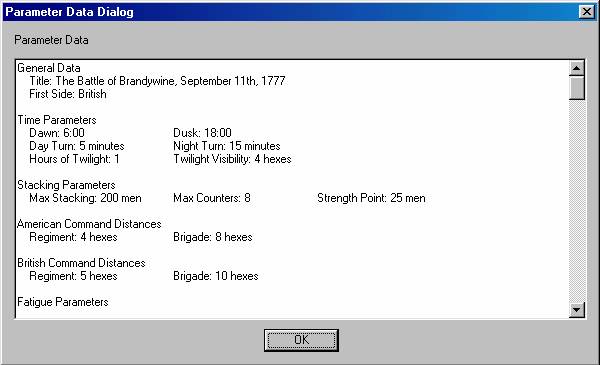 The
Parameter Data Dialog consists of a
text listing of the scenario values. The
values are read from the PDT file
corresponding to the current scenario.
The
Parameter Data Dialog consists of a
text listing of the scenario values. The
values are read from the PDT file
corresponding to the current scenario.
The Parameter Data values are:
Title: the title of the Parameter Data file.
First Side: the first side of each turn.
Dawn: the time of first light.
Dusk: the time of last light.
Day Turn: the length of one game turn in minutes during the day.
Night Turn: the length of one game turn in minutes during the night.
Hours of Twilight: the number of hours of reduced visibility after dawn and before dusk.
Twilight Visibility: the distance that can be seen during twilight turns.
Stacking Parameters
Max Stacking: the maximum number of men, or equivalent strength, that can be placed in a single hex.
Max Counters: the maximum number of unit counters that can be placed in a single hex.
Strength Point: the conversion factor between number of artillery guns and equivalent strength in men.
American and British Command Distances
Regiment: the maximum distance that a unit can be from its Regimental commander and still be in command and not Detached.
Brigade: the maximum distance that a Regimental leader can be from his Brigade leader and still be in command and not Detached.
Fatigue Parameters
Max Fatigue: the maximum Fatigue value that a unit can have.
Day Recovery: the percentage chance that a unit will recover a fatigue point during day turns.
Night Recovery: the percentage chance that a unit will recover a fatigue point during night turns.
Movement Parameters
Infantry Allow: the movement allowance of infantry, and dismounted cavalry, units.
Cavalry Allow: the movement allowance of mounted cavalry and leaders.
Artillery Allow: the movement allowance of limbered artillery.
Supply Allow: the movement allowance of supply wagons.
Line/Column Infantry, Mounted Cavalry, and Supply Wagon Movement Costs
The movement cost for each unit in the corresponding terrain. Dismounted cavalry moves according to Line Infantry and Leaders move according to Mounted Cavalry.
Change Facing Costs
The movement cost for each unit to change its facing one hexside.
About Face Costs
The movement cost for each unit to change its facing 180 degrees.
Formation Change Costs
The movement cost for each unit to change its formation, from line to column, from dismounted to mounted, from limbered to unlimbered, or to and from extended line.
American and British Ammo Loss
The probability that a unit which fires will suffer a reduction in ammo level, either to Low Ammo, or from Low Ammo to No Ammo state. The artillery reduction probability only applies to artillery which is Isolated.
Fire Modifiers
Enfiladed: the increase in effect of fire directed against a target unit which is not facing the firing unit.
Cavalry: the increase in effect of fire directed against mounted cavalry.
Terrain Combat Modifiers
For each terrain type, the value is the percentage effect that terrain has on fire which is directed into the terrain or across the terrain hexside. The Elevation modifier is the fire modifier for fire directed against targets on higher elevations. The modifier is multiplied by the number of elevation increments difference between the firing unit and target unit. Elevation increments are indicated on the map by different shading and coloring.
American and British Leader Loss Values
Fire Wound: the percentage chance that a loss check will result in a leader in the target hex being wounded. When there is a loss of x against a unit, a loss check will occur relative to every leader in the hex with the probability of:
x / (x + 10)
Fire Kill: the percentage chance that a fire result check will result in a leader in the target hex being killed.
Melee Wound: when a leader is involve in a melee that results in losses for his side, then the percentage given is the probability that the leader will be wounded as a result of the melee.
Melee Kill: when a leader is involve in a melee that results in losses for his side, then the percentage given is the probability that the leader will be killed as a result of the melee.
Melee Captured: when a leader is involve in a melee that results in losses for his side, then the percentage given is the probability that the leader will be captured as a result of the melee.
Height Values
The height of each terrain type and the height of a man for purposes of computing Line-Of-Sight.
Breastworks Values
Movement: the additional movement cost of moving across breastworks.
Combat: the combat benefit that units behind breastworks receive.
Artillery Resupply Values
When artillery units arrive as reinforcements, the value given is the number of additional artillery ammunition points added to the artillery supply for that side for each gun in the unit.
Weapon Data
For each weapon type, the data indicates the firing effectiveness of that weapon at each of the ranges given. In particular, the last range indicated is the maximum range for that weapon.
The Bridge Dialog can be used to place or remove Bridges in the current Hot Spot hex.
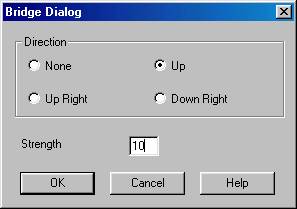 The
direction of the Bridge is selected by checking one of the checkboxes in the Direction box. Note that the Bridge direction Down is the same as Up and so forth. The Strength
value for the Bridge indicates it's ability to withstand damage and still
function. A value of 0 indicates a
Bridge that has been damaged to the point it cannot be crossed. Bridge values normally range from 0 to 100.
The
direction of the Bridge is selected by checking one of the checkboxes in the Direction box. Note that the Bridge direction Down is the same as Up and so forth. The Strength
value for the Bridge indicates it's ability to withstand damage and still
function. A value of 0 indicates a
Bridge that has been damaged to the point it cannot be crossed. Bridge values normally range from 0 to 100.
The Hex Info Area displays a list of the units in the Hot Spot hex and information about the terrain in that hex.
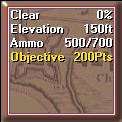 The
Terrain Box at the bottom or right
of the unit list displays information about the current Hot Spot hex. The first
line of the display describes the type of terrain (in this case Clear) and the percentage benefit a
unit will receive when fired upon by virtue of that terrain. In the case of a Water hex crossed by a
Trail, the terrain description will be Ford. The second line of the text area shows the Elevation of the current hex in
feet. The third line of the text area
shows the artillery Ammo values for
the American and British sides respectively. The fourth line of the text area shows the Objective value of the hex, if any. Note: Exit Objective hexes will have
the word Exit on this line.
The
Terrain Box at the bottom or right
of the unit list displays information about the current Hot Spot hex. The first
line of the display describes the type of terrain (in this case Clear) and the percentage benefit a
unit will receive when fired upon by virtue of that terrain. In the case of a Water hex crossed by a
Trail, the terrain description will be Ford. The second line of the text area shows the Elevation of the current hex in
feet. The third line of the text area
shows the artillery Ammo values for
the American and British sides respectively. The fourth line of the text area shows the Objective value of the hex, if any. Note: Exit Objective hexes will have
the word Exit on this line.
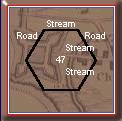 Clicking
on the Terrain Box with the right mouse button causes the display to change to
the Alternative display. In this
display, the text area changes to show a description of the various hex sides
that are present in the hex. The names
of the hex sides are arranged in a rough hexagonal pattern around the center of
the text area showing the position of the hex side with respect to the hex. The value in the center of this display is
the number of men, or equivalent strength, in the hex.
Clicking
on the Terrain Box with the right mouse button causes the display to change to
the Alternative display. In this
display, the text area changes to show a description of the various hex sides
that are present in the hex. The names
of the hex sides are arranged in a rough hexagonal pattern around the center of
the text area showing the position of the hex side with respect to the hex. The value in the center of this display is
the number of men, or equivalent strength, in the hex.
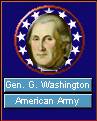 Leaders
are displayed using a Leader Box. Each leader is displayed with his picture,
his name, and his organization. When the
organization name is displayed in Yellow, it indicates that the leader is
subordinate to another leader in the organization.
Leaders
are displayed using a Leader Box. Each leader is displayed with his picture,
his name, and his organization. When the
organization name is displayed in Yellow, it indicates that the leader is
subordinate to another leader in the organization.
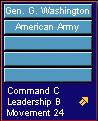 Clicking
on a leader's display with the right mouse button causes a display to appear
showing the command hierarchy of the leader. From top to bottom the window lists the leader, his organization, the
next higher organization, and so forth. In addition, it displays his Command
Value (his ability to command with A
being highest and F being lowest),
his Leadership Value (his ability to
motivate his troops with A being
highest and F being lowest), and his
Movement Value. When the Command Value is displayed in
Yellow, it indicates that the leader has failed his Command Test.
Clicking
on a leader's display with the right mouse button causes a display to appear
showing the command hierarchy of the leader. From top to bottom the window lists the leader, his organization, the
next higher organization, and so forth. In addition, it displays his Command
Value (his ability to command with A
being highest and F being lowest),
his Leadership Value (his ability to
motivate his troops with A being
highest and F being lowest), and his
Movement Value. When the Command Value is displayed in
Yellow, it indicates that the leader has failed his Command Test.
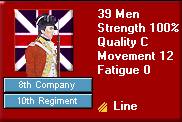 The
Hex Info area is filled to the right with Unit Box displays. The number of these depends on your screen
resolution. The Unit Box shows a
representative picture of the unit, its name, its organization, its Strength (in men for infantry and
cavalry, in guns for artillery, and in resupply ability for supply wagons), its
Movement Value, its Quality, and its current Fatigue Level (in values from 0 to
90). If the Strength value is displayed
in Yellow, it indicates that the unit is at less than full strength. If the Quality level is displayed in Yellow,
it indicates that the unit's morale is reduced for some reason such as fatigue
or ammo level. For Supply Wagons, each
unit of strength represents enough ammunition to resupply 10 men.
The
Hex Info area is filled to the right with Unit Box displays. The number of these depends on your screen
resolution. The Unit Box shows a
representative picture of the unit, its name, its organization, its Strength (in men for infantry and
cavalry, in guns for artillery, and in resupply ability for supply wagons), its
Movement Value, its Quality, and its current Fatigue Level (in values from 0 to
90). If the Strength value is displayed
in Yellow, it indicates that the unit is at less than full strength. If the Quality level is displayed in Yellow,
it indicates that the unit's morale is reduced for some reason such as fatigue
or ammo level. For Supply Wagons, each
unit of strength represents enough ammunition to resupply 10 men.
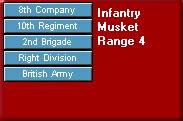 Clicking
on a Unit Box with the right mouse button causes a pop-up window to appear
showing the command hierarchy of the unit. From top to bottom, the window lists the unit name, the unit's
organization, the next higher organization and so forth. In addition, in this mode, the type of unit,
the unit's weapon, and the firing range of the unit are displayed.
Clicking
on a Unit Box with the right mouse button causes a pop-up window to appear
showing the command hierarchy of the unit. From top to bottom, the window lists the unit name, the unit's
organization, the next higher organization and so forth. In addition, in this mode, the type of unit,
the unit's weapon, and the firing range of the unit are displayed.
![]() When
there are more units in the Hot Spot hex than can be displayed in the available
Unit Boxes, then scroll arrows that appear after the list of units can be used
to scroll the Unit Boxes. When the left
or top arrow is displayed in full color, there are units to the left or top of
the displayed units and when the right or bottom arrow is displayed in full
color, there are units to the right or bottom of the displayed units.
When
there are more units in the Hot Spot hex than can be displayed in the available
Unit Boxes, then scroll arrows that appear after the list of units can be used
to scroll the Unit Boxes. When the left
or top arrow is displayed in full color, there are units to the left or top of
the displayed units and when the right or bottom arrow is displayed in full
color, there are units to the right or bottom of the displayed units.
The Editor has a Toolbar which exists at the top of the Editor window just under the Menu Bar. Note: depending on your screen resolution, only some of these buttons may be displayed on your screen. You need a screen width of at least 1024 before all of the buttons are displayed unless you have selected the Complete Toolbar Option. Note that most all of these buttons implement a menu selection and the command may be issued as a menu selection when the button is not displayed.
![]() Mode - toggles the Editor mode between Place Mode (when pressed) and Move Mode (when unpressed).
Mode - toggles the Editor mode between Place Mode (when pressed) and Move Mode (when unpressed).
![]() New - clears any existing scenario data
and starts a new scenario from scratch.
New - clears any existing scenario data
and starts a new scenario from scratch.
![]() Open - opens an existing scenario file.
Open - opens an existing scenario file.
![]() Save - save current scenario under
existing filename or prompt for filename if none.
Save - save current scenario under
existing filename or prompt for filename if none.
![]() Counterclock - turn the selected units
counterclockwise.
Counterclock - turn the selected units
counterclockwise.
![]() Clockwise - turn the selected units
clockwise.
Clockwise - turn the selected units
clockwise.
![]() About Face - turn the selected units
about-face.
About Face - turn the selected units
about-face.
![]() Formation - change formation of the
selected units.
Formation - change formation of the
selected units.
![]() Increase Strength - increase the
strength of the selected units. Holding
the Alt key while pressing this
button increases the strength by 10.
Increase Strength - increase the
strength of the selected units. Holding
the Alt key while pressing this
button increases the strength by 10.
![]() Decrease Strength - decrease the
strength of the selected units. Holding
the Alt key while pressing this
button decreases the strength by 10.
Decrease Strength - decrease the
strength of the selected units. Holding
the Alt key while pressing this
button decreases the strength by 10.
![]() Increase Fatigue - increase the fatigue
of the selected units. Holding the Alt key while pressing this button
increases the fatigue by 10.
Increase Fatigue - increase the fatigue
of the selected units. Holding the Alt key while pressing this button
increases the fatigue by 10.
![]() Decrease Fatigue - decrease the fatigue
of the selected units. Holding the Alt key while pressing this button
decreases the fatigue by 10.
Decrease Fatigue - decrease the fatigue
of the selected units. Holding the Alt key while pressing this button
decreases the fatigue by 10.
![]() Disrupted - toggle the disrupted state
of the selected units.
Disrupted - toggle the disrupted state
of the selected units.
![]() Routed - toggle the routed state of the
selected units.
Routed - toggle the routed state of the
selected units.
![]() Fixed - toggle the Fixed state of the selected units.
Fixed - toggle the Fixed state of the selected units.
![]() Remove - remove selected units from
map.
Remove - remove selected units from
map.
![]() Bridge - display the Bridge Dialog to set or delete a bridge in the
current Hot Spot hex.
Bridge - display the Bridge Dialog to set or delete a bridge in the
current Hot Spot hex.
![]() Breastworks - display the Breastworks Dialog so that breastworks can be set or
deleted in the current Hot Spot hex.
Breastworks - display the Breastworks Dialog so that breastworks can be set or
deleted in the current Hot Spot hex.
![]() Set Objective - display the Set Objective Dialog so that an Objective can be set
or deleted in the current Hot Spot hex.
Set Objective - display the Set Objective Dialog so that an Objective can be set
or deleted in the current Hot Spot hex.
![]() A/I - display the A/I Script Dialog.
A/I - display the A/I Script Dialog.
![]() Zoom In - increase the scale of the
map.
Zoom In - increase the scale of the
map.
![]() Zoom Out - decrease the scale of the
map.
Zoom Out - decrease the scale of the
map.
Normally the screen is recentered on the Hot Spot hex when you change zoom modes. If you hold down the Alt key when you change zoom modes, the screen will retain the current view.
![]() Units - toggle the display of units on
the map.
Units - toggle the display of units on
the map.
![]() Bases - toggle the display of unit
bases on the 3D map.
Bases - toggle the display of unit
bases on the 3D map.
![]() Leaders - toggle the display of leaders
on top of stacks.
Leaders - toggle the display of leaders
on top of stacks.
![]() Objectives - toggle the display of
objectives on the map.
Objectives - toggle the display of
objectives on the map.
![]() Visible Hexes - toggle the display of
hexes visible from the current Hot Spot hex.
Visible Hexes - toggle the display of
hexes visible from the current Hot Spot hex.
![]() Full Screen - toggle the display of the
full-screen map.
Full Screen - toggle the display of the
full-screen map.
![]() Jump Dialog - display the Jump Dialog so you can quickly go to another part of
the map.
Jump Dialog - display the Jump Dialog so you can quickly go to another part of
the map.
![]() Highlight Fixed - toggle the Highlight of Fixed units.
Highlight Fixed - toggle the Highlight of Fixed units.
![]() Highlight Disrupted - toggle the
Highlight of Disrupted units.
Highlight Disrupted - toggle the
Highlight of Disrupted units.
![]() Highlight Low Ammo - toggle the
Highlight of units that are Low-On or Out-Of Ammo.
Highlight Low Ammo - toggle the
Highlight of units that are Low-On or Out-Of Ammo.
![]() Highlight Organization - toggle the
Highlight of all units in the same organization as the top selected unit. Holding the Alt key while pressing this button causes the next higher
organization to be highlighted.
Highlight Organization - toggle the
Highlight of all units in the same organization as the top selected unit. Holding the Alt key while pressing this button causes the next higher
organization to be highlighted.
![]() General Help - display this help file.
General Help - display this help file.
Roaming Mode enables you to view several locations on the map without having to click the mouse on each one.
To start Roaming Mode, enter Control Z (Ctrl-Z). Thereafter, the Hot Spot will follow the mouse as you move it over the map. To leave Roaming Mode, click on any hex.
The following Hot Keys are supported in the Editor. Note that these Hot Keys are defined as command accelerators of the Editor main window and therefore the Editor main window must have the keyboard focus for these to work (that is, the Editor main window must have a highlighted title bar).
Shift Key - display the on-map labels while this key is pressed.
Space Bar - display the Selection Dialog (useful in Full Screen mode).
F1 - invoke General Help (display this help file).
Ctrl-B - move the selected units backward in the Hot Spot hex (Note: this only has a visible effect in the 3D graphics mode).
Ctrl-F - move the selected units forward in the Hot Spot hex (Note: this only has a visible effect in the 3D graphics mode).
Ctrl-L - turn the selected units counterclockwise.
Ctrl-R - turn the selected units clockwise.
Ctrl-X - remove the selected units from the map.
Ctrl-Z - start Roaming Mode.
- display the map in Zoom-Out 2D mode.
- display the map in Normal 2D mode.
- display the map in Zoom-Out 3D mode.
- display the map in Normal 3D mode.
Normally the screen is recentered on the Hot Spot hex when you change zoom modes. If you hold down the Alt key when you change zoom modes, the screen will retain the current view.
Keypad 0 - change the formation of the selected units.
Keypad 1 - move the selected units down and to the left one hex.
Keypad 2 - move the selected units down one hex.
Keypad 3 - move the selected units down and to the right one hex.
Keypad 4 - turn the selected units counterclockwise.
Keypad 5 - turn the selected units about-face.
Keypad 6 - turn the selected units clockwise.
Keypad 7 - move the selected units up and to the left one hex.
Keypad 8 - move the selected units up one hex.
Keypad 9 - move the selected units up and to the right one hex.
Delete - move the selected units counterclockwise.
Page Down - move the selected units clockwise.
Home - move the selected units forward in the Hot Spot hex (Note: this only has a visible effect in the 3D graphics mode).
End - move the selected units backward in the Hot Spot hex (Note: this only has a visible effect in the 3D graphics mode).
Artificial Intelligence. In this case, this represents the automatic movement, firing, and combat by units under the control of the computer program.
The hex on the map currently selected with the red hex outline.
Basic data from the pdt file that applies to the current scenario.
A leader created when a Regiment leader has been made a casualty or has been promoted to lead his Brigade.
The mode where clicking on the map with the right mouse button causes the currently selected units to be moved to the selected hex.
The mode where right clicking on the map causes the currently selected unit in the Unit Dialog to be placed on the map.
A keyboard character which when typed performs the same function as a menu selection or toolbar button.
To display a unit on the map with a yellow outline.
Units which are Fixed cannot move until Released, fired upon, or meleed against, but may fire themselves and may change formation.
An Exit Objective awards points to the side owning the Objective for each unit that is removed from the map from the Objective hex.
Index
A
Add Release Dialog 23
Adding and Deleting Reinforcements 4
B
Breastworks Dialog 20
Bridge Dialog 34
C
Command Menu 9
D
Description Dialog 18
E
Editing A/I Scripts 4
F
File Menu 7
Find Unit Dialog 29
H
Header Dialog 16
Help Menu 16
Hex Info Area 36
Hexes Menu 10
Hot Keys 39
I
Info Menu 11
Introduction 3
J
Jump Dialog 28
L
Location Dialog 27
O
Objectives Dialog 24
Order Dialog 27
Organization Dialog 29
P
Parameter Data Dialog 31
Placing and Moving Units 3
R
Reinforce Dialog 21
Release Dialog 22
Roaming Mode 39
S
Scenario Menu 8
Scheduled Dialog 22
Script Dialog 25
Scripts Menu 12
Selection Dialog 30
Set Objective Dialog 20
Settings Menu 14
Strength Dialog 24
T
Toolbar 37
U
Units Dialog 19
Units Menu 11
Using the Editor 3
V
View Menu 12
|
