WINTREK

Player's Manual
Introduction
Welcome to WINTREK!
WINTREK is a computer simulation based on "Mainframe Star Trek". If you are new to computers, you may not be familiar with this classic program. Often debated as being the first computer game, Mainframe Star Trek appeared in 1970 on IBM/360 mainframes across the country. It became the most popular computer game, and was ported to virtually every mini and micro-computer in the last 20 years. The most well known version is the Apple IIe BASIC version, shipped on the Apple DOS system disk from the late seventies through the early eighties. The original author(s) of Mainframe Star Trek are still unknown.
WINTREK is Mainframe Star Trek for the "latest and greatest" operating system. That is, Windows 3.1. WINTREK supports Multimedia sound, color graphics, and VGA/SVGA monitors. WINTREK contains many new and unique features not found in any previous versions.
Shareware Registration
Thank you for your Shareware registration. The Shareware system continues to offer lower-priced, high quality alternatives to commercial software. Unfortunately, a number of users still do not realize that the Shareware system is an honor system. Authors get paid for their efforts only when people send in their registration fee. I thank you for your honesty, integrity, and your efforts to keep the Shareware system alive.
Feel free to distribute WINTREK to other folks who may want to "try before they buy" just like you did. I only ask that you include all 6 files (listed in the Installation section) whenever you distribute copies. The registration fee is $20 ($25 for overseas shipments). The shareware registration address is:
Joseph Jaworski
You can also reach us on the World Wide Web at https://www.joejaworski.com
System Requirements
In order to play WINTREK, you MUST have:
· 17417h724r ; 17417h724r ; Windows 3.1 or Window '95.
· 17417h724r ; 17417h724r ; A mouse.
· 17417h724r ; 17417h724r ; A VGA display (16-color minimum recommended).
· 17417h724r ; 17417h724r ; Approximately 950K of free hard disk space.
To get the most out of WINTREK, you should optionally have:
· 17417h724r ; 17417h724r ; A windows-compatible sound card (SoundBlaster, Adlib, etc.).
· 17417h724r ; 17417h724r ; One Megabyte of FREE system memory.
· 17417h724r ; 17417h724r ; A 486-25Mhz system or better.
· 17417h724r ; 17417h724r ; Run Windows in Enhanced Mode, and install SmartDrive.
Optionally, you should UNCHECK the "Enable System Sounds" checkbox in the Control Panel's SOUND utility. This prevents WINTREK's sound tracks from playing in response to standard system beep generation.
All of the typical things that make other programs run faster also apply to WINTREK, such as a math coprocessor, large permanent swap file, lots of extended memory, etc. WINTREK can run concurrently with other Windows applications, but as you probably know, more programs running at the same time means lower overall performance. Although WINTREK is a huge program, it is memory-friendly and only requires 50 - 100K during operation.
Installation
The six files named WINTREK.EXE, WINTREK1.DLL, WINTREK2.DLL, WINTREK.HLP, WINTREK.WRI, and README.WRI make up the files you need to run WINTREK. Copy them to your hard disk, preferably to their own directory. WINTREK will create two other files when run, WINTREK.SCR and WINTREK.INI. Any time you elect to save a game, WINTREK will create a file with a .GAM extension with a filename you choose.
WINTREK doesn't add any files to your Windows directory, and it never touches your WIN.INI or SYSTEM.INI files. Similarly, WINTREK does not have to be in your AUTOEXEC.BAT PATH statement. To run WINTREK, use the Program Manager or your shell's RUN command, or set up an item in a group. You should however, make sure that the "Working Directory" edit line in the Program Manager's PROPERTIES dialog is set to the WINTREK directory.
If you want to remove WINTREK from your hard disk, simply delete all the files in the WINTREK directory, plus any .GAM files you created.
Object of the Game
A number of alien ships are preparing to attack Federation headquarters. As commander of the USS Enterprise, your mission is to search the galaxy to find and destroy all alien vessels before they reach earth. Star Fleet has placed a number of Starbases throughout the galaxy. These Starbases are equipped with spare parts and a large supply of Dilithium crystals to help ensure a successful mission.
Your efficiency and speed in reaching your goal will directly determine your score. If you succeed in your mission and achieve a new high score, your name will be recorded in the "Top Star Fleet Officers" list at the end of the game. You lose the game if, at any point during play if you:
· 17417h724r ; 17417h724r ; Run out of Dilithium energy
· 17417h724r ; 17417h724r ; All Ship Control Systems are damaged or destroyed.
· 17417h724r ; 17417h724r ; Run out of time.
Starting the Game
When WINTREK first starts, you have several options. You can select these options from one of the three menus.
FILE MENU
NEW Selecting this item starts a new game at the current skill level.
OPEN Loads a previously saved game, resuming the game at the point at which it was last saved. You can load a new game at any time. Doing so while in play erases the existing game in progress.
SAVE
SAVE AS If you are not in game play, these items are disabled. While in game play, you can save the current game to disk, either overwriting a game of the same file name (SAVE), or save the current game under a different name (SAVE AS). All game files automatically have the extension .GAM if you do not specify one.
HINT: It is a good idea to save the game before going into battle, especially with multiple aliens. Should the worse happen, you can restore the game and replay the battle. However, due to the random elements of alien move/fire strategies, an alien may not take the same action again, unless you exactly duplicate your moves.
END GAME This
terminates the current game and if not saved or the game has changed, prompts
you to save the game before ending. This item does not terminate WINTREK, it
simply ends the current game and takes you back to the opening menu. About once
every minute, the
EXIT Terminates the WINTREK application. If you have not recently saved the current game, you are prompted to do so.
SKILL MENU
The skill menus let's you set the difficulty level of play. There are six levels of difficulty, from the easiest (Expendable Crewman) to the most difficult (Admiral). You should start at the Expendable Crewman level if you are new to the game. Once play begins, you cannot change the skill level. Use the ship's computer to display the current skill level during play.
HELP
The HELP menu contains the WINTREK Shareware registration form, and version/author information.
Entering Game Play
After you choose either NEW or OPEN from the FILE Menu, you receive a memo from Star Fleet with your mission orders. These orders consist of three key elements.
1) 17417h724r ; 17417h724r ; The number of alien vessels in the galaxy. You must navigate through the galaxy to find and destroy this number of alien ships in order to win the game.
2) 17417h724r ; 17417h724r ; The end Stardate of your mission. You must destroy all alien vessels on or before the end Stardate. The Status Panel and Ship's Computer can inform you of the current Stardate, the time used so far, and the time left.
3) 17417h724r ; 17417h724r ; Starbases. Your ship does not carry enough energy (Dilithium Power) to destroy all the alien ships in the galaxy. Therefore, you must periodically dock at a Starbase to refuel and more importantly, to repair any damaged or destroyed systems. Initially, you do not know where Starbases are located. You must navigate through unexplored sections of the galaxy to find them.
Although this information is later available through the ship's Computer, it is a good idea to write it down quick reference. While in play, additional menu items are present:
FILE
These menu items are same both in game play and at the beginning of the game.
NOTE: You cannot save the current game while in a Condition Red. If you want to quit WINTREK and save the game, move to a non-alien occupied (Condition Green) quadrant.
OPTIONS
The Options Menu lets you set global preferences:
PAUSE GAME Pauses the current game. Note that Dilithium power and time are always being used up, so make sure you select this item if you are interrupted from game play.
AUTO ACTIVATE SRS When you click the EXECUTE button in a control window, any events are shown in the Short Range Sensor (SRS) window. For example, when you fire Phasers or navigate to a new sector or quadrant, the results are visually displayed in the SRS window. Checking this option will automatically bring the SRS window to the front anytime a control event is about to be displayed. This is the default, and lets you see all the action. The only reason to uncheck this option is if your SRS is damaged for long periods of time (and it annoys you to see a blank window), or you have a big screen monitor and want to see multiple windows simultaneously.
SINGLE CONTROL WINDOW For standard VGA and 800x600 SVGA, most users prefer to see only one Control Window at once. Checking this option does this- it automatically minimizes all other control windows when you select a new control window. This is the default setting. If this option is unchecked, control windows will not be minimized and will appear in an overlapped fashion. It's like having 9 documents opened at the same time in Word for Windows. Confusing, but some people like it.
PAUSE WHEN ICONIC If this option is checked, WINTREK will automatically pause the game whenever it's minimized. The only exception is a Condition Red (Red Alert), which you cannot pause under any circumstances. If you minimize WINTREK during a Condition Red the game keeps going, and you will probably die a horrible death without ever knowing it.
SOUNDS
This item lets you turn all game sounds on or off. If you don't have a windows-compatible sound board/driver in your computer, this option is dimmed. If you turn sound off and then exit WINTREK, the next time you return the sounds will be disabled, including the opening game sounds that occur prior to play.
WINDOW
The Window Menu lets you arrange and setup all of WINTREK's windows to your liking:
CASCADE
TILE These are the "standard" window arrangement items. For WINTREK, they don't make much sense unless you are using a wide screen display and prefer all windows opened at once and/or arranged equally.
ARRANGE ICONS Rearranges (moves) all iconic windows to the bottom of the screen. If you change the overall WINTREK window size, you may want to select this item to bring iconic windows back into view.
DEFAULT POSITIONS If you give up trying to arrange and resize all the windows in WINTREK, select this option to reposition/resize all of them to their initial "New Game" positions.
SAVE WINDOW POSITIONS If you decide you like all the windows positioned a certain way, selecting this item will record their positions in WINTREK's INI file. You can later recall them at any time using the next item.
RESTORE WINDOW POSITIONS Restores all windows to their previously saved sizes/positions. If you don't like the default positions/sizes, select this option whenever you start a new game.
SELECT WINDOW A difficult way to select a control or other window, unless you like hot keys. Using the Control button window is easier for most users.
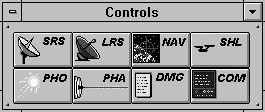
Control Systems
|
|
Controlling your ship is performed through the use of 8 independent Control Windows. A set of buttons in its own window (shown left) is provided to quickly allow you to switch between the various control windows. Click on the button to bring up any of these windows. If the SINGLE CONTROL WINDOW menu item is checked, any other control windows that may be showing are automatically minimized (made iconic) when you click a button.
There are eight buttons on the panel. To activate a button, click once with the mouse. You may also select the same control in the WINDOW menu, or press the key equivalent shown next to the window name in the menu. Control Windows perform the following:
SRS
LRS
NAV Navigation. This control lets you specify course and distance information to move about the galaxy. You can move within a sector (Impulse power) or from one quadrant to the next (Warp power). You set the direction you want to travel in degrees, and the distance in either Warp or Impulse level.
SHL Shields. This control allows you to raise and lower the Shields. You can set any amount of shield power up to the total Dilithium Level. Shields protect your ship from damage when you are fired upon by aliens. As long as the shields are up, you cannot be damaged while in battle. In order to raise the shields, you must have adequate Dilithium reserves.
PHO Photon
Torpedo Control. This control allows you to launch Photon Torpedoes on a
specified course and distance. Photo Torpedoes are a powerful weapon used to
destroy or greatly reduce the strength of the enemy. The
PHA Phaser Control. This control allows you fire a specified amount of Phaser power at one or more aliens. Like the Shields, Phaser power is taken directly from the Dilithium reserves. The aiming mechanism of the Phasers is controlled by the on-board computer. That is, they are automatically locked (and continuously track movements) of all alien ships in the immediate vicinity. You can fire at a single alien or at all aliens in the sector on each command.
DMG Damage
Control. This shows you the Damage status of all Control systems. Damage
Control informs you of which control systems are damaged and the estimated time
of repair. A control system can also be destroyed.
You cannot repair a destroyed system in flight; you must dock at a Starbase to
acquire spare parts and make final repairs. The
COM Computer. The ship's Computer contains many commands that allow you access to specific information. This helps you plan your strategy and to fight battles with maximum efficiency.
Status Panel
The
Status Panel shows you all the vital functions of the
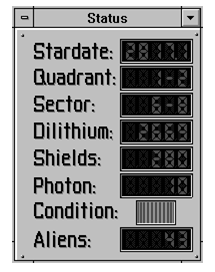
Stardate Shows the current Stardate. When this number is equal to the Federation attack date (shown in your mission orders at the beginning of the game), the game is over. In this case, you have run out of time. The Stardate is also useful for tracking estimates to system repairs.
Quadrant Shows
the current location of the
Sector Shows the current sector. This value corresponds to the X,Y
position of the
Dilithium Dilithium Crystals constitute the energy used to power all systems. When you start a new game or dock at a Starbase, the ship is fueled to a level of 3000. Anything and everything you do in WINTREK takes energy, and this number is always decreasing. If it ever reaches zero, all systems cease to function (including life support) and your history.
HINT: If Dilithium power levels fall below 300, a Yellow Alert Condition exists. You should immediately seek out a Starbase for refueling. Transfer any Shield power back to Dilithium. If you are in battle (Red Alert) conditions, The Condition lamp in the Status Panel will not switch to Yellow, but remain Red. Therefore, always keep an eye on your Dilithium power. As a general rule, you should never be in battle with less than 300 units of Dilithium power.
Shields Shows the current level of shield power. A level of zero is considered Shields Down, while any level greater than zero is Shields Up. While Shields are up, you cannot incur ship damage when fired upon by aliens. However, if an alien hits you with more fire power than the shield level, they will go down and the amount reaching the ship may cause damage. Dilithium and Shield power have a one to one relationship. That is, setting shields to a level of 100 subtracts 100 units away from the Dilithium supply.
Photon The number of Photon Torpedoes currently on board. The
Condition The
Condition lamp shows the current condition of the
Green Energy level nominal, no alien vessels within firing range.
Yellow Dilithium levels approaching critical low levels. Seek out the nearest Starbase immediately. Avoid any unnecessary maneuvers or ship operations.
Red Alien vessels within sensor range. You are (or will soon be) fired upon by hostile forces.
Blue
Aliens Shows to the total number of alien vessels left in the galaxy. When this number reaches zero, you win the game.
Message Window
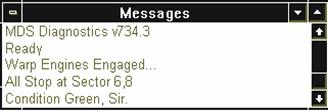
The message window
constantly monitors all activities on the
Like all other controls, the message window can be damaged in battle. Being such a valuable asset, The Enterprise is equipped with the proper hardware that allows you to reroute messages destined for the Message window to be displayed in the Computer window. See the Ship's Computer section for additional information on this feature.
Short Range Sensors
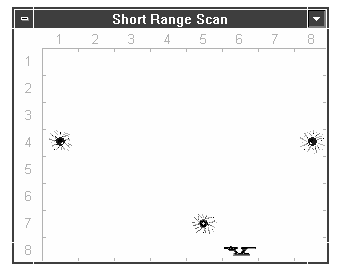 The
Short Range Sensors are your most valuable control. At a glance, you can see
your position with respect to other objects, including alien ships. It allows
you to precisely maneuver using impulse power, take accurate aim with Photon
Torpedoes, and keep a visual on your progress. You need to understand how
quadrants (Long Range Scan) and sectors (Short Range Scan) are laid out.
The
Short Range Sensors are your most valuable control. At a glance, you can see
your position with respect to other objects, including alien ships. It allows
you to precisely maneuver using impulse power, take accurate aim with Photon
Torpedoes, and keep a visual on your progress. You need to understand how
quadrants (Long Range Scan) and sectors (Short Range Scan) are laid out.
The galaxy is divided into 64 sections called quadrants. These quadrants are arranged
in an 8 X 8 grid. Whenever you perform any action related to quadrants, you
specify the action in X,Y quadrant coordinates. For example, Quadrant 5,2
refers to the position five quadrants to the right and two down in the galaxy.
The Long Range Sensor (LRS) window shows the contents of all quadrants. A
quadrant can contain any number of stars, alien ships, Starbases, the
Each quadrant is further divided into sectors. Each quadrant contains 64 sectors, also arranged in an 8 X
8 grid. Each sector within a quadrant may contain an object. The object can be
a star, the
There are many types of sector objects displayed in the SRS window. You should learn to identify these, especially the four different types of alien ships:
|
|
Klingon ships have average power and average maneuverability. About half of all the alien ships you encounter will be Klingon. They make excellent targets to learn the strategies of how to effectively do battle with aliens.
|
|
Romulan ships are slightly more powerful than Klingons, but are slow movers and will usually present ample time for a clean Photon Torpedo shot. About 25% of all ships in the galaxy will be of the Romulan type.
|
|
Farengi ships are extremely under
powered. They do not present a great threat to the
|
|
The rare and powerful Borg ships will challenge even the most experienced commander. They are the slowest movers of all, but their sheer firepower makes up for the difference. A Borg can easily wipe out your Shields and destroy a control system in one shot. It takes several direct hits with Photon Torpedoes and/or a great deal of Phaser power to get this enemy under control. Less than 3% of all ships you encounter will be Borg, somewhat more at higher skill levels.
|
|
Stars are spread out across the galaxy. You cannot navigate through a star, nor can you shoot a Photon Torpedo or fire Phasers through one. Fortunately, neither can the aliens. At higher levels, there are many more stars to contend with. Stars aren't all that bad. Ricochet-compatible stars (red, pulsating ones) let you use their gravity to ricochet your ship across the galaxy. Not all red stars are ricochet-compatible. You'll have to use the computer command SCAN to determine this.
|
|
Starbases are extremely important. They repair damaged/destroyed system, refill empty Torpedo tubes, and replace your worn-out Dilithium crystals. You dock at a Starbase by navigating to one of its adjacent sectors. If any aliens are around, you'll have to destroy them first before docking.
If you lose your Short Range Sensors, you will be handicapped. But with a little practice, you can safely maneuver out of danger or get to the nearest Starbase. Use the Computer commands GETQ, GETS, SCAN, and BASE to determine object locations and maneuvering coordinates. Also, keep a close eye on both the Message window and Status Panel for additional feedback. The more aggressive commander will even go into battle with no SRS display, since you don't need the SRS to fire Phasers (Phaser lock is automatic). You can also fire Photon Torpedoes using only the data obtained from a computer SCAN command. For the less aggressive or inexperienced commander, it is better to seek out a Starbase if the Short Range Sensors are damaged and especially, if they're destroyed.
Long
Range Sensors
Every quadrant in the LRS display is coded with a three digit number. The left-most digit is the number of alien ships(all types). The middle digit is the number of Starbases, and the right-most digit is the number of stars. The example below illustrates a quadrant containing two alien ships, one Starbase, and three stars:

The Long Range Sensors have a range of one quadrant in all directions. This is why at the beginning of the game you can see the data for your own quadrant plus the surrounding quadrants. When you reach your destination after a warp through the galaxy, the LRS is updated with new information. As you navigate, you will eventually build a map of the entire galaxy as the LRS tracks your movements.
NOTE: If you warp long distances, keep in mind that the Long Range Sensors are updated only when you reach your destination. Therefore, warping more than two quadrants into unexplored territory will result in "missing" LRS data along your route. Similarly, a damaged LRS stops recording new quadrant information.
Navigating The
Navigation Control allows you to move the
A Warp is a measure of distance, not speed.
The
|
Increase Course by 5 degrees |
Click the Course "+" button with the mouse. |
|
Decrease Course by 5 degrees |
Click the Course "-" button with the mouse. |
|
Increase Course by 1 degree |
Hold Down the Shift key and click the "+" button, or press the "+" key on the keyboard |
|
Decrease Course by 1 degree |
Hold Down the Shift key and click the "-" button. Press the "-" key on the keyboard. |
|
Set course to a 45 degree increment |
Use the keypad in a "star" pattern to directly set the course in 45 degree increments. You can also use the cursor arrow keys. |
|
Random Course selection |
Click once directly on the Course dial with the mouse. |
|
Increase/Decrease Warp |
Click on the Warp or buttons. Click and Hold the button down for auto-repeat. |
|
Increase/Decrease Impulse |
Click on the Impulse or buttons. Click and Hold the button down for auto-repeat. |
|
Execute |
Click the EXECUTE button. Press the RETURN key. |
When you click the EXECUTE button or press the RETURN key, your course and distance settings will be executed. With the AUTO ACTIVATE SRS menu item checked, the SRS window will automatically be activated, and you will see the results of your navigation command.
When traveling under Impulse power, the ship is
automatically stopped if you run into any object. You must maneuver around
objects with additional course and Impulse commands if you want to continue on
your present course. If the Impulse setting takes you beyond the edge of the
current quadrant, you will wind up in the adjacent quadrant. When this occurs,
the sector coordinates of the
HINT: You should use this to your advantage. Warp travel uses up lots of energy and time. Travel under Impulse power whenever possible. Even if your ultimate destination is more than one quadrant away, the random coordinate factor may buy you some time. Adjacent quadrants to the left, right, top and bottom of your position are good candidates for Impulse movement. However, traveling at 45 degree angles to new quadrants requires many maneuvers (you need to be positioned in the corner sectors), and it is best to use Warp power in these cases. Remember that the galaxy is spherical in shape. If you are at X-quadrant 8 and want to travel to X-quadrant 1, use Warp 1 at a direction of 90 degrees, rather than Warp 7 at 270 degrees.
After you arrive at your destination, both Stardate, Dilithium, and Shield levels will be adjusted accordingly, based on the time it took and the energy levels consumed by your ship.
Shields
The Shields are an electro-magnetic force field that
surrounds the
|
Increase Shields by 10 Units |
Click the with the mouse, or Press the Left Arrow key. |
|
Decrease Shields by 10 Units |
Click the with the mouse, or Press the Right Arrow key. |
|
Increase Shields by 1 Unit |
Hold Down the Shift key and click the button |
|
Decrease Shields by 1 Unit |
Hold Down the Shift key and click the button. |
|
Increase Shields by 100 Units |
Press the Up Arrow key. |
|
Decrease Shields by 100 Units |
Press the Down Arrow key. |
|
Execute |
Click the EXECUTE button. Press the RETURN key. |
Firing Photon Torpedoes or Phasers requires lowering of the Shields. However, the computer automatically lowers and raises the Shields for you when using these weapons.
HINT: Don't misuse the Shields. Setting very high levels can cause problems. First, the amount you specify is subtracted directly away from Dilithium levels and that energy is no longer available for other controls (including Phasers). Secondly, there is a movement penalty for traveling with Shields Up. A portion of the Shield level you set will simply be wasted away into space. The higher the level during travel, the more Shield energy is wasted.
One final note of caution. it is possible to set a Shield level high enough to allocate all but 40-50 units of Dilithium power to the Shields. If you choose to do this, you will enter a Condition Yellow. Keep in mind that normal Impulse or Warp movement will take an additional amount of Dilithium power, and it is likely you will completely run out of energy under these conditions.
Photon Torpedoes
Photon Torpedoes are a very powerful weapon. With their
Anti-Matter warheads, a single Photon Torpedo can destroy most aliens in a
single hit (especially at lower skill levels). Photon Torpedoes are
self-sustaining, they require no Dilithium power to launch nor do they take any
Dilithium power to release their destructive force. At the start of a new game
(and when docked at a Starbase), the
Unlike the Phasers, Photon Torpedoes must be aimed at a target. You enter the direction in degrees and optionally, the distance to impact. You can use the computer's SCAN command to get the degrees/distance to all aliens in the sector. Enter this information then click the EXECUTE button to fire the Torpedo. To aim manually, It will take some practice to determine the correct angle. For new commanders, it often better to make a trip to the computer and get the exact coordinates of impact.
HINT: The Distance setting for a Photon Torpedo is not a mandatory requirement in order for a Torpedo to reach its target. Torpedoes will continue on their present course until they either collide with an object, burn up within a star system, or leave the current sector. In the latter two cases, the Torpedo is lost. Setting the distance of a Photon Torpedo causes it to detonate slightly ahead of its target, inflicting greater damage to the enemy. It is usually wise to take the time and set distance. The additional destructive firepower ( approximately 70 Units) can make the difference between destroying an alien ship and wasting another Torpedo.
|
Increase Course by 5 Units |
Click the "+" button with the mouse, or Press the Left Arrow key. |
|
Decrease Course by 5 Units |
Click the "-" button with the mouse, or Press the Right Arrow key. |
|
Increase Course by 1 degree |
Hold Down the Shift key and click the "+" button, or press the "+" key on the keyboard. |
|
Decrease Course by 1 degree |
Hold Down the Shift key and click the "-" button. Press the "-" key on the keyboard. |
|
Set course to a 45 degree increment |
Use the keypad in a "star" pattern to directly set the course in 45 degree increments. You can also use the cursor arrow keys. |
|
Random Course selection |
Click once directly on the Course dial with the mouse |
|
Increase/Decrease Distance |
Click on the or buttons. Click and Hold the button down for auto-repeat. |
|
Execute |
Click the EXECUTE button. Press the RETURN key. |
Phasers
The Phasers are an extremely powerful weapon, capable of penetrating the hull of any ship. You can designate any amount of firepower up to your total Dilithium reserves (minus 40-50 Units), and fire that energy on one or more aliens. When multiple aliens are present and the SINGLE TARGET checkbox is checked, all Phaser power will be applied to only one alien vessel (the ship's computer chooses the alien that currently poses the most danger). When Wide Dispersal is checked, Phaser power is equally divided among all alien vessels in the sector. If there is only one alien vessel in the sector, the computer will direct all Phaser power to this alien, regardless if you have the WIDE DISPERSAL or SINGLE TARGET checkbox set.
You cannot manually aim the Phasers. Phaser course and distance are set automatically by the computer. When you select Phaser Control, the computer scans the current sector and then locks Phasers on any alien vessels that are present (Cloaking devices are generally not used by aliens, but some may cloak on occasion for brief periods of time). Target lock by the computer is completed when the display "Locked on Target" in shown. When any alien vessel moves, the computer continually tracks all targets and maintains locked status. You cannot shoot through stars. Even though the "Locked on Target" indicator may be flashing, you must have a "clean shot" in order to reach the alien with your Phasers. This may result in some Impulse movement on your part during battle. Fortunately, alien ships must also have a clean shot to hit you.
|
Increase Phasers by 10 Units |
Click the button with the mouse, or Press the Left Arrow key. |
|
Decrease Phasers by 10 Units |
Click the button with the mouse, or Press the Right Arrow key. |
|
Increase Phasers by 1 Unit |
Hold Down the Shift key and click the button |
|
Decrease Phasers by 1 Unit |
Hold Down the Shift key and click the button. |
|
Increase Phasers by 100 Units |
Press the Up Arrow key. |
|
Decrease Phasers by 100 Units |
Press the Down Arrow key. |
|
Execute |
Click the EXECUTE button. Press the RETURN key. |
When the desired Phaser level is set, click the Execute button to fire the Phasers. The amount of energy selected for the Phasers is then directly subtracted from Dilithium power levels. If you want to reset or cancel your settings, click another control window instead of the EXECUTE button.
If you have set the right amount of Phaser power, the alien(s) targeted will be destroyed. You can use the computer's SCAN command to determine the power level needed to destroy one or more alien ships. Any Phaser units beyond the level shown is simply wasted. Hence, it is important not to waste excess energy by blowing away alien ships with unusually high Phaser levels.
Like the Shields, it is possible to allocate almost Dilithium power to the Phasers. This would surely be your last shot in the game.
NOTE: There is a distance penalty for the Phasers. A portion of Phaser power is lost proportional to the distance between you and the alien (See Operational Data Chart). The further away you are from the target, a greater portion of Phaser power is lost. Unless you are in an adjacent sector to the target, you should always compensate for distance when using the values reported by the computer's SCAN command.
Damage Control
When Shields are down, alien fire will hit the hull of the
When a control is damaged, it requires some time for the crew to make necessary repairs. The Stardate shown is the time that the system will be back on line. When the Stardate in the Status Panel equals the Stardate shown, the control will be fully functional. If you want to view repair time as the number of days instead of the Stardate to repair, click once with the mouse anywhere in the Damage Control window.
|
View Repair Time in Days |
Click once anywhere in the Damage Control window. |
|
View Repair Time by Stardate |
Click once anywhere in the Damage Control window. |
The fastest way to repair a damaged control is to travel. This gives the crew the necessary time to perform the repairs. You can also use the computer ADV command to advance the Stardate any amount you desire.
HINT: It is generally not a good idea to fly around the galaxy solely for the purpose to make repairs. Such a waste of time almost always leads to an incomplete mission. You may want to travel by Warp drive instead of Impulse power to help speed repairs. But unless the particular system is critical to the
situation, you should continue on your present course and strategy. If that's not possible, seek out a Starbase for repair. Docking at a Starbase automatically repairs all damage immediately (Starbases have replacement parts and the right tools for the job).
If a control is reported as destroyed, it cannot be repaired in any amount of time, and you must seek out a Starbase. If all your systems become damaged or destroyed, you lose the game.
Note that Damage Control itself is a control, and it too can become damaged or destroyed. In this case, you won't be able to tell which other controls are damaged or for how long. Use the computer's DAM command in this case. Note that the Damage Control window does not report on the status of the message window or the Status Panel. These two monitors are not technically controls, and is therefore not part of the ship-wide damage report system. Once again, use the computer's DAM command for this.
Computer
The Ship's computer is a valuable source of information concerning mission progress, alien vessel identification, firing coordinates, Starbase course plotting, and a myriad of other functions.
New commanders tend to use the computer sparingly, often confused by its many commands and responses. However, the more advanced players unanimously agree that it is second in importance only to the Short Range Sensors.
To access the computer, click on the COM button in the Controls window. From this point, you can choose any one of the following commands. Virtually every command can be shortened to the first three letters, except those that require additional information.
ADV n.n The ADVANCE command advances the Stardate. If you need to repair a system quickly, the ADV command will advance the time and highly accelerate repairs. For example, if you enter ADV 1.2 the Stardate will immediately advance by 1.2 days. Use this command sparingly, especially at higher levels. It is far better to travel along your desired route and gain more LRS information that to simply advance the clock.
ALIENS The ALIENS command reports on your progress of destroyed and active alien ships. Once again, it is useful when the Status Panel is destroyed.
BASE The BASE command reports on the location of known Starbases, and the computer's best guess of where unknown Starbases may be located. If the words "Starbase found at..." is displayed, you can be sure of a Starbase in the reported quadrant. If "Starbase possible at..." is displayed, it is the computer's best hypothesis of its location. If you must get to a Starbase in time of emergency, head towards the direction of a "possible" Starbase if it's closer to your current coordinates. The computer is rarely off by one or two quadrants in its guess.
DAMAGE The DAMAGE command is similar to the Damage Control window, except you also get a damage report on both the Status Panel and Message Window. Use this command if your Damage Control window is damaged or destroyed.
GETQ X,Y The GET QUADRANT command provides the navigational degrees and warp factor input needed to travel to any quadrant in the galaxy. The values computed are relative to the current quadrant, so you should use this data immediately, or use the GETQ command again if you move to a new quadrant. For example, if you enter GETQ 5,6 the degrees and warp factor reported will be the values you need to enter into the navigation control to reach quadrant 5,6. When used in conjunction with the BASE command, you can easily navigate to the nearest Starbase when your Long Range Sensors are damaged.
HINT: The computer does not take into the effect the "wrap-around" nature of the galaxy. A shorter route may exist. Move nearer to the destination quadrant, then using the GETQ command again if this occurs.
SETQ X,Y The
SET QUADRANT command provides the navigational degrees and Impulse factor
needed to travel to any sector in the current quadrant. The values computed are
relative to the current location of the
LOCATION The location command gives you quadrant and sector information normally reported in the Status Panel. Use this command when the Status Panel is damaged or destroyed.
POWER The POWER command gives you information about your Dilithium and Shield levels, normally reported in the Status Panel. Use this command if the Status Panel is damaged or destroyed.
NOTE: While the Message window is rerouted, The computer control window stays active (not minimized) when you select a control, even though you may have the SINGLE CONTROL WINDOW menu item checked. To take advantage of this feature, drag the computer window over to the message window location on the screen. Some users prefer to REROUTE the entire game. This way, you not only get messages but have the computer opened and ready to use all the time.
REROUTE The REROUTE command lets you redirect all messages destined for the Message window to the Computer window. This command is useful if the Message window is damaged or destroyed in battle. The only drawback to this is if the computer receives damage later on, you won't be able to "unroute" the connection until the computer is repaired. Despite this, the REROUTE command is very valuable and definitely worth the risk.
RICOCHET The ricochet command initiates a ricochet sequence. Certain stars let you use their gravitational pull to fling your ship across the galaxy without using up any time or power. If you see a red, pulsating star in the SRS window, there is a high probability that it is ricochet-compatible. The computer calculates all coordinates as well as takes over navigation to perform the maneuver. You get hurled through space, hopefully to an area of the unexplored galaxy. The Ricochet maneuver is most valuable when you have only a few aliens left at the end of the game and you need to make up some lost time. Similarly, a ricochet-compatible star in one of your Starbase quadrants is a great situation to take advantage of. You can ricochet will a full load of weapons and power far away from your Starbases' area, which is usually void of any serious aliens. Make sure you lower your Shields before a using RICOCHET. If you don't, all Shield power will be lost.
SCAN The Scan command gives you detailed information about every object in the current sector. It reports the energy requirements necessary to destroy an alien with Phasers, provides the course and distance settings for Photon Torpedoes, and reports on ricochet compatible stars. The SCAN command is most valuable when you lose your Short Range Sensors. Use it to dock with a Starbase and to avoid stars.
SKILL Shows the current skill level of the game.
STATUS The STATUS command reports on your progress of the game. It shows you the end Stardate and time used so far in Stardates and days. When used in conjunction with the ALIEN command, you get a good indicator of how you're progressing time-wise.
UNROUTE The UNROUTE command cancels the effect of the REROUTE. Messages resume normally, being displayed in the Message window.
Joe's Strategies for a Winning Game
Tactical Tips
At the tactical level, the rules are simple: you need to destroy all aliens in a given sector with a minimum of return firepower. Your primary goal is to get in the first shot. Hopefully, that shot will be lethal (in WINTREK, diplomacy is not an option).
The first consideration is moving into the occupied quadrant. It almost always makes sense to move into an adjacent quadrant first, so that only Impulse (or Warp 1) power is used. This lets you raise the Shields ahead of time with a minimum of loss. It also gives you a chance to use your Long Range Sensors one more time.
The amount of Shield power needed depends greatly on the type and quantity of alien vessels. For a single Klingon or Romulan ship, a level of 250 - 350 should provide adequate protection. Of course, this will only protect you against one or possibly two hits. Fire as soon as you enter the quadrant. Plan on raising the Shield level once again while in battle if you do not destroy the alien(s) on your first shot. Do this before Shield power gets dangerously low (less than 75).
Learn to identify each different type of ship. The computer SCAN command can identify the ship design for you, as well as report on their energy levels. Once you know what each type looks like, you can set your Phaser and shield levels accordingly.
Niether you or the aliens can shoot through stars. If you enter a quadrant with multiple aliens and many stars are present, it is better to make a quick Impulse move behind a star. This gives you time to access the computer's SCAN command, and see what you're up against.
Your current armament and its working order is key to a successful kill. Do you have enough Photon Torpedoes left to complete the job? Is there enough Dilithium reserves for multiple Phaser fire? If either of these controls are damaged, you must have more than adequate power in the other control to completely destroy the aliens. If the computer is down, you will have to calculate Torpedo distance and/or Phaser power manually. This raises the possibility of missing or not destroying the target(s) and using more energy.
If at all possible, you should know the position of the nearest Starbase before going into battle. If you lose your LRS during the fight, you won't know where to go next. Aliens frequently inhabit the same quadrant as Starbases, and although aliens cannot destroy a Starbase, you won't be able to dock until all aliens within the Starbase's quadrant are completely destroyed.
If any of your controls or your power level is not up to par, it is sometimes wise to enter the battle quadrant, take a quick look, then immediately retreat to an adjacent quadrant (one that is Condition Green, of course). This allows you to perform a quick SCAN command or just to get a look in identifying the types and quantities of ships present. Depending upon the types of vessels, a great variety of firepower and movement exists. Consult the Alien Data Chart so you can get a better idea of what you're up against. Set Shield levels accordingly.
Once in battle, time becomes more important than energy. No matter what you do from this point on, all alien vessels will be firing at you in less than a 60 seconds. Some may fire immediately. Your only recourse is to fire your weapons as soon as possible. Avoid unnecessary access to controls that do not assist you in this immediate task. For example, there is no need to check Damage Control after getting hit, nor is there a need to use Long Range Sensors at this point.
It is best to fire a Photon Torpedo first, especially at those vessels that are aligned on "easy" angles (i.e., directly above, below, right or to the left). Use the keypad to quickly set 45 degree angles. More difficult positions will require the assistance of the computer's Photon Targeting data, Impulse movement, or your best guess at a firing angle. Smaller, less powerful ships (such as the Ferengi) are best handled by Phaser power, since the strength of a typical Photon Torpedo is more than twice that needed to destroy them.
When using Photon Torpedoes, avoid long delays between computer and/or visual targeting and actually firing the Torpedo. It is rare, but some aliens have been known to move out of the way just in time to miss a direct hit. More frequently though, an alien will move while you have the computer or Photon Torpedo window displayed, invalidating your direction setting. Photon Targeting Data from the computer is only valid for the actual instant you request the data. If an alien vessel moves while the computer is displayed, the report is not accurate. The computer also reports "line of sight" information, and doesn't take into account any obstructions (such as stars). You could fire a Torpedo only to have its energy absorbed by a star that's half-way between you and the alien. When battling in a quadrant containing many stars, it is usually better to move out in the open, then fire repeatedly. Wait until the alien(s) move and/or fire, then make your move. This gives you the maximum amount of time to setup your shots. Although all aliens move and fire at different times, they always do it on regular intervals.
If a Photon Torpedo doesn't destroy an alien, chances are it will be severely damaged and can probably be "finished off" by a small Phaser blast. This is true of most Romulan and Klingons. Do another Sensor Scan to check alien power levels or simply set Phasers at a much lower level (perhaps 50 - 100 units) and open fire. If you use another Torpedo to destroy a crippled vessel, most of the Torpedo's firepower will be wasted.
When challenging multiple targets, a single Photon fire to each alien followed by small amounts of Phaser power is a good all around strategy, especially at lower skill levels.
The biggest mistake new commanders make is not compensating for multiple targets when using WIDE DISPERSAL mode with Phasers. If three aliens are present and you want to fire 100 units at each one, you must enter 300 units of Phaser power. When firing Phasers, the further away you are to the target the more your Phasers will degrade in power levels. If you are at the opposite end of the sector, this becomes significant. If you have to use Impulse power and move anyway (perhaps out from behind a star) move right up against the alien and then open fire. Close to 100% of your specified Phaser power will be applied.
These standard tactics don't work very well on the rare and
powerful Borg ships. They have unusually high-power levels and a strong hull. A
Borg ship can easily withstand 3 or 4 Photon Torpedoes with a minimum of
damage. At lower skill levels, you may not run into many Borgs, but if you do,
be prepared for a bloody battle. The Borg move slow compared to other vessels,
so use this to your advantage to position the
If the battle takes a turn for the worst, don't hesitate to run. Trying to fight with severely damaged systems (such as no SRS display) and/or inadequate Dilithium power is suicide. Aliens can't repair themselves, so any damage you've caused so far will make your job easier when you return later. Since alien ships cannot leave a quadrant, you will know the types and quantity of ships when you return. The RICOCHET command is probably the fastest way out of danger if you can use it. If you notice that an alien is firing only very short bursts, it is severely damaged and can probably be wiped out with less than 50 units of Phasers.
If you are successful in destroying all alien ships in the quadrant, you will stand down from Red Alert and return to a Condition Green. At this point, it is wise to check Damage Control, Shield level, and power reserve before planning your next battle. For severe damage and/or a Condition Yellow, it is wise to seek out the nearest Starbase. If you do enter a Condition Yellow, set Shield levels back down to zero, which returns the unused power back to Dilithium.
Strategic
At the start of a new game, set your sights in a specific direction. It is helpful to first check the computer's BASE command. This gives a general idea of Starbase layout. Remember, unless Starbases are shown in your LRS display, the computer gives only an estimate of their location. But this is more than adequate to plan your overall strategy. Plan your movements so you can travel from one Starbase to the next, with ample power in-between to destroy aliens.
Work between Starbases. After docking, move in a direction that is both unexplored and away from your last Starbase. There is a good chance that you will spot a new Starbase along the way and generally, just in time for refueling. Aliens around Starbases must be destroyed before docking.
If a large number of Alien vessels are detected in the Starbases' quadrant, make sure you have adequate power to destroy all of them, or you won't be able to dock. If this is not the case, move on in the direction of the next Starbase.
Avoid "overlapping" or back-tracking through the galaxy. Determine which direction you want to go to and stick with it. Your movement objectives should be to reveal at least one more quadrant with each new move. "Doubling-backing" doesn't buy you much, unless a single isolated alien will be left behind. Avoid creating these alien "islands". You will have to eventually travel back great distances to destroy them.
Time is your most valued resource. You can refuel, get more Torpedoes, use the computer 'til the cows come home, but you can't stop the clock. At higher skill levels, any unnecessary movement will surely cost you the game.
Plan your navigation carefully. In most cases, you will never need to travel more than one Warp factor at a time. When moving on 90 degree angles, use Impulse power instead of the Warp engines. You'll save both power and time. Since entering a new quadrant results in a random sector location, chances are you'll get some free movement (and time) out of it. Using Impulse power to move even greater distances will save even more power and time, but it does require extensive use of Impulse navigation, especially to maneuver around stars. You could play an entire game without ever using warp power. And you must to win at the Admiral level.
Never Warp more than two quadrants into unexplored territory. This leaves "holes" in your LRS display that eventually results in useless back-tracking.
There is no limit to the number of times you can dock at a Starbase. Once docked, it is a good time to take a "breather" and catch up on your overall strategy. Access the computer. Use the STATUS and ALIEN commands to see how well your doing time-wise versus aliens destroyed. Study the Long Range Sensor map to plan your next major route through the galaxy. Now is a good time to save the game. But keep in mind that the clock is always ticking, even while docked. Don't get cocky.
About half way through the game, you'll probably realize that there aren't any more aliens around your Starbases. You need to Warp greater distances to get back into the action. Not necessarily so. The computer's RICOCHET command comes in handy here. If a ricochet-compatible star is in the same quadrant as your Starbase, you can usually ricochet from a docked condition right into the action, without using up any time. If a surrounding quadrant seems to have a great many stars, chances are one of them may be ricochet-compatible.
Always take the shortest route possible to your destination by "wrapping-around" the galaxy map. Don't forget that if you're at the bottom of the LRS screen, the top row is only one Warp away. Ignore the computer when using the GETQ command and it tells you have to warp greater than Warp 4 to get somewhere. There is a shorter route. No quadrant is ever more than Warp 4 away from your present location.
A game with only one Starbase is the most difficult of all, but yields the highest score. In this situation, use RICOCHET whenever you can. You will also have to live through a lot of Condition Yellows to succeed.
When you near the end of the game and there are only one or two aliens left, check the end time with the computer's STATUS command. If you don't have enough time left, all is not lost. Use only Impulse power and plan your moves carefully. Avoid any unnecessary movement. Even if a Starbase appears to be "on the way", avoid docking unless it is an absolute necessity. The seemingly few maneuvers to perform docking add up quickly. Many a game has been lost to this greedy endeavor. You could also use RICOCHET at this point, but you may wind up further away from your intended destination.
Alien Data Charts
|
Klingon |
Romulan |
Farengi |
Borg |
|
|
Move Time, seconds 2,3 |
15-24 |
20-44 |
15-34 |
35-59 |
|
Fire Time, seconds 2,3 |
25-49 |
30-54 |
20-39 |
35-64 |
|
Initial Energy Level 1 |
150-299 |
200-349 |
50-149 |
500-999 |
(1) Skill levels 1st Officer through Admiral, 50% probability of +75 units, each alien type.
(2) Skill levels 1st Officer through Admiral, 25% probability of one half the shown fire time, each alien type.
(3) All skill levels, 6% probability that an alien will move and/or fire in zero seconds, upon first encounter.
Operational Data Chart
|
SKILL LEVEL |
Crew |
Yeoman |
Officer |
1st Off |
Captain |
Admiral |
|
Photon Torpedo strength, units |
200-279 |
200-279 |
150-219 |
150-219 |
100-179 |
100-179 |
|
|
Exact Distance, add |
+70 |
+70 |
+70 |
+70 |
+70 |
+70 |
|
|
Total Starbases |
2-5 |
2-4 |
1-3 |
1-3 |
1-2 |
1-2 |
|
|
Total Stars |
50-149 |
165-163 |
80-179 |
95-194 |
110-209 |
125-224 |
|
|
Mission Length, days |
34-43 |
34-43 |
34-43 |
34-43 |
34-43 |
34-43 |
|
|
Alien Vessels |
20-29 |
25-34 |
30-39 |
35-44 |
35-44 |
40-49 |
|
|
Klingon |
55 |
50 |
50 |
45 |
40 |
40 |
|
|
Romulan |
25 |
30 |
30 |
35 |
40 |
40 |
|
|
Ferengi |
19 |
18 |
17 |
16 |
15 |
15 |
|
|
Borg |
1 |
2 |
3 |
4 |
5 |
5 |
|
|
Shield Degradation each Warp, units |
20 |
20 |
20 |
20 |
20 |
20 |
|
|
each Impulse, units |
10 |
10 |
10 |
10 |
10 |
10 |
|
|
Phaser Degradation each Impulse, units |
5-9 |
5-9 |
5-9 |
5-9 |
5-9 |
5-9 |
|
Computer Command Summary
|
COMMAND |
DESCRIPTION |
EXAMPLE |
|
ADV |
Advance the Stardate |
ADV 0.5 |
|
ALIENS |
Get Alien Statistics |
ALI |
|
BASE |
Get Starbase Location(s) |
BAS |
|
DAM |
Display Damage Report |
DAM |
|
GETQ |
Get specified Quadrant Info |
GETQ 3,7 |
|
GETS |
Get specified Sector Info |
GETS 4,4 |
|
LOCATION |
Get Location Info |
LOC |
|
POWER |
Get Current Power Levels |
POW |
|
RER |
Reroute Messages to Computer |
RER |
|
RICOCHET |
Initiate Ricochet Maneuver |
RIC |
|
SCAN |
Scan Sector for details |
SCA |
|
SKILL |
Show current skill level |
SKI |
|
STATUS |
Get Stardates and play status |
STA |
|
UNR |
Unroute or restore Messages |
UNR |
|