ALTE DOCUMENTE
|
||||
Created:
Ok, many users who have a habit of downloading movies from the Net prefer to
use subtitles with those clips due various reasons (obviously most of the
world's population don't speak English, but want to watch
Now,
since AVI videos can virtually contain anything under the Sun, there are
several things you need to check before proceeding with the re-encoding. First
one is obviously to check whether the video plays on your system at all. If it
doesn't, you probably need to install required video codecs
to your system. Generally speaking, 99% of the movies available on the Net can
be opened with FFDShow
codec/filter. If your video plays, but audio doesn't, this is very important
aspect -- your video is most likely using AC3 or Ogg Vorbis audio. This
poses a small problem to us, since TMPGEnc can't
handle these types of audio formats directly.
You need to have appx. 1.5 gigabytes of free space for the resulting VCD file. You also need to have these tools -- some of the are optional, depending on the video and audio codecs of your video and what you have installed on your system already:
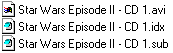 Now, copy your subtitles
and your AVI file into same directory on your HDD and rename them so that their
filenames are exactly identical, but the extensions remain different (i.e.
c:\movie name.avi and c:\movie name.srt).
Now, copy your subtitles
and your AVI file into same directory on your HDD and rename them so that their
filenames are exactly identical, but the extensions remain different (i.e.
c:\movie name.avi and c:\movie name.srt).
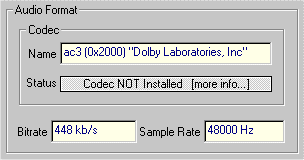
First of all, download and install an excellent little freeware tool called GSpot that can tell you what audio and video encoding the video file uses. In GSpot, go to File menu and select Open and simply locate your AVI file and click Open. GSpot analyzes the file and fills the information into correct places on its main window. Now, the most important information for us in here is the Audio Format information. If your audio format is in Ogg Vorbis or in AC3 format, we must separate the audio from the video file and re-encode the audio separately. If the audio is in MP3 format, you can go directly to the TMPGEnc step. Other thing you should check from GSpot is the video framerate which is showed in the Video Format section, in Frames/Sec box. Write this value down, you need it later on.
Next: Separate audio from the video >>
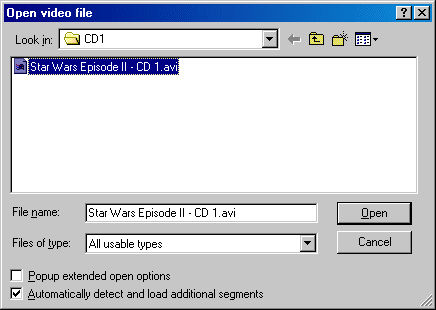 Ok, you need to do this
step if your video file contains an audio file that TMPGEnc
doesn't support, such as AC3 or Ogg Vorbis. So, open the modified version of VirtualDub called VirtualDubMod
and go to File menu and select Open video file... and
locate your .avi file
Ok, you need to do this
step if your video file contains an audio file that TMPGEnc
doesn't support, such as AC3 or Ogg Vorbis. So, open the modified version of VirtualDub called VirtualDubMod
and go to File menu and select Open video file... and
locate your .avi file
Next, go to Audio
menu and check that Direct stream copy is selected -- if not, select it.
After you've done that, go to File menu again and select Save WAV....
This pops up a new dialog box. From Save as
type: dropdown, select All files (*.*). Then enter an
easy-to-remember filename for your audio with correct extension -- if your audio is in Ogg Vorbis, use extension .ogg or if
your audio is in AC3, use extension .ac3 (you checked the audio
compression with GSpot earlier on). Also make
sure that your destination directory has at least couple of hundred megabytes
of free space, since especially AC3 tends to take quite a lot space. Now,
enter something as your filename and remember to use the file extension
accordingly. Then click Save button.

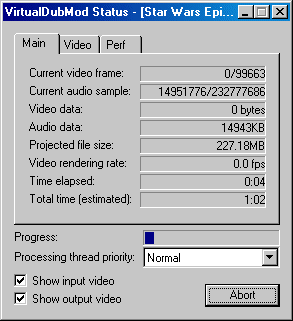 Now VirtualDubMod
is processing the AC3 and saving it into a separate file for further processing
with audio encoders. This takes a while, but shouldn't take
"forever".
Now VirtualDubMod
is processing the AC3 and saving it into a separate file for further processing
with audio encoders. This takes a while, but shouldn't take
"forever".
 file headers (optional)
 Now, since VirtualDubMod tends to add WAV headers to the all audio
files it demuxes by using "Save WAV"
feature, we need to fix the file headers. We do this by using BeSliced which is basically just a very basic GUI
for BeSplit -- which is included inside BeSliced's distribution package. Launch BeSliced
and you'll see a small window with a guy's face on it. That's everything there
is :-) Don't try to find anything fancy from the tool, there isn't anything but
the guy in there ;-) Now, find your .ac3 or .ogg file
(depends on your audio format you had in your AVI) and drag-n-drop it
into BeSliced's window. This pops up a small menu
with two options -- select the one that says Fix File This opens a good olde command prompt window with BeSplit
running on it and fixing the file. After few moments, you'll see a short log
file of errors found on the file and that's it -- the file has been fixed to
have correct audio headers.
Now, since VirtualDubMod tends to add WAV headers to the all audio
files it demuxes by using "Save WAV"
feature, we need to fix the file headers. We do this by using BeSliced which is basically just a very basic GUI
for BeSplit -- which is included inside BeSliced's distribution package. Launch BeSliced
and you'll see a small window with a guy's face on it. That's everything there
is :-) Don't try to find anything fancy from the tool, there isn't anything but
the guy in there ;-) Now, find your .ac3 or .ogg file
(depends on your audio format you had in your AVI) and drag-n-drop it
into BeSliced's window. This pops up a small menu
with two options -- select the one that says Fix File This opens a good olde command prompt window with BeSplit
running on it and fixing the file. After few moments, you'll see a short log
file of errors found on the file and that's it -- the file has been fixed to
have correct audio headers.
<< Previous: Introduction and requirements | Next: Encode the audio >>
Ok,
now you need to encode your Ogg Vorbis
or AC3 audio into MP2 (yes, em-pee-TWO) format
that VCD uses. We do this by using BeSweetGUI, which
has decent set of pre-defined encoding templates for various encoding tasks and
by using BeSweetGUI we can also avoid the hassle of
using command line options ;-) Open the BeSweetGUI
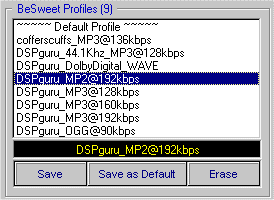
and in the top-right corner you should see a list of pre-defined templates.
Select the one that says DSPGuru_MP2@192kbps.
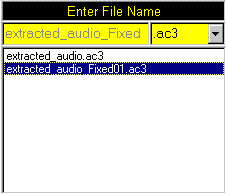
Next, click the
folder icon next to Input textfield and locate
your header-corrected audio file, which should be the name you originally saved
it with VirtualDubMod plus an addition of Fixed01
in its name (remember to change the file extenstion
from the right-most dropdown in order to see your files in the filelist) and click OK to close the file dialog
box. Then, enter your preferred audio output file name with an extension of MP2
into Output box.
Now, if you
want to create a truly standards-compliant VCD and your audio happens to be in
48kHz frequency (which is the case with all AC3 tracks), you need to
perform a downsampling for 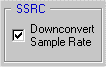 the audio to change it
to be 44.1kHz. You can do this by selecting the SSRC - Downconvert
Sample Rate option.
the audio to change it
to be 44.1kHz. You can do this by selecting the SSRC - Downconvert
Sample Rate option.
Next step is to
simply start re-encoding the audio. Click the green AC3 to MP2 or OGG
to MP2 button and program launches a new command prompt window where you
can see the audio encoding process. This takes a while, might take even over an
hour, depending on various things, such as the original audio format and your
computer's CPU. After the process is over, the command prompt window will close
and you will have an encoded MP2 file ready to be muxed into the VCD video file.
<< Previous: Separate audio from the video | Next: TMPGEnc >>
Ok,
launch TMPGEnc and first thing what we need to change
are the VFAPI Plugin orders, to 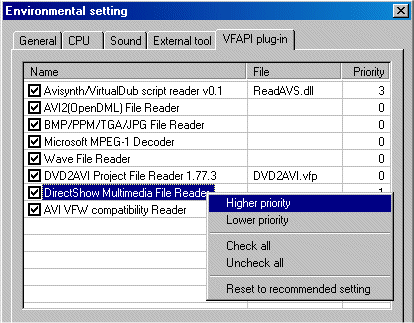 make the DirectShow plugin to kick in. This is required because we want to use
the DirectShow subtitle filters -- and also, if you use FFDShow
to play your DivX/XviD (FFDShow
is not a "real" codec, but DirectShow multimedia filter instead).
So, go to the Option menu and select Environmental setting....
Now, go to the VFAPI plug-in tab. Here you see a list of registered
reader plugins for the TMPGEnc.
Now, if the top-most plugin in the list is not called
DirectShow Multimedia File Reader, you need to go and select this plugin. Now, click right-mouse-button and select Higher priority and do this until the
DirectShow Multimedia File Reader's priority is higher than anything else.
Finally close the window by clicking OK.
make the DirectShow plugin to kick in. This is required because we want to use
the DirectShow subtitle filters -- and also, if you use FFDShow
to play your DivX/XviD (FFDShow
is not a "real" codec, but DirectShow multimedia filter instead).
So, go to the Option menu and select Environmental setting....
Now, go to the VFAPI plug-in tab. Here you see a list of registered
reader plugins for the TMPGEnc.
Now, if the top-most plugin in the list is not called
DirectShow Multimedia File Reader, you need to go and select this plugin. Now, click right-mouse-button and select Higher priority and do this until the
DirectShow Multimedia File Reader's priority is higher than anything else.
Finally close the window by clicking OK.
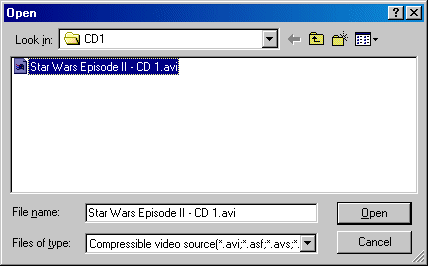 Now we're ready to load
the video into TMPGEnc. Simply click the Browse
button next to Video source: selection and locate your AVI file from
your HDD and load it by clicking Open.
Now we're ready to load
the video into TMPGEnc. Simply click the Browse
button next to Video source: selection and locate your AVI file from
your HDD and load it by clicking Open.
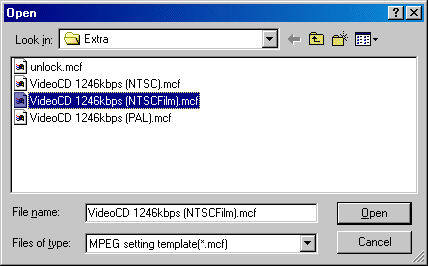 Now, take out the piece
of paper where you wrote your AVI file's framerate.
Now, if the framerate is 29.97 or 30fps, your video
format will be NTSC.
If the framerate is 25fps, your video format will be PAL. Finally, if the
framerate is 23.97 or 24fps, the video format will be
NTSCFilm. So, click the Load button located in
bottom-right corner of the TMPGEnc's main window.
This opens a file dialog that lets you choose the video encoding template. Now,
choose either VideoCD 1246kbps (NTSC), VideoCD 1246kbps (NTSCFilm)
or VideoCD 1246kbps (PAL) according to
your video format you chose. Now, if you had to go through the audio hassle
earlier in this guide, you need to click the Load again and select a
template called unlock.mcf. This frees the
locked settings, but leaves the settings selected that the previous template
loaded anyway. Still, if your audio needs tweaking,
from the right-bottom corner, select System (Video only) as your Stream
type.
Now, take out the piece
of paper where you wrote your AVI file's framerate.
Now, if the framerate is 29.97 or 30fps, your video
format will be NTSC.
If the framerate is 25fps, your video format will be PAL. Finally, if the
framerate is 23.97 or 24fps, the video format will be
NTSCFilm. So, click the Load button located in
bottom-right corner of the TMPGEnc's main window.
This opens a file dialog that lets you choose the video encoding template. Now,
choose either VideoCD 1246kbps (NTSC), VideoCD 1246kbps (NTSCFilm)
or VideoCD 1246kbps (PAL) according to
your video format you chose. Now, if you had to go through the audio hassle
earlier in this guide, you need to click the Load again and select a
template called unlock.mcf. This frees the
locked settings, but leaves the settings selected that the previous template
loaded anyway. Still, if your audio needs tweaking,
from the right-bottom corner, select System (Video only) as your Stream
type.
<< Previous: Encode the audio | Next: TMPGEnc - Advanced settings >>
![]() Now, click the Setting
button from the right-bottom corner of the TMPGEnc's
main window. This pops up a new window that allows you to modify the encoding
settings. From the Video tab, leave everything else intact, but change
the Motion search precision setting to Highest
quality (very slow) in order to minimize the quality-drop in re-encoding.
Now, click the Setting
button from the right-bottom corner of the TMPGEnc's
main window. This pops up a new window that allows you to modify the encoding
settings. From the Video tab, leave everything else intact, but change
the Motion search precision setting to Highest
quality (very slow) in order to minimize the quality-drop in re-encoding.
 From the Advanced
tab, set the Video source type to be Non-interlaced (progressive)
as normally the deinterlacing has been done to the
encoded AVI already if necessary. Change the Source aspect
ratio to be 1:1 (VGA) and set the Video arrange
Method to Full screen (keep aspect ratio). Leave all the boxes in
the bottom part unchecked. Close the window by clicking OK.
From the Advanced
tab, set the Video source type to be Non-interlaced (progressive)
as normally the deinterlacing has been done to the
encoded AVI already if necessary. Change the Source aspect
ratio to be 1:1 (VGA) and set the Video arrange
Method to Full screen (keep aspect ratio). Leave all the boxes in
the bottom part unchecked. Close the window by clicking OK.
Now, go to File menu and select Preview... This opens a new
window that allows you to preview the video how it will look like after your modifications.
It is also important to check whether the subtitles are visible at this point
-- if they're not, check your subtitle filter's settings and make sure it works
correctly (try opening the video with Windows Media Player -- if the
subtitles play on it without turning them on anywhere, the problem is probably
that you didn't remember to make the DirectShow Multimedia File Reader to be
the top priority filter in the filter list in TMPGEnc).
If everything looks OK, simply close the preview window.
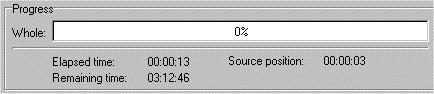 Change in the Output
file name field the filename and directory you wish to use for the
resulting MPEG-1 file and then simply hit the Start button in the
top-left corner and wait for couple of hours (might take much longer if your
computer is slightly slower) for encoder to finish the video encoding part.
Change in the Output
file name field the filename and directory you wish to use for the
resulting MPEG-1 file and then simply hit the Start button in the
top-left corner and wait for couple of hours (might take much longer if your
computer is slightly slower) for encoder to finish the video encoding part.
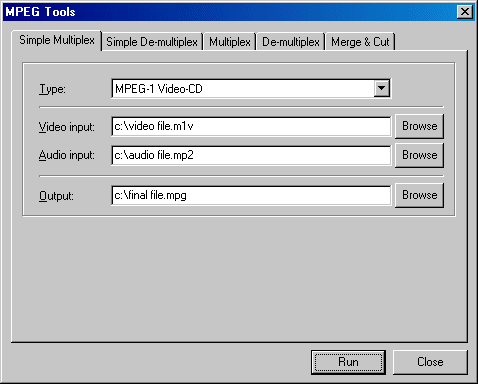 Now, if you had a
separate audio file, you need to join the video and audio files together. This
process is called multiplexing. Go to TMPGEnc's File
menu and select MPEG Tools... In Simple Multiplex tab, change the
Type to MPEG-1 Video-CD. Next, click the Browse button
next to Video input dialog and select your video file you just encoded
with TMPGEnc. After you've done that, click the Browse
button next to Audio input dialog and select the .mp2 file you
created earlier with BeSliced. Finally, change the
filename and directory to the Output to whatever you want, but remember
that this destination has to have appx. 1.5GB of free
space, because it actually copies the audio and video files into one and puts
the resulting .mpg file into this directory. After you've done this, click Run.
After a short while, you will have a finished VCD-compliant .mpg file :-)
Now, if you had a
separate audio file, you need to join the video and audio files together. This
process is called multiplexing. Go to TMPGEnc's File
menu and select MPEG Tools... In Simple Multiplex tab, change the
Type to MPEG-1 Video-CD. Next, click the Browse button
next to Video input dialog and select your video file you just encoded
with TMPGEnc. After you've done that, click the Browse
button next to Audio input dialog and select the .mp2 file you
created earlier with BeSliced. Finally, change the
filename and directory to the Output to whatever you want, but remember
that this destination has to have appx. 1.5GB of free
space, because it actually copies the audio and video files into one and puts
the resulting .mpg file into this directory. After you've done this, click Run.
After a short while, you will have a finished VCD-compliant .mpg file :-)
<< Previous: TMPGEnc | Next: Final words >>
Now,
your video file is probably going to be more than 740MBs and you need to split
it to two CDs. We recommend that you read our guide on how to do this -- you
can find the guide from here.
And obviously you want to burn the VCD correctly as well -- we have a guide
for this process as well :-) Now, if you have any comments, ideas or questions,
please post your thoughts to our discussion
forums.
v1.0 --
Created:
![]() At times you find that
the MPEG video file you have is just too big to be practically burned as a VideoCD or Super VideoCD. It
might be that the video just won't fit on one CD, or you might want to split it
in smaller parts for easier navigation.
At times you find that
the MPEG video file you have is just too big to be practically burned as a VideoCD or Super VideoCD. It
might be that the video just won't fit on one CD, or you might want to split it
in smaller parts for easier navigation.
Splitting the video in smaller parts is rather trivial, when you have the right
tools. We're going to use the excellent DV-Tool,
which, among other features, has an "MPEG aware" cut & merge
tool.
![]() Download DV-Tool from
the link above, unzip it to a folder of your liking and run it. Then choose the
File Processor 2.31 tab, and check the
Download DV-Tool from
the link above, unzip it to a folder of your liking and run it. Then choose the
File Processor 2.31 tab, and check the
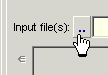 Click the Input
file(s) .. and locate the
file you want to split.
Click the Input
file(s) .. and locate the
file you want to split.
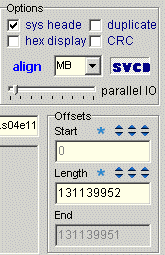 Using the arrows above
the length field adjust
the size of the parts. The video will be split into equal parts of the size
specified. Make sure you have checked the SVCD button above.
Using the arrows above
the length field adjust
the size of the parts. The video will be split into equal parts of the size
specified. Make sure you have checked the SVCD button above.
You can see how the file will be split in the blue diagram.
 Click the Output
file: (or mask) .. and
choose the path to save the file. The question mark ?
will be replaced by a running number. So you want the
path to be something like:
Click the Output
file: (or mask) .. and
choose the path to save the file. The question mark ?
will be replaced by a running number. So you want the
path to be something like:
 Just click Start
and wait for the magic to happen!
Just click Start
and wait for the magic to happen!
Created:
VideoCDs are
an excellent media for storing your video files. With modern day computers compressing
a VideoCD
compilant MPEG-file takes just a couple of hours. And
with CD-RW -drives being standard on just about every new computer system,
there's no reason for not taking full advantage of the medium.
To follow this guide you will need:
·Video file(s) compressed in VideoCD
compilant MPEG format using e.g. TMPGEnc.
(see our VideoCD guides for more information on creating VideoCD compilant MPEG-files)
·Nero
Burning Rom CD-recording software (demo
version)
Set to go? Good!
 After launcing Nero Burning Rom you are presented with the
New Compilation dialog. Scroll down the list until you see the Video-CD
-option. Choose it.
After launcing Nero Burning Rom you are presented with the
New Compilation dialog. Scroll down the list until you see the Video-CD
-option. Choose it.
If your video files are in PAL format,
choose the PAL
-radio-button in the Encoding resolution tab. If they are in NTSC format,
choose NTSC. The
selection of encoding format also affects the format of the menu screen.
 If you want to create a
fancy menu screen for your VideoCD,
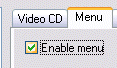
click on the Menu-tab and check the Enable menu -box.
If you want to create a
fancy menu screen for your VideoCD,
click on the Menu-tab and check the Enable menu -box.
Creating a menu makes it a lot easier for you, and others, to access the VideoCD.
Unfortunately you cannot create the likes of fancy menus you see on DVDs, but
it's still much better than nothing, don't you think?
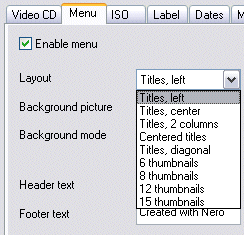 Next you should choose a
layout for your menu. Don't worry. If you don't know what kind of a menu
you should choose, you can change the layout later by just coming back to the
menu screen. I suggest choosing one of the thumbnail -options. Just
click on the Layout -selection and choose, for example, 6 thumbnails.
Next you should choose a
layout for your menu. Don't worry. If you don't know what kind of a menu
you should choose, you can change the layout later by just coming back to the
menu screen. I suggest choosing one of the thumbnail -options. Just
click on the Layout -selection and choose, for example, 6 thumbnails.
You can also give a title text for your VideoCD,
change the typeface and colour of the fonts etc.
These, of course, can also be edited later on as well.
After choosing the layout, click on the New
button on the New Compilation window.
 Now that you've got the
basic interface for the VideoCD,
it's time to add some content. There are numerous ways of doing this. You can drag
& drop the files to the track list, use the right mouse button to Add
files... using the standard Windows requester, or find the files using the File
Browser on the right side of the Nero window.
Now that you've got the
basic interface for the VideoCD,
it's time to add some content. There are numerous ways of doing this. You can drag
& drop the files to the track list, use the right mouse button to Add
files... using the standard Windows requester, or find the files using the File
Browser on the right side of the Nero window.
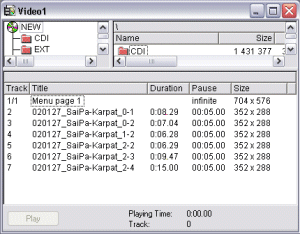
After adding the files, your track list should look similar to the picture on
the right.
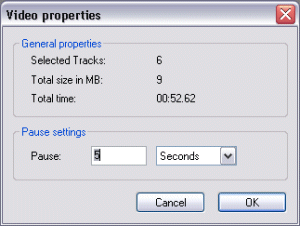 By default Nero adds a
five second pause between all the tracks. In most of the cases this is either
undesirable or outright annoying. You can get rid of the pause by choosing all
the tracks, clicking the right mouse button, and choosing Properties....
Of course you can also skip this step or edit the pause individualy
for each track. Make sure you leave the delay for the menu screen to Infinite.
By default Nero adds a
five second pause between all the tracks. In most of the cases this is either
undesirable or outright annoying. You can get rid of the pause by choosing all
the tracks, clicking the right mouse button, and choosing Properties....
Of course you can also skip this step or edit the pause individualy
for each track. Make sure you leave the delay for the menu screen to Infinite.
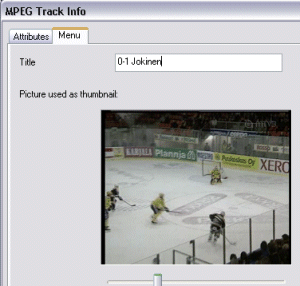 Next you'll probably
want to edit the names of the tracks a bit. Nero uses the body of the
filename as a default title. You can edit this by clicking on the track and
choosing Properties.... Next click the Menu-tab and enter a title
of your liking. You can also change the thumbnail picture for the menu screen
by scanning to an appropriate position of the video using the slider.
Next you'll probably
want to edit the names of the tracks a bit. Nero uses the body of the
filename as a default title. You can edit this by clicking on the track and
choosing Properties.... Next click the Menu-tab and enter a title
of your liking. You can also change the thumbnail picture for the menu screen
by scanning to an appropriate position of the video using the slider.
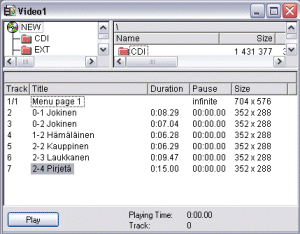 After editing all the
titles your track list should look something like this. Altogether you can fit
74-99 minutes of video on a single VideoCD
depending on the size of the CD-R media you are using. However using a medium
with a capacity larger than 80 minutes is not advisable, since some DVD-players
may have problems with such discs.
After editing all the
titles your track list should look something like this. Altogether you can fit
74-99 minutes of video on a single VideoCD
depending on the size of the CD-R media you are using. However using a medium
with a capacity larger than 80 minutes is not advisable, since some DVD-players
may have problems with such discs.
 You're probably
interested in seeing how the menu looks like on the final disc. This can
be done by opening up the disc properties and choosing the Menu-tab
(either by right-clicking on the name of the VideoCD
and choosing Properties... or opening the File..., Compilation
info... from the pulldown menu).
You're probably
interested in seeing how the menu looks like on the final disc. This can
be done by opening up the disc properties and choosing the Menu-tab
(either by right-clicking on the name of the VideoCD
and choosing Properties... or opening the File..., Compilation
info... from the pulldown menu).
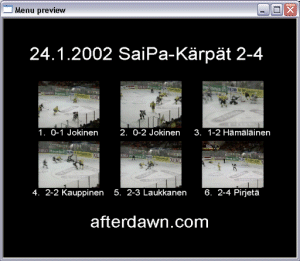
On the menu tab click on the checkbox next to Preview first page to see
what the first page of the menu structure looks like. If the menu doesn't fit
on one page, Nero will automatically divide the titles on several pages. All
the menu pages will have a layout similar to the first page. You can preview
the other menu pages by double clicking on them in the track list.
 The only remaining step
is to write the VideoCD on a CD-R or CD-RW medium. Just open up the
Write CD-dialog, and check the Write and Finalize CD checkboxes.
Leave the other two boxes unchecked.
The only remaining step
is to write the VideoCD on a CD-R or CD-RW medium. Just open up the
Write CD-dialog, and check the Write and Finalize CD checkboxes.
Leave the other two boxes unchecked.
I know you're eager to click on the Write-button by now, but there are a
couple of things to bear in mind before you do.
If you ever intend to view the VideoCD
on a standalone player, it's highly advisable to
It might sound strange, but many DVD-players have difficulties with CD-Rs written at high speeds.
Okay. Now that we've got everything settled it's time to click on that Write-button,
wait a couple of minutes, and enjoy the results!
https://www.afterdawn.com/articles/archive/divx_to_vcd_page_3.cfm
|
