Table of content
Introduction
Important safety instruction
Package content
Minimu system requirements
Description
Display
Use
Battery installation
Power ON/OFF
Options selection
HOLD switch
Main Menu
Music (Music Player)
Voice (Voice Messages Player)
Setting (Setup)
EQ Set (Equalizer)
Repeat mode
Contrast
Backlight
Backlight Color
Power Set
Language
Voice (Voice messages recorder)
Folder
Computer installation
Windows® 98 Second Edition - Safety Remove Hardware
Windows® ME, Windows® 2000 and Windows® XP
File transfer
Copyright ©
All the brands, logos or product names contained in the present document are brands or registered brands of the respective owners. The information contained in this manual is subject to modification without prior notice. It is forbidden to produce this document, or any part of it, in any form, using any electronic or mechanical means, including fotocopying and recording, without Nortek's written authorisation. Since maximum care h 20420w2221u s been taken in the drafting and production of this manual, Nortek does not consider itself liable for any malfunctions or damage caused as a result of improper use or an erroneous interpretation of the instructions.
Copyright © 2006. All rights reserved
Congratulation for the purchasing of the Jogger MP3 Player. The high integration reduces the device weight and the dimensions and the use is comfortable. The FLASH memory allows to use the MP3 player in every situation with "jumping" problem (for example during jogging activities). The LCD display offers clear and sharp information and the USB 2.0 Full Speed interface make easier the data transfer operation from/to the computer. By the microphone inside it is possible to record voice messages and play them directly with the device or by computer.
Before to start to install and use the product please read this manual and retain the instruction for future reference.
Here below you will find important safety instructions. Please read the following information.
Before to start the use and the installation product please check if there are available the following items:
MP3 Player
Earphones
Quick Guide
Warranty Card
|
ALERT |
If one or more items are missing or damaged please refer to local dealer and require the replacement. |
To use the product it is necessary a computer with the following hardware configuration:
|
ALERT |
The computer must also satisfy the operating system requirements. For more information please refer to Windows® documentation. |
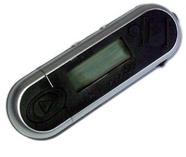
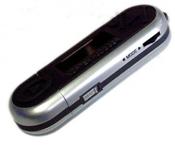
Here below you will find an MP3 player description
|
v w x |
||||||||||||||||||||||
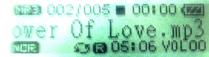
Here below you will find a display options description:
![]()

|
|
|
File Format
Song position / Total songs.
PLAY, Pause and STOP
Play time.
Battery charge level.
EQ
Repeat Mode
Total Duration
Volume
Here below you will find how to install the battery inside the MP3 player:
|
1. Open the cover. |
2. Insert the battery. |
3. Close the cover. |
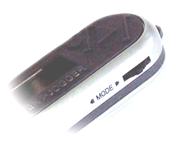
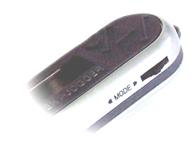
To select options the MP3 player uses the [MODE] control. Here below you will find instructions how to use it.
|
Move the joystick like the arrow to select [ |
Move the joystick like the arrow to select [ |
Press the joystick to select [MODE] |
The HOLD switch block the MP3 player buttons then you cannot operate with them. When the HOLD function is enabled the "LOCKED" message appears on the display and it is not possible to operate with the player. To unlock the player please use the HOLD switch.
To access at the main menu and select option please follow here below instruction.
|
Music: |
Select this option to play songs. |
|
Voice: |
Select this option to play recorded voice messages. |
|
Setting: |
Select this option to access at setup of MP3 player. |
|
Voice: |
Select this option to record voice messages by the microphone inside. |
|
Folder |
Select this option to delete file stored in the MP3 Player memory. |
|
Info |
Select this option to check the MP3 player firmware version, total memory and free memory size. |
|
Exit: |
Select this option to exit from the main menu. |
The music player option allow to play songs. To activate this option please follow here below instruction:
During the song play it is possible to activate the following controls.
|
PLAY [► |
Press the play [ ] to start to play a song. Press the play button again to pause the song. To restart to play the song press play button again. |
|
REW & FFWD [ |
Press [ ] or [ ] to select the previous or the next. Press for fews seconds the [ ] or [ ] buttons to rewind or fast forward the song. |
|
Volume (VOL+ and VOL-): |
Press [VOL+] button to increase the volume and press [VOL-] button to decrease the volume. |
|
Hold: |
Press HOLD button to block all MP3 Players buttons. The screen will display LOCKED to inform you that HOLD function is activated. |
The voice option allows to plays the voice messages recorded by the MP3 Player. To activate this option please follow here below instruction:
|
NOTE |
The VOICE
option can play Wave files (.Wav) coded by ADPCM CODEC and stored in the
VOICE folder available in the MP3 Player memory. When the VOICE option is
activated it is possible to use only the |
During the voice message playing it is possible to use the following controls:
|
PLAY [► |
Press the play [ ] to start to play a song. Press the play button again to pause the song. To restart to play the song press play button again. |
|
REW & FFWD [ |
Press [ ] or [ ] to select the previous or the next. Press for fews seconds the [ ] or [ ] buttons to rewind or fast forward the song. |
|
Volume (VOL+ and VOL-): |
Press [VOL+] button to increase the volume and press [VOL-] button to decrease the volume. |
|
Hold: |
Press HOLD button to block all MP3 Players buttons. The screen will display LOCKED to inform you that HOLD function is activated. |
The SETTING option allows to access to MP3 Player setup system. The parameters available in the setup system are:
|
EQUALIZER |
This option allows to select the EQ desired preset. |
|
REPEAT MODE |
this option allows to select the repeat desired mode. |
|
CONTRAST: |
This option allows to set the CONTRAST value. |
|
BACKLIGHT: |
This option allows to set the backlight time. |
|
BACKLIGHT COLOUR: |
This option allows to set the backlight colour. |
|
POWER SET: |
This option allows to set the power management features. |
|
RECORD SET: |
To set the voice recording sample rate. |
|
LANGUAGE: |
This option allows to set the OSD language. |
|
EXIT: |
This option allows to exit fromt the SETTING menu. |
To access at system setup please follow here below instruction:
The EQ SET parameter allows to select the EQ preset. The MP3 Player has available Seven EQ styles:
To select your desired EQ preset please follow here below instruction:
The PlayMode parameter allows to select the desired repeat mode. Here below you will find the repeat modes available:
|
Normal: |
Select this option to play all files sequentially. At the end of the last file the MP3 Player stops automatically. |
|
Repeat All: |
Select this option to play all file sequentially. At the end of the last file the MP3 Player will restart to play the first one. To stop the playing press play [ ] button. |
|
Repeat One: |
Select this option to play the current song/file repeatedly. To stop the playing press play [ ] button. |
|
Random repeat |
Select this option to play all files randomly. At the end of the last file the MP3 Player stops automatically. |
|
Random All: |
Select this option to play all files randomly. At the end of the last file the MP3 Player will restart to play the first one. To stop the playing press play [ ] button. |
|
Dir normal: |
Select this option to play directory files sequentially. At the end of the directory file the MP3 Player stops automatically. |
|
Dir all repeat: |
Select this option to play all directory files sequentially. At the end of directory file the MP3 Player stops automatically. |
|
Dir random repeat: |
Select this option to play directory files randomly. To stop the playing press play [ ] button. |
To select the desired play mode please follow here below instruction:
This option allows to set the contrast level. To modify this parameter please follow here below instruction.
This option allows to set the backlight time. To modify this value please follow here below instruction:
|
NOTE |
To disable backlight select "0 sec." value. The battery life depends from backlight. |
This option allows to select the backlight color combination. Here below you will find the available color combination:
|
Yellow: |
Select this option to enable yellow backlight color. |
|
Purple: |
Select this option to enable purple backlight color. |
|
Red: |
Select this option to enable red backlight color. |
|
Cyan: |
Select this option to enable cyan backlight color. |
|
Green: |
Select this option to enable green backlight color. |
|
Blue: |
Select this option to enable blue backlight color. |
|
White: |
Select this option to enable white backlight color. |
|
Auto: |
Select this option to enable random backlight color. |
To modify the backlight color parameter please follow here below instruction:
|
NOTE |
If the backlight parameter value is set to "0 sec." the backlight color option does not work. |
This option allows to enable or disable the power management features. It is possible the automatic shut-down time. Here below you will find the available options:
|
Disable: |
Select this option to disable the power management features. To power OFF the MP3 player you must to press for few seconds the PLAY button. |
|
2 MIN.: |
Select this option to set the automatic shut-down time at 2 minutes. |
|
10 MIN.: |
Select this option to set the automatic shut-down time at 10 minutes. |
|
30 MIN.: |
Select this option to set the automatic shut-down time at 30 minutes. |
To modify this parameter please follow here below instruction:
This option allows to change the OSD (On Screen Display) language.
Here below you will find the available languages:
|
English |
Portoguese |
Poland |
|
French |
Italian |
Dutch |
|
Russian |
Czech | |
|
German |
Spanish |
To select the desired OSD language please follow here below instruction:
This option allows to record voice messages by using the microphone inside. To record a voice message please follow here below instruction:
The MP3 Player records wave file with the following audio parameters:
|
CODEC: |
IMA ADPCM |
|
Sample Rate: |
8 KHz 4 bit mono |
|
Bitrate: |
32 Kbp Kbp Kbp Kbp |
|
NOTE |
To play the wave files recorded by the MP3 Player in your computer it is request a compatible audio CODEC like Microsoft® ADPCM. If you need more information about audio CODEC installed in you PC please refer to Windows® help on-line. |
Users can save files in any existing folder via player (users need to create folder via PC before).
This option allows to delete one or more files stored in the MP3 Player memory. To delete a file please follow here below instruction:
This chapter describes how to install the MP3 player in your computer system in order to transfer songs file in the memory device.
|
NOTE |
If your computer uses Windows® 98 SE please download the device driver from www.nortekonline.com . Install the device driver before connecting the MP3 player to the USB port |
To install the MP3 player in a computer with Windows® 98 SE please follow here below instruction:
If your computer uses Windows® 98 SE please download the device driver from www.nortekonline.com
Power ON the computer without connect the MP3 Player to USB port.
Run the driver you have downloaded
The installation program will start, follow the instruction on the screen and when the installation is finished close the session and restart the PC.
When the operating system is ready connect the MP3 Player to USB port by using the USB data cable available. The system will detect the new hardware and it will install the device driver automatically.
Now it is possible to browse the MP3 Player memory by using "My Computer" or " Windows Explorer".
The Windows® 98 SE driver install the Safety Remove utility in the systray
Before to disconnect the MP3 Player to USB port please follow here below instruction:
![]()
Windows® 98 SE - Systray
Windows® 98 SE - Safety Remove Hardware
|
NOTE |
Under Windows® 2000 and Windows® XP to install a new hardware device it is necessary to logon to the system as "Administrator" or user with administrator rights. For more information about user account please refer to Windows® documentation or to you network administrator. |
To install the MP3 player in a computer with Windows® ME, Windows® 2000 or Windows® XP please follow here below instruction:
When the MP3 Player is connected to the computer, "My Computer" has a new "Removable Disc". This removable disc is the MP3 player. The operating system assigns automatically a drive letter to removable device (the picture below shows an MP3 Player where the operating system has assigned the H: letter).
![]()
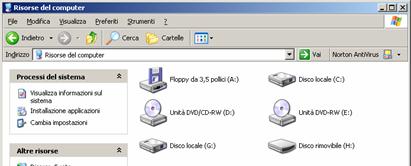
Windows® XP - My Computer
To transfer song files to MP3 Player please follow here below instruction:

Windows® XP - Windows Explorer
|
NOTE |
Windows® offers different ways to copy files. For more information please refer Windows® documentation or help on-line. |
Windows® Media Player - Synchronization
|