|
The usual chargers of battery automotive, are simple and cheap appliances that charge
continuously the battery, with a rythm of few amperes, for the time where
the appliance is ON. If the holder do not close in
time the charger, the battery will overcharge and her electrolytic faculty
are lost with evaporation or likely exists destruction of her elements. The
charger of circuit exceeds these faults. It checks electronic the situation
of charge of battery and it has circuit of control with retroaction, that
forces the battery charge with biggest rythm until charge completely. When
charge completely, it turns on one RED led (LD2). The charger has been
drawn in order to charge batteries of 12V, ONLY. What should watch it from
what it manufactures the circuit, they are the cables that connect the
transformer with the circuit and in the continuity the battery, should they
are big cross-section, so that heat when it passes from in them the current
of charge and also they do not cause fall of voltage at the way of current
through them.
Adjustment
When it finishes the manufacture you turn TR1 in
the place of null price and you make the below regulations - controls. 1 ] You check without you have connected the battery,
that also the two LED's turn on. You connect a
battery automotive in the charger. Check that the LD2 is off and that a
current (normally 2 until 4 A), flows to the battery.
You turn the TR1 and you check that the LD2 can turn on, also the current
of charge be cut 4 ] Turn the TR1 in the null price and charge the battery
using the regular technique of hydrometer (if it does not exist, then you
completely use a battery in good situation and charge). Turn carefully the
TR1 so the LD2 begins to turn on also the current of charge to fall in few
hundreds mA. If the TR1 is placed rightly then in next charges, you will
see the LD2 it will begin first to flicker, as charge the battery. When
charge completely the battery then the LD2 turns on completely. The TR1
does not need anymore other regulation. The Q1 is connected in line with
the circuit of battery and it can be fired from circuit R3-4 and LD2 The voltage, on binding post of battery, is received
by circuit R2, C1, TR1, D2 and it activates the Q2 when the voltage on
binding post exceeds, the price that we have predetermined with the TR1.
When a uncharged battery is placed for charge, the
voltage on binding post, is low. Under this situation the Q2 is turn off
and Q1 is fired in each half of circle from circuit R3-4, LD2. The Q1
functions as simple rectifier. As such charge the battery, the voltage on
binding post increases. If the voltage on binding post is increased above
the level that we have fixed with the TR1, then the Q2 it shifts the
control of gate of Q1, this deactivate, stops it gives current in the
battery and it turns on LD2, showing us that the charge has been completed.
The Q1 and the bridge of rectification GR1, it should install on good
heatsink, for good refrigeration. The M1 is a
ampere meter 5A DC, in order to we can watch the current of charge.
Optionally it can be placed a voltmeter in parallel, with the poles of
battery, will be supposed it has however high resistance of entry, in order
to it does not influence the circuit of measurement of appliance.
|
**This translation and the editing,
became from a good friend. Thanks
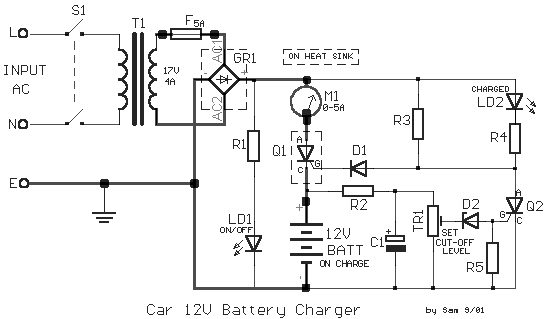
Operation
Most car battery chargers are simple devices that continuously charge
the battery with a few amperes for the duration it is ON. If the charger
is not switched OFF in time, the battery will overcharge, its electrolyte
lost due to evaporation, and its plate-element will likely be destroyed.
The circuit above will eliminate these problems by monitoring the
battery's condition of charge through its retroactive control circuit by
applying a high charge current until the battery is completely charged.
When charging is complete, it turns on the red LED (LD2) and deactivates
the charging circuit. This circuit is drawn to charge 12V batteries ONLY.
Certain emphasis should be taken when wiring up this circuit. They are
the connections of the transformer to the circuit board, and those
supplying current to the battery being charged. These connections should
be made with cables having a large cross-sectional area to prevent
voltage-drop and heat build-up when current flows through them.
Adjustment
After assembling of the circuit, adjust TR1 to null value,
power-up and make the following adjustments :-
[1] Without connecting the battery check that the 2 LED's are
turned on.
[2] Connect a car battery to the circuit and check that LD2 is OFF
and a current (normally 2A to 4A) is flowing to the battery.
[3] Adjust TR1 until LD2 turns ON and the charge current is cut.
[4] Adjust TR1 to null value and charge the battery using the
hydrometer technique (if you do not have or do not know how to use a
hydrometer, then use a good condition battery
and charge).
Carefully adjust TR1 so that LD2 begins to turn ON and the charge
current falls to a few hundred milliamps (mA). If TR1 is set correctly
then in the next round of charging you will noticed
LD2 begin to flicker as the battery is being charged. When battery is
completely charged, LD2 turns ON completely.TR1 does
not need further adjustment anymore. Q1 is connected in line with the
battery and is fired by R3, R4 and LD2. The R2, C1, TR1 and D2 sense the
voltage of the battery terminal and activate Q2 when the voltage of the
battery terminal exceeds the value predetermined by TR1. When an
uncharged battery is connected, the terminal voltage is low. Under this
circumstance, Q2 is turned OFF and Q1 is fired in each half cycle by R3,
R4 and LD2. The Q1 functions as a simple rectifier and charges the
battery. If the battery terminal voltage is increased above the level
that had been fixed by TR1, then Q2 shifts the control of Q1 gate. This
deactivates Q1 and cuts off the current supply to the battery and turns
LD2 ON indicating that the charge has been completed. Q1 and bridge
rectifier GR1 should be mounted on heatsinks to prevent overheating. M1
is a 5A DC ammeter to measure the charge current. Optionally a voltmeter
can be connected in parallel with the battery,
however it must have a high input resistance so as not to influence the
measurement.
|
|