|
Autodesk Inventor: Making the Transition from 2D
|
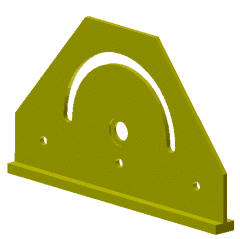
Figure 1: Completed part.
|
One of the
challenges when moving from a 2D environment, such as the one in AutoCAD®,
to 3D modeling in Autodesk InventorT is learning the different thought
process required to build
rather than document a
model. In fact, you may have an easier time of it if you've got little or
no 2D AutoCAD experience because you lack the ingrained habits of good 2D
designers. The accompanying tutorial, New to Autodesk InventorT, leads
you through planning and creating a simple part model in Autodesk
Inventor. The tutorial highlights some of the areas where you may need to
think outside the AutoCAD "box" to be proficient with Autodesk
Inventor.
Three Words:
Planning, Planning, Planning
As with most things, a little planning goes a long way. The process of
building a 3D part model typically inv 858l1118i olves a series of operations that
either add material to, or remove material from, the model. There are
many exceptions to this process, but the following steps comprise much of
the workflow for many part models.
Create a
closed-profile 2D sketch.
Add some rules
(constraints and dimensions) as to how the sketch entities should behave.
Create a 3D solid from the sketch by either extruding the
sketch perpendicular to the sketch plane, or revolving the sketch about
an axis on the sketch plane.The resulting solid can add or remove
material from the part.
Repeat as necessary.
The biggest hurdle
is often where to start. Well, since the part will be modeled as a series
of features, break it down into discreet features. Identify the one shape
that best describes the part's form. That shape is usually a great candidate
for your first sketch and feature.
Examine the part
in Figure 1. What would your choice be for the feature that defines the
part? To me, the plate with the chamfered corners is the most obvious
feature and would be a reasonable place to start. If you look at the part
from the end, an inverted "T" shape might define the part just
as efficiently.
|
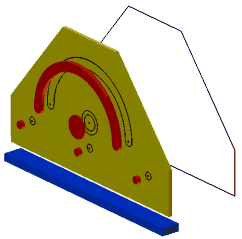
Figure 2: Feature
breakdown.
|
Figure 2 shows the
part exploded into features. The image on the left shows the part
starting with a sketch and extrusion of the plate outline. The image on
the right shows the part starting with an extrusion of the T-shaped
sketch. The feature created from the initial sketch is shown in gold;
features that remove material are shown in red; and the feature that adds
material is shown in blue. Note that the bottom rail is not included in
the first extrusion in the left image; that's because it's a different
thickness than the plate. There are advanced techniques you can use to
overcome this, but better keep it simple when creating your first models.
If you were using AutoCAD software to document
this part, you would likely start with the view of the face with the
chamfered corners. In addition, the view would probably be drawn entirely
in the positive XY quadrant of the WCS. It is also likely that you would
draw entities from left to right and use symmetry where appropriate. When
building a 3D model, using symmetry is important for efficient and robust
designs.
|
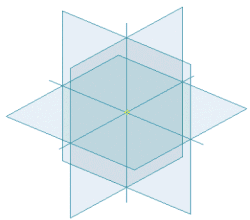
Figure 3:
Reference geometry.
|
|
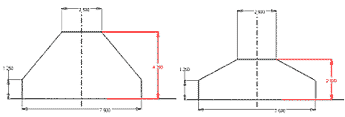
Figure 4: Dimension value drives sketch geometry.
|
A new part file
contains default reference geometry (planes, axes, and center point). It
is good practice to build models around this geometry, aligning critical
geometry with the reference axes or center point. You must project reference geometry into
your sketch before it can participate in the sketch. Adopting a more
"center-out" design philosophy will lead to the creation of
robust 3D models.
AutoCAD 2D
vs. Autodesk Inventor 2D
A drawing view created in 2D AutoCAD consists of precisely created
geometry representing edges, points, and so on. To reduce the chance of
being frustrated during sketch creation, you have to let go of the good
2D habit that everything must be drawn exactly. Unlike AutoCAD
associative dimensions that can track changes to the underlying geometry,
dimensions added to Autodesk Inventor sketches drive the size of the
sketch geometry. Editing a sketch dimension value changes the size or
position of the referenced geometry (Figure 4).
|
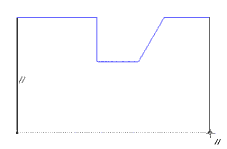
Figure 5: Parallel constraint and horizontal alignment.
|
Because changing a
dimension value modifies the geometry, you can get some interesting
results if the value change is large. Sketching roughly to scale reduces
the chance of odd editing behavior. Use the following as a guide to
editing sketch dimensions.
Modify dimensions
in the following order:
|