ALTE DOCUMENTE
|
||||||||||

3Com DMI Agent
User Guide
3Com Corporation n 5400
©3Com Corporation, 1999. All rights reserved. No part of this document may be reproduced in any form or by any means or used to make any derivative work (such as translation, transformation, or adaptation) without permission from 3Com Corporation.
3Com Corporation reserves the right to revise this documentation and to make changes in content from time to time without obligation on the part of 3Com Corporation to provide notification of such revision or change.
3Com Corporation provides this documentation without warranty of any kind, either implied or expressed, including, but not limited to, the implied warranties of merchantability and fitness for a particular purpose. 3Com may make improvements or changes in the product(s) and/or the program(s) described in this document at any time.
UNITED STATES GOVERNMENT LEGENDS:
If you are a
For units of the Department of Defense:
Restricted Rights Legend: Use, reproduction or disclosure
by the government is subject to restrictions set forth in subparagraph (c) (1)
(ii) for Restricted Rights in Technical Data and Computer Software clause at 48
C.F.R. 52.227-7013. 3Com Corporation, 5400
For civilian agencies:
Restricted Rights Legend: Use, reproduction or disclosure
is subject to restrictions set forth in subparagraph (a) through (d) of the
Commercial Computer Software - Restricted Rights clause at 48 C.F.R. 52.227-19
and the limitations set forth in 3Com Corporation's standard commercial
agreement for the software. Unpublished rights reserved under the copyright
laws of the
The software described in this documentation is furnished under a license agreement included with the product viewable during software setup. If you are unable to locate a copy, please contact 3Com and a copy will be provided to you.
Unless otherwise indicated, 3Com registered trademarks are
registered in the
3Com®, the 3Com logo, Windows Managed PC Boot Agent®, MBA®, DynamicAccess®, and OfficeConnect® are registered trademarks of 3Com Corporation or its subsidiaries.
Microsoft, Windows, NT, and SMS are registered trademarks of Microsoft Corporation. Novell and NetWare are registered trademarks of Novell, Inc. Tivoli Manager is a registered trademark of Tivoli Systems,Inc. Intel and LANDesk are registered trademarks of Intel Corporation. OpenView and TopTools a registered trademark of Hewlett-Packard Company. Dell and OpenManage are registered trademarks of Dell Corporation. Compaq and Insight Manager are registered trademarks of Compaq. Smart Technology Enablers and The Enablers are registered trademarks of Smart Technology, Inc.
Other brands and trademarks may be registered trademarks of their respective holders.
March, 1999
CONTENTS. iii
About This Guide.......... ..... ...... .......... ..... ...... ........
Chapter 1: Product Overview
What is DMI? 3
List of Features 3
Agent Requirements 5
Network Requirements 5
PC Requirements 5
Distributing the 3Com DMI Agent 6
Obtaining the Latest Software 6
Chapter 2: Installing the 3Com DMI Agent
How to Install the 3Com DMI Agent 9
To Verify the Installation 11
Troubleshooting 12
For an Unattended Installation 12
Distributing the 3Com DMI Agent with Login Scripts 13
Using the 3Com DMI Agent on Windows NT 3.51 13
Installing the 3Com DMI Agent on NT 3.51 13
Removing the 3Com DMI Agent on NT 3.51 15
Removing the 3Com DMI Agent 16
Chapter 3: Using the 3Com DMI Agent
Using SNMP to Access the 3Com DMI Agent 19
Basic Features 20
Extended Features 20
Tech Tips 20
Appendix A - Network Adapter 802 Port.......... ..... ...... .....
Appendix B - Boot ROM Configuration.......... ..... ...... ........
Appendix C - MBA Configuration.......... ..... ...... ...............
Appendix D - General Parameters.......... ..... ...... .............
Appendix E - Keep-Alive.......... ..... ...... ...........................
Appendix F - Remote Wake Up.......... ..... ...... ..................
Appendix G - Remote System Alert Configuration
Appendix H - Obtaining Technical Support.......... ..... ...... .
3Com Corporation LIMITED WARRANTY.......... ..... ...... ......
These instructions are intended for network administrators who have experience installing software and using management tools for an Ethernet network.
This user guide has been created in Microsoft Word 97 format, especially designed for both online viewing and print. If you do not have Microsoft Word 97, you can download and install the free Microsoft Word 97 Viewer from:
https://officeupdate.microsoft.com/downloadCatalog/dldWord.htm?ShowType=Viewer
To extract the 3Com DMI Agent User Guide:
Double-click the 3COMDMI.EXE file.
You can find this file in the 3Com DMI directory on the disk or CD, or in the
directory into which you downloaded this file from the 3Com web site.
Select the first task, Copy the User Guide to your hard drive, and specify a directory into which the file will be expanded. By default, this directory is c:\3Com DMI.
To best view this document:
Open the document in Word 97.
From the View menu, select Online Layout.
From the Tools menu, select Options.
From View tab, select the following options:
Show Drawings
Window/Vertical scroll bar
Window/Enlarge fonts less than: 7.5
Click OK.
You can now view the document online. To navigate, click any of the topic entries in the Document Map to the left of the main frame.
If you do not see the Document Map, click the ![]() in the Word toolbar.
in the Word toolbar.
Thank you for choosing the 3Com Desktop Management Interface (DMI) Agent, one of several advanced software management solutions from the world's leading supplier of desktop and workgroup networking solutions.
DMI is a management instrumentation standard drafted by the Desktop Management Task Force (DMTF), an industry-led organization that implements technology specifications to ensure open standards. DMI 2.0s (Desktop Management Interface - (s) Supports Secure Mode) is an instrumentation technology that has been widely accepted by all major hardware and software manufacturers to monitor and configure hardware and software devices. By installing the 3Com DMI Agent, any DMI 2.0-compliant management browser can access information such as the 3Com NIC driver version, size, statistics on number of packets sent, CRC receive errors, and much more. DMI also enables you to remotely configure software and hardware features such as Remote Wake Up, OS-absent alerts, and the 3Com Managed PC Boot Agent with a DMI-compatible browser.
As part of 3Com's DynamicAccess technology, the 3Com DMI Agent is one of many technologies that provide you with superior Managed PC solutions. Other applicable technologies include Advanced Power Management Interface (ACPI), Remote Wake Up (RWU) and Managed PC Boot Agent (MBA). Combining these Managed PC features with 3Com advanced management software such as the 3Com Edge Monitor Suite, gives you the most advanced network management solutions available on the market today.
This 3Com DMI Agent which replaces the previous version, is fully supported by 3Com Technical Support and meets the requirements of DMTF DMI 2.0 and 2.0S specifications, as well as PC98, PC99, and WfM (Wired for Management) v 1.1a and 2.0 specifications. You can download the latest 3Com DMI Agents from the 3Com Managed PC web site: https://www.3com.com/managedpc
The features available in the 3Com DMI Agent fall into 2 categories - basic and extended. The basic features are implemented on all full-featured 3Com NICs and meet the standards for PC99 and WfM 2.0 compliance, as well as those supplied by PC OEM vendors. The 3Com DMI Agent is not currently supported on the OfficeConnect family of NICs.
The 3Com DMI Agent supports secure connectivity between the DMI browser and local Service Provider in conjunction with the DMI Agent. This security is provided by Remote Procedure Call (RPC) and must reside within the software browser. Refer to your DMI management application documentation for instructions on how to install RPC.
When you dynamically insert or remove the NIC without turning off the PC ("hot swapping") from a notebook PC running Windows 95 or Windows 98, the 3Com DMI Agent automatically adds or removes the component from the Service Provider.
Most 3Com NICs are instrumented for the 3Com DMI Agent. Multi-NIC support enables DMI browsers to display the attributes of more than one 3Com NIC in a PC or PC server.
Apart from supporting the standard DMTF
MIF group, the 3Com DMI Agent can manage extended NIC features such as configuration
of a 3Com BootROM, the configuration of Remote Wake-Up, alerts, and keep-alive
features of Managed NICs. The 3Com DMI Agent generates a Management Information
Format (MIF) file that contains information about the NIC. DMI uses the information from the MIF to
manage the PC. Refer to the table
below for the location of additional information:
|
Extended Features |
Appendix |
|
Keep-Alive |
Appendix E |
|
Remote Wake Up |
Appendix F |
|
Remote System |
Appendix G |
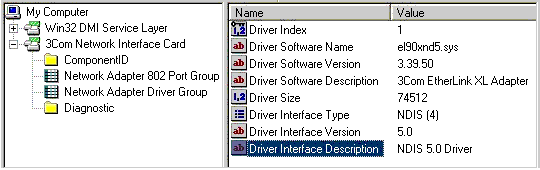
The 3Com DMI Agent dynamically builds a MIF file before registering with the DMI Service Provider. The NIC-specific MIF ensures that irrelevant groups of information are not forwarded to the network management application.
The MIF content is based on the capabilities of the NIC driver found on the system. For example, if a NIC with a remote wake up feature is found, all groups related to remote wake up will be included in the MIF for that particular NIC.
The figure below displays some supported objects.
Some DMI management applications support manual manipulation of the MIF database. This capability allows you to add or delete components, groups, or attributes from the MIF database. Be careful if you directly edit the MIF database, because you can corrupt it by adding irrelevant information or deleting important components. The 3Com DMI Agent handles this potential problem by verifying the information on the MIF database upon start up. If a mismatch is found, the 3Com components in the MIF database are rebuilt to reflect what is on the system.
Caution: When Editing a MIF Database:
If you plan to make these types of changes you may want to back up your MIF
database before you start. For
instructions on how to do this, please refer to your DMI management application
user guide.
The 3Com DMI Agent has been tested and evaluated with the test plan issued by the DMTF. You can find information on the DMTF and DMI 2.0s specifications on the DMTF web site: https://www.dmtf.org
The 3Com DMI Agent satisfies all the DMI-related requirements specified in the WfM 2.0 specification. For information on the WfM 2.0 specification, see the following Intel developer web site: https://developer.intel.com/ial/wfm/wfmspecs.htm. In addition, this support is required by the management capabilities of the PC99 specification developed by Intel and Microsoft and adhered to by PC manufacturers and OEMs.
In this section you can find the information necessary to plan your deployment of the 3Com DMI Agent.
Your network management station requires a DMI-compatible browser or a network management application that supports DMI 2.0 or 2.0s browsers, such as:
![]() Hewlett Packard TopTools
Hewlett Packard TopTools
![]()
![]() Dell OpenManageT Administrator version 4.3
(clean installations only, for details see Tech Tips.)
or IT Assistant
Dell OpenManageT Administrator version 4.3
(clean installations only, for details see Tech Tips.)
or IT Assistant
![]() Compaq Insight Manager Management Station
Compaq Insight Manager Management Station
![]() Intel LANDesk Client Manager
Intel LANDesk Client Manager
If you have deployed any previous 3Com
DMI Agent, this new release automatically removes any legacy 3Com agents during
installation.
Your PC requires the following items to use the 3Com DMI Agent:
![]() A full-featured 3Com NIC, properly installed
A full-featured 3Com NIC, properly installed
![]() DMI Service Provider 2.0 or greater (such as
Smart Technologies Service Provider 2.0)
DMI Service Provider 2.0 or greater (such as
Smart Technologies Service Provider 2.0)
![]() NDIS 3, 4, or 5 driver
NDIS 3, 4, or 5 driver
![]() Windows 95, Windows 98, or Windows NT, using
the appropriate Service Pack listed below:
Windows 95, Windows 98, or Windows NT, using
the appropriate Service Pack listed below:
Windows 95 Retail Service Pack 1 or OEM Service Release (OSR) 2
Windows 98 retail release
![]() Windows NT 4.0 Service Pack 3 or above
Windows NT 4.0 Service Pack 3 or above
![]() Windows NT 3.51 Service Pack 5
Windows NT 3.51 Service Pack 5
![]() Windows 2000
Windows 2000
For installation, a minimum of 2.5MB free hard drive space is required.
The 3Com DMI Agent installation process can be done at each end node or it can be done from a central location, eliminating the need to touch end node PCs.
The distribution methods are:
![]() Distribute
the 3Com DMI Agent installation program from a login script or a software
distribution system that you have.
Distribute
the 3Com DMI Agent installation program from a login script or a software
distribution system that you have.
![]() Have each
end user download the 3Com DMI Agent from a network or intranet server. After installing the software and rebooting,
the 3Com DMI Agent should be running properly.
Have each
end user download the 3Com DMI Agent from a network or intranet server. After installing the software and rebooting,
the 3Com DMI Agent should be running properly.
This initial installation and configuration process is the same one you would use for a local node installation. For installation details, refer to Chapter 2.
The 3Com DMI Agent software installation program detects whether you have previously installed any 3Com DMI Agent software on a PC. If any previous software version is detected, the installation program removes it, and then installs this current version. Because the installation program checks for the presence of the current 3Com DMI Agent software, any subsequent time users log on to the network, the installation program does not reinstall the 3Com DMI Agent software.
You should not leave the installation and configuration files in your login script files any longer than you need to be satisfied that each end node has completed the installation.
You can obtain the 3Com DMI Agent for download from the 3Com Managed PC Web site https://www.3com.com/managedpc . Be sure to check this site for the latest information and FAQs regarding the 3Com DMI Agent.
This chapter describes how you can install and remove the 3Com DMI Agent on PCs running Windows 95, 98, Windows NT or Windows 2000. The 3Com DMI Agent comes with an installation program to automate the process. You can perform unattended and attended installations. These tasks do not interfere or conflict with any other agents or intermediate drivers that may be already installed on the PC. For unattended installation, you can use a batch file with a command line switch that supplies responses normally given interactively.
This section shows you how to install the 3Com DMI Agent on your PC running Windows 9X or NT 4.X. To install the 3Com DMI Agent on a PC running Windows NT 3.51, see the section Using_the_3Com_DMI_Agent_on_NT_3.51.
After you have obtained the 3Com DMI Agent files from the web or other 3Com media, follow the procedure below. If you are installing the 3Com DMI Agent from the EtherCD, follow the navigation provided on the CD.
Before performing any of the installation or removal steps on a Windows NT system, you must log on to the PC with an account that has system administration privileges.
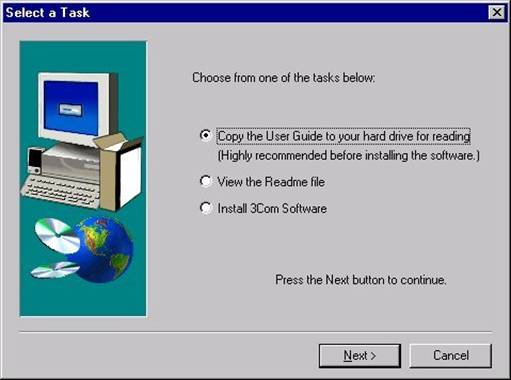
To install the 3Com DMI Agent:
Double-click the 3COMDMI.EXE file.
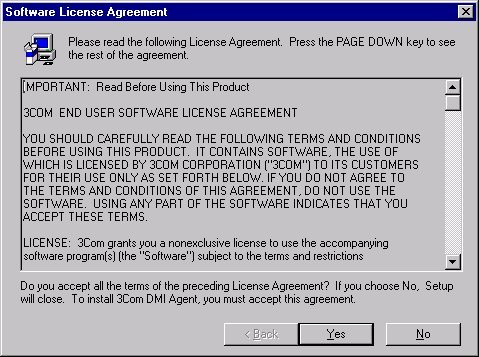
Select Install 3Com Software and click Next.
Read and accept the License Agreement.
You will see the progress indicator on the screen.

Restart the system when instructed to do so.
You can verify that the 3Com DMI Agent is correctly installed using several methods.
![]() Use a DMI
management application to verify that the 3Com NIC component is present. The name of the component is 3Com Network
Interface Card.
Use a DMI
management application to verify that the 3Com NIC component is present. The name of the component is 3Com Network
Interface Card.
![]() For both
Windows 9x and NT, the agent is installed in the following folder:
For both
Windows 9x and NT, the agent is installed in the following folder:
<windows system directory>\3com_dmi directory.
where <windows system directory> is
the installed directory for Windows.
For example, on Windows 95 the system directory may be c:\windows or on Windows
NT, the system directory may be c:\winnt4\system32
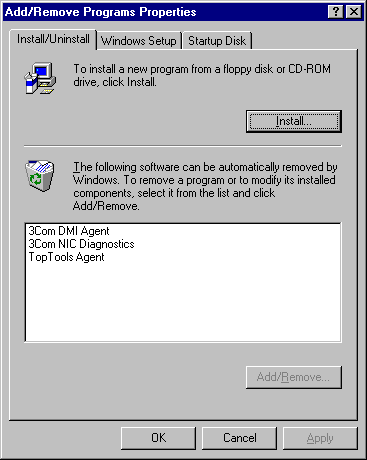
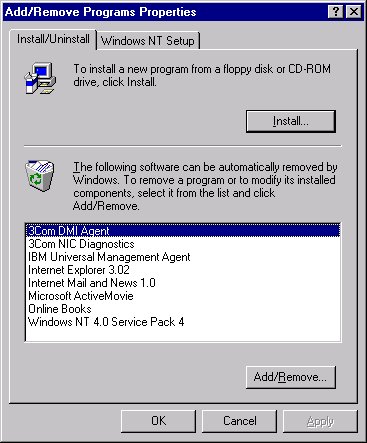
![]() In the Control Panel, you can verify that the 3Com DMI entry exists in
the Add/Remove Program applet, as shown in the next figure.
In the Control Panel, you can verify that the 3Com DMI entry exists in
the Add/Remove Program applet, as shown in the next figure.
Note: If the 3Com DMI Agent is indeed working and you have more than one NIC in your PC, you will see in the Network Control Panel applet that the 3Com DMI Agent binds to all NICs in the PC. However the software only reports information on 3Com NICs.
If you do not see any information on the 3Com NIC after installing the 3Com DMI Agent:
![]() Verify that your DMI management application is
DMI 2.0 or DMI 2.0s compliant. You can
check the application documentation or the vendor's web site for this
information. The 3Com DMI Agent does not
work with DMI 1.x-compliant management applications.
Verify that your DMI management application is
DMI 2.0 or DMI 2.0s compliant. You can
check the application documentation or the vendor's web site for this
information. The 3Com DMI Agent does not
work with DMI 1.x-compliant management applications.
![]() Verify that
your PC configuration meets all the requirements listed in this User Guide.
Verify that
your PC configuration meets all the requirements listed in this User Guide.
![]() If you receive an error on a PC running Windows
NT, check the event log for error messages.
If you receive an error on a PC running Windows
NT, check the event log for error messages.
The unattended method of installing the 3Com DMI Agent works only on PCs running Windows9X and Windows NT 4.0.
For unattended mode, at a DOS
prompt, type:
3ComDMI -s -a -s -f1setup.iss
This command uses the same program for unattended install that is used for
regular installation.
Inform your user community about the changes you are making that they will see when they log in to your network. The network login process pauses until the DMI Agent installation is complete. Your users will see the network bindings window appear. No user intervention is required.
You should not leave the installation and configuration files in your login script files any longer than you need to be satisfied that each end node has completed the installation.
![]() For
NetWare, use the NetAdmin tool to modify a login script to include the 3Com DMI
Agent file using the unattended installation mode.
For
NetWare, use the NetAdmin tool to modify a login script to include the 3Com DMI
Agent file using the unattended installation mode.
![]() For
Windows NT networks, add a batch file. Use the User Manager for Domain to add this batch file to the login
script.
For
Windows NT networks, add a batch file. Use the User Manager for Domain to add this batch file to the login
script.
The installation program does not completely install the 3Com DMI Agent on PCs running Windows NT 3.51. Once properly installed, the 3Com DMI Agent accurately reports DMI data. Follow the steps below to ensure a proper installation:
Double-click the 3COMDMI.EXE file to complete the first portion of the installation.
Go to
the Network Settings in the Control Panel.
Select Add Software.
Click
Other.
Click Continue.
Windows prompts for a disk or the path to an .INF
file.
Type:
c:\<windows system directory>\3com_dmi
where <windows system directory> is the installed directory for Windows.
For example, if the system directory is c:\winnt351\system32, enter:
c:\winnt351\system32\3com_dmi
Windows displays 3Com BCAITDI DMI TDI.
Click OK.
Click OK in the Network Settings applet in Control Panel.
Reboot your PC.
To remove the 3Com DMI Agent:
Go to the Network Settings applet in the Control Panel.
In the Installed Network Software list, select 3Com BCAITDI DMI TDI.
Click Remove.
Click OK to exit the Network Settings applet in the Control Panel.
Run <windows system directory>\3com_dmi\undmint.exe.
Reboot the PC.
Note: Upon removing the 3Com BCAITDI DMI
TDI from the Network Control Panel applet, you may see the error message
Unable to open the file <windows system directory>\3com_dmi\unbcatdi.exe
NT 3.51 is looking for a file that is already deleted by UNDMINT.EXE.
To fix the problem, run 3COMDMI.EXE and then follow the steps described in Removing the 3Com DMI Agent on NT
3.51
This section shows you how to remove the 3Com DMI Agent from your PCs running Windows 9X or Windows NT 4.0.
Open the Control Panel.
Click Add/Remove Programs.
Select 3Com DMI Agent and click Remove.
Reboot the system immediately.
You can use any DMI 2.0-compliant management application to view the attributes displayed by the 3Com DMI Agent. You can also use an SNMP console to query the same information.
The SNMP console can query or set all the information available through the 3Com DMI Agent.
To use the SNMP console:
Make sure you have a functional DMI platform with the 3Com DMI Agent installed. Minimally, a DMI 2.0 Service Provider and 3Com DMI Agent must be installed.
Install a DMI-SNMP mapper (provided with your DMI management application, or a mapper can be ordered through Smart Technologies Enablers, Inc.).
Install the Microsoft SNMP agent through the Network Control Panel applet. For Windows NT, the SNMP agent needs to be configured to match your SNMP settings (community and destination trap address).
Have a functional SNMP console such as HP OpenView Network Node Manager.
Compile the nic-3com.mib file into the SNMP Console environment. The MIB file, nic-3com.mib can be found in the <windows system directory>\3Com DMI directory. The SNMP Console should have an SNMP browser module which allows you to perform gets and sets on the 3Com DMI Agent.
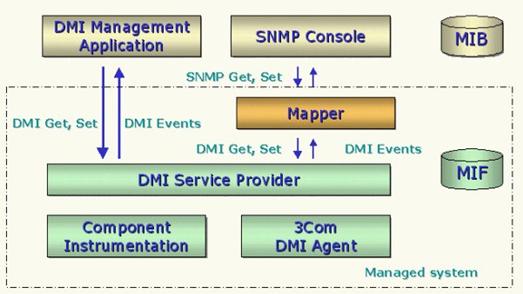
DMI-SNMP Mapper Architecture
There are two ranges of features that
may be available on your full-featured 3Com NIC: basic or extended. The basic features are available for all
full-featured 3Com NICs, while extended features are available for newer
management NICs. You can gather standard
DMI 2.0 statistics with the 3Com DMI Agent, such as NIC identification, node
address, MAC address, or driver version.
The 3Com DMI Agent supports additional NIC features such as:
![]() MBA
configuration
MBA
configuration
![]() Remote
Wake-Up configuration
Remote
Wake-Up configuration
![]() Keep-Alive
configuration
Keep-Alive
configuration
![]() Remote
System Alert, also called Platform Event Trap (PETs) configuration
Remote
System Alert, also called Platform Event Trap (PETs) configuration
Please refer to the NIC user
guide for details about the features that are supported. The complete set of supported attributes is
described in the appendices of this User Guide, as indicated in the table
below.
|
NIC Features |
Appendix |
|
MBA Configuration |
Appendix C |
|
Keep-Alive |
Appendix E |
|
Remote Wake Up |
Appendix F |
|
Remote System Alert Configuration |
Appendix G |
These tech tips are provided to assist you with using the 3Com DMI Agent on various platforms or specific configurations.
![]() Tip 1 -
Installing the 3Com DMI Agent on a Dell OpenManage Client PC
Tip 1 -
Installing the 3Com DMI Agent on a Dell OpenManage Client PC
If plan to install the 3Com DMI Agent on a PC that has been upgraded from Dell OpenManage Client Version 4.2 or earlier to version 4.3, the 3Com DMI Agent does not function properly because of an incomplete upgrade process. To use the 3Com DMI Agent on an upgraded PC, follow the steps below:
Stop all DMI programs including Dell OpenManage and the 3Com DMI Agent.
On an NT PC, the 3Com DMI Agent is a service and can be stopped through the Service Control Manager in the Control Panel.
On a Win9X
PC, stop the 3Com DMI Agent using the steps below:
1. Press Ctrl+Alt+Del to open the Close
Program window.
2. Select the 3CDMINIC.EXE.
3. Click End Task.
Go to the windows system directory.
Rename
the following files to a different name:
WCDMI.DLL
WDIMUTIL.DLL
WCDMIDCE.DLL
provided no other application is using these DLLs.
Reboot the PC.
Restart Dell OpenManage or complete the installation of the Dell OpenManage Administrator.
The 3Com NIC now appears as a manageable DMI component.
![]() Tip 2 -
Some PCs running Windows NT 4 and DMI Reporting
Tip 2 -
Some PCs running Windows NT 4 and DMI Reporting
On some PCs running Windows NT 4.0, you may notice that DMI attribute data does not appear immediately upon each reboot only. The data does appear in the DMI browser after a slight delay of up to four minutes. Until the next reboot, the data is continuously reported.
Group: Network Adapter 802 Port
Description: Contains objects related to each of the network ports on the network adapter. This is a standard DMTF group that is supported by all full-featured 3Com NICs, depending on the driver.
|
DMI Attribute |
Access |
Data Type |
Description |
|
Port Index |
Read |
Integer |
Always 1 |
|
Permanent Network Address |
Read |
String |
Node address stored permanently in the adapter |
|
Current Network Address |
Read |
String |
Node address that can be modified by software, sometimes referred to as the Locally Administered Address (LAA) |
|
Connector Type |
Read |
Integer |
Type of connector currently used to physically attach this port to the LAN. Possible values are: 0x01 = Unknown Always return 0x05 |
|
Data Rate |
Read |
Integer |
Data rate in Mpbs |
|
Total Packets Transmitted |
Read |
Counter |
Total number of packets transmitted |
|
Total Bytes |
Read |
Counter |
Total number of bytes transmitted |
|
Total Packets Received |
Read |
Counter |
Total number of packets received |
|
Total Bytes Received |
Read |
Counter |
Total number of bytes received |
|
Total Transmit Errors |
Read |
Counter |
Total number of transmit errors of any type |
|
Total Receive Errors |
Read |
Counter |
Total number of receive errors of any type. |
|
Total Host Errors |
Read |
Counter |
Total number of errors due to problems with the network adapter host interface (that is, overrun / underrun errors |
|
Total Wire Errors |
Read |
Counter |
Total number of either receive or All transmit errors due to problems with the network (that is, receive CRC Errors) |
Group: Managed PC Boot Agent (MBA) Configuration
Description: This group describes the characteristics of 3Com's ManagedBoot Agent (MBA). This is a standard DMTF group that is supported by some 3Com NICs with a legacy BootROM or MBA installed.
|
DMI Attribute |
Access |
Data Type |
Description |
|
Boot ROM Description |
Read |
String |
Description of the software contained in the BootROM (depending on NIC support) |
|
Boot ROM Version |
Read |
String |
Version number of the master BootROM software |
|
Remote Boot Protocol Type |
Read |
Integer |
Type of remote boot protocol 1 = Other 11 = DHCP |
|
Remote Boot Protocol Version |
Read |
String |
Version of the individual remote boot protocols within MBA |
Group: MBA Configuration
Description: This group describes the configuration of 3Com's ManagedBoot Agent (MBA) BootROM. This information is in addition to the standard DMTF Boot ROM Configuration group. This is a 3Com proprietary group that is supported by some 3Com NICs with MBA installed.
|
DMI Attribute |
Access |
Data Type |
Description |
|
Default Boot |
Read Write |
Integer Enum |
Select the default boot media to be either the local hard disk or the network. This field is unsupported on a BIOS Boot Specification (BBS) compliant machine 1 = Logical Hard Disk 2 = Network 3 = Unsupported |
|
Built-in Configuration Facility |
Read Write |
Integer Enum |
Enables or disables the built-in Configuration Facility which can be accessed when a machine boots up 1 = Enabled 2 = Disabled 3 = Unsupported |
|
Local Boot |
Read Write |
Integer Enum |
Enables or disables booting from the local boot media 1 = Enabled 2 = Disabled 3 = Unsupported |
|
Configuration Facility Message |
Read Write |
Integer Enum |
When a machine boots up, the Boot ROM may display a Configuration Facility prompt message. This field enables or disables the prompt message and has no impact on whether Configuration Facility is enabled or disabled 1 = Enabled 2 = Disabled 3 = Unsupported |
|
Message Time-Out |
Read Write |
Integer |
When a machine boots up, the Boot ROM displays different messages. This fields determines how long the message will stay on the screen in seconds |
|
Fatal Error Handling |
Read Write |
Integer Enum |
Specifies if fatal errors will be handled with or without user intervention. User Induced Reboot means that user will be required to press a key before machine will reboot 1 = User Induced Reboot 2 = Automatic Reboot 3 = Unsupported |
|
Multi-Server Director (MSD) |
Read Write |
Integer Enum |
Enables or disables Multi-Server Director (MSD) support in the Boot ROM. This field is meaningful only if Native NetWare is the current Boot ROM Boot Protocol 1 = Enabled 2 = Disabled 3 = Unsupported |
|
BOOTCONF.SYS scan |
Read Write |
Integer Enum |
Enables or disables BOOTCONF.SYS scanning while booting from a NetWare server. This field is meaningful only if Native NetWare is the current Boot ROM Boot Protocol and Multi-Server Director (MSD) is not used. 1 = Enabled 2 = Disabled 3 = Unsupported |
|
NetWare Boot Image Filename |
Read Write |
Integer Enum |
Determines if the NetWare Boot Image Filename should be obtained from a NetWare server or from the Boot ROM internal storage area. This field is meaningful only if Native NetWare is the current Boot ROM Boot Protocol 1 = Boot Image Filename from NetWare server 2 = Boot Image Filename from Boot ROM 3 = Unsupported |
|
TFTP Secure Mode |
Read Write |
Integer Enum |
Enables or disables TFTP secure mode. This field is meaningful only if TCP/IP (BOOTP, DHCP or PXE) is the current Boot ROM Boot Protocol 1 = Enabled 2 = Disabled 3 = Unsupported |
Group: General
Description: This is a 3Com proprietary group that is supported by 3Com NICs with advanced management capabilities.
|
DMI Attribute |
Access |
Data Type |
Description |
|
Standby Current Setting |
Read |
Enum |
Set the standby current to high or low (enable or disable Alerting Remote Wake Up and Keep-Alives). Possible values are: 1 = Enabled |
|
System GUID |
Read |
Octet String |
A machine specific Globally Unique Identifier (GUID) obtained from SM BIOS 2.2 compliant BIOS |
|
Transmit Broadcast Limiting |
Read |
Integer |
Configure Transmit Broadcast Limit. Value must be between 0-100 with 0 means disable. |
|
DHCP Server Restriction |
Read |
Integer |
Enables or Disables DHCP Server Restriction. Possible values are: 1 = Enabled |
Group: Keep-Alive
Description: This group configures different keep-alive methods. This is a 3Com-proprietary group that is supported by 3Com NICs with advanced management capabilities.
|
DMI Attribute |
Access |
Data Type |
Description |
|
Refresh MAC |
Read |
Integer |
Enables or Disables Keep-Alive by refreshing MAC Address. Possible values are: 1 = Enabled |
|
Refresh MAC Interval |
Read |
Integer |
Specify in minutes how often MAC Address is refreshed for Keep-Alive. |
|
ARP Response |
Read |
Integer |
Enables or Disables Keep-Alive by responding to ARP requests. Possible values are: 1 = Enabled |
|
ARP Response Interval |
Read |
Integer |
Specify in minutes how often ARP is responded for Keep-Alive |
|
DHCP Lease Renewal |
Read |
Integer |
Enables or Disables Keep-Alive using renewing DHCP Lease. Possible values are: 1 = Enabled |
|
DHCP Lease Renewal Interval |
Read |
Integer |
Specify in minutes how often DHCP lease is renewed. |
|
NetWare Watchdog |
Read |
Integer |
Enables or Disables Keep-Alive by responding to NetWare watchdog. Possible values are: 1 = Enabled |
|
Master Browser |
Read |
Integer |
Enables or Disables Keep-Alive by supporting Master Browser refresh. Possible values are: 1 = Enabled |
|
Master Browser Interval |
Read |
Integer |
Specify in minutes how often Master Browser is refreshed for Keep-Alive. |
|
Ping Response |
Read |
Integer |
Enables or Disables Keep-Alives by responding to Ping requests 1 = Enabled |
Group: Remote Wake Up
Description: This group configures different Wake-Up methods. This is a 3Com-proprietary group that is supported by 3Com NICs with advanced management capabilities.
|
DMI Attribute |
Access |
Data Type |
Description |
|
Magic Packet Wake Up |
Read |
Integer |
Enables or
Disables Wake Up on Magic Packet. Possible values are: |
|
PING Wake Up |
Read |
Integer |
Enables or
Disables Wake Up on PING. Possible
values are: |
|
ARP Wake Up |
Read |
Integer |
Enables or
Disables Wake Up on ARP. Possible
values are: |
|
Link State Wake Up |
Read |
Integer |
Enables or
Disables Wake Up on Link State Change. Possible values are: |
|
DHCP Timeout Wake Up |
Read |
Integer |
Enables or
Disables Wake Up on DHCP lease expires. Possible values are: |
|
Hardware Error Wake Up |
Read |
Integer |
Enables or
Disables Wake Up on Hardware error. Possible values are: |
|
Timer Wake Up |
Read |
Integer |
Enables or
Disables Wake Up on Timer. Possible values are: |
|
Timer Wake Up Interval |
Read |
Integer |
Specifies
in seconds the Wake Up on timer interval. Enter a positive value. Suggested
values are: |
Group: Remote System Alert Configuration
Description: This group configures 3Com NIC alerts. This is a 3Com-proprietary
group that is supported by 3Com NICs with advanced management capabilities,
depending on the features of the NIC driver.
|
DMI Attribute |
Access |
Data Type |
Description |
|
Alert Configuration Setting |
Read |
Integer |
Enable or disable all the Remote System Alert Configuration parameters. Possible values are: 1 = Enabled |
|
Alert Interval Setting |
Read |
Integer |
Specify in seconds how often alerts will be sent. |
|
Alert Destination IP Address |
Read |
Octet String |
Destination IP address for Remote System Alert |
|
Alert Gateway IP Address |
Read |
Octet |
Gateway IP address for Remote System Alert |
|
BIOS did not complete alert |
Read |
Integer |
Alert if BIOS did not complete. Possible values are: 1 = Logical Hard Disk |
|
BIOS did not complete alert interval |
Read |
Integer |
Specifies in seconds how often BIOS did not complete alert will be sent. |
|
OS did not come up alert |
Read |
Integer |
Alert if the OS did not complete startup. Possible values are: 1 = Enabled |
|
OS did not come up alert interval |
Read |
Integer |
Specifies in seconds how often OS did not come up alert will be sent. |
|
OS hung alert |
Read |
Integer |
Alert if the OS hung. Possible values are: 1 = Enabled |
|
Fan problem alert |
Read |
Integer |
Alert if the cooling fan fails. Possible values are: 1 = Enabled |
|
Temperature alert |
Read |
Integer |
Alert if there is a temperature problem. Possible values are: 1 = User Induced
Reboot |
|
Case intrusion alert |
Read |
Integer |
Alert if there is a case intrusion. Possible values are: 1 = Enabled |
|
Incorrect BIOS password alert |
Read |
Integer |
Alert if the BIOS password is incorrect. Possible values are: 1 = Enabled |
|
Heartbeat Alert |
Read |
Integer |
A heartbeat alert that will be periodically sent out. Possible values are: 1 = Enabled |
|
Heartbeat Alert Interval |
Read |
Integer |
Specify in minutes how often heartbeat signal is sent to indicate a machine is not stolen. |
|
Power Problem Alert |
Read |
Integer |
Alert if there is a problem with the power. Possible values are: 1 = Enabled |
|
Docking Station Alert |
Read |
Integer |
Alert when a notebook undocks from the docking station. Possible values are: 1 = Enabled |
|
Verify Alert Configuration |
Read |
Integer Enum |
This attribute can be used to verify if the Alert Configuration is correct. For example, the destination IP address is ARP to ensure the IP address is valid. 1 = Verify in progress 2 = Alert Configuration incorrect/Unable to verify Alert Configuration 3 = Alert Configuration correct 4 = Unable to verify |
Following is a list of worldwide technical
telephone support numbers:
|
Country |
Telephone Number |
|
Asia Pacific Rim |
|
|
Australia |
1 800 678 515 |
|
Hong Kong |
800 933 486 |
|
India |
61 2 9937 5085 |
|
Indonesia |
001 800 61 009 |
|
Japan |
0031 61 6439 |
|
Malaysia |
1800 801 777 |
|
New Zealand |
0800 446 398 |
|
Pakistan |
61 2 9937 5085 |
|
Philippines |
1235 61 266 2602 |
|
P.R. of China |
10800 61 00317 or 021 6350 1590 |
|
Singapore |
800 6161 463 |
|
S. Korea from anywhere in S. Korea: from Seoul: |
82 2 3455 6455 00798 611 2230 |
|
Taiwan, R.O.C. |
0080 611 261 |
|
Thailand |
001 800 611 2000 |
|
Europe From anywhere in Europe, call: |
+31 (0)30 6029900 phone +31 (0)30 6029999 fax |
|
From the following European countries, you may use the toll-free numbers: |
|
|
Austria |
06 607468 |
|
Belgium |
0800 71429 |
|
Denmark |
800 17309 |
|
Finland |
0800 113153 |
|
France |
0800 917959 |
|
Germany |
0130 821502 |
|
Country |
Telephone Number |
|
Hungary |
00800 12813 |
|
Ireland |
1 800 553117 |
|
Israel |
177 3103794 |
|
Italy |
1678 79489 |
|
Netherlands |
0800 0227788 |
|
Norway |
800 11376 |
|
Poland |
0800 3111206 |
|
Portugal |
05 05313416 |
|
South Africa |
0800 995014 |
|
Spain |
900 983125 |
|
Sweden |
020 795482 |
|
Switzerland |
0800 55 3072 |
|
U.K. |
0800 966197 |
|
|
|
|
Argentina |
AT&T +800 666 5065 |
|
Brazil Chile |
0800 13 3266 1230 020 0645 |
|
Colombia |
98012 2127 |
|
Mexico |
01 800 Care (01 800 2273) |
|
Peru |
AT&T +800 666 5065 |
|
Puerto Rico |
800 665 5065 |
|
Venezuela |
AT&T +800 666 5065 |
|
North America |
|
|
North America |
1 800 NET 3Com |
3Com DMI Agent
software 3Com warrants that each software program licensed from it will perform in substantial conformance to its program specifications, for a period of ninety (90) days from the date of purchase from 3Com or its authorized reseller. 3Com warrants the media containing software against failure during the warranty period. No updates are provided. 3Com's sole obligation under this express warranty shall be, at 3Com's option and expense, to refund the purchase price paid by Customer for any defective software product, or to replace any defective media with software which substantially conforms to applicable 3Com published specifications. Customer assumes responsibility for the selection of the appropriate applications program and associated reference materials. 3Com makes no warranty or representation that its software products will meet Customer's requirements or work in combination with any hardware or applications software products provided by third parties, that the operation of the software products will be uninterrupted or error free, or that all defects in the software products will be corrected. For any third party products listed in the 3Com software product documentation or specifications as being compatible, 3Com will make reasonable efforts to provide compatibility, except where the non-compatibility is caused by a bug or defect in the third party's product or from use of the software product not in accordance with 3Com's published specifications or user manual.
YEAR 2000 WARRANTY: In addition to the Software Warranty identified above, 3Com warrants that each product sold or licensed to Customer on and after January 1, 1998 that is date sensitive will continue performing properly with regard to such date data on and after January 1, 2000, provided that all other products used by Customer in connection or combination with the 3Com product, including hardware, software, and firmware, accurately exchange date data with the 3Com product, with the exception of those products identified at 3Com's Web site, http://www. com.com/products/yr2000.html, as not meeting this standard. If it appears that any product that is stated to meet this standard does not perform properly with regard to such date data on and after January 1, 2000, and Customer notifies 3Com before the later of April 1, 2000, or ninety (90) days after purchase of the product from 3Com or its authorized reseller, 3Com shall, at its option and expense, provide a software update which would effect the proper performance of such product, repair such product, deliver to Customer an equivalent product to replace such product, or if none of the foregoing is feasible, refund to Customer the purchase price paid for such product.
Any software update or replaced or repaired product will carry a Year 2000 Warranty for ninety (90) days or until April 1, 2000.
ADDITIONAL SERVICES:
Telephone Support, with coverage for basic troubleshooting only, will be provided for the lifetime of the product, on a commercially reasonable efforts basis. Telephone support from 3Com is available from 3Com only if Customer purchased this product directly from 3Com, or if Customer's reseller is unable to provide telephone support. Please refer to the Technical Support appendix in the user guide for telephone numbers.
3Com's Web and Bulletin Board Service are available at no charge, and provide software and firmware upgrades, a bug list, and technical information about 3Com products.
Warranties Exclusive If a 3Com product does not operate as warranted above, Customer's sole remedy FOR BREACh OF THAT WARRANTY shall be repair, replacement, or refund of the purchase price paid, at 3Com's option. TO THE FULL EXTENT ALLOWED BY LAW, THE FOREGOING WARRANTIES AND REMEDIES ARE EXCLUSIVE AND ARE IN LIEU OF ALL OTHER WARRANTIES, terms, or conditions, EXPRESS OR IMPLIED, EITHER IN FACT OR BY OPERATION OF LAW, STATUTORY OR OTHERWISE, INCLUDING WARRANTIES, terms, or conditions OF MERCHANTABILITY, FITNESS FOR A PARTICULAR PURPOSE, satisfactory quality, CORRESPONDENCE WITH DESCRIPTION, AND NON-INFRINGEMENT, ALL OF WHICH ARE EXPRESSLY DISCLAIMED. 3COM NEITHER ASSUMES NOR AUTHORIZES ANY OTHER PERSON TO ASSUME FOR IT ANY OTHER LIABILITY IN CONNECTION WITH THE SALE, INSTALLATION, MAINTENANCE OR USE OF ITS PRODUCTS.
3COM SHALL NOT BE LIABLE UNDER THIS WARRANTY IF ITS TESTING AND EXAMINATION DISCLOSE THAT THE ALLEGED DEFECT OR MALFUNCTION IN THE PRODUCT DOES NOT EXIST OR WAS CAUSED BY CUSTOMER'S OR ANY THIRD PERSON'S MISUSE, NEGLECT, IMPROPER INSTALLATION OR TESTING, UNAUTHORIZED ATTEMPTS TO OPEN, REPAIR OR MODIFY THE PRODUCT, OR ANY OTHER CAUSE BEYOND THE RANGE OF THE INTENDED USE, OR BY ACCIDENT, FIRE, LIGHTNING, OTHER HAZARDS, OR ACTS OF GOD.
Limitation of Liability. TO THE FULL EXTENT ALLOWED BY LAW, 3COM ALSO EXCLUDES for itself and its suppliers ANY LIABILITY, WHETHER BASED IN CONTRACT OR TORT (INCLUDING NEGLIGENCE), FOR INCIDENTAL, CONSEQUENTIAL, INDIRECT, SPECIAL, OR PUNITIVE DAMAGES OF ANY KIND, OR FOR LOSS OF REVENUE or profits, LOSS OF BUSINESS, loss of information or data, OR OTHER FINANCIAL LOSS ARISING OUT OF OR IN CONNECTION WITH THE SALE, INSTALLATION, MAINTENANCE, USE, PERFORMANCE, FAILURE, OR INTERRUPTION OF ITS PRODUCTS, even if 3com or its authorized reseller has been advised of the possibility of such damages, AND LIMITS ITS LIABILITY TO REPAIR, REPLACEMENT, OR REFUND OF THE PURCHASE PRICE paid, AT 3cOM'S OPTION. THIS DISCLAIMER OF LIABILITY FOR DAMAGES WILL NOT BE AFFECTED IF ANY REMEDY PROVIDED HEREIN SHALL FAIL OF ITS ESSENTIAL PURPOSE.
DISCLAIMER: Some countries, states, or provinces do not allow the exclusion or limitation of implied warranties or the limitation of incidental or consequential damages for certain products supplied to consumers or the limitation of liability for personal injury, so the above limitations and exclusions may be limited in their application to you. When the implied warranties are not allowed to be excluded in their entirety, they will be limited to the duration of the applicable written warranty. This warranty gives you specific legal rights which may vary depending on local law.
GOVERNING LAW: This Limited Warranty shall be governed by the laws of the State of California, U.S.A. excluding its conflicts of laws principles and excluding the United Nations Convention on Contracts for the International Sale of Goods.
3Com Corporation
5400 Bayfront Plaza
Santa Clara, CA 95052-8145
(408) 326-5000
3/99
|
