 VNC Viewer Manual
At present only the Nokia E61 and Sony Ericsson P990i are supported, although the VNC viewer should work on other Nokia Series 60 version 3 and UIQ 3 phones.
In order to install the VNC Viewer, you will first need to copy the Symbian PIPS libraries to your phone. If your phone is a Nokia E61, the PIPS.SIS file you require is in the S60v3 directory. For a Sony Ericsson P990i, the PIPS.SIS file is located in the UIQ3 directory. Copy the file to your phone and install it.
This can be done via a Bluetooth connection, pairing the PC to phone and sending the SIS file to your phone. The SIS file should appear in your messaging inbox and it can be installed from this location.
Alternatively, the SIS file can be installed via your PC Suite. See your phone's user manual for details on how to install a SIS file.
You will also need to copy the VNCViewer.SIS file to your phone and install it. A 14214q1621o gain, the E61 version is in the S60v3 directory, and the P990i version is in the UIQ3 directory.
The VNC Viewer needs to communicate to a VNC server. The VNC server can be downloaded from the following website https://www.tightvnc.com/. The VNC viewer can communicate to the VNC server via a Wi-fi connection, or via local connection such as Bluetooth or USB. For more details on how to connect your phone to the VNC server see Appendix A.
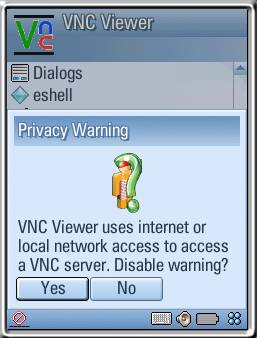
When you start the VNC Viewer for the first time you will be presented with a warning stating that the viewer will use network or local resources.
The VNC Viewer has four tabs of settings in order to configure your connection to the VNC server. You can move between the tabs by clicking the left and right directional buttons on the Nokia E61 and Sony Ericsson P990i in flip closed mode, or using your pen on the P990i in flip open mode.
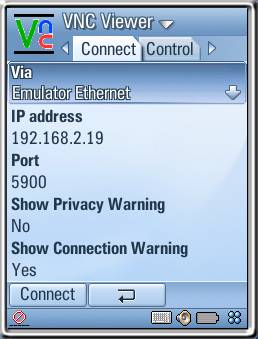
The connection settings page contains details of the location of the VNC server and how to communicate to it.
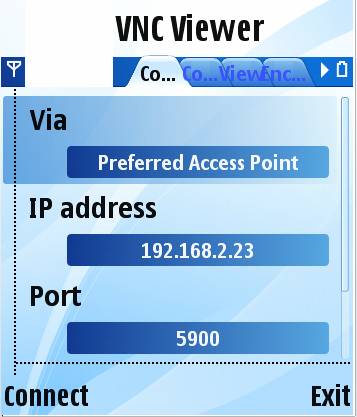
Via The Via list shows the available internet access points, from this list you can choose which is the best route to connect to the VNC server. Alternatively, selecting the 'Preferred Access Point' option will use the system's default internet access point.
Address The Address editor allows you to enter the location of the VNC server. This can be in the form of machine name i.e. \\robs_pc, but is more likely to be an IP address in the form of 4 numbers separated by dots, i.e. 192.168.2.1. See Appendix B for information on how to find the PC's IP address.
Port This is the port number for the VNC viewer to connect to. Most VNC servers listen on port 5900, which is the default value.
Show Privacy Warning This allows you to turn on or off the privacy warning when you open the application.
Show Connection Warning A warning appears before you attempt to connect to the VNC server, alerting you that the VNC viewer will use network or local resources. This option lets you turn the warning on or off.
The control page lets you configure how you interact with the VNC server.
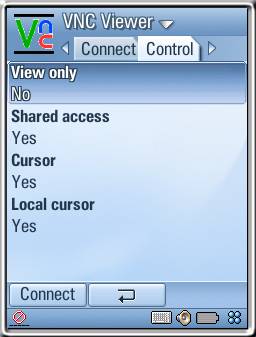
View Only This option allows the viewer to only the VNC server's screen or to be able to send key presses and mouse events to the server'sscreen.
Shared The shared option allows you to share control of the VNC server with another user or to take complete control over the VNC servet.
Cursor The cursor option allows you to take control over the VNC server's cursor.
Local Cursor This option allows you to provide a locally rendered cursor as a separate entity to the VNC server's screen. Using this option increases the performance of the display.
The view page allows you to configure how you view the VNC server's screen.

Fullscreen This option states whether the initial screen displayed is the VNC server's full screen compressed onto the phone's screen or an accurate to scale representation of the VNC server's screen.
Depth This option selects the colour depth of the VNC server's display transmitted to the VNC viewer, either 8, 16 or 32 bits per pixel. The higher the bits per pixel, the more colours can be displayed accurately but the performance is worse.
The encodings page allows you to specify the desired encoding mechanisms.
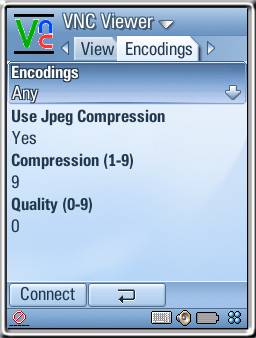
Encoding This option shows a list of possible encoding types. Selecting 'Any' selects the best encoding that the VNC server can use. Otherwise you can select a specific encoding scheme, usually 'Tight' and 'Hextile' give the best results. 'Raw' directly transfers pixel values without compression.
Use Jpeg compression This option allows you to use Jpeg compression with the 'Tight' encoding scheme usually increasing performance.
Compression This gives a compression value for Jpeg compression, the higher the number the greater the compression.
Quality The quality option specifies how much the quality of the VNC's server display should be preserved during Jpeg compression. The higher the quality the better the quality of displayed image.
When you have chosen the connection and display settings click on the 'Connect' button or select the 'Connect' menu option.
If the 'Show Connection Warning' option is selected you will see the following screen.
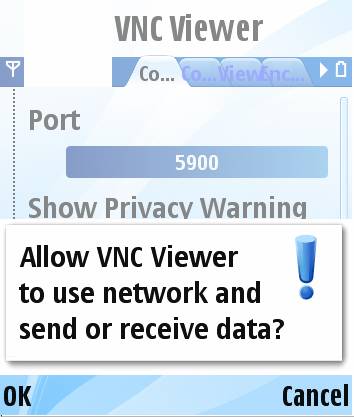
Selecting 'OK' will continue with the connection, 'Cancel' will stop the connection attempt.
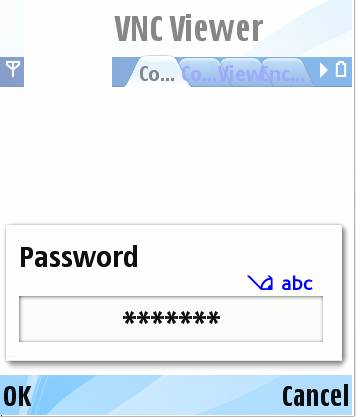
After choosing to continue the connection, you will be asked for the logon password to VNC server. Enter your password.
If your logon attempt is successful you should be able to view the VNC server's screen. On the Sony Ericsson P990i with the flip open the screen will change to landscape mode to allow more of the VNC server's screen to be visible.
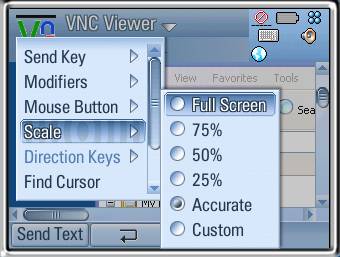
The scale of the display shown is in accordance with the full screen mode selected. The scale menu allows you to select the percentage of the VNC server's screen to be viewable at once, either full screen, 75%, 50%, 25%, an accurate representation or a custom scale factor.
On a Nokia E61 or Sony Ericsson P990i with the flip closed, the directional keys will scroll around the viewable screen area. On the P990i with the flip open the pen can be used to operate the scroll bars.
When you connect to the VNC server, the screen will be centred on the current cursor location. On a Nokia E61 or Sony Ericsson P990i with the flip closed, the directional keys will move the remote cursor. If the remote cursor reaches the edge of the viewable screen, the screen will scroll along with the cursor.
On the P990i, with the flip open, the pen can be used to position the cursor on the screen. If you drag the cursor to the edge of the viewable screen the screen will scroll along with the cursor.
If at any time the cursor becomes lost due to activity on the VNC server, the 'Find Cursor' menu option will locate the current position of the cursor and centre the screen upon it.
The 'Direction Keys' menu option allows you to specify whether the directional keys move the cursor or the caret within a remote edit window.

Using the button inside the directional keys (the select key) will enact a mouse button click on the remote terminal. Clicking the key quickly will perform a double mouse click. Using the pen on Sony Ericsson P990i in flip open mode will translate the pen down into a mouse button click.
In order to perform a mouse drag on the Nokia E61 or Sony Ericsson P990i in flip open mode, hold down the Ctrl key (or use the modifier menu to turn Ctrl on), press the Select key then drag the item to the new location and press the Select key again. You can now release the Ctrl key.
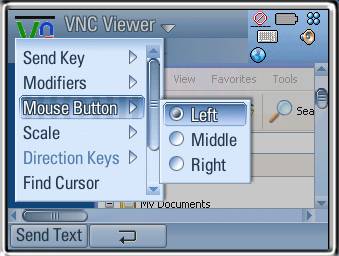
In order to perform a VNC server middle button or right button click, the 'Mouse Button' menu can be used to select which mouse button is emulated by the Select key or pen operation.
On the Nokia E61 and Sony Ericsson P990i in flip open mode, the keyboard can be used to directly enter key presses on the VNC server's terminal. On a Nokia E61, the function key will allow the number keypad to be operational.
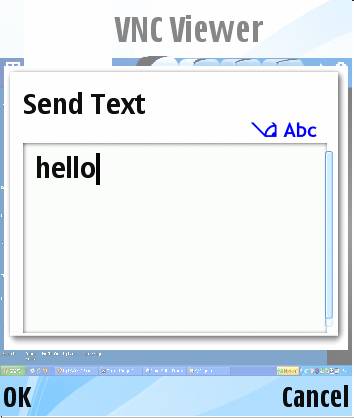
If you would like to send a string of text to the remote display using the phone's textual entry (necessary on a P990i with flip closed) you should use the 'Send Text' menu option. This will display a dialog allowing keyboard entry.
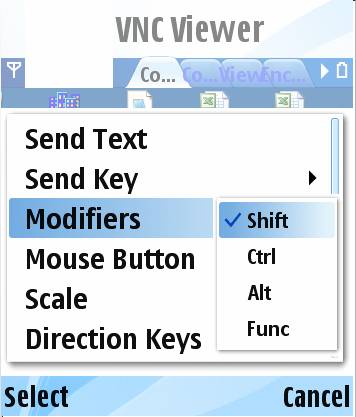
To hold down any special keys such as Shift, Ctrl, Alt and Function keys use the modifier mode.
In order to send a special key such as the Page Down key, use the 'Send Key' menu option.
The 'Ctrl+Alt+Del' menu option will send the Ctrl, Alt and Delete combination to the remote terminal, quite often used to show a shutdown menu.
The 'Refresh' option will refresh the screen.
The 'Back' menu option on the Nokia E61 or back key on the Sony Ericsson P990i will return the application to the connection and display settings.
The 'About' menu option will show the latest version information for the VNC Viewer application.
The Sony Ericsson P990i starts the VNC view in landscape mode by default when the flip is open. This menu allows switching between landscape and portrait modes.
One of the best ways to connect to your VNC server is via Wi-fi in infrastructure mode, this relies on a Wi-fi access point or using an internet enabled PC with Wi-fi. In order to set this up you will need the security settings of the access point you wish to connect to.
Use the instructions in your phone's user manual on how to set up the access point to connect to wi-fi.
Once you have created the access point, test it by launching the 'Web' application and browse a favourite web page.
On the VNC Viewer's connection settings page, choose the 'Via' option and select the name of your newly created access point.
It is possible to set up a wi-fi connection between a non-internet enabled PC (contain the VNC server) and the mobile phone using a wi-fi ad-hoc connection.
The following steps show how to do this on a Windows XP machine;
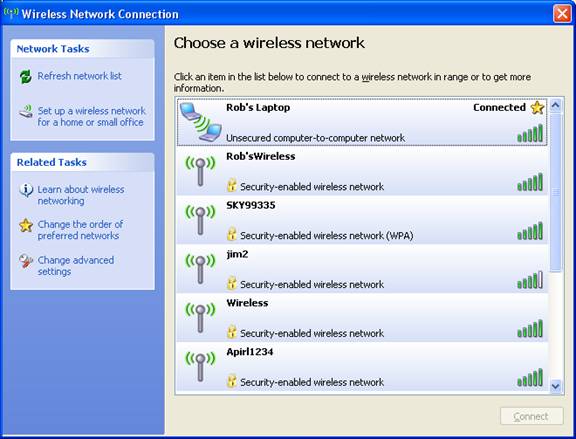
Click on the Wi-fi icon in the
system tray. ![]()
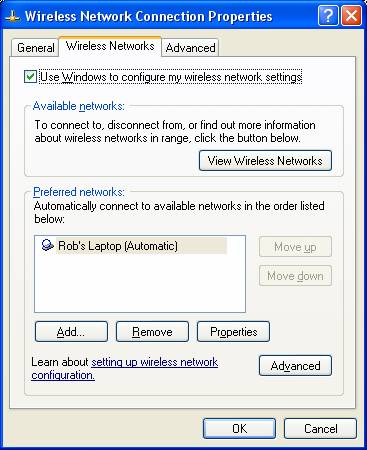
Select the 'View Available Windows Networks' option to show the following dialog.
Select the 'Change Advanced Settings' option to show the next dialog.
Remove all entries in the 'Preferred Networks' list.
Click 'Advanced' to show the advanced settings.
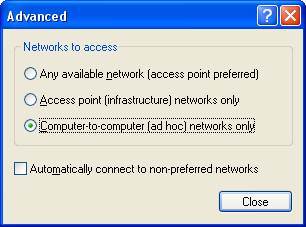
Select 'Computer-to-computer (ad-hoc) networks only' connection type and click Close.
Click 'Add' to add a new Wi-fi network, the following dialog shows.
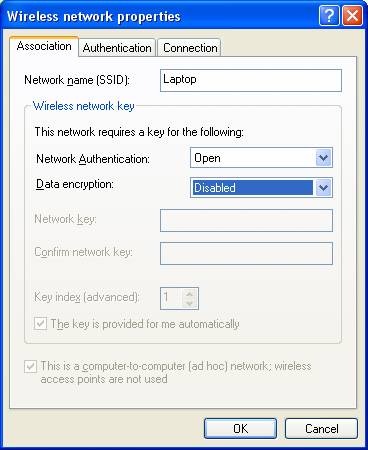
Give the network a name such as 'Laptop'.
Turn off data encryption by changing the menu to disabled. Click OK to return to the connection properties page. Select the general page.

Select the 'Internet Protocol (TCP/IP)' item and click properties.
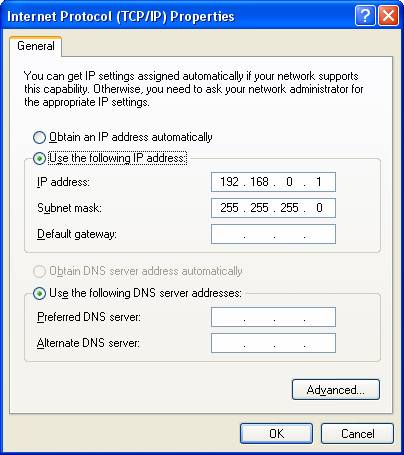
On the IP page, select IP and click Properties. In the IP address box, enter 192.168.0.1 and set the subnet mask as 255.255.255.0.
Click OK, and OK again on the Wireless Network Connection Properties page.
On a Nokia E61:
Go to the Tools menu, open the Settings, then Connections and select the Access Points option.
Create a 'New access point' and select 'Use Default Settings'.
Give the access point a new name.
Select Wi-fi in the data bearer type.
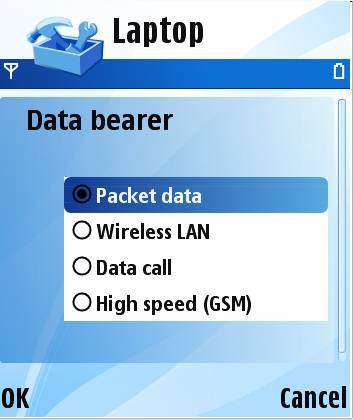
Under 'WLAN network name' search for the laptop and select it.
Now select the Advanced menu option.
Enter an IP address of 192.168.0.2, a subnet of 255.255.255.0, and a dummy gateway of 1.2.3.4.
Save the settings and the access point.
On a Sony Ericsson P990i:
Go to the Tools menu, open the Control Panel and select the Connections option.
Open the Internet accounts.
From the menu, select New Account and choose WLAN from the options.
Enter an account name, and search for the laptop and select it.
In the 'Network mode' option, choose 'Ad hoc'.
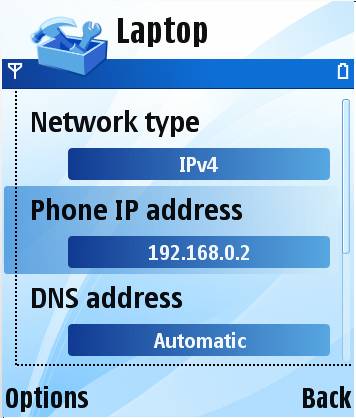
From the menu, open the TCP/IP menu item and IP config option.
Change the configuration from Automatic to IPv4. Enter an IP address of 192.168.0.2, a subnet of 255.255.255.0, and a dummy gateway of 1.2.3.4.
To connect to the VNC server, the IP address chosen in the VNC connection options should be 192.168.0.1.
USB is the
best way to connect the E61 to the internet via local connectivity. You will
need to download and install the
On the E61 phone, go into the Tools\Settings\Connection\Access Points menu and add a new access point, setting the data bearer to 'IP Passthru'. Go into the Connections\USB menu and set the mode to 'IP Passthru'.
Connect the
phone to the PC and open the PC's control panel. There will be a new entry
called '
Select the option for your PC's internet connection route. On the VNC viewer, select your new access point and see Appendix B to find the IP address to use.
The best way to achieve local connectivity on the Sony Ericsson P990i is using m-Router which is part of the Sony Ericsson PC Suite. Read the instructions for full advice on how to connect.
After installing the PC Suite, it should be a simple matter of plugging the USB cable into the PC and phone for the two to connect. If there are any problems, make sure 'Phone mode' is selected in the Tools\Control Panel\Connections\USB settings. In the 'Via' connection settings, you should select 'mRouter USB'.
If you wish
to use Bluetooth open the m-Router options by double-clicking on the m-Router
icon (![]() ), and go to the
Bluetooth page. Find your phone and click the Connect button.
), and go to the
Bluetooth page. Find your phone and click the Connect button.
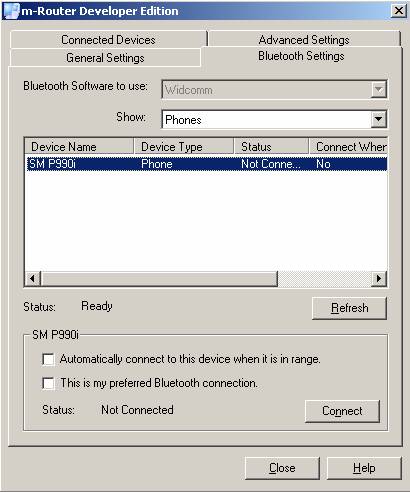
The phone should now be connected.
If the PC is connected to the internet then see Appendix B to find the IP address to specify when using VNC viewer. Otherwise an IP address of 169.254.1.68 should work. In the 'Via' connection settings, you should select 'mRouter sockcomm'.
It is possible to connect via GPRS and 3G to a remote VNC server provided the server is outside of a company firewall. Due to the large amounts of data which are sent and received during a VNC session, this may be an expensive option.
On the VNC server open a command prompt and type:
ipconfig
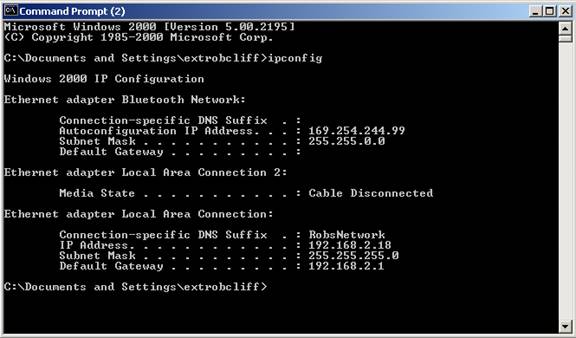
In the above configuration, the IP address to use is 192.168.2.18.
|
