ALTE DOCUMENTE
|
||
![]() Using
Forms
Using
Forms
Forms make it easy for you and your students to access information in a database. You can use a form to focus on one record at a time for viewing, adding, and deleting data. In addition, you can customize a form to view and print information in a style that you like-you can even add pictures to make the form more visually appealing. If you want to organize fields into subcategories, you can create a multipage form.
Creating forms
The easiest way to build a form is by using the Form Wizard. The Form Wizard helps you choose the layout of r 10410x2311k ecords in the form and also the background, color, and format of the display. You can also preview the layout and style options when you create a form by using the Form Wizard.
A form can be based on a table or a query. For the shipwrecks assignment, you might decide to base the form on the full table so that students can enter data in all the fields. After you create a basic form, you can customize it in Design view.
To create a form
In the Shipwrecks database window, under Objects, click Forms, and then double-click Create Form by using wizard.
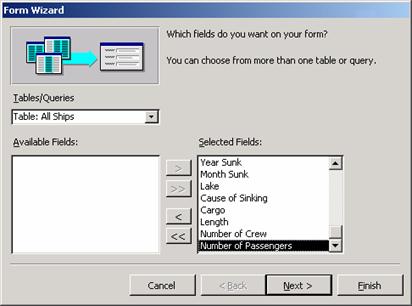
In the Tables/Queries list box, click the table or query from which you want to create the form. For example, select the All Ships table from the list.
Select the fields that you want your form to
include. To base the form on the full All Ships table, select all the fields by
clicking the double forward arrow ![]() .
Click Next.
.
Click Next.
Click the layout that you want or that is most appropriate for the database. For example, to make sure that the form has enough room to display all field names, click Columnar. Click Next.

Click the style you want, and then click Next.
In the appropriate box, type the name of the form or accept the name that Access 2002 suggests. Click Open the form to view or enter information, and then click Finish.
The form opens in Form view, which is the default view when you open a form. You can enter information in a form through Form view or Datasheet view. Any changes you make to a record in a form automatically appear in the table that the form draws information from.

To customize a form
You can customize the form in a number of ways. For example,
because there is a finite number of Great Lakes, you
can change the text box under the
The following procedure shows a couple of the possibilities for customizing the form for the Shipwrecks assignment.
In the open form, on the toolbar, click the arrow next to the View button, and then click Design View.
To change a text box to a combo box:
Under Detail,
right-click the text box in the
On the toolbar, click the Properties button
![]() .
.
In the Combo
Box:
To insert a picture in the form:
Click the Toolbox
button ![]() .
.
In the toolbox, click the Image
button ![]() ,
and then in the area under Form
Footer, drag the mouse to create the image size that you want.
,
and then in the area under Form
Footer, drag the mouse to create the image size that you want.
In the Insert
Picture dialog box, locate the image file that you want to insert, and
then click OK.
Switch to Form view to see how the image looks in
the form. To further customize, switch back to Design view.
|
