ALTE DOCUMENTE
|
||||
The DIALOG object represents a built-in Microsoft Excel dialog box. The Dialog object is a member of the Dialogs collection, which contains all the built-in dialog boxes in Microsoft Excel. You cannot create a new built-in dialog box or add one to the collection; the only useful thing you can do with a Dialog object is use it with the Show method to display the corresponding dialog box.
Using the Dialog Object
Use Dialogs(index), where index is a built-in co 17217r1722r nstant identifying the dialog box, to return a single Dialog object. The following example runs the built-in Open dialog box (File menu). The Show method returns True if Microsoft Excel successfully opens a file; it returns False if the user cancels the dialog box.
dlgAnswer = Application.Dialogs(xlDialogOpen).Show
The Microsoft Excel Visual Basic object library includes built-in constants for many of the built-in dialog boxes. Each constant is formed from the prefix "xlDialog" followed by the name of the dialog box. For example, the Apply Names dialog box constant is xlDialogApplyNames, and the Find File dialog box constant is xlDialogFindFile. These constants are members of the XlBuiltinDialog enumerated type. For more information about the available constants, open a VBA Editor window, and press F2 (or choose View, Object Browser, from the menu. This will open a window with several panels: scroll down the left-hand panel to find XlBuiltInDialog and select it. This will display a list of the constants necessary to display all of the built-in dialogs in the right hand panel.
Using the Dialogs Collection
Use the Dialogs property to return the Dialogs collection. The following example displays the number of available built-in Microsoft Excel dialog boxes.
MsgBox Application.Dialogs.Count
Attempts to display built-in dialog boxes may fail if you try to do so in an incorrect context. For example, to display the Data Labels dialog box, using the Visual Basic expression:
Application.Dialogs(xlDialogDataLabel).Show
the active sheet must be a chart; otherwise, the property fails. An alternative method makes use of the Item property:
Application.Dialogs.Item(xlDialogOpen).Show arg3:=True
Here, arg3 allows you to specify that you want the file to be opened read-only. For a list of available arguments, see on-line help.
Try placing the above statements into a new module and running them - test out some of the other built-in dialogs.
These are special types of built-in dialogs that you can only access from VBA, and which provide a useful way of getting simple information to and from a user.
MsgBox
We have already seen how a simple message box can be displayed using MSGBOX <message>, but the MSGBOX function can do more. Have a look at the relevant section of the main notes, and see what the effect is of this statement:
X=MSGBOX("Do you want to go home?",vbYesNo+vbQuestion,"Message Box Title")
The constant vbYesNo tells VBA to provide YES and NO buttons on the message box, and the constant vbQuestion provides the standard question icon. Other constants are used to show other buttons and icons - see the notes or the help file.
Suppose you want to respond in a different way depending upon whether the user clicked YES or NO in response to the question. In its form shown above, the MsgBox function (as opposed to the MsgBox statement that was used before) returns a value, in this case X. You can chck the value of X, comparing it with the built in constants vbYes and vbNo, as follows:
If X=vbYes then
.. Statements to be executed of the user chose YES
Else
.. ditto for NO
End If
Note that here there is no real need to explicitly check for vbNo, since no other possibility exists.
InputBox
You should check the relevant section of the notes here, but you can test out this simple example:
InputVal=InputBox("Enter a number","Testing the Input Box")
MsgBox InputVal
You will see from the notes that there is another form of this function which allows you to validate the input (i.e. check that it meets certain criteria, such as being numeric). This is the InputBox method of the Application object, and is access as follows:
InputVal=Application.InputBox(Prompt:="Enter a Number", Type=1)
In addition to being able to place form controls on the worksheet, you can also add scriptable (ActiveX) controls. These are accessed from the Control Toolbox:
![]()
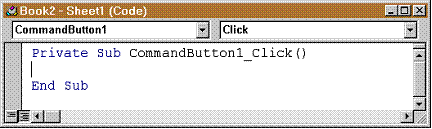
Try plaing a command button (6th from left) on the worksheet. While making sure it is selected (resize boxes visible around its edge) click on the code view button (3rd from left in the control toolbox). You should find that the VBA editor opens, with the event procedure visible for the click event for that object - the commandbutton:
Try exploring around at this point. You will find that you have access to the event procedures for all of the objects on the worksheet, including the worksheet itself, and their events. If you are familiar at all with stand-along Visual Basic, this should seem pretty familiar. The objects are accessed from the left hand drop-down list box:
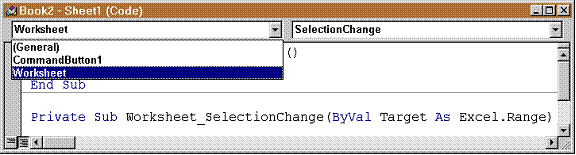
and the events from the right:
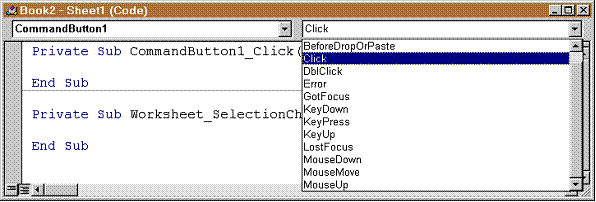
To create a working event procedure, you simply add code as necessary. For example, to make something happen when you pass the mouse over the commandbutton, try adding this to the MouseMove event for that button:
MsgBox "Hello!"
Try it.
To see how and where Excel saves all this information, take a look at the Project window:
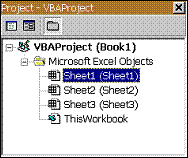
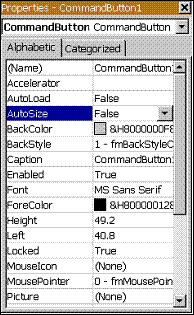
The current sheet is highlighted. If you double-click on one of the other sheets, you will see that this gives you access to the obejcts and events of that sheet, which may be different from sheet1, depending upon what ActiveX controls have been placed there. You also have access to the properties of each control via the Properties window:
In addition to allowing you to script control events as seen above, you can also write code to respond to events that happen to the WorkSheet object. Have a look at the drop-down list of events that are recognised by the worksheet object:
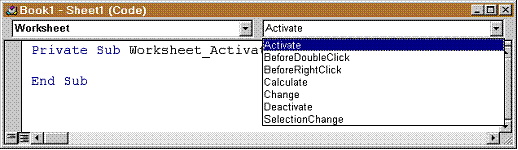
Refer to the notes (or the help file) for more information about each of these events.
This task is to create a way of validating data entry into part of a worksheet.
Create a new workbook and on Sheet1 change the background colour of cells A5-C15 (use the highlight toolbar icon - a pen with a yellow bar underneath).
Open the VBA editor and double-click on Sheet1 in the Project window to load its code window. Select the Worksheet object and the Activate event, and type:
Worksheets("Sheet1").OnEntry = "Validate"
Now add a new module and enter this code:
Sub validate()
thisrow = ActiveCell.Row
thiscol = ActiveCell.Column
If thisrow > 4 And thisrow < 16 Then
If thiscol < 4 Then
cellval = ActiveCell.Value
If Not IsNumeric(cellval) Then
MsgBox "Value must be numeric.", 16, "Data Entry Error"
ActiveCell.Value = ""
End If
End If
End If
End Sub
Try running it. Note that there is no simple way of trapping the event of leaving a cell, so that you can not directly write an event procedure for checking the contents of a cell.
Try writing event procedures to:
Display a message on activating/deactivating a worksheet.
Respond to a right-click on a cell by capitalising the first letter of any words in that cell
As above, but only for words more than 3 letters long.
When you create an event handler for, say, the SelectionChange event on Sheet1, that handler only applies to that worksheet. If you activate Sheet2 and change the selection, nothing happens. Worksheet event handlers respond to events only on their own worksheet - to handle and event on any worksheet, you must use a workbook-level event handler.

To do this, from the VBA editor activate the
project window and double-click the ThisWorkbook item. From the object list, select Workbook.
A new procedure appears with the name Workbook_Open (Open is the default event for a workbook). Tis is the event you would use if you wanted to run a procedure every time you opened the workbook.
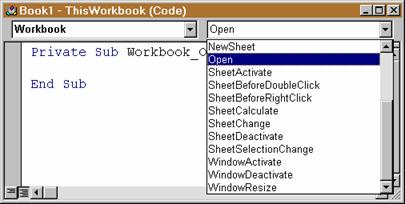
Click the Procedures list to see the events
available for a workbook.
There are 19 possible events to which a workbook can respond, and the seven that begin with Sheet are the seven worksheet events from the previous section. In this case, however, they can apply to any worksheet in the workbook, even ones which do not yet exist.
Select the SheetSelectionChange event. This creates a new Workbook_SheetSelectionChange procedure.
You can if you wish delete the Workbook_Open procedure - it won't be needed for this example.

In the body of the procedure, type
Selection.Interior.Color=vbRed.
Switch to Excel, activate Sheet2, and click various cells. The cells change to red.
If you had placed a SelectionChange event handler in this worksheet, you might wonder which of the two Excel chooses to run. In fact, both run - although you will often find that since the workbook procedure runs last, it may overwrite the action of the worksheet procedure.
You can dictate the behaviour of these procedures. If you want both to run, do nothing. If you want just the worksheet event to run, or to override the behaviour of the workbook procedure, you need to define a global variable which is set by the worksheet procedure and checked by the workbook procedure. If this variable is set, you can place suitable code in the latter to avoid it taking any action.
Cancelling an Event
Some events are made to be cancelled. For example, Excel displays a shortcut menu by default when you right-click on a worksheet (try it out). What if you want to make excel do something when you right-click a cell, and do not want this shortcut menu to appear? You can place code in the event-handler to cancel this action.
Events that can be cancelled all have the work Before in front of the event name. A worksheet has a BeforeDoubleClick event and a BeforeRightClick event. A workbook has corresponding SheetBeforeDoubleClick and SheetBeforeRightClick events, and also BeforeClose, BeforeSave and BeforePrint events. Each event procedure that can be cancelled has a Cancel argument. To cancel the corresponding event, set this to be True.
Exercise:
In the Sheet1 code window, select Worksheet from the Object list and BeforeRightClick from the Procedures list.

In the event handler body that appears, type
Cancel = False:
Activate Excel and select Sheet1. Try right-clicking a cell. The colour changes, but the shortcut menu does not appear - the event handler executed before the actual event occurred and you prevented the event from happening.
To summarise:
ActiveX controls, worksheet events and workbook events can be linked to event handlers. As we will see later, macros can also be linked to menus and toolbars. All these tools enable you to create applications that are easy for anyone to use.
|
