ALTE DOCUMENTE
|
|||||||||
MFC Overview
In Chapter 1, 'Visual C++ Environment,' you looked at the Developer Studio and the tools that it provides to help you develop C++ applications for Windows. Now you will get down to business and look at real application development. To help you with this, the Microsoft Foundation Classes (MFC) provides an application framework, in addition to the general classes and Win32 API wrapper classes that you expect from a Windows class library.
In this chapter, you will:
Develop a complete application with AppWizard
Examine the application architecture used by MFC
See how MFC works behind the scenes to make your application run
The MFC, as the name suggests, provides a set of reusable classes designed to simplify Windows programming. Like any class library, MFC provides classes for certain basic objects, such as strings, files, and collections, that are used in everyday programming. It also provides classes that wrap common Windows APIs and data structures, such as windows, controls, and device contexts. In addition, MFC provides an application framework, including the classes that make up the application architecture hierarchy.
The application framework helps get your application running by providing program initialization, passing Windows messages to the appropriate places, and cleaning it all up when your application exits. The framework also provides a solid foundation for more advanced features, such as ActiveX and document/view processing.
To kick off your examination of the application framework, you will create the first sample application to illustrate the things that AppWizard can do for you and to provide concrete examples of the MFC application framework.
You will create the HiMom sample included on the CD-ROM, using the AppWizard. In a way, this will be 'hello world!' program for MFC, but it also provides much more support for building real applications, so I didn't think HelloWorld would be an appropriate name. (Also, it just so happens that I'd rather say 'hi' to my mom than to the rest of the world.) If you would rather use your own application, bear in mind that AppWizard will name many classes and files based on your application nameif your application name is different, the names of your classes and files will be different.
To start a new project with Visual C++, you create a new project workspace. To do this, select the New command from the File menu and choose the Projects tab. This will display the New Project dialog shown in Figure 2.1.
Figure 2.1. The New Project Workspace dialog box
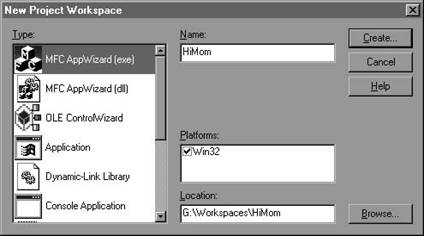
For this example, you use the MFC AppWizard (exe), so make sure it is highlighted in the box on the left. Next, put the name of your project (HiMom) in the project Name box. Be careful to choose a name here that you can live with; AppWizard will use it to create many class names and filenames and may use some awkward abbreviations. You may also need to be careful about using filenames longer than the 8.3 DOS standard. Long 535e47f filenames are very useful, and Visual C++ and Win32 operating systems have no problem working with them. However, if you have any tools that support only the 8.3 format, it is much easier to adjust the filenames now.
If you don't like the location that AppWizard has picked for your project, you can change it now by entering a new path in the Location box or using the Browse button to pick a new spot. You may also choose whether to create the project as part of a brand new workspace, or as part of the current workspace. If you choose to add the new project to the current workspace, you may create the new project as a dependency of an existing project in the current workspace by checking Dependency of: and selecting a dependent project in the drop-down list. When you are satisfied with your choices, click OK to start the AppWizard, which will begin with the dialog shown in Figure 2.2.
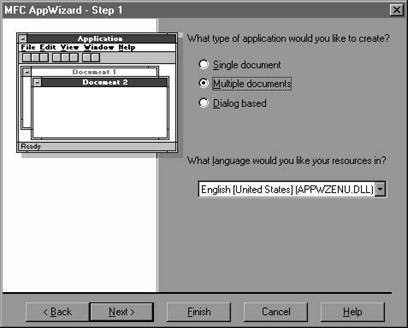
This dialog allows you to select the type of application you would like to create. For this example, you will use Multiple documents, which will create an application structure that you may have seen in Word or Excel, in which you may view several documents at the same time. For reasons you can well imagine, your sample application will not provide quite as much functionality as MS Word or Excel, but it will allow multiple documents.
Figure 2.2. MFC AppWizardstep 1
|
NOTE |
|
In MFC, a document can be any set of data that may be grouped together. Although this can be a word processing document, it can also be a group of settings for an application, such as a terminal session. |
Single document applications are similar, but they allow only one open document at a time. You will learn some other differences in Chapter 4, 'Frames, Documents, and Views,' where you will start to dig into the document/view architecture.
The third choice, Dialog based applications, does not use the document/view architecture at all. These applications are based on a dialog resource. This is useful for small utility applications, but if you plan to implement menus, toolbars, or printing, you should seriously consider using one of the document-based types, because they can implement many of these things for you much easier than you can add these features to dialog-based applications.
For an application type other than multiple documents, the following steps will be slightly different, but I think you will get the picture. If you do have a question about any step, you can press F1 to bring up help on the current page. This applies not only to AppWizard, but to most other areas of Developer Studio as well.
For this example, you will use English as the language of choice for your resources, but if you want, you may choose any other language offered.
By now, you have probably noticed the row of buttons along the bottom of the dialog box. The Back and Next buttons allow you to navigate between the pages of the AppWizard. If you just remembered that you really wanted to change something in a previous step, you can easily go back and change it. When you have entered your selections in a page, click on Next to go to the next step. If you know that you want to use the default settings for the rest of the steps, you could click on Finish to go straight to the end. For the HiMom sample, you could do this now, because you are going to use only the defaults, but let's take a look at the other options available. The Cancel button enables you to exit the AppWizard without creating a new project.
By clicking on the Next button, you can move to the next page, which looks like Figure 2.3.
Figure 2.3. MFC AppWizardstep 2
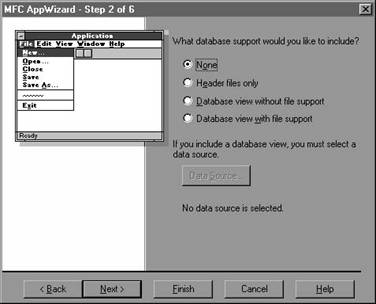
This page allows you to select options for database support in your application. Obviously, if you select None, you will get none (from the AppWizard anywayyou can always add things later, but you have to do it manually). The Header files only option includes the AFXDB.H header file, which includes simple database support, allowing you to create and use recordsets to work with databases.
The two Database view options create a view class for your application based on CRecordView, which gives you a form-based application allowing you to view and update records. The Database view with file support option supports document serialization. If you choose either of these options, you must also choose a data source. You learn about this in much greater detail in Part V, 'Database Programming,' so let's go ahead to the next page, shown in Figure 2.4.
With this page, you can select options that allow your application to support various levels of object linking and embedding (OLE). Once again, if you select None, that's just what you'll get. You have to add OLE support manually if you change your mind after the application is created. You will explore OLE, COM, and ActiveX in much greater detail in Part III, 'Programming with ActiveX,' but here's the short version of what the other options mean:
Container support allows your application to contain ActiveX objects.
Mini-server applications can create and manage compound document objects, but they cannot run stand-alone, supporting only embedded objects.
Figure 2.4. MFC AppWizardstep 3
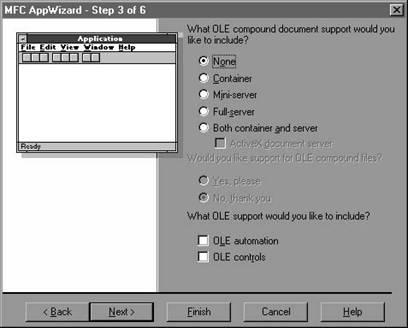
Full-server applications can also create and manage compound document objects, run stand-alone, and support both linked and embedded items.
Select Both container and server if you want your application to be able to place embedded or linked objects into its own documents and be able to create OLE objects for use in container applications.
If you have selected any of the server options, you can also make your application an ActiveX document server.
If you select support for compound files, MFC will serialize your container application's documents using the OLE compound-file format. If you choose 'No, thank you,' it won't.
You can select Automation to allow automation clients, such as Excel, to access your application.
If you want to include ActiveX controls in your application, such as those provided in the component gallery, select the OLE controls option.
Step 4, shown in Figure 2.5 allows you to select several advanced features that AppWizard can add for you.
Selecting Docking toolbar allows the user to move the toolbar from its default location and dock it to the borders of the window.
The Initial status bar option provides a status bar, including keyboard state indicators and fly-by help for menus and toolbars. This also adds menu commands to hide or display the status bar and toolbar.
The Printing and print preview option tells AppWizard to generate code and menu commands to handle printing tasks automatically.
Figure 2.5. MFC AppWizardstep 4
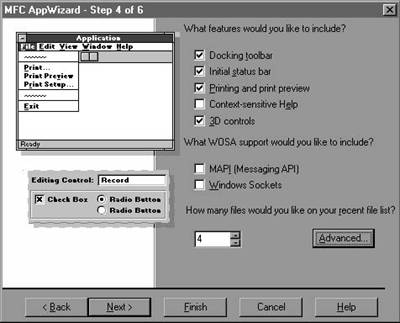
The Context-sensitive Help option generates help files that you can use to give your users help on specific areas of your application. We will be looking at Windows help in Chapter 35, 'Adding Windows Help.'
If you select 3D controls, all controls in your application will have that nifty chiseled look.
You can include support for the Windows Open Services Architecture (WOSA) by selecting the MAPI (Messaging API) option, which allows your application to integrate with mail systems, or the Windows Sockets option, which enables TCP/IP communications.
The AppWizard automatically implements a most-recently-used file list for you in the File menu. You may set the number of files here to keep in this list.
The Advanced button allows you to select preferences about document types and window styles for your application.
Step 5 allows you to tell AppWizard to include source file comments where it has added things.
This page also gives you the option to use the shared DLL versions of MFC or the statically linked library. If you know that your application will be the only MFC app running at any given time, you may want to use the static libraries, but it is generally better to use the DLL versions, which can be shared by all applications. Using the DLL versions also reduces the disk and memory requirements of your application's executable file.
Step 6, shown in Figure 2.6, shows the classes that AppWizard will create for you.
If you like, you can change the defaults that AppWizard supplies by selecting the class in the top list and editing the fields below. For many of the classes, options will be inactive (grayed). In most of these cases, changing the default doesn't make sense anywayan application class based on anything other than CWinApp just wouldn't work well with MFC.
Figure 2.6. MFC AppWizardstep 6
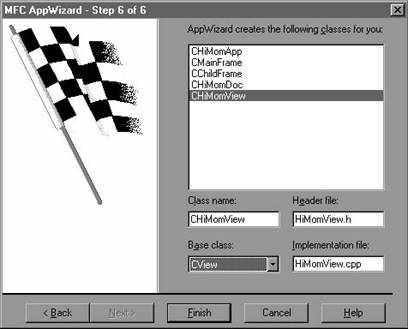
If you don't like the filenames that AppWizard has chosen, you may freely change these (for all but the app class), but you can place only one of the classes in each file.
For MDI applications, you can change only the base class of your view class. You probably will not want to use the base CView class in a real application, but will want to use one of the available derived classes that provide much greater functionality. For more on MFC's view classes, see Chapter 4.
Click Finish here, and you're just about done. AppWizard will display a window like Figure 2.7.
Figure 2.7. The New Project Information dialog box
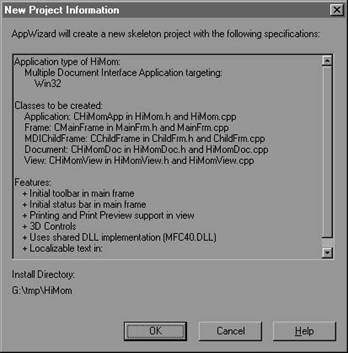
You should review the information presented here to see that it matches the options you selected. If you find that something here doesn't match what you wanted, click on Cancel to go back to step 6. If you are satisfied with your choices, click on OK and let AppWizard do the work for you.
You now have a complete Windows application. You can see this for yourself by choosing the Build HiMom.exe command from the Build menu to compile and link, and then choosing
the Execute HiMom command from the Build menu to run it. You will notice that many cool functions that you expect from a Windows application have already been implemented for you, such as File | New and Print Preview. Now all you have to do is the really good stuff to fit your application.
|
TIP |
|
AppWizard is extremely useful in creating new projects, but it isn't intended to manage your projects after you have clicked on that last OK. If you find yourself wanting to add functionality to an application midway through development, but forgot to choose a few options in AppWizard when you created it, you can use AppWizard to give you some help. If you create a new project with the AppWizard options you used to create your application and then create another with the options you wish to add (or delete), you can use a utility such as WinDiff to see what the new options have added to each of your source and header files. |
Okay, so you clicked a few buttons and got this little app with a bunch of menus that don't do anything. What's it got under the hood? Here, you will look at what AppWizard has created for you and how the application framework that was created provides a solid backbone for your application.
If you're like me, your first instinct may be to open a DOS window and start digging through files. Sure, you can still do this, but it really is easier to use the Project Workspace windowI promise. Remember that you can open any source file, usually to just the right place, by double-clicking on the file or class view of the project workspace.
As you may have already noticed, AppWizard has created a handful of classes for you, based on your application's name. These fall into the basic classes of Application classes, Document classes, View classes, and Frame classes. Each of these classes is based on one of the classes in the application architecture hierarchy. (You will almost never use the base classes directly, but will derive your own classes from them.) The HiMom example you just created will implement the classes shown in Table 2.1.
Table 2.1. Classes for HiMom
|
MFC Base class |
Derived class |
Filename |
|
CWinApp |
CHiMomApp |
HiMom.cpp |
|
CDocument |
CHiMomDoc |
HiMomDoc.cpp |
|
CView |
CHiMomView |
HiMomView.cpp |
|
CFrameWnd |
CMainFrame |
MainFrm.cpp |
|
CMDIChildWnd |
CChildFrame |
ChildFrm.cpp |
The classes that you derive from CDocument are intended to hold the data that your application will work with. Your CDocument class will be responsible for reading and writing data files and will serve as a repository for the information that your CView classes will allow the user to view and manipulate. You may choose not to use these classes and the document/view architecture, but you will see in Chapter 4 that these are very useful in helping you implement many functions common to Windows applications.
Classes based on CMainFrame will implement the main frame for your application. (Kinda makes sense, I suppose.) It is this class that will manage the menus, toolbars, and status bars (even the main window itself) for the main window of your application. Classes derived from CChildFrame are used in MDI applications to manage the child windows created for multiple views. Like the main frame, CChildFrame classes can manage menus, toolbars, status bars, and the window for the children of your main frame. You will look at how the document, view, and frame classes work together in Chapter 4, so let's leave it at that for now and move on to the real heart of your MFC application.
Every true MFC application has a class derived from CWinApp. You can see how AppWizard has done this for you by looking at the following sample from HiMom.h:
class CHiMomApp : public CWinAppThe first line shown here is what gives your application the real power of the MFC application framework. This is where the CHiMom class is derived from CWinApp. Apart from that, you will notice an awful lot of strange comments. These comments give the Class Wizard landmarks to find the pieces of the code that it manipulates.
|
CAUTION |
|
You should notice the DO NOT EDIT warning in the comments. Although it is possible to change or add some things in these sections, it is not generally a good idea. The changes you make here may confuse ClassWizard to the point that you won't be able to use it to help manage your classes. If you feel you must make changes on ClassWizard's turf, it's best to try out ClassWizard right after you make the changes to see whether things still work. You should also realize that ClassWizard may change the code in these sections. If you ever want to use ClassWizard again, by all means do not delete these comments! |
Just as your Application class derives from CWinApp, CWinApp itself is derived from a chain of other classes in the application architecture hierarchy, including CWinThread, CCmdTarget, and CObject.
One of the major differences between Windows 3.1 and the Windows NT and Windows 95 operating systems is the use of preemptive multitasking. Although Windows 3.1 supports multiple tasks, only one task could be running at one time, and nobody else could run without the running task giving up the processor. Win32 supports true multitasking through the use of threads, which allow more than one thing to be going on at the same time. True, most processors really execute only one instruction stream at a time, but as far as this chapter is concerned, all threads run at the same time.
When your application first starts, it has oneand only onethread, known as the primary thread. This thread is encapsulated by the CWinApp class that you have derived. This means that a pointer to your CWinApp object is also a pointer to the CWinThread object for the primary thread. Once your application gets going, it can create as many new threads as it wants to manage various tasks.
|
NOTE |
|
Even though you may not be using more than one thread, the MFC libraries always expect to link with multithreaded runtime libraries. You should select the appropriate multithreaded libraries in the Build Settings under the C/C++ Code Generation options. (This is not the default for new application workspaces that are not created with the MFC AppWizard.) |
You learn more about working with threads in Chapter 9, 'Multithreading with MFC,' but, for now, let's move on to the base class of CWinThread, CCmdTarget.
All window classes under MFC, including OLE classes, are derived at some level from CCmdTarget. This class is used as a base class for so many other classes because it allows your class to handle Windows messages.
Windows programs are based on an event-driven model. This means that they run in the traditional sense for only a short time at startup, then spend the rest of their lives waiting around for messages, reacting to them, and waiting again for more messages. These messages can be generated by simply moving the mouse, clicking on a button, or selecting a menu command.
In C programs, these messages were generally handled by large switch blocks involving case statements for each message that your application wanted to process. Because the processing of these messages was often dependent on several other variables, most applications ended up with a massive web of nested switch and if blocks.
To remedy this situation, and to allow you to use the power of C++ freely, MFC has implemented message maps to allow your classes to handle Windows messages in a much cleaner fashion. Any class derived from CCmdTarget may have its own message map, allowing each class to handle the messages it is interested in however it chooses, while leaving other messages to be handled higher in the class hierarchy.
Working with messages is one of the most important things that you will do in Windows programming (so important, that it has its own chapterChapter 3, 'MFC Messages and Commands'). For now, let's move on to the base class of CCmdTarget, CObject.
At least as far as MFC is concerned, CObject is the mother of all classes (well, most of them anyway). Almost all the classes in MFC are derived from CObjectwith a few notable exceptions, such as CString. Deriving a class from CObject provides several very important features, including serialization, runtime type information, and some very important debugging features.
Many features of Windows programming with MFC require the capability of serializing the data in your objects. Perhaps the simplest example of this is saving an object to a file. You need to have a way to convert your object to a series of bytes that can be written to disk and brought back later to restore your object to its previous state.
To implement serialization in your classes, you first derive them, either directly or indirectly, from CObject. Then you can implement the Serialize member function for your class to serialize its data. To see just how to do this, let's start by looking at a few macros MFC provides to help.
To help implement serialization in your class, MFC provides a pair of macros: DECLARE_SERIAL for use in your class declaration (usually in an .h file) and IMPLEMENT_SERIAL for use in your class implementation (a .cpp file).
The DECLARE_SERIAL macro takes only one parameter: the name of your class. Placing this in your class declaration provides prototypes for the serialization functions and some special handling for the insertion operator. You can see how this is used in the following class declaration:
Class CEmployee : public CObjectNotice that this example declares a Serialize() function, which takes a reference to a CArchive object, which provides a context for the serialization. The Serialize() function prepares the CArchive object either to read from or write to objects of your class. You must implement the Serialize() function for each class that you intend to serialize.
As mentioned previously, the same Serialize() function implements both loading and storing, based on the CArchive context. You can use the CArchive::IsLoading() or CArchive::IsStoring() function to determine the direction of serialization. The implementation for the CEmployee class declared earlier might look like this:
IMPLEMENT_SERIAL(CEmployee, CObject, 0x200)There are many interesting things that you should notice in this example, beginning with the use of the IMPLEMENT_SERIAL macro, which takes three parameters: the class name, the base class it is derived from, and a schema number, which you'll learn about in just a bit.
Next, you should notice that you call the Serialize member of the base class. Every implementation of Serialize() must call the Serialize() function of the base class to allow it to serialize its data first, before you serialize the data for your class.
Notice that the serialization is performed by the overloaded insertion and extraction operators. These are predefined for the CArchive class for the following data types:
BYTEThe insertion and extraction operators are also defined for any class that implements serialization. You can thank the DECLARE_SERIAL and IMPLEMENT_SERIAL macros for this. If you need to use any other data types, you have to create your own override functions or use macros or type casts to use the supported types.
Earlier, you learned that the IMPLEMENT_SERIAL macro takes a schema number for its third parameter. This can be any number in the valid range of type UINT, with the exception of -1, which is reserved for use by MFC. The schema number effectively allows you to embed a version number in your serialized data; if the schema number you specify in IMPLEMENT_SERIAL does not match the schema number in the file you are reading, MFC will fail an assert.
If MFC just blows up, how can it support multiple versions? This is where the VERSIONABLE_SCHEMA macro comes in. If you combine your current schema number and the VERSIONABLE_SCHEMA macro by using the OR operator (|), your Serialize() routine will write your data with the current schema number, but can read any schema. This is handled by use of the CArchive::GetObjectSchema() function, as you will see in the following example. Here, you assume that the previous version of CEmployee did not implement the m_Name member:
IMPLEMENT_SERIAL(CEmployee, CObject, VERSIONABLE_SCHEMA|0x200)As you can see, you should provide reasonable defaults for data that cannot be retrieved from the archive. On the other hand, you probably should provide some sort of mechanism to report unknown cases to the user, instead of doing nothing, as I did here.
Beginning with version 4.0 of Visual C++, two versions of runtime type information are supported: the ANSI standard C++ typeid() variety and MFC's own, more powerful brand of type identification provided by the CObject class.
If you want to use the ANSI variety of runtime type information (RTTI), you can enable this in the Project Settings dialog by selecting the Enable Run-Time Type Information (RTTI) option on the C++ Language page of the C/C++ tab. This allows you to use the C++ typeid() operator to get the name of the class.
The MFC version of runtime type information provides backward compatibility with MFC apps that predate ANSI RTTI in Microsoft compilers and provides information for efficient serialization and cross-platform compatibility.
To use MFC's runtime type information, you can use the DECLARE_DYNAMIC macro, which takes your class name as an argument in your class declaration, and the IMPLEMENT_DYNAMIC macro, which takes your class name and its base class in your implementation. These set up the structures that MFC uses to track type information for your classes.
|
NOTE |
|
You use only one set of these macros for your CObject class. DECLARE/IMPLEMENT_DYNCREATE includes DECLARE/ IMPLEMENT_DYNAMIC functionality, and DECLARE/IMPLEMENT_SERIAL encompasses both of these. |
If you have enabled runtime type identification in your classes, you can now verify that any pointer you get is a valid pointer to the class you expect, before your app goes off into the weeds from a faulty pointer. This is done by using the CObject::IsKindOf() function, which takes a pointer to a runtime type information structure. This structure can be provided for constant class types by the RUNTIME_CLASS macro, taking your class name as a parameter. This example demonstrates this a little better:
if(pMyPtr->IsKindOf(RUNTIME_CLASS(CEmployee)))In this example, if CMyPtr points to an object of class CEmployee or any class derived from it, IsKindOf() returns TRUE. If IsKindOf() returns FALSE, you will probably want to report an error.
In addition to the type information available from CObject, MFC provides macros to validate types when you want to cast a pointer to an object to a pointer to a more specific derived class. You can use STATIC_DOWNCAST to check your casting with code like this:
CWnd* pWnd;If you are running a debug build and pWnd is not really a pointer to a CButton class object, MFC will assert; otherwise, the cast is performed as normal. In a nondebug build, STATIC_DOWNCAST will always perform the cast without type checking. If you want to do type checking in release builds, you can use the DYNAMIC_DOWNCAST macro, which works the same way in debug and nondebug builds. If the type check fails, or if the pointer is NULL, DYNAMIC_DOWNCAST will return NULL. It is then up to your application to decide what to do.
If you want to check that a pointer is of the type you want it to be, you could use a line like the following:
ASSERT(pMyPtr->IsKindOf(RUNTIME_CLASS(CEmployee)));This may be a bit cumbersome both to type and to read, so MFC provides a shortcutthe ASSERT_KINDOF macro. The following line behaves exactly the same as the previous ASSERTit just looks neater:
ASSERT_KINDOF(CEmployee, pMyPtr);You can probably guess that the first argument is the desired class type and the second is the pointer in question.
Because CObject is the base class for almost all other classes in the MFC, it serves as a convenient place to stash a few very important debugging features.
If you want to be able to verify that an object of your class is valid, you can override the AssertValid() member function of CObject. Like many other debug features, this should only be implemented in builds where _DEBUG is defined. To implement an AssertValid() function for your class, the declaration for your class should look like the following:
class CMyClass : public CObjectNow you need to implement your AssertValid() function. This function should perform a quick check that the elements of your class are in order. Your implementation should look something like this:
#ifdef _DEBUGYou should perform all your validity tests with the ASSERT macro (and derivatives like ASSERT_KINDOF). You can use AssertValid() in your applications by calling the ASSERT_VALID macro, which takes a pointer to the object to be validated. This macro, like many other debug macros, will not generate any code in nondebug builds, so you won't need to hassle with all those pesky #ifdefs.
Because I have mentioned asserts several times already, it's about time you look at them in more detail. The ASSERT macro takes any expression that evaluates to a Boolean expression. If this expression is true (nonzero), all is well and the app goes on its merry way. If however, the expression is false (0), a dialog box will appear.
This dialog box gives you three choices. You may choose Abort to stop your app right there; or you can choose Ignore to close the dialog and press on; or you can choose Retry, which enables you to jump right into the debugger at the point that the ASSERT failed, even if you did not start the application in the debugger. From this point, you can easily use the Call Stack window to figure out just where in your code things went amiss.
Remember that the ASSERT macro does not generate any code in nondebug builds. It will not even evaluate the expression. If you want to have the expression evaluated in release builds, you can use the VERIFY macro instead.
Another important debugging feature of the CObject class is the Dump() function. This is useful when you want to spit out information about the current state of your class object periodically, or when you have noticed a problem. Once again, this feature should not be implemented in nondebug builds. To use the Dump() function in your classes, you insert code something like this:
class CEmployee : public CObjectYour implementation would include code such as this:
#ifdef _DEBUG|
TIP |
|
Remember to use newlines or other whitespace to separate your data; it will make your dump much more readable. It is also a good practice to end your output with a newline to ensure your output doesn't get scrambled with the next object to dump. |
If you are running your application under the Visual C++ debugger, MFC will set up the dump context passed to Dump() to send its output to the Output window of the debugger.
The insertion operator for the dump context that is used in the examples is defined for the following types:
BYTEIf the type you want to dump isn't supported, you can generally get by with a simple cast. After all, the data is just going to be converted to a string for output.
In addition to the Dump() function, your application can write to the debug context with the TRACE() macro provided by MFC. The TRACE() macro works much like printf(). It accepts a string that may include placeholders for other variables, using the same % variables that printf() uses, except TRACE() does not support floating-point variables. The TRACE() macros will, however, support Unicode strings.
With the MFC Tracer application (TRACER.EXE), included in the Tools menu of Developer Studio, you can enable or disable several sorts of trace messages provided by MFC's internals, as well as disable tracing altogether.
If you wish to assign MFC's dump contextand the TRACE() and Dump() output that goes with itto something other than the debugger's Output window, see the documentation for the CDumpContext and Dumpinit.cpp in MsdevMfcSrc, which declares CDumpContext afxDump. Unfortunately, the details of doing this are beyond the scope of this book.
In this chapter, you have taken a look at the classes in the application architecture hierarchy and have seen many of the features these classes have to offer. Now let's take a look at how MFC brings this all together to get your application off and running.
The first thing that your application will do when it begins executing is initialize all the static and global objects in your application. Perhaps the most important global object that will be created is an instance of your CWinApp class. If you have created your app with AppWizard, this is done for you by code like this from HiMom.cpp in the HiMom sample:
The code created by Visual C++ will call the constructor of your CWinApp class just after creating global variables by loading an initialized data segment and constructing a few other objects that MFC uses internally.
You should be aware that your application is not really running yet when the constructor for your CWinApp (or any other static object) is called. You should avoid doing any serious operations in these constructors, particularly with Windows classes. Simple initialization of your variables (including CString objects) is fine, but you will soon run into trouble if you try to perform operations on other more complicated classes, particularly classes such as CWnd, because the actual window underlying CWnd objects has not been created yet.
Once all the constructors for static objects have run, the runtime library will call MFC's implementation of WinMain(). This function will take care of initializing MFC for you and will then call the InitApplication() and InitInstance() members of your CWinApp class. When these have finished, WinMain() will call the Run() function of your CWinApp class. Normally, this defaults to CWinThread::Run(), which will get the message pump for your application going. At this point, your application will begin to process messages like any good Windows application.
When your application terminates (when a WM_QUIT message is received) MFC will call the ExitInstance() function of your CWinApp class, then the destructors of any static objects, including your CWinApp object. The application then returns control to the operating system and is done.
The InitApplication() function is really not necessary for Win32 programming, but is a relic from the good (or bad) old days of Win16. In 16-bit windows, two instances of an application could run at the same time, with the InitApplication() code running only when the first instance was started. In Win32, an application that is run twice, it will exist in two totally separate, independent processes. You can place code in InitApplication(), but it is no different than InitInstance() in Win32, except InitApplication() will be called first. If you choose to override the default InitApplication(), you should return TRUE if all is well. If your function returns FALSE, initialization will halt, ending your program.
|
NOTE |
|
If you are used to doing all your initialization in WinMain(), you will find that you can still access the information passed in the parameters to WinMain() by way of members of the CWinApp class. The handle to the executing instance of the application, normally passed to WinMain() as hInstance, is available in CWinApp::m_hInstance or by calling ::AfxGetInstanceHandle(), which can be called from anywhere. The hPrevInstance parameter to WinMain() is always NULL in Win32 applications, so it is not provided in a member variable. The lpszCmdLine parameter to WinMain(), which points to the command-line string, may be found in CWinApp::m_lpCmdLine. You will take a closer look at using this in just a bit. The nCmdShow parameter to WinMain() is available in the m_nCmdShow member. This should be used in your call to ShowWindow(). |
Your InitInstance() function is where all the serious initialization for your app should occur. If you look at the InitInstance() function created by AppWizard for the HiMom example shown next, you will notice that it does several very important things. Depending on the options you selected in AppWizard, you may see how AppWizard initializes things such as OLE, Windows sockets, and 3D controls:
You should also notice a call to LoadStdProfileSettings(). This will load some standard data items, including the files on the Most Recently Used list, from either the application's .ini file or from the Registry. For now, suffice it to say that the Registry allows a hierarchical, secure place to store and retrieve data that was formerly relegated to various .ini files in Win16. Although MFC will default to using .ini files, you should look at Chapter 34, 'Developing Complete Applications,' for more information on using the Registry to store information about your application that you will want to use the next time your app starts.
In MFC applications, you can handle command-line information in several ways. Traditional C-style argc and argv processing is available by using the __argc and __argv global variables provided. You may also look at the entire command line provided by m_lpCmdLine. Windows applications, however, can support some special command-line options that are best handled with the methods shown next.
As you can see from the previous example, InitInstance() creates a CCommandLineInfo object and passes it to ParseCommandLine(). This function will then call CCommandLineInfo::ParseParam() for each parameter. ParseParam() will modify the CCommandLineInfo structure based on these parameters. In InitInstance(), the resulting CCommandLineInfo object is then passed to ProcessShellCommand(), which is responsible for carrying out any default actions specified in the command line.
The default implementation of ParseParam() will handle the parameters and the actions detailed in Table 2.2.
Table 2.2. Default parameter actions.
|
Parameter |
Action |
|
(No parameter) |
Create new document. |
|
<filename> |
Open specified file. |
|
/p <filename> |
Print specified file. |
|
/pt <filename> <printer> |
Print file to specified printer. |
|
<driver> <port> | |
|
/dde |
Serve a DDE session. |
|
/automation |
Start an OLE automation server. |
|
/embedding |
Prepare to serve an embedded OLE object. |
You may use argc, argv processing along with ParseCommandLine() if you want, or you may change the way ParseCommandLine() works by creating your own class derived from CCommandLineInfo and overriding the ParseParam() function.
You may also change your application's behavior by modifying the CCommandLineInfo object before you call ProcessShellCommand(). For example, if you do not want your application to create a new document by default, you can make sure that the m_nShellCommand member of the CCommandLineInfo object is not FileNew before you pass it to ProcessShellCommand(). For more on this, refer to CCommandLineInfo in the Visual C++ online documentation.
The last thing that the AppWizard-generated version of InitInstance does is call ShowWindow() and UpdateWindow() to present the main window of your application, which was created earlier in InitInstance. Like InitApplication(), your InitInstance() call should return FALSE only if something has gone wrong and you want to bail out of your program right there.
Now that all the initialization for your program has executed, the CWinThread::Run() function will start up the message pump, or message loop, of your application. The message pump will do nothing but wait until it receives a message. At this point, the message is dispatched to a message handler function, provided by your application or by MFC, that will react to the message. The details of message dispatching are covered in the next chapter.
When I said that the message pump does nothing but wait around between messages, I stretched the truth just a little. When the message pump finds that the message queue is empty, it will call OnIdle(), which may allow you to do some background processing or update the status of your user interface objects, such as disabling toolbars if needed.
The OnIdle() function will be called repeatedly until it returns FALSE, or until a message is receivedat which point, the message is dispatched. When OnIdle() returns FALSE, the message pump will sleep until the next message arrives.
If you choose to implement your own OnIdle() function, you should keep in mind that the message queue for your application (or at least this thread) will not be able to process any messages until OnIdle() returns, because this is a non-preemptive method of multitasking. If you want to do preemptive multitasking, see Chapter 9. Also, your implementation of OnIdle() should call the base class implementation, which updates user interface objects and cleans up some internal data structures. With this in mind, the declaration of OnIdle() looks like this:
virtual BOOL OnIdle(LONG lCount);The lCount parameter is incremented each time OnIdle() is called and it is set to 0 when new messages are processed.
In this chapter, you learned how to create an application using AppWizard to save time. You have also looked at the classes that make up the application architecture hierarchy and what they can do for the application. Finally, you saw how MFC uses the application hierarchy to get your application started.
Chapter 3 MFC Messages and Commands
Windows programs are based on an event-driven programming model. This means that most of the things your application will do are done in response to various Windows messages. If you have done any Windows programming, you already know this. This chapter will show you how to work with MFC to handle messages with C++ classes. In this chapter, you will learn about
Standard Windows commands handled by the MFC
How MFC dispatches messages to your application
Using ClassWizard to handle messages
Implementing your own message maps
Almost everything that your application will do is based on handling Windows messages. These come in three basic varieties: general Windows messages, control notifications, and commands.
The Message IDs for Windows messages are generally prefixed by WM_for example, WM_PAINT or WM_QUIT. These messages, which are handled by windows and views, can represent a wide range of things that happen in your application. Thankfully, MFC provides default handlers for most of these, as you will see. Note that WM_COMMAND messages receive special handling as either control notifications or commands.
Control notifications are WM_COMMAND messages sent from child windows to their parent window. For example, an edit control will send an EN_CHANGE message to its parent window (usually a dialog box) whenever its content may have changed. Windows messages and control notifications are usually handled by window objectsthat is, objects derived from class CWnd.
Commands are WM_COMMAND messages from menus, buttons (including toolbars), and accelerator keys. Command messages may be handled by a wider array of classes, including documents, document templates, windows, views, and the application itself.
MFC provides a framework for handling windows messages that can be much easier to work with than the web of switches and ifs that are used in traditional Windows programs to control the handling of messages. This is based on the capability of classes derived from CCmdTarget to have their own message maps. MFC uses the message maps of your classes to decide how any given message should be handled, allowing you to take full advantage of the benefits of the C++ language to encapsulate functionality in your classes so that other classes derived from them don't have to reinvent the wheel.
To further expand on reusability, MFC provides default handlers for a wide range of commands used in most Windows applications. Most of the commands that have default handlers are also included in the default menus generated by AppWizard. The following are menu commands that have default handlers in MFC:
File menu commands: New, Open, Close, Save, Save As, Page Setup, Print Setup, Print, Print Preview, Exit, and the most recently used files list
Edit menu commands: Clear, Clear All, Copy, Cut, Find, Paste, Repeat, Replace, Select All, Undo, and Redo
View menu commands: Toolbar and Status Bar
Window menu
commands: New, Arrange, Cascade, Tile Horizontal, Tile Vertical, and
Help menu commands: Index, Using Help, and About
The menus created by AppWizard generate messages for the standard commands defined in AFXRES.H. For example, the File | New menu item generates a message with the command ID of ID_FILE_NEW. The other standard commands are similarly named, with ID_, the menu name, and the command name.
If you wish to perform one of these standard actions, you can send one of the predefined command messages from anywhere in your application that will be handled by MFC's default handlers. Of course, you can also implement your own handlers for these commands, but you will explore that later. For more information on the default commands, see Technical Note 22 (TN022) in the online help.
As mentioned in Chapter 2, 'MFC Overview,' the Run() function of the CWinThread class provides the message pump for your application. (For now, let's assume there is only one thread in your application. If you want to learn how to use threads to have more than one message pump in your app, see Chapter 9, 'Multithreading with MFC.') The only function of the message pump is to wait for messages and then send them where they should go to be handledthis is called dispatching the message.
When the message pump receives a Windows message, it identifies the class that should get first crack at handling the message by consulting an internal structure that maps the handles of existing windows to the class responsible for each window. MFC will then check to see whether this targeted class provides an entry for the message in its message map. If an entry is found, the message is passed to the handler, ending the dispatch process. If an entry for the message is not found, MFC will check the message map of the base class for the targeted class, moving farther up the class hierarchy until an entry is found.
For command messages, the search is quite a bit more complicated. When a command is routed to a class it may allow another class to try to handle it before checking its own message map or routing the command to another command target. In most cases, a command target will route commands in the following order:
To the currently active child command target object
To itself
To other command targets
Table 3.1 lists more specific routing for the usual command target classes. When a class is mentioned in the right side of the table, you should jump to that class on the left side, follow its routing, then go back to where you were to continue the routing.
Table 3.1. Standard command routing
|
This object type |
Routes commands in this order |
|
MDI Main Frame |
1. Active CMDIChildWnd |
|
2. This frame window |
|
|
3. Application (CWinApp) |
|
|
MDI child frame |
1. Active view |
|
|
2. This frame window |
|
SDI Main Frame |
1. Active view |
|
2. This frame window |
|
|
3. Application (CWinApp) |
|
|
View |
1. This view |
|
2. Document associated with this view |
|
|
Document |
1. This document |
|
2. Document template associated with |
|
|
this document |
|
|
Dialog Box |
1. This dialog box |
|
2. Window that owns this dialog |
|
|
3. Application (CWinApp) |
By now, this is as clear as mud, right? The following example will clear things up a bit.
Suppose you add a menu item that will send the ID_MY_COMMAND command message to the MDI main frame of your application:
If you find that you must use a different command routing scheme, perhaps to include your own special command target classes, you can do so by overriding the OnCmdMsg() member of CCmdTarget. This may involve overriding OnCmdMsg() for several classes and is beyond the scope of this book; for more information, see Command Routing in the MFC online documentation.
|
NOTE |
|
MFC speeds up this process by using an internal cache of recent message handler search results, avoiding lengthy searches. |
I know this all seems horribly complicated, but it will make much more sense when you work with documents and views in the next chapter. In fact, it will seem much simpler even sooner, when you see how you can use ClassWizard to associate messages with the appropriate handler.
For most all of your message handling tasks, you will find that ClassWizard can be a great help. ClassWizard allows you to map messages to handlers for all your classes that are derived from CCmdTarget, by using the Message Maps page of ClassWizard. Remember that you can always start ClassWizard from the View menu or by pressing Ctrl+W. Selecting the Message Maps tab will present a dialog box that looks like the one in Figure 3.1.
Figure 3.1. The ClassWizard Message Maps page
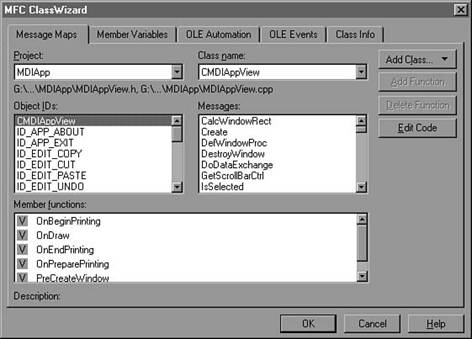
If you have multiple projects in your workspace, you will first need to select the appropriate entry in the Project list. You can then select any of your classes derived from CCmdTarget in the Class name list. This will present you with a list of Object IDs, the messages those objects may receive, and a list of the member functions already implemented in the Member functions list.
The objects listed in the Object ID's list can be of three different types: the classes listed in Class name, menu item objects, and other controls that may send messages to the class you have selected in Class name.
When you select your class name from the top of the Object IDs list, you will see a list of all of the Windows messages that your class is likely to receive, including several functions, such as InitInstance or Create, that aren't really message handlers at all. Nevertheless, ClassWizard will allow you to manage these functions here as well. ClassWizard will display only a certain subset of all available Windows messages, based on the Message filter specified in the Class Info page. This allows you to filter out messages that are not normally handled by certain classes. If you want to handle a message that you don't see listed, try changing the message filter.
|
TIP |
|
To find out more about a message in the Messages list, highlight the message and press F1 to get help on the specifics of that message and its handler function. |
When you select a menu command, such as ID_FILE_OPEN, from the Object IDs list, you will see two entries in the Messages list. To do something when the user selects this command from a menu, select the COMMAND message. The UPDATE_COMMAND_UI message is used to help update the status (checked, grayed, and so forth) of the menu item. You will look at this in greater detail in Chapter 5, 'Dialogs and Controls.'
The third type of objects listed in the Object IDs list are controls that may send messages to your class. For simple controls such as buttons, you will receive only a limited set of messages, such as BN_CLICKED and BN_DOUBLECLICKED. For more complicated objects, such as edit controls, you will be able to handle many different control notifications.
|
TIP |
|
If you want your class to handle notifications from a control that is not listed, make sure that the control is highlighted in a resource editor window before you start ClassWizard. |
Once you have selected the message that you want to handle, simply click on the Add Function button to create a handler function. ClassWizard will add a declaration for your handler to the declaration of your class and add a message map entry and skeleton handler function to your class implementation.
All you have to do now is add the code to your handler function. You can go straight to your new handler function implementation by double-clicking in the Member functions list or by clicking on the Edit Code button.
When you create a class with AppWizard or ClassWizard, Visual C++ will produce the code to create a message map for your class. If you create your own CCmdTarget-derived class outside of ClassWizard, you need to create the message map yourself. You should start by adding the following line to the end of your class declaration:
DECLARE_MESSAGE_MAP()This macro is defined in AFXWIN.H in the DevStudioVCmfcinclude directory. It declares the array that will hold your message map entries and some pointers used to find the message map of the base class. You should be aware, though, that the structures for your class's message map are defined static const. This means that you can have only one message map for all objects of your class, not a different map for each object. This also means that you cannot change a class's message map at runtime, at least not with methods that are discussed here. (It can be done with overrides of PreTranslateMessage() or the functions hidden in the message map itself.)
Next, you add a message map to your class implementation. To see how this is done, let's take a look at the message map implementation created for the CHimMomApp class in HiMom.cpp:
As you can see in this example, message maps are created by a set of macros, beginning with BEGIN_MESSAGE_MAP() and ending with END_MESSAGE_MAP(). To start the definition of your message map, use the BEGIN_MESSAGE_MAP() macro, which takes the name of your class and the name of its base class as parameters.
The BEGIN_MESSAGE_MAP() macro (defined in AFXWIN.H) actually defines the _messageEntries array, leaving the initializer list open, to be filled by additional macros. If you forget to include the END_MESSAGE_MAP() macro, which closes the initializer list, the compiler will become quite lost, so make sure you end your message map with END_MESSAGE_MAP().
In the previous example, you will see a DO NOT EDIT message from ClassWizard. It is a good idea to avoid editing these sections if you don't have to, but you can make changes here. However, you should be aware that changes to these blocks have the potential to confuse ClassWizard so that you cannot edit your class or must regenerate the .clw file. ClassWizard may just overwrite your new changes. If you make changes to these blocks yourself, try to model your code after other ClassWizard-generated code and check the function of ClassWizard right after making your changes.
That said, you will be populating your message map by using several different macros for different types of messages, including message ranges.
For many standard Windows messages, there are predefined message map macros provided in AFXMSG.H. The names for these macros are derived directly from the message ID and they take no parameters. For example, the WM_PAINT message can be mapped by the ON_WM_PAINT() macro. This will map the WM_PAINT message to the OnPaint() function of your class. The other standard Windows messages are implemented in a similar fashion.
For your own user-defined messages, or for Windows commands that do not have a default handler, you can use the generic ON_MESSAGE()macro, which takes the message ID and handler function name:
ON_MESSAGE( WM_USER+1, OnMyUserMessage)The handler for these messages would be declared like this:
afx_msg LRESULT OnMyUserMessage(WPARAM wParam, LPARAM lParam);For command messages, you will use the ON_COMMAND() macro(), which takes the command ID (which will be in the wParam of the WM_COMMAND message) and the name of the handler function:
ON_COMMAND(ID_FILE_NEW, CWinApp::OnFileNew)The handler function will take no parameters and return void:
afx_msg void OnFileNew();Notifications from controls can be mapped by using the ON_CONTROL()()macro, which takes the control ID, the command ID, and the handler function as arguments:
ON_CONTROL( BN_CLICKED, IDC_MY_BUTTON, OnMyButtonClicked)
The handler for these messages, like command messages, returns void and takes no parameters:
afx_msg void OnMyButtonClicked();There are also macros that will map a handler to messages for a range of commands or controls. This is one of the few areas where you must make your own message map entries, because ClassWizard doesn't handle ranges. Your entries for ranges would look like this:
ON_COMMAND_RANGE(ID_MY_FIRST_COMMAND, ID_MY_LAST_COMMAND, myCommandHandler)For message IDs that you have received from the RegisterWindowsMessage() function, you can use ON_REGISTERED_MESSAGE()(), which takes the registered message ID and the handler function. The handler again returns void and takes no parameters.
AFXMSG.H also defines many other macros designed to map different special cases of messages that you may find useful in creating your own message maps. For example, the ON_CONTROL() example used above can also be written like this:
ON_BN_CLICKED(IDC_MYBUTTON, OnMyButtonClicked)This is actually the syntax that ClassWizard uses when it inserts entries like this, but it results in exactly the same entry in the message map as the ON_CONTROL() macro used above. There are also special macros for handling OLE functions and user interface updates that you will learn about later.
The message map macros DECLARE_MESSAGE_MAP, BEGIN_MESSAGE_MAP, and END_MESSAGE_MAP are defined in AFXWIN.H. If you are curious, you can find this file in the DevstudioVCmfcinclude directory. In short, DECLARE_MESSAGE_MAP defines functions to return the class's message map (GetMessageMap()), and that of its base class (_GetBaseMessageMap()), as well as an AFX_MSGMAP structure. This structure consists primarily of an array of AFX_MSGMAP_ENTRY structures (_messageEntries[]).
The BEGIN_MESSAGE_MAP() macro implements the GetMessageMap() and _GetBaseMessageMap() functions, then begins initializing the _messageEntries[] array. The initializer list is left without a closing brace, leaving END_MESSAGE_MAP to add an entry that marks the end of the message map and closes the initializer list.
In this code, between BEGIN_MESSAGE_MAP and END_MESSAGE_MAP, you use the message map entry macros, such as ON_COMMAND, which is actually defined like this:
#define ON_COMMAND(id, memberFxn)The values specified in the message map macros are used to initialize an AFX_MSGMAP_ENTRY, which looks like this:
struct AFX_MSGMAP_ENTRYThe first four elements are used by MFC to check whether this message map entry applies to the Windows message that is being dispatched. The last two elements specify information about the handler function to be called. pfn is a pointer to the function to call, and nSig is a special signature type, which MFC uses to specify the return type and parameters that will be passed to the function specified by pfn.
The values used for nSig are defined in the AfxSig enum type in Afxmsg_.h. This file also lists the function prototypes that should be used to correspond with each nSig value.
If you are ever unsure of what form a handler function for a given message map macro should take, you can look up the macrofor example, ON_COMMANDin Afxmsg_.h, see that it uses AfxSig_vv, then find the definition of AfxSig_vv to find that your handler function should return void and take no parameters.
Using ClassWizard to add your handler functions will save you this trouble in most cases; however, there are certain message map entries that ClassWizard does not support, such as ON_COMMAND_RANGE or ON_THREAD_MESSAGE.
When you add handler functions with ClassWizard, your handler function will be created for you, with the proper parameters and return type. If you create your message map entries and corresponding handler functions yourself, be very careful to declare your handler function with the parameters and return type that the message map entry expects. Failure to do so will result in a corrupted stack at some point and can cause big headaches.
In most cases, the message pump receives messages and dispatches them by way of message maps, as you saw in the previous example. However, if you find that you need to intercept messages prior to the normal dispatch process, MFC offers a way to do thisthe PreTranslateMessage() function.
You can override the PreTranslateMessage() member function in any class derived from CWnd, CWinApp, or CWinThread. The function takes a pointer to an MSG structure and returns a BOOL. If PreTranslateMessage() returns TRUE, MFC will assume that you have handled the message. If it returns FALSE, MFC assumes that you have elected not to handle it and will proceed with its normal dispatch process.
In this chapter, you learned how MFC handles messages, including the default message handlers for common commands. You also looked at how MFC dispatches a message to the appropriate handler function and how to create message maps, both with and without ClassWizard.
|
