We mentioned before, that there is a compiler for a small resource language that describes our dialog boxes. Let's look at that with a little bit more detail before we go to our dialog procedure.
Open that file that should be called dialog.rc if you gave the project the "dialog" name , and look at this lines:
IDD_MAINDIALOG DIALOG 7, 20, 195, 86 (1)
STYLE DS_MODALFRAME|WS_POPUP|WS_VISIBLE|WS_CAPTION|WS_SYSMENU (2)
CAPTION "dialog" (3)
FONT 8, "Helv" (4)
DEFPUSHBUTTON "OK", IDOK, 149, 6, 40, 14 (5)
PUSHBUTTON "Cancel", IDCANCEL, 149, 23, 40, 14 (6)
We see that all those statements concern the dialog box, its appearance, the position of its child windows, etc. Let's go statement by statement:
We find here the same identifier IDD_MAINDIALOG, and then the DIALOG statement, together with some coordinates. Those coordinates are expressed in Dialog Units, not in pixels. The motivation behind this, is to make dialog boxes that will look similar at all resolutions and with different screen sizes. The units are based somehow in the size of the system font, and there are APIs to get from those units into pixels, and from pixels into those units.
The STYLE statement tells the interpreter which things should be done when creating the window. We will see later when we create a real window and not a dialog box window, that there can be quite a lot of them. In this case the style indicates the appearance (DS_MODALFRAME), that this window is visible, has a caption, and a system menu.
The CAPTION statement indicates just what character string will be shown in the caption.
In a similar way, the FONT statement tells the system to use Helv
The following statements enumerate the controls of the dialog box, and their descriptions are enclosed in a BEGIN/END block. We have two of them, a push button that is the default push button, and a normal pushbutton
the Cancel button. Both of them have a certain text associated with them, a set of coords as all controls, and an ID, that in the case of the OK button is the predefined symbol IDOK, with the numerical value of 1, and in the case of the Cancel button IDCANCEL (numerical value 2).
To convert this set of instruction in this language into a binary resource file that windows can interpret, we use a compiler called a resource compiler. Microsoft's one is called rc, Borland's one is called "brc", and lcc-win32's one is called lrc. All of them take this resource language with some minor extensions depending on the compiler, and produce a binary resource file for the run time interpreter of windows.
The resource compiler of lcc-win32 is explained in detail in the technical documentation, and we will not repeat that stuff again here. For our purposes it is enough to know that it is compatible with the other ones.
The binary resource files generated by the resource compiler are passed to the linker that converts them into resource specifications to be included in the executable.
Note that actually you do not need to know this language, because the IDE has a resource editor that can be used to build graphically using drag and drop the dialog box. But the emphasis here is to introduce you to the system so that you know not only what button should you push, but why you should push that button too.
But we wanted originally to make a dialog box containing an edit field. We are far away from our objective yet.
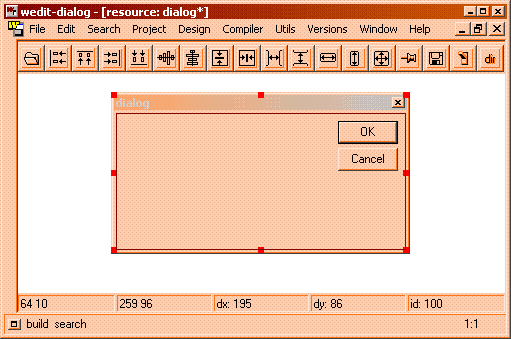
Again, we come back to the IDE, after closing our text file "dialog.rc", and we go to the "Design" menu bar and press "Open/new". The resource editor opens up, and we see the following display:
|
|
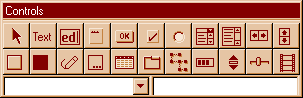
Near Wedit, you will see another window, containing yet another series of cryptic icons. It looks like this:
The whole operation of the editor is quite simple: The smaller window represents all the controls that you can put in a dialog box: entry fields, buttons, checkboxes, and several others. You select one button with the mouse, and drag it to your dialog box. There you drop it at the right position. To add an entry field then, we just push the edit field icon, the third one from the left in the upper row of icons, and drag it to our dialog box in the main wedit window.
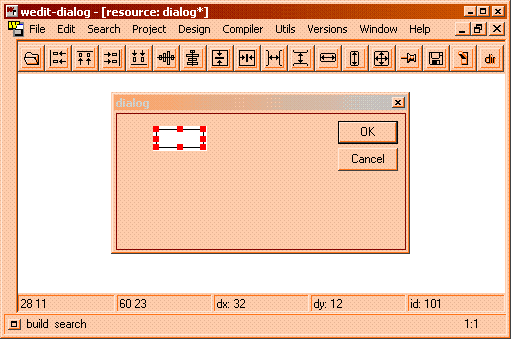
After doing that, or dialog will look like this:
|
|
Our entry field becomes the selected item, hence the red handles around it. After resizing if necessary, we need to enter its identifier, i.e. the symbolic name that we will use in our program to refer to it. We can enter this data directly in the auxiliary window like this:
We will refer then in our program to this entry field with the name IDENTRYFIELD, maybe not a very cute name, but at least better than some bare number. The editor will write a
#define IDENTRYFIELD 101
in the generated header file. The number 101 is an arbitrary constant, chosen by the editor.
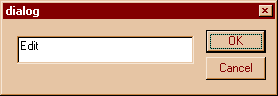
We resize the dialog box a bit (I like dialogs that aren't bigger than what they should be), and we press the "test" button, the one just before the "Dr" button in the upper row of icons of Wedit's main window.
We see a display like this:
|
|
We can enter text in the entry field, and pushing Cancel or OK will finish the test mode and return us to the dialog box editor.
OK, seems to be working. We save, and close the dialog box editor. We come back to our dialog procedure, where we will use this new entry field to get some text from the user.
|