ALTE DOCUMENTE
|
|||||||||
Visual C++ Environment
Although Visual C++ is first and foremost a C++ compiler, it also offers a complete development environment made up of many components that work together to simplify the development process. Many of the features of this environment will be familiar to you; after all, some basic features are ones that any integrated development environment is expected to provide. However, many of the features of the development environment are unique to Visual C++ and might seem a bit foreign at first, but you will soon see that these features can significantly improve your productivity.
In this chapter, you will take a tour of all of the components that make up the Visual C++ Environment. You will examine the Developer Studio and the tools it offers to simplify your development tasks, including the Resource editors, Application Wizard, and ClassWizard. You will also take a look at some of the other utilities included with Visual C++ to make your life as a developer a little easier.
For a complete reference on every menu, button, or other widget in the IDE, see the online help. I will try to cover the basics and point out some of the most interesting or useful features of the development environment, but won't be rehashing the whole user's guide.
Visual C++ 5.0 includes the Microsoft Developer Studio Integrated Development Environment (IDE). This environment is the centerpiece of most any interaction you will have with your C++ projects, including source file creation, resource editing, compiling, linking, debugging, and many other useful features. Developer Studio allows seamless integration of other Microsoft products, including MS Fortran Power Station, MS Visual Test, the MS Development Library, and Visual J++.
In the bad old days, all C files, resource files, help files, and everything else had to be created with one or more editors. Then, each object or resource had to be compiled with its own flavor of compiler, with its own set of switches and options. Then the whole darn thing had to be linked to create an application. Running and debugging an application involved several other steps and utilities. The only truly integrated development environment at that time was DOS DEBUGof course, only if you were writing in machine language and entering a byte or so at a time.
Several compiler vendors started making integrated development environments, which allowed editing and compiling source in one application or shell, but still required several other functions to be performed outside of the IDE, not to mention the fact that you had to move in and out of the IDE to debug your application. This switching back and forth could quickly consume a big chunk of your development time.
The Developer Studio included with Visual C++ 5.0 allows you to perform everything you need to do throughout the life of your application, without ever leaving the IDE. Developer Studio also includes several features that will make your development tasks much simpler.
When you first start Microsoft Developer Studio, you should see a screen similar to the one in Figure 1.1, although you won't have an open project if this is your first time.
Figure 1.1. Microsoft Developer Studio.

Figure 1.1 shows an example of the windows that you might have open. Unfortunately, production of this book requires standard VGA mode screen shots, so some of the things you see here might appear a bit crowded. If you plan to do much work with Visual C++, you will probably want to use a higher resolution. I find that a 17-inch monitor at 1280¥1024 is well worth the cost of the hardware.
|
TIP |
|
Feel free to try out your own projects in Developer Studio now if you like, but for the rest of this chapter, you might want to install the examples from the CD-ROM and open the HiMom (an MFC version of HelloWorld) example to follow along. You can open an existing workspace by choosing the Open Workspace command from the File |
|
menu. (Note that this is different from the Open command on the File menu.) You can open the HiMom example by opening the file HiMom.dsw, located in the Chapter 1 samples directory on the CD-ROM. Most of the features of Developer Studio are not activated until you have opened a workspace. |
In addition to the windows for your source files, Developer Studio uses several view windows to present useful information at various stages in project development. When starting a project, you will probably be most interested in the Workspace, InfoViewer Topic, and Output windows, shown in Figure 1.1. Developer Studio also provides separate windows for various debugging information including the Watch, Variables, Registers, Memory, Call Stack, and Disassembly windows.
Each of these windows can be moved around in the workspace in different ways. By default, these windows will dock to an edge of your screen. If you double-click the frame of a docked window, it will undock, and you can freely place it where you like. You can even drag it outside of the Developer Studio window by holding Ctrl while you drag.
However, you might find the docking feature annoying. The window will try to dock when you don't want it to, and it will always float on top of your source windows. You can disable the docking view for each window from the Workspace tab of the Options dialog found on the Tools menu. This will make the view window act just like a regular source code window, which also means you will no longer be able to drag it outside the Developer Studio frame.
You will notice that several different toolbars are used in Developer Studio. Most of these will normally dock at the top of the window, although you may drag the frame of the toolbar anywhere you like. You can attach the toolbar to any edge of the frame or you can 121e47b just leave it floating around somewhere.
|
TIP |
|
If you are unsure about what a tool does, hold the mouse pointer over it and a brief description, or tool tip, will pop up, telling you what the tool does. |
Many toolbars are not normally displayed. Sometimes these will pop up at appropriate times, such as the Resource toolbar, when you edit resources. At any time, you can select the toolbars you want to be displayed by right-clicking an empty area of Developer Studio (like an unused portion of the menu bar area). You may select the toolbars that are displayed from the Toolbars page of the dialog that is presented by the Customize command on the Tools menu. You may also select which toolbars are displayed by right-clicking in the toolbar area. The New button in the Toolbars dialog will allow you to create your own custom toolbars. To add buttons to a toolbar, go to the Commands tab of the Customize dialog and drag the desired tools from the Commands tab to the new toolbar. You might need to move the Customize dialog out of the way to see the new toolbar.
Working with the Developer Studio is based on working with Project workspaces. These workspaces represent a particular set of projects, which can represent anything from a single application, to a function library, to an entire suite of applications. Each workspace may include any number of different projects that you want to group into a single workspace so that you can work closely with each separate project at the same time.
The project workspace (.dsw) file is responsible for maintaining all of the information that defines your workspace and the projects that you have included in it. Previously, you might have used make (.mak) files to maintain projects and the processes involved in creating your applications. Developer Studio 5.0 does not create .mak files by default anymore, although you can force Developer Studio to create a makefile based on current project settings by using the Export Makefile command from the Project menu. This is useful if you are using .mak files to automate your builds outside of Developer Studio.
In addition to makefile-type information about your projects, the project workspace file includes information about the settings you have chosen for Developer Studio itself. This means that whenever you open a project workspace, all of the Developer Studio settings that you had when you last worked with this workspace will be restored. All of the windows that you had open before will also be opened and returned to their previous position in the workspace.
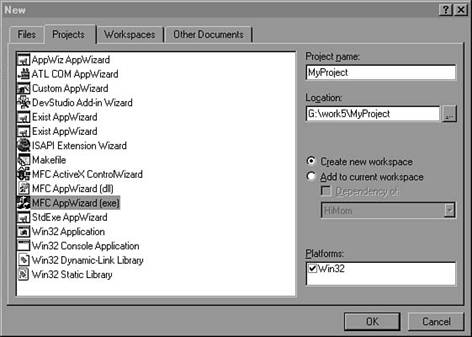
You can create a new, empty workspace using the Workspaces tab of the File | New dialog. However, an empty workspace isn't generally of much use. You may create a new workspace whenever you create a new project from the Projects tab of the File | New dialog. This will present you with several different choices, as shown in Figure 1.2.
When you create a new project, Visual C++ will set up default build settings for the type of project you specify here. You may also start up one of the Application Wizards from this dialog. You will see exactly what each of these project types will do for you later in this chapter.
With all of this talk about workspaces, perhaps you would expect that Developer Studio would provide a nice graphical interface to this information. Well, sure enough, it doesthe Workspace window.
Figure 1.2. New project dialog
When you open a project workspace you should see the Workspace window. If you do not, it was hidden the last time the workspace was open and can be brought to the foreground by selecting the Workspace command from the View menu or simply by pressing Alt-0. This window provides a road map to your projects that allows you to quickly navigate to where you need to go to do the real work of developing your application. You will notice that there are four tabs on the bottom of the window that allow you to view different sorts of information about your projects.
The InfoView gives quick access to the online documentation and has a very intuitive interface. We will leave the InfoView at that and move on to the good stuff, starting with the FileView.
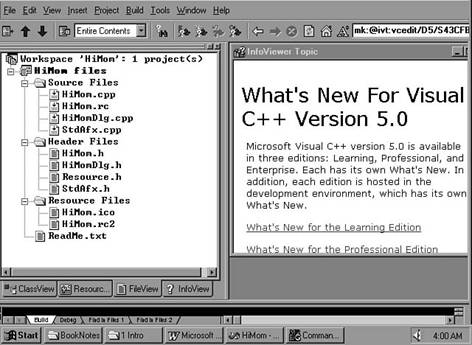
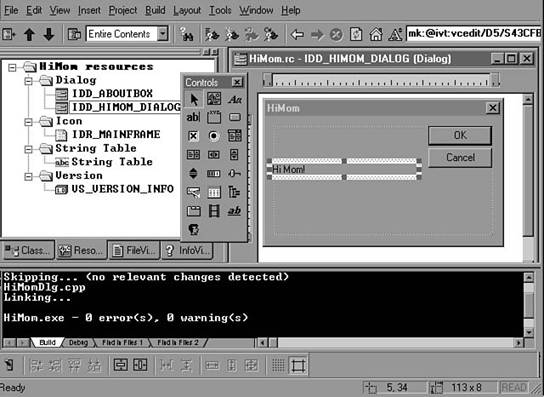
You will notice immediately that the FileView will let you view the list of files in your projects, hence the name. What might not be quite so obvious is the fact that it provides a great deal of functionality designed to help you manage your files and projects. Although many workspaces include only a single project, you will see later that you can add any number of projects to a workspace. The FileView will display each project as a different top-level folder that can be expanded just like any other tree control in Windows. The FileView window for the HiMom example is shown in Figure 1.3.
Any files that you create within Developer Studio will be automatically added to your project, so you need to be concerned only with adding files that you have created yourself, outside of Developer Studio. This can include documentation or existing source files that you want to manage as part of your project.
Figure 1.3. FileView for the HiMom example
Note that you should not include any of the standard libraries in your project. You should, however, include any libraries that will be built by your project so that the build process can check to see if that library should be rebuilt in order to bring the project up-to-date. Libraries to be included in a project may be specified in the Link tab of the Project Settings dialog (from the Project | Settings menu command).
FileView allows you to drag and drop files to add them to your project or to move or copy them between your projects. If you want to delete a file from your project, simply select the file and press the Delete key. This will not actually delete the file, but will remove it from your project.
FileView will show an icon next to each filename. These icons can give you additional information about the file. For instance, if the icon has a down arrow on it, this file will be used in building the current configuration. In addition, certain add-on products may alter these icons. For example, if you have a source code control system installed, the icon might have a checkmark to denote that you have the file checked out.
You can open a file for editing by double-clicking it. You can also bring up a context menu by right-clicking the file. This gives you several other options, depending on the type of file you selected. Any version of the context menu will allow you to go to the Project Settings dialog by selecting the Settings command.
The context menu will allow you to view a file's Properties dialog, which is different for different file types, but will generally list information about the file, its inputs, outputs, and dependencies. This can be useful in making sure that the files in your project are being put together the way they should.
For source files, the context menu will give you the option to compile that file. Similarly, the context menu for a project will allow you to build the project. You can also use the Set as Active Project command to set it as the default project. For workspaces that contain more than one project, the active project is used whenever you build, execute, or debug.
You may also delete any intermediate files in a project by choosing the Clean command from the project's context menu. This is particularly useful when you see the amount of disk space that even simple projects may take up.
|
TIP |
|
It is a good idea to delete intermediate files from a project before trying to back it up. Some of the intermediate files can become very large, even for small projects. |
As the name suggests, the ClassView displays a tree view of the classes that you have created for your project and allows you to expand the classes to reveal their member functions and variables. The ClassView for the HiMom application is shown in Figure 1.4.
Figure 1.4. ClassView for HiMom project
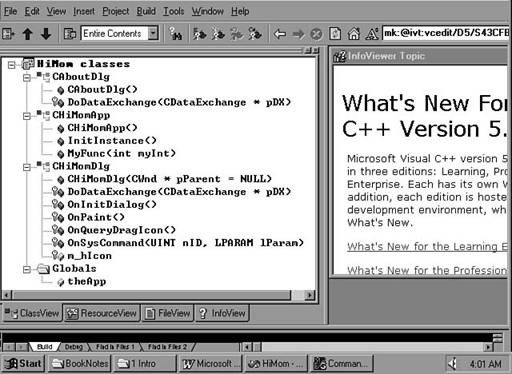
You will notice that each of the class members has one or more icons to the left of it; these give useful information about the member type (data or function) and access class. (Protected members have a key, private members have a padlock, and public members have no access icon.)
You can directly access the source code for your classes by double-clicking the object that you are interested in. Double-clicking a class will immediately open the header file for the class and position the cursor at the start of the class declaration. Double-clicking a member variable will position the cursor on the declaration of the member variable. Double-clicking a member function will take you straight to the function definition, or implementation.
The context menu for a class allows several different choices for you to jump to the more powerful source code browser to examine how a class is used. Choices include direct access to the definitions and references for the class, as well as lists of any base classes and derived classes associated with this class.
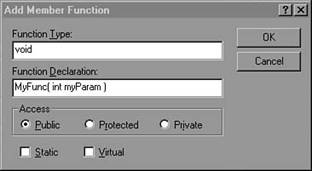
The context menu also allows a quick way to add member functions or variables by way of a simple dialog, shown in Figure 1.5.
Figure 1.5. Add Member Function dialog.
Visual C++ allows you to work with different build configurations for each project. As long as you are producing the same executable filename (or library), you may select from any number of configurations to determine how the project will be built. Whenever you create a new workspace in Developer Studio, two default configurations will be created for you: one for debug and one for release. The debug configuration will build in many different debugging features that will not be compiled when building release configurations.
You can select a configuration to be the default configuration used for builds from several different places, including the configuration combo box on the Build toolbar, the context menu from FileView, or the Set Active Configuration command from the Build menu. If you want to add or delete configurations, you can do so from the Configurations command from the Build menu.
Each configuration allows you to choose from a wide range of different project settings, appropriately handled by the Project Settings dialog, shown in Figure 1.6. The Project Settings dialog is started from the Settings command of either the Project menu or the FileView context menu.
Figure 1.6. Project Settings dialog
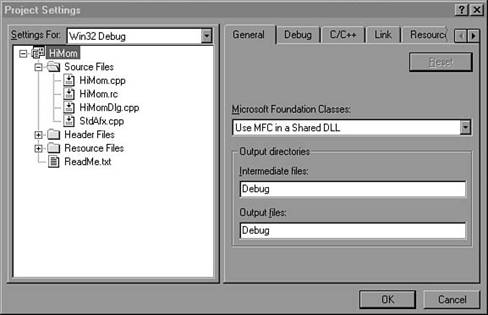
You will notice that each of the defined configurations is listed in the Settings For combo box. It seems fairly obvious that if you selected one configuration, you would be working with the settings for that configuration. What is less obvious is that you can select several configurations at the same time. In this case, you will be presented with the settings that are common to both projects.
For example, if you selected the default debug and release configurations, you would not see the Output directories on the General page. This is because each of the configurations has different settings for these fields. If you highlighted a single configuration, you would see where the output will go. If you changed any settings with more than one configuration selected, you would change the settings for both projects. This can be very useful, but you should be careful and have only one configuration selected if you only want to modify one configuration or see all of the settings for a configurationand not just the settings that two configurations have in common.
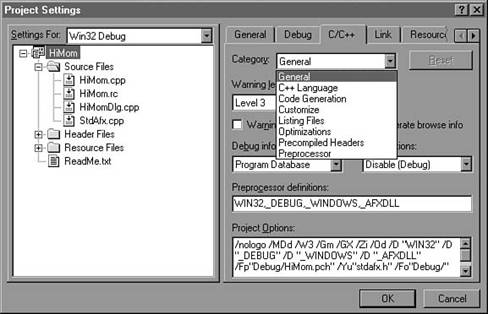
There are about a gazillion different options available in the Project Settings dialog, so the options are grouped into several different pages, accessed by the tabs at the top. In addition, several pages, such as the C/C++ page shown in Figure 1.7, have drop-down menus in which you can select several different subpages.
It might take a while to find all the various settings, but I think you will find this much easier than trying to keep track of all of the different compiler and linker flags manually. Just remember that you might need to try changing the Category combo box to find the setting you are looking for.
Figure 1.7. Drop-down menu in the C/C++ Project Settings page
You can use the Open workspace command of the File menu to open project files (or makefiles) from previous versions of Visual C++. When you do this, a warning message will appear suggesting that you save the file to a different name before it performs the conversion. This is generally a good idea if you will still need to use the project from a previous version of Visual C++ (such as when sharing with a group that hasn't upgraded yet), because, once converted, the project file will no longer be usable by older versions of Visual C++.
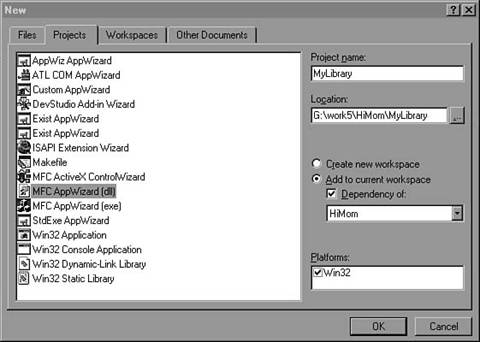
As hinted at earlier, Developer Studio allows you to work with many different projects within the same workspace. This is very handy for working with projects that are closely related. To add a new project to the current workspace, use the File | New command and go to the Project page, shown in Figure 1.8.
To create a new project and add it to the current workspace, simply click the Add to current workspace radio button and create your new project. If you choose to add the new project to the existing workspace, you also have the option of making the new project a dependency of one of the existing projects in the workspace. This is useful for such things as building a library that is in turn used by an application. When you create the library as a dependency, it will be automatically built for you each time you build the application that depends on it. This can help keeping all of the pieces of a project up-to-date.
Figure 1.8. Projects page
Later, you can modify the dependencies that are set up for a workspace by selecting Dependencies from the Project menu. This will allow you to use the Project Dependencies dialog, shown in Figure 1.9.
Figure 1.9. Project Dependencies dialog
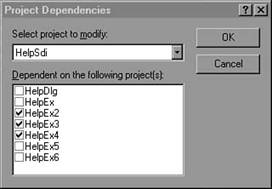
Simply choose one of your projects from the drop-down list at the top and then click any of the other projects that are its dependencies.
You will see each of your projects in the Workspace views, and you may easily switch between projects. If you use multiple projects within a workspace, the Batch Build command on the Build menu will allow you to build any number of your projects at once.
If you have been developing Windows applications for a while, you are probably familiar with resource scripts. These are files that define all of the resources used by your application, including dialogs, icons, and menus. In the old days, you often had to move back and forth between your source editor and your resource editor, the C compiler, and the resource compiler. Developer Studio makes this much simpler by providing a visual editor for your resources that is fully integrated with the rest of Developer Studio.
In programming for Windows, you will use several different types of resources. Most of these correspond directly to graphics objects such as bitmaps, cursors, and icons, as well as more complicated types such as menus, toolbars, and dialog templates. In addition, you will have a string table and version resource, as well as any custom resources you might define.
In the bad old days, all resources were defined in a text resource script (.rc) file. You had to compile the .rc file with a separate resource compiler and explicitly link your resources to your executable. Visual C++ 5.0 still uses the .rc file, but you will most likely never have to edit it directly. Developer Studio allows you to edit your resources graphically, and will automatically take the necessary steps to compile your resource script and link it to your application.
To help you work with resources, Developer Studio provides the ResourceView, which displays information about the various resources included in each project, grouped by resource type. The ResourceView for the HiMom project is shown in Figure 1.10.
If you created a Windows application with AppWizard, a resource script would automatically be created as part of your new project. However, you can also create a new resource script from the Files tab for the New command on the File menu or open existing resource scripts from the Open command on the File menu. Resource script windows support drag-and-drop, making it quite simple to open an existing resource script from another project and add resources to your current project by just dragging them over.
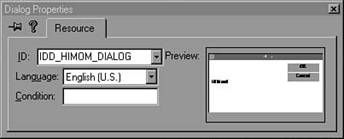
Like the other Project Workspace views, there is a context menu available by right-clicking in the ResourceView. This allows you to open the selected resource for editing, insert new resources, or import existing resources, among other things. In addition, the context menu gives you access to the Properties page for your resources, as shown in Figure 1.11.
Unlike some properties pages, the resource property pages allow you to change some important aspects of your resource, including the ID and language for the resource. In addition, resources, such as icons and bitmaps that are stored in files outside of the resource script, allow you to specify the filename for the resource here. The Condition field allows you to enter a precompiler symbol that is used to specify that the resource be built into your project only if the given precompiler symbol is defined.
Figure 1.10. The ResourceView
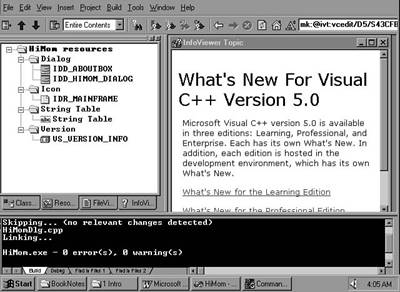
Figure 1.11. Resource Properties dialog
|
CAUTION |
|
The context menu will let you open the binary data for any resource. Although this is useful for custom resource types, be very careful with it. It is very simple to accidentally change a byte in a resource and the window will save your changes without prompting. This can easily make your resource unusable. |
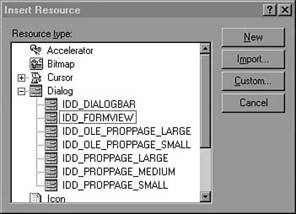
If you have already created resources that exist in separate files, you can add these to the resource script for the current project by importing them. You can add a separate image, icon, or cursor file to your current resource script by clicking the Import button in the Insert | Resource dialog. This will allow you to browse for the files containing the resources you want to add to the current project.
Whenever you create a new resource with the Developer Studio, a resource ID is automatically assigned. This means that the symbol you have entered as the resource ID is defined to be a certain value in a header file. Although you might luck out and never have to deal with resource IDs or resource header files directly, the View menu offers two very useful commands: Resource Symbols and Resource Includes. The Resource Symbols command will produce the dialog shown in Figure 1.12.
Figure 1.12. Resource Symbols dialog
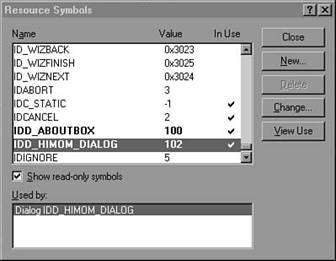
The Resource Symbols dialog provides a handy way to work with the symbols that are defined for the currently selected configuration. You will see a list of all of the symbols defined in your project, their values, and whether or not they are currently being used by a resource. If a symbol is in use, the Used by list will show the resources using that symbol. Selecting Show
read-only symbols will display predefined Windows symbols in a lighter shade along with your symbols.
You can add new symbols by clicking the New button or change values with the Change button. The View Use button will open a window for directly editing the resource that uses the selected ID. To change the value of a symbol that is in use, use the View Use button to open a window for the resource. If you open the properties dialog for the resource, by right-clicking in the resource and choosing Properties, you can assign a value to the symbol by entering it after the symbol name, like this:
IDD_MYDIALOG=111
|
TIP |
|
If you plan to use resource IDs that must be in a consecutive range, as for the ON_COMMAND_RANGE macro, it might be easier to define all of the IDs you plan to use before creating your resources, because the IDs that are automatically assigned are not necessarily consecutive. |
The Resource Includes command from the View menu will display a dialog like that shown in Figure 1.13. This dialog allows you to work with the include files that define your resource symbols.
Figure 1.13. Resource Includes dialog
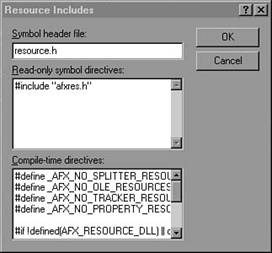
You may change the name of the header file that will contain your resource symbol definitions here. You may also add any #include or #define directives to the header file. This allows you to include additional header files, which can help in group projects. Because none of the Developer Studio tools will modify the #included files, these values are much more likely to remain constant.
You might have noticed that when you create a new resource, the tree list of resource types available may be expanded, as in Figure 1.14. This provides you with the ability to create resources based on resource templates. This comes in handy whenever you will want to create many different resources that are similar, and can help standardize the look and feel of your applications.
You can create resources based on a template by selecting the template and clicking New. If you just want a plain, blank dialog, select the dialog line before clicking New.
Figure 1.14. Creating resources with resource templates
With Developer Studio, you can create your own resource templates by choosing Resource Template from the Files tab of the New dialog displayed by the File | New command. This will open an empty resource script that you can insert resources into. When you are finished, the resource template (.rct) file will be saved in the MsdevTemplates directory with the other templates. Now, whenever you create a new resource, you will see that your template is shown as one of the choices in the Insert Resource dialog tree. Whenever you create a new resource based on the template, any changes you make to the new resource affect only the new resource and not the template.
Developer Studio allows you to edit all of your resources with various visual editors that are part of Developer Studio. You can edit any resource by double-clicking it in the ResourceView. In the next few pages, you will be looking at the various resource editors provided by Developer Studio, starting with the Dialog editor, which you will probably be using most often.
In most applications, dialog boxes provide a large portion of the interface between the user and your application. Dialog boxes allow you to provide an interface to the user for certain sets of information as it is needed, without taking up real estate in your main window. Whenever you open a dialog resource, you will get a window similar to the one shown in Figure 1.15.
If you have just created a new dialog, it's time to make it do something useful. Developer Studio makes this easy. You should notice the controls toolbar floating around your workspace somewhere when you open the dialog. Each of the icons on the toolbar (with the exception of the pointer in the top left) represents a control that you can add to your dialog, including any controls that you have added with Component Gallery.
Figure 1.15. Dialog Box editor
To add a control, select it from the toolbar, click the dialog, and you have a new control. If you are unsure of what some funny picture on the toolbar represents, just hold the mouse pointer over it. Like other toolbars, this will provide tooltip help that will give a short description of the control.
|
NOTE |
|
The Controls toolbar, like the other toolbars, may be docked or hidden altogether. If you don't see it, try using the Toolbars page of the Tools | Customize dialog to toggle the Controls toolbar on. |
When adding a control, it is generally easier to assign its size and location when it is added by dragging a rectangle in your dialog before releasing the mouse to insert the control. However, if you have already inserted a control, you can easily move it by clicking it and dragging a point within the control to the new location. You can easily resize controls by dragging the resize handles (little boxes) on the border of the selected control.
For most controls, you should change their properties after you have placed them in a dialog. You can edit a control's properties by selecting Properties from the context menu that you can pull up by right-clicking the control. The Properties dialog looks similar to the one shown in Figure 1.16.
Figure 1.16. Control Properties dialog.

The Properties dialog will be a bit different for each different type of control, but will always allow you to edit the resource ID. Although the ID can be a symbol or a number, you should try to give your resource ID symbol a meaningful name, rather than just a number or the default symbol name. If you want to force your ID to have a certain value, you can specify a value after the resource symbol like this:
IDC_MYBUTTON=123
For more information about the specifics of the styles and other options on the Properties page, press F1 to bring up context-sensitive help on the current page. You can access the properties of the dialog itself by double-clicking a blank spot in the dialog or its title bar.
One of the trickiest parts of designing your dialogs can be getting everything to line up just right where you want it. The dialog editor provides several nifty features for dealing with this in the Layout menu. Many of the options in the Layout menu will not be enabled unless you have a certain type of control selected or have several controls selected.
|
NOTE |
|
You can select multiple controls by holding the Shift key while clicking on the controls. The dominant control will be the control last selected. |
The Size to Content command in the Layout menu (or F7) is particularly useful with static text and button controls. This will make the control just the right size to contain its text, preventing characters from being clipped off or controls that run over your other controls.
|
NOTE |
|
Most of the commands from the Layout menu are also provided by tools in the Dialog toolbar. |
You might notice a blue, shaded line encircling the contents of your dialog box. If you place any controls in the dialog so that they touch this margin line, they will be automatically moved whenever you resize your dialog. Unfortunately, this only works while you are creating your dialog resource and will not help with resizing at runtime. You may create your own guide lines by dragging in either of the ruler bars at the top or left of your dialog. By later adjusting these guides, any controls placed on the guide will be moved with it.
Windows allows you to move from control to control within a dialog by use of the Tab key. This functionality is provided automatically when you create a dialog in Developer Studio, but you might need to do a few things to tweak it to work just the way you want.
To adjust the tab order of your controls, you can choose the Tab Order command from the Layout menu and click the controls in the order that you want them to be tabbed. If you have a complicated dialog and only want to change the tab order of a few controls, you can take a little shortcut by holding the Ctrl key down and selecting the last control that tabs properly before selecting the controls that tab incorrectly. Clicking an empty spot in the dialog, or pressing Enter, will exit the tab order mode.
You could save your dialog and rebuild the application to test the layout of your dialog, but there is a much simpler method of testing things like tab order. The Layout menu provides the Test command (You can also use Ctrl-T or that little switch on the Dialog toolbar) that will run your dialog for you. This test mode ends whenever you exit the dialog that you are testing.
|
NOTE |
|
When you choose Save from the File menu or the ResourceView context menu, the whole resource script file is saved, not just the resource you are working on. |
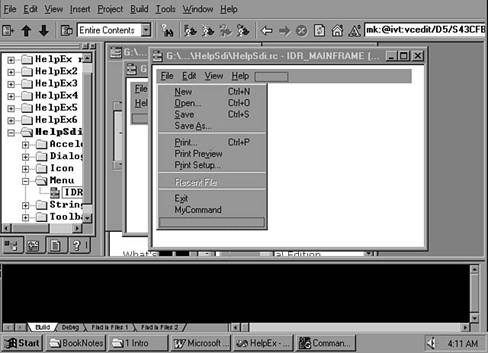
Double-clicking a menu resource in the ResourceView will open a window like the one shown in Figure 1.17 that allows you to edit your menu resource.
Figure 1.17. Menu editor
To add a new menu item, double-click in the empty space to the right or bottom of the last menu item. This will open the Menu Item Properties dialog, as shown in Figure 1.18, which lets you enter the menu caption, its associated command ID, and style information. You may freely rearrange your menu items by dragging and dropping.
Figure 1.18. Menu Item Properties dialog
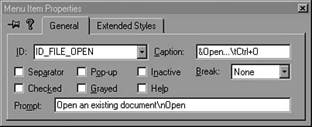
The Command ID that you enter here will be the command ID that your application will receive when the user selects this menu item.
The Caption is the text that is displayed for the menu item. Placing an ampersand (&) in front of a character will cause that character to become the mnemonic key for that menu item. It is also customary to include text information about accelerators after the caption text, separated by a tab sequence (t).
The Prompt field is used to enter text that will appear on the status bar as fly-by help when the cursor is on this menu item.
If you choose the Separator style, this will not be a real menu item, but just a separator between menu items. The Checked, Grayed, and Inactive styles determine the initial state of the menu item; these may be changed at runtime. The Help style will cause the menu item to be displayed on the far right of the menu bar, but this convention isn't used as often now as it once was.
By choosing the Pop-up style, you can easily create layers of menus. If you are creating a menu that will be used as a pop-up, you can select the View as Popup option from the right-button context menu to tell the menu editor to display your menu as a pop-up while you are editing it.
Developer Studio also provides visual editors for the other common windows resources, including accelerator tables, bitmaps, icons, cursors, string tables, and toolbars. You may also edit version resources to track various information about the version of your application.
In addition, you may define your own custom resource types that will be bound with your application. Because Developer Studio doesn't 'know' how you intend to use these resources, you can only edit these resources in a binary format. You can, however, import existing files into your custom resource.
It has been rumored that in prehistoric days there was but one piece of code ever written and that all projects since were merely the result of cutting and pasting from other projects. This does seem to have the ring of truth every time I cut and paste the same boilerplate code for Windows applications for each new project. Visual C++ makes this task much simpler by providing the Application Wizard, or AppWizard for short.
AppWizard is really a collection of different Application Wizards that help to manage different sorts of projects. (I will generally use AppWizard to refer to any of the Application Wizards and will be more specific when discussing one particular AppWizard.) Each of the AppWizards will guide you through the process of creating a new project, prompting for various option selections along the way.
When you have made all of your choices, MFC will create your project for you. For some types of projects, this can be a tremendous time saver. For MFC applications, this means creating all of the source, header, resource, help, and project files necessary to create a skeleton for your application. The project created by the MFC AppWizard (exe) will build without any further modifications and has all of the setup for the application features you selected. This can easily reduce half a day's hunting, cutting, and pasting to just a few seconds.
To use an AppWizard to help you create a new project, use the New command from the File menu. The Projects tab of this dialog, shown in Figure 1.19, will show you a list of all of the available application wizards, including other simple new project types, such as Win32 Application.
Figure 1.19. The New Projects dialog
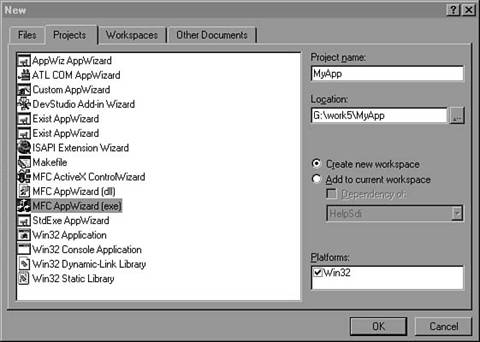
The New Projects Workspace gives you the opportunity to create several different types of projects, so let's take a brief look at what Visual C++ will do for you when you choose each project type.
This is used to create a new project based on the ActiveX Template Library (ATL). This type of project then allows you to add your own COM objects, using ATL.
This type of project will allow you to create your very own AppWizard, which may then be used to help you create additional projects.
This creates a new skeleton project that may be used to add commands to the Developer Studio environment. This project may include the framework required to add a toolbar to Developer Studio, as well as to handle events that occur within Developer Studio.
This wizard allows you to easily create the framework required to create extensions to Internet Information Server, using the Internet Server API.
This project type is used to add a project that works with an external makefile. The project settings will allow you to specify the command line that you want to execute to build this project. By default, this is NMAKE /f myMake.mak. If you have existing makefiles that you want to incorporate into a build from Visual C++, without creating one of the other project types to replace your makefile, you should use this project type.
This AppWizard will help you to create the framework for a project that uses the Microsoft Foundation Classes to implement ActiveX controls. We will be looking at how to implement such controls in more detail in Chapter 15, 'ActiveX Controls.'
This will use the MFC AppWizard for DLLs to create a new dynamic link library project for you. The project created implements the code needed to initialize a DLL that uses MFC, but you will need to add functionality to it. We will be looking at DLL projects more closely in Chapter 10, 'Dynamic Link Libraries (DLLs).'
This will start up the MFC AppWizard to help you create the framework for a full-blown MFC Windows application. We will look at this in more detail in Chapter 2, 'MFC Overview,' but feel free to try it out if you like. The skeleton application created by AppWizard is a complete application in that it will build and run. You just need to add on the functionality specific to your application.
The application project type does not use an AppWizard, nor will it create any source files for you. It will, however, create a new project with the default build settings for a Windows application. This type of project is useful for creating a Visual C++ 5.0 project for existing applications that you are moving to VC++ 5.0. You will have to add your existing source files to the new project with the Project | Add to Project | Files dialog.
This project type will create a new project with the build settings appropriate for building console applications. This type of application does not have a Windows graphical interface, but uses a standard command window. You will need to add your own source files. This project type is appropriate for command-line utilities and other applications that do not have a graphical user interface.
Like the application project type, you will need to insert your own source files into this project (or create new ones). This option will set up the default project settings for creating a DLL.
This is similar to the Dynamic Link Library option, but the project settings are set to create a standard statically linked library (.lib).
You might also see additional project types listed. These are custom AppWizards that you have created, or that were provided by a third-party vendor and optionally loaded with Visual C++.
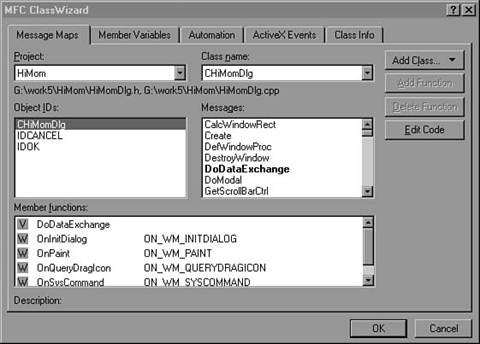
In developing C++ applications, you will do a lot of work with your own classes. Developer Studio provides you with the Class Wizard to help in organizing your classes and integrating your classes with Windows. ClassWizard may be started from the View menu or by pressing Ctrl-W. The Class Wizard dialog is made up of several different tabs, or pages, each of which allows you to work with different aspects of your classes. We will look at each of these tabs in the following sections.
The Message Maps page allows you to work with assigning message handlers to Windows messages that your application will receive. This is really the heart of programming in the Windows event-driven programming model. The Message Maps tab is shown in Figure 1.20.
We will look at the specifics of using Class Wizard to work with message maps in Chapter 3, 'MFC Messages and Commands.'
Figure 1.20. Class WizardMessage Maps
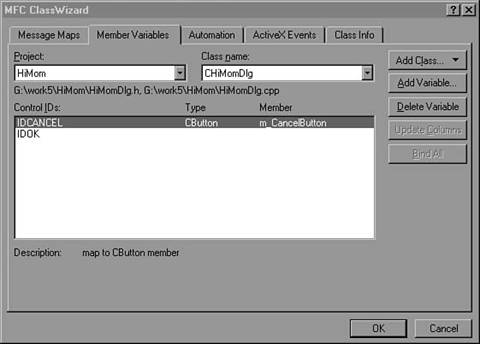
The Member Variables page, shown in Figure 1.21, is used to create member variables of your class that will be used to work with controls in dialogs. Unfortunately, it does not allow you to work with more general sorts of member variables. You will see more on how this page is used in Chapter 5, 'Dialogs and Controls.'
Figure 1.21. Class WizardMember Variables
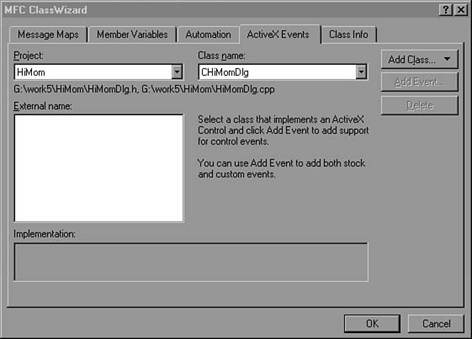
The Automation tab, shown in Figure 1.22, helps you work with the methods and properties associated with classes that use OLE Automation. We will look at this in more detail in Part III, 'Programming with ActiveX.'
Figure 1.22. Class WizardAutomation

The ActiveX Events tab, shown in Figure 1.23, allows you to easily manage the ActiveX events that are supported by your ActiveX classes. We will look at ActiveX events in more detail in Part III of this book.
Figure 1.23. Class WizardActiveX Events
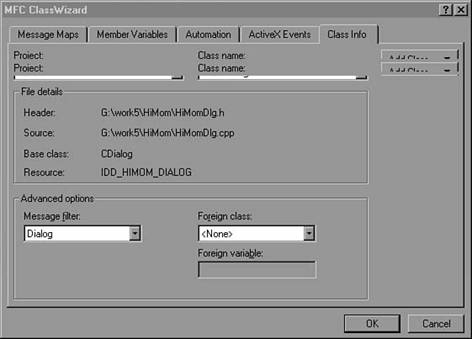
The Class Info tab, shown in Figure 1.24, will show you some general information about your classes, including the header and source files in which it is defined, as well as its base class and any resource associated with it.
Figure 1.24. Class WizardClass Info
The Add Class button provides a quick and easy way to create a new class in your project. The New Class dialog, which is presented when you choose New, allows you to choose the name for your new class and the base class that it derives from. You may select the file to create the class in and specify a particular resource that should be associated with the class. If the base class you choose can support OLE automation, you may specify options. The new class can also be automatically added to the Component Gallery.
In addition, you may choose the From a type library option when adding a new class. This will allow you to create classes based on an existing OLE type library.
Object-oriented programming is intended to promote the re-use of existing software components. To make it even easier to re-use your classes, Developer Studio provides the Component Gallery, which allows you to insert many predefined classes into your project and also provides a handy way to catalog and store your own classes for use in other projects. To start the Component Gallery, as shown in Figure 1.25, choose Components and Controls from the Project | Add to Project menu.
Figure 1.25. The Component Gallery

The components included in the gallery are organized in a directory tree structure. When you first install Visual C++ 5.0, you will see Developer Studio Components, which contains standard Visual C++ components, and Registered ActiveX Controls, which contains any ActiveX controls registered on your machine as top-level directories. You may also add your own controls in their own directory structures. After you open one of these folders, you will see a list of available components, as shown in Figure 1.26.
Figure 1.26. Developer Studio components

The predefined components in Component Gallery can be used to add a wide variety of functionality to your applications, ranging from simple controls that can be used in dialogs, to ActiveX controls that can add some very complex capabilities to your application with a minimum of effort. Some of the components, such as palette support, add support for functions simply by providing handlers for a few messages.
Many of the components in the gallery might seem a bit cryptic at first glance, but there is a good deal of help available. When you select a component, a short description will appear next in the dialog box. If you click on the More Info button, you will see a much more detailed description of the component. Note that this help is available only if it has been entered by whoever created the component. Most of the predefined components include help, but you might consider adding help for your own components so that others can more easily re-use them.
Developer Studio includes a full-featured debugger for fixing those problems that inevitably manage to slip in. The best reference for the debugger is the online help, and we don't have the space to include it all here, so I will just mention a few things that you may find useful.
When you are debugging, you will be concerned with the values represented by the variables in your program. The simplest way to do this in Developer Studio is to point the mouse at the variable in the source code and wait a second or two. A small tip box will appear that displays the current value of the variable.
For a more detailed view, you can use the right mouse button to produce a Context menu, which allows you to open a quick watch window for the selected variable. The quick watch window allows you to enter any expression you want to evaluate in the expression window. However, preprocessor constants (including resource ID constants) are generally not available for evaluation. To add this expression to the more permanent watch window, click the Add Watch button.
|
TIP |
|
Developer Studio supports drag-and-drop in many situations. For example, you can highlight a variable and drag it with the right mouse button to the memory window, which will then automatically display the memory for that variable. |
At some time or another, you will almost definitely find yourself with an application that will trip over an unhandled exception. This will bring up a dialog that will allow you to exit altogether or debug the application. You may actually load the debugger to view the current state of your application at the time of the exception, source code and all, even if you were not running your application from Developer Studio at the time!
Despite all of the whiz-bang tools that Developer Studio offers, let's not forget that the heart of Visual C++ is a C++ compiler, a linker, a library utility, a resource compiler, and a build facility. These can all be accessed from the command line directly. Here are the command-line equivalents for these tools:
cl.exe: CompilerIf you need to use these utilities directly from the command line, you will find that all of their command-line arguments and options are detailed in the online help.
In addition to Developer Studio, Visual C++ supplies several external utilities that are added to the program group for Visual C++ when it is installed. Several of these are also available from Developer Studio by way of the Tools menu.
|
TIP |
|
You can add anything else you like to the Tools menu from the Tools page of the dialog produced by Tools | Customize. |
Spy++ provides a very detailed view into the goings-on of the Windows operating system. It will allow you to view all processes, threads, and windows on the machine, along with all of the Windows messages that are being sent.
This application may be used to enable various levels of debug messages that MFC may send to the Output window of Developer Studio when an application is executing or being debugged.
In order to use OLE controls in Win32, the control must be registered with the operating system. Register Control from the Tools menu gives you a convenient method of doing this.
This provides a simple environment that allows you to test your ActiveX controls and how they work when used from a container application.
This utility provides information about all of the OLE and ActiveX objects that are installed on your system.
This utility provides a way to easily look up information about the standard error codes that are returned by most Win32 API functions. This might be easier than searching through the various header files used to define errors, although it is a bit slow.
Although WinDiff does not appear in the default Tools menu, it ships with Visual C++ 5.0, in DevStudioVCbinWinDiff.exe. WinDiff allows you to compare two files in a convenient Windows app that is much more user-friendly than other compare or diff tools you might have used from the command line.
Help Workshop is used to help manage your help projects. Although it is not automatically included in the Tools menu, it is included with Visual C++ 5.0. You will see more information about how to use this tool in Chapter 35, 'Adding Windows Help.'
As you have seen, the development environment provided for Visual C++ has come a long way from DOS DEBUG. Everything you need to do to develop applications (in most cases, anyway) can be done from within Developer Studio.
In this chapter, you have seen how to use the Developer Studio environment, including the toolbars and dockable view windows and particularly the project workspace window, which allows you to manage the classes, files, and resources in your application, as well as to provide quick access to the online documentation.
You have seen how to create new projects for Visual C++ and the variety of project types and application wizards that are available, as well as how to work with the project settings that affect builds of your application. You have also seen how to create multiple projects in your workspace, including managing dependencies.
In addition, you have seen how Developer Studio provides resource editors for the various Windows resources our projects will use, including dialogs, menus, and other resources.
You have also seen previews of AppWizard and ClassWizard, which is used throughout this book, as well as some of the other tools included with Visual C++.
This chapter has shown you how to get started using the Visual C++ environment, but I obviously haven't shown you everything. I just don't have the time or space. However, with the things have covered here, you should be able to work with applications. If you're curious about what something does, try it! Play around with a few simple projects and get a feel for the environment. When you're done playing, move on to what goes into your applications.
|
