English Garden Bench
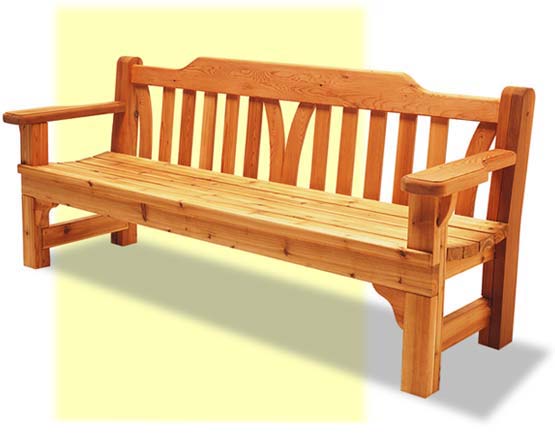
An elegant yet traditional piece, this English garden bench features design modifications that make it a good project for varying levels of woodworking expertise. For instance, a lot of furniture uses the mortise and tenon technique, which can be difficult, and requires expensive and specialized tools and equipment. This project uses lap joints and doweling instead to simplify the process.
|
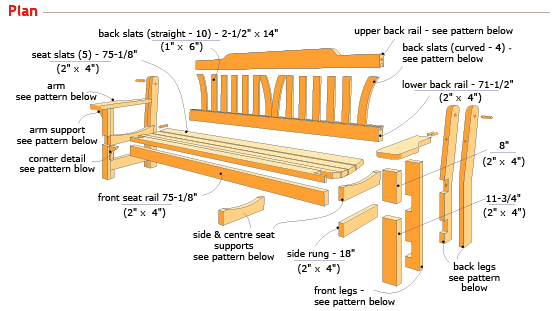
what you'll need materials . 8 pcs. 2" x 4" x 8' frame and seat boards . 1 pc. 2" x 6" x 10' back and arms . 1 pc. 2" x 6" x 12' rear legs . 2 pcs. 1" x 6" x 5' back slats . 1/2" hardwood dowel 4ft length: 2624-271 . 3/8" hardwood dowel 4 ft: 2624-235 . 2-1/2" deck screws 2182-989 . 1-1/2" galvanized finishing nails 2134-826 . waterproof glue 2020-850/869 . stain or wood sealer CWF-UV clear 1877-838 . 4 wooden buttons to cover 1/2" drilled holes 8296-500 Note: The true measurement of 2" x 4" stock is actually 1-1/2" x 3-1/2". tools . compound mitre saw or circular saw 1265-222 . building square 1070-067/085 . drill, bits, #8 countersink and driver 1227-915 . 1/2" wood boring spur bit 1214-377 . 3/8" wood boring spur bit 1214-359 . clamps 1022-930-985 . hammer 1030-556 . measuring tape 1048-832 . jigsaw 1268-666/700 . sander, belt or orbital 1262-333/859 . router, 1258-347 and rounding-over or ogee bit (optional) 1215-189 . routing flush trim bit (optional) 1288-332 . 7" dado blade 1346-056 |

6. Clamp the arm pieces together for ease and uniformity when sanding the edges. The upper edges of the arms, except where they contact the back support, are routed at this time.
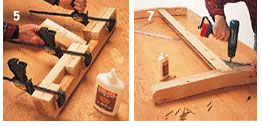
7. Attach the 2-1/2" x 4-1/2"
lower back rail, dado edge up, into the appropriate back leg notches using
2-1/2" deck screws and glue. Check to ensure the two sections are square
to each other.
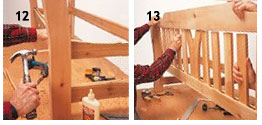
8. Similarly, insert the side seat supports and the side rungs into the
appropriate notches at a 90 degree angle to the back seat support, using
clamps, 2-1/2" decks screws and glue.
9. Set and screw the front legs to the side
seat supports and bottom rail pieces using 2-1/2" deck screws and glue.
Check again to ensure the sections are square to each other. Allow the clamped
and glued sections to set for 24 hours.
10. Glue and set the front seat rail into the appropriate slot, using
2-1/2" deck screws. Check again for square.
11. Find the centre point of the bench, and fasten the centre seat support to
the frame with 2-1/2" deck screws and glue.
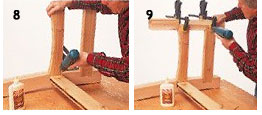
12. Drill 1/2" holes approximately 4-1/2" deep through the back legs into the side seat supports as indicated in the diagram. Insert a 1/2" hardwood dowel 4-1/4" in length with a little glue, and set the dowel slightly to allow for the a 1/2"wooden button to cover the drilled holes.
13. The back slats are now set into the dado of the 2" x 4" bottom back seat rail, at 2-1/2" intervals.These can be adjusted as you proceed.
14. Check the inside measurement between the back seat rails for accuracy. You can now accurately cut the upper rail piece to size, taking equal amounts from either end.
15. Place the upper rail over the upper ends of the slats, beginning at one end, and easing the slats into the dado of the upper rail. A second pair of hands can be useful here in order to keep one end of the upper rail secure as you work your way along the slats to the other end. Be sure the slats are completely seated in the dado before proceeding.
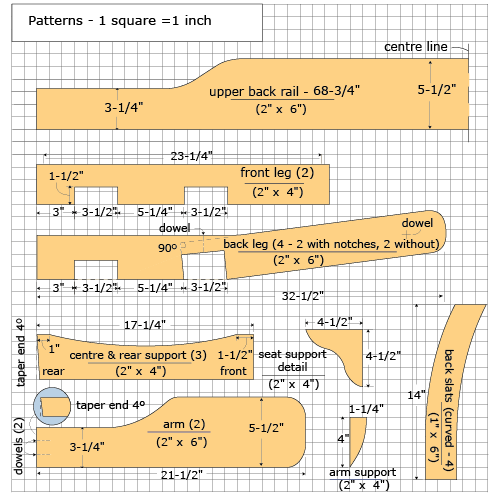
1. Translate and transpose the patterns for
the front and back legs, arms, top back rail, and seat supports onto the
appropriate stock.
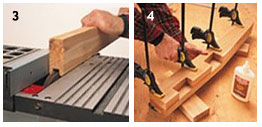
2. Cut out the pieces required using a jigsaw for the curved cuts.The upper
back rail, arms, and back legs are constructed from 2" x 6" material,
and the seat supports, front legs, seat rail and lower back rail are
constructed from 2"x 4" stock.The back slats are constructed from
1" x 6" stock. Save the cutout corners from the arms and back for the
arm support and front leg details.
Tip: Leave an extra 1-1/2" of material at either end of the top rail
for accurate fitting later.
3. The lower and upper back rails are dadoed to receive the seat slats. Set the
dado cut to 1/2" in depth, and to the width of the slat material. In our
bench, the width was 9/16". The dado cut runs down the center of the edge
of the stock.
4. The 2 pieces forming the rear legs are now fastened together using
2-1/2" deck screws and carpenter's waterproof glue, and left clamped for
24 hours. Be sure to face the notched pieces to the inside on each pair. Final
finishing and sanding of the matched pairs of legs takes place after the clamps
are removed.
5. The front legs are assembled and clamped similarly, as indicated on the
diagram. Use a spacer to ensure proper seating for the seat rail. This will
form the notch to receive and support the front seat rail.

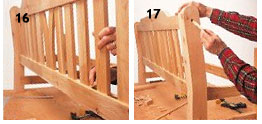

16. The 2-1/2" spacers can no"e inserted between the straight slats on the upper and lower rails, and secured with a small amount of glue.The remaining spacers are cut to appropriate lengths and inserted similarly. Spacers are used to help secure the seat slats, and to prevent water and debris from collecting in the exposed dado.
17. Drill 1/2" holes, approximately
4-1/2" in depth, through the back leg assemblies, and into the top seat
rail as indicated in the diagram. Insert lengths of 1/2" dowel 4" in
length into each hole with a little glue, and set the dowel slightly below the
surface. Use a little glue on a 1/2" wooden cap to cover the holes.
18. At either end of the front seat board cut a notch 3" x 3-1/4" in
order to fit the board around the front legs of the bench. Install the seat
boards, leaving approximately 1/2" between them. Fasten at either end and
in the center with 2-1/2" deck screws.
19. Secure the arms with 3/8" dowel at the back, and a 1-1/2" deck
screw at the front. Hide the front screw by inserting it from below, angling
through the front leg and up into the under side of the arm.The front arm
supports are held in place with glue and a couple of 1-1/2" finishing
nails. Install the decorative front seat supports in the same way. The arm and
seat corner details can be cut from material saved from the stock remaining from
the cutting out of the arms.
20. The screw holes may be filled with a waterproof wood filler. Sand the
assembled bench, and finish with an exterior finish of your choice. Cedar may
be left to weather naturally to a grey color.

|
