Recommended minimum PC specification
Intel Pentium II 466MHz Processor with 128K cache
128MB RAM
50x Speed Internal
14" Colour SVGA Monitor
MS Windows NT Version 4 - Service Pack 6
Keyboard
PS2 mouse (a serial mouse is not compatible)
*Zip Drive (250Mb)
*UPS
*Internal Modem (56K)
*
Note: The items marked with * are additionally required for a remote ACS to HUC configuration
Please note these instructions assume that your CD ROM drive letter is D.
If not, then please substitute the applicable letter in its place.
There are 7 main stages associated with the installation of the ACS.
Installation Of 'ACS' on SQL Server
Installation Of 'HeadEnd' on HUC PC
Configuration Of ACS SQL Database Files
Configuration Of HUC Database Files
Antenna Hungaria ACS Region Configuration
Configuring the
Establishing Communication from the ACS to the HeadEnd
Stage 1 - Installation of 'ACS' on SQL Server
To install 'ACS':
Insert the DALVI ACS Version 3.3 CD-ROM into the drive
Double Click on 'My Computer'
Double Click on 'Acs_v3_3 [D:]'
Double Click on 'ACS' Folder
Double Click on 'SQL_Non_Token' Folder
Double Click on 'ACS' Folder
Double Click on 'Setup.exe' Application
The following ACS SQL Set-up menu should now be shown
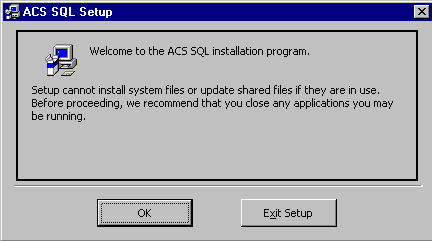
Click On 'OK' option to continue the installation process,
Click On 'Exit Setup' to cease installation
Note: It may be required that certain files are updated. If this is true, then it is required that the PC be Restarted and then steps 1 to 7 of this stage be repeated
The following ACS SQL Set-up menu should now be shown
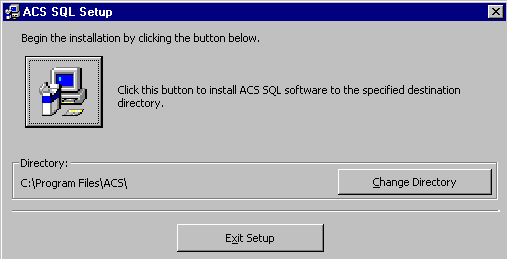
Configure the destination directory for the ACS, or click the Icon where the default destination is C:\Program Files\ACS\
Click On 'ACS' Icon to install the ACS SQL software
The 'ACS - Choose Program Group' menu should be shown
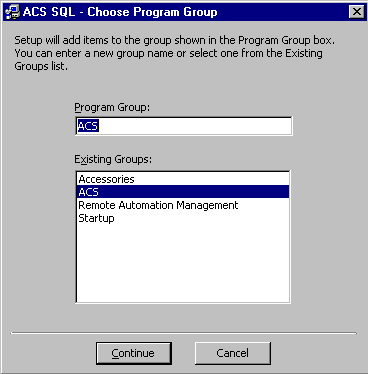
This menu allows you to edit the name that is assigned to the ACS SQL software in the Programs menu and to browse those already present
Enter the appropriate Program Group name and then click the 'Continue' option
Click On 'OK' option to continue the installation process
The 'ACS' stage of the installation is now complete. Close all Windows and progress to Stage 2 of the installation process
Stage 2 - Installation of 'HeadEnd' on HUC PC
To install 'HeadEnd':
Close the 'ACS' Folder
Close the 'SQL_Non_Token' Folder
Double Click on 'HeadEnd_Non_Token' Folder
Double Click on ' Setup.exe' Application
The following HeadEnd Setup menu should now be shown

Click On 'OK' option to continue the installation process
Click On 'Exit Setup' to cease installation
The following HeadEnd Setup menu should now be shown
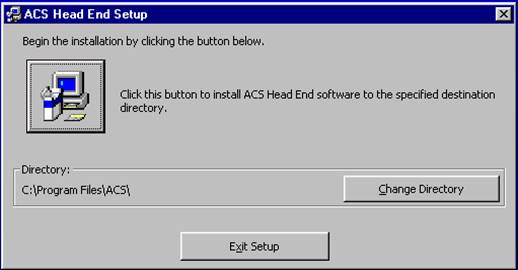
Configure the destination directory for the ACS, or click the Icon where the default destination is C:\Program Files\ACS\
Click On 'ACS HeadEnd' Icon to install the ACS HeadEnd software
The 'ACS HeadEnd - Choose Program Group' menu should be shown

This menu allows you to edit the name that is assigned to the ACS software in the Programs menu and to browse those already present
Enter the appropriate Program Group name i.e. ACS and then click the 'Continue' option
Click On 'OK' option to continue the installation process
The 'HeadEnd' stage of the installation is now complete. Close all Windows and progress to Stage 3 of the installation process
To Configure ACS SQL Database Files:
Click On Windows 'Start'
Point to 'Settings', and then click 'Control Panel'
Double Click On ' ODBC Data Sources' Application
The following 'ODBC Data Source Administrator' menu should be shown
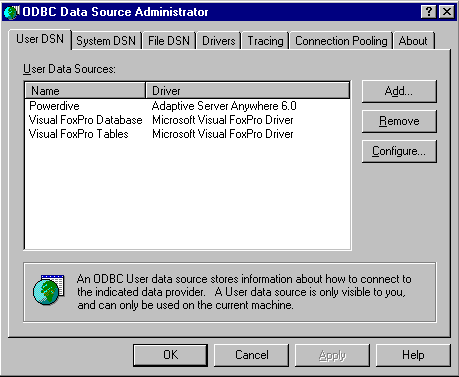
Click On 'User DSN' menu
Click On 'Add' Option
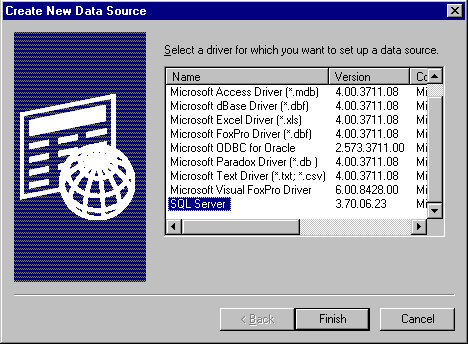
Highlight the 'SQL Server' option
Click the 'Finish' option
The following Menu should be shown
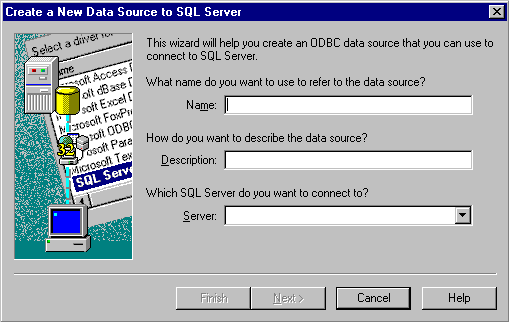
Type in the 'Name' field ACS
Type in the 'Description' field ACS
Select the Remote SQL Server location i.e. ACS
Click the 'Next' option

Click the 'Next' option
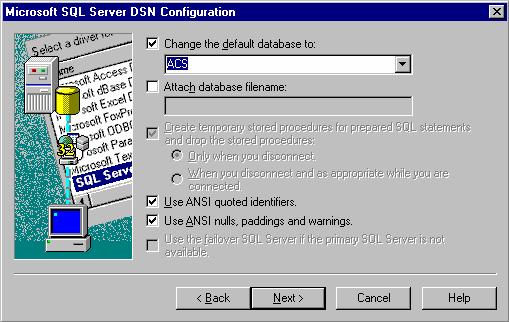
The following Menu should appear
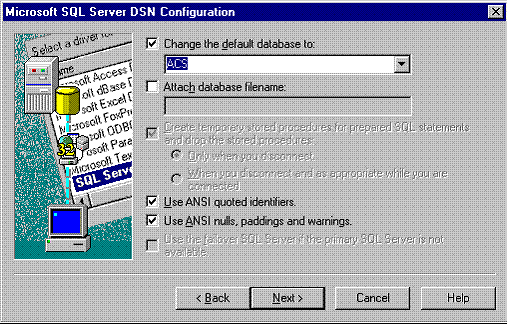
Use the pull down menu to change the default Database to ACS
The following menu will appear
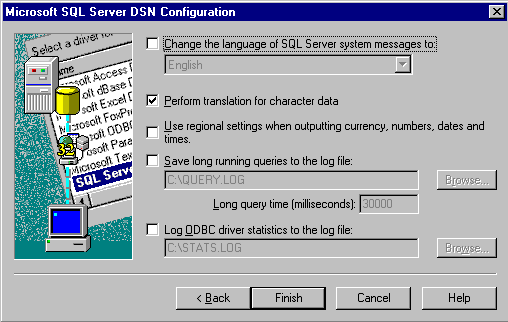
Click the 'Finish' option
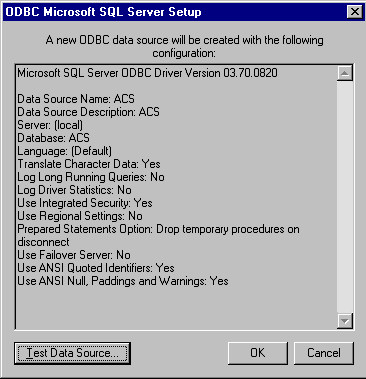
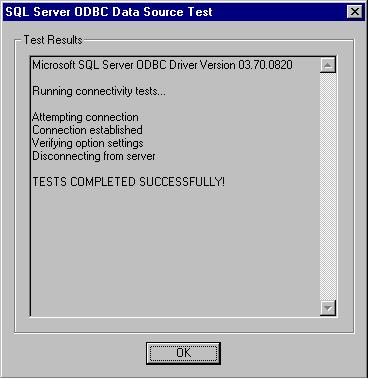
Select the 'Test Data Source' option
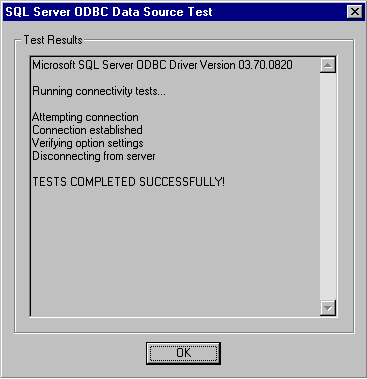
Press 'OK' option to exit when test completes successfully.
If the Test does not complete successfully, please check the configuration connections to the SQL Database and resume again from
Repeat the same procedure above to also include Databases
ACSUPDATE and PASSWORD the SQL ODBC Database Sources will then be fully completed. Stage 4 - Configuration of HUC Database Files
To Configure HUC Database Files:
Click On Windows 'Start'
Point to 'Settings', and then click 'Control Panel'
Double Click On ' ODBC Data Sources' Application
The following 'ODBC Data Source Administrator' menu should be shown
Click On 'User DSN' menu
Click On 'Add' Option
The following 'Create New Data Source' menu should be shown
Highlight the 'SQL Server' option
Click the 'Finish' option
The following Menu should be shown
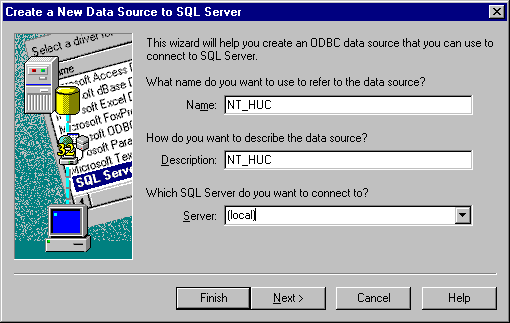
Type in the 'Name' field NT_HUC
Type in the 'Description' field NT_HUC
Select the Remote SQL Server location i.e. ACS
Click the 'Next' option
The following Menu should appear
Click the 'Next' option
The following Menu should appear
Use the pull down menu to change the default Database to ACS
Select the 'Next' option
The following menu will appear
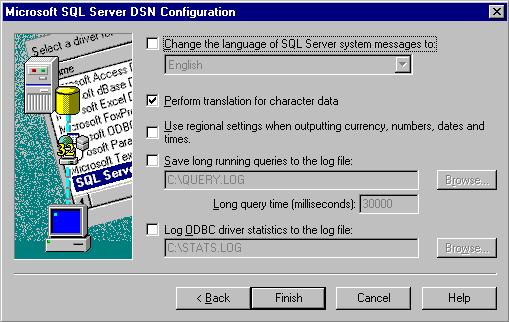
Select the 'Finish' option
The following menu will appear

Select the 'Test Data Source' option
The following menu will appear
Press 'OK' option to exit when test completes successfully and close all Windows.
If the Test does not complete successfully, please check the configuration connections to the SQL Database and resume again from
Stage 4 - Configuration of HUC Database Files
To ensure that the ACS SQL Database files have been configured correctly, it is required that we use the 'Database Checker'
Click On Windows 'Start'
Highlight 'Programs'
Highlight 'ACS' and then Click on 'Database Checker'
The following 'Check DataBases' menu should be shown
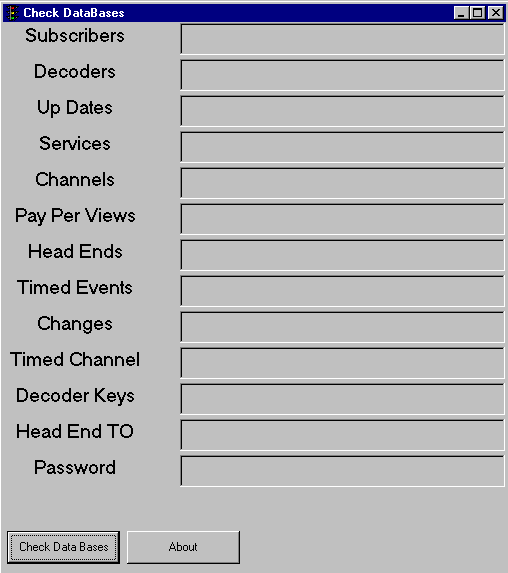
Click On 'Check Data Bases' Option
If the ACS SQL Database files have been correctly configured, then the traffic light indicator for each of the Database sections should be Green
If any of the indicators are Red, then that particular Database section has been incorrectly configured. It is therefore required that the incorrectly configured Database be configured correctly, please see Stage 4 - Configuration Of HUC Database Files
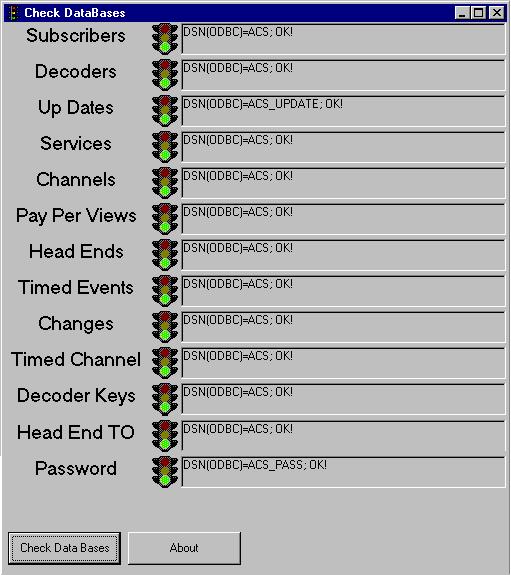
The Configuration of Database Files stage of the installation is now complete. Progress to Stage 5 of the installation process
It is now required that the ACS be configured for your particular Region Code.
The Region Code number for
This is configured on the ACS by going through the following steps
Note: You must first start the System Scheduler and System Manager Icons in the ACS and then start the HeadEnd.exe. This will then create the File Technetix.ini File in the ACS and HeadEnd.ini File in the HUC
Double Click on 'My Computer'
Double Click On '[C:]' Drive
Double Click on 'Winnt' Folder
Double Click on 'Technetix.ini' File
A notepad file similar to the following should be shown

In the [SystemManager] section of this text file, change the Region code to be: 015
Note: Region Code must always consist of 3 digits
In the [System Scheduler] section of this text file, change the Head End Enable =True change to become =False
Note: This disables the HeadEnd.exe File in the ACS and enables the remote HUC to be used.
In the [System Scheduler] section of this text file ensure that SQL=YES
Note: This enables the ACS to utilise an SQL Database
Go to Notepad Tool bar and select File then save
Close all Windows
Double Click on 'My Computer'
Double Click On '[C:]' Drive
Double Click on 'Winnt' Folder
Double Click on 'HeadEnd.ini' File
A notepad file similar to the following should be shown
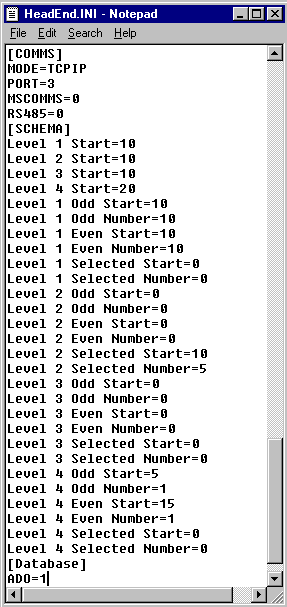
Search through the file and find section [COMMS]
Ensure that the heading MODE=TCPIP
Ensure that Port=3
Ensure that RS485=0
In the [Database] section of this
text file, change the
to become =1
Go to Notepad Tool bar and select File then save
Close all Windows
The installation of the ACS system is now complete.
The ACS Communication Cable Diagram is as follows:

This Cable is connected from the top
RS-485 Card to the RS-485 Input of the First Encoder
Start / Open System Scheduler
Start / Open System Manager
System Manager Password= SERV
In System Manager Select HeadEnd
The following Menu will appear
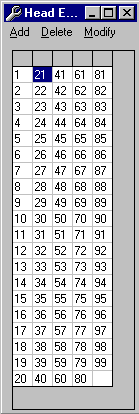
Select Add to add a new HeadEnd to the ACS
The following Menu will appear
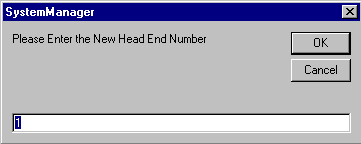
Use the default HeadEnd Number 1 and press OK
The following Menu will appear
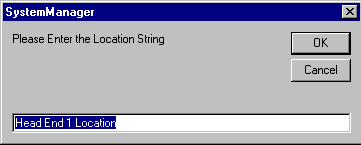
Use default Location Name HeadEnd 1 Location or type in the name, which you will use to identify the HeadEnd and then press OK
The following Menu will appear
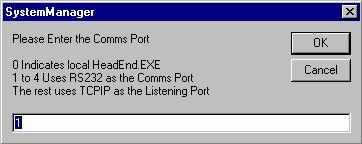
Type in 10025 for TCP/IP Communication with the HUC
and press OK
The following Menu will appear
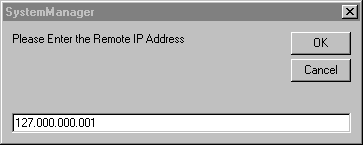
Type in the Remote IP Address of the HUC
Note: If you are using a DHCP Server it will allocate the new HUC PC
An IP Address on the Network.
The following Menu will appear
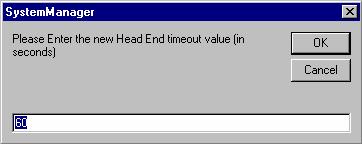
To accept default value of 60 Seconds Press OK
Note: The Timeout value is the wait time that the ACS Update Manager waits until trying to re-establish communication to the HeadEnd.exe
The following Menu will appear

Press YES
The following Menu will appear
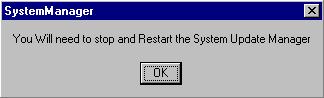
Press OK
The following Menu will appear
Close Down HeadEnd Manager Window
Close Down System Manager
Close Down System Scheduler
To test the Communications restart System Scheduler on the ACS
(As indicated by the System Manager)
Restart the System Manager on the ACS
Restart the HeadEnd.exe on the HUC
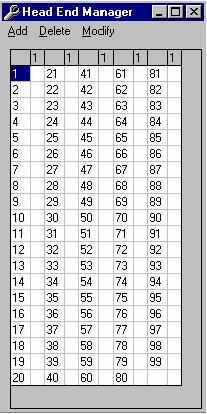
The following Window will appear
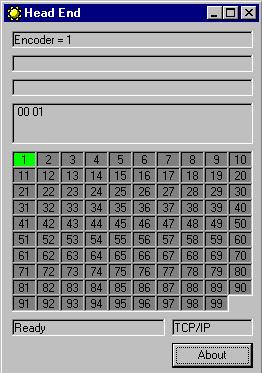
The window above indicates that HeadEnd.exe is Active and Communicating Internally via the installed RS485 Card to Encoder 1.
The TCPIP link to the ACS will enable the HeadEnd.exe to receive new ACS Channel Updates to the sent to the Encoders, when receiving new data the 'Ready' message will read 'Processing' until the new update has completed.
UPS Settings.
Click On Windows 'Start'
Point to 'Settings', and then click 'Control Panel'
Double click the UPS Icon
The following menu should appear
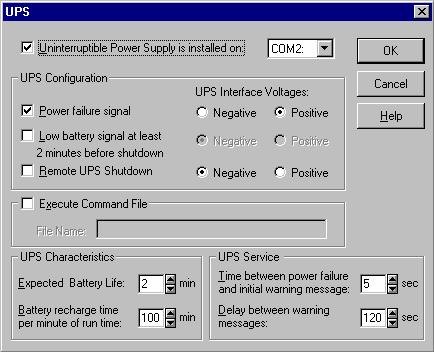
Make the 'tick box' selections as detailed in the menu above and select the 'OK' option, the close all Windows.
The above configuration settings will enable the HUC to utilise its internal battery pack to shut down Windows NT in the event of a Mains Power failure.
Note: An external Manual Power on is required to re-start the HUC PC when Mains Power returns, the HUC will re-start automatically when placed in the Start menu.
The Cable Diagram for the UPS is as follows:

Stage 1 - Installation of 'SMS'
To install 'SMS':
Insert the DALVI SMS Version 3.3 CD-ROM into the drive
Double Click on 'My Computer'
Double Click on 'Acs_v3_3 ' [D:]
Double Click on 'SQL_Non_Token' Folder
Double Click on 'SMS-ACS' Folder
Double Click on 'Setup.exe' Application
The following ACS Set-up menu should now be shown

Click On 'OK' option to continue the installation process
OR Click On 'Exit Set-up' to cease installation
Note: It may be required that certain files are updated. If this is true, then it is required that the PC be Restarted and then steps 1 to 7 of this stage be repeated
The following SMS Set-up menu should now be shown
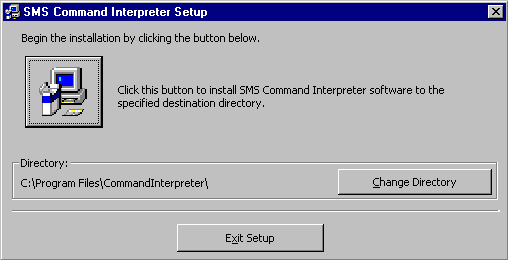
Configure the destination directory for the SMS, or click the Icon where the default destination is C:\Program Files\CommandInterpreter
Click On 'SMS' Icon to install the SMS software
The 'SMS - Choose Program Group' menu should be shown
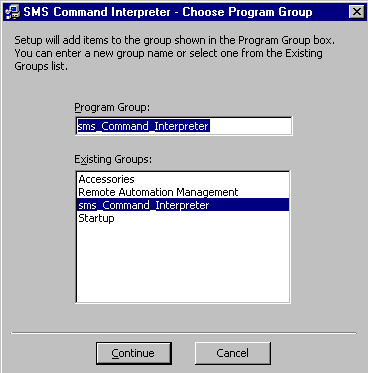
This menu allows you to edit the name that is assigned to the ACS software in the Programs menu and to browse those already present
Enter the appropriate Program Group name and then click the 'Continue' option
The 'ACS' stage of the installation is now complete. Progress to Stage 2 of the SMS installation process
Stage 2 - Configuration and testing the SMS Interface
To ensure that the SMS Command Interpreter files have been configured correctly, it is required that we modify the 'Cmdint.INI' File
Double Click on 'My Computer'
Double Click On '[C:]' Drive
Double Click On 'Program Files' Folder
Double Click On 'Command Interpreter' File
Double Click on 'Cmdint.INI' File
A notepad file similar to the following should be shown
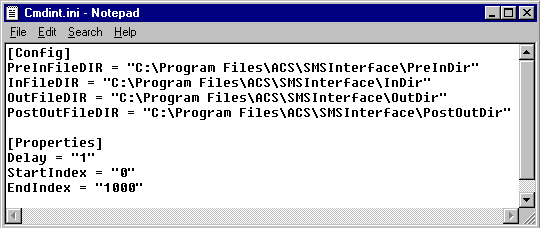
Type in the full Path Name where the SMS Command Interface has been installed. If this was the default path name upon installation it will be configured as above i.e.
C:\Program Files\ACS\SMSInterface\
Note: In order for the Command Interpreter to process the Commands efficiently Please set the 'Delay Time from '0001' to '1' this will poll the PreIn Dir every 1 millisecond looking for the next new Command to Process.
Click On Windows 'Start'
Point to 'Programs', and then point to 'SMS_Command_Interpreter'
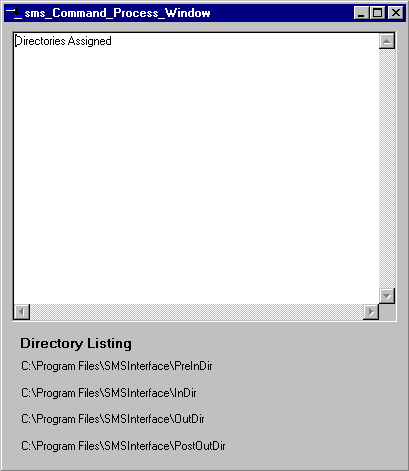
The following 'SMS_Command_Interpreter Window' will be shown
To efficiently test the SMS Command Interpreter you can deposit a File named '00000000.cmd' into the File 'PreInDir'.
This is held within the Path Name
C:\Program Files\ACS\SMSInterface\PreInDir
The 00000000.cmd File should contain the following Command to test the SMS Command Interpreter

Note: When Saving the File please ensure that you insert a carriage return before saving the File
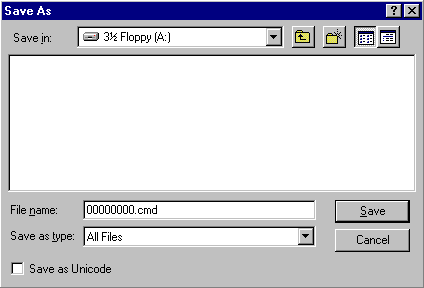
Note: Save the File as 00000000.cmd with the extension for 'All Files'
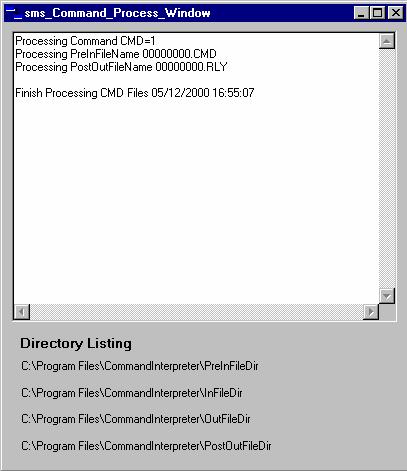
After the Command Interpreter has executed the Command File, it will be deposited into the PostOutDir with a new File extension of 00000000.rly
The Command Interpreter will list the Process of the Command as shown
ACS Retrieval Procedure
The full recovery of the ACS in the event of a System Crash can only be determined by performing regular housekeeping of the System. This includes the frequent routine backup of the following Files:
ACS
Technetix.ini
HUC
HeadEnd.ini
These two Files can be backed up automatically on the 250Mb Zip drives provided in both the ACS and the HUC PC.
Note: You should configure the SQL Server to automatically back up the Technetix.ini File at a regular interval i.e. every 24Hours and the HUC to automatically back up the HeadEnd.ini File at a regular interval i.e. every 24Hours
The ACS and HeadEnd may first need to be re-installed, depending on how severe the System Crash
Please refer to Section-2 System Installation
After the HeadEnd has been re-installed, the HeadEnd.ini File is to be copied into the Path name within the HUC
C:\Winnt
After the ACS has been re-installed, the Technetix.ini File is to be copied into the Path name of the ACS SQL Database
C:\Winnt
|
