
After many, many emails asking me to make a tutorial on how
I make glitter names, I have finally decided to make one.
Please keep in mind that this IS my FIRST tutorial, and I am still learning
alot of stuff myself.
So, that being said, this is the way I, MYSELF make these things.
Also, I will be as detailed as i can, because I know alot of the people who
view my site are new to PSP and all this stuff, so Im going to try to make it
as easy as possible for you to understand. So if it sounds like im babying 19119c28t you,
Im not..lol, im just making it so everyone,even
beginners, can learn to do this.
OK For this tutorial, I will be using Paint Shop Pro
7.
It works with paint shop pro 6 and 8 as well, as i use all 3 of them..and its basically all the same.
If you have one of the other 2 and cant figure out a
step, email me at [email protected] and i will be happy to explain the step
using them.
Ok..on to the toturial.
** First thing you wanna do is pick the glitter fill you want to use.
I have many from you to pick from on my website, if you dont have one.
You can view them HERE
For this example, I will be using 
** OK..so open your paint shop pro, and open the
animation shop.

**Once you have it open, go to file/open and find the glitter fill that you
want to use. (It is a good idea to keep them all in one folder, named something
like "glitterfills")
**Once you have the glitter fill you want open, It will be in frames, like this
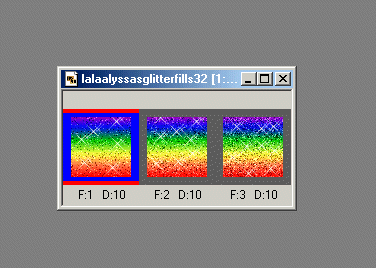
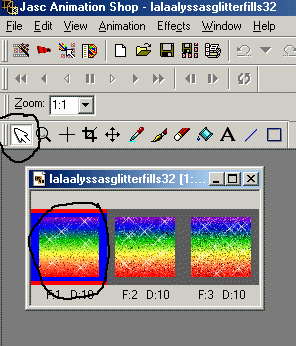
** Select the arrow tool and with it, select the first frame.
** OK, once you have the first frame selected, press CRTL and C at the same
time. This will COPY the frame.
** Then go up to edit/paste as new animation

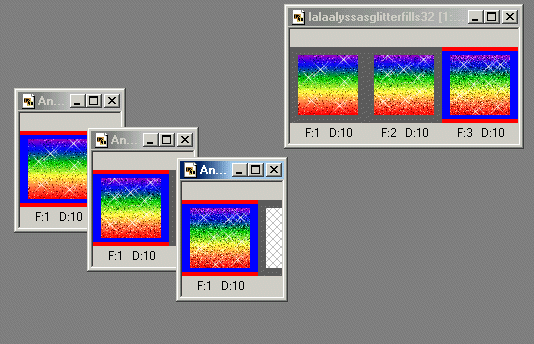
** Do the same thing to all three frames, untill you have them all as their own
frame, like this....
** ok, now you need to save and name them. So click on the first one, go to
file/save as/ and pick a name for it, like rainbow 1.
Once you have that one saved, close it.
Go the next one, do the same thing, file/save as then number it rainbow 2.
Close that one and do the 3rd frame file/save as/ rainbow 3.
NOw you should have each frame saved.
** GO back to your paint shop pro window (not animation shop) and open all 3 of
the frames you just saved.
To do this, go to file/open then find the frames, rainbow1, rainbow2, rainbow
3. You should open all 3.
** OK, now you have everything you need to start your name. So go up to
File/new/ and set your setting like this
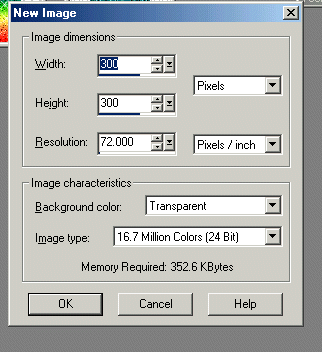
That will open you a nice big transparent canvas to
work on.
**Select the text tool
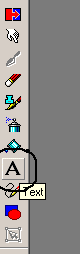
then click somewhere in the canvas you had opened. This will open your text
window.
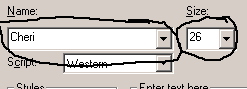
**Ok..go to the first color box and make sure you have
it selected on color fill. You can see here, I chose the black color. Then I
selected white for the inner color. 
You can pick whatever font you want, and the size of the font by playing with
these 2 buttons.
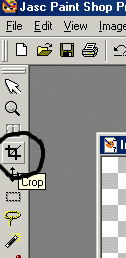
** OK, press ok and your name should appear on the canvas. Go up and press the
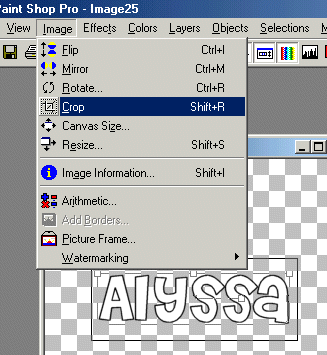
crop button
Then crop around your name and take all the excess space off. To do this, once
the crop tool is selected, hold down the button on your mouse and make a box
around your name. Then go up to image/crop.
**Then go to selections and push "select none"

This should Leave your name looking like this 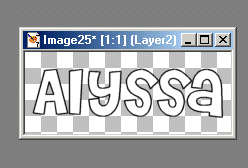
** OK, once i get here..for some reason, it wont let
me click my tool bar. So this is my way around this. Go up to Save and press
save as and save your name. Just save it as like
"Glitternametemplate" or something you will remeber and save it as a
gif. Save it, then close it. Then go up and open it..lol, i know it sounds retarded..but
as i said, im still learning to, and there may be an easier way around this
part...but i have yet to find it..so untill i do..this is what i do..lol..
See, once you open it, you have access to your tool bar again. Ok, so go up and
click Colors/Increase Color Depth/16 million Colors. 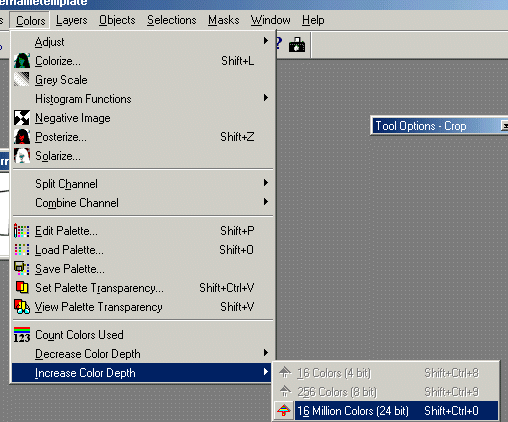
**Ok, now go up and select your wand tool and put the setting like this

**Go over to your name and put the wand in the first letter. If will make the
"marching ants" come up like this 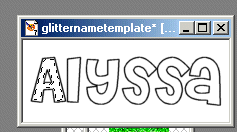
**Ok, that means that letter is ready to be filled. Go over to your Foreground
color box, (the top of the 2 color boxes) and select the pattern fill.
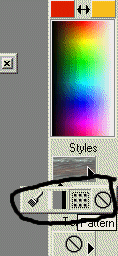
Then double click in the foreground color box and this box will appear and let
you pick the pattern you would like to use.Scroll up and find and Pick
"rainbow 1" Press Ok, once you have it. 
(note- you must still have the rainbow glitter fills open for them to show up
in the pattern box, this is why we opended them to begin with)
** Go down and select your "flood fill" tool.

** Then go up and fill the letter where the marching ants are.
Ok, now go back to the wand tool and select the 2nd letter, marching ants will
come up. Go back to the flood fill tool and fill the letter. Repeat this step
untill all the letters are filled.
** Once all the letters are filled, save it as "glittername1" and
save it as a gif.
**Ok, once you have it saved. Go up to edit/undo and undo till you have just
the outline/template of the name again.
** Go over to your foreground color and double click it, and this time select
"rainbow 2"
** Do the same as you did before and switch betwen the wand and flood fill till
each letter is filled with "rainbow 2". Then save it as
"glittername2.gif"
**Ok, once you have it saved. Go up to edit/undo and undo till you have just
the outline/template of the name again.
** Go over to your foreground color and double click it, and this time select
"rainbow 3"
** Do the same as you did before and switch betwen the wand and flood fill till
each letter is filled with "rainbow 3". Then save it as
"glittername3.gif"
** OK, so now you have all 3 glitternames saved and filled with each rainbow
fill frame.
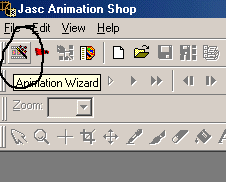
**Open animation shop again.
Select the animation wizard.
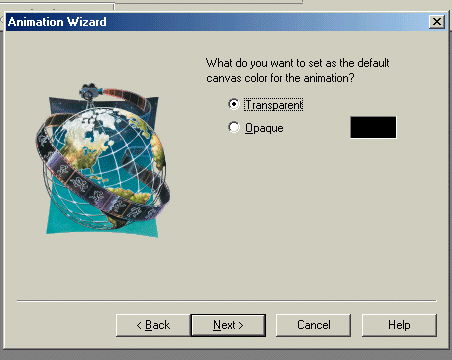
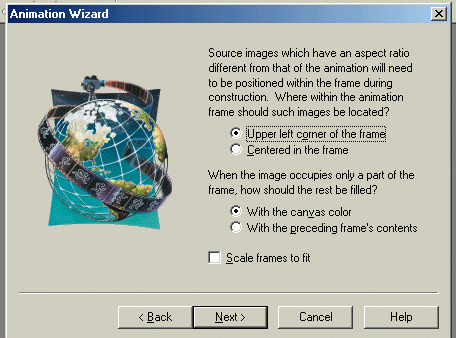
** Follow these settings

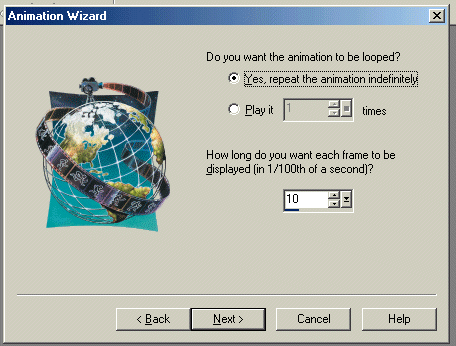
(this is where you would play with the speed of the glitter moving. You could
slow it down by bringing the number 10 down..or speed
it up by taking the number 10 up. But, for this tutorial, we will leave it at
10
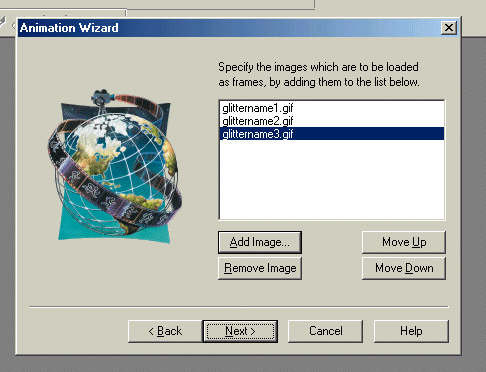
**Ok, in this window you select the glitternames, so press add image and find
glittername1.gif. Then add image again and select glittername2.gif. Then once
more press add image and select glittername3.gif. It should now look like this.
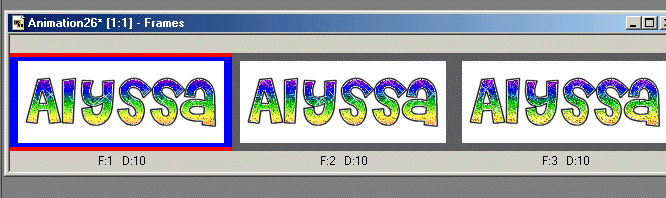
**press next, then press finish. **Now you should have
all 3 of your frames in front of you like this
**Ok, so now go up to Animation/replace color

** set your setting like this
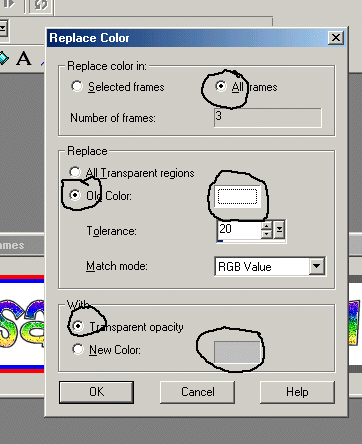
press Ok
***ALMOST DONE!!! lol
** Go up and hit the "view animation" tool.

**Viola!! You have your glitter name. The background is transparent, and it
should now look like this
