The Dreamweaver product and engineering teams have given CSS serious thought and have integrated a very handy feature that allows you to customize the look and feel of your website using a graphical interface.
To define a CSS style for your site, you use the Design panel. You will redefine the look of the <body> and <a> HTML tags and you will also create six new CSS classes, as follows:
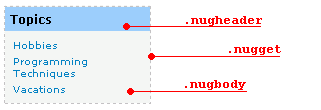
Figure 28. The nugget CSS classes

Figure 29. The article CSS classes
In the next steps, you define the skin of your site. You can change the look and feel of your blog from a single file called blog.css. To create this file:
Click the New CSS Style icon from the bottom of the panel. Dreamweaver opens the New CSS Styl 15215n135p e dialog box.
Start by defining the general formatting of the
document: the <body>
tag.
o Click OK.
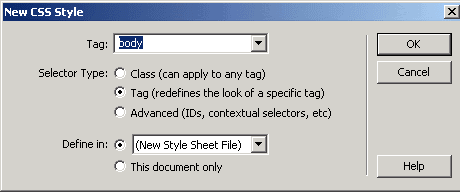
Figure 30.
Use the New CSS Style dialog box to redefine the body tag
Click
Save. The file is created and the CSS Style Definition dialog box asks you to
configure the formatting of the <body>
tag as shown in Figure 31.
o In the Box category, set the Padding and Margin attributes to 0, to eliminate the whitespace between elements of the page.
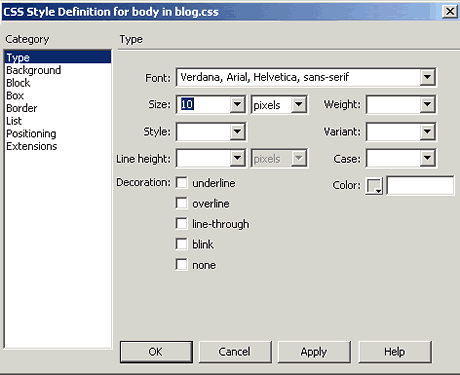
Figure 31.
The CSS Style Definition for the body
tag
Next, define the formatting of the links. You will first edit the formatting
of a link, in general (the <a>
tag), and then apply special formatting for mouse-over effects and for visited
links.
Follow the steps described above for defining a new CSS style. This time select a from the Tag list. Remember to define the style in the same file: blog.css. Set the following attributes in the Type category of the CSS Style Definition dialog box:
Next, edit the hover state of a link:
In the displayed dialog box, select:
Set the following attributes in the Type category of the CSS Style Definition configuration window:
Finally, follow the same steps to define the formatting of the visited state of a link. This time, the only attribute that you specify is:
Color: #0080C0
Note: The link tags inherit the font attributes
of the <body> tag,
unless you specify otherwise. The only attribute that is particular to <a> is the color. In general, the
inner tags inherit the CSS attributes of the enclosing tags.
Now that you have finished modifying existing HTML tags, you define six custom CSS classes, which are used as described above. Use the following steps to create a custom style that you can apply as a class attribute to a range or block of text.
In the New CSS Style dialog box, specify the following information:
Note: Class names must begin with a period and can contain any combination of letters and numbers. If you don't enter a beginning period, Dreamweaver automatically enters it for you.
Here is the complete list of formatting options that you must specify for the custom styles:
|
CSS Category |
CSS Properties |
|
|
.nugget |
Box |
Padding: Same for all, 5 pixels |
|
Margin: Bottom, 10 pixels |
||
|
Border |
Style: Same for all, dotted |
|
|
Width: Same for all, 1 pixel |
||
|
Color: Same for all, #C0C0C0 |
||
|
.nugheader |
Type |
Size: 12 pixels |
|
Weight: bolder |
||
|
Background |
Background color: #99CCFF |
|
|
.nugbody |
Background |
Background-color: #F4F4F4 |
|
.topic |
Box |
Padding Top: 10 pixels, Right: 7 pixels, |
|
Border |
Style: Same for all, dotted |
|
|
Width: Same for all, 1 pixel |
||
|
Color: Same for all, #C0C0C0 |
||
|
.topheader |
Type |
Size: 12 pixels |
|
Background |
Background color: #F4F4F4 |
|
|
.topbody |
Type |
Style: italic |
When you're done defining the styles, you can see all of them listed in the CSS Styles tab of the Design panel as shown in Figure 32.

Figure 32. The CSS Styles tab showing the styles for the blog.css stylsheet
Make sure you save the template and the blog.css files. Dreamweaver will ask you to update all of the pages base on the Template. Click update. You can use the defined CSS styles in all pages based on blgtemplate, since it contains a link to the blog.css file.
To apply these styles to the various tags in your pages, all you have to do is to right-click the corresponding tag in the tag selector and select the appropriate class from the displayed pop-up menu.
Open the blgtemplate page and apply the CSS styles to the menu nugget using the following steps.
On
the tag selector, right-click the <table>
tag containing the topics menu and select Set Class > nugget from the pop-up
menu, as shown in Figure 33.
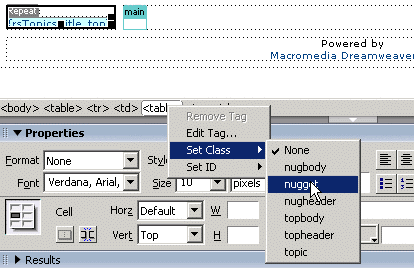
Figure33. Setting the class for the table tag
<td> tag containing the menu header and select Set Class >
nugheader.<td> tag containing the menu entries and select Set Class >
nugbody.Save the page using Control + S. Dreamweaver asks if you want to update all pages based on the blgtemplate. Click Update as shown in Figure 34.
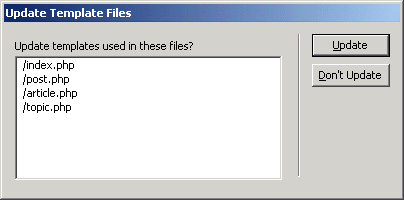
Figure 34. Updating the files based on the template
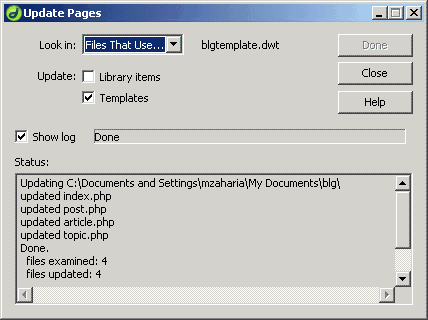
Figure 35. Updating the pages
Note: There is one issue though: because Dreamweaver uses a document-relative link to the blog.css file within blgtemplate, the CSS file is not be accessible in documents based on that template. Use these steps to fix this issue.
Enter this search string: blg.css, and click Find Next.
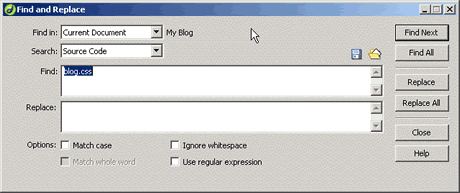
Figure 36. Updating the CSS file that the pages use
Dreamweaver finds the text on this code line:
<link href="blog.css" rel="stylesheet"
type="text/css">
Modify the code line as follows:
<link href="Templates/blog.css"
rel="stylesheet"
type="text/css">
Next, open the topic.php page and apply the CSS styles to the article list:
<table> tag containing the
article list and select Set Class > topic from the displayed pop-up
menu, as shown in Figure 37. Similarly,
right-click the <tr> tag containing the article title
and select Set Class > topheader.

Figure 37. Setting the class for the table tag
(+) View larger
<td> tag containing the article description and select Set Class >
topbody.Follow the same procedure to format the other blog pages using CSS styles. Use your creativity to enhance these styles or define new ones, as needed.
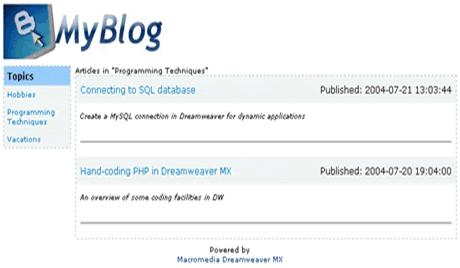
Figure 38. Previewing the page in the browser
(+) View larger
In this article, I've presented how to use Dreamweaver with PHP and MySQL to build the skeleton of a blog. This tutorial is just the starting point of a series of six articles, that will guide you through creating a full-fledged weblog. Here is a quick glimpse into the future features that will enrich your blog:
Building a Blog with Dreamweaver, PHP, and MySQL - Part 2: Creating an Administration
|
