|
Microsoft Operations Manager 2005 Deployment Guide |
Creating Multitiered Management Groups
Authors: Py Bateman (S&T Onsite), John Hallows, James R. Morey
Program Managers: Vlad Joanovic, Lorenzo Rizzi, Travis Wright
Published: June 2005
Applies To: Microsoft Operations Manager 2005
Document Version: Release 1.1
The information contained in this document represents the current view of Microsoft Corporation on the issues discussed as of the date of publication. Because Microsoft must respond to changing market conditions, it should not be interpreted to be a commitment on the part of Microsoft, and Microsoft cannot guarantee the accuracy of any information presented after the date of publication.
This White Paper is for informational purposes only. MICROSOFT MAKES NO WARRANTIES, EXPRESS, IMPLIED OR STATUTORY, AS TO THE INFORMATION IN THIS DOCUMENT.
Complying with all applicable copyright laws is the responsibility of the user. Without limiting the rights under copyright, no part of this document may be reproduced, stored in or introduced into a retrieval system, or transmitted in any form or by any means (electronic, mechanical, photocopying, recording, or otherwise), or for any purpose, without the express written permission of Microsoft Corporation.
Microsoft may have patents, patent applications, trademarks, copyrights, or other intellectual property rights covering subject matter in this document. Except as expressly provided in any written license agreement from Microsoft, the furnishing of this document does not give you any license to these patents, trademarks, copyrights, or other intellectual property.
Unless otherwise noted, the example companies, organizations, products, domain names, e-mail addresses, logos, people, places, and events depicted herein are fictitious, and no association with any real company, organization, product, domain name, e-mail address, logo, person, place, or event is intended or should be inferred.
2005 Microsoft Corporation. All rights reserved.
Microsoft, MS-DOS, Windows, Windows NT, Windows Server, Active Directory, ActiveSync, and Windows Mobile are either registered trademarks or trademarks of Microsoft Corporation in the United States and/or other countries.
The names of actual companies and products mentioned herein may be the trademarks of their respective owners.
Acknowledgments
Primary Reviewers:
Secondary Reviewers: Ian Jirka, Janaina Bueno
Managing Editor: Sandra Faucett
|
Creating Multitiered Management Groups |
Chapter 9
This chapter provides instructions for creating multitiered Microsoft Operations Manager (MOM) 2005 management groups. Multitiered MOM management groups are one or more source management groups that forward alerts and oth 17317i820r er monitoring data to a destination management group. You can configure multitiered management groups so that changes made to forwarded alerts in either the destination management group or the source management groups are synchronized.
By using multitiered management groups, you can isolate monitoring activity according to logical business units or physical locations, and also maintain a centralized monitoring function. You can have up to 10 source management groups communicating with a destination management group. You cannot have more than three tiers of management groups. Synchronization happens between the source and the destination, but not between sources.
The following table summarizes the revisions that have been made to this document.
Revisions, May 2005
|
Section |
New or Updated |
Title |
Description |
|
Updated |
Deployment Scenario Description |
New information about non-trusted domains. |
|
|
|
Note This guide uses a two-tier deployment scenario where alert data is automatically synchronized between the source and destination management groups. Because of the options available with forwarding, many other scenarios are possible. |
Deployment Scenario Description
Deploying the Destination and Source Management Groups
Configuring the Destination Management Group
Configuring the First Source Management Group
Configuring Additional Source Management Groups
Configuring Three Tiers of Management Groups
Send feedback to the MOM Documentation Team: [email protected].
Before beginning the deployment described in this chapter it is recommended that you review the key concepts of MOM that are outlined in the "Before You Begin" section of Chapter 3, "Deploying MOM 2005 across Multiple Computers."
Other areas to review include:
MOM 2005 release notes.
Microsoft Operations Manager 2005 Security Guide.
All planning and design documents that you developed in preparation for deploying MOM 2005.
The following information highlights the key elements and issues that you must understand about multitiered management groups.
Alert forwarding
A source management group can forward to only one destination management group, but a destination group can receive forwarding from as many as 10 source management groups. Alerts can be forwarded to the destination management group as follows:
Automatically based on the forwarding configuration.
Manually when a user specifies that an alert be
forwarded using the MOM Operator console by setting the alert's
Programmatically by using MOM supported APIs.
Duplicate alert suppression is primarily done at the source management group. Duplicate alerts received by the source management group are not forwarded to the destination management group. Only the repeat count for the alert is forwarded. Management packs need to be synchronized between the source and destination management groups. Alert suppression is also done at the destination and one alert from a source management group can suppress alerts coming from another source management group, depending upon the rule's alert suppression settings and logic. Rules also need to be synchronized between the source and destination management groups for the correct knowledge to be displayed for the alert.
|
|
|
Note If the source (zone) management group is running MOM 2005 and the destination (master) configuration group is running MOM 2000 SP1 and you want to synchronize alerts, synchronization must be enabled on both the source and the destination. |
Alert synchronization
If you enable synchronization, MOM inserts alerts and, if the option is enabled, discovery data, from the source management groups into the MOM databases for both the source management group and the destination management group. You can manage alerts independently in the source and the destination management groups. Changes that you make to a forwarded alert's resolution status, owner assignment, or history in either the source or destination management group are synchronized by the MOM product connector and are reflected in both management groups.
|
|
|
Note If the source (zone) management group is running MOM 2005 and the destination (master) configuration group is running MOM 2000 SP1 and you want to synchronize alerts, synchronization must be enabled on both the source and the destination. |
Alert responses
You can configure alert responses to run independently in the source and the destination management groups. When an alert is raised in the source management group, the agent or the Management Server runs responses that are defined in its local alert rules. These responses are run in the source management group only. When the alert is forwarded to the destination management group, its alert rules are applied independently and can run a different response.
If you want a response for a forwarded alert to be run specifically in the destination management group, you should create an alert rule for that alert response in the destination management group. This alert rule needs to be associated to the Management Servers in the destination management group for the responses to work.
Alert forwarding and rules
For an alert to be forwarded to the destination management group, the rule that generated the alert must be installed in both the source management group and the destination management group. You can ensure that the rule is in both management groups by importing the same Management Packs in both management groups. If you create your own custom alert generating rules, you must export the rules and import them into the other management group. If you do not export and import your rules, then those alerts are not forwarded. Rules that exist in only the destination or source management group can only be managed locally.
Additional points to understand before you install multitiered management groups are:
Every rule has a globally unique identifier (GUID). When you implement alert forwarding, you must ensure that the GUID for a rule is the same across the management groups. To use an alert rule in the destination management group, such as sending an e-mail message or running a script, the rule that generated the alert in the source management group must also exist in the destination management group and use the same GUID.
|
|
|
Note GUID matching is not an issue if you use Microsoft Management Packs because these always use the same GUIDs when you import or export them. |
When you create a new custom rule, follow this process:
Create the rule in one management group.
Export the rule from the management group that you created it in.
Import the rule into the other management groups as required.
Only alert information is forwarded; neither event nor performance data is forwarded.
Alert forwarding and synchronization occurs from Management Server to Management Server.
You can use these feature on a Domain Controller running either Windows 2000 or Windows Server 2003. However, you must take additional steps for these features to run properly.
|
|
To use these features on a Domain Controller running on Windows Server 2003
Grant the IIS_WPG group Read / Execute permissions to the %WINNT%\Temp directory.
Grant the IIS_WPG group Modify permissions to the "Temporary ASP.Net Files" directory.
Restart IIS.
|
|
To use these features on a Domain Controller running on Windows 2000
Grant the IWAM_<computername> account Read / Execute permissions to the %WINNT%\Temp directory.
Grant the IWAM_<computername> account Modify permissions to the "Temporary ASP.Net Files" directory.
Grant the IWAM_<computername> account the Impersonate privilege (SeImpersonatePrivilege). For more information about how to do this, see the Microsoft Knowledge Base article Q824308 (https://go.microsoft.com/fwlink/?LinkId=2952).
Restart IIS.
The scenario described in this chapter uses a topology that consists of three management groups, two source management groups that forward data to a third, destination management group. The destination management group functions as a centralized source for enterprise monitoring.
The destination management group can be in a different domain than the source management groups and there does not have to be a trust relationship between those domains. In the scenario described in this chapter, the managed computers are in the same domain as the Management Servers in the source management groups.
|
|
|
Important If your topology consists of a destination management group in one domain and the source management group in another, and those two domains do not share a trust relationship, you must assign a client certificate for the MOM-to-MOM Product Connector (MMPC) service account and map it to an account that is a member of the MOM Service security group on the destination management group. For more information about using client certificates, see the MOM 2005 Security Guide at https://go.microsoft.com/fwlink/?LinkId=330354. For more information about using MOM with non-trusted domains, see Chapter 7, "Deploying MOM 2005 in Advanced Environments." |
It is recommended that you divide your deployment tasks into phases to ensure that each of the MOM components is correctly installed, configured, and adequately tested. The flowchart in Figure 9.1 shows the phases that are used to create the scenario described in this chapter.
Figure 9. General process for deploying source management groups
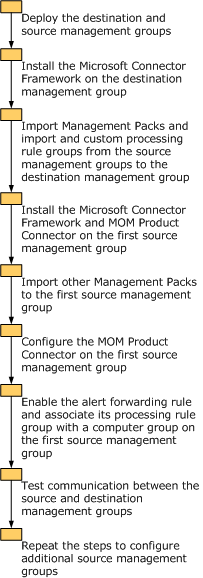
Install the destination management group and the source management groups. For detailed information about deploying management groups, see Chapter 2, "Installing MOM 2005 on a Single Computer" or Chapter 3, "Deploying MOM 2005 across Multiple Computers."
The scenario in this chapter assumes that you have installed the management groups first, and that you are now installing the MOM Product Connector components to create multitiered management groups. If you are installing new management groups specifically for the purpose of creating multitiered management groups, you can install the Microsoft Connector Framework and MOM Product Connector components during setup. These components are subcomponents of the MOM Management Server component.
To configure the destination management group, you must complete the following steps:
Install the Microsoft Connector Framework (MCF) components. You do not need to install the MOM Product Connector components on the destination management group.
Import Management Packs and any custom rule groups used in the source management groups.
Install the Microsoft Connector Framework on a Management Server in the destination management group. You do not need to install the MOM Product Connector components on the destination management group.
|
|
To install the Microsoft Connector Framework
Log on to a Management Server in the destination management group.
Double-click Setup.exe on the product CD.
In the Microsoft Operations Manager 2005 Setup Resources dialog box, click Install Microsoft Operations Manager 2005 to start the MOM 2005 Setup Wizard.
On the Microsoft Operations Manager 2005 Maintenance page, click Modify, and then click Next.
On the Custom Setup page, expand MOM 2005 Management Server.
Click the down arrow next to MOM Connector Framework, click This component will be installed on local hard disk, and then click Next.
|
|
|
Note Do not install the MOM Product Connector component on the destination management group. |
The Prerequisite Check page indicates whether you have met the requirements for installing the MOM components.
On the Ready to Modify the Program page, click Install.
Add the DAS account to the MOM Service security group on the Management Server. This enables the source to send data to the destination.
|
|
To verify the successful installation of the Microsoft Connector Framework
Open Internet Explorer on a computer that has access to the Management Server where you installed the Microsoft Connector Framework.
In the Address bar, type:
https://[ComputerName]:[port number]/connectorserviceV2.asmx
Where ComputerName is the name of the computer where the Management Server is installed and port number is the TCP port setting. The default port setting is 1271.
|
|
|
Important If another application is using TCP port 1271, you must change either that application's settings or the settings for the MCF after installing the MCF. You can change the TCP port setting by using Internet Information Services (IIS) Manager. For more information, see the Microsoft Operations Manager 2005 Security Guide. |
Press Enter.
If the Microsoft Connector Framework is installed and configured correctly, the page displays information about the Connector Service.
The Management Packs and rule groups on the destination management group must include all rule groups used on any of the source management groups. For example, if in one source management group you have imported only the Microsoft Exchange Server 2003 Management Pack, and in the second source management group you have imported only the Microsoft SQL Server 2000 Management Pack, you must import both the Microsoft Exchange Server 2003 and the Microsoft SQL Server 2000 Management Packs in the destination management group.
This includes any custom rule groups or rules that you use on the source management groups. Export any custom rule groups or rules from the source management groups, and then import them into the destination management group. For more information about exporting and importing Management Packs, see Chapter 6 "Deploying MOM 2005 Management Packs."
To configure a source management group to communicate with the destination management group, complete the following steps:
Install the Microsoft Connector Framework and the MOM Product Connector components.
Enable the alert forwarding rule and associate its rule group with a computer group.
Import Management Packs.
Export any custom rule groups, and then import them into the destination management group.
Install the Microsoft Connector Framework and MOM Product Connector on a Management Server in the first source management group.
|
|
|
Note You can use SSL encryption to secure the data being forwarded between the source and destination management groups. For more information, see the Microsoft Operations 2005 Security Guide. |
|
|
To Install the Microsoft Connector Framework and MOM Product Connector
Log on to a Management Server in the first source management group.
Double-click Setup.exe on the product CD.
In the Microsoft Operations Manager 2005 Setup Resources dialog box, click Install Microsoft Operations Manager 2005 to start the MOM 2005 Setup Wizard.
On the Microsoft Operations Manager 2005 Maintenance page, click Modify, and then click Next.
On the Custom Setup page, expand MOM 2005 Management Server.
Click the down arrow next to MOM Connector Framework, and then click This component will be installed on local hard disk.
Click the down arrow next to MOM Product Connector, click This component will be installed on local hard disk, and then click Next.
The Prerequisite Check page indicates whether you have met the requirements for installing the MOM database components.
On the Data Access Server Account page, enter the Data Access Server (DAS) account that you used to install MOM in this management group. Setup uses the DAS account for the MMPC service account.
|
|
|
Important You must add the DAS account used for the MMPC service account on the source management group to the MOM Service group on the destination Management Server. This is done so that the service can insert forwarded alerts into the MOM Database in the destination management group. |
On the Ready to Modify the Program page, click Install.
|
|
|
Note If you install the MCF and MMPC on additional Management Servers in the source management group, these will automatically be used for MMPC service fail-over. |
After installing the Microsoft Connector Framework and MOM Product Connector on a Management Server in the source management group, you must enable the alert forwarding rule in the MOM 2005 Management Pack.
|
|
To enable the alert forwarding rule in the MOM 2005 Management Pack
Open a MOM Administrator console that is connected to a Management Server in the source management group.
In the console tree, expand Microsoft Operations Manager, expand Management Packs, expand Rule groups, expand Microsoft Operations Manager, and then expand Operations Manager 2005.
In the Operations Manager 2005 folder, expand Connector Framework, expand Mark Alerts for forwarding to MOM Master management group and then click Alert Rules.
In the details pane, double-click Mark Alerts for forwarding to the MOM Master management group
On the General tab, select the This rule is enabled check box, and then click OK.
|
|
|
Important Make sure that the script for this rule uses the correct Resolution State ID if you are using one that is different form the default (150). The script is not automatically updated by MOM and must be changed manually. |
Before MOM deploys rules to managed computers, you must:
Associate the rule's rule group with the computer group or groups that you want its rules to apply to.
Commit the configuration change to send the updated rules to computers in the targeted computer groups.
|
|
To associate the rule group with a computer group and commit the configuration change
In the console tree, right-click Mark Alerts for forwarding to MOM Master management group, and then click Associate with Computer Group.
On the Computer Groups tab, click Add.
|
|
|
Note You must associate at least the following Computer Groups with this rule: Microsoft Operations Manager 2005 Agents Microsoft Operations Manager 2005 Servers Microsoft Operations Manager 2000 Agents (if on a mixed environment with MOM 2000 agents) |
In the Select Item dialog box, click the computer group that you want to associate the alert forwarding rule with, and then click OK.
You can add any computer group or groups. For purposes of this example, it is assumed that you choose Microsoft Operations Manager 2005 Servers and Microsoft Operations Manager 2005 Agents.
In the console tree, right-click Management Packs, and then click Commit Configuration Change.
You must now configure a MOM-to-MOM Connector for the source management group to communicate with the destination management group.
|
|
To configure a MOM-to-MOM Connector to communicate with the destination management group
Open a MOM Administrator console that is connected to a Management Server in the source management group.
In the console tree, expand Administration, right-click Product Connectors, and then click Create MOM-to-MOM Connection to start the Create MOM-to-MOM Connector Wizard.
On the Specify Connector properties page, enter a name for the connector, select a resolution state ID to uniquely identify alerts from this source management group, and specify how often data is sent to the destination management group.
On the Add MOM Master Management Group page:
In the Target MOM Management Server box, type the computer name of the Management Server in the destination management group where you installed the MOM Connector Framework.
- Or -
In the Target MOM Web Service box, type the URL of the web service in the destination management group using the following syntax:
https://[ComputerName]:[port number]/connectorserviceV2.asmx.
Where ComputerName is the computer name of the Management Server in the destination management group where you installed the MOM Connector Framework and port number is the TCP port setting. The default port setting is 1271.
|
|
|
Note If you used a different TCP port than 1271 for the MOM Connector Framework, you must use the Target MOM Web Service option. This is also true if you are using SSL encryption with Connectors. |
On the Forwarding Properties page, configure the appropriate properties, and then click Next.
On the Failover Configuration page, configure additional web services in the designated destination management group.
If you have more than one Management Server in the designated destination management group, you can install the MOM Connector Framework to create additional web services on those Management Servers. You can then use this wizard page to configure failover to one or more of those web services, in the event that the primary web service becomes unavailable.
On the Confirmation page, review your selections. If you want to change any of your selections, click Back. To close the wizard and create the MOM-to-MOM connector, click Next, and then click Finish.
After you have created the MOM-to-MOM Connector, you should verify that the connector is present and working.
First verify that the connector appears in the MOM Administrator console on both the source and the destination management groups. In the MOM Administrator console, expand Administration, and then click Product Connectors. In the details pane, you should see the Product Connector that you just created.
Testing communication between the source and destination management groups
To verify that alerts are being forwarded correctly, generate an event that triggers an alert in the source management group. One way to do this is to install a MOM agent on a non-critical computer in the source management group and then shutdown that computer. This will generate a Critical Error alert that will appear in the MOM Operator console for the source management group. That alert also should be forwarded to the destination management group and appear in its MOM Operator console.
|
|
To verify that alerts are being forwarded to the destination management group
Generate an event that triggers an alert in the source management group.
Open the MOM Operator console in the source management group.
In the Alert Views pane, click Alerts.
In the Alerts list pane, verify that an alert appears.
Open the MOM Operator console in the destination management group.
In the Global folder of the Alerts pane, click Alerts.
In the Alerts list pane, verify that the same alert appears.
Click the alert In the Alerts list pane, and then in the details pane, click the History tab. You should see that MOM forwarded the alert from the source destination group.
If the same alert appears in the MOM Operator console of the destination management group, alerts are being forwarded. If you do not see the same alert, carefully review the steps in this chapter.
Test Alert Resolution Synchronization
If you enabled alert synchronization, you can verify that alert resolution is being synchronized correctly by resolving an alert in the MOM Operator console of the destination management group and then verifying that the alert is resolved on the source management group. The synchronization might take a minute or two, depending upon network speed and conditions.
|
|
To verify that alert resolution is synchronized correctly
Open the MOM Operator console in the destination management group.
In the Global folder of the Alerts pane, click Alerts.
In the Alerts list pane, locate an alert that MOM has forwarded from a source management group.
Right-click the alert, point to
In the Resolve Alerts dialog box, enter any comments, and then click OK.
Open the MOM Operator console in the source management group .
In the Global folder of the Alerts pane, click Alerts.
In the Alerts list pane, verify that the alert no longer appears. You might need to refresh the view.
Repeat the steps used in the "Configure the First Source Management group" section earlier in this chapter to configure up to nine additional source management groups. After adding all the source management groups, make sure that the destination management group has all the Management Packs and customized rules that the source management groups have.
|
|
|
Note MOM does not automatically synchronize changes in a Management Pack on the source management group with the destination management group. You must manually synchronize any subsequent changes to rules. |
You can create a third tier simply by creating a Connector between the destination management group (second tier) to another destination management group. The destination, therefore becomes the source for another destination management group.
|
|
|
Important Do not have the destination management group forward back to the original source management group. |
|
