Single-Channel Remote - DVR2000
DVR2000 remote have strong functions such as remote surveillance, remote monitor, remote tall back, remote recording, playback, remote control (indication light and lock on/off), remote control PTZ, patrolling, remote receiving alarm and so on.
![]() Note: please make sure the web is expedited
before connecting remote surveillance software.
Note: please make sure the web is expedited
before connecting remote surveillance software.
There will automatically create a shortcut icon on the Windows interface after the single screen remote software having been installed. Following the below figure 30. Double click the icon, there will pop up an operation interface as figure 31 on the upper right hand of the screen.
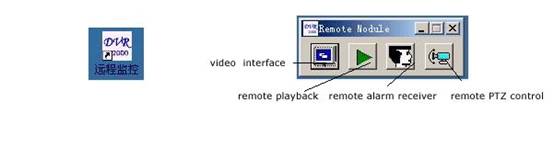 Figure 9-1 figure 9-2
1.1Connect Server
Chose servers firstly and then click "video interface" "server" to pop up following dialog box:
Figure 9-3

1.2 Setup the Server Mode
1.2.1 Add Server
Click "set" button in the video server, pop up a dialog box following figure 33
Figure 9-4
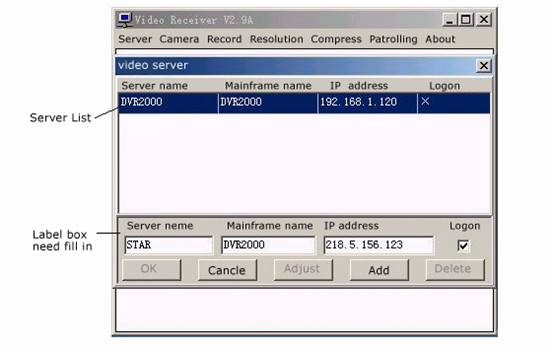
Input correspond
content in every label box of figure 33, then click "add" key. If you want to
monitor more than one server, please input correspond content of another server
by the same way.
After setting, click "OK" to return main interface, select the server name you want to link to, press "OK".
![]() Note:
Note:
If server and surveillance center is linked by dynamic IP network, you must draw " " in the "logon" to allow the server can logon by user resolution server.
1.2.2 Modify, Delete Server
If the server setting is error, please select the error server in the server list and make it become blue color, and then click "modify" again after finish modify by click "modify" button, 121e48b press "OK" to return main interface.
1.3 Logon Server
1.3.1 Logon Server
After set the server, return to main interface as figure 32. Select the server want to land in the drop down menu, click "OK". It will pop up a dialog box as figure 34 after many seconds. Input user name and password provided by server port, click "OK" to logon server and to monitor remote image.
![]() Note:
Note:
You must draw " " in "save password" to avoid input user name and password again when you want to view second channel and third channel.
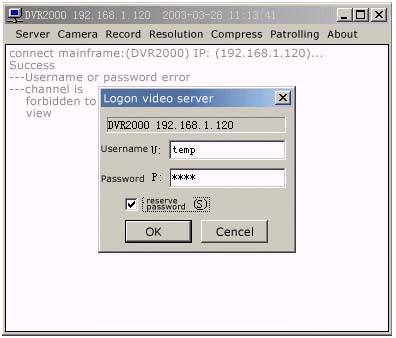
Figure 9-5
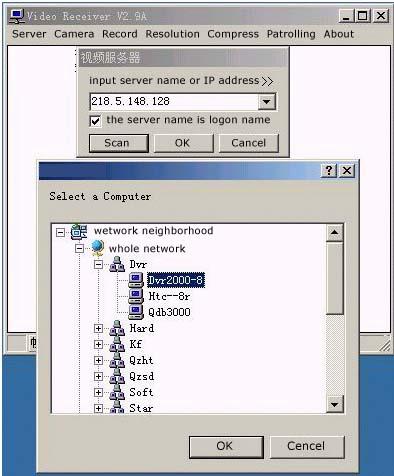
1.3.2 Logon Server Directly
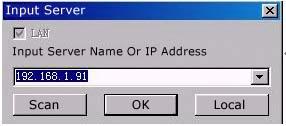
There is a method to logon server directly instead of logon through server setting.
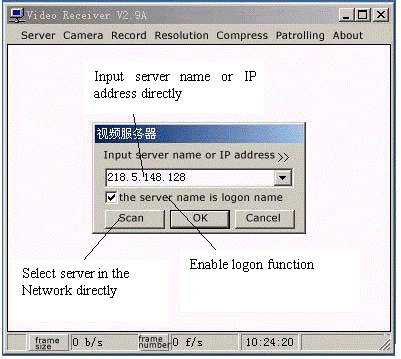
Click "<<"
in the main interface as figure 32 swap to another logon method like figure 35,
input server name (that have registered) or the server IP address, press "OK".
It will pop up a dialog box as figure 34 after many seconds. You only need to
input user name and password to logon. The other method is that clicks "scan"
and directly selects the server you want to monitor in the network (available
in the LAN), other operation are the same as upper.
Figure 9-6
Figure 9-7
1.4 Remote Setting
1.4.1 Select Camera
Click "camera" and select the channel you want in the drop down menu to view different camera channel.
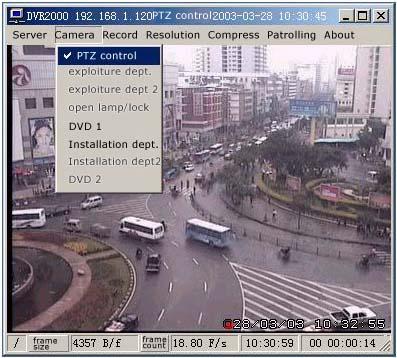
Figure 9-8
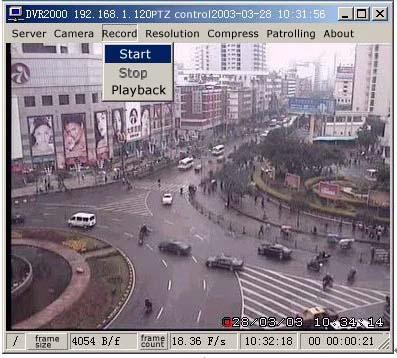
1.4.2 Remote Record, Playback
If you want to do remote record, please click "record" and select "Start" in the drop down menu to record, press "stop" to stop and click "playback" to return playback interface after many seconds, you can refer 4.5 part to know the playback operation.
Figure 9-9
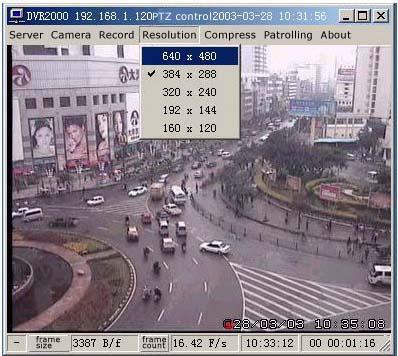
1.4.3 Adjust Surveillance Resolution
Select different surveillance resolution according users' different taste. Click " resolution" to select.
The image will be more clear and small when showing by less resolution. The standard is 384*288.
Figure
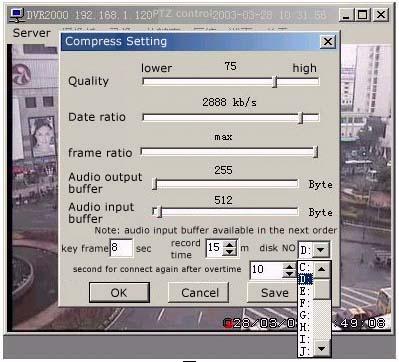
1.4.4 Adjust Compression Ratio
Compression ratio is set for remote record. In generally, users use the standard setting of the company instead of setup again. But the record setting can be set according users' need.
Following figure 40
Figure 9-11
![]() Note:
Note:
The record time can be select by will, but the disk NO usually is more space disk except C: (system disk).
After setting, please click "save" "OK".
1.4.5 Patrolling Setting
Patrolling function means that the monitor interface can automatically swap to the camera channel that had been set in the limited time when there is no person doing monitor. It will facilitate the user to play back the status of patrolling camera when he has free time.
Detailed setting following figure 41
Figure 9-12
![]()
![]()
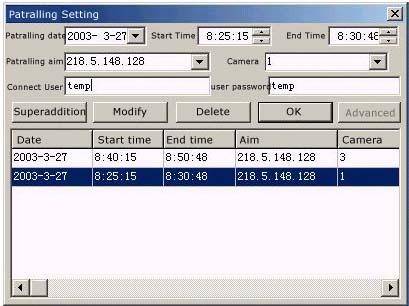
1.4.5.1 Add, Modify, and Detect the Patrolling Aim
Add: click "add" button after camera channel has been set according user need. If you want to add another camera channel, please select other camera No, after input the corresponding content click "add".
Modify: select the aim wanted to modify in the patrolling aim list, and click to change the color to blue, and then modify the corresponding content in every boxes. Finally click "modify" "OK" to return to main interface.
Delete: select the aim want to modify in the patrolling aim list, click to become blue color, and then click "delete" "OK" to return main interface.
After setting, it will OK after select "start" in the drop down menu of "patrolling".
1.5 Remote Control
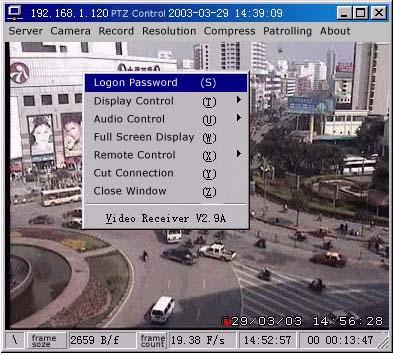
1.5.1 Logon Password
Click right mouse after enter the surveillance image. The main interface will pop up a drop down menu as figure 42: click " logon password" to disappear the dialog box as figure 34, and then input the correct user name and password. Click "OK" finally.
Figure 9-13
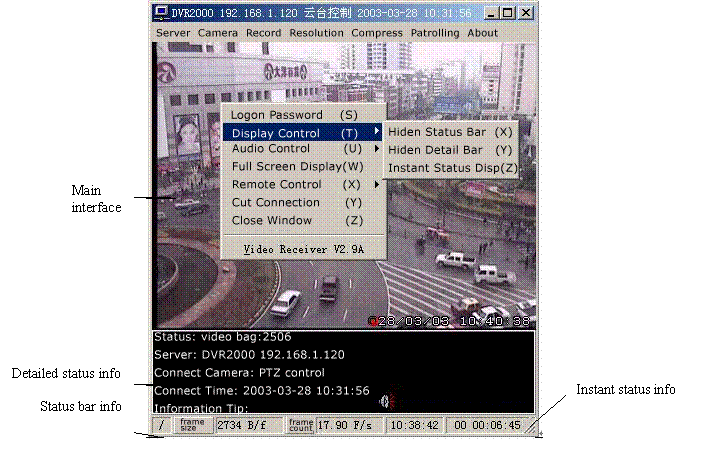
1.5.2 Display Control
There are 3 options in the display control such as "display status bar", "display detail bar" and "display instant status". Other is " hidden bar".
Enable "display status bar", it will add a bar with " frame size", "frame count", and a status bar with current time and surveillance time in the bottom of main interface.
Enable "display detail bar", it will disappear some detailed status information to be clear at a glance in the bottom of main interface.
If you needn't this detail information, please select "hidden bar".
The detail information following figure 43
Figure 9-14
1.5.3 Audio Control
Remote audio control can enable remote monitor, tall back and other audio dealings under the status that server input correct audio.
![]() Note:
Note:
The monitor port must install microphone and sound box.
Monitor: select "start monitor" in the drop down menu.
Talk back: select "talk" under the monitor status.
Other options can be select according the users' need. Like figure 44 following:
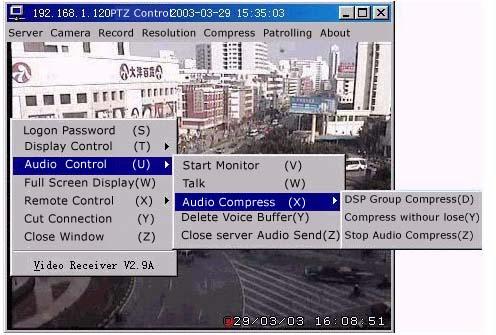 Figure 9-15
1.5.4 Full Screen Display
You only need to select "full screen display" button in the drop down menu in figure 9-15 to display the view image by full screen.
Click left mouse in the full screen to return to original image.
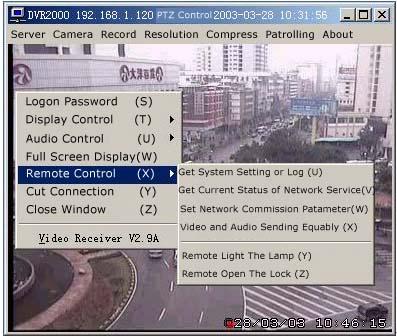
1.5.5 Remote Control
The remote system set, remote light the lamp, open the luck and other series functions will be realized in the remote control option.
Remote system set: select " get system setting or log" to pop up a dialog box as following figure:
Figure 9-16

Input the super password, click "OK", then you can set the remote system in the system setting box that pop up after seconds. Please refer to "user guider" to see setting details. If you want to get the server's log, please click "OK" after affirming the start date and day of log you want to view, wait for seconds to view the detailed log information by linking to network successful.
Remote indicator light and lock on /off
Select "ON/OFF light" and "open the lock" buttons in the drop down menu to control remote indicator light and lock.
![]() Note:
Note:
The electromagnetism lock and electro motion lock in the server can automatically close several seconds after starting.
![]() Other:
Other:
The user can select other options according control need. Following figure 46
Figure 9-17
1.5.6 Cut Connection/ Close Window
Select "cut connection" in the drop down menu like figure 46 to cut the current link. Select "close window" or click " " on the upper right hand of main interface to close the current monitor interface.
1.6 Remote Playback
![]() Note: if you want remote playback, you must
share the file that agree doing remote playback firstly.
Note: if you want remote playback, you must
share the file that agree doing remote playback firstly.
There are two formats of playback: one is remote playback, and another is local playback. Click the green triangle button of "playback". If it is remote playback, you can input server name (have been registered) or IP address in the pop-up dialog box, and then click " ok". If it is local playback, you just can click "local" to enter the playback interface in the pop-up box directly.
Figure 9-18
The operation of playback is the same as the one of server playback: select camera name select date select play file play.
Please refer to "record playback" department.
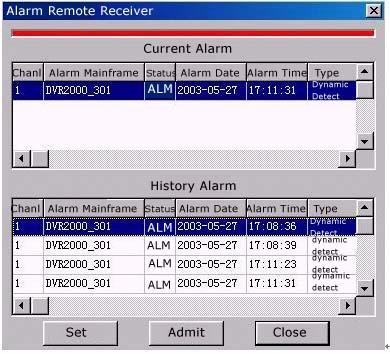
1.7 Remote Alarm Receiver
The remote alarm receiver means to the monitor side will receive the alarm information and pop up that camera image immediately when the alarm happened in the service side. It makes the monitor side can see the status and deal with in time.
It will appear a head portrait icon in the lower right side of Windows by clicking and starting "alarm receiver" button. Click right mouse in the icon to pop up a dialog box, if you want to exit receive, please select "exit" directly. If you want to view the alarm information and doing corresponding setting, please select " resume" to pop up the dialog box as figure 48.
There are two departments of alarm receiver: one shows current alarm information, and another records history alarm information. Alarm information points out "channel", "alarm server name", "status", "alarm date", "detailed alarm time" and "alarm type" in detail.
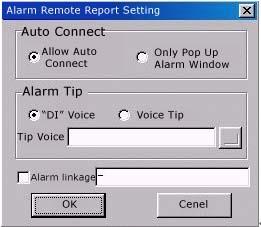
Set: click "set" button to pop up a dialog box as figure 9-19.
![]() Permit auto link: the monitor side not only
can receive current alarm information, but also can auto pop up the alarm
camera image, and then input the user name and password provide by server in
the pop-up dialog box.
Permit auto link: the monitor side not only
can receive current alarm information, but also can auto pop up the alarm
camera image, and then input the user name and password provide by server in
the pop-up dialog box.
![]() Only pop up alarm window: the monitor will
pop up a alarm information window instead of pop up
the camera window at once there are alarm happened in the server side.
Only pop up alarm window: the monitor will
pop up a alarm information window instead of pop up
the camera window at once there are alarm happened in the server side.
![]() Alarm tip: there are two mode of sound. One is
"DI" voice that the software own; another is the sound the users can set by
their will. Click "scan" and select WAV mode sound file in the mainframe.
Alarm tip: there are two mode of sound. One is
"DI" voice that the software own; another is the sound the users can set by
their will. Click "scan" and select WAV mode sound file in the mainframe.
![]() Alarm linkage: this function only can be used
on the guidance edition with electronic map. Draw " " in the front box and input the title of alarm
linking in the back blank box.
Alarm linkage: this function only can be used
on the guidance edition with electronic map. Draw " " in the front box and input the title of alarm
linking in the back blank box.
After setting,
click "OK" "close" to exit.
Figure 9-19
Figure 9-20
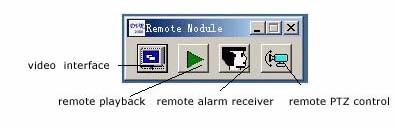
1.8 Remote PTZ Control
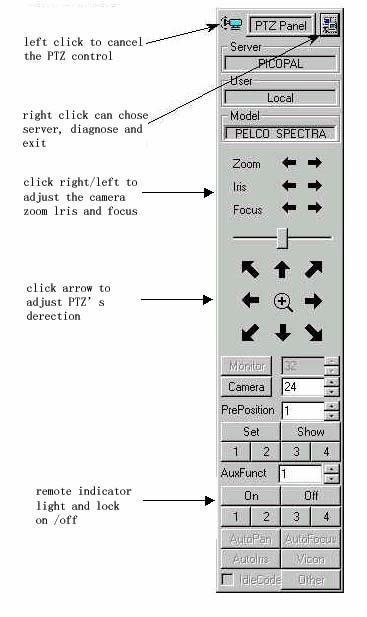
Remote PTZ control means the server side can change the direction of pain/toil, adjust the camera "zoom", "lris" and "focus", and can control remote indicator light and lock on/off and so on.
Click PTZ button to start PTZ controller, input server's name or IP and user's name that provided by server side in the pop up dialog box. Following figure 50. Detail operation please refers to figure 9-21.
![]() Note: it will support user whose name has add
to the user list in the PTZ control server to logon.
Note: it will support user whose name has add
to the user list in the PTZ control server to logon.
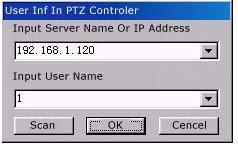 Figure 9-21
![]() Camera select
Camera select
Use the camera select box in the PTZ control panel to chose the camera that controlled by PTZ.
![]() Note: the setting of OSRD camera number must
correspond with the linked camera number.
Note: the setting of OSRD camera number must
correspond with the linked camera number.
![]() Speed control
Speed control
The moving speed of PTZ can be control through slide.
![]() Pre position
Pre position
The position of PTZ can be saved in order to make the camera back the position by need.
![]() Set pre-positions: input the pre position
number in the pre position box.
Set pre-positions: input the pre position
number in the pre position box.
Adjust the camera to the pre-position up/down, right/left after select pre position number. Click "set" button to distribute the pre position to this station.
![]() Display pre-positions: input pre-position no.
Click display button to set the camera to the pre position.
Display pre-positions: input pre-position no.
Click display button to set the camera to the pre position.
![]() Pre-position hot key: have supported
pre-position hot key for the four pre-position that in common use. Use the hot
key can adjust the camera to the corresponding pre-position after the
successful setting.
Pre-position hot key: have supported
pre-position hot key for the four pre-position that in common use. Use the hot
key can adjust the camera to the corresponding pre-position after the
successful setting.
Figure 9-22
|
