ALTE DOCUMENTE
|
||||||||||
If you need to insert 3D letters and words into your models and graphic designs, use the TriSpectives text features.
On a 3D page, for example, you can use text to create brochure copy, titles, and captions for your designs and layouts. For more details, see the next chapter.
Text has many of the same features as IntelliShapes. For example, you can change its color, apply textures to it, rotate it, and position it on other shapes.

Creating text in a scene
Creating text on a page
The text sizebox
· 14114b119o 14114b119o The text toolbar
· 14114b119o 14114b119o Beveling text
· 14114b119o 14114b119o Text properties
To add 3D text to a scene, you drag generic text shapes from the Text catalog. To add text to a page, you can use the Text catalog or insert a text box. The following examples show you both methods. Before you begin, insert a new scene or page in your WorkBook.
u To add text to a 3D scene or page using the Text catalog:
|
|
1 14114b119o 14114b119o If the Edit Surfaces and Edges tool is active, click it off. |
2 14114b119o 14114b119o Select the Text tab to see the items in the Text catalog.
3 14114b119o 14114b119o Drag a Text shape from the catalog into a scene or page.
Generic text appears as a 3D shape and in an editing window.
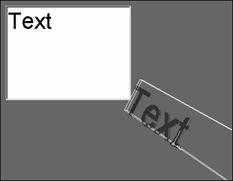
Text shape and editing window
4 14114b119o 14114b119o After pressing the Backspace key to delete the text in the editing window, type the text you want.
5 14114b119o 14114b119o Click in the scene or page to make the new text appear there.
|
|
You might have to use the Orbit Camera and Look At tools to change your viewpoint of the text. |
6 14114b119o 14114b119o
To delete text, right-click it and select Delete
from the
pop-up menu.
You can also select the text and then press the Delete key.
When working on a 3D page, you can add text using the preceding method or you can insert a text box.
u To add text to a 3D page by inserting a text box:
1 14114b119o 14114b119o If you don't have a page in your WorkBook, select Page from the Insert menu and click OK in the resulting dialog box.
|
|
2 14114b119o 14114b119o If the Edit Surfaces and Edges tool is active, click it off. |
3 14114b119o 14114b119o Select Text Box from the Insert menu and move your mouse pointer to the page.
4 14114b119o 14114b119o When a cross hair appears, click and drag to define the text's location on the page.
When you release the mouse, an editing window appears.
5 14114b119o 14114b119o After pressing the Backspace key to delete the text in the editing window, type the text you want.
6 14114b119o 14114b119o Click on the page to make the new text appear there.
Once the text is in your scene or page, you can change the text's size and position and alter its properties like other 3D shapes.
The rest of this chapter explains what you can do with 3D text.
You can edit 3D text at any time by double-clicking it in the scene or page, or by right-clicking it and selecting Edit Text from the pop-up menu. In either case, the editing window appears. Click in the window and edit the text. When you finish, click in the scene or page to make the edited text appear there.
Note: By default, the editing window appears when you double-click text. If you want a different response when you double-click text, change its Interaction property. Right-click the text, select Text Properties from the pop-up menu, select the Interaction tab, and then select a different double-click action in the Interaction properties sheet.
To delete text, right-click it and select Delete from the pop-up menu. You can also select the text and then press the Delete key.
If the Edit Surfaces and Edges tool is not active, a sizebox appears around 3D text when you click it on the page or scene. The text sizebox is different from its counterpart for IntelliShapes.
· 14114b119o 14114b119o When you drag the side handles of the sizebox, you resize the text box, not the text itself. For instance, if you have a few words of text and want to change how the words wrap from line to line, drag the side handles. The following illustration shows the effect of dragging these handles.
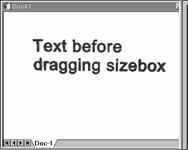
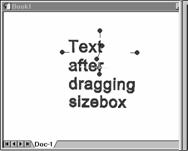
Resizing the text box
· 14114b119o 14114b119o Grab the two handles within the text box to increase or decrease the width of the text. These handles help you create the 3D effect.
To specify a particular width, right-click the text, select Text Properties from the pop-up menu, select the Text tab, and then type a value in the Text Depth field.
You cannot always use the sizebox handles to change the font size of the text itself. To change the font size, alignment, and other settings, use the Text tools described in the next section.
The Text tools let you format the selected text on a
page or scene. To display this toolbar, open the View menu and select Toolbars.
In the resulting dialog, click Text Tools and then click OK.
![]()
Text Tools toolbar
The
Text tools become active only when you select text.
These tools, from left to right, are:
Font and Font Size drop-down boxes. To choose a special typeface and typeface size for the selected text, click the q to the right of the boxes. Click your selections in the resulting lists. You can also specify a font size by typing it straight into the Font Size box.
Bold and Italic. Click the B to display the selected text in boldface. Click the I to display the selected text in italics.
Align Left, Align Center, and Align Right. Click these tools to align text with the left margin of the text box, center the text between the left and right margins, or align it with the right margin of the text box, respectively. You can only select one of these tools at a time.
Grow and Shrink. Click these tools to increase or decrease the size of the selected text. To specify a size, enter it in the Font Size box.
Like 3D IntelliShapes, you can round the edges of text shapes to create a more professional look.
u To bevel 3D text:
|
|
1 14114b119o 14114b119o If the Edit Surfaces and Edges tool is active, click it off. |
2 14114b119o 14114b119o
Right-click the text and select Text Properties from the
pop-up menu.
3 14114b119o 14114b119o Select the Text tab in the resulting dialog.
4 14114b119o 14114b119o In the Text properties sheet, select a type of bevel.
Click the q to the right of the Bevel Type field and choose Flat, Round, Inverted Round, or no beveling.
5 14114b119o 14114b119o Enter values for depth, scale, and smoothness of the bevel in the appropriate fields.
· 14114b119o 14114b119o
The scale
is the ratio of a bevel's height to its thickness.
For example, a flat bevel has a scale of 1.0, meaning the height of the beveled
edge equals its thickness.
If you change the scale to 2.0, the bevel edge has the same thickness, but the bevel extends beyond the text's basic outline by twice the original amount.
If you change the scale of a Round bevel to the maximum setting of 0.5, the text is fully curved and has a slightly inflated look. To retain the roundness but reduce the inflated appearance, set a smaller scale such as 0.75.
· 14114b119o 14114b119o Smoothness applies only to the Round and Inverted Round bevel types. Enter a greater value to create a more geometrically smooth surface and silhouette.
6 14114b119o 14114b119o Click OK to bevel the text and close the dialog box.
IntelliShapes have three modes for changing properties and position, but text shapes have only two: Shape mode and Surfaces mode.
|
|
· 14114b119o 14114b119o Text is in Shape mode by default or if you select the Edit IntelliShapes tool. In this mode, you can use the Text Tools toolbar, drag sizebox handles, and move and position text shapes. To position text, use the same techniques and properties you use for IntelliShapes. Text shapes have anchors, which let you affix the text to other shapes. You can drag text and rotate it with the TriBall, just as you've learned to do with IntelliShapes. |
When you right-click text shapes, you can select their Text properties and Style properties for editing. Other than the Text tab on the Text properties sheet, these options are identical to the IntelliShape and model properties described in Chapters 2 and 3.
|
|
· 14114b119o 14114b119o
Select the Edit Surfaces and Edges tool to
move to Surfaces mode. |
You can also import text documents from word-processing programs that support object linking and embedding (OLE), such as Microsoft Word. OLE lets you quickly move graphics and text documents between programs. For details, see Chapter 8, "The outside world."
|
