Age of Empires II: The
Age of Kings
Player Manual
Alpha Version
2/16/99
Microsoft may have patents, patent applications, trademarks, copyrights, or other intellectual property rights covering subject matter in this document. Except as expressly provided in any written license agreement from Microsoft, the furnishing of this document does not give you any license to these patents, trademarks, copyrights, or other intellectual property.
Unpublished work. 1997 - 1999 Microsoft Corporation. All rights reserved.
Microsoft, MS-DOS, MS, Windows, Windows NT, and Age of Empires are either registered trademarks or trademarks of Microsoft Corporation in the U.S.A. and/or other countries.
The names of actual companies and products mentioned herein may be the trademarks of their respective owners.
Table of Contents 3
About Age of Empires II: The Age of Kings 5
What's new in Age of Empires II 5
Installing & Starting 6
Installing 6
Starting 6
How to win 6
Single player games 8
Multiplayer games 8
Latency and frame rate problems 9
Cooperative games 9
Creating or joining a multiplayer game 9
Connecting through the Zone 10
Restoring a saved multiplayer game 11
Resigning a multiplayer game 12
Creating your own scenarios 12
Creating your own campaigns 13
Choosing a civilization 13
Using the interface 14
Stockpile counters 14
Population indicator 14
Age indicator 15
Online tech tree 15
Chatting 15
Diplomacy/Tribute 15
Menu button 15
Command buttons 16
Status area 16
Score 16
Mini-map 17
Changing the configuration settings 18
Customizing the hot keys 18
Getting Help 19
Saving and exiting 19
Exploring 20
Terrain 20
Gathering resources 21
Villager tasks 21
Creating units 22
Production queues 23
Gather points 23
Upgrading units 24
Constructing buildings 24
Repairing buildings and boats 25
Garrisoning units inside buildings 25
Researching technology 27
Advancing to the next age 27
Trading 28
Commodity trade 28
Player-to-player trade 29
Capturing trade units 29
Moving & grouping units 30
Moving units 30
Grouping units 30
Moving units using waypoints 31
Transporting units across water 31
Combat 32
Attack notification 32
Ordering an attack 32
Patrolling an area 32
Guarding a unit or building 33
Following a unit 33
Combat stances 33
Healing friendly units 33
Converting enemy units 35
Monks 35
Boarding Galleys 35
Monks and relics 36
Diplomacy 36
Allied games 38
Choosing your allies 38
Signaling allies 38
Tribute 39
Unit descriptions 40
Chapter 1
Getting Started
Age of Empires II: The Age of Kings spans the Medieval period from the Dark Age to the Imperial Age. You control one of 9 civilizations, which you build up to conquer other civilizations before they conquer you.
Age of Empires II: The Age of Kings includes these new features.
9 new civilizations -- Each with a unique unit and a multiplayer civilization bonus.
New units - Including Kings, Heroes, female villagers, knights, cannons, and exploding ships.
New buildings - Including Castles and Gates.
New technologies - Including Conscription and Tower Murder Holes.
New campaigns - Including Joan D'Arc.
New map types - Including Fortress, Rivers, and Very Black Forest.
Improved resource gathering - Sheep, Fish Traps, Hunting, Farms.
Improved trading - Trade with other players over land and buy or sell your own resources for gold at the Market.
Garrisoning - Move units inside buildings for protection, healing, and surprise attacks.
New combat features - Order military units to Patrol, Guard, Defend, or Follow and choose their aggression stance.
Improved interface - Mini-map filters, obscured units are more visible, can set gather points, attack notification improved, chat interface expanded, Help integrated into the game.
New user profiles - Customize the game settings and hot keys and automatically use them from game to game.
New online tech tree - See which units, buildings, and technologies are available to your civilization and which nodes you've researched.
Improved player communication - Signal allies and taunt other players.
Improved multiplayer features - Save and restore multiplayer games, lock the game speed for all players, and lock game teams so players can't change alliance during a game.
To install Age of Empires II
Insert the Age of Empires II CD into the CD-ROM drive, and then follow the instructions on the screen.
If Setup does not begin automatically, refer to the Readme file on the Age of Empires II CD.
You must have the Age of Empires II CD in your CD-ROM drive to play single player games or use the scenario builder. If you do not have a CD, you can play only multiplayer games.
To start Age of Empires II
Insert the Age of Empires II CD into the CD-ROM drive, and then click Play.
-or-
If the CD is already in your CD-ROM drive, click the Start button, point to Programs, point to Microsoft Games, point to Age of Empires II, and then point to and click Age of Empires II.
If you have trouble starting Age of Empires II, refer to the Readme file on the Age of Empires II CD.
How you win a game depends on its victory conditions. You can win most games by achieving one of the standard victory conditions (conquest or Wonder). If you're playing the standard victory conditions, you and your opponents do not have to pursue the same victory condition. For example, you may try to win by conquest while your opponent tries to win by controlling building a Wonder.
If you do not want to play the standard victory conditions, you can choose one of the other victory conditions before you start a game. If you're playing a custom scenario (one provided with the game or designed by another player), you win by achieving the objective displayed at the beginning of the game.
To change the victory condition
On Main Street, click Single Player or Multiplayer, select the game you want to play, click the Settings button, and then select the victory condition.
To win by military conquest, you must be the first player or team to eliminate the offensive (attack) capability of all opponents. To eliminate an enemy's attack capability, you must destroy all villagers, military units (including Monks), military buildings, Town Centers (produce villagers), Churches (produce Monks), and Wonders. You do not need to destroy enemy towers (defensive), walls, trade units, Farms, Fishing Ships, etc.
The first player to build a Wonder that stands for the required time period wins. Before you can build a Wonder, you must advance to the Imperial Age and gather many resources. When a civilization begins to build a Wonder, the other civilizations are notified and shown its location on the mini-map in the lower-right corner of the screen. When the Wonder is completed, all civilizations are notified and a countdown clock appears in the upper-right corner of the screen. The color of the clock indicates which civilization owns the Wonder. If a Wonder is destroyed before the required time period, the countdown is terminated. The map size determines how long a Wonder must stand to win the game.
In a timed game, the player or team with the highest score when the timer expires wins. You can also win by military conquest. When you select this victory condition, you also choose the time limit. A countdown clock is displayed in the upper-right corner of the screen. When the clock reaches zero, the game ends and the player (or team) with the highest score wins. A team score is the average of all team members' scores.
In a score game, the first player or team to achieve the required score wins. You can also win by military conquest. When you select this victory condition, you also choose the score. All players are notified when a player or team is within 20 percent of the score. A team score is the average of all team members' scores.
Chapter 2
Playing a game
In single player games, you play against computer players. You can play games with two to eight players.
To play a single player game
On Main Street, click Single Player, and then select the type of game you want to play:
Campaign - Play a campaign (series of related games) in which you engage in battle with Joan D'Arc.
Random Game - Play a different map every game and choose all of the game variables, including map size, civilizations, victory condition, etc.
Regicide - Play a random map game in which you try to kill your opponent's King before he kills yours. In a regicide game, the first player or team to kill all enemy Kings wins. Each player starts the game with a King garrisoned in their Town Center. If your King is killed, you're eliminated from the game. [Currently, Regicide only works if you are playing a multiplayer game.]
Death Match - Play a random map game in which all players start with large inventories of food, wood, stone, and gold . then fight to the death.
Custom Campaign - Play campaigns (series of related games) that you or other players have created. For information about creating custom campaigns, see [X].
Custom Scenario - Play games that you or other players have created. For information about creating custom scenarios, see [X].
Saved Game - Play games that you saved while playing.
For help setting up a single player game, pause your pointer over any item on the screen and information appears in the lower-right corner of the screen.
You can play multiplayer games against human players connected across a network or the Internet. Up to eight players can connect to a game across a network or the Internet. Two players can connect to a game across a modem or serial connection.
A multiplayer game requires the following number of CDs: 2-3 players (1 CD); 4-6 players (2 CDs); 7-8 players (3 CDs). The player with the most powerful computer should create (host) the multiplayer game. If you lose your connection during a multiplayer game, you cannot rejoin the game.
Any latency and frame rate problems are displayed beside each player's score. Multiplayer games run only as fast as the slowest computer in the game. If a player's frame rate drops below 15 frames per second, a turtle icon appears beside that player's name. If more than one player's frame rate drops below 15 frames per second, a turtle icon appears beside the name of the player with the slowest computer. The player can drop out of the game or can try to improve performance as explained in the Readme file on the Age of Empires II CD.
If you are connected to a multiplayer game across the Internet, a yellow or red dot appears beside the names of players with whom you have a slow connection (yellow = latency of 300 milliseconds to 1 second; red = latency greater than 1 second). To decrease the latency problem, the player can try to reestablish the Internet connection and restart the game.
In a cooperative game, two or more players share control of a single civilization. Each player can give unrestricted (and even conflicting) orders to all units. To play a cooperative game, players must select the same player number before starting a multiplayer game.
You can create a game that other players can join. The player with the most powerful computer should create the game.
To create or join a multiplayer game
If you are connecting across a network or the Internet, establish your network connection before you start Age of Empires II. If you are connecting through the Internet Gaming Zone, see "Connecting through the Zone."
On Main Street, click Multiplayer.
Select your connection type. The connection types listed depend on the hardware, software, and services you are using. If you are on a network and do not know which protocol it uses, check with your network administrator. Common connection types include:
IPX Connection for DirectPlay - Connect across a network that uses the IPX protocol.
Internet TCP/IP Connection for DirectPlay - Connect across the Internet or a network that uses the TCP/IP protocol.
Local (LAN) TCP/IP Connection - Connect with users who are on the same LAN server. If you choose this connection type, games automatically appear in the games list without clicking the Show Games button.
Modem Connection for DirectPlay - Connect two computers using a modem. Age of Empires II requires a modem speed of 28.8 Kbps or faster.
Serial Connection for DirectPlay - Connect two computers using a null-modem cable.
To create a game, click the Create button.
To join a game, click the Show Games button, click the game to join, and then click the Join button. Only games created with the version of Age of Empires you are using appear in the games list. For example, if you are using Age of Empires II: The Age of Kings, Rise of Rome Expansion and Age of Empires games do not appear in the multiplayer games list.
Follow the instructions that appear on the screen for the connection type you are using.
Select the player settings:
Name - Shows the player names. If you are creating a game, close some of the positions to limit a game to fewer than 8 players. Closing a position occupied by a player ejects the player from the game.
Civ - Each civilization has special skills and can research different technologies, as explained in [X]. More than one player can choose the same civilization.
Player - Starting position on the map and color of civilization. To change the setting, click the player number. To play a cooperative game, two or more players can select the same player number and share control of a single civilization. Each player can give unrestricted (and even conflicting) orders to all units.
Team - Players who want to start the game as allies can select a team by clicking the Team number. A dash (-) in the Team box indicates no team. Players on the same team automatically have their diplomatic stance set to Ally and Allied Victory set. If you want to prevent players from changing teams after the game starts, select the Lock Game Teams option (in the pre-game settings). Also, if this option is set, you can only tribute allied players. If game teams are not locked, players can change the settings during the game by clicking the Diplomacy button in the upper-right corner of the screen.
7 If you are creating a game, click the Settings button to change the game settings shown on the screen. For help setting up a game, pause your pointer over any item and more information appears in the lower-right corner of the screen.
To discuss the game settings with the other players, type in the Chat box. To send your message, press ENTER. For information about chatting while playing, see [X].
8 When you are ready to begin the game, click I'm Ready!
The names of players who are ready are shown in green. If you change your mind before the game starts, click the button again. The game does not begin until all players are ready and the game creator starts it.
9 If you are creating a game, click the Start Game button.
Note: If you already have a Zone account and the software installed, you can skip these steps. Go directly to "Playing Age of Empires II on the Zone."
Connect to your Internet Service Provider.
Launch either Internet Explorer or Netscape Navigator.
Type https://www.zone.com and press ENTER. This will bring you to the Zone Web site.
At the Zone Web site, click New Zone Users: Signup to Play Games if you are not a member of the Zone. Complete the form and click Submit to register on the Zone.
In the "Sign In was successful!" window, click Zone software to install the software on your computer. The Zone software is in the Goodies folder on the Age of Empires II CD.
Click Complete Install and type an install directory.
Once the Zone software is installed, you are ready to begin.
Make sure both Age of Empires II and the Zone software are installed on your computer.
Start Age of Empires II.
On Main Street, click the Zone button, and then click the Go to the Zone button.
This exits the game, launches your Internet browser, and connects to the Age of Empires II alpha site on the Zone. Or you can connect by typing https://www.zone.com/asp/script/default.asp?Game=aoe2&password=TRIBE2 in your browser and pressing ENTER.
Type your Member ID and password in the Sign In window. Click OK and the Zone Age of Empires II page will appear.
Select the "Rule the World" game room by clicking it.
A list of game tables will appear. Move your mouse over any one of them. If a table is unoccupied, a host icon will appear. To host a game, click the host icon and wait for other players to join. Use the chat feature to recruit other players. When all players are logged on and ready to go, click Launch to begin.
Note: If you are hosting a game and decide to quit, the first player who joined your game will become the host.
You can also join a game hosted by another player. Move your mouse over a table and click Join to add your name to the game, and wait for the host to launch it. Next to each player's name is a latency indicator. The latency indicator shows how fast your current connection is to each player. If you are joining a game, it is recommended that you connect to a host with a green latency indicator.
If you have any problems, see the Help page for more details.
You can restore a multiplayer game that you saved.
To restore a multiplayer game
If you are connecting across a network or the Internet, establish your network connection before you start Age of Empires II.
On Main Street, click Multiplayer.
Select your connection type, as explained in "Creating or Joining a Multiplayer Game."
If you are hosting the game, click the Restore button, and then choose the saved multiplayer game to restore.
If you are joining the game, select the game from the games list as usual.
Follow the instructions that appear on the screen for the connection type you are using.
To resign a multiplayer game
Click the Menu button in the upper-right corner of the screen, and then click Resign.
All units on the map become visible so you can observe the game, but you can no longer participate.
You can create your own custom games for up to eight players. You can customize the:
Map - Choose the map size, terrain, and distribution of resources.
Terrain - Place resources, elevation, cliffs, forests, and water.
Players - Choose the starting age, starting stockpiles, civilization, starting technology, and computer personality for each player.
Units - Place buildings, villagers, military units, and boats for each player, as well as world (Gaia) objects such as trees, resources, and terrain accents such as bones, grass clumps, etc.
Diplomacy settings - Choose the diplomatic stance of players (ally, neutral, or enemy) and whether any players pursue allied victory.
Global victory conditions - Choose one or more victory conditions that all players must achieve.
Options - Enable the full tech tree or disable technology for each player.
Messages - Write scenario instructions, hints, a victory message, a loss message, and historical information.
Cinematics - Choose the cinematics that play at the beginning and end of the scenario.
To create or edit a scenario
1 On Main Street, click Map Editor.
2 To create a new scenario, click Create Scenario.
To edit an existing scenario, click Edit Scenario, and then select the scenario to edit.
3 Change the appropriate settings to customize the scenario. For help using the scenario builder, click the ? button in the lower-right corner of the screen, and then click an item on the screen.
To playtest your scenario without leaving the scenario builder, click Menu, and then click Test.
To return to the scenario builder after testing your scenario, click Menu, and then click Quit Game.
To save the scenario, click Menu, and then click Save or Save As.
To create or edit a custom campaign
1 On Main Street, click Map Editor.
2 To create a campaign, click Campaign Editor.
3 Type or select the Campaign Filename.
Select a scenario from the Scenarios box, and then click Add to include it in the campaign.
The Campaign Scenarios box shows the scenarios in the campaign (listed in the order they will be played in the campaign). To change the order of the scenarios, click a scenario, and then click the Up or Down button.
To remove a scenario from the campaign, click a scenario in the Campaign Scenarios box, and then click the Remove button.
To save the campaign, click the Save button.
You can play one of 9 great medieval civilizations (Byzantines, Chinese, French, Germans, Goths, Japanese, Persians, Saracens, and Turks).
Each civilization has special strengths and weaknesses and can research different units and technology. Each civilization also has a unique unit that is trained at the Castle. In multiplayer games, each civilization also has a multiplayer civilization bonus (see "Multiplayer Games." More than one player can choose the same civilization. In a multiplayer cooperative game, two or more players can choose the same player number and share control of the same civilization.
When you choose your civilization, consider the map type, victory conditions, and strengths and weaknesses of your opponents. For example, if a map has extensive seas, choose a civilization with advantages in ship building or speed. For information about the special attributes of each civilization, refer to the technology trees for each civilization in the Appendix and on the Age of Empires II CD.
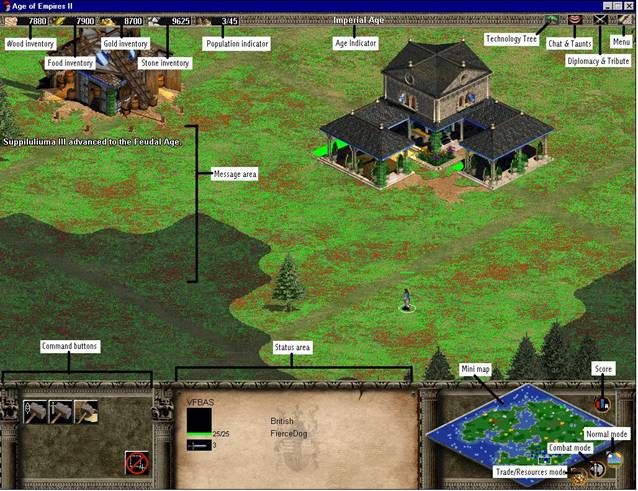
The stockpile counters (upper-left corner of screen) show the amount of wood, food, gold, and stone in your stockpile. For information about gathering resources, see [X].
The Population indicator (upper-left corner of screen) shows your current/supportable population. The first number shows how many units you currently have. The second number shows how many units your civilization can support. For information about supporting your population, see [X].
The Age indicator (center top of screen) indicates which of the four ages you are currently in (Dark Age, Middle Age, Feudal Age, Imperial Age). For information about advancing through the ages, see [X].
The online tech tree shows your current standing in the game (which civilization you are playing, a summary of its strengths and weaknesses, the Age you are currently in, and the buildings, units, and technologies you have researched). The status of each item is color-coded as shown in the lower-left corner of the online technology tree. You can pause your pointer over any node to highlight its research path and display more information about the item.
The Chat button (upper-right corner of screen) lets you send typed messages or recorded taunts to other players. You can choose the message recipients individually or by groups (allies, enemies). If you choose to play an allied game before you start the game, chat is automatically set to send messages to all allies. Also stores past chat messages for the current game in case you want to review them.
To chat during a multiplayer game
1 Click the Chat button, and then select which players should receive the message: allies, enemies, everyone, or a particular player.
-or-
To display only the chat text box, press ENTER.
Type a message, or to taunt your opponents with a recorded message, type a number from 1 to 25.
Press ENTER to send the message or taunt.
The Diplomacy/Tribute button (upper-right corner of screen) lets you change your alliance with other players or tribute resources to them. For more information, see [X].
The Menu button (upper-right corner of screen) lets you restart, load, save, pause or exit the game, display the game objectives, display the achievements screen, or change the game settings.
The command buttons (lower-left corner of screen) displayed in this area change depending on which game object is selected. For example, if you click a building, the buttons display the units and technologies you can research at the building. If you click a unit, the buttons display the commands (build, repair, etc.) for the unit.
The status area shows information about the building or unit you have clicked.
Hit points -- The green/red bar indicates the current/maximum hit points (how much damage a unit can suffer before it dies). To display a unit's hit points, click the unit. A colored bar appears above the unit showing its general health (green = healthy, red = wounded). The unit's numerical hit points are shown in the status area. Monks and garrisoning can heal wounded units, as explained in [X].
Attack strength - The sword icon indicates attack strength (how much damage a unit inflicts).
Armor - The armor icon indicates armor (normal/piercing). Armor reduces the amount of damage a unit suffers in combat. For example, +5 armor reduces damage by 5. Normal armor reduces the amount of damage units suffer from hand-to-hand combat. Piercing armor reduces the amount of damage a unit suffers from missile weapons (Archery Range units, siege weapons, towers, and some ships).
Range - The target icon indicates range (how far a missile weapon can fire). Missile weapons include Archery Range units, siege weapons, towers, and some ships.
Recharge percentage - Monks and Boarding Galleys must recharge their strength after attempting a conversion. The hourglass icon indicates the recharge percentage. When the Monk or Boarding Galley is recharged 100 percent, it can attempt another conversion.
Garrison indicator - The people icon indicates how many units can be garrisoned inside a building (current # garrisoned/max).
Research percentage - Indicates the percent complete when you click a building where you are training a unit or researching a technology.
If you select multiple units, click a building with garrisoned units, or are queuing the production of units at a building, the status area displays icons for each unit so you can select individual units in the group.
The score shows player names (in player color) and current scores. Players are grouped by alliance with scores listed from highest to lowest. Player names that are crossed out have been eliminated from the game. A red dot to the left of a player name indicates a slow connection. A turtle indicates a slow computer. For more information about multiplayer connections, see "Multiplayer Games." The information in the score area changes depending on the mini-map mode you select.
To display civilization scores
To turn the display on or off, click the Score button above the mini-map in the lower-right corner of the screen.
The scores are shown as civilization score/team score. The list of players is ranked by team score and then by civilization score. The team score is the average of all team members' scores.
To display the details of your score, click the Menu button in the upper-right corner of the screen, and then click Achievements.
To display a timeline of important events over the course of the game, click the Menu button in the upper-right corner of the screen, click Achievements, and then click the Timeline button.
The mini-map (lower-right corner of screen) shows the entire map in smaller scale. To navigate using the mini-map, click a location or drag the box outline to change map view. You can view the mini-map in three modes: Normal, Combat, or Trade/Resources.
Normal mode
|
Color code |
Represents |
|
Player color |
All player units. |
|
White |
Selected units. |
|
Blue |
Water. |
|
Green/Brown |
Land. |
|
Dark Green |
Forest. |
Combat mode
Shows only units that can engage in combat (including villagers). When the combat filter is active, the score area shows the number of combat units you have, listed by class (archer, cavalry, siege, etc.). [Color coding not implemented for alpha]
|
Color code |
Represents |
|
Player color |
Units engaged in combat, moving, or idle. |
|
Player color (dark) |
Moving or idle units. |
|
White cross |
Gather point. |
|
Single dot (bright) |
Garrisoned units engaged in combat. |
|
Single dot (dark) |
Idle garrisoned units. |
Trade/Resources mode
Shows only resource and trade units (villagers, Trade Carts, Cogs, and buildings where you can drop off resources). Shows only your own possessions, except for other players' trade locations. When the trade filter is active, the score area shows the number of villagers you have by task (stone miner, lumberjack, idle, etc.) and the number of trade units and Fishing Ships active and idle. [Color coding not implemented for alpha]
|
Color code |
Represents |
|
Player color (bright) |
Idle units. |
|
Player color (dark) |
Units gathering resources or trading. |
|
Yellow |
Gold mines. |
|
Dark Yellow |
Food sites. |
|
Dark Green |
Trees. |
|
Gray |
Stone mines. |
|
Gray blocks |
Resource drop-off buildings (Mill, Lumber Camp, Mining Camp, Town Center). Visible Docks and Markets are shown in the owning player's color. |
You can change the music and sound effects volume, scroll speed, screen size, and mouse interface to your liking and turn taunts and Help on or off.
To change the game settings
To change the game settings before you start a game, on Main Street, click the Configuration sign.
-or-
To change the game settings while you are playing, click the Menu button in the upper-right corner of the screen, and then click Game Settings.
For help changing any of the game settings, pause your pointer over any item on the screen and information appears in the lower-right corner of the screen.
You can customize the hot keys according to your preference.
To display or customize the hot keys
On Main Street, click Configuration, and then click the Hot Keys button.
You can get Help with any part of the game interface and units, buildings, and technologies while you are playing.
To display Help
Pause your pointer over the item you want information about. If you are setting up a game, the Help text appears in the lower-right corner of the screen. If you are playing a game, the Help text appears across the bottom of the game map.
To turn Help on/off
On Main Street, click Configuration, and then click the Rollover Help check box. If there is a check in the box, rollover Help is on.
-or-
From within the game, click the Menu button in the upper-right corner of the screen, click Game Settings, and then click Roll-over Help On/Off.
To save a game
Click the Menu button in the upper-right corner of the screen, click Save, and then type a name for the game, or select the game to save.
Saved games are located in the Savegame folder where Age of Empires II is installed.
To exit a game
Click the Menu button in the upper-right corner of the screen, and then click Quit Game.
Chapter 3
Building your empire
Exploration is vital at the beginning of a typical game. You must quickly find sources of food and wood so you can train villagers to gather more resources. Then you can construct buildings to train units, research technology, and advance to the next age. You must explore the lay of the land to decide where to build your defenses against enemy attacks and to discover where your enemy is so you can plan your attacks. You should also note distant resources for your eventual expansion and control any Relics you find.
Unexplored areas of the map are black. Moving a villager, military unit, or boat into a black area reveals the map. You cannot explore beyond the edge of the map. Enemy buildings and walls are not visible until you explore the area of the map where they are located. Once an area has been explored, buildings and walls remain visible. However, changes to the buildings, such as age upgrades, damage, and destruction are not visible unless the building or wall is within the sight of a villager, military unit, or boat from your civilization. Enemy villagers, military units, and boats are only visible when they attack or are within the sight of a unit from your civilization.
Researching Cartography lets allies share exploration.
Terrain provides resources and has tactical or strategic uses in combat. The types of terrain include:
Water - Impassable to villagers and military units.
Shallows - Water that is passable to villagers, military units, and boats.
Forest - Impassable to villagers and military units.
Cliff - Impassable to villagers and military units. Provides a 25 percent chance that the attacking unit will cause triple damage on each hit when the target is on the low side of the cliff.
Elevation - Provides a 25 percent chance that the attacking unit will cause triple damage on each hit when the target is at a lower elevation.
Resources (food, wood, stone, and gold) are the building blocks of your civilization. Villagers gather these items from the land and deposit them in your stockpile so you can use them to pay for new units, buildings, and technologies to build the strength of your civilization.
Villagers increase your stockpile of resources by foraging, mining, hunting, etc. Sources of food, wood, stone, and gold are gradually depleted and disappear as the resources are gathered. As you advance through the ages, you can research technologies that improve your ability to gather resources.
You can also increase your stockpile by trading (see [X]) and by receiving tribute from other civilizations (see [X]). If a Monk carries a Relic into a Church, both are garrisoned and the Church generates gold at a rate of 30 gold per minute. Multiple Relics in the same Church yield economic bonus from each. However, Churches with garrisoned Relics are visible to all players.
The resources in your stockpile are shown in the upper-left corner of the screen. They are:
Wood - Gathered from trees. Used primarily to construct buildings, boats, and some military units.
Food - Gathered from deer, wild boars, sheep, berry bushes, Farms, Fish Traps, and fishing from shore with villagers or at sea with Fishing Ships. Used primarily to create villagers, train and upgrade military units, research technologies, and advance to the next age.
Gold - Gathered by mining, trading with other civilizations, selling wood, food, or stone (commodity trading), and garrisoning Relics. Used primarily to research technologies in later ages, create some military units, advance to the Imperial Age, and pay tribute to other civilizations.
Stone - Gathered by mining or salvaging destroyed buildings. Used primarily to build and upgrade towers and walls and research some technologies.
To display the resources at a work site
Click the work site. For example, to display the amount of gold a gold mine contains, click the gold mine. The quantity of resources is displayed in the status box at the bottom of the game screen.
Villagers are invaluable to your civilization. The more villagers you have, the faster you can gather resources to build up your civilization. They also perform the maintenance functions for your civilization, such as building and repairing buildings.
Researching the Wheel increases the speed of villagers.
Villagers have the following roles:
Builder - Constructs buildings.
Farmer - Gathers food from a Farm. Food from farming is deposited at the Town Center or Mill, whichever is closer. Researching Domestication, the Plow, and Irrigation increases Farm production. Right-click an expired Farm to order the villager to automatically rebuild it.
Fisherman - Gathers food from fishing sites (jumping fish) near the shore in streams and oceans. Food from fishing is deposited at the Town Center or Dock, whichever is closer. Fishing Ships also fish for food, which they deposit at the Dock.
Forager - Gathers food from forage sites (berry bushes). Food from foraging is deposited at the Town Center or Mill, whichever is closer.
Miner - Gathers stone from stone mines and gold from gold mines. Stone and Gold are deposited at the Town Center or Mining Camp, whichever is closer.
Hunter - Kills wild game (deer, wild boars) for food. Food from hunting is deposited at the Town Center or Mill, whichever is closer. Hunters carry the entire carcass in one trip rather than making repeated trips from the kill to the drop-off location. Military units can also kill animals, but food cannot be gathered from the carcass. Wild Boars don't attack unless attacked.
Repairer - Repairs buildings and boats damaged in combat.
Shepherd - Gathers food from sheep. Food from sheep is deposited at the Town Center or Mill, which ever is closer. You can move the sheep you own. To own a sheep, click a villager, and then right-click a sheep. All sheep within your sight become yours so you can move them. To move a sheep, click it, and then right-click a location. To gather the food from sheep, click a villager, and then right-click a sheep. The sheep dies when you have gathered all of the food from it. You can steal other players' sheep by killing all units that have the sheep in their sight. Sheep are neutral (gray), then take player color.
Villager - Engaged in combat or not assigned a task.
Lumberjack - Chops trees for wood. Wood is deposited at the Town Center or Lumber Camp, whichever is closer.
To assign a villager a task
Click a villager, and then right-click a work site. For example, to assign a villager to mine for gold, right-click a gold mine.
The villager goes to the work site, gathers an armload of the resource and deposits it at the Town Center, Mill, Lumber Camp, or Mining Camp (where it is added to your stockpile), and returns to the work site to gather more. Fishing Ships deposit food at the Dock.
The villager continues to perform a task until you assign a different task or until the resource is depleted. If a resource is depleted, he searches for a new work site of the same type within his sight and continues working. If the villager does not find a new work site, he becomes idle.
To find idle villagers
Press the . (period) key.
Creating villagers, military units, and boats costs resources (food, wood, stone, and gold). You must also have enough Houses to build a new villager, military unit, or boat (one House supports four units). A Town Center also supports four units. A Castle supports 20 units. If a House is destroyed, you do not lose the units it supported, but you must build new housing to support any new units.
The population limit set at the beginning of the game determines how many villagers, military units, or boats your population can support. The default population limit for most games is 75. You can increase or decrease the population limit before you start a game by clicking the Settings button. For descriptions of the villagers, military units, and boats you can build, refer to [X].
To create a villager
Click the Town Center, and then click the Create Villager button. After a brief training period, the villager appears beside the Town Center.
To train a military unit
1 Build a Barracks, Archery Range, Stable, Siege Workshop, Castle, or Church.
2 Click the building.
3 Click the button of the military unit to train. For example, to train a Militia (at the Barracks), click the Train Militia button.
After a brief training period, the military unit appears beside the building.
To build a boat
1 Build a Dock.
2 Click the Dock.
3 Click the button of the boat to build. For example, to build a Fishing Ship, click the Build Fishing Ship button.
After a brief training period, the boat appears beside the Dock.
To delete a villager, military unit, building, or boat
Click a unit that belongs to your civilization, and then press the DELETE key.
You can delete your own units and buildings at any time. If you delete a building while it is under construction, the resources from the unbuilt portion of the building are returned to your stockpile.
You can automatically train multiple units. Click any unit button to add one of that unit to the queue. Left-click a unit in the queue to remove it from the queue. Multiple units can be added to the same queue (archers and skirmishers). You can queue up to 15 units. Units are trained in the order they are queued. The resources are deducted from your stockpile at the time a unit is added to the queue. Queues at different buildings operate in tandem. If you remove a unit from the queue, the resources are returned to your stockpile.
All buildings that can train units allow you to set a gather point where all newly trained units gather. For example, if you are training villagers, you might set a gather point at a forage site so the villagers automatically forage for food as soon as they are created. You can also set a gather point on a military building so the newly trained units from that building are garrisoned inside the building for protection.
To set a gather point
Click a building where you can train units, click the Set Gather Point button, and then click a location on the map. To move a gather point, simply set a new one.
To remove a gather point
Click the building, click the Set Gather Point button, and then click the Remove Gather Point button.
To display gather points
You can display the gather point you set from a particular building.
Click a building where you set a gather point, and then click the Set Gather Point button. If the gather point is set in open terrain, a white flag appears. If the gather point is set on a resource or building, the resource or building is outlined in green momentarily.
As you advance through the ages, you can upgrade your military units, boats, walls, and towers. When you upgrade, existing units of a particular type are replaced by more powerful units. Units a Monk or Boarding Galley has converted are not upgraded.
To upgrade a military unit, boat, wall, or tower
1 To upgrade a military unit, click the Barracks, Archery Range, Stable, Church, Siege Workshop, or Castle. To upgrade a boat, click the Dock. To upgrade a wall or tower, click the University.
Click the button at the bottom of the game screen that corresponds to the unit you want to upgrade. For example, to upgrade to Heavy Camel (from the Stable), click the Upgrade to Heavy Camel button. All existing units (Camels, in this case) are upgraded to Heavy Camels and you can train new Heavy Camels.
Constructing buildings costs wood or stone or gold. You can build more than one of each building. For example, you might build two Town Centers or three Barracks. As you advance through the ages, the appearance of each building evolves and new military units, upgrades, technologies, and buildings become available. Allied civilizations cannot help each other construct buildings.
Researching Architecture increases the hit points and decreases the construction time of buildings and walls.
For descriptions of the buildings you can construct, refer to [X].
To construct a building
1 Click a villager (or select a group). The more villagers assigned to a building, the faster it is built.
2 Click the Build Economic Buildings button or Build Military Buildings button.
3 Click the button of the building to build. For example, to build a House, click the Build House button. To display more buildings, click the Next button.
4 Click a location on the map. The building is shown in red if you cannot build in a particular location.
-or-
If you want to build more than one of the same building, press SHIFT, and then click multiple locations on the map. To build multiple walls, click a location and drag the pointer where you want to build walls.
Damaged buildings and boats catch fire. They can be repaired to full strength by villagers (yours or your allies). Repairing buildings and boats requires resources. Destroyed buildings are reduced to rubble and eventually disappear. Destroyed boats sink. You can repair the buildings of allied civilizations. Assign multiple villagers to repair faster. Garrisoned villagers cannot repair from inside a building. Repairing a building takes a fraction of the time required to construct it and costs 25 percent of the original cost in resources. The cost of the repair is deducted from the civilization that owns the building.
Buildings show damage when they are attacked and their hit points are reduced. They smoke when damaged by 25 percent, flame when damaged by 50 percent, automatically eject all garrisoned units when damaged by 80 percent, and collapse and are completely destroyed when damaged 100 percent.
To repair a building or boat
Click a villager (or select a group), click the Repair button, and then click the building or boat to repair.
Foot units can be garrisoned within Castles, Town Centers, and towers. Cavalry, Cavalry Archers, and Heavy Cavalry Archers can also be garrisoned in Castles. Newly trained units can also be garrisoned in the building where they are trained.
Garrisoned units receive some protection while inside a building. Units garrisoned in the Town Center are not damaged if the Town Center is attacked. Units inside the other buildings receive 25 percent of the damage inflicted on the building. The units are ejected if the building is damaged to 20 percent of its starting hit points.
Ranged units and villagers can attack while garrisoned. Archers add attack strength to towers. Villagers add only a small amount. You can gauge the approximate power of a garrisoned tower by observing how many arrows it fires.
When you click a building with garrisoned units, a green health bar for each unit appears above the building health bar and the units are displayed in the status box. You and your allies can see the health bars. Your enemies and neutral players can't. Allied players can garrison units in each other's buildings (and eject them at will). Units are automatically ejected if allied players change their diplomatic stance. You cannot garrison units in enemy buildings.
Garrisoned units heal automatically. The Church heals faster than other buildings.
|
Building |
Maximum Units |
|
Castle |
20 |
|
Town Center |
10 |
|
Church |
8 |
|
Watch Tower |
5 |
|
Guard Tower |
5 |
|
Keep |
5 |
|
Bombard Tower |
5 |
To garrison units
Click a unit (or select a group), and then right-click a Castle, Town Center, or tower.
To garrison newly trained units
You can garrison newly trained units, including cavalry, in the building where they're trained. You can eject the units as usual, but they cannot re-enter the building. This feature is useful for generating a defensive army when your town is under attack, so the new units don't perish one by one as you train them.
Click the Gather Point button, and then click the building where you are going to train new units. This sets the gather point inside the building so any units trained there appear inside the building.
Train new units as usual. When they are trained, they appear inside the building instead of outside.
To eject garrisoned units
Click a building with garrisoned units, and then click the Eject button.
To eject a single unit, click that unit in the status box.
To eject all units but one, click the unit to retain in the status box, and then press SHIFT and click the UnGarrison button.
To eject all like units (for example, all villagers), click a villager and then CTRL and click the UnGarrison button.
To eject all non-like units, click a unit, and then CTRL+SHIFT and click the UnGarrison button.
New buildings, military units, and technologies become available as you build technology buildings and advance through the ages. The technologies available to you depend on the civilization you are playing. The technology trees for each civilization are in the Appendix and in the Docs folder on the Age of Empires II CD.
To research technology
1 Click a technology building on the game map. The technologies you can research appear on the buttons at the bottom of the game screen.
2 Click the button that corresponds to the technology you want to research. For example, to research Loom from the Town Center, click the Research Loom button. Researching technology takes time and costs resources, but after you have researched a technology, your civilization immediately begins reaping its benefit(s).
There are four ages: Dark Age, Middle Age, Feudal Age, and Imperial Age. When you advance to a new age, new buildings, military units, and technologies become available to make your civilization even stronger.
Before you can advance to the next age, you must have the required number of resources and two technology buildings from the current age. Technology buildings are where you train units or research technology (not Houses, Farms, walls, towers, etc.). Also, you must build two different buildings from each age (Mill and Barracks), not two of the same building.
To advance to the next age
Click the Town Center, and then point to the Advance to Middle Age, Advance to Feudal Age, or Advance to Imperial Age button to see how many resources you need.
If you have the required buildings and resources, click the button to advance to the next age.
There are two ways to trade-commodity trade (buy and sell resources for gold) and player-to-player trade (establish trade routes with other players).
Commodity trade lets you buy and sell resources (wood, food, stone) in your stockpile for gold. You trade commodities at the Market as if it were a bank; other players are not involved. For example, if you have a lot of stone in your stockpile, but you need gold to advance to the Imperial Age, you can sell some of your stone for gold. Or, if you have a lot of gold, but you really need wood to rebuild your navy, you can use the gold to buy some wood.
You buy and sell commodities in lots of 100. For example, you might sell 100 wood or buy 100 stone at the current exchange rate. If you do not have 100 of the commodity or enough gold to buy it, the button is grayed out.
The exchange rate for each commodity fluctuates according to the global market. In other words, the price to buy or sell a commodity increases and decreases depending on which resources all players in the game are buying and selling the most. For example, 100 wood costs less gold if players are selling a lot of it and costs more gold if players aren't selling much of it.
The exchange rate is updated following each transaction. For example, after you sell 100 wood for 70 gold, the selling price might decrease to 100 wood for 69 gold. There is no limit to the price of a resource, but a lot of 100 never sells for less than 20 gold.
In addition, there is a 30 percent transaction fee for commodity trades. You can reduce this fee by researching Negotiation (at the University).
To buy or sell commodities for gold
Build a Market.
Click the Market.
The buttons in the lower-left corner of the screen show the current exchange rate to buy or sell a commodity. For example, if the Sell Wood button displays 70, you can sell 100 wood for 70 gold.
Click the button of the resource to buy or sell.
The gold, wood, food, and stone are automatically deducted from or added to your stockpile.
You can establish trade routes with other players to generate gold. You can trade across land using Trade Carts and Markets or by sea using Cogs and Docks. Trade Carts can only trade at Markets and Cogs can only trade at Docks. You can trade with any player (allied, neutral, or enemy), but if you trade with your enemies, your trade units are likely to be attacked. The longer the trade route, the more gold you receive.
Trading with other players generates gold as profit from establishing and maintaining a trade route. No resources are actually traded. Trade also works with the gather point - if you set a gather point from a dock or market on a foreign dock or market - trade units will start trading automatically when produced.
If enemy units attack a trade unit, it flees some distance and then attempts to continue along its route. If the foreign Market or Dock on the trade route is destroyed, the Trade Cart or Cog returns to the Market or Dock where it received its trade goods and awaits orders. Trade units can only return gold to locations owned by their player, not allies.
The trade unit shows the profit for the trade route after it has completed the trip to the foreign Market or Dock. The civilization you are trading with makes 10 percent profit at their Market or Dock. For example, if your trade route generates 80 gold per trip, the civilization you are trading with receives 8 gold.
To establish a trade route
Build a Trade Cart at the Market, or build a Cog at the Dock.
Click the Trade Cart or Cog, and then right-click a Market or Dock to trade with.
The Trade Cart or Cog travels to the foreign Market or Dock with a load of trade goods, picks up a load of gold (profit from the trade goods), and returns to your Market or Dock to deposit the gold in your stockpile. The trade unit continues to travel back and forth along the trade route unless you send it to a different location or it is destroyed by the enemy.
If a trade unit is converted by a Monk or Boarding Galley while returning with a load of gold or if a trade unit is destroyed by military units, the attacking civilization automatically receives 50 gold for the captured goods.
Chapter 4
Moving your units
How quickly villagers, military units, and boats move depends on the speed of the unit and the game speed, as explained in [X].
To move a villager, military unit, or boat
Click a villager, military unit, or boat (or select a group), and then right-click a location.
Grouping lets you command several villagers, military units, or boats at the same time.
To select a group
Drag the pointer over the villagers, military units, or boats you want to group.
To select all units of the same type, double-click a unit. For example, to select all Skirmishers, double-click a Skirmisher.
To create a group
Select a group (as described above), then click the Group button. When you click one member of the group, the other members are also selected.
To ungroup units
Click a member of the group, and then click the Ungroup button.
To assign a number to a group
1 Select a group.
Press CTRL and the number to assign to the group. For example, to assign the number 2 to a group, press CTRL+2. The number appears on each unit in the group.
To select the group, press the number assigned to it. For example, to select group 2, press the 2 key.
You can use waypoints to order your units to go to a location using a specific path. Any mobile unit (villagers, military units, boats, etc.) can be moved with waypoints.
To move a unit with waypoints
1 Click a unit (or select a group).
Press SHIFT, and then right-click each point along the path. A waypoint marker appears.
Release the SHIFT key, and then right-click the last point in the path. The unit moves along the path.
You can transport units across water by loading them on a Transport ship. You can build a Transport at the Dock. Any mobile unit (villagers, military units) can be loaded aboard a Transport. Allied players can transport each other's units. Each Transport can carry a limited number of units per trip.
To see how many units a Transport can carry
Click the Transport. The status box at the bottom of the screen shows how many units the Transport can carry (current/maximum).
To load a Transport
Click a unit, and then right-click the Transport to load. The units disappear into the Transport.
To unload a Transport
Click a loaded Transport, click the Unload button, and then click a location on shore or in shallows.
Chapter 5
Combat
Military units and villagers can engage in combat on land. War ships can engage in combat at sea. Military units automatically attack enemy units within their sight unless you order them to attack a different unit or stand ground.
In most games, the first player to eliminate the offensive (attack) capability of all opponents wins. To eliminate an enemy's attack capability, you must destroy all villagers, military units (including Monks), military buildings, Town Centers (produce villagers), Churches (produce Monks), and Wonders. You do not need to destroy enemy towers (defensive), walls, trade units, Farms, Fishing Ships, etc. For information about pursuing an allied victory with other civilizations, see "Allied victory."
A Bugle sounds when one of your military units come under attack. A bell tolls when one of your villagers, buildings or Fishing Ships is under attack. When you hear a sound cue (attack warning, newly trained unit, etc.), you can press the HOME key or click the middle mouse button to go to the trouble spot. Pressing the key multiple times cycles through the locations of the last five sound cues. A yellow rectangle on the mini-map outlines the location of these events. Sounds one tile off screen (left or right) are heard at half volume. Sounds to the top and bottom are half volume centered.
To order a military unit, villager, or boat to attack
Click a military unit, villager, or boat (or select a group), and then right-click the enemy villager, military unit, or building to attack.
Patrol units protect an area that you designate by setting waypoints. Patrol units attack enemy units that enter their sight, but they do not stray further from the patrol route than their sight. They return to their patrol route after engaging the enemy. If you set the waypoints independently, the unit walks the waypoints in a linear manner (goes to each waypoint, and then reverses direction and walks to each waypoint. If you right-click an existing waypoint, the unit walks all of the waypoints in a circular manner.
To assign a unit to patrol
Click a unit, click the Patrol button, and then set waypoints to designate the area to patrol. For information about setting waypoints, see [X].
Guard units position themselves so the unit or building they are protecting is within their sight. Guards attack any units that attack or enter the sight of the unit or building they are protecting. However, they only attack if they can do so without losing sight of the unit or building they are protecting.
To assign a unit to guard
Click a unit, click the Guard button, and then click the unit or building to guard.
Following units protect a unit by following it at the maximum distance allowed by their sight.
To assign a unit to follow
Click a unit, click the Follow button, and then click the unit to follow.
You can decide how a military unit responds in combat situations:
Aggressive - Unit attacks any enemy unit or building within its sight and does not retreat until it or the enemy unit has been destroyed (default stance).
Defensive - Unit attacks any enemy unit in its sight but pursues mobile units no more than 5 tiles from the location you have ordered.
Stand Ground - Unit attacks any enemy unit that enters its range but does not move, even if attacked.
To set the combat stance
Click a unit, and then click the Aggressive button, Defensive button, or Stand Ground button.
You can use Monks or garrisoning to heal your units, which restores their original hit points.
Monks can heal the hit points of wounded villagers and military units from their own and allied civilizations. A Monk must be able to stand adjacent to a unit in order to heal it (except German Monks, which can heal from range). Once a Monk has healed a unit, it continues to automatically heal any nearby villagers and military units. Unlike conversions, there is no recharge period between healings. Monks cannot heal buildings or boats.
You can also heal units by garrisoning them in buildings. All buildings heal at the same rate except the Church, which heals much faster. For more information about garrisoning, see [X].
To heal a villager or military unit
Click a Monk, and then right-click the friendly unit to heal.
-or-
Click a Monk, click the Heal button, and then click the friendly unit to heal.
You can use Monks and Boarding Galleys to convert enemy units, buildings, and boats to your civilization.
Monks can convert enemy villagers and military units to your civilization. If you research Redemption, Monks can also convert enemy buildings (except Town Centers, Wonders, and walls). If you research Atonement, Monks can convert enemy Monks. Monks cannot convert enemy ships, but Boarding Galleys can. Monks cannot convert allied units or buildings.
Unlike other military units, Monks do not automatically attack (convert) units within their sight unless they are attacked. You must order a Monk to convert a unit. The Monk then attempts to convert the unit as soon as it is within range. When the Monk has converted a unit, he stands idle until given another command. There is a random chance that the Monk will successfully convert a unit. Monks must recharge their strength after attempting a conversion. The recharge percentage is shown in the status box at the bottom of the screen.
When converting a building, the Monk must move adjacent to the building. You can convert and use a building you have not constructed. Converted units maintain their attributes (attack, range, etc.) at conversion; they cannot be upgraded.
You can improve your Monks by researching these technologies at the Church: Sanctity (increases Monk hit points), Monk Speed (makes Monks walk faster), Redemption (allows Monks to convert buildings), Atonement (allows Monks to convert enemy Monks), Faith (makes Monks more resistant to conversion), Illumination (reduces recharge time), and Block Printing (increase conversion range).
To convert enemy units and buildings
Click a Monk, and then right-click the enemy unit or building to convert.
-or-
Click a Monk, click the Convert button, and then click the enemy unit or building to convert.
Boarding Galleys and Armored Boarding Galleys are Monks of the sea that convert enemy ships to your civilization. Like Monks, boarding galleys do not automatically attack (convert) ships within their sight unless they are attacked. You must order a boarding galley to convert a ship. The boarding galley then moves to the ship and attempts to convert it while the ship attempts to destroy the boarding galley. Both ships must remain stationary during the conversion. Afterward, the boarding galley remains idle until given another command. There is a random chance of converting the enemy ship and the boarding galley does not damage the ship while attempting to convert it. Boarding galleys must rejuvenate their strength after attempting a conversion. The recharge percentage is shown in the status box at the bottom of the screen.
If a boarding galley converts a Transport ship carrying units, the ship is converted but its cargo and passengers are not. Converted ships maintain their attributes (attack, range, etc.) at conversion; they cannot be upgraded.
To convert ships
Click a Boarding Galley or Armored Boarding Galley, and then right-click the enemy ship to convert.
-or-
Click a Boarding Galley or Armored Boarding Galley, click the Convert button, and then click the enemy ship to convert.
Relics are special objects (similar to trophies) that are placed randomly on the map. Relics can be moved but must be carried by a Monk.
To claim a Relic, click a Monk, and then click a Relic.
While carrying a Relic, the Monk cannot convert or heal units. If the Monk is killed, the Relic can be picked up by another player.
To order a Monk to drop a Relic, click the Monk, and then click the Drop button.
If a Monk carries the Relic into a Church, both are garrisoned and the church generates gold for the player at a rate of 30 gold per minute. If more than one Relic is garrisoned in a Church, you receive the gold bonus for each. When you garrison a Relic, all players are notified and are able to see the Church that contains it.
Each civilization can choose its diplomatic stance toward other civilizations. Two civilizations can take different stances toward each other. If a civilization is allied with an enemy, the enemy civilization attacks, but the allied civilization does not. Research Cartography to share exploration with your allies.
To set your diplomatic stance toward other civilizations
1 Click the Diplomacy button in the upper-right corner of the screen.
2 Select your diplomatic stance toward each of the other players:
Ally - Your units defend the units and buildings of allied players as if they were your own. You cannot attack allied units or buildings.
Neutral - Your units ignore the units and buildings of neutral players unless you order them to attack. If your units are attacked by neutral units, your units defend themselves.
Enemy - Your units attack the units and buildings of enemy players who enter their sight. Scouts and Monks do not attack on sight.
In an allied game, two or more civilizations work together to win (or lose) as a team. Any allied civilization who achieves the victory condition(s) wins the game for the entire team. Playing an allied game has several advantages. Allies can garrison units in each other's buildings, open and close each other's gates, send signals, and share exploration (by researching Cartography). When an ally advances to the next age or builds a Castle, other allies are notified with an on-screen message. Researching Cartography lets allies share exploration.
You can choose your allies before you start a game or while you are playing. If you choose your allies before starting a game, the game automatically sets your diplomacy settings, the chat dialog to send messages to all allies, and allied Town Centers are visible on the map when you start the game.
To choose your allies before you start a game
Click the Team button to select the same team number as your allies.
The game automatically sets your diplomatic stance to ally and selects Allied Victory. Your Chat dialog is automatically set to send messages to all allies, and allied Town Centers are visible on the mini-map.
If you want to prevent players from changing teams after the game starts, select the Lock Game Teams option (in the pre-game settings). Also, if this option is set, you can only tribute allied players.
To choose your allies after you start a game
Click the Diplomacy button in the upper-right corner of the screen.
Click the Ally button for each civilization on your team. All players who want to be allies must do this.
Click Allied Victory. All players who to pursue an allied victory must do this.
Allies can signal each other to indicate where they need help or have located the enemy.
To signal allies
Click a unit at the location where you want to send the signal, and then click the Signal Allies button, or press the F key.
Allied players are notified by sound and the mini-map flashes where your unit was standing when you signaled. The signal exposes the terrain within the signaling unit's sight and remains on the map for two minutes. After this time, the area is again covered by the fog of war. There is no limit to the number of times you can signal your allies.
You can send tribute in the form of food, wood, stone, or gold to any other player in the game. For example, you might tribute an enemy to buy off an impending attack or to encourage an attack against another player. Or you might tribute an ally who lacks the resources to advance to the next age or build a Wonder.
You must build a Market before you can tribute resources to other players. You can tribute food, wood, stone, and gold to another civilization at any time. There is a 30 percent fee for tributes. For example, if you tribute 100 gold, 130 gold is deducted from your stockpile (100 gold is deposited in the other player's stockpile, and 30 gold is paid as a fee). You can reduce this fee by researching Guilds and Banking (at the Town Center).
Note: If the Lock Game Teams option is on (in the pre-game settings), you can only tribute allied players.
To pay tribute
1 Click the Diplomacy button in the upper-right corner of the screen.
2 Click the Wood, Food, Gold, or Stone buttons beside each civilization you want to tribute.
Each time you click a button, 130 of the resource is deducted from your stockpile-100 is added to the tribute and 30 is paid as a fee. The tribute amount is shown on the resource button and your stockpile is shown at the top of the column. f you have less than 100 of an item, the civilization receives the amount in your stockpile minus the 30 percent fee.
To finish the transaction, click OK. The resources are deducted from your stockpile and transferred to the other civilization(s). Or, to cancel the transaction, click Clear Tributes.
Chapter 6
Units
|
Building |
Line |
Age |
Unit |
What it does |
||||
|
Archery Range |
Archer |
2 |
Archer |
Quick and light. Excel against any unit that allows them to keep their distance but are killed quickly by units at close range. Perform well against foot units but poorly against knights, cavaliers, paladins, and light infantry/skirmishers. |
||||
|
3 |
Crossbowman |
|||||||
|
4 |
Arbalest |
|||||||
|
Siege Workshop |
Battering Ram |
3 |
Battering Ram |
Slow, lumbering hulks resistant to archer attacks. Cause massive damage to buildings at close range but are easy to destroy with infantry or cavalry units (even villagers). Can quickly reduce an enemy settlement to ruins. |
||||
|
4 |
Capped Battering Ram |
|||||||
|
4 |
Siege Ram |
|||||||
|
Dock |
Boarding Galley |
3 |
Boarding Galley |
Can convert other ships. Use to capture fire ships but avoid encounters with galleys. |
||||
|
4 |
Armored Boarding Galley |
|||||||
|
Siege Workshop |
Bombard Cannon |
4 |
Bombard Cannon |
Powerful, mobile, anti-building siege engine. Can be used against units, but is far better against structures. |
||||
|
Stable |
Camel |
3 |
Camel |
Mounted units that excel at killing other mounted units. |
||||
|
4 |
Heavy Camel |
|||||||
|
| ||||||||
|
Dock |
Cannon Galley |
4 |
Cannon Galley |
Can attack targets on shore at a great distance but are limited when fighting other ships at sea. Good for establishing a beachhead when supported, but poor in most other capacities. Fire slowly and cannot fire on units at close range. |
||||
|
Stable |
Cavalry |
3 |
Knight |
Strong cavalry units. Perform well against archers, and are better than infantry, but are beaten by camels and lose miserably to groups of pikemen. |
||||
|
4 |
Cavalier |
|||||||
|
4 |
Paladin |
|||||||
|
Archery Range |
Cavalry Archer |
3 |
Cavalry Archer |
Fair-ranged attack paired with speed that allows efficient hit-and-run attacks. Strong against infantry and cavalry because they can generally avoid getting close to them. Typically poor against light cavalry (which move fast enough to catch them) and foot archers (who have greater ranges and stronger attacks). |
||||
|
4 |
Heavy Cavalry Archer |
|||||||
|
Dock |
Demolition Ship |
3 |
Demolition Ship |
Ships filled with explosives. Piloted near enemy ships and detonated. Not particularly good or bad against any other ship type; primarily used to wrest control of the sea from an entrenched opponent. |
||||
|
4 |
Heavy Demolition Ship |
|||||||
|
Dock |
Fire Ship |
3 |
Fire Ship |
Spew fire at other ships. Good for sinking galleys. |
||||
|
4 |
Fast Fire Ship |
|||||||
|
Dock |
Galley |
2 |
Scout Ship |
Basic combat ships. |
||||
|
3 |
Galley |
|||||||
|
4 |
War Galley |
|||||||
|
Siege Workshop |
Hand Cannoneer |
4 |
Hand Cannoneer |
More inaccurate at range but have a powerful close attack. Good for preventing non-ranged units (like cavalry) from getting close to units. Weak when a non-ranged unit closes on them. |
||||
|
Barracks |
Infantry |
1 |
Militia |
Basic units. Not exceptionally good or bad against any particular unit. Suffer more damage from archers because infantry are slower. Inflict a few extra points of damage against buildings. Quick to produce and relatively cheap. |
||||
|
2 |
Swordsman |
|||||||
|
3 |
Two-Handed Swordsman |
|||||||
|
4 |
Champion |
|||||||
|
4 |
Hero |
|||||||
|
Stable |
Light Cavalry |
2 |
Scout Cavalry |
Very fast units. Possess a natural resistance to conversion and also have some protection against archers. Have extensive sight, which, combined with their speed and resistance to tower and archer attacks, makes them perfect scouting units. Perform well against priests and fairly well against archers but are beaten by infantry and fall apart when facing knights, cavaliers, or paladins. Speed and armor make them ideal for hunting down cavalry archers. |
||||
|
3 |
Light Cavalry |
|||||||
|
Siege Workshop |
Mangonel |
3 |
Mangonel |
Wheeled siege units. Have area effect attack useful for taking out a few enemy units en masse but fall apart when attacked at close range. Cannot attack enemy units that are very close. |
||||
|
4 |
Onager |
|||||||
|
4 |
Siege Onager |
|||||||
|
Church |
Monk |
2 |
Monk |
Slow and weak but has the ability to convert enemy units and buildings. Can also be used to heal wounded troops. |
||||
|
Barracks |
Pikeman |
2 |
Spearman |
Exceptionally powerful attack against any unit on horseback. |
||||
|
3 |
Pikeman |
|||||||
|
Siege Workshop |
Scorpion |
3 |
Scorpion |
Can shoot through units. Any shot will continue moving until it reaches the limit of its range. All units the shot passes through are damaged. Useful against large masses of units. Poor against any unit that manages to get close but fairly resistant to archer attacks. |
||||
|
4 |
Heavy Scorpion |
|||||||
|
Archery Range |
Skirmisher |
2 |
Skirmisher |
Ranged units with protective armor against archer attacks; ideal against archers. Fairly weak against cavalry or close-range infantry. |
||||
|
3 |
Elite Skirmisher |
|||||||
|
Siege Workshop |
Trebuchet |
4 |
Trebuchet |
Massive siege engines that must pack to move and unpack to attack. Capable of doing massive damage to structures. Have an immense range that allows them to siege even the most built-up defenses without suffering from counter-attacks from towers or units behind walls. Cannot fire on enemy units at very close range. |
||||
|
Castle |
Unique |
3 |
Cataphract |
Heavily armored special cavalry unit good for use against infantry and other cavalry. Fair against archers but have less protection against archer attacks than some other cavalry units. |
||||
|
Castle |
Unique |
3 |
Chu-Ko-Nu |
Special archer unit capable of firing a large number of arrows very quickly. |
||||
|
Castle |
Unique |
3 |
Goth Berserker |
Special infantry unit with high hit points, a fair attack, but no inherent armor. |
||||
|
Castle |
Unique |
3 |
Janissary |
Powerful, ranged, special unit armed with a rifle. Devastating against slow non-ranged units like infantry but take damage from cavalry that are able to close on them quickly and archers who can outrange them. |
||||
|
Castle |
Unique |
3 |
Mameluke |
Strong, special infantry unit that can attack all enemy units around it simultaneously. |
||||
|
Castle |
Unique |
3 |
War Elephant |
N/A. |
||||
|
Castle |
Unique |
3 |
Samurai |
Special infantry unit with a very fast attack. |
||||
|
Castle |
Unique |
3 |
Teutonic Knight |
Special infantry unit with a slow but very strong attack. |
||||
|
Castle |
Unique |
3 |
Throwing Axemen |
A compromise between archers and infantry. Have a very small ranged attack range but are similar to regular infantry units and thus do not suffer from the drawbacks of normal archers. |
||||
|
