 |
|
||||||||||||||
|
|
||||||||||||||
ALTE DOCUMENTE |
|
|
ENDODONTICS AND ESTHETIC DENTISTRY - Noah Chivian, DDS, Donald E.
Arens, DDS, MSD, Asgeir Sigurdsson, cand. odont., MS
INTRODUCTION
Part of the success of esthetic dentistry depends on the dentist's ability to
use teeth that have pulps compromised by trauma or injury. The role of the
endodontist or general dentist performing endodontic procedures is to clearly
intercept or eliminate the potential for problems. An equally important role is
to respond to pulpal disease after esthetic restorations have been completed.
Endodontics has clearly established its role in providing the foundation needed
to rebuild the dentition to form, function, health, and esthetics. As long as
there is sufficient tooth structure to restore and a healthy periodontal
complex for support, root canal therapy is the treatment of choice when a pulp
is diseased or compromised by restorative demands. Although regional
differences in techniques and materials exist, there is general agreement
within the endodontic community on principles, that is, strict adherence to the
endodontic triad of microbial disinfection and control, debridement, and the
sealing of the canal system. With proven and predictable success rates,
dentists can include endodontically treated teeth in their esthetic restorative
treatment plans with the utmost degree of confidence.
TREATMENT PLANNING
Endodontics should be incorporated into the multidisciplined treatment process
when the ultimate esthetic design is being determined. Treatment sequencing can
be established and painful episodes and disruption of the restorative schedule
avoided if the pulpal health and any previously root canal-treated teeth are
evaluated early in the planning stages. The patient should be informed that the
overall treatment plan is dynamic and may change as conditions arise. It is
equally important to evaluate the patient's radiographs, and if deep existing
amalgam or other restorations will be redone as part of the treatment plan, the
patient should be advised of future problems owing to the depth of those
restorations. If, at a later time, there are complications such as an inflamed
pulp or pain following final cementation, the patient has at least been
forewarned. This problem is sometimes complicated by difficulty in seeing the
depth of certain tooth-colored restorations.
The removal of existing restorations, excavation of decay, and paralleling of
multiple abutments may require periodic reassessment and endodontic
reconsideration. Sensitive teeth that do not respond to palliative measures
within a reasonable period of time may require pulpectomy. There is nothing
more disheartening to a patient who has completed 18 months of combined
orthodontic, periodontic, and restorative treatment than to experience a
"toothache" shortly after final cementation. Although pulpal problems
cannot always be predicted, a great majority can be avoided with insight,
careful evaluation, and good judgment.
CLINICAL EVALUATION
The success of any reconstructive treatment plan depends on the health of the
pulp, the periradicular area, and/or the quality of the existing root canal
therapy of the teeth to be restored. In an effort to determine this condition,
a standardized evaluating procedure should include the following:
. Communication that includes listening and recording
. Visual examination
. Periodontal probing
. Thermal tests
. Electric tests
. Cavity tests
. Periapical tests
. Percussion
. Palpation
. Bite tests
. Radiographic evaluation
History
Besides knowing the medical condition of the patient, the diagnostician should
ask the patient about past dental experiences. Their desires and objectives
should be clearly defined. If neglect is evident, the reasons for the neglect
should be determined and discussed. If phobia and anxieties exist, the
extensiveness of the case should be explained and relaxation techniques should
be offered to ensure a comfortable and pain-free treatment experience. In
addition, when a professional air of confidence, concern, and care is exhibited
by the doctor, the patient's faith and interest can be gained. Once this
rapport is established, the patient becomes far more receptive to accepting and
entering a treatment program regardless of its difficulty and their apprehensions.
The quality of treatment is inversely proportional to the level of stress
experienced by the patient and the doctor during the procedure. Again, warning
your patient about the potential for existing restorations to require future
endodontic treatment is vital for continued patient trust.
Communication
Listen, Learn, and Record. Dentists are the professionals who must
perform the tests, interpret the results, and design a treatment based on the
information gathered. When the diagnosis is not evident, the dentist must turn
to the patient for that one pinpointing clue. Sir William Osler, the famous
English physician, once said, "Listen, listen, listen - for the patient is
giving you the diagnosis." This statement is profound. The diagnostician
must not only ask sufficient and leading questions to obtain as much
information as possible but must also listen carefully to interpret the verbal
response and its expressed meaning. Patients should be quoted verbatim in the
chart, and their answers must become a permanent record for review.
Visual Examination
Direct examination of each tooth with some method of magnification (loupes or a
microscope) is essential to locate fracture lines, decay, or defective
restorations.
Transillumination via a fiber-optic light may be of great assistance in
detecting color shifts in a crown (Figures 19-1A, and 19-1B). A tooth with a pink or reddish
hue would more than likely indicate internal hemorrhage from a recent injury (Figure 19-2), a dental procedure (Figure 19-3), or gingival tissue hyperplasia
that has invaded a coronal cavity produced by caries or resorption (Figures 19-4A 19-4B 19-4C, and 19-4D).
A gray, blue, or black color might indicate blood infiltrate hemostasis within
the dentinal tubules and chamber, long-term necrotic tissue (Figure 19-5), or silver precipitants from
certain root canal sealers and filling materials (Figures 19-6A 19-6B, and 19-6C). A yellow or brown (Figures 19-7A, and 19-7B) unrestored crown often represents
a physiologically calcified nonpathologic obliteration of the root chamber/
canal. Pharmacologically affected (ie, tetracycline-stained) teeth may vary in
color from yellow to black (Figures 19-8A to
C), and
their drug fluorescence and etiology may be verified by using an ultraviolet or
Woods black light.
The reader is referred to the chapter on bleaching as many of these
discolorations can be reduced or eliminated by oxidizing techniques and agents
without requiring endodontic intervention.
Teeth with vertical fractures have a diagnostic constant. The transilluminated
light does not pass through the fracture line, but the crown beyond the
fracture (Figures 19-9A
and B) or
the opposite cusp(s) (Figure 19-10) appears darker. Periodontal
probing, cold testing, and a bite test will possibly assist in confirming the diagnosis
of cracked tooth syndrome.
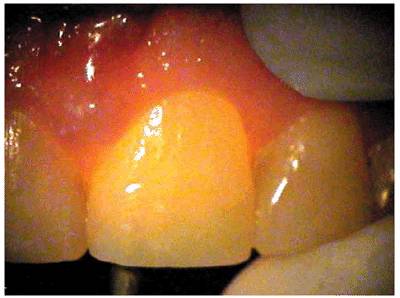
Figure 19-1A: Transillumination of a maxillary left central incisor with a necrotic pulp.
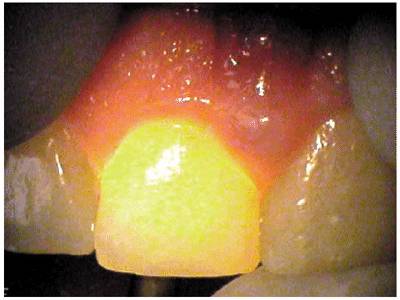
Figure 19-1B: Transillumination of the adjacent tooth with a vital pulp. Because there is active blood flow through the live pulp tissue, the tooth appears brighter to the fiber-optic light than the adjacent tooth with a necrotic pulp.
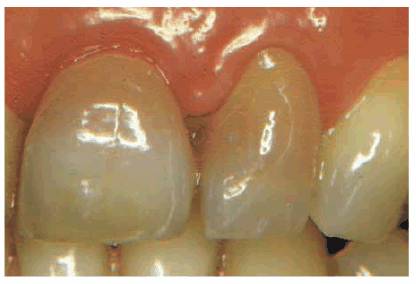
Figure 19-2: The maxillary central and lateral incisor teeth experienced a concussion injury and there was subsequent extravasation of blood causing the reddish hue.
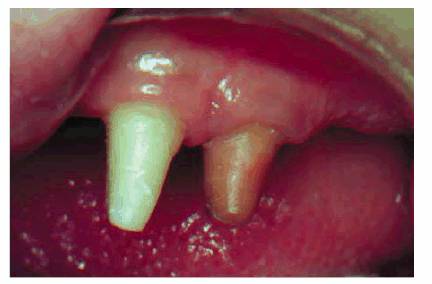
Figure 19-3: One week following crown preparation, the tooth structure was red, signifying extravasation of blood and the need for pulp extirpation.
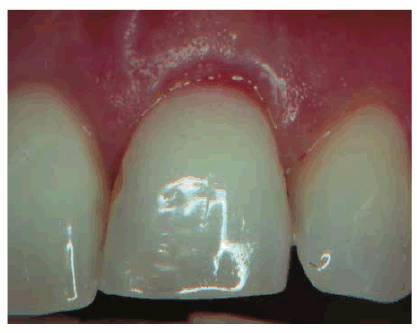
Figure 19-4A: Pink spot as a result of external resorption.
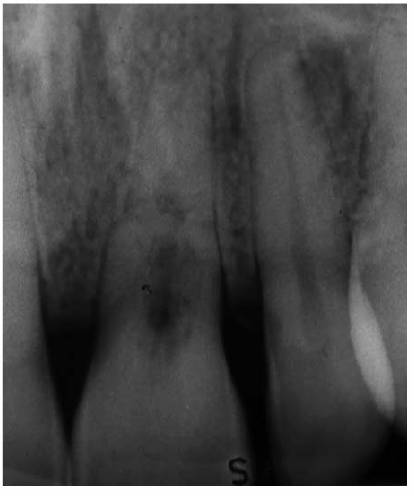
Figure 19-4B: Radiograph of the same tooth showing external resorption.
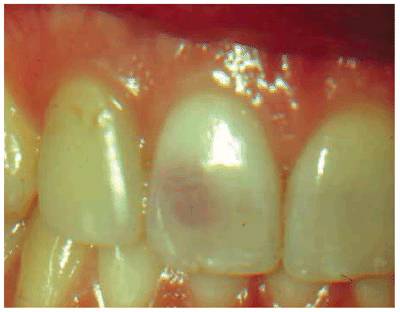
Figure 19-4C: Pink spot as a result of internal resorption.
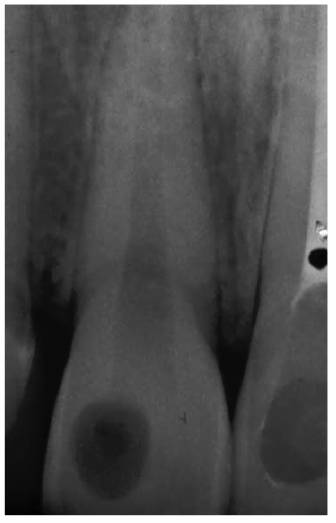
Figure 19-4D: Radiograph of the same tooth showing internal resorption.
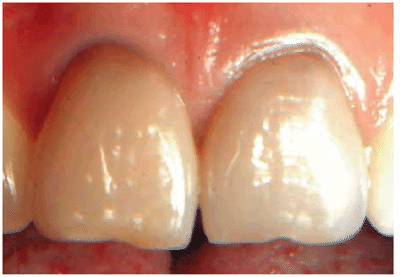
Figure 19-5: Discolored maxillary central incisors with necrotic pulps.
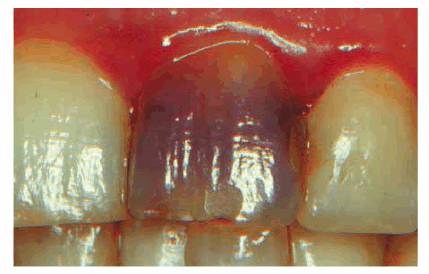
Figure 19-6A: Discoloration from silver-containing root canal cement.
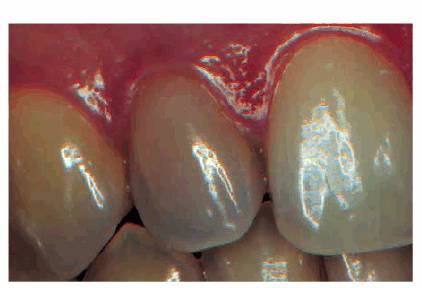
Figure 19-6B: Gray color of crown from a post.
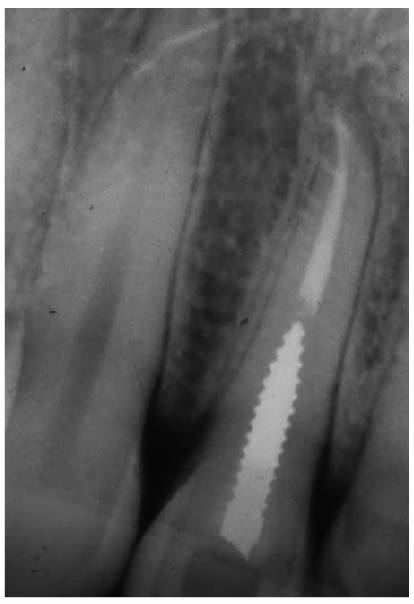
Figure 19-6C: Same radiograph as 19-6B. An unnecessary post that caused the discoloration.
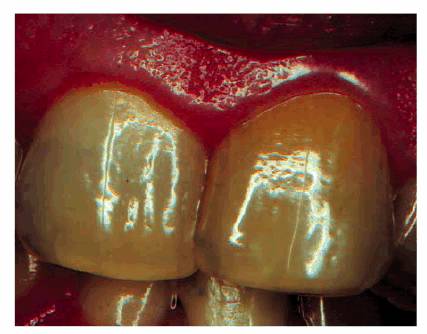
Figure 19-7A: The crown of this maxillary central incisor discolored gradually over a 3-year period following a concussion injury. The complete fill-in of the pulp chamber with dentin is the cause of the yellowish brown hue. In the absence of periapical radiographic changes and clinical symptoms, endodontic therapy is not indicated.
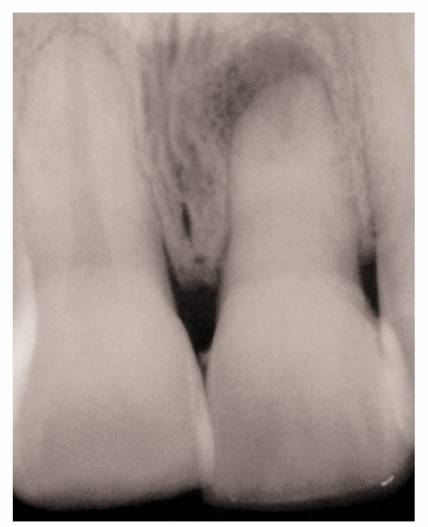
Figure 19-7B: Radiograph of a similar maxillary central incisor 10 years after a concussion injury. The pulp chamber is filled in with dentin producing the discoloration. In this case, there was pulp death years after the discoloration appeared. Because the pulp canal was obliterated, a surgical approach was used to seal the apex.
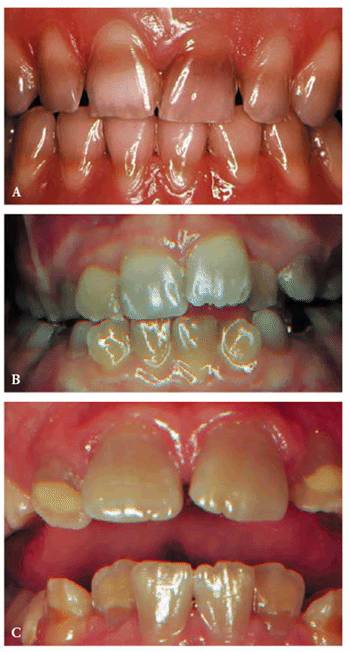
Figure 19-8A to C: (A) Brown staining from Terramycin. (B) Gray staining from Acromycin. (C) Tan staining from Aureomycin.

Figure 19-9A and B: (A) View of a maxillary central incisor tooth with overhead lighting. No fracture is visible. (B) Transilluminated view of the same tooth revealing the fracture line.
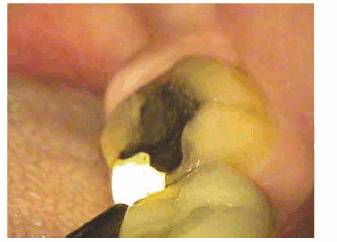
Figure 19-10: Transillumination of a mandibular second molar. The fracture lines at the mesial and lingual grooves do not allow the light to pass through.
Periodontal Probing
The depth of the sulcus and individual pockets are of concern to the treating
dentist or endodontist. There are two main reasons for that concern. One is
that if there is a combined periodontal endodontic problem associated with a
tooth, the true cause of the problem is not only difficult to diagnose but
could also be even more difficult to manage during treatment. The second issue
is that if there is an isolated, narrow, but deep periodontal pocket somewhere
around the tooth, a vertical root fracture has to be ruled out prior to any
further restorative treatment. The pocket could be just a draining sinus tract
from a necrotic and infected pulp. Endodontic therapy would then be indicated,
and the pocket should heal without any periodontal therapy within days after
the initial endodontic visit. The pocket could also be associated with a
vertical root fracture, and if that is the case, the prognosis of the tooth is
hopeless. Endodontic therapy would not clear up the pocket, nor would
periodontal therapy. Extraction of the tooth or removal of the root would be
the only treatment option.
Thermal Pulp Tests
In an effort to determine the vitality of a pulp, the cold test is probably the
most commonly advocated. In the past, an "ice pencil" (water frozen
in sterilized anesthetic cartridge and removed) (Figure 19-11) or an ice cube was the only
consistent way to chill a tooth. But there are several problems with using
frozen water: it is not very cold, so the stimulus may not be intense enough to
penetrate through a porcelain crown, and cold water from the pencil could leak
on adjacent teeth or gingival tissue, giving a false impression of pulpal
vitality in the tooth that is being tested. However, in a tooth with an acute
pulpitis, an ice pencil is an effective diagnostic tool. Recently,
1,1,1,2-tetrafluoroethane has become available in spray form (Endo-Ice,
Hygenic,
Dry ice cylinders (Odontotest Thermal Pulp Tester, Miltex,
The response of a normal, healthy, vital pulp is sharp and quickly dissipates
once the stimulus is removed. If the response is quicker, more intense, and
prolonged, it usually indicates an irreversible pulpitis. When calcified pulp
chambers or constricted canals exist, the response from an otherwise healthy
tooth may be delayed or nonexistent. The reduced conductivity can mislead the
operator. Therefore, other tests must be used to confirm negative responses.
When faced with teeth that are heavily restored, the final tests can be delayed
until the tooth has been excavated, and the patient is in a provisional
restoration. By wisely testing prior to final cementation, the true status of
the pulp may be validated, and any changes that may have arisen during the fabrication
interval can be appraised.
Heat is the least informative of the pulp tests and the most difficult to
apply. Heated water applied to an individual tooth after it has been carefully
isolated by a rubber dam is the most reliable method, but it is time consuming,
and extreme care has to be taken so that there is no leaking under the rubber
dam. It is recommended to start isolating and stimulating a tooth that is
posterior to the one that is suspected to be heat sensitive and then move the
rubber dam anteriorly tooth by tooth so that if there is a leak under the
rubber dam, it will leak only on an already tested tooth. Heated temporary
gutta-percha stopping applied to the lateral surface of a natural tooth or a
metal surface of a veneer casting has been recommended, but it is difficult to
control the heat, and the stopping has the tendency to stick on the tooth,
causing prolonged stimuli. A rubber polishing wheel in a low-speed handpiece is
an alternative also, but because it is difficult if not impossible to control
the stimulus, this method is not recommended. The antiquated method of touching
a tooth with a red hot burnisher should be avoided because of the risk of
overheating the tooth and pulp, and there is no control over how intense the
stimulus will be.

Figure 19-11: An ice pencil being applied to a maxillary central incisor tooth.
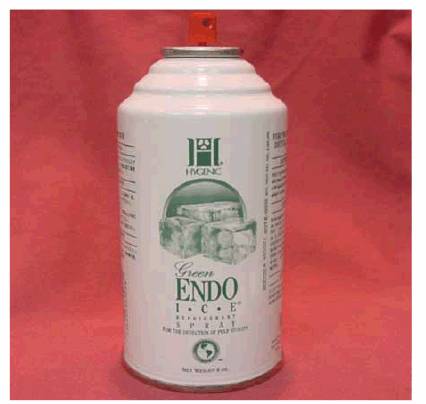
Figure 19-12: Endo-Ice (Hygenic) refrigerant.
Electric Pulp Testing
Over the last 25 years, the Analytical Technology Vitality Scanner (Figure 19-13), recently renamed Kerr Vitality
Scanner 2006 (KerrDental,
Credence should not be placed on the exactness of the numbers displayed, nor
should the differential between tests of individual teeth be used to determine
stages of pulpal degeneration. As previously stated, testing heavily restored
teeth is difficult at best and impossible with most. It has been suggested that
if root structure is exposed owing to gingival recession, the
"mini-tip" that comes with the Vitality Scanner should be used (Figure 19-15). Unfortunately, this is not a very
accurate method because there is a significant likelihood that the periodontal
ligament would respond to the stimulus, giving the false impression that the
pulp is still vital. The mini-tip, when used in conjunction with a prepared
test cavity or a small opening in a cast crown (Figures 19-16A, and 19-16B), is quite advantageous. This tip
is placed directly through the opening and onto the exposed dentin. Care should
be taken to keep the electrolyte (toothpaste or fluoride gel) from touching the
metal of the casting.
If you determine that root canal therapy is indicated while the patient is
still in the provisional restorations, then the endodontic needs can be
addressed without disturbing the restorative margins, changing the basic shape
of the prepared tooth, or disrupting the appointment schedule. The patient should
have been informed of such possibilities during the treatment plan discussion.
No single test should be construed as conclusive. This is particularly true
when dealing with apprehensive patients. Under stress, these patients will
anticipate and respond even when no stimulus exists. With these patients, the
decision to treat may be based on finesse, experience, intestinal fortitude,
and the intensity of pain. The option and choice of tooth should be
communicated in detail. The records should indicate that the decision to
continue is based on the presenting symptoms, responses (or lack thereof) to
vitality tests, and emergency condition, and it is possible with the limited
information gathered that the wrong tooth could be chosen. Your release form
should be signed to document the discussion. In the case of an emergency, the
alternative should be offered to wait until the symptoms and signs positively
identify the tooth. The patient decides whether to proceed.
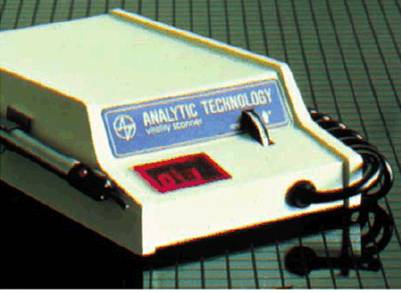
Figure 19-13: Analytical Technology Vitality Scanner Model 2005 (KerrDental).
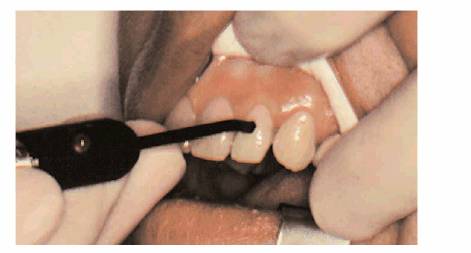
Figure 19-14: Pulp tester being applied to a dried tooth.
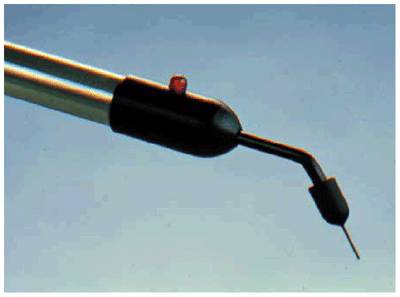
Figure 19-15: Mini-tip for the Vitality Scanner.
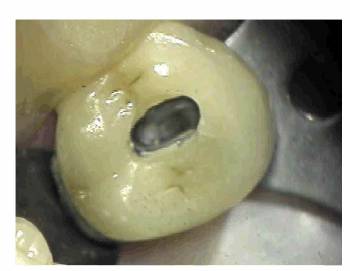
Figure 19-16A: Access through porcelain and metal to the dentin.
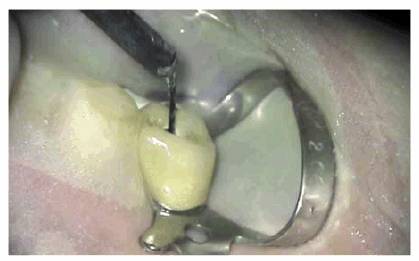
Figure 19-16B: Mini-tip placed on dentin through prepared cavity.
Cavity Tests
When tests are inconclusive with the less apprehensive patient, drilling
through the crown surface and the dentin of an unanesthetized tooth is an
excellent method of investigating further if the pulp is necrotic. This should
be done only if the tooth has not responded to the traditional vitality tests
like cold and electric pulp testing (EPT). It must be carefully explained to
the patient that based on testing, it is likely that the pulp is already
necrotic; therefore, he or she should not feel any pain when the tooth is
drilled. If the patient reports pain or sensitivity once the cavity preparation
has reached the dentin and the "normal" response has been established
with a test like the EPT, then the opening is restored. If extensive caries is
present, the patient is then anesthetized, and all caries and filling materials
are removed prior to restoration. This will allow visual evaluation of the
cavity floor and the ability to estimate the strength of the remaining core. If
the patient did not report any pain or sensation, an endodontic access is cut,
and appropriate endodontic therapy is initiated after all decay has been
removed from the tooth.
Electric pulp testing with a "mini-tip" through a test cavity may be
the key to making a diagnosis in a tooth with a radiolucency that cannot be
differentiated as either of periodontal or endodontic origin.
One can suspect a necrotic pulp if the reading is negative. Endodontics would
then be the treatment of choice (Figures 19-17A, and 19-17B). If the reading is positive and
there are no pulpal symptoms, periodontal therapy would be indicated (Figures 19-17C 19-17D, and 19-17E). Endodontic treatment may be
required if the root apices are compromised during periodontal procedures (Figures 19-17F, and 19-17G
Figure 19-17A: Mandibular molar with a necrotic pulp. Root canal therapy was instituted.
Figure 19-17B: Ten years following completion of root canal therapy there is a complete bone fill-in. No periodontal treatments were performed on this tooth.
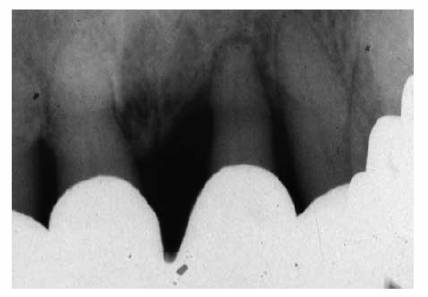
Figure 19-17C: Maxillary central incisor tooth with a vital pulp. Endodontic therapy was not indicated.
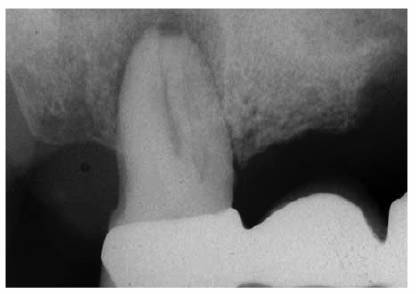
Figure 19-17D: A maxillary first molar with a periapical radiolucency.
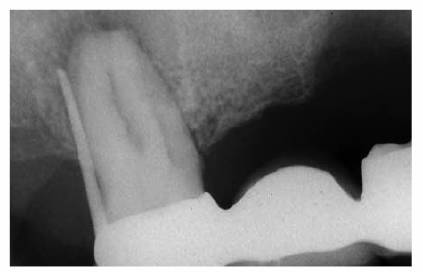
Figure 19-17E: A gutta-percha point placed in the distal pocket. Pulp testing through an occlusal opening revealed a vital pulp. The cause of the radiolucency was of periodontal origin and therapy followed that course.
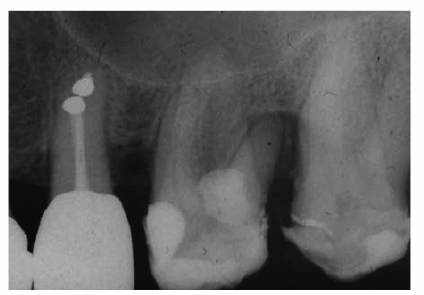
Figure 19-17F: Maxillary first molar with an uninflamed vital pulp. There was extensive bone loss surrounding the distobuccal root.
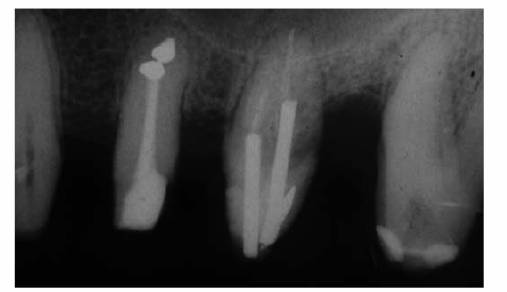
Figure 19-17G: Root canal therapy was performed to allow for the resection of the periodontally involved root.
Periapical Tests
Percussion. Gently tapping the forefinger on the incisal or
occlusal surface of a tooth may elicit a painful response (Figure 19-18). In situations when the response
generated is mild or absent, a more pronounced blow should follow by percussing
the tooth with a mirror handle (Figure 19-19).
A painful response usually indicates inflammatory changes in the periodontal
ligament that could be caused by pulpal degeneration. When bacteria have
entered the pulp, necrosis will follow. Endotoxins from the bacteria will
eventually exit the canal and stimulate an inflammation of the periodontal
tissue surrounding the apex of the tested tooth. The reaction is usually more
intense when the inflammatory condition is of an endodontic rather than a
periodontal origin.
Occasionally, painful responses to percussion are elicited from teeth not
undergoing pulpal degeneration. Acute sinusitis often causes the maxillary
posterior teeth to be painful when percussed. A careful history of the
patient's respiratory experiences and allergies is essential in making the
differential diagnosis. Teeth in traumatic occlusion are frequently sensitive
to percussion but are also painful to cold. To exclude this possibility, a
check for occlusal prematurities is indicated. A degenerative pulp does not
usually respond to thermal pulp tests unless it is in its most acute stage. If
a tooth is painful to both percussion and cold, one should suspect a vertical
fracture. These are most frequently observed in mandibular second molars and
maxillary bicuspids and occur irrespective of their restorative conditions. The
use of the transilluminator or fiber-optic light is quite useful in diagnosing
cracked tooth syndrome (see Fig 19-10).
Palpation. Pressure with a gloved forefinger over the apex of a
suspected tooth may reveal tissue distention and elicit a painful response (Figure 19-20). This indicates the inflammatory
response at the apex. The tender area may be so extensive that the teeth
adjacent to the suspected tooth must also be tested. Once again, a differential
diagnosis of acute sinusitis should be considered when the maxillary posterior
teeth are involved. The tissues painful to palpation with sinusitis usually
spread away from the dentition and extend superiorly and facially. Although the
area of pain is usually concentrated at the zygomatic process of the maxilla,
the pain may extend around the orbit and incite headaches. Pulp testing and a
careful history are essential in these situations.
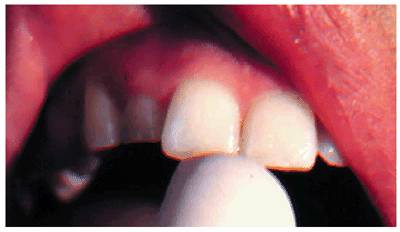
Figure 19-18: The first percussion check is a gentle tap with a gloved fingernail.
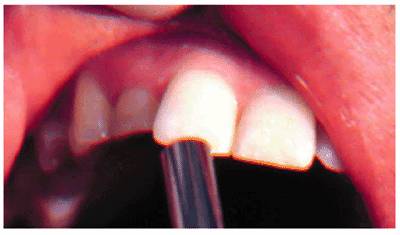
Figure 19-19: The second percussion is a gentle tap with a mirror handle.
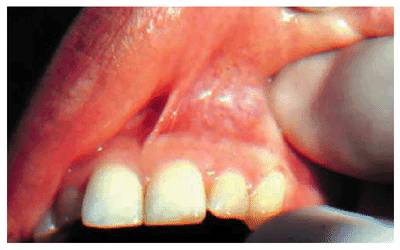
Figure 19-20: Palpation with the forefinger over a suspected tooth.
Bite Test
Every time that the patient's complaint is sensitivity to biting and/or
chewing, it is important to investigate further which tooth and, more
importantly, which part of it are sensitive to biting pressure. This is to
distinguish between vertical crown/root fractures and periapical pathosis. A
very convenient instrument for this investigation is the Tooth Slooth
(Professional Results,
A plastic saliva ejector may be used as an alternative instrument for this test
(Figure 19-23
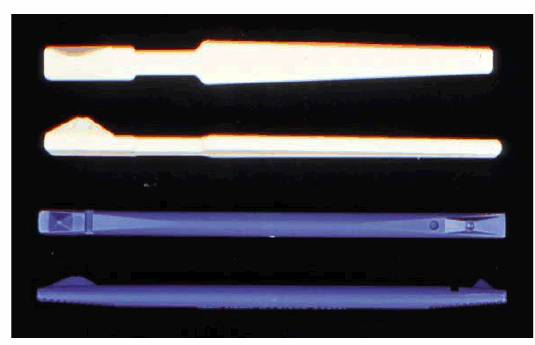
Figure 19-21: Tooth Slooths, two sizes.
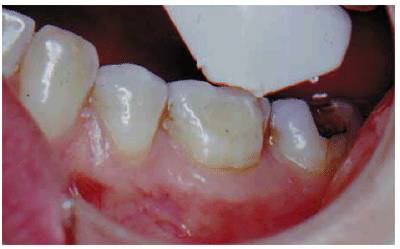
Figure 19-22A: Bite test with Tooth Slooth (Professional Results) checking DB cusp of mandibular molar.
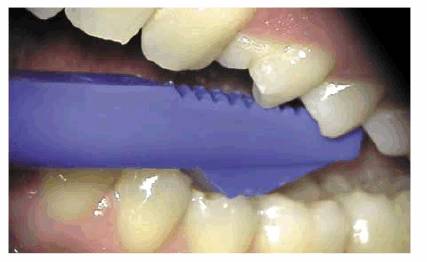
Figure 19-22B: Bite test with smaller-sized (blue) Tooth Slooth.
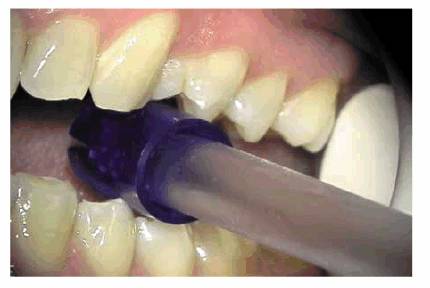
Figure 19-23: Plastic saliva ejector is useful in bite testing the entire tooth rather than an individual cusp.
Pretreatment Radiographs
Reconstructive planning requires a full set of well-angulated long cone-exposed
films or digital images using film holders like XCP (DENTSPLY/Rinn, Elgin, IL),
which enables 90-degree angulation of the x-ray beam on the film or sensor. In
addition to a good angulation on the radiograph, these film holders will enable
the operator to take comparable films or digital images over time, which is
very important when evaluating healing or failure.
When dealing with extensive cases, panoramic film is equally essential. If the
patient requires endodontic therapy and is referred for treatment, these films
and a description of the goals and objectives of the referring dentist should
be sent to the endodontist prior to the patient's first appointment. Most
endodontists will take additional films of the teeth to be treated to establish
a complete record of their own.
In most cases, an endodontic procedure should not be initiated without
evaluating at least two recent radiographs exposed at different horizontal
angulations of the suspected tooth (Figures 19-24A
and B).
Comparing varied views is essential in diagnosing the presence of additional
roots, anatomic configurations, anomalies, and other unusual circumstances that
may complicate the treatment.
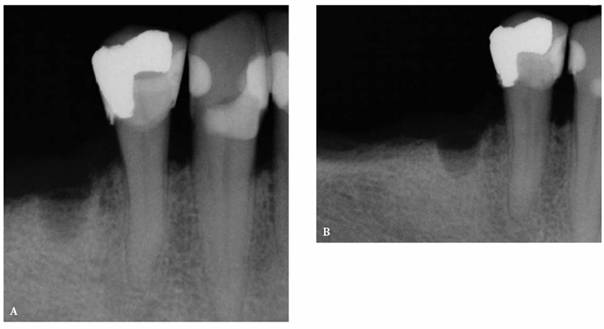
Figure 19-24A and B: (A) Pretreatment radiograph of a mandibular premolar shows one canal. (B) A second radiograph taken from an angulation of 15 degrees from the mesial discloses a second root.
Precementation Radiographs
Prior to cementation, Yamada (personal communication, 2001) re-radiographs the
prepared teeth (Figures 19-25A
and B).
These images check the pulpal, periapical, and periodontal status of the teeth.
Also, the radiographs, unencumbered by the presence of the metal castings,
provide a chamber/canal road map record if the tooth requires endodontics in
the future. This may appear pessimistic, but Arens and Chivian reported that
over 40% of teeth requiring root canal therapy are crowned.4 Prior
knowledge of the size, location, and direction of the chamber and the canal will
reduce the possibility of (1) crown damage during access opening, (2) lost time
searching for the canal orifice, (3) perforations of the chamber or the canal
because of disorientation, (4) natural core elimination by gutting, (5) crown
dislodgment, and (6) sufficient destruction to alter the situation and require
corrective surgery. Each of these iatrogenic possibilities reduces the
prognosis and jeopardizes the tooth's reliability as an abutment.
Diagnosis
By correlating all of the information gathered, the clinician can, within
reason, determine which teeth may or may not require root canal therapy prior
to the reconstructive procedures. By far the most difficult pulpal tissue
status to classify is found within the confines of a previously restored tooth.
For this reason, it is imperative to understand how pulps react to dental
procedures.
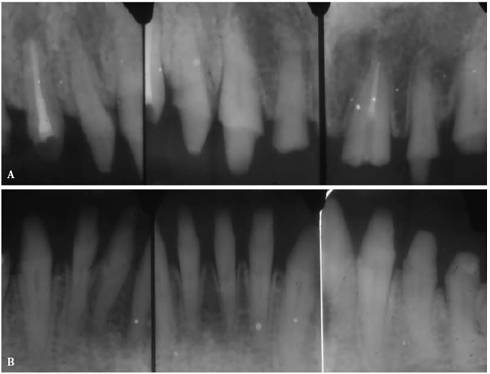
Figure 19-25A and B: Precementation radiographs provide a road map to the canals if endodontic therapy is necessary after cementation of the castings. (Radiographs courtesy of Dr. Henry Yamada.)
PULPAL RESPONSE TO OPERATIVE PROCEDURES
Following caries, the single most influencing factor on the health of the pulp
(Figure 19-26) is the operator. Simply modifying
traumatic operative techniques could easily prevent sequelae and reduce the
eventual need for iatrogenically required endodontics.
A normal tooth, when cut, responds immediately to the dentinal injury. The
involved tubules are vulnerable to the heat developed during the procedure, to
the air during drying, and to any of the chemicals or materials used during the
restorative procedures.
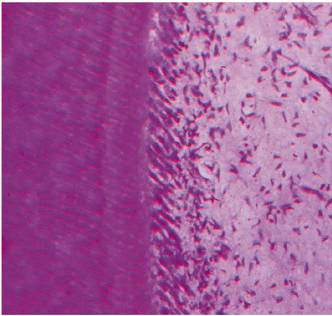
Figure 19-26: A vital healthy pulp with a typical pattern of palisading odontoblasts. (Photograph courtesy of Dr. Harold R. Stanley.)
Regardless of the source, the odontoblasts will react. It is only a question of
degree. With tooth reduction, the equation is simple: the higher the speed of
the rotating instrument, the greater the heat generated, and the greater the
pulpal damage. Common sense would suggest that in response to these predictable
and undesirable insults, the surface of the tooth should be reduced with high speed,
and the deepest excavation and final preparation should be achieved with low
speed. Adjunctively, a coolant spray should accompany all cutting, and every
effort should be made to eliminate air blasts. Not only has Langeland shown
that 10 seconds of air is enough to displace odontoblastic nuclei (Figure 19-27) and present a definite hazard to
the viability of the pulp,16 but

Figure 19-27: Aspiration of odontoblastic nuclei as a result of injury from cavity preparation.
For the
above reasons, there is a definite advantage to using an alternative to the
typical high-speed handpiece. Either air abrasion or a laser that cuts hard
tissue, such as an erbium:YAG laser, can be much kinder to the pulp tissue.10
Although neither of these instruments can be used for a full-crown preparation,
they may be ideal for initial cavity preparation, thereby negating potential
pulp damage.
In addition, bleaching, rapid tooth movement, impression taking, temporization,
and cementation are other aggressive procedures within the normal dental
regimen that demand equal attention and caution.
The operator should select materials and agents that have relatively neutral pH
values, create little or no heat during set, and control orthodontic forces
within the physiologic tolerance of the periodontal ligament.
To ensure pulpal health and to avoid raising future diagnostic and treatment
dilemmas, the pulp must be treated with the utmost care. In many situations,
these problems may be avoided by careful evaluation prior to and during the
restorative treatment. Examples of such situations are as follows:
1. When a tooth is exhibiting symptoms such as being exquisitely painful to
cold liquids long after excavation of deep decay even with pulp
protection/sedation and final restoration (Figure 19-28).
2. A patient cannot exert full biting pressure on a crown 6 to 9 months after
cementation, yet the radiographs are negative (Figure 19-29).
Some postrestorative exacerbations are predisposing and unavoidable, particularly
when dealing with heavily restored teeth. Such episodes of acute or chronic
pulpal inflammation more often stem from a preexisting pulpal condition that
has been aroused by what appeared to be a simple operative procedure. Although
the healing potential of a healthy pulp following dental intervention has been
well documented, the potential for complete repair has been known to decrease
as the number of procedures are accumulated during a tooth's lifetime. Provided
that there are no additional insults, a healthy pulp's survival with resolution
of acute inflammation will usually take place within a few weeks. However,
extending a patient's palliative treatment beyond that time frame is not only
unjustified but also seriously threatens the patient/doctor relationship. Once
that happens, further communications are diluted, and the patient usually
leaves the practice. Rather, extirpation of the pulp followed by endodontic
therapy should be considered early, and the patient should be warned that that
might be the best treatment option if the symptoms do not resolve within a
reasonable time.
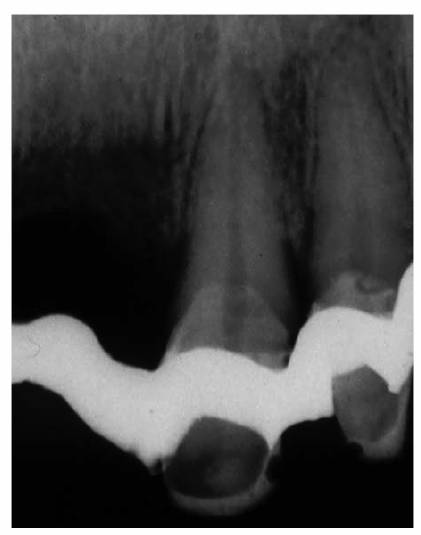
Figure 19-28: Periodontally compromised maxillary central incisor that is painful to minor temperature changes 10 weeks after deep caries excavation and crown preparation.
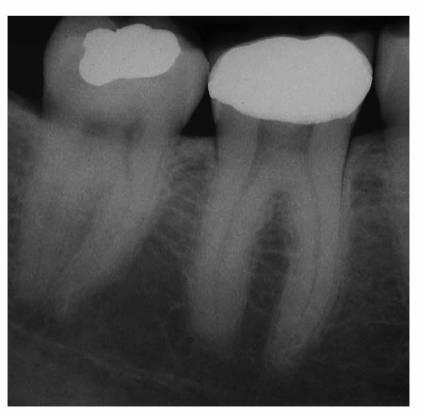
Figure 19-29: Mandibular molar with a normal radiographic appearance. However, the patient avoids using the tooth because of pain when chewing 9 months after cementation of the crown.
Pulpal Repair
Reparative or irregular dentin is deposited to form a protective barrier for
the pulp tissue and is generally localized to the injury site. This abnormal
dentin forms in response to intense and aggressive pulpal irritants that have
reached the limit of pulp tolerance (eg, erosion, abrasion, caries, dentinal
exposure by fracture, decay or mechanical tooth reduction, traumatic injury,
caustic medicaments, and harmful filling materials).
The histologic appearance of reparative dentin (Figure 19-30) demonstrates dentinal tubules that
are irregular, tortuous, or even absent. The increased thickness of the total
dentin is likely the reason for patients having decreased responses to cold
stimuli as time passes following a dental procedure. Quantitatively, it is
noted that the greater the degree of the "insult" caused by
preparations and restorative materials, the greater the amount of reparative
dentin that forms.
Although this calcified solid wall is considered beneficial and capable of
resisting further episodes of irritation, this healing phenomenon decreases the
ability of the tooth to respond to pulp testing at a later date.
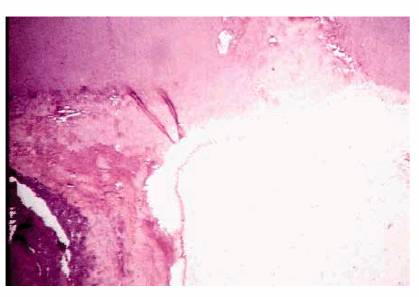
Figure 19-30: Reparative dentin is deposited at specific sites as a result of injury (ie, caries, restorative procedures, attrition, or trauma).
Secondary Dentin
Histologically and physiologically, there is a difference between reparative
and secondary dentin. Secondary dentin begins forming soon after the tooth
erupts into occlusion and continues to form throughout the pulp's life. This
tooth structure is deposited over the primary dentin (Figure 19-31) throughout the entire chamber and
canal in response to stimuli within the limits of normal biologic function:
mastication, light thermal changes, chemical irritants, and slight trauma. The
newly deposited dentinal tubules are smaller, exhibit more curves, and form a
protective barrier for the pulp as the size of the pulp cavity is reduced.
Reparative dentin forms as a direct response to injury. Although the deposition
is not uniform in thickness, this dystrophic calcification may completely
occlude the canal, reduce the blood supply, necrose the tissue, and complicate
the eventual endodontic therapy.
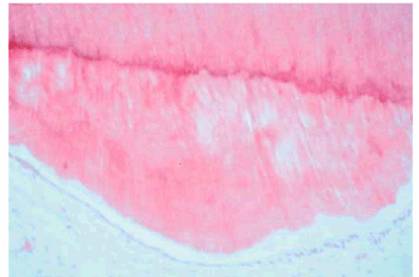
Figure 19-31: Secondary dentin represents the continuing slower circumpulpal deposition of dentin after root formation is complete.
ELECTIVE ENDODONTICS FOR PULPAL REASONS
Depth of Preparation/Remaining Dentin
According to Stanley and Swerdlow, "The most important single factor in
determining pulpal response to a given stimulus is the remaining dentin
thickness between the floor of the cavity preparation or the surface of a crown
preparation and the pulp chamber."28 Studies have shown that a
2-mm dentin thickness between the floor of the cavity preparation and the pulp
(Figure 19-32) will provide adequate insulation
against the more traumatic thermogenic operative techniques in spite of
intentional abuse and most restorative materials.23 Cavity or crown
preparations cut with high speed (50-200,000 rpm), air water spray, and a light
touch produced minimal pathologic alteration to healthy pulps when the
remaining dentin was 2 mm or more. However, Stanley stated that "Although
2 mm of primary dentin between the floor of the cavity preparation and the pulp
is usually a sufficient protective barrier against cutting techniques.the
effluent of cements and self-curing resins can overcome this thickness of protection."27
To avoid such intrusions, calcium hydroxide lining materials capable of
protecting the pulp tissue, when appropriately used, should be placed in all
deep-seated cavity preparations prior to building a secondary protective base
of cement.
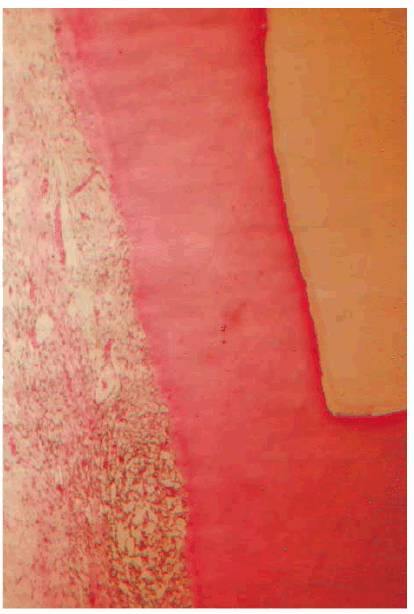
Figure 19-32: Cavity preparation with 2 mm of remaining dentin between its floor and the pulp tissue. (Photograph courtesy of Dr. Harold R. Stanley.)
If the final restoration is a one-stage procedure (ie, amalgam or composite
resin), then a dentin/pulpal floor protected with a calcium hydroxide dressing
base can be permanently restored. The patient must be advised if there are
risks involved. The records should reflect the risk condition and the
discussion. The scenario differs with multistage restorations (ie, castings).
If a tooth is compromised, the additional insults of impression, try-in, and
cementation may exceed the pulp's ability to repair. Although judgmental, these
teeth should be intentionally extirpated and endodontically treated. Success rates
justify this prophylactic approach, and it is almost always unwarranted to
chance discomfort, re-treatment, and repercussion.
If the requirements of the final restoration or the excavation of extensive
caries result in less than 2 mm of remaining dentin, the expectation of a
severe inflammatory reaction is greater. If a pink spot in the cavity or a
blush on the tooth appears (Figures 19-33A, and 19-33B) during or after preparation, it is
obvious that the 2-mm remaining dentin barrier has been violated. The
probability of complete inflammatory reversibility and healing of a noticeably
hemorrhagic pulp is minimal. Considering that additional procedures are
required to finish the crown, elective endodontics should be instituted before
continuing. If, at any time, a patient elects to forego endodontic therapy
following your recommendations, the records must indicate that the option to
extirpate was strongly suggested and refused.
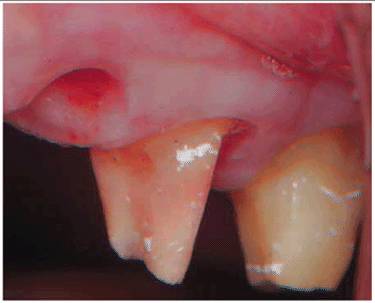
Figure 19-33A: Pink crown preparation 1 week following instrumentation.
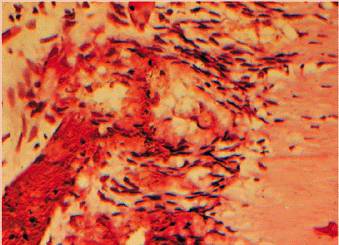
Figure 19-33B: Hemorrhagic pulp with extravasation of blood. (Photograph courtesy of Dr. Harold R. Stanley.)
This presents a moral issue as to whether a patient should be allowed to
dictate the final treatment when the risk of failure is involved. The dentist
must realize that he or she can always refuse to continue, provide palliative
but temporary treatment to ensure comfort, and suggest that the patient see
another dentist. If chosen, this decision, discussion, and referral must be
recorded and witnessed. Irrespective of the remaining dentin thickness, the
restoration has to be bacteria tight if the pulp is going to survive the
insult. Care has to be taken to ensure the bacterial seal because if there is
leakage, the bacteria will penetrate under the restoration and through the
dentinal tubuli, initially cause pulpal irritation, and eventually cause pulpal
necrosis if the leakage is not stopped.
Pulp Capping
Direct pulp capping in special situations has been shown to be safe, effective,
and predictable. The ability of the pulp to repair when a mechanical exposure
has been dressed with calcium hydroxide is well documented. The odontoblastic
layer, once stimulated, forms a matrix that leads to the bridging of new dentin.
This is because if the pulp was accidentally exposed by a dental bur (Figure 19-34) or by traumatic injury, then only
the surface will show reversible inflammatory changes. If the pulp exposure is
under deep decay, then there is good likelihood that the inflammation has
affected a large portion of the pulpal tissue and even caused partial necrosis.
In a recently published study, the long-term success (over 10 years) of pulp
capping of carious exposures was successful in only 13% of all cases evaluated.6
It is also important to remember that, as a rule, pulpitis is asymptomatic,8
so the patient might not have any history of pain even though there is a
significant lesion in the pulpal chamber.
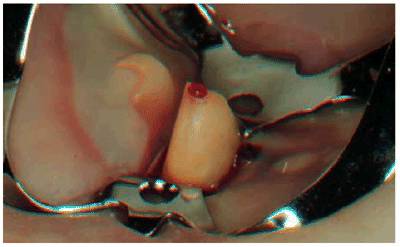
Figure 19-34: Pulp exposure during crown preparation. Pulp extirpation is indicated.
Because of the risk of leakage of bacteria into the pulp, direct pulp capping
should be considered only with one-stage restorations (ie, amalgam or direct
resin) and only when the patient is aware of the condition and the risk.
A thin calcium hydroxide mix of Dycal (DENTSPLY/Caulk,
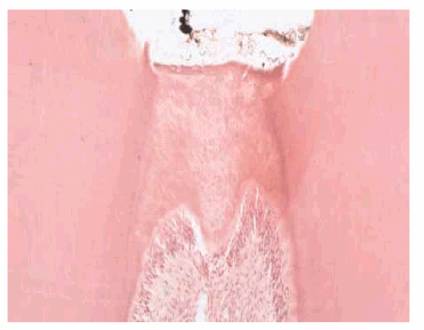
Figure 19-35: Dentin bridge following pulp capping with mineral trioxide aggregate (ProRoot MTA). Note the thickness of the bridge and the palisading odontoblastic layer. (Photograph courtesy of Dr. Mahmoud Torabinejad.)
Recently, pulp capping with a technique of acid etching and bonding has been
advocated. This concept was based on clinical observations but has few scientific
data for support. Pameijer and Stanley studied the technique in a carefully
controlled experiment on primates.22 Their results showed that pulp
caps with acid etching and bonding agents produced 45% necrotic pulps, and only
25% of the specimens developed dentin bridge formation. Of the group pulp
capped with calcium hydroxide, only 7% of the pulps were necrotic, and 82% of
the teeth developed dentin bridge formation. Obviously, if you elect to pulp
cap, calcium hydroxide and MTA are the materials of choice.
The poor long-term prognosis of pulp capping and the ease and assurance of
endodontics certainly demand that the patient be offered the more predictable
alternative of root canal therapy when a definite exposure is confronted. In
teeth with pulp exposures for which multistage restorative procedures are
contemplated (ie, inlays, crowns, bridge abutments), conventional root canal
therapy is the treatment modality of choice. Performing the endodontics prior
to the prosthetic delivery obviates the above-noted liabilities.
Stressed Pulp
The dental literature is replete with methods and materials that demonstrate
apparent success in preserving the integrity of the pulp, including the
combination of sorghum molasses and English sparrow droppings.12 But
as time passes, subtle changes take place in the pulp, creating an unhealthy
and unreliable tissue to depend on as a sound foundation. This condition is
often identified as "stressed pulp."
Abou-Rass considered the stressed pulp condition as an endodontic-restorative
concept.1 He felt that it was of a clinical nature and not a
histologic entity. It should be considered a preexisting pulpal possibility in
every restored tooth prior to subjecting the tooth to further restorative
procedures. If the pulp is stressed, its ability to react favorably to the new
insult will be diminished.
For example, a mandibular molar, although repeatedly filled, has remained
symptomless over a long period of time. A radiographic examination of the tooth
demonstrates a deep occlusal amalgam and a large buccal composite restoration,
recession of the pulp chamber, and narrowing of the root canals (Figure 19-36). Another example of stressed pulps
is the maxillary incisors that underwent concussion injuries and two previous
crown preparations. Although there were no pulp exposures and there were
minimal symptoms, intentional extirpations were performed because it was felt
that the pulps would not survive another restorative procedure (Figures 19-37A 19-37B, and 19-37C). According to Abou-Rass's
criteria, further insult to the affected (stressed) pulpal tissue would
probably invite disaster. An intelligent decision would be elective
endodontics, thereby intercepting potential problems.
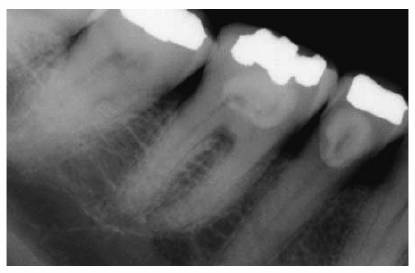
Figure 19-36: Mandibular molar with a stressed pulp.
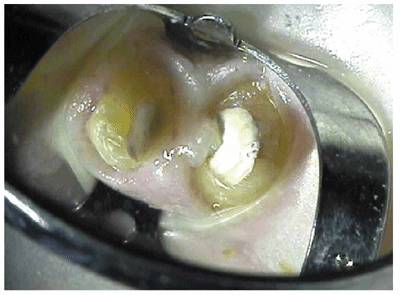
Figure 19-37A: View of maxillary central incisors following excavation of extensive caries. The pulps were not exposed.
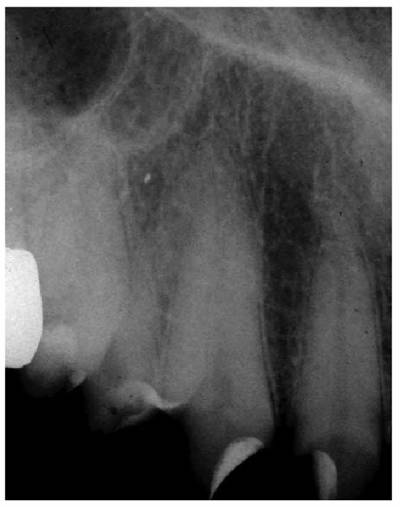
Figure 19-37B: Radiograph of the same teeth. Note the minimal thickness of dentin adjacent to the pulp chambers.
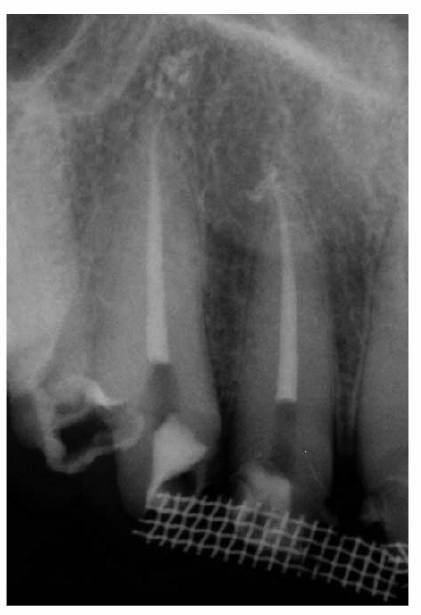
Figure 19-37C: Root canal therapy completed on the maxillary central incisors.
Abou-Rass stated that the pulp's ability to recover from "stressed"
pulp is relative to the type and duration of the injury, physiologic age,
thickness of remaining dentin, and past trauma (impact injuries, repeated
operative procedures). When all of these factors are examined and the patient's
normal routine is changed because of vague symptoms, elective endodontic
intervention must be considered. Another example of a stressed pulp is the
patient with a maxillary anterior provisional restoration who required local
anesthesia to remove the bridge 12 months after crown preparation and
periodontal therapy because of pain in a maxillary central incisor tooth (Figures 19-38A, and 19-38B). The combined dental procedures
have created stress on the pulpal complex that have exceeded the pulp's ability
to repair. No patient wants to hear why it should have been done after the
fact.
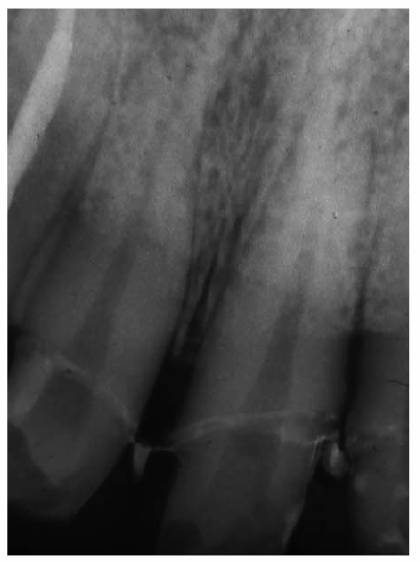
Figure 19-38A: Maxillary central incisor with a chronically inflamed (stressed) pulp.
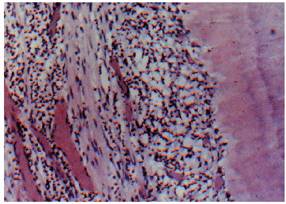
Figure 19-38B: A histologic section of chronic inflammation, irreversible pulpitis, with round cell infiltration. (Photograph courtesy of Dr. Harold R. Stanley.)
Elective Endodontics for Prosthetic
Reasons
No tooth or components of a tooth should be sacrificed if the prognosis of the
remaining dentition can be improved by its retention. Discussing elective
endodontics vis-a-vis extensive restorations, Bohannan and Abrams felt that
root canal therapy should he performed for reorientation of occlusal planes,
reduction of crown:root ratios, and establishment of parallelism.7 A
clinician faces many such situations when the overall esthetic and restorative
results could be enhanced if the pulp was extirpated and the ideal root form
was available. Unfortunately, the decision to perform the endodontics is often
determined by issues other than what is beneficial to the patient (ie,
economics, time, lack of skill or experience). Regardless, it is the duty of
every diagnostician to evaluate and design each case with the goal of
maximizing form, function, health, and esthetics. Therefore, when endodontic
therapy enables the clinician to deliver the ideal restoration, why should the
situation be compromised?
Endodontic Treatment Complications
An understanding of basic endodontic principles and a clearly defined
restorative plan are essential prior to initiating root canal therapy. The
final esthetic result should not be compromised by an inadequate approach.
Therefore, various phases of endodontic treatment will be examined to see how
they may enhance or preserve esthetics rather than detract from it. Although this
may seem repetitious, the risk of performing endodontic procedures on restored
teeth must be explained and accepted by the patient, and all discussions should
be documented and recorded before a procedure is attempted.
Rubber Dam
The use of the rubber dam is regarded as mandatory in endodontics. However,
isolating teeth decayed below the gingival crest or restored with all-ceramic
crowns presents unique problems that invite a departure from the standard of
care. It must be remembered that an untoward incident (ie, swallowing or
aspirating a reamer or file when the rubber dam has not been used during
therapy) leaves little doubt about legal liability.
The market offers a variety of rubber dam clamps designed to fit almost every
situation. Crown lengthening prior to endodontic treatment is often required to
expose sufficient tooth structure to clamp. This is not a detriment since
lengthening procedures will be beneficial when the restorative dentist is
establishing a finishing line for the restoration. The effect of a rubber dam
clamp on porcelain or cast glass restorations can be esthetically devastating.
Madison et al. studied the problem in a laboratory model.17 The
clamps were placed on the crowns and left undisturbed for 1 hour. They found
that regardless of the crown margin design, all of the test samples displayed
crazing of the porcelain in the area of the beaks of the clamp. Additional
forces on the porcelain in clinical situations as the clamp is inadvertently
moved during treatment would most certainly be destructive. As previously
discussed, this problem could be eliminated if all teeth having questionable
pulpal health were endodontically treated prior to cementation of the crown.
The retentive value of the abutment would be increased, and damage to the
porcelain would be avoided if elective endodontics preempted the crown
fabrication and/or cementation.
Since over 40% of root canal treatment is performed through existing castings,
the following alternative methods of rubber dam application are suggested for
porcelain and cast glass crowns:
1. Floss or rubber cord ligation. Dental floss or Hygenic's rubber cord
"Wedjets" (Figure 19-39A) can be used to retain a rubber dam
when isolating a single tooth. Wedjets is a stretchable cord that is made from
natural latex. The cord, available in three sizes, is placed like dental floss
to hold the dam in place. Wedges can be used in conjunction with dental floss
or Wedjets once the dam is in place. For convenience, it is recommended that at
least one tooth on either side of the treated tooth be included in the
isolation (Figure 19-39B
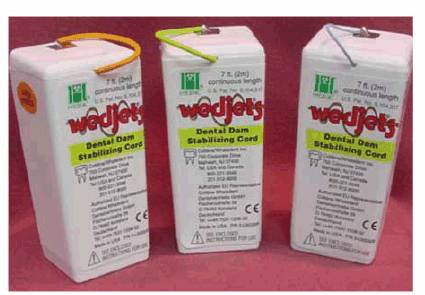
Figure 19-39A: Wedjets (Hygenic), three sizes.
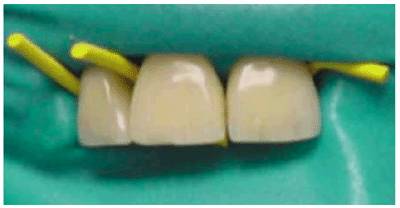
Figure 19-39B: Wedjets stabilizing the rubber dam and aiding in the isolation of a maxillary central incisor.
2. Multiple teeth isolation. This technique suggests that the clamps be
placed on unrestored adjacent teeth. Three or more contiguous holes are punched
in the dam, and the rubber is stretched over all of the teeth to be isolated;
the tooth to be treated remains unclamped, and access is unrestricted (Figures 19-40A
and B).
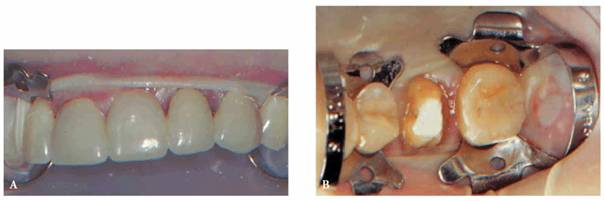
Figure 19-40A and B: Rubber dam isolation of multiple teeth.
3. Jacoby
plastic clamps. Bay Technical Products (
4. Cushee
rubber dam clamp cushions (Practicon). Cushees are soft silicon cushions
that fit over the jaws of standard steel clamps. The jaws of the clamp do not
come in contact with the gingiva, tooth structure, or restoration. Patient
comfort is increased, and potential damage to porcelain and cast glass is
decreased. They are available in two sizes: yellow for anterior and bicuspid
clamps (Figures 19-42A
and B) and
blue for molar clamps (Figure 19-42C).
5. Ingenuity. When dealing with splinted units, ingenuity becomes part
of the problem-solving equation. A triple-width hole is punched, and the teeth
adjacent to the treated tooth are clamped. Once the dam is in place, Cavit (3M
ESPE, St. Paul, MN), Provit (E.C. Moore, Dearborn, MI), or Oraseal Putty
(Ultradent, South Jordan, UT) is compacted around the gingival margin of the
crown to block off the expected leakage. When the entire arch is a
porcelain-fused-to-metal or cast glass crown, you are faced with a most
difficult situation and must improvise esthetic damage control. If there are
individual crowns, you avoid placing rubber dam clamps on any of the anterior
or first premolar teeth. Surface damage to the porcelain, when risked, should
be confined to the second premolar and molar teeth, which are less visible in
most situations. Cushees, Jacoby clamps, or Wedjets should be used to protect
the restorations.
Again, for both contamination and patient protection, as well as medicolegal
reasons, endodontic treatment should never be attempted without rubber dam
isolation. Nonlatex dam is available from Hygenic for those patients with known
latex allergies. Apprehensive patients may be accommodated with the use of
Quick dam (Figure 19-43) from Ivoclar Vivadent (
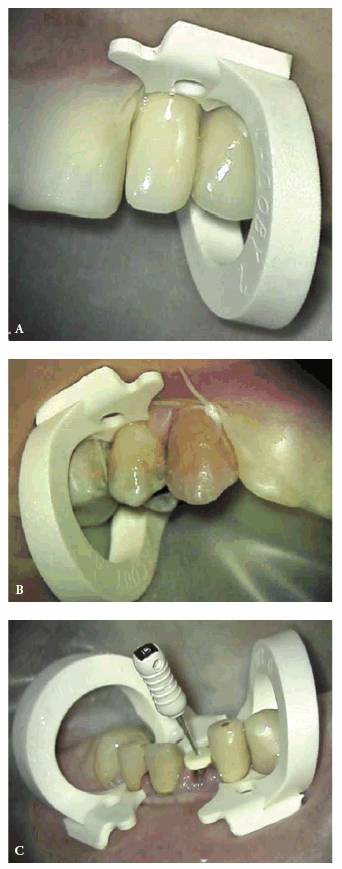
Figure 19-41A to C: Jacoby rubber dam clamps (Bay Technical Products) isolating (A) lateral incisor, (B) premolar and canine, and (C) multiple teeth.
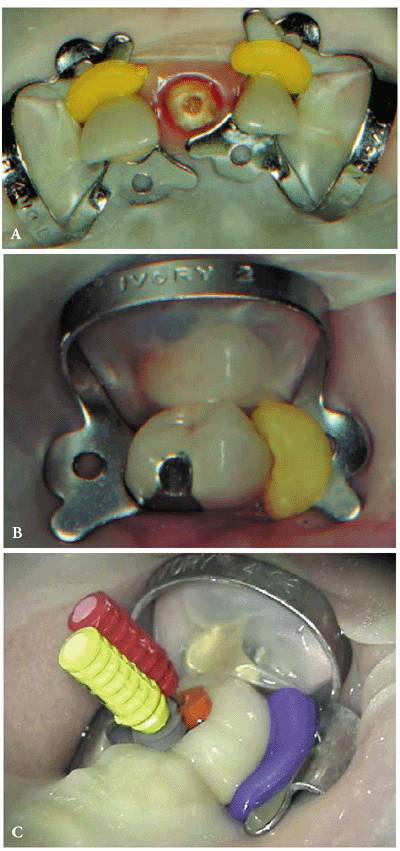
Figure 19-42A to C: Cushee rubber dam clamp (Practicon) cushions isolating (A) multiple anterior teeth, (B) maxillary premolar, and (C) mandibular molar.
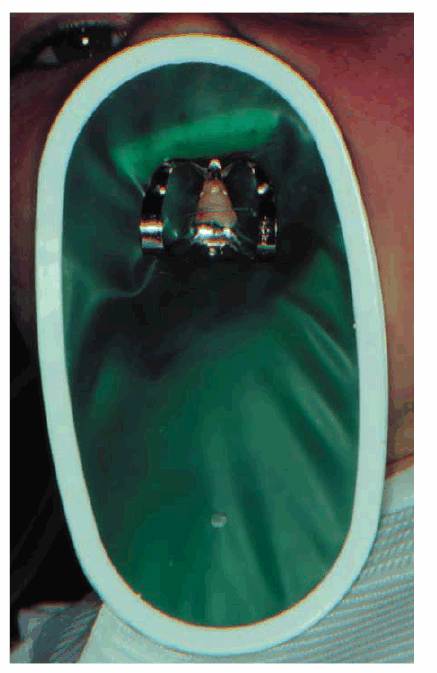
Figure 19-43: Quick dam.
Access Cavity Preparation
An access cavity must be large enough to enable proper debridement of the
entire chamber and canal system yet small enough to preserve tooth structure.
Discoloration from retained pulpal tissue and/or filling materials must be
prevented. Therefore, chamber access must be internally widened and all pulp
horns unroofed. A fine line exists between protection of existing restorations
and tooth structure and a sufficiently sized access cavity to achieve the
desired endodontic result.
A carefully planned and executed access cavity preparation should minimize
weakening the tooth, provide for maximum visibility, and allow for straight
line access into all root canals for optimal preparation and filling of the
canal(s) (Figure 19-44
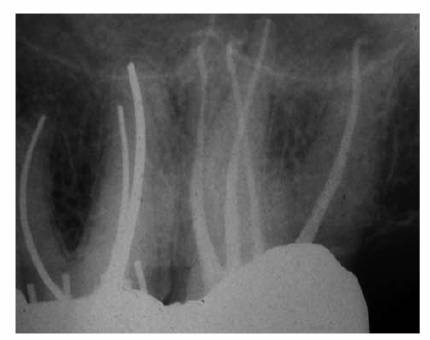
Figure 19-44: Straight line access allowed for visualization of all four canals in the maxillary second molar.
Entering the pulp chamber requires a general knowledge of tooth morphology, the
specific intricacies of the tooth in question, and proper instrumentation.
Recent radiographs that were taken with a paralleling device to ensure minimal
distortion should be studied prior to picking up the handpiece. It is
recommended that two preoperative films be exposed from different horizontal
angles to provide better information and help in visualizing the crown and root
morphology (see Figures 19-24A
and B).
The films should depict the location of the chamber, presence or absence of
calcification, number of roots and canals, and relationship of the incisal or
occlusal surfaces to the axial line of the root.
Morphologically, the access cavity takes the shape of the underlying pulp
chamber (Figures 19-45A
to C).
Variations in size and shape of the pulp chamber take place as the result of
calcification resulting from caries, operative procedures, restorations,
occlusal wear, abrasion, etc. Therefore, by nature, the access cavity in a
youngster's nonrestored tooth (Figures 19-46A, and 19-46B) would differ considerably from
that of the same tooth with multiple restorations in a middle-aged person (Figures 19-47A, and 19-47B
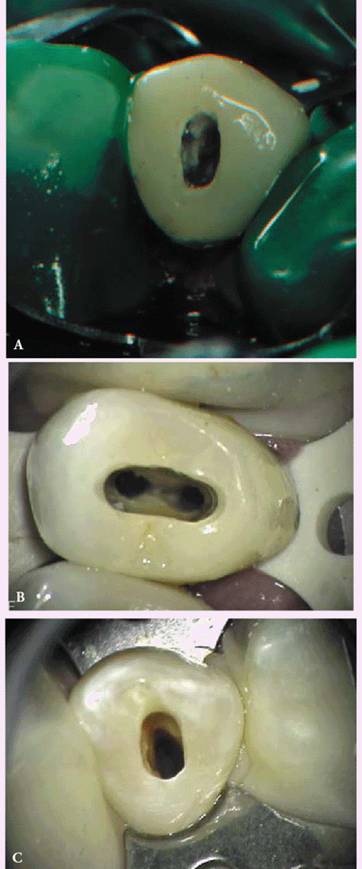
Figure 19-45A to C: Access cavity outlines reflect the shape of the pulp chambers: (A) maxillary canine, (B) maxillary premolar, and (C) mandibular premolar.
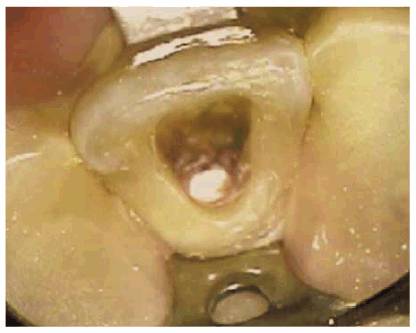
Figure 19-46A: Access cavity in a traumatized unrestored maxillary central incisor of a 16-year-old male.
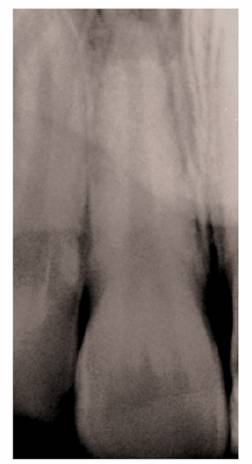
Figure 19-46B: Radiograph of the same tooth showing a large pulp chamber and root canal.
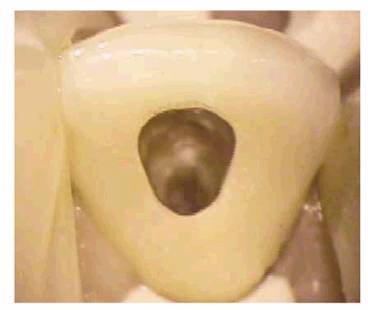
Figure 19-47A: Access cavities through porcelain-fused-to-metal crowns in a middle-aged male.
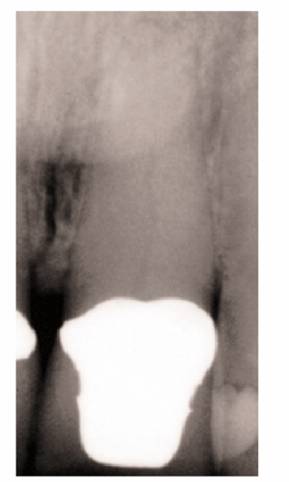
Figure 19-47B: Radiograph of the same tooth depicting a narrow root canal. The size of the access opening in the crown reflected the recession of the pulpal complex.
Magnifying
loupes or a dental operating microscope are necessary aids in searching for
canals when calcification has obliterated the chamber. Magnification in
conjunction with an auxiliary light source tends to reduce the frustration of
this phase of endodontic therapy.
Procedure
If the tooth that needs an endodontic treatment has a full-coverage
restoration, special care must be taken prior to cutting access preparation
because in many cases, the "artificial" tooth structure could be very
different from the natural tooth, both in regard to size and shape and the occlusal
plane (Figure 19-48). The preoperative radiograph(s)
and careful probing with a periodontal probe around the cervical area of the
tooth will give some indications.
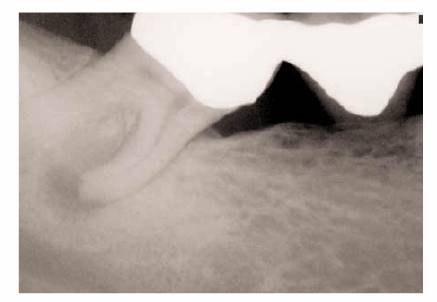
Figure 19-48: Mesially inclined mandibular second molar. Because of the tilt, the direction of the bur should be angled toward the distal to avoid a perforation during access cavity preparation.
Natural tooth structure should be protected from heat. Studies have shown that
deleterious crazing and cracking occur in the enamel and in the dentin when
access cavities are prepared dry. Regardless of the fact that the pulp will be
extirpated, water should be used to cool both the bur and the tooth during
access preparation.
Burs
Penetration and funneling are the two phases of cavity preparation. This can be
accomplished with a round #2 or #4 bur for penetration, followed by a #1558 or
#701 fissure bur for funneling. Alternatively, the funneling could be done with
an Endo-Z bur (DENTSPLY/Maillefer,
Removal of existing occlusal and proximal restorations should be completed
prior to entering the pulp chamber. Besides providing a direct view, it also
saves time and eliminates the chance that loose particles from the restoration
are entering the canal, thereby preventing negotiation to full length. The only
exception to this is if removing deep, but sound, proximal extension of the
restoration will compromise the rubber dam seal.
Restored Teeth. To facilitate canal orientation, it may be
beneficial to gain access and locate the orifices of the canals prior to
placing the rubber dam because then the root eminence of the alveolar bone
could be observed and used as a guide. It is important, as always, to place the
rubber dam before introducing an endodontic file into the tooth to eliminate
the possibility of the aspiration or ingestion of the file.
Acrylic Veneer and Full Metallic Crowns. A new #2 round or #1558
round end fissure bur is preferred when penetrating gold. The sharpness of a
new bur will maximize penetration and minimize the tendency to skip or skid. As
mentioned, the access opening must be large enough to allow visualization of
the entire chamber, location of the root canal orifice(s), and removal of all
existing decay.
Access through nonprecious metal crowns requires the use of a coarse
dome-shaped cylindrical diamond bur. Stokes et al. found that the Horico
139x012 (Pfingst,
Aluminous Porcelain. Medium- or fine-cut diamonds accompanied by a
water spray should be used to cut through porcelain.21 Carbide burs
will generate incredible heat, and the cutting action of the bur will
significantly increase the possibility of porcelain failure. The operator has
the choice of a round diamond stone (Premier 120F, Premier Dental Products,
King of Prussia, PA, or Gnathos 801-016, Gnathos Dental Products, Weston, MA),
a round end fissure diamond stone (Premier 982.8, Premier Dental Products), or
a pear-shaped diamond (Premier 365.4F, Premier Dental Products). Disposable
diamonds are efficient when cutting porcelain or all ceramic restorations.
Being new, they tend to reduce crazing or cracking in the restoration and
generate less heat (eg, Gnathos 801-016).
Porcelain Fused-to-Metal Crown. A round diamond stone (Premier 120F
or Gnathos 801-016) accompanied by a copious water spray is best for the
porcelain entry. A classic access cavity is traced in the porcelain (Figure 19-49A). Penetration through the metal and
dentin and into the pulp chamber is accomplished with a new #2 or #1558 carbide
bur (Figure 19-49B). Carbide burs dull rapidly and
should be discarded when they lose their cutting efficiency.
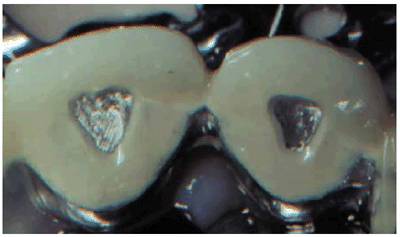
Figure 19-49A: Outline of access cavity traced through porcelain with a diamond stone.
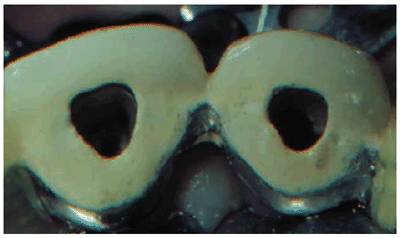
Figure 19-49B: Penetration and funneling of access cavity completed with a carbide bur.
All-Ceramic Crowns. A laboratory study has shown that high-speed
diamond instrumentation with water spray is efficient when cutting through
Cerestore crowns (3M ESPE, St. Paul, MN).30 The same study also
indicated that carbide burs used under similar conditions were inefficient.
More specifically, when preparing access cavities in cast glass crown, a
diamond stone should be selected (eg, Premier 120F, Gnathos 801-016).
Porcelain Inlays and Onlays. A two-fold problem presents with these
restorations vis-a-vis access preparation: fragility of the material and design
of the restoration.
Fracture and dislodgment are potential sequelae when cutting into these
restorations. To avoid the problem, one must be certain of the pulpal health
prior to selecting these restorations. If faced with endodontic therapy through
these restorations, however, the patient must be advised of the possibility of
replacement. Once the risk is accepted, high-speed diamond instrumentation
(Brasseler 801-016 [Brasseler,
Etched Cast Bridges
Any tooth with a questionable pulp should be endodontically treated prior to
placing an etched cast restoration. Frequently, this restoration is used to
replace an anterior tooth that has been lost as a result of trauma. It is
reasonable to assume that the adjacent teeth may have sustained injury as well.
Therefore, it is imperative that the pulp and periapical status be ascertained
before bonding the restoration in place. However, if faced with root canal
therapy, the access cavity must be kept as small as possible. The likelihood of
weakening the bond is great. In most cases, a new #2 or #1558 carbide bur and a
copious water spray will minimize heat and reduce the vibration, which is the
cause of debonding. Occasionally, it is more practical to prepare the access
cavity through the labial surface, in particular when dealing with lower
incisor teeth that are lingually inclined (Figures 19-50A
to D). The
distinct advantage of direct access without disturbing the casting is
immeasurable. The opening can then be repaired with a light-cured composite
resin. Cosmetically, the lip and smile lines should be considered before using
this approach. Communicating the benefits of this approach and having the
patient accept the technique before proceeding are essential.
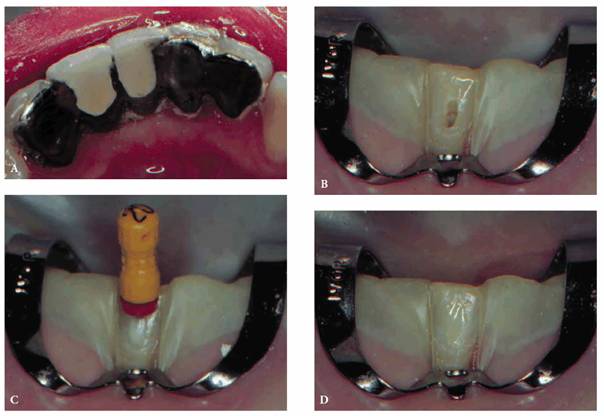
Figure 19-50A to D: Access alternative for an etched cast bridge: (A) five-unit bridge, (B) access cavity prepared on labial surface, (C) measurement file in place, and (D) composite resin repair of access cavity.
Retentive Value After Access Preparation
In addition to esthetic compromises that occur as a result of access
preparation, crown retention also becomes questionable. An in vitro study by
McMullen et al. showed that the retentive value of a porcelain-fused-to-metal
crown was decreased 60.17% following access cavity preparation.19 In
a follow-up study, McMullen et al. showed that the retentive value of the crown
could be increased 237% over its original value if the crown was recemented
with polycarboxylate cement and the access cavity was filled with amalgam.20
However, it is rare that a crown or a bridge is removed after final cementation
to allow for endodontic therapy. Unfortunately, retentive value following the
filling of the access cavities with amalgam alone has not been studied. With
this is mind, filling an access cavity with amalgam after endodontics may not
restore it to an acceptable level. This reiterates the need to perform elective
endodontics whenever a risk exists prior to the fabrication and cementation of a
crown (Figure 19-51
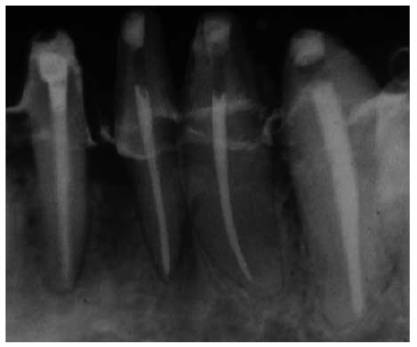
Figure 19-51: Endodontic therapy completed prior to fabrication of final castings on four mandibular anterior teeth with questionable pulpal health.
When faced with unusual situations (eg, occlusal rests and attachment
receptacles in removable partial denture abutments), innovation enters the
picture. To preserve their usefulness, attempts should be made to keep away
from the attachment area. The final access preparation outline should be
finished near the attachment but not encroach on it. The shape of the
preparation may be decidedly atypical, but the preservation of the mechanical
lock integrity will be retained.
Instrumentation/Debridement
The goal of this phase of endodontic therapy is to eliminate all microorganisms
from the canal system by completely removing organic and inorganic debris. The
objective is to accomplish instrumentation yet maintain the constriction of the
canal apex and the flare of the coronal aspect. This canal design will
accommodate condensing instruments during the gutta-percha compaction yet
confine the filling materials within the canal. Thorough debridement and
hemorrhage control will not only ensure endodontic success, they will also
prevent discoloration of the crown. This is an extremely important esthetic
consideration. Crown discoloration can stem from blood entering the dentinal
tubules followed by latent red blood cell degeneration. Severe pulpal bleeding
usually occurs when an acutely inflamed pulp is not entirely removed during
extirpation. Once an accurate measurement is ascertained, further debridement
of the canal and subsequent shaping coupled with copious irrigation with 2.5%
sodium hypochlorite (NaOCl) will normally control the hemorrhage. If, on
occasion, the flow continues, full-strength 5.25% NaOCl should be used as the
irrigant. The solution should remain in the chamber for periods of 5 to 10
minutes.
Today's suggested medication in teeth with vital and necrotic pulps is calcium
hydroxide, which does not cause tooth discoloration. However, one still
encounters discolored endodontically treated teeth that have been discolored by
medication, root canal cements, and paste fillings. Their removal, as well as
bleaching procedures, may return the crown to its optimal color, but the
duration of the esthetic improvement may be short. Patients should be advised
of this fact.
Sealing the Canal System
The final phase of treatment and the key to successful endodontics is the
sealing of all portals of exit from the canal system. Here again, esthetic
consideration revolves around discoloration of filling materials. A nonstaining
root canal cement (ie, Roth 801, Roth International,
The canals should be filled completely as confirmed by radiographs. The excess
gutta-percha and root canal cement should be removed 2 to 3 mm apical to the
cervical line to prevent discoloration (Figure 19-52). In periodontally involved teeth
where longer crowns are planned, the root-filling materials should be removed
to the bone level. A 2-mm layer of white temporary stopping should be placed
over the gutta-percha.25 Remnants of the cement may be removed with
alcohol. A tooth- colored restorative material (ie, composite resin or glass
ionomer cement) may be used to fill the rest of the canal and chamber when a
post and core are not indicated.
The coronal restoration should be placed as soon as possible after completion
of the root canal treatment if it is not placed at the time when the canals are
filled. There is now building evidence that the coronal restoration is as
important, if not more important, in microbiologically sealing the root canal
system as the root canal obturation material (Figures 19-53A
and B). In a
recent study, Ray and Trope evaluated the radiologic quality of both coronal
and canal obturations.24 It was demonstrated that a tooth with good
coronal and root seals had the best rate of absence of periapical lesions
(91.4%). Good restoration resulted in significantly less incidence of
periapical lesions than good endodontic filling (80% versus 75.7%). Poor
restoration resulted in significantly more periapical lesions than poor
endodontic fillings (48.6% versus 30.2%).
A proper finish of both the temporary and the final filling material is
essential so as not to irritate the patient's tongue or soft tissue.
Thirty-bladed finishing instruments (ETUF, OS 1, Brasseler) are perfectly
suited to provide the smoothest margins for both the material and especially
the marginal remnants of the existing restoration. Gold restorations are
particularly susceptible to rough edges that need finishing with the 30-bladed
instruments.
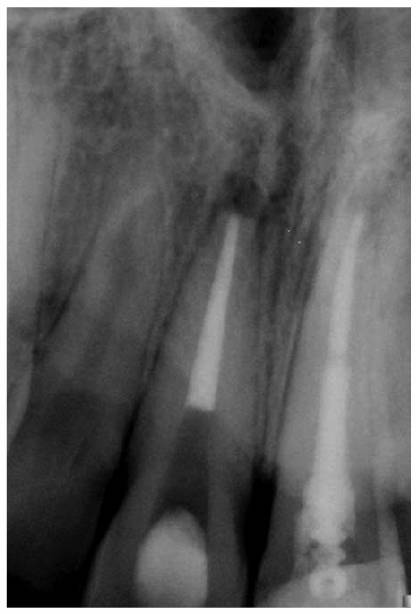
Figure 19-52: Gutta-percha root filling cut back 3 mm apical to the cervical line to prevent discoloration. Two millimeters of white temporary stopping is placed over the gutta-percha. This space will be restored with composite resin. The adjacent tooth will be restored with a crown.
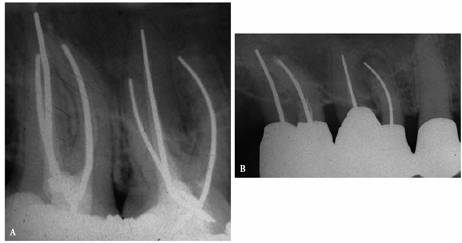
Figure 19-53A and B: (A) Thirty-five years after root canal therapy. The teeth are asymptomatic, and there are no radiographic changes. (B) Three years after distobuccal root resections and new castings. Periapical lesions developed around the mesiobuccal roots. During the extended treatment phase, the coronal ends of the silvers points were periodically exposed to saliva.
Bleaching
Bleaching endodontically treated teeth has been a successful part of the
endodontic treatment armamentarium. When indicated, the procedure should be
instituted at the completion of the root fillings. The results are satisfying,
and the patient can readily see the change in tooth appearance.
Unfortunately, a liability associated with bleaching, external root resorption,
has appeared in the literature and has been demonstrated in research studies.32
External resorption is the result of an injury to and a subsequent reaction in
the periodontal ligament. The use of 30% hydrogen peroxide (Superoxol, Sultan
Chemists) and/or heat has been demonstrated to increase the probability of
resorption.18 Microscopic opening in the dentinal wall in the
cervical region that is not covered by enamel or cementum may allow for the
penetration of the bleaching solution to the periodontal ligament. This
morphologic abnormality occurred in 5 to 10% of the teeth examined.15
Acid etching of the chamber has been advocated prior to bleaching to allow for
deeper penetration of the Superoxol. Heat, Superoxol, and acid etching of the
chamber increase the probability of resorption (Figures 19-54A, and 19-54B) and should be avoided, and a
kinder, gentler technique should be used.
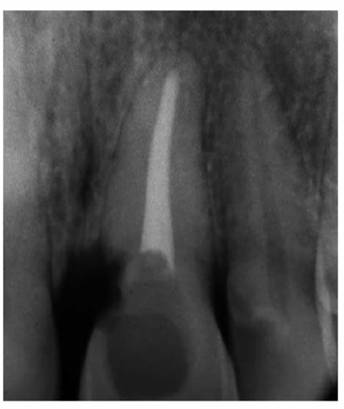
Figure 19-54A: External cervical resorption 4 years following bleaching with 30% Superoxol (Sultan Chemists) and heat.
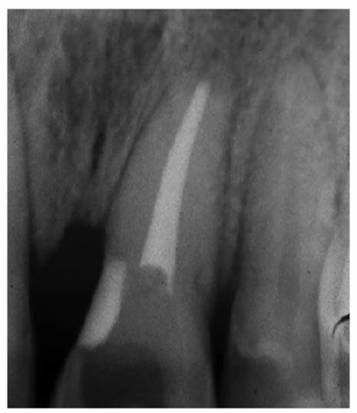
Figure 19-54B: Two years after orthodontic extrusion and a surgical approach to repair the resorptive defect.
Walking Bleach Technique
A solid, well-condensed gutta-percha root filling is a prerequisite to
bleaching discolored endodontically treated teeth. This should be confirmed
with a radiograph. If the root filling is inadequate, it should be redone. Once
it has been established that the gutta-percha filling is adequate, it should be
removed 2 mm apical to the cervical line, and the reservoir that is created
should be filled with a zinc oxide eugenol temporary filling material such as
IRM (DENTSPLY/Caulk, Milford, DE). All remnants of root and crown filling
should be removed from the chamber. The chamber is washed with 70% alcohol.
Sodium perborate powder mixed with water or 3% hydrogen peroxide to a
resin-like consistency is packed into the chamber with a plastic instrument.
Excess moisture is absorbed with a cotton pellet. The access cavity is closed
with a good temporary filling material. An effort is made to ensure a total
seal by removing the bleaching agent from the access walls. The maximum
bleaching effect takes place within 48 hours (Figures 19-55A, and 19-55B). The tooth is evaluated for
improvement after that time. Application of the paste is repeated until an
acceptable result is achieved, which is usually two to three applications. A
case of severe discoloration could take even more applications. Rivera et al.
recommended the placement of a 2-mm layer of white temporary stopping over the
gutta-percha root filling following intracoronal bleaching. This is followed by
a thin layer of an auto cure glass ionomer cement. The remaining access cavity
is then restored with a composite resin. This approach serves two purposes: (1)
prevention of microleakage and (2) prevention of iatrogenic perforation if
future bleaching or retreatment of the root canal therapy is required by providing
different textures of filling materials with slight variations in shading.25
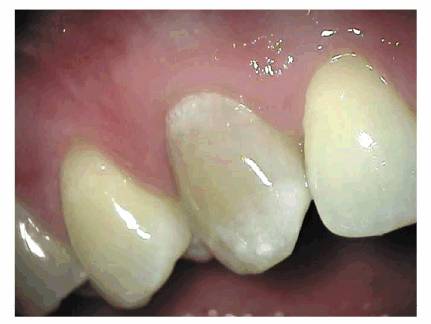
Figure 19-55A: Discolored maxillary canine with a necrotic pulp.
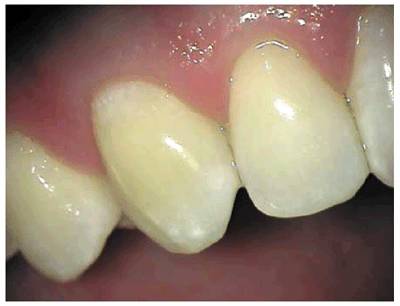
Figure 19-55B: Forty-eight hours after the completion of root canal therapy and placement of a walking bleach.
This walking bleach procedure was introduced by Spasser over 40 years ago.26
The combination of sodium perborate and water apparently produces a sufficient
oxygenating effect to bleach internal stains and is believed to be much gentler
to the periodontal ligament.14 In vivo and in vitro research studies
have confirmed its efficacy. Its obvious advantage lies in its ability to
produce the desired result without the liability of root resorption, which is
associated with the use of Superoxol and heat.
TRAUMA
The era of the 1980s and 1990s and the new millennium has been one of
participation, an era of sports and speed. With it came the concurrent hazard
of dental injury. Any blow to a tooth, regardless of its intensity, can cause
pulpal damage or pulpal necrosis. The need for endodontic treatment is
predicated on the physiologic response of the pulpal tissue and periodontal
ligament.32 The esthetic interest in traumatized teeth centers more
around the hard tissue damage even though the associated pulpal problems can
greatly influence the treatment plan. Crown discolorations, fractured crowns,
fractured roots, root displacements, and external resorption are the normal
challenges. These problems and their endodontic implications will be discussed individually.
Crown Discolorations
The etiology of tooth discoloration can be congenital, chemical, metabolic, or
traumatic. A tooth can absorb a blow without causing a crown or root fracture,
yet the force may be sufficient enough to rupture the blood vessels of the
pulp. The released blood enters the dentinal tubules, and a reddening of the
crown may occur (see Figure 19-2). Treatment of this condition is
immediate pulp extirpation followed by complete root canal therapy and
bleaching. The sooner that treatment is initiated, the better the prognosis of
the bleach. When the tooth is left untreated, the degeneration of the blood
cells within the tubules and the necrotic tissue of the chamber will soon cause
the crown of the tooth to turn a noticeable gray or black. Treatment is still
endodontics; however, bleaching may be more difficult, and color regression after
bleaching may occur within a shorter period of time. Often the pulp survives
the injury but, unfortunately, undergoes a dystrophic calcification. The
density of the tubular reparative dentin and its tendency to totally calcify
the coronal pulp chamber cause the tooth to darken to a brownish-yellow hue
(see Figure 19-7A). Owing to the obliteration of the
chamber and the canal, endodontic treatment of brown-yellow discolored teeth
becomes extremely difficult, and bleaching is highly unpredictable.
Crown Fractures
In the fracture of a crown that does not involve the pulp, or a so-called
uncomplicated crown fracture, the pulp most often survives without further
complications (Figure 19-56). Apparently, when the crown
fractures, the force is dissipated and therefore is not transmitted to the root
or periodontal ligament. For this reason, the internal tissues remain unharmed.
When sufficient tooth structure exists to retain a crown or composite build-up,
the exposed dentin is covered with calcium hydroxide and bonded with composite
resin until a deferred vitality analysis can be determined at 2, 6, and 12
weeks after the trauma. A true pulpal diagnosis may be determined at this time,
and the final restoration may be safely considered.
If the remaining tooth structure is insufficient to adequately retain a
restoration, the need for endodontics should be considered. Although an
argument may exist to support the use of pin-retained restorations, the degree
of injury of pin placement and the risk of fracture predispose elective
endodontics and a full crown. The only exception would be a tooth with
incomplete root apex formation. Once the root canal therapy is completed, a
post and core can be fabricated to provide the ideal restorative condition.
However, when the pulp is exposed, endodontic intervention is indicated (Figure 19-57): either complete root canal
therapy when the root is fully formed or an apexification procedure in a tooth
with an open apex.2 Innovative solutions are required to provide for
the esthetic needs of these younger patients (Figures 19-58A
to C
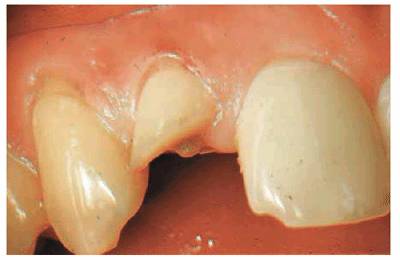
Figure 19-56: Crown fracture with no exposure; the pulp remained vital.
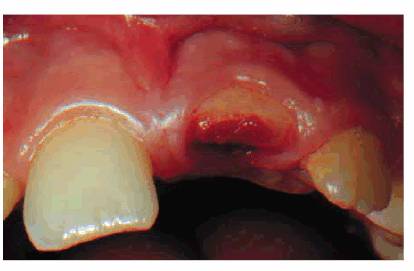
Figure 19-57: Crown fracture exposing the pulp. Root canal therapy was performed.
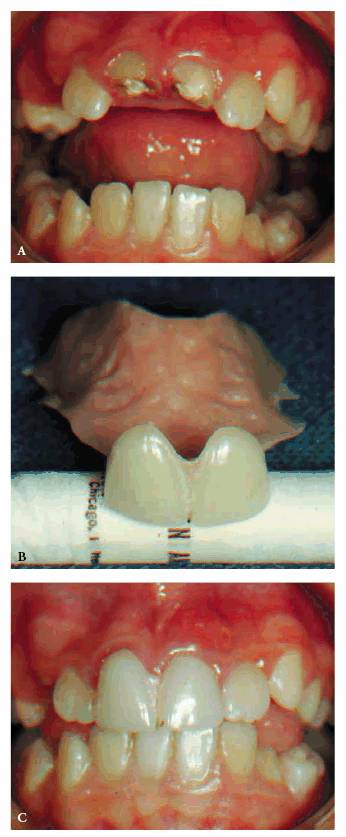
Figure 19-58A to C: Maxillary central incisor teeth: (A) crown fracture and pulp exposures requiring root pulpotomies because of immature apices, (B) a flipper was fabricated for this 9-year-old patient to satisfy the esthetic requirement, and (C) the removable denture in place.
Root Fractures
Horizontal fractures of the root present unique problems, and the degree of
difficulty is relative to the level of the break. It is very possible, and it
occurs in a significant number of cases, that separation of the hard structure
of a tooth can occur; however, the elasticity of soft tissue thwarts pulpal
separation. For this reason, no root canal treatment is indicated and should be
considered only when signs or symptoms indicate that an irreversible
inflammatory reaction has occurred. When situations arise that warrant
attention, the following alternatives are available.
For those fractures involving the apical third of the root, endodontics is
performed, if the pulp necroses, to the level of the break, and the separated
tip is monitored because most likely the pulpal tissue in it is healthy and
does not need any treatment. In the case of a periapical lesion around the apex
of the apical portion, surgical extraction is the only treatment possible (Figures 19-59A
and B). As
to its restorative implications, there is usually sufficient root length that
adequate post preparation can be accomplished without reaching the break level
and jeopardizing the seal.
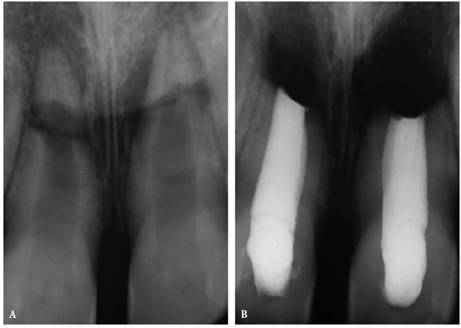
Figure 19-59A and B: Root fracture in the apical third. (A) Maxillary central incisors, horizontal root fractures with pulp necrosis. (B) Root canal therapy in the coronal segments. The apical portions of the roots were surgically removed.
Mid-root breaks create more challenging problems, the first of which is
mobility. Owing to the crown:root ratio being reduced to less than one to one,
stability is impaired, and a splint must be fabricated (Figures 19-60A
to C). These
teeth must be monitored periodically to check pulp vitality and periodontal
ligament damage. Many of these teeth maintain vital pulps and a healthy
periodontium and need no endodontic intervention (Figures 19-60D
and E).
However, if the pulp becomes necrotic, pulp extirpation is required. Endodontic
options are maintaining and filling the coronal segment to the break,
instrumenting both segments and uniting the segments with either gutta-percha
or the more solid Vitallium (Austenal, Chicago, IL) pin, and removing the
apical segment and inserting a Vitallium pin through the coronal segment and
extending it to the height of the vacant apical alveolus (Figures 19-61A
to C). Such
endosseous stabilizers are highly successful as long as there is no
communication between the pin and the oral cavity by way of the crown or the
periodontium. For this reason, the pin should be reduced to a coronal level
within the canal to allow the chamber to be sealed with a bonded resin filling.
This obviously presents a problem when a post and core is needed to provide an
adequate crown stump. Realizing that post length will be curtailed, the dentist
must consider splinted units in the final treatment plan or extraction.

Figure 19-60A to E: Mid-root fractures. (A) Mid-root fracture maxillary central incisor with minimal displacement. (B) Tooth splinted to adjacent teeth. (C) Six years postfracture, there is excellent root healing, and the pulp remained vital. The patient insisted on retaining the bonded bracket-arch bar palatal surface splint. (D) Mid-root fractures of maxillary central incisor teeth with severe displacement. (E) Five-year-check radiograph. The treatment consisted of reducing the fracture and splinting with orthodontic brackets and an arch bar for 16 weeks. Vital pulps are present.
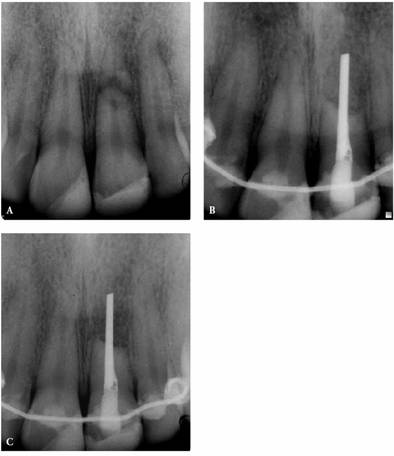
Figure 19-61A to C: (A) Mid-root fracture with pulp necrosis and sinus tract formation. (B) Treatment included pulp extirpation, Vitallium (Austenal) pin implant, bonded splint and bone graft, and guided tissue barrier. (C) Sixteen-month check-up shows deposition of bone in the graft area. Even though the tooth was firm, the patient insisted on retaining the splint.
Root
fractures that occur in the coronal third present by far the most difficult
situations. The crown:root ratio is adverse, mobility is critical, and the
prognosis is grave (Figures 19-62A
and B). The
coronal segment is too short to retain, and the options for the root segment
are extraction followed by a single tooth implant or bridge, vertical extrusion
(Figure 19-63), or embedding of the apical
segment. The loss of the root would ultimately lead to the loss of the alveolar
integrity and the reduction of the alveolar height. Unless ridge augmentation
is performed into the vacant alveolus, an unesthetic bridge is inevitable.
Endodontically treating the segment and further reducing the root coronally to
a level at least 2 mm above/below the crestal height will enable bone to form
across the coronal root surface. The embedded root will maintain the alveolar
shape, form, and height. A fixed partial denture can then be fabricated without
fear of alveolar shrinkage.
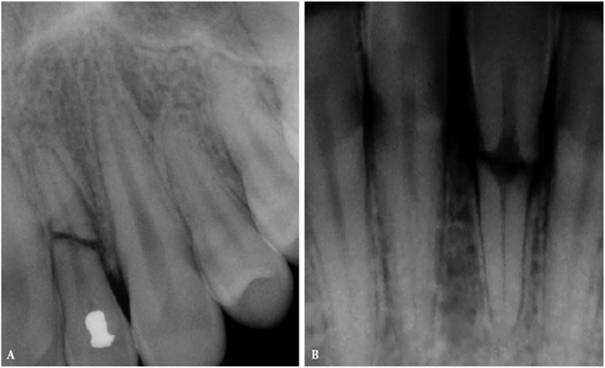
Figure 19-62A and B: Root fractures in coronal third of root requiring extraction: (A) maxillary lateral incisor and (B) mandibular lateral incisor.
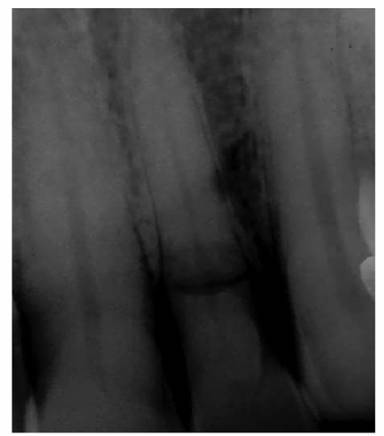
Figure 19-63: Maxillary lateral incisor with a root fracture in the coronal third. The root is long enough to consider a vertical extrusion.
Perhaps the
most favorable treatment would be extrusion of the root segment.11
Endodontics is performed on the submerged root, and a post space is prepared to
the normal depth. A stainless steel pin or post, prebent to form a hook that
will extend approximately 4 mm into the oral cavity, occlusion permitting, is
cemented in place. An arch wire is adapted to the labial surfaces of the two
adjacent teeth on either side of the injured tooth. The wire is contoured to
bend into the lingual space and create a 180-degree angle with the long axis of
the root segment. The labial surfaces of the adjacent teeth are acid etched,
and the wire is bonded in place. Ligature bands are wound around the wire and
the hook. Owing to the perpendicular angle forces, the root will extrude into
its predetermined position. Once the root segment is extruded to a level beyond
the crest, it is prepared and impressioned. The active force is eliminated, and
the root is held in a passive position for a period of 6 to 10 weeks. This
enables the resistant forces of the periodontal fibers to become stable and
minimize the possibility of root regression. Occasionally, postextrusion
periodontal probing will reveal the need for crown lengthening. Once the
dentist is confident of root stability, the final post core and crown can be
fabricated with certainty.
Displaced vertical root fractures offer little hope unless the angle of the
break terminates at a level that offers the options discussed for a horizontal
coronal fracture.
Luxation and Avulsion
The prognosis after severe luxation and avulsion injuries has dramatically
improved in the last few years because of a better understanding of how those
injuries should be treated. If a tooth is replaced into its original position
within a few hours after the injury, or in the case of avulsion replanted
within 30 to 60 minutes after proper storage and root canal therapy is
initiated 7 to 10 days later, the periodontal ligament will, in most cases,
heal without any significant problems.3 Luxated or avulsed teeth
that were not properly treated or that suffered a massive injury to the
periodontal ligament could present atypical problems created by subsequent
ankylosis and root resorption.
Ankylosis without excessive resorption is not a serious problem unless the
tooth fuses to bone in a location that creates an esthetic problem. Such is the
possibility when the tooth is replanted on a child before the maxilla has had
the opportunity to complete its growth. The maxilla continues to develop to
adulthood, at which time the injured tooth is superior and labial to the
adjacent uninjured incisors. When extracted, ridge augmentation and grafting
are required to close the labial mucosa and reconstruct an esthetic alveolar
ridge level. Currently, there is no treatment known to arrest ankylosis once it
has started. In most cases, root canal treatment will not have any effect on
the process because it is caused and maintained by the damage to the
periodontal ligament.
Inflammatory root resorption presents a somewhat different situation. The
endodontic objectives are centered on the arrest of the inflammatory processes
that were initiated by damage to the periodontal ligament, which are being
maintained by irritation from an infected root canal system and dentinal
tubules. Presently, treatment consists of periodic applications of calcium
hydroxide dressings within the cleansed canals. If successfully arrested, the
normal periodontal ligament will establish itself again over some period, and
the endodontic seal can be completed. When there is extensive damage that is so
bad that it has broken into the canal space from the root surface, additional
repair is attempted by surgically exposing the defect, preparing a Class I
cavity preparation, and filling the defect with a nondiscoloring material. The
choice of material depends on the location of the problem; however, a
resin-modified glass ionomer cement (Figures 19-64A to
E) (ie,
Geristore, DEN-MAT,
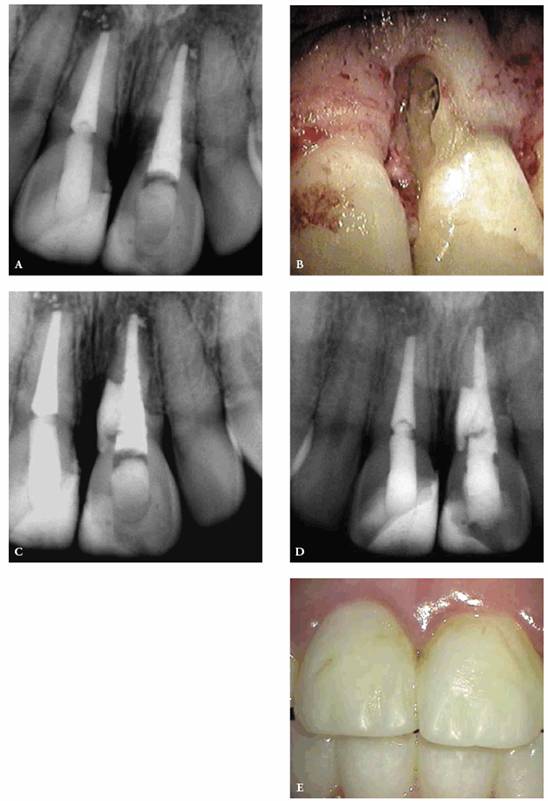
Figure 19-64A to E: Maxillary central incisor-surgical repair of resorptive defect following replantation. (A) Radiograph of a resorptive defect at cervical region following replantation, calcium hydroxide treatment, and root filling. Patient was 10 years old at this time. (B) Photograph showing the extent of the defect on the root. (C) Geristore (DEN-MAT) repair of the resorptive lacunae. (D) Check at 41/2 years discloses a return to the normal periradicular bone pattern. (E) Photograph of the resin-bonded repairs that will be replaced with laminates.
ENDODONTIC SURGERY
Although the technological advancements in endodontics have improved the rate
of success, the demands of the populace to save teeth present degrees of
difficulty that test the best of conventional therapy. In an effort to satisfy
these demands, we are often called on to overcome anatomic, dentistogenic, or
traumatic complications by intervening surgically. Sealing portals of exit
surgically, for example, post perforations (Figures 19-65A
and B), root
resorption lesions (see Figures 19-64A
to D), and
inadequate root fillings where nonsurgical treatment is not practical (Figures 19-66A
to C)
constitute an extension of endodontic therapy and are alternatives to
extraction.
Within the endodontic community, there is an emphasis on re-treating wherever
possible and feasible rather than resorting to surgery as the first treatment
option. The advent of sophisticated techniques, equipment, and materials allows
for the nonsurgical retreatment of teeth that were heretofore candidates for
extraction (Figures 19-67A
to C).
Since endodontic surgery requires incising and elevating the soft tissue from
bone, the obvious esthetic consequences can be recession and scarring. For
these reasons, the choice and location of the surgical flap must be carefully
evaluated before a scalpel ever touches tissue.5 There are several
major flap designs that could be used, depending on existing restorations and
anatomic factors.
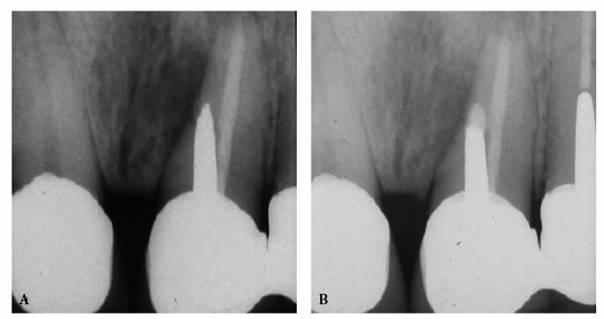
Figure 19-65A and B: Post perforation repair: (A) post perforation maxillary central incisor tooth and (B) 5 years after the surgical repair of the defect with IRM (DENTSPLY/Caulk).
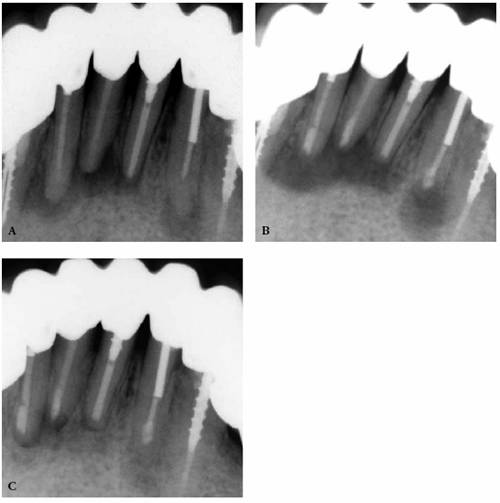
Figure 19-66A to C: Surgical re-treatment of mandibular anterior teeth: (A) preoperative radiograph, (B) mineral trioxide aggregate seals of the mandibular central and lateral incisors, and (C) 18-month check-up radiograph shows evidence of bone deposition.
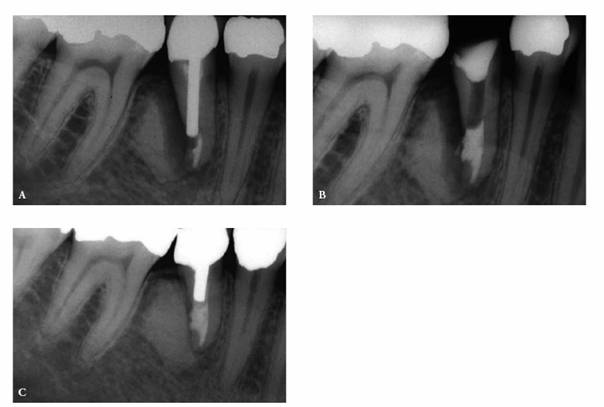
Figure 19-67A to C: Nonsurgical repair of a post perforation. (A) Preoperative radiograph of a mandibular premolar tooth. The position of the strip perforation on the distal surface obviates the possibility of surgical repair. (B) The crown, core build-up, and post were removed. The perforation was sealed with MTA. The tooth was restored with a cast post and a porcelain-fused-to-metal crown. (C) Six years later, the tooth is asymptomatic, and there is complete bone regeneration of the bone in the defect site.
TISSUE DISCOLORATION (TATTOO)
In the past, silver amalgam was the material of choice for retrofilling teeth
when nonsurgical therapy could not be accomplished. The same material was
indicated for the repair of perforations and resorptions. In a tissue
environment, this material is notorious for its discoloring effect. Once the
black tattoo occurs, corrective treatment requires removal of the cause,
excising the tattoo, and grafting tissue across the defect. Such treatment can
now be avoided by using either zinc oxide- and eugenol-based filling material
(Super EBA, H.J. Bosworth, Skokie, IL, or IRM, DENTSPLY/Caulk), composite
resin, glass ionomer cements (Geristore), or MTA because not only do they seal
better than amalgam, they also do not cause the staining that is associated
with the amalgam.
SUMMARY
Endodontic therapy may be the key to long-term maintenance of esthetic
restorations. It is essential that the patient is aware of this fact from the
outset. This way, there will be no misunderstanding about "fault" if
pain should arise. Thus, a well-informed patient will continue to be a trusting
patient who values these services throughout the life of the dental procedures.
REFERENCES
1. Abou-Rass M. The stressed pulp condition: an endodontic-restorative
diagnostic concept. J Prosthet
Dent 1982;48:264.
2. Andreasen JO, Andreasen FM. Essentials of traumatic injuries to teeth.
3. Andreasen JO, Borum MK, Jacobsen HL, Andreasen FM. Replantation of 400
avulsed permanent incisors. 4. Factors related to periodontal ligament healing.
Endodont Dent
Traumat 1995;11:76-89.
4. Arens DE, Chivian N. Endodontic contributions to esthetic dentistry.
5. Arens DE, Torabinejad M, Chivian N, Rubinstein R. Practical lessons in
endodontic surgery. 3rd edn.
6. Barthel CR, Rosenkranz B, Lwuenberg A, Roulet JF. Pulp capping of carious
exposures: treatment outcome after 5 and 10 years: a retrospective study. J Endodont
2000;26:525-8.
7. Bohannan H, Abrams L. Intentional vital extirpation in periodontal
prosthesis. J Prosthet Dent 1961;11: 781-9.
8. Dummer PMH, Hicks R, Huws D. Clinical signs and symptoms in pulpal disease. Int Endod J 1980;13:
27-35.
9. Ford TR, Torabinejad M, Abedi HR, et al. Using mineral trioxide aggregate as a
pulp-capping material. J Am Dent
Assoc 1996;127:1491-4.
10. Glockner K, Rumpler J, Ebeleseder K, Stadtler P. Intrapulpal temperature
during preparation with the er: YAG laser compared to the conventional bur: an
in vitro study. J Clin Laser
Med Surg 1998;16:153-7.
11. Heithersay GS. Combined endodontic-orthodontic treatment of transverse root
fractures in the region of the alveolar crest. Oral Surg 1973;3:404.
12. Hunter FA. Saving pulps. A queer process. Dent Item Int 1883;5:352.
13. Ingram TA, Peters DD. Evaluation of the effects of carbon dioxide used as a
pulpal test. Part 2: in vivo effect on canine enamel and pulpal tissues. J Endodont
1983;9:296-303.
14. Jimenez-Rubio A,
15. Lado EA, Stanley HR, Weissman MI. Cervical resorption in bleached teeth. Oral Surg
1983;55:78.
16. Langeland K. Prevention of pulpal damage. Dent Clin
North Am 1972;16:709-32.
17. Madison S,
18. Madison S, Walton R. Cervical root resorption following bleaching of
endodontically treated teeth. J Endodont
1990;16:570-4.
19. McMullen AF,
20. McMullen AF,
21. Michanowicz AE, Michanowicz JP. Endodontic access to the pulp chamber via
porcelain jacket crowns. Oral Surg 1962;15(Suppl 2):S1483-8.
22. Pameijer CH, Stanley HR. The disastrous effects of the "total
etch" technique in vital pulp capping in primates. Am J Dent
1998;11:S45-54.
23. Peters D, Lorton L, Mader C, et al. Evaluation of the effects of carbon
dioxide used as a pulpal test. Part I: in vitro effect of human enamel. J Endodont
1983;9: 219-27.
24. Ray HA, Trope M. Periapical status of endodontically treated teeth in
relation to the technical quality of the root filling and the coronal
restoration. Int Endo J
1995;28:12-8.
25. Rivera EM, Vargas M, Ricks-Williamson L. Considerations for the aesthetic
restoration of endodontically treated teeth following intracoronal bleaching. Pract Periodont Aesthet Dent 1997;9:117-28.
26. Spasser HF. A simple bleaching technique using sodium perborate. N Y State
Dent J 1961;27:332-4.
27. Stanley HR. Human
pulp response to restorative dental procedures.
28. Stanley HR, Swerdlow H. Reaction of the human pulp to cavity preparation:
results produced by eight different operative techniques. J Am Dent Assoc 1959;
58:49.
29. Stokes AN, Tidmarsh BG. A comparison of diamond and tungsten carbide burs
for preparing endodontic access cavities through crowns. J Endodont 1988;
14:11.
30. Teplitsky PE, Sutherland JK. Endodontic access of Cerestore crowns. J
Endodont 1985;11:12.
31. Torabinejad M, Chivian N. Clinical applications of mineral trioxide
aggregate. J Endodont 1999;25:3.
32. Trope M, Chivian N, Sigurdsson A. Trauma. In: Pathways of the pulp. 8th edn. St. Louis: Mosby, 2001: 603-49.

Politica de confidentialitate |