 |
|
||||||||||||||
|
|
||||||||||||||
ESTHETIC PROBLEMS OF MALOCCLUSION
CHAPTER 23. RESTORATIVE TREATMENT OF
DIASTEMA - Mark D. Dlugokinski, DDS, Kevin B. Frazier, DMD, Ronald E.
Goldstein, DDS
INTRODUCTION
One of the most challenging tasks of modern restorative dentistry is resolving
the dilemma of spaces between anterior teeth. The presence of a diastema can be
a problem because the esthetic value of anterior spacing varies between
cultures, and the best treatment options are often rejected. To some, an
anterior diastema is desirable, whereas others attempt to hide it with habits
such as lip or tongue posturing.6 Some patients have even resorted
to daily applications of wax or cotton to disguise a diastema (Figures 23-1A
and B).
Treatment planning to correct a diastema may include orthodontics, restorative
dentistry, or a combination of several therapies. Like most esthetic problems,
the treatment of a diastema requires careful analysis and occasional
consultation with specialists. Diagnostic casts, radiographs, and photographs
or digital imaging are necessary to thoroughly evaluate a diastema. Anterior
spaces should not be closed without first recognizing and treating the
underlying cause(s).4
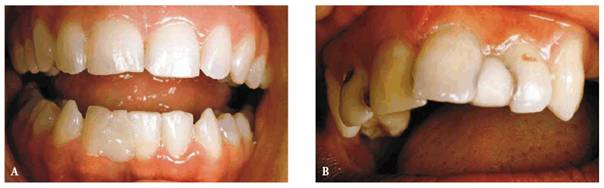
Figure 23-1A and B: Some patients resort to daily applications of materials such as wax (#25) or cotton (#10) to disguise a diastema.
ETIOLOGY OF DIASTEMA
The etiology of diastema may be attributed to hereditary and developmental
factors (Table 23-1).10,18 Although
hereditary determinants play a major role in causing diastemas, there is
nothing that can be done to prevent them. Most of the other causes of diastema
formation are preventable.

Maxillary lateral incisors are the most frequent congenitally missing permanent
teeth, along with mandibular second premolars and the third molars. A missing
tooth creates an obvious space problem in the immediate area and may lead to
undesirable spacing in adjacent regions as the position of several teeth in a
quadrant can be affected by the absence of one tooth. Small teeth and large
jaws can lead to generalized spacing, whereas unerupted supernumerary teeth can
create a diastema by their position between the roots of other teeth.28
Anatomic factors such as those seen in atypical frenum positions may also
contribute to diastema formation.14 The presence of the frenum
muscle fibers on the alveolar ridge influences the direction of tooth eruption
and maintains separation of the adjacent teeth after eruption (Figures 23-2A
and B 23-2C to E 23-2F 23-2G 23-2H 23-2I and J, and 23-2K). Although teeth can be moved
together orthodontically in the presence of a frenum, once the active appliance
is removed, the teeth tend to separate, reforming the diastema unless permanent
retention is provided. An adequate border of attached gingiva is essential to
successful orthodontic movement. Surgical removal or repositioning of the
undesirable frenum attachment (and the creation of a stable area of attached
gingiva in its place) prior to orthodontic repositioning reduces frenum-related
diastema relapse.7,16
COMBINED THERAPY FOR FRENUM INVOLVEMENT
PROBLEM: A 23-year-old female presented with a large maxillary and a
relatively small mandibular diastema (see Figures 23-2A
and B, and 23-2K). The frenum protruded, and the
left central incisor was rotated and in labioversion. Because the patient's
profession was in fashion modeling, her chief complaint was that the presence
of a space between her teeth was a liability to her.
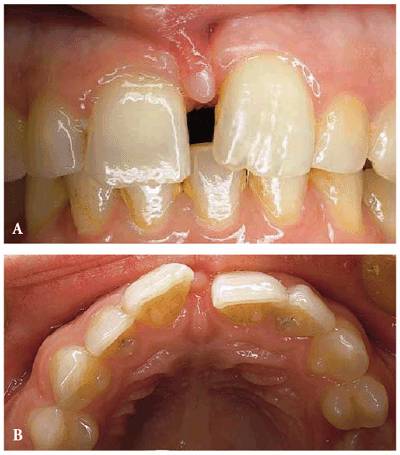
Figure 23-2A and B: This 23-year-old model was dissatisfied not only with the space between her teeth but also with the presence and form of the labial frenum.
TREATMENT: A frenectomy was performed (see Figures 23-2C to
E). After
healing, maxillary and mandibular Hawley retainers were designed for the
patient (see Figure 23-2F). Note how a plastic coating that
conceals the labial wires permitted the patient to wear the appliance while
working. Therefore, she gained the advantage of wearing it more often. Figure 23-2F shows a maxillary appliance in
position and the amount of space needed to close the diastema. Figure 23-2G illustrates the result of wearing
the appliance for 18 hours per day for approximately 4 months. At this point,
the central incisors were mechanically bonded with composite resin to mask the
remaining interdental tissue space (see Figure 23-2H Figures 23-2I
and J show
how facial, mesial, and lingual surfaces were bonded to close the remaining
interdental spaces.

Figure 23-2C to E: The labial frenum was surgically removed so that after her teeth were repositioned there would be no muscle interference.
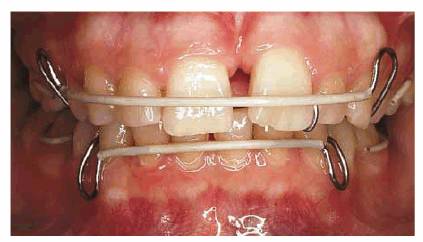
Figure 23-2F: After the tissue healed, removable Hawley appliances were placed. Note the tooth-colored Teflon tubing applied to the wire to mask the metal color.
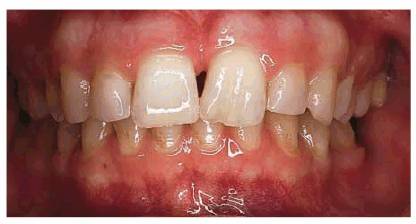
Figure 23-2G: After approximately 4 months of wearing the appliance 18 hours per day, the teeth were together.

Figure 23-2H: Composite resin bonding was chosen to close the interdental space between the central incisors.
Figure 23-2I and J: Composite resin bonding is the most conservative method to close an interdental space. (I) Before the restoration. (J) After the restoration outlining the surfaces involved with the restoration.
It is sometimes possible to retain the interdental tissue if it is considered
to be attractive. In this particular case, the protruding frenum looked like a
small cyst, which the patient disliked, and was subsequently removed.
RESULT: Approximately 4 months of treatment were necessary to completely
close and transform the patient's unattractive smile into an attractive one
(see Figures 23-2K
and L). The
appliance was designed to be as unobtrusive as possible. Because of the
patient's motivation and ability to tolerate the appliance, the movement was
accomplished in less time than expected. Twenty-five years later, the patient
wanted to update her smile. Following bleaching treatments, two porcelain
laminates were fabricated for the central incisors (Figure 23-2M

Figure 23-2K and L: A combination of minor orthodontic and restorative treatment helped to improve the smile in only 4 months.
Figure 23-2M: Twenty-five years later, the patient wanted to update her smile. Bleaching treatments and two porcelain laminates were fabricated for the two central incisors to update the patient's smile to her satisfaction.
Among the
most common developmental causes of diastemas are habits such as tong 10310i814k ue thrust.
Large tongues or abnormal swallowing patterns can cause tooth separation by
forcing the tongue into lingual embrasures (Figures 23-3A
and B). The
habitual probing action of the tongue wedges the teeth apart. Chronic lip
biting may also contribute to diastema formation due to the patient's habit of
sucking the mangled lip mucosa against the teeth. Periodontal trauma with
resultant spacing between the incisors can be caused by habits such as wedging
a fingernail, toothpick, or other foreign object between the teeth (see Chapter 20 Figures 20-18A 20-18B 20-18C, and 20-18D). Other developmental causes of
diastemas are obvious, such as the loss of a permanent tooth, or a more subtle
cause, such as periodontal disease.26 Tooth loss in the posterior
region has been associated with anterior diastema formation as a result of
posterior bite collapse.15 In this case, the loss of posterior
occlusal contacts alters the pattern of occlusal function, causing tooth
migration and a decreased vertical dimension. The indirect result of this
condition can be a flaring out of the maxillary incisors with space formation.
The pressure from inflammatory exudate in an acutely involved periodontal
pocket may facilitate localized tooth movement and the creation of a diastema.
Prevention of tooth loss and maintenance of gingival health can prevent
diastema formation that results from deterioration of the structure and
function of the oral cavity.
Figure 23-3A and B: This lady had a habit of forcing her tongue between both maxillary and mandibular anterior teeth, which caused her diastema to continue to enlarge.
DIAGNOSIS AND TREATMENT PLANNING
Although the presence of a diastema is self-evident, these spaces must not be
closed without first addressing the underlying cause(s). As previously
discussed, the etiology of diastema may be attributed to hereditary and
developmental factors. On identifying these factors, the dentist should include
the patient in the treatment planning process by presenting appropriate
treatment alternatives, prognoses, and fees.
Identifying the cause(s) of a diastema will usually indicate the appropriate
corrective treatment.19 For example, diastema due to periodontal
problems cannot be corrected predictably with restorations alone if alveolar
bone has been lost and the teeth are mobile. Splinting or some other method of
stabilization would have to be included in the treatment plan. When periodontal
disease is causing the teeth to drift and separate, the acute pathology must be
treated first. Final periodontal treatment can be postponed until after orthodontic
therapy. Following orthodontic and periodontal therapy, any needed restorative
treatment to achieve the final esthetic result may be performed.1
Although restorations are usually indicated to close multiple diastemas due to
small teeth, other therapies may be needed to achieve an optimal esthetic
result. Tooth repositioning may be necessary to even the spaces prior to
restorations. Periodontal surgery may be required to provide additional
clinical crown length to balance the increase in tooth width from restorations
as spaces are closed. Additional teeth not directly affected by a diastema may
need to be included in the restorative treatment plan to provide a proportional
smile. Anytime a patient is considering extensive restorative treatment, he or
she should first be given the opportunity to change the tooth color.
Prerestorative bleaching can improve the esthetic result of any type of
restorative therapy and should be considered when extensive dental treatment is
planned. Tooth-whitening procedures allow thinner or more translucent
restorations to be used when dark/ stained tooth structure does not have to be
masked. The preceding factors illustrate the importance of thorough diagnosis
and comprehensive treatment planning for all types of diastema cases.
As patient acceptance of ideal treatment is the ultimate objective for the
dentist in this phase, it is often necessary to allow the patient to visualize
and judge the end result.6 For simple diastema closures involving
restorations, the chairside application of tooth-colored wax or unbonded
composite resin to the patient's proximal tooth surfaces should provide a good
indication of the result. For complex cases that involve several teeth or
combination therapies (orthodontics and restorations), a diagnostic wax-up and
computer imaging may be required to enable the patient to appreciate the
anticipated result of extensive treatment (see Chapter 2, Esthetics in
Dentistry, Volume 1, 2nd Edition).17 When multiple disciplines
are involved, such as orthodontics, surgery, and restorative dentistry, a case
presentation conference (or teleconference) with all involved clinicians and
the patient may facilitate acceptance of complex treatment plans.
Pre- and postoperative photographs or digital images can provide many benefits.
Photographs of the results of treatment on other patients can be used to help
current patients envision the possibilities associated with their own treatment
and inspire confidence in the dentist's abilities. Photographs document the procedure
and can be used to improve the chances for reimbursement from insurance
carriers in certain cases. A duplicate set of pre- and post-treatment images
given to a patient following treatment helps to prevent "buyer's
remorse" and allows him or her to serve as a marketing advocate for the
office when the dramatic before and after photos are displayed to family and
friends. However, it is sound practice to use computer imaging of both close-up
and full-face before and after images for best patient and doctor
visualization.
TREATMENT TO CORRECT DIASTEMA
Orthodontic Repositioning
The traditional treatment modalities for diastema correction have included
operative, surgical, periodontal, orthodontic, and/or prosthodontic procedures.
In many cases of diastema, the treatment of choice is orthodontics (see Chapter 25). Too often, dentists compromise
treatment with unnecessary restorations. This decision may result in sound
tooth structure being sacrificed to correct a cosmetic problem, and, if so, it
is an esthetic compromise in its truest sense. When a patient chooses to
eliminate a diastema, the dentist is responsible for impressing on the patient
the importance of choosing the best possible cosmetic treatment, namely, the
one that best maintains the integrity of the oral cavity. An esthetic problem
should be treated like any other dental condition. Just as the dentist is
responsible for letting a patient know the best possible treatment to save a
tooth, the clinician is obligated to inform the patient with an esthetic
problem of the optimal method(s) of treatment.
When a diastema is best treated by orthodontics, the dentist should educate and
motivate the patient to consider that type of therapy. No restorative material
is equal to healthy tooth structure, and regardless of the time taken, skill
employed, or material used, a restoration cannot duplicate the beauty of the
natural dentition. In other words, the health and preservation of the natural
dentition should always be foremost in our minds. Furthermore, there is a
considerable monetary savings to the patient who chooses orthodontics over
restorative dentistry due to the periodic repairs and/or remaking of the
restoring dentition.
Localized spacing of the permanent teeth due to malalignment or resulting from
an isolated habit is probably the optimal indication for treatment of a
diastema with orthodontic repositioning. Any space-producing habit must be
eliminated as part of the treatment, and it is essential that the patient
understands that breaking the habit is ultimately his or her responsibility.
The dentist's role in this situation is to identify the habit, educate the
patient, and provide any habit-breaking appliances or techniques. Orthodontic
treatment to close a diastema can be accomplished with the appropriate fixed or
removable appliances followed by at least 6 months of stabilization with a fixed
retainer. Permanent splinting is often necessary to prevent relapse when
orthodontic treatment is the only therapy used to close spaces.25
A compromise can sometimes be found for the patient by electing to use a night
guard that fits well. Even after postorthodontic stabilization, some space can
continuously recur. The solution can be permanent splinting and tight-fitting
fixed restorations. This works well if a patient resists using threaded floss,
which is necessary for splinted teeth.
COMBINATION TECHNIQUE FOR CLOSURE OF A
DIASTEMA
PROBLEM: This 39-year-old individual presented with diastemas between
the maxillary central incisors and congenitally malformed lateral incisors. He
had a marked overbite and fracture of a mandibular central incisor (Figure 23-4A
Figure 23-4A: This 39-year-old man was unhappy with his diastema, deformed laterals, and mandibular fractured incisor.
TREATMENT: A removable maxillary appliance with finger springs was
constructed to orthodontically reposition the central incisors together (Figure 23-4B). A mandibular lingual appliance
was also used to upright the molars to regain lost vertical dimension and
realign the crowded mandibular anterior teeth. After completion of orthodontic
treatment, the maxillary central incisors were splinted together with composite
resin to prevent future drifting and reformation of the diastema (Figures 23-4C
and D). The
adjacent maxillary lateral incisors were crowned to assist the stabilization of
the central incisors and restore symmetry to the maxillary arch, eliminating
their "peg-lateral" shape (Figure 23-4E). In addition, the mandibular left
central incisor was crowned. The final smile achieved improved esthetics,
health, and function (Figure 23-4F
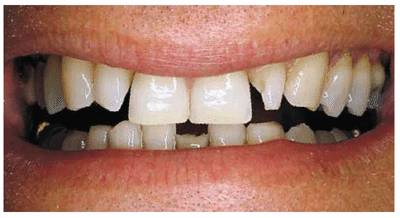
Figure 23-4B: A removable maxillary appliance with finger springs was used to bring the central incisors together.
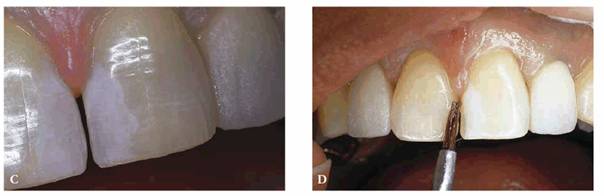
Figure 23-4C and D: The maxillary central incisors were bonded together with composite resin to help retain them in their new position.
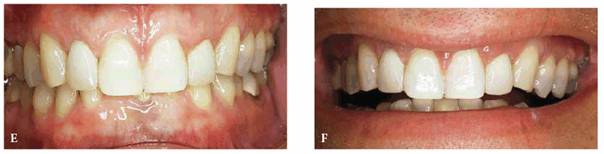
Figure 23-4E and F: The adjacent maxillary lateral incisors were crowned to help hold the central incisors in place and restore symmetry to the maxillary arch. The mandibular left central incisor also was crowned to complete the esthetic result.
RESULT: The success of this case is based
on a close working relationship with the orthodontist to accomplish necessary
repositioning before restorative procedures are begun. The final esthetic
result could not have been achieved by crowning the four incisors alone. If
orthodontics had not been employed, either the central or lateral incisors
would have necessarily been overcontoured; in addition, the overbite would not
have been corrected to any appreciable extent.
After orthodontic repositioning, it is sometimes necessary to splint teeth
together to compensate for the resilient forces of the gingiva. Unless it is
absolutely necessary, the central incisors should not be splinted together so
the patient may readily maintain good oral hygiene with dental floss. An
alternative to splinting central incisors together would be to bring the spaced
central incisors together using either orthodontic wire or elastic ligature and
then enlarge the mesial aspect of the adjacent lateral incisors with composite
resin bonding. This technique is illustrated in the following case.
CLOSURE BY BONDING ADJACENT TEETH
PROBLEM: This 23-year-old man stated as his chief complaint that the
space between his two front teeth had come back after they were restored
several years ago with full porcelain crowns to correct the diastema (Figure 23-5A). It was believed that the teeth
had drifted apart because of an existing periodontal condition that was further
complicated by an occlusal problem.
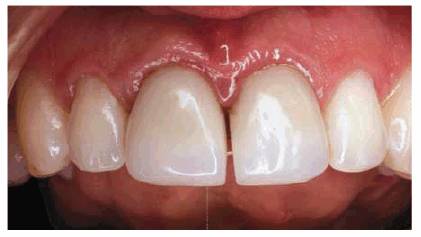
Figure 23-5A: This 23-year-old man presented with a new diastema formation between his previously crowned central incisors. The space had opened because of a periodontal condition complicated by traumatic occlusion.
TREATMENT: The mandibular incisors were adjusted to eliminate anterior
interference and traumatic occlusion, followed by initiation of periodontal
therapy. On completion of conservative periodontal therapy, an elastic ligature
was placed around the maxillary central incisors to close the diastema. After
wearing the elastic for several days, the patient returned with the space
closed (Figure 23-5B
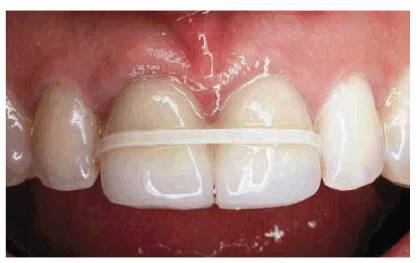
Figure 23-5B: After conservative periodontal therapy and occlusal equilibration, a rubber elastic was placed on the central incisors to close the diastema.
To prevent future drifting of the central incisors and reformation of the
diastema, the newly created space between the central and lateral incisors must
be treated. Artus's shim-type articulating ribbon (
The addition of a single increment of composite resin is next adapted to the lateral incisor to close the diastema. This material is then polymerized (Figure 23-5D) labially and lingually. Lastly, the patient is instructed in the use of thin dental floss to properly cleanse the interdental spaces.
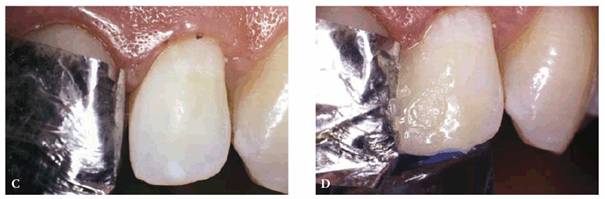
Figure 23-5C and D: The adjacent lateral incisors were tightly bonded using Artus shim stock (5/10,000th inch thick) to achieve the tightest closure possible.
RESULT: Figure 23-5E shows the closed diastema,
sufficiently stabilized by the lateral incisors. Regardless of whether the
lateral incisors were crowned, laminated, or bonded, it is essential that the
contact area be broad so that the central incisors are held firmly in place.
During closure, it is recommended to stabilize the central incisors with
digital pressure while the composite resin is being applied and until it is
polymerized.
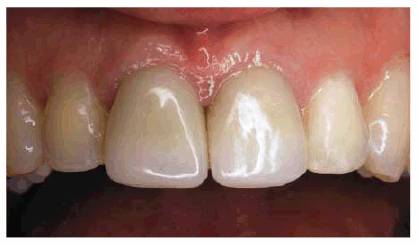
Figure 23-5E: After 24 months, the teeth continue to be held in position by the tightly bonded lateral incisors.
Localized spacing due to missing teeth may require a combination of orthodontic
and restorative treatment. Minor tooth movement to correct uneven, mesial
distal drifting of spaced teeth can improve the esthetic result of corrective
restorations by creating symmetric interdental spaces for individual
restorations or through the formation of normal-sized edentulous spaces for a
prosthetic replacement. Composite resin bonding can be used to do the final
esthetic correction of remaining interdental spaces (Figures 23-6A, and 23-6B

Figure 23-6A: This 29-year-old man had lost a mandibular tooth and the remaining teeth had shifted, exposing unattractive spaces when he talked or smiled.
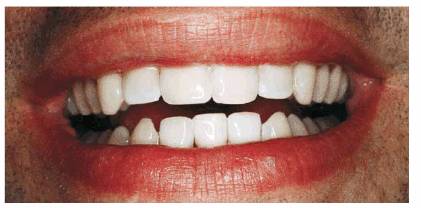
Figure 23-6B: After a one-appointment procedure with composite resin bonding and cosmetic contouring of both maxillary and mandibular incisors, the smile greatly improved. Note how
much better the three remaining mandibular incisors appear when they are in balance with the rest of the mouth.
Orthognathic Surgery
Tooth repositioning cannot adequately eliminate generalized spacing of the
anterior teeth resulting from tooth/jaw size discrepancies, skeletal
malocclusions, or the single abnormally wide diastema. Restorative dentistry is
often the best therapeutic option for correcting generalized spacing due to
small teeth as they can be made artificially larger, thus filling the gaps (Figures 23-7A 23-7B 23-7C and D). Orthognathic surgery or an
implant can treat the single, wide diastema that cannot be eliminated with
restorations or a conventional prosthesis.2,11,23,24 Diastema
closure via surgical contracture of the arch can provide a stable and esthetic
result if the patient is willing to assume the risks that are inherent with any
surgical procedure and make the necessary financial commitment. However,
restorative dentistry will sometimes be necessary to close any remaining
diastemas following surgery.
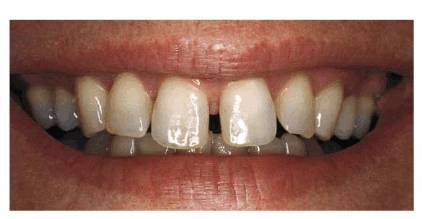
Figure 23-7A: This 24-year-old actress felt that she was being typecast because of her small and spaced anterior teeth.
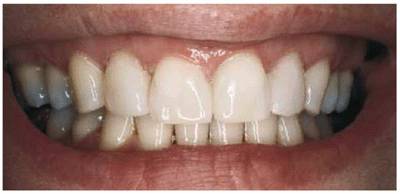
Figure 23-7B: Because the central and lateral incisors were too narrow for the patient's face, the teeth were bonded with composite resin to provide a more proportionate smile.

Figure 23-7C and D: (C) Illustrates the proper form in which the composite resin must be contoured to mask the interdental space while still allowing easy cleaning with dental floss. (D) Illustrates the improper form.
IMMEDIATE TEMPORARY CLOSURE OF A
POSTERIOR DIASTEMA
PROBLEM: A 26-year-old female had undergone orthognathic surgery for her
Class III protrusive malocclusion, which left a small diastema between the
mandibular right cuspid and first bicuspid. The patient was very self-conscious
of this space and adamantly declined other needed dental treatment until the
space was closed (Figures 23-8A to
C

Figure 23-8A to C: This 26-year-old female was unhappy with the large diastema between the mandibular right cuspid and bicuspid following orthognathic surgery.
TREATMENT: Because a lack of sufficient space prevented the construction
of a two- or three-unit fixed partial denture that would look symmetric and
attractive, an alternative treatment was needed. The option of a second
orthodontic treatment was deemed impractical as surgical orthodontics had
already been employed as long-term treatment. The composite resin technique was
chosen as both an immediate and economic solution. As previously stated in this
chapter, if the diastema is large, both teeth must be treated. In this case,
the distal surface of the cuspid and the mesial surface of the first bicuspid
were etched and restored with composite resin to close the diastema (Figures 23-8D 23-8E and F
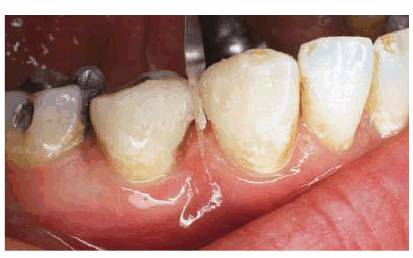
Figure 23-8D: Composite resin bonding was done on the adjacent proximating surfaces and separated by a Mylar strip.
Figure 23-8E and F: The closure immediately after bonding.
Because esthetics was the patient's chief concern, it was not imperative to
completely close the space or obtain tight contact between these teeth. The
patient was told that she would have to use dental floss to adequately clean
the space. As each tooth was minimally bonded, neither appeared from a distance
to be overly contoured or too large (see Figures 23-8E
and F).
RESULT: The final result can be seen in Figures 23-8E
and F. It is
important to inform the patient that no dental restoration is truly
"permanent" and that composite resin closure of a diastema may
require refinishing, repair, or remake every few years as discoloration and
wear may occur. If longer life is achieved, the patient is satisfied (Figure 23-8G). It is hoped that, in time, the
profession of dentistry may find a more "permanent" material or
technique.
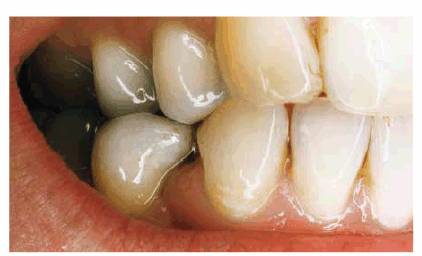
Figure 23-8G: The teeth remained acceptably closed after 5 years.
Esthetic Considerations for Restorative
Options
When restorations are indicated for diastema closure, several esthetic factors
must be considered. First and most obvious is the esthetic appearance of the
individual teeth. The optimal proportions for a natural-looking maxillary
incisor are an incisogingival length to mesiodistal width ratio of 1:0.6 (the
tooth width should be approximately 60% of the length). When these proportions
are violated, as often happens when large diastemas are closed with
restorations, the restored teeth look "wrong" because they are out of
proportion (see Chapter 9, Esthetics in Dentistry, Volume 1, 2nd
Edition). The methods available to compensate for the extra width include
lengthening the anatomic crown with a restoration, increasing the clinical
crown length with periodontal surgery, or using restorative optical illusions
to make a wide tooth appear narrow (see Chapter 8, Esthetics in Dentistry,
Volume 1, 2nd Edition).
DIASTEMA CAUSED BY TEETH TOO SMALL
PROBLEM: This 28-year-old male store manager was so self-conscious about
smiling that he adopted a more "serious" demeanor (Figure 23-9A) so that he would not have to
smile.
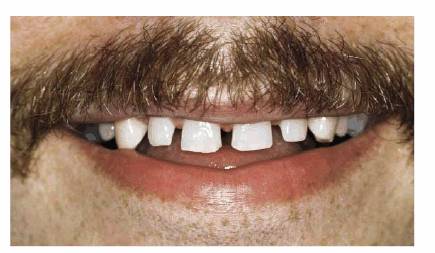
Figure 23-9A: This 28-year-old man presented with multiple diastemas and teeth too small for his facial structure.
TREATMENT: Esthetic analysis of the patient's smile, using a dental dial
caliper, revealed teeth that were too small to be proportionate. Thus, even if
orthodontics were chosen, the outcome would still result in a disproportionate
smile. Therefore, the patient chose composite resin bonding as both an economic
and immediate solution.
First, the shade selection was determined by testing different materials
directly on the teeth. Once this was completed, a rubber dam was applied to
maintain isolation during the procedures (Figure 23-9B). Next, the right central incisor
was bonded to the predetermined mesiodistal width, measured again, and reduced
slightly with a series of SoFlex discs (3M ESPE, St. Paul, MN) to exactly two
of the spaces to be filled in (Figure 23-9C). Then the right central incisor
was wrapped with a 5/10,000-inch thickness shim stock (Artus), held in place
with an alligator clip, and the left central incisor was restored (Figure 23-9D
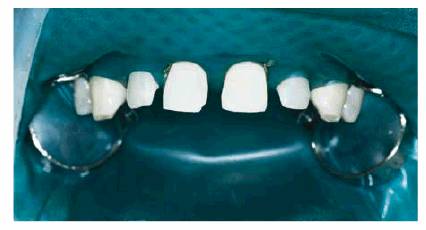
Figure 23-9B: A rubber dam was placed to maintain isolation during a multiple bonding procedure.
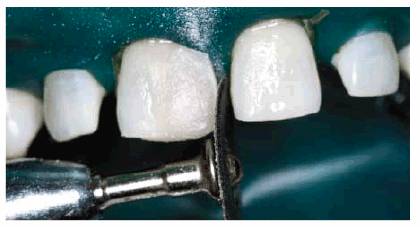
Figure 23-9C: The teeth were measured, sized, and proportionally bonded one by one.
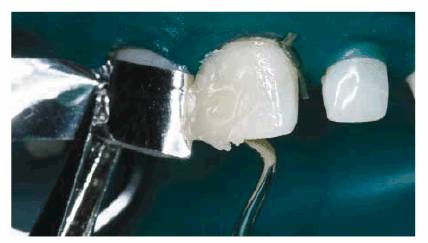
Figure 23-9D: After bonding the right central incisor, composite resin was placed on the left central incisor to close the space.
Finishing procedures included the ET (Brasseler,
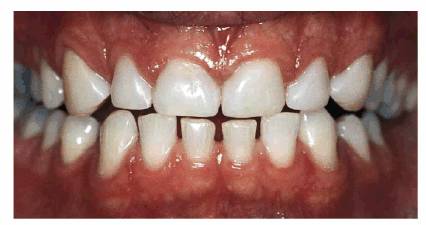
Figure 23-9E: The final results from bonding six anterior teeth.
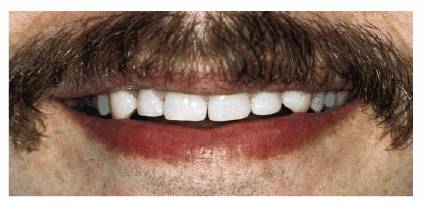
Figure 23-9F: One year later, the smile remained balanced and proportional for this patient.
RESULT: This balanced smile, shown 1 year
later (see Figure 23-9F), is the product of reproportioning
six teeth that were too small for the patient. Although orthodontics alone
could have been used to close the spaces, the end result would not be as
satisfying, both functionally and esthetically.
Lengthening the tooth by extending the incisal edge is the simplest method of
maintaining proportionality of the individual tooth. However, the patient's
occlusal scheme may not allow enough extra length to compensate for the added
width because of the potential to create protrusive interferences. A complete
examination and thorough analysis of the patient's occlusion would reveal this
complication prior to starting the treatment phase. Lengthening the clinical
crown by gingivectomy or an apically repositioned flap with osseous
recontouring will provide the needed length to offset the extra width without
creating potential occlusal interferences. Either of these options can enable
you to close diastemas with natural-looking, proportional restorations, although
the esthetic harmony of all of the anterior teeth must be considered as well.
The concept of the "golden proportion" as applied to a smile
indicates that the apparent width (which is visible from a straight view of the
patient from the midline) of each tooth on one side of the midline should be
approximately 63% of the width of the tooth mesial to it. In other words, if
the apparent width of the central incisor is assigned a value of 1, the
apparent width of the lateral should be 63% of the central incisor's value
(ratio of 1.6:1.0), and the visible portion of the facial surface of the canine
should be 63% of the lateral incisor's value (see Chapter 9, Esthetics in
Dentistry, Volume 1, 2nd Edition). Simply restoring two individual teeth in
a proportional fashion of length to width to close a diastema does not mean
that the final result will be esthetic if altering the golden proportion
disrupts the symmetry of the entire smile (see Chapter 9, Esthetics in
Dentistry, Volume 1, 2nd Edition).
There are esthetic considerations for periodontal surgery that are as important
as those for teeth. Ideally, the position of the midfacial portion of the free
gingival margin of the central incisors and the canines should be at the same
height, whereas the free gingival margin of the lateral incisors is slightly
coronal to the other two. Crown lengthening one tooth to achieve length to
width proportionality may result in a decreased esthetic result because of the
asymmetry of the gingival margins. Gingivectomies or apically positioned flap
procedures should usually be carried out over several teeth, including all of
the anterior teeth, to maintain esthetic harmony of the gingival contours.
Occasionally, a single tooth may exhibit an improper gingival contour due to delayed
passive eruption, and, in this case, a periodontal procedure for the individual
tooth would be appropriate.
A wide tooth can be made to appear smaller than it is by altering its contours
and using different color values in various parts of the tooth. The apparent
face of the tooth is that portion of the facial surface that is isolated by the
four facial line angles. The mesiofacial and distofacial line angles will
influence what the eye perceives as the width of the facial surface of a tooth.
A wide tooth can be made to look narrower by moving the mesio- and distofacial
line angles toward each other, and a narrow tooth will look wider if these line
angles are moved farther apart (see Chapter 8, Esthetics in Dentistry,
Volume 1, 2nd Edition). Two adjacent teeth with different actual widths can
look equally wide if the distance between the facial line angles is the same.
Proximal contours, facial surface features, and color values can enhance the
illusion provided by line angles as well. Wide and deep facial embrasures with
lingually positioned contact areas give the illusion of narrow teeth, whereas
constricted and shallow facial embrasures make teeth look wider. Horizontal or
vertical "lines" added to the facial surfaces of teeth can make the
tooth look artificially wider or longer as needed. Lighter color values on the
facial surface of a tooth and darker values on the proximal surfaces will
further contribute to the deception of tooth size. These illusions enable the
dentist to make several teeth of different actual sizes look proportional in
their widths by manipulating line angle location, proximal contours, surface
texture, and color value. They are valuable adjuncts to treatment when
compromises have to be made and ideal conditions are not available for closing
diastemas and maintaining tooth proportionality or smile symmetry.
Direct Composite Resin Bonding
Although orthodontic repositioning may offer the most noninvasive or
conservative method for diastema correction, this approach may be impractical,
unaffordable, or unacceptable to the patient and may not even result in
permanent closure of the diastema. In these situations, restorations are used
as a means of closing a diastema rather than orthodontics, or as splints
following tooth repositioning.8 The size and number of the
diastemas, functional and esthetic requirements of the patient, and
pretreatment condition of the affected teeth influence the choice of
restoration. The principles to be used in closing multiple spaces are
illustrated in Figures 23-10A 23-10B 23-10C 23-10D 23-10E and F
LARGE DIASTEMA CLOSED BY BONDING
PROBLEM: This 60-year-old airline travel agent presented with a large
diastema of the maxillary central incisors (see Figures 23-10A, and 23-10E). Advanced cervical erosion was
also evident on her maxillary anterior teeth, especially on her right side.
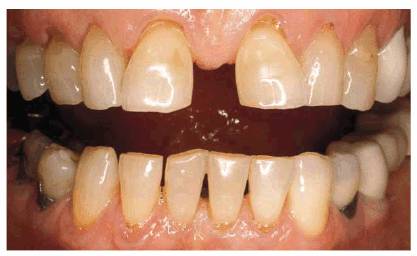
Figure 23-10A: This 60-year-old woman presented with a large diastema between her central incisors and cervical erosion on her maxillary anterior teeth.
TREATMENT: The teeth were slightly reproportioned by stripping and
disking the distal surfaces of the central and lateral incisors (see Figure 23-10B). The key to successful restorative
diastema closure is creating the illusion of a believable "natural"
tooth width in the central and lateral incisors. Figure 23-10C shows a narrower width of the
central incisors after the distal surfaces have been sufficiently reduced and
ready for full-veneer bonding to close the central incisor diastema and restore
the cervical defects. Final restoration is seen in Figure 23-10D
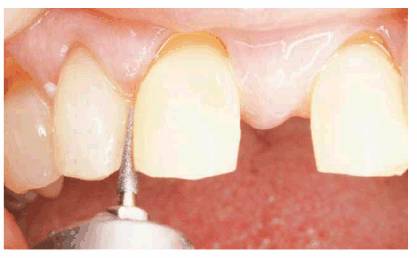
Figure 23-10B: Stripping and disking of the distal surfaces of the central and lateral incisors were done to slightly reproportion the teeth.
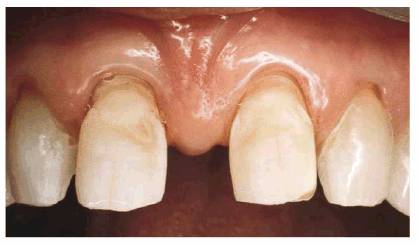
Figure 23-10C: The narrower width of the central incisors readies the diastema for closure.
Figure 23-10D: The final full-veneer bonding closed the diastema and restored the cervical defects.
RESULT: Figure 23-10F shows an entirely new smile with
better proportioned teeth rather than two oversized teeth. Note that the
cervical erosion on the maxillary right side has been simultaneously restored
with composite resin bonding. The mandibular anterior incisors were also
cosmetically contoured to give them a level plane of occlusion. Comparing the
before and after smiles (see Figures 23-10E
and F)
specifically illustrates how the patient's mid-upper lip naturally drops rather
low, forming a "cupid's bow." This lowered lip line tends to mask the
extra width of the central incisors, which also contributes to the illusion.
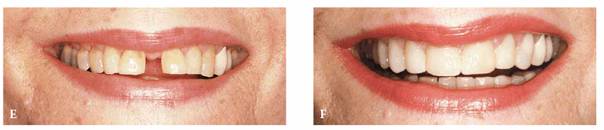
Figure 23-10E and F: Comparison of the before and after smiles shows an entirely new smile that is better proportioned by treating four anterior teeth. If only the two central incisors had been bonded, two oversized central incisors would have resulted.
A schematic drawing of how this case was restored can be seen in Figures 23-11A
and B.
"X" denotes the distal surface of the central and lateral incisors,
which were reduced to compensate for the addition of composite resin to the
mesial surface of the teeth. This reduction of the distal surface helps to keep
the mesially bonded aspects ("Y") of the central incisors in proper
proportion. Any subgingival bonded areas must be meticulously contoured and
finished so that the patient can maintain good dental hygiene and tissue health
with the use of dental floss (Figure 23-11C
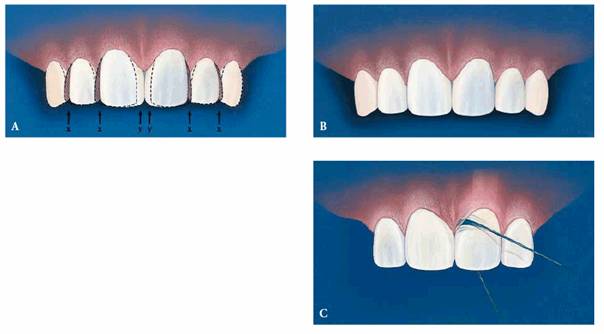
Figure 23-11A to C: (A) and (B) These drawings illustrate how the teeth of the patient in Figure 23-10 were restored to give a better proportioned smile (see text). (C) The shape of the bonding should be conducive to easy flossing.
The most practical restorative treatment to eliminate a
small diastema between sound teeth is by direct bonding with composite resin (Figures 23-12A and B, 23-12C, 23-12D, 23-12E, 23-12F, 23-12G and H). Direct composite resin bonding is fast (one
appointment) and reversible because mechanical tooth preparation is often
unnecessary.12 If an improved material or technique becomes
available, it is relatively easy to remove the existing bonded composite and
use the new method. Economics is an additional advantage for the use of direct
composite resin bonding as this technique is approximately one-third to one
half the cost of porcelain laminates or crowns. The ability to save time,
money, and tooth structure makes composite resin a popular choice with many
dentists and patients.
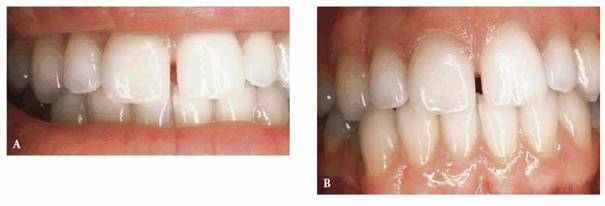
Figure 23-12A and B: The most practical method for closing a simple diastema is with composite resin bonding.
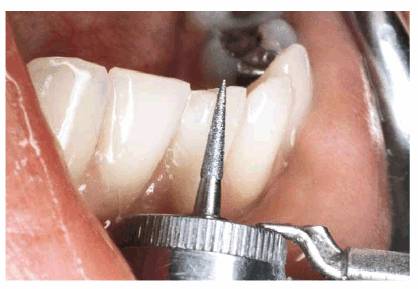
Figure 23-12C: Many times, it will be necessary to adjust the occlusion on the opposing arch to lessen the stress on the bonded incisors.
Figure 23-12D: This drawing illustrates that the composite resin will be bonded to labial, mesial, and lingual surfaces.
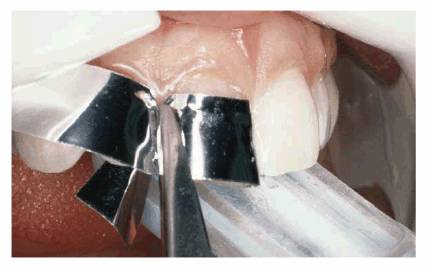
Figure 23-12E: It is important to measure the size of the space to be closed and bond each tooth separately using one half of the space for each tooth.
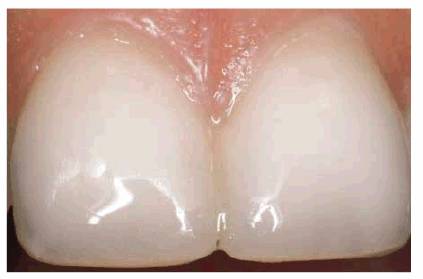
Figure 23-12F: The space is now closed. Note how invisible a self-contoured and polished margin can be.
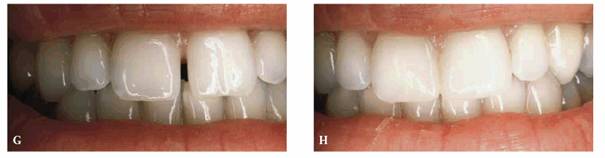
Figure 23-12G and H: The before and after comparison seems to confirm what this patient said: that even a small diastema can be distracting while observing the entire smile.
There are two design options possible with a composite resin restoration used
to close a diastema: full labial veneer or proximal addition with labiolingual
overlap. The decision to use a full-veneer technique rather than a proximal
addition to close a diastema with composite resin is influenced by several
factors:
1. Full labial veneering offers the advantage of concealing the restoration
margins interproximally or lingually. Hidden restoration margins are useful for
disguising slight shade mismatches with tooth structure and to hide any stain
accumulation that eventually occurs after initial placement.
2. A full-veneer restoration offers the advantage of increased retention, which
is essential when tooth lengthening is desired in addition to interproximal
space closure. Tooth lengthening is needed to maintain an esthetic proportion
of length to width for teeth when proximal additions are made to close spaces.
3. If only one diastema has to be closed, then three proximal surfaces (facial,
mesial, and distal) per tooth need to be bonded. When only three proximal
surfaces require composite resin, there is less indication for a complete
labial veneer. An increment of composite resin that covers one-third to two-thirds
of the labiolingual-proximal surface may be all that is necessary. This amount
of coverage provides enough retention and allows a sufficient amount of
material to be removed by polishing when future staining occurs.
4. Extremely translucent incisal edges on the teeth to be bonded may be a
contraindication to using a complete labial veneer of composite. In this
situation, confining the bonding material to the proximal surfaces will
maintain the translucency of the incisal edges. As an alternative, choose a
dark, medium, or light translucent shade of composite resin to blend in.13
In general, the choice of composite resin is influenced by the size of the
space being closed in addition to the functional and esthetic requirements of
the restoration.20 If the space is small (1.5 mm or less), a
microfilled composite material can be used alone to close the diastema. The
occlusion should be evaluated for any aggressive contacts. Ideally, the lower
incisors should have minimal occlusal function on the portion of the
restorative material used to close the diastema. A deep overbite or heavy
functional contacts may contribute to excessive wear or fracture of a
microfilled composite. In these situations or in the case of a larger diastema
(greater than 1.5 mm), a hybrid or microhybrid composite will offer greater
wear and fracture resistance. A microfilled material can be veneered on the
labial surface of a hybrid to provide a higher degree of luster and improved
esthetics (Figures 23-13A, 23-13B and C).
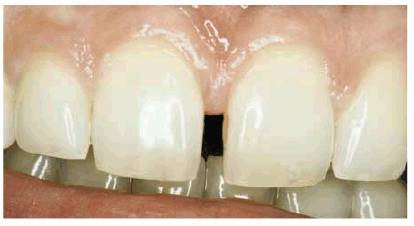
Figure 23-13A: When a diastema of this size is to be closed using composite resin bonding, a hybrid material should be chosen on the lingual surface for strength.
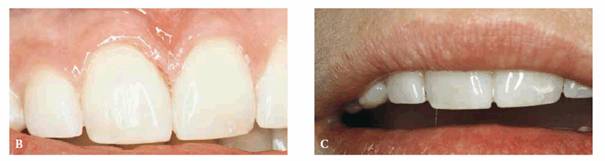
Figure 23-13B and C: To obtain a maximum "glaze" or polish to match existing enamel, a microfilled composite resin can be used on the labial surface. Note the glazed appearance of the labial microfilled polished composite resin.
Porcelain
Veneers
The choice of porcelain laminates for diastema closure offers superb esthetics
as the major indication for their use. Indirectly fabricated restorations are
easier to contour, finish, and polish when compared with restorations that are
created directly in the mouth. When several restorations will be required
(multiple diastemas), laboratory-fabricated restorations allow the dentist to
achieve perfection in proportioning multiple teeth (Figures 23-14A, 23-14B, 23-14C, 23-14D, 23-14E, 23-14F, 23-14G and H, 23-14I and J, and 23-14K). Porcelain has excellent optical properties and can
closely mimic enamel in appearance. Other advantages of porcelain veneers
include resistance to surface staining and therefore less maintenance and
increased wear resistance as compared with composite resin. Whereas composite
resin restorations do not usually involve mechanical tooth preparation,
porcelain laminates almost always require some enamel preparation and therefore
should not be considered a reversible procedure.
The normal proximal finish line employed for
porcelain veneers includes a chamfer labial to the interproximal contact when
there are no interdental spaces present. The finish line for a porcelain veneer
that is being used to close a diastema may approach a featheredge at the
linguoproximal line angle, although a chamfer provides more edge strength.21
The amount of extension toward the lingual surfaces can vary depending on the
needs of the individual case. When incisal coverage is not needed, the amount
of proximal extension toward the lingual can be minimal, approximately to the
middle third or the middle of the tooth. When incisal edges are to be
lengthened with veneers, or if translucency of the proximal segment of the
restoration is not desired, more proximal extension, approaching the
lingual-proximal line angle, is recommended. A lingually positioned proximal
finish line on the diastema side of the tooth avoids preparation undercuts with
the linguoincisal extension and also allows for a thicker interproximal increment
of porcelain to reduce translucency.
FOUR PORCELAIN LAMINATES TO CLOSE
DIASTEMAS
PROBLEM: This 21-year-old male model hesitated to smile because of his
diastemas (see Figures 23-14A, 23-14G, and 23-14I). The patient was also concerned about the appearance
of his inflamed gingiva adjacent to the left central incisor; subsequent
examination showed an overextension of composite bonding. A main requirement of
this patient was immediate esthetic treatment since he was leaving for Italy in
1 week. A second requirement was that no additional tooth be reduced, including
the opposing teeth.
Figure 23-14A: This 21-year-old male model performed both runway and photography modeling without smiling because he disliked the spaces in his teeth.
TREATMENT: To maximize longevity and esthetics, porcelain laminates were
chosen as the most conservative treatment. Figure 23-14B shows the previously bonded left central
incisor coated with dentin-disclosing solution to determine how much enamel was
left. The tooth is washed, leaving red dye to indicate dentin areas (see Figure 23-14C). Figure 23-14D shows the left central incisor laminate being bonded
into place. Figure 23-14E shows the occlusal view, indicating just how
much the left central incisor protruded before restoration. Four porcelain
laminates were used to create a symmetric arch with proper spacing (see Figure 23-14F). The improvement by the final result can be
seen by comparing the before and after smiles (see Figures 23-14G and H). Note how the increased tooth size is
well proportioned to the face (see Figure 23-14J). The conventional preparation for a porcelain
laminate veneer when there is no diastema usually extends one-third to midway
into the proximal surface (see Figure 23-14K). However, when closing diastemas, extend the
proximal margins as far to the lingual surface as possible (Figure 23-14L). In addition, extending the preparation to the
lingual surface allows for incorporating more translucent porcelain, which can
keep the teeth from appearing too wide.
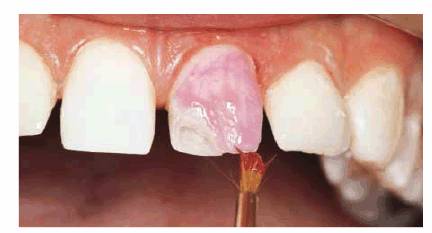
Figure 23-14B: Dentin disclosing solution is applied to determine how much enamel remained on this previously bonded left central incisor.
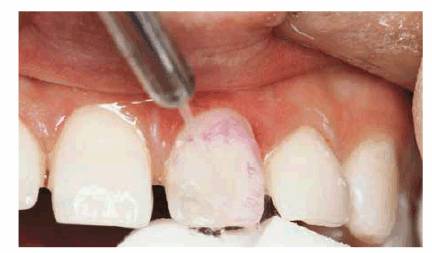
Figure 23-14C: Red dye indicates the areas of dentin.
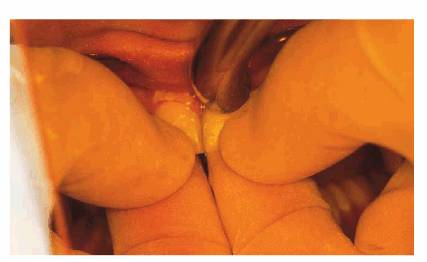
Figure 23-14D: A porcelain laminate is bonded to the left central incisor.
Figure 23-14E: This before occlusal view shows how much the left central incisor protruded prior to treatment.
Figure 23-14F: Only four porcelain laminate veneers were necessary to eliminate the dark spaces between his teeth. Also note that the protrusion was eliminated.
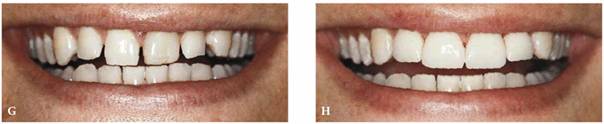
Figure 23-14G and H: Note the improvement in the smile by comparing the before and after pictures.
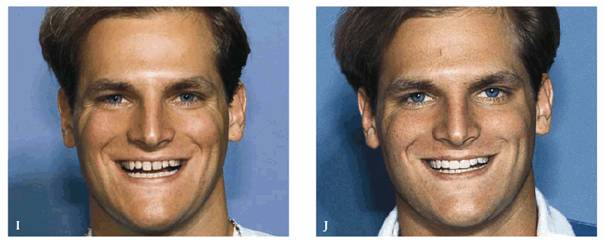
Figure 23-14I and J: These before and after pictures show how much better proportioned the larger teeth appear in full face. (Reproduced with permission from Goldstein RE. Change your smile. 3rd edn. Carol Stream, IL: Quintessence, 1997:122.)
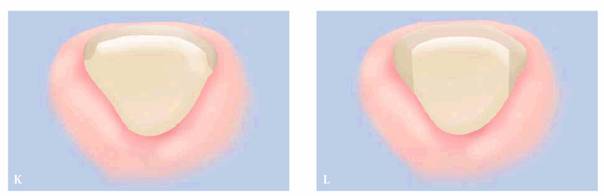
Figure 23-14K and L: (K) The conventional preparation for a porcelain laminate, when there is no space to close, usually extends one-third to midway into the proximating surface. (L) The revised preparation when increased opacity (or translucency) is desired; the proximal margins should be extended as far as possible to the lingual.
RESULT: Frequently, orthodontics is required to reposition teeth
together to avoid the overly contoured appearance of restored teeth. Although
this treatment could have been employed, the patient chose immediate esthetic
correction over lengthy orthodontic treatment.
Full-Coverage Crowns
Prior to the introduction of laminates, direct composite resin bonding and
full-coverage crowns were the only two restorative options available to treat a
diastema. Crowns are indicated when the affected teeth are broken down and
require additional support from a strong extracoronal restoration. Teeth that
do not have a sufficient amount of enamel for bonding procedures can provide
adequate retention when a full-coverage restoration design is used. When the
teeth to be restored are in a poor pretreatment position, crowns can be used in
place of orthodontics to "preposition" teeth without creating
overcontoured restorations, which result when more conservative restorations
are used.
When crowning, try to prepare as few teeth as possible that will still achieve
an esthetic result. Although conservative dentistry is a worthy goal in itself,
attempting to close a diastema by treating only one tooth will almost always
result in esthetic failure, as in Figures 23-15A, 23-15B, 23-15C and D.
PROBLEM IN CROWNING ONE TOOTH TO CLOSE
A CENTRAL DIASTEMA
PROBLEM: This 25-year-old actress and model presented with an oversized
maxillary central incisor that had been crowned to close a central diastema
(see Figure 23-15A). Note the extraordinary amount of space
occupied by the left central incisor.
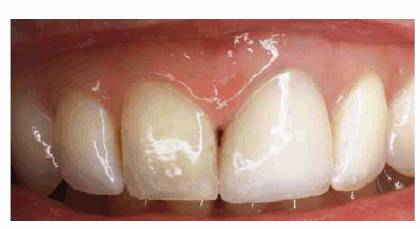
Figure 23-15A: This 25-year-old actress was unhappy with the result obtained with closing her wide diastema with a single central crown. Note the gingival inflammation caused by the overbuilt crown.
TREATMENT: The porcelain crown on the left central incisor was removed,
margins were redefined, and the right central incisor was prepared for a full
porcelain crown. However, if restored today, the right central incisor could
have been more conservatively treated with a porcelain laminate or composite
resin bonding. It was important, in this case, to construct temporary crowns
that would esthetically balance the space and provide the dentist and
technician with a guide for construction of the final restoration. It was felt
that two central incisors were adequate to restore the anterior space. Note the
tissue health around the temporary restorations, but stained acrylic, after 3
weeks of placement (see Figure 23-15B). Final restorations are shown in Figure 23-15C. Note that highlights, vertical lines, and
texture are emphasized to give the illusion of a tooth appearing longer and
narrower than it actually is. The effect can be appreciated by comparing before
and after photographs (see Figures 23-15A, and 23-15C). Note the horizontal highlights in the extra-wide
crown on the left central incisor (see Figure 23-15A) and the vertical emphasis on the new central
incisors (see Figure 23-15C). Figure 23-15D shows the lasting esthetic result 9 years
later.
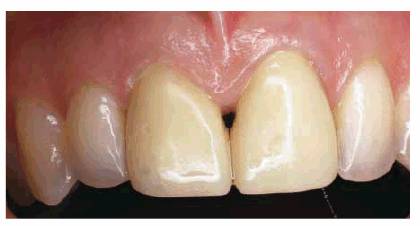
Figure 23-15B: Following conservative periodontal therapy, interim crowns were placed on both central incisors.
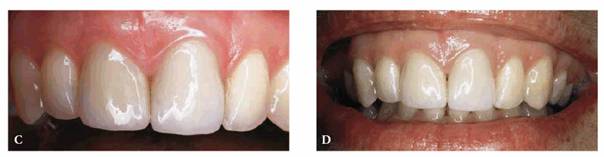
Figure 23-15C and D: Comparison of before and after treatment, which consisted of two all-ceramic crowns, shows a more esthetic result and acceptable tissue health. (C) Crown placement shows an esthetically pleasing result. (D) Nine years later, the esthetic result has been maintained.
RESULT: The original mistake made in this case was to try to close a
diastema between central incisors by altering only one. Unless both central
incisors share restoration of the diastema, or if the single central incisor is
not reduced on the distal to maintain an equal mesiodistal dimension with the
adjacent central incisor, the result will be poor. The most realistic result in
treating a diastema comes from a symmetric approach. This means bonding,
laminating, or crowning two, four, or even several teeth to balance the existing
space.
Normal-Sized Teeth
The previous cases discussed the occurrence of diastemas that are the result of
small teeth. However, it is generally accepted that if a diastema coincides
with normal-sized teeth, more teeth are used to close the space. This offers
greater potential for shade matching and symmetry in size and shape. If there
is a single diastema between the central incisors, and the teeth are in good
occlusion, two, four, or several teeth may require crowns, bonding, or
laminating, depending on the condition of the teeth.
SHAPING FOUR CROWNS TO CLOSE A DIASTEMA
PROBLEM: A 20-year-old female presented with diastemas between her
maxillary lateral and central incisors (Figure 23-16A). She had a poorly fitting crown on the
maxillary right central incisor as well.
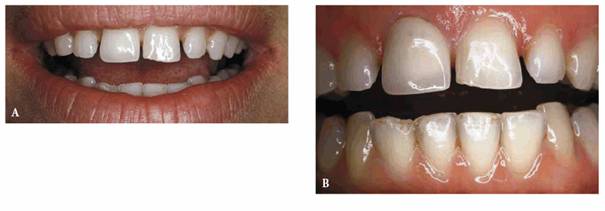
Figure 23-16A and B: This 20-year-old student was unhappy with the appearance of her smile. In addition to the multiple spaces, there was a labial flare to the teeth that made them look shorter than they actually were.
TREATMENT: In cases where diastemas are evenly distributed between the
central and lateral incisors (Figure 23-16B), the best solution is laminating or crowning
all four anterior teeth. If only the central incisors were laminated or
crowned, the result would be less than ideal due to the overly contoured
appearance of the centrals. Proportionally contoured and shaped crowns were
constructed for the incisors and seated in place (Figures 23-16C, and 23-16D).
Figure 23-16C: Crowning the four maxillary incisors enabled the spaces to be closed and created better proportion between the central and lateral incisors.
Figure 23-16D: This close-up view shows the improved interincisal distance achieved.
RESULT: As previously stated, orthodontics is the preferred treatment of
choice in closing diastemas involving normal-sized teeth. However, when
correction by restoration is chosen, it is best to use an even number of teeth
to close diastemas. Although the above case was successfully treated with four
porcelain-fused-to-metal crowns, porcelain laminate veneering would probably be
the treatment of choice today.
Principles in Shaping
In shaping crowns to close a space, several principles should be observed:4
1. Contacts should favor a lingual orientation. Figures 23-16E and F show the labial surface and how it is
contoured ("S") toward that of the lingual surface. By controlling
the reflection of light, the teeth can be made to appear thinner than they
actually are. The distal and mesial line angles of the labial surfaces should
be moved lingually and toward the midline of the tooth, leaving only a narrow
surface width ("X") of the actual labial surface flat enough to pick
up the light.5
2. Incisal embrasures should be more
pronounced. Figure 23-16G shows widening and elongation of the incisal
embrasures (ie, to help make the tooth appear narrower). The reshaping of the
distal incisal angle should usually begin at point X or at the distolabial
point of labial reduction.
3. Vary the interincisal distances (see Figure 23-16G). Note the favorable illusion that this
creates. The central incisors appear longer, enhancing the illusion of
narrowness.5
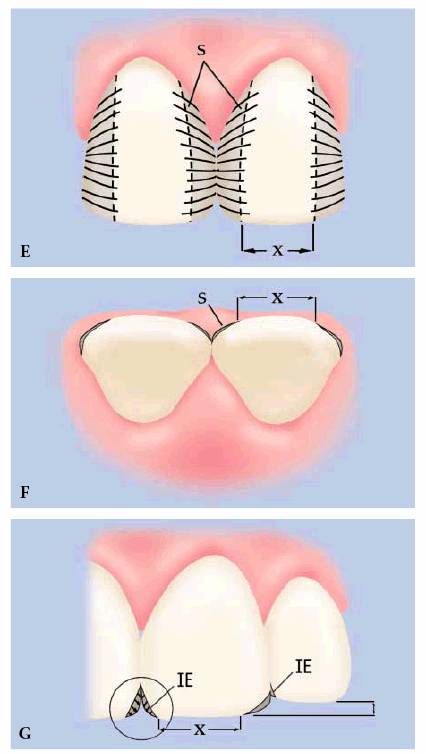
Figure 23-16E to G: These drawings illustrate the principles used in closing a diastema (see text). IE = incisal embrasures.
Shaping tips: when closing teeth with either bonding or crowning, the primary
objective is to create teeth that do not appear too wide:
1. Lengthen the central incisors slightly by decreasing the interincisal
distance.
2. Move facial line angles toward the midline, thus giving the illusion of
narrowness.
3. Consider crown lengthening if the patient has a high lip line.4
The two significant advantages of full-coverage crowns over other restorations
at the present include increased fracture resistance to the forces of
mastication (Figures 23-17A, and 23-17B) and the ability to achieve maximum esthetics because
the contours of the entire tooth can be easily controlled. When a restoration
is indicated for diastema closure, the most conservative type should always be
used as long as the result will provide a durable and esthetic result.
CROWNING
SIX TEETH TO CLOSE MULTIPLE DIASTEMAS
PROBLEM: This 43-year-old male presented with multiple diastemas between
the maxillary anterior teeth (see Figure 23-17A).
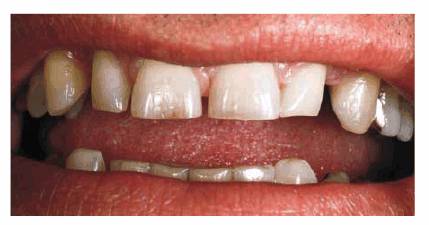
Figure 23-17A: This 43-year-old dentist was more concerned about the diastemas between his lateral incisors and cuspids than the space between the central incisors.
TREATMENT: Although porcelain laminates would be considered the
preferred treatment of choice today, the option of full crowns was chosen when
these teeth were restored. Therefore, six porcelain-fused-to-metal crowns were
constructed to close the anterior diastemas because the natural teeth were too
small for the space. Crowning with larger but proportionally sized teeth and
using principles of illusion (see Chapter 8, Figures 8-32A and B, Esthetics
in Dentistry, Volume 1, 2nd Edition) restored the man's appearance without
overly contouring any of the crowns. Because the patient had a somewhat rugged
look about him, anatomy was included in the restorations to give them
natural-looking shape and texture. Some wear was simulated on the incisors, and
a slight diastema was created between the central incisors to simulate the
arrangement of the original teeth. The patient had objected more to the large
spaces between the lateral incisors and cuspids than to the one between the
central incisors as when he smiled it looked as if he were missing his teeth.
The results can be seen in Figure 23-17B.
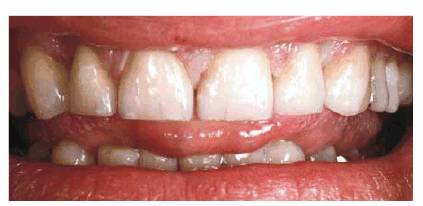
Figure 23-17B: Six aluminous porcelain crowns were placed to close the diastemas. However, the patient requested that a slight space be left between the central incisors to give him what he considered a more natural look.
RESULT: Sometimes,
it may take six crowns to close a diastema and create a symmetric result. There
are times when a patient will want to retain natural characteristics and even
duplicate a diastema on a smaller scale. If done well, this can effectively
reproduce the realism and naturalness of the original dentition. If this case
were to be restored using porcelain laminates, the esthetic principles
illustrated here would be the same.
The main consideration in closing a central diastema is shown in Figures 23-18A, 23-18B, 23-18C, and 23-18D. The central incisors are reduced more on the distal
proximal surface than on the mesial as the majority of the diastema will be
addressed by the mesial edges of the restored central incisors (indicated by
"X," see Figure 23-18C). The lateral incisors will then assume a more
mesial position. As much as possible, all of the teeth will have distally
rounded incisal edges to reduce the amount of incisal edge that shows. The
result is illustrated in Figure 23-18D. Note how directing the reflection of light
gives the illusion of narrow teeth. The highlights are approximately in the
center of the teeth (indicated by "X," see Figure 23-18D) rather than toward the distal surfaces
("Y").
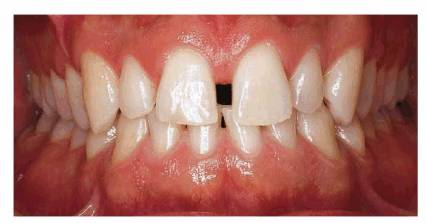
Figure 23-18A: This 27-year-old policeman wanted to close the space between his teeth without orthodontics.
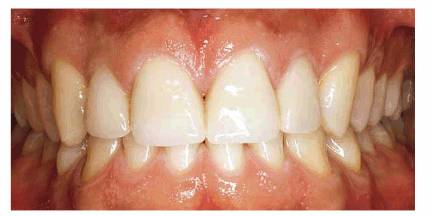
Figure 23-18B: Four full porcelain crowns were fabricated to proportionally close the space.

Figure 23-18C: This drawing illustrates the principle of reducing the tooth much more on the distal than the lingual surface, allowing more mesial placement of the lateral incisor crowns.
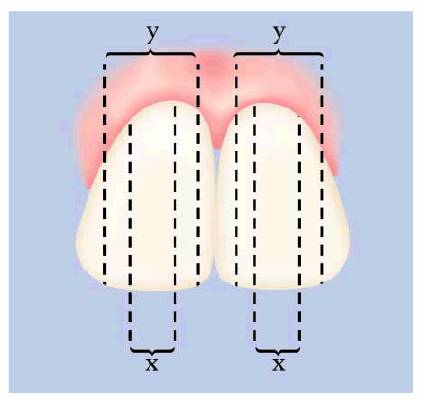
Figure 23-18D: When teeth are too wide, they should be contoured so that the labial surface does not appear too wide. Thus, the line angles should be more to the center of the tooth ("X" instead of "Y").
Prosthodontic Replacement
When a missing permanent tooth (eg, maxillary lateral) is the cause of a
diastema and the remaining teeth do not possess adequate mass to allow space
closure by orthodontics, restorations are indicated.27 The width of
the diastema will determine the type of restoration that should be used because
of the limitations imposed by tooth symmetry and esthetic proportioning of the
teeth. Small diastemas can be closed by individual restorations as long as the
proximal extensions do not violate the optimal range of length to width ratios
for the affected teeth. Large diastemas may be better restored by prosthetic
replacements to preserve the proportions and symmetry of the anterior portion
of the mouth. Prerestorative orthodontic treatment to equalize the space can
usually improve the esthetic result and provide more options for restorative
treatment. The options for prosthetic replacement of a missing anterior tooth
include conventional porcelain-fused-to-metal bridge, resin-bonded bridge,
fiber-reinforced resin bridge, and an implant-supported crown.3,9
Esthetics, function, condition of the adjacent teeth, and patient finances
influence the choices in this category.
Advanced Bone Loss
In instances where the patient has had posterior bite collapse and advanced
bone loss, the anterior teeth tend to become splayed, resulting in large
diastemas. Treatment of the resulting diastemas can consist of orthodontics
combined with prosthodontics, extraction and implant therapy, and/or full-mouth
rehabilitation. Such a case is illustrated in Figures 23-19A, 23-19B, 23-19C, 23-19D, 23-19E, 23-19F and G, and 23-19H and I using interim bonding followed by a telescopic
fixed prosthesis.
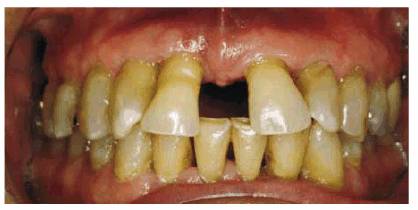
Figure 23-19A: This 65-year-old man was embarrassed by the appearance of his front teeth.
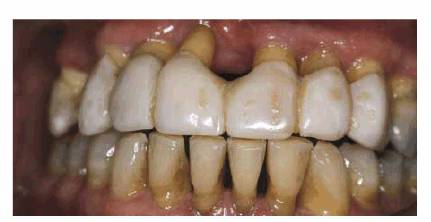
Figure 23-19B: Using the principles previously outlined in this chapter, composite resin bonding was done to immediately improve the patient's appearance and stabilize the dentition.
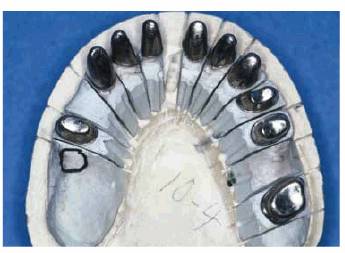
Figure 23-19C: Following periodontal therapy and interim stabilization for 3 months, a maxillary telescopic prosthesis was constructed. The gold copings are seen here on the model.

Figure 23-19D: The superstructure was constructed in two sections using a semiprecision attachment.
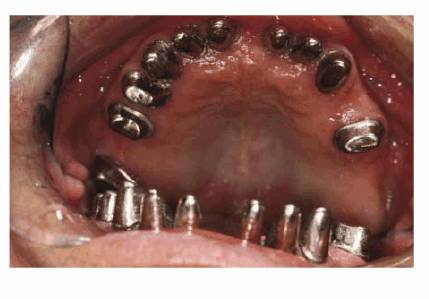
Figure 23-19E: The gold copings are seen here cemented in the mouth with final cement. This permits the superstructure to be cemented with soft cement so that it can be easily removed in the event that repairs are necessary. A further advantage in using "individual" telescopic copings is that the patient will require only minimal treatment if there is a superstructure cement washout.
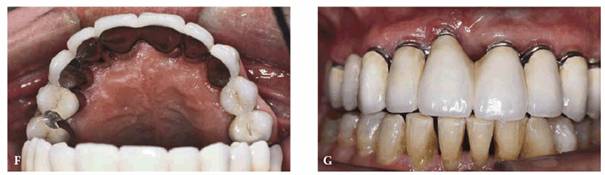
Figure 23-19F and G: The superstructure was first cemented with petrolatum and zinc oxide for 1 week to help fully seat the case.
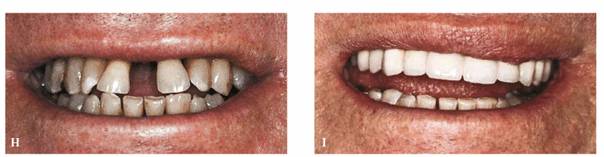
Figure 23-19H and I: Before and after treatment comparison show a greatly improved esthetic result. Note the patient's lower lip line. He felt comfortable that, because of his low lip line, none of the exposed metal margins would show.
SUMMARY
The esthetic significance of a diastema and the decision to close it is
predominantly the choice of the patient. The dentist must possess a full
appreciation of the factors contributing to diastemas and the various options
available to treat them. Once the etiology of a diastema is identified, the
patient should be informed of treatment alternatives, therapeutic time
commitments, prognoses, and costs.
Regardless of treatment choice, the objective is to improve esthetics while
preserving as much healthy tooth structure as possible. Good occlusion and
maintenance of the supporting tissues are equally important to prevent diastema
re-formation and failure of corrective therapies. The ability of the dentist to
successfully manage diastemas is the mark of a clinician who practices esthetic
dentistry according to sound, evidence-based principles.
REFERENCES
1. Attia Y. Midline diastemas: closure and stability. Angle Orthod 1993;63:209-12.
2. Clark DC. Immediate closure of labial diastema by frenectomy and maxillary
ostectomy. J Oral Surg 1968; 26:273-6.
3. Davis RC. Prosthetically maintaining a dental diastema using single tooth
implants. Implant Soc 1993; 3(6):8-9.
4. Goldstein RE. Esthetics in dentistry. 1st edn. Philadelphia: JB Lippincott,
1976.
5. Goldstein RE. Esthetic principles for ceramo-metal restorations. Dent Clin
North Am 1988;21:803-2.
6. Goldstein RE. Change you smile. 3rd edn. Chicago: Quintessence, 1997.
7. Goodman NR. Treatment of diastema: not always frenectomy. Dent Surv 1975;51(4):28-9, 32, 34.
8. Gribble AR. Multiple diastema management: an interdisciplinary approach. J Esthet Dent 1994;6:97-102.
9. Hagge MS, Clarke DA. Diastema preservation in resin-bonded fixed partial
dentures. J Esthet Dent 1992; 4:134-9.
10. Huang WJ, Creath CJ. The midline diastema: a review of its etiology and
treatment [review]. Pediatr Dent 1995;17:171-9.
11. Kraut RA, Payne J. Osteotomy of intermaxillary suture for closure of median
diastema. J Am Dent Assoc 1983;107:760-1.
12. Lacy AM. Application of composite resin for single-appointment anterior and
posterior diastema closure. Pract Periodont Aesthet Dent 1998;10:279-86.
13. Larson TD. Techniques for achieving realistic color distribution in large
composite resin restorations. J Am Dent Assoc 1986;112:669-72.
14. Leonard MS. The maxillary frenum and surgical treatment. Gen Dent 1998;46:614-7.
15. Martinez-Canut P, Carrasquer A, Magan R, Lorca A. A study on factors
associated with pathologic tooth migration. J Clin Periodont 1997;24:492-7.
16. Miller PD Jr. The frenectomy combined with a laterally positioned pedical
graft. Functional and esthetic considerations. J Periodont 1985;56:102-6.
17. Newitter DA. Predictable diastema reduction with filled resin: diagnostic
wax-up. J Prosthet Dent 1986; 55:293-6.
18. Oesterle LJ, Shellhart WE. Maxillary diastemas: a look at the causes. J Am Dent Assoc 1999;130:85-94.
19. Popovich F, Thompson GW. Maxillary diastemas: a look at the causes. J Am Dent Assoc 1999;130:85-94.
20. Radz GM. Anterior esthetic bonded restorations using an improved hybrid
composite. Compend Cont Educ Dent 1995;16:1204, 1206-7, 1210.
21. Rouse JS. Full veneer versus traditional veneer preparation: a discussion
of interproximal extensions [review]. J Prosthet Dent 1997;78:545-9.
22. Sahafian AA. Bonding as permanent retention after closure of median
diastema. J Clin Orthod 1978;12:568.
23. Sher MR. Surgical correction of the diastema. N Y State Dent J 1981;47:382-3.
24. Spilka CJ, Mathews PH. Surgical closure of diastema of central incisors. Am J Orthod 1979;76:443-7.
25. Sullivan TC, Turpin DL, Artun J. A postretention study of patients
presenting with a maxillary median diastema. Angle Orthod 1996;66:131-8.
26. Towfighi PP, Brunsvold MA, Storey AT, et al. Pathologic migration of
anterior teeth in patients with moderate to severe periodontitis. J Periodont 1997;68:967-72.
27. Wise RJ, Nevins M. Anterior tooth site analysis (Bolton Index): how to
determine anterior diastema closure. Int J Periodont Restor Dent 1988;8:8-23.
28. Yamaoka M, Furusawa K, Yasuda K. Effects of maxillary anterior supemumerary
impacted teeth on diastema [letter]. Oral Surg Oral Med Oral Pathol Oral Radiol Endod 1995;80:252.
ADDITIONAL RESOURCES
Goldstein RE. Diagnostic dilemma: to bond, laminate, or crown. Int J Periodont
Restor Dent 1987;87(5): 9-30.
Goldstein RE. Esthetic principles for ceramo-metal restorations. Dent Clin
North Am 1988;21:803-22.
Goldstein RE. Status report: dentistry in the 1980's. J Am Dent Assoc
1988;116:617-24.
Goldstein RE. Finishing of composites and laminates. Dent Clin North Am 1989;33:305-18.
Goldstein RE, Feinman RA, Garber DA. Esthetic considerations in the selection
and use of restorative materials. Dent Clin North Am 1983;27:723-31.
Goldstein RE, Garber DA, Goldstein CE, et al. The changing esthetic dental
practice. J Am Dent Assoc 1994;125:1447-57.
Goldstein RE, Garber DA, Schwartz CG, Goldstein CE. Patient maintenance of
esthetic restorations. J Am Dent Assoc 1992;123:61-6.
Goldstein RE, Goldstein CE. Is your case really finished? J Clin Orthod 1988;22:702-13.
Goldstein RE, et al. Immediate conservative corrections of esthetic problems. J
Dent Technol (Jpn) 1990;75: 50-9.

Politica de confidentialitate |