Armies of Exigo (AoX)
Scenario Editor Guide & Basic Tutorial v.1.4
© 2004 Electronic Arts.
Acknowledgements: To Alexei Kozlenok & Sheldon Ferguson for the excellent work they did dissecting & testing it. Thanks to the whole EA Exigo QA Team & Production Team for their hard work and perseverance.
Written and compiled by Joseph A. Hatcher Jr.
NOTICE: Electronic Arts, Black Hole Entertainment and Cinergi Interactive
are not responsible for the accuracy of this document. This document was created and kept up to date as much as possible during development. Some screenshots in this document were taken early in development and some objects, names, menus, etc; in the Scenario Editor were changed or re-named.
Please keep this in mind when using this document as a guide.
For the latest information, updates and advanced documents for the Armies of Exigo game and the Scenario Editor, please see the official https://aox.ea.com website and forums.
Table of Contents
(A) Introduction
(B) How to Use this Guide
(C) Scenario Editor HotKeys
(c1) Basic HotKeys List
(c2) Advanced HotKeys
(c3) Customizing HotKeys
(D) How to Build a Multiplayer Map - Step by Step
(4 Player Dual Layer)
(d1) Step 1
(d2) Creating a New Scenario
(d3) Drop-Down Menus
(d4) Top Menu Bar Icons
(d5) Edit Window Category Tabs and Navigation
(d6) Mini-Map and Toggle Buttons
(d7) Step 2
(d8) Camera Control
(d9) Placing Starting Locations and the Nation MainBases for Player 1 and 3
(d10) Step 3
(d11) Adding a Second Level
(d12) Placing Starting Locations and the Nation MainBases for Players 2 and 4
(d13) Placing Cave Entrances and Exits
(d14) Connecting Cave Entrances and Exits (aka - "Linking the Levels")
(d15) Step 4
(d16) Adding Resources to the Map
(d17) Tutorial Follow-Up Notes
(E) Creating a Custom Single Player Campaign Map - General Overview
(G) Loading, Saving, Backing Up Maps & More
(g1) Saving a map
(g2) Loading a map
(g3) Saving in the Background
(g4) Backup on Save
(g5) Auto Create New Map
(g6) Auto Load Last Map
(F) Sound Editor - General Overview
(H) Trigger Editor & Advanced Functions - General Overview
(I) Hints & Tips - End Notes
(A) Introduction
Welcome to the Scenario Editor Tutorial! The Armies of Exigo Scenario Editor is an easy to use tool where the possibilities for creating an exciting RTS multiplayer map is truly only limited by your imagination.
AoX's unique game design of waging war on two levels simultaneously increases the strategy involved for playing, in addition to expanding the possibilities of the various types and designs that you can implement into your own maps and strategies for defeating your opponent.
This tutorial covers the basics for creating your own single level and two level maps for multiplayer play. The maps used in this tutorial are included with this document (in theory) for you to use and try out.
By the time you have completed the tutorial you should have a good idea of how to start building your own maps. Reading this entire document is highly recommended before going to the AoX website for inquires, and going through the documents on the advanced features of the Scenario Editor.
The Scenario Editor has been designed for RTS gamers to be able to get into making their own maps quickly and easily, to create truly fun and unique strategy gaming experiences to share with their friends, clans, opponents, and 141d313b the world.
So what are you waiting for?
For the map making gurus out there, this tutorial will help get you started, but does not contain information for all of the advanced features in the Scenario Editor. For more information, FAQs, etc; please see the Armies of Exigo website and forums.
(B) How to Use this Guide
Notices are in solid line boxes like this.
My recommendations and notes are in dotted line boxes like this with italicized text.
Examples: Are in italicized text and surrounded by a finely dotted line box like this.
(X.x) Directions to follow for making a map, are in a gray, highlighted, box like this.
Text that is in boldface within paragraphs and sections of text usually indicates, relates to, and/or refers to the name of an object, command, menu selection, function, choice, etc; in the Scenario Editor.
Clicking with the left mouse button on a function icon or button usually enables that function. Right clicking usually disables that function.
(C) Scenario Editor HotKeys
(c1) Basic HotKeys List
The HotKeys below will help you get started using the Scenario Editor. For the more advanced users, all of the HotKeys are organized into an easy-to-refer to legend list on Page (X).
Close - Ctrl+Alt+C
Copy - Ctrl+C
Cut - Ctrl+X
Delete Map - Alt+Shift+D
Entity Delete - Shift+R
Fullscreen - F11
Go to start location - Ctrl+G
Help - F1
Map properties - Shift+Enter
New - Ctrl+N
Open - Ctrl+O
Options - Ctrl+P
Pan - Middle Mouse Button
Paste - Ctrl+V
Redo - Ctrl+Y
Refresh - Ctrl+r
Rotate - Ctrl+Middle Mouse Button
Save - Ctrl+S
Save As - Ctrl+Alt+S
Select all - Ctrl+A
Set Start Location - Ctrl+L
Settings - Ctrl+Enter
Trigger Editor - Ctrl+T
Undo - Ctrl+Z
Zoom - Alt+Middle Wheel Button (mouse)
Zoom in - Mouse Wheel up
Zoom out - Mouse Wheel down
(c2) Advanced HotKeys
- Please see the Armies of Exigo website or browse through them in the Scenario Editor.
(c3) Customizing HotKeys
Don't like how the HotKeys are setup? Want them to fit your style? No problem.
In the drop down menu, Click on Options (alternatively, press Ctrl+P).
Then, Click on Options to bring up the Options window (as seen below).
Click on the Keyboard tab.
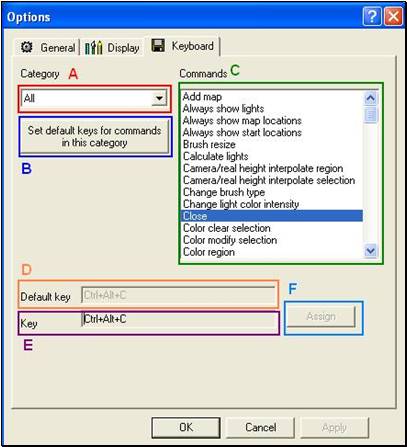
Image hk.a
The explanations for the Options/Keyboard window shown above are described below.
A The Category listbox displays different choices that you can select from in category groups to make browsing and changing the HotKeys easier.
B Click on this button to reset the HotKeys in the Category selected if you want to start over and re-assign the HotKeys.
C The Commands listbox displays the actual commands for the HotKeys that are assigned to them. The assigned HotKeys for that Command are displayed in the Default key (D) and Key (E) sections.
D - Default key displays the default HotKey assigned for the corresponding Command.
E - Key displays the current HotKey assigned for the corresponding Command. If you have not changed the default HotKeys, Key will display the same HotKey as Default key.
F Click on Assign once you have typed in the new HotKey that you want in the Key (E) section. The new HotKey you have assigned to the Command that you changed, is now in effect.
(D) How to Build a Multiplayer Map - Step by Step
(4 Player Dual Layer)
Welcome to the multiplayer map tutorial for creating a single layer (level) map!
This section will walk you through the steps needed to make a 4 player multiplayer map on two levels (dual layer, above and below ground). The level you will be building in this tutorial will be an above ground map set in the Season of Spring and a below ground map, which you will learn more about in later Steps.
You will learn how to adjust the terrain the way you want, apply textures to the terrain to "paint" it, adding required starting points for all 4 players, placing landscape objects like trees, animals, NPC (non-playing character) units, and more.
Each Step will describe things that you will have to do or learn for each Step, you will then apply what was explained so you can complete the sections of each Step. Just follow along in this tutorial to build your map. Step 1 covers a lot of the menus and navigation basic that you need to know before going on to Step 2.
(d1) Step (1)
(d2) Creating a New Scenario
(Step 1) In the drop-down menu, click on New.
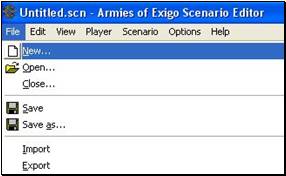
Image s1.a
The New scenario window will pop-up like Image s1.b.
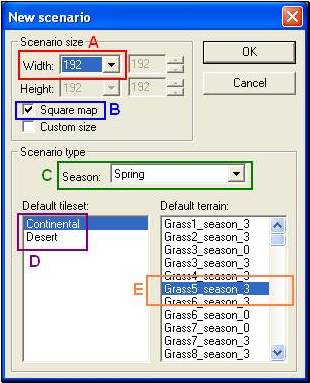
Image s1.b
The descriptions for the New Scenario image are as follows:
A - The Width list box allows you to select from a pre-set group of width sizes for your map.
When Square map is checked, the following Width size selections are available, as shown in Image s1.c.
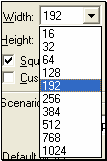
Image s1.c
B - The Square map check box (it should be checked (enabled) by default) when enabled, allows you to quickly and easily make a perfectly square map by just selecting one Width number from the list.
Disabling Square map allows you to customize the Width and Height of your maps.
Experiment with the Square map and Custom size options later, to shape your maps the way you want. For beginners, it is recommended that you leave Square map enabled until you get familiar with the Scenario Editor functions. Rectangular maps are fun to do, as well as large maps for battles with a large amount of units, or small maps for creating battle royals with certain groups of units. Be creative.
Example: If you select 192 in the Width list, with Square map checked, when the map is created, the size of it will be 192 w x 192 h.
C - The Season selection list under Scenario Type section, displays the four seasons that you can choose from for your map to be set in, as shown in Image s1.d.
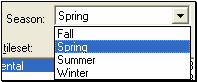
Image s1.d
D - Default tileset as it shown in Image s1.b, displays the two groups of tilesets available for you to choose from in this selection. This is what the basic first terrain type that is applied to the entire surface of your map's landscape.
When Continental is selected, Default terrain correspondingly displays a list of various terrain types such as: grass, dirt, deepforest, sand, rock, swamp, cave and more to select from.
E - Default terrain as it shown in Image s1.b, displays a list of various terrain types depending on what is selected under Default tileset.
(Step 1.a) In the New scenario window, select a Width of 192 (Make sure Square map is enabled).
Select Spring for the Season.
Select Continental for the Default tileset.
Select Grass5_season_3 for the Default terrain.
Click OK.
Wait a few moments for the map to build.
Refer to Image s1.b for this step if needed.
Now your Scenario Editor screen should similar to Image s1.e.
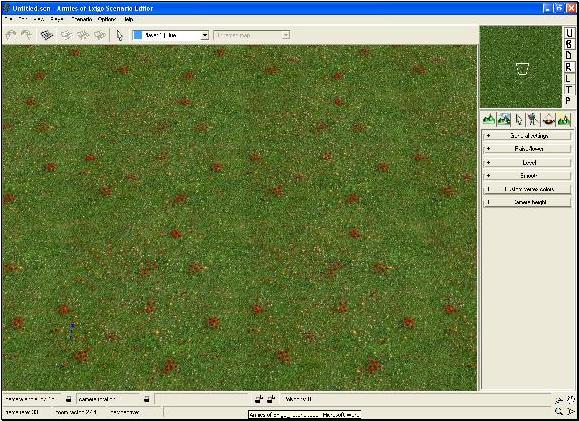
Image s1.e
Welcome to the Scenario Editor!
Before we move on to the next steps, I'm going to show you the menus and interface for navigating through the Scenario Editor. You should read the following information as well as explore and follow along. The menus and functions you'll be using will be explained and described to you.
I'll move on to Step 2 afterwards.
The functions that are not described or mentioned in this document are considered Advanced Functions. For those functions, you will need to obtain more information & documentation from the Armies of Exigo website or forums. The only functions that will be described here in length will the basic ones you need to know in order to make the 4 player map described in this tutorial.
(d3) Drop-down Menus
![]()
Image s1.f
Image s1.f shows the menu bar. The majority of the functions in the menu bar have HotKeys assigned them by default, for those of you who like to use HotKeys. Refer to the Scenario Editor HotKeys section in this guide if needed. The next series of images will show the full contents of each of the selection menus for the menu bar in Image s1.f as a general reference guide.
File menu
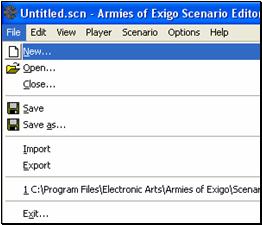
Image s1.g
The File menu is where you Save, Open, and Close your maps.
Edit menu
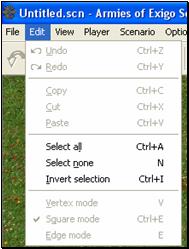
Image s1.h
- The Edit menu is where you can Undo, Redo, Copy, Paste, etc (Using the HotKeys for these are more efficient).
View menu

Image s1.i
- The View menu is where you can setup a large variety of choices. It is recommended that you have the selections checked like they are in Image s1.i until you get use to the Scenario editor and have learned most or all of its functions.
Player menu
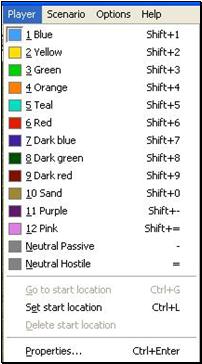
Image s1.j
- The Player menu is where you can change which player's (or team's) objects you will be focusing on, placing, etc; where to set a player's starting point on the map, and accessing Properties for each Player.
Scenario menu
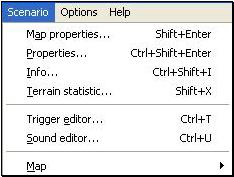
Image s1.k
The Scenario menu displays a variety of advanced options that you should take extra care not to change too much until you have become more experienced in using the Scenario Editor.
Options menu
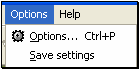
Image s1.l
The Options menu lets you go to more options and selections and Save settings when clicked on, will save all settings and options you've chosen and will be loaded up the same way every time the Scenario Editor is started.
The Help option is no longer available in the Scenario Editor as seen in some of the images in this document. That's why you're reading this ;)
(d4) Top Menu Bar Icons
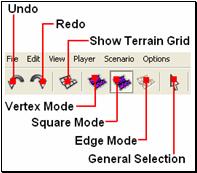
Image1.m
- The Undo icon will allow you to undo actions that you have done in the Scenario Editor.
- The Redo icon will allow you to redo actions that you have done in the Scenario Editor.
- The Show terrain grid, Vertex mode, Square mode, and Edge mode icons are Advanced functions.
The General selection icon is a quicker way to be able to start selecting various objects for manipulation, movement, deletion, etc. Until you learn all of the functionality of this feature, it is recommended that you select it and change the options for it under the Edit window first.
(d5) Edit Window Category Tabs & Navigation
On the right side of the Scenario Editor screen, you will see the Edit window. The following information is where you'll learn to navigate it and see what lies beneath its skin. First, how to navigate the selection buttons.
To expand or collapse selection lists in the Edit window, just click on one of the selection buttons. Click on the Object/Entities tab in the Edit window. Collapse the selection buttons until it looks like Image s1.n.
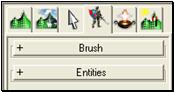
Image s1.n
- Now, to expand the selection buttons just click on Entities. You will see it expand the directory lists like in Image s1.o
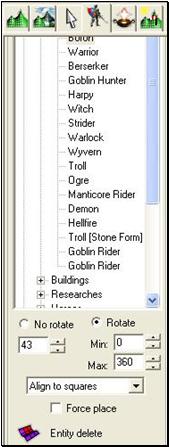
Image s1.o
- Now you will notice that the Entities list has expanded off of the Edit window view. To scroll the list up or down to where you can see it better, all you have to do is click on an area of the Edit window, where there is no text, listbox, settings, etc; and move it.
- When you mouseover certain parts of the Edit window, you will notice that the mouse cursor turns into a hand, like it does in some desktop publishing applications.
Click the left mouse button, and you will see the hand "grip" the Edit window. Now you can drag the Edit window up and down where ever you need until you let go of the left mouse button. If you have trouble seeing some of the expanded selections, just collapse some of the selection buttons until you can find what you are looking for.
Now, for the descriptions of the Edit window icon tabs.
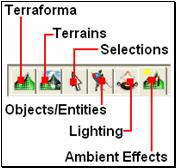
Image s1.p
Image s1.p displays the main categories for the functions in the Edit window.
1) The Terraforma tab contains General Settings, Raise/lower, Level, Smooth, Custom vertex colors and Camera height.
- General settings is considered an Advanced function. Experiment at your own risk. You can set the Brush size to set the size of the squares of the terrain that you raise/lower or otherwise edit and change.
- Raise/lower you will use to modify the terrain as you see fit. Click on the wavy grid icon to enable, then move the mouse over to the main map view screen. Left click the mouse to raise the land, right click to lower.
You can use the Level and Smooth functions in similar ways to Raise/Lower.
- Custom vertex colors and Camera height are Advanced functions. Experiment at your own risk.
2) The Terrains tab contains Brush, Terrains, Levels and Weather.
- Brush allows you to change the size of the terrain you are going to place onto the map.
Brush type lets you choose whether the terrain you place is perfectly Square when applied, or in a Circle. You can paint the landscape easily and make great looking surfaces for your landscape. Transition is an Advanced function. Experiment at your own risk.
- Terrains displays a listbox with all the various terrains (90+) types that you can pick from. Just click on the terrain you want to place, then click in the main map view screen in the location that you want place it. Hold down the left mouse button while over the terrain, to "paint" in a continuous line, or design the terrain how you see fit. Experiment Show favorites or Do not modify upper layers later on.
- Levels allows you to add different landscape objects such as cliffs, water manipulation, etc. Experiment at your own risk.
-- Passability is an Advanced function.
The Selections tab contains Unit selection, General selection and Map locations.
- Unit selection allows you to choose which choices of units, objects or buildings you want to be able to select and move, alter, delete, etc. Click on the arrow icon under Unit selection, then select an object that you want to alter, move or delete. You can also click on an object and click and drag the object to another location on your map as well. Additionally, you can Cut, Copy or Paste objects while using Unit selection.
- The Select parent and Mirror functions under Paste are Advanced functions.
- General Selection allows you to choose which expanded choices of Textures, Custom colors, Heights, Cliffs, Passability, Lights, Buildings, Ground units, Air units, and Objects that you want to select from. This varies from Unit selection by expanding the types of objects that you can select. Other functions in General selection are Advanced functions.
- Map locations displays the map location data that has been placed on the map for advanced functions for building single player maps and multiplayer and is considered an Advanced function.
The Objects/Entities tab contains Brush and Entities.
Brush size allows you to select how many objects, such as units, buildings, trees, etc; that you can place in multiples.
Example: Set the Brush size to 10 then select a Peasant under Entities/Empire/Units. Then click on the main map view screen. You will notice a large grid of many Peasants that have been placed onto the map. You can use this to quickly landscape your maps with trees, bushes, etc; without having to individually place a mass of objects.
- Entities lists all the various types of objects that you can select from to put onto your map. You will use this frequently. Misc, AmbientSound, SpellHolder, SpellComponents and TrapComponents in the Entities list are considered Advanced functions.
- No rotate, Rotate, Min, Max, and
- You'll use Entity delete to help you delete certain objects depending on what you select. You can choose from Delete units, Delete object and Delete ambient sounds. Click on the wavy grid icon to enable this function. Excellent tool to use by click and dragging to delete only certain objects checked, when enabled.
The Lighting tab contains Lights, Camera and Map camera settings.
- Lights, Camera and Map camera settings are Advanced functions.
The Ambient effects tab contains Sets, Ambient sound, Shadow intensity, Object intensity, User fog, Height fog, Building night lights, Cloud, Ambient light, Wind, Snow, Rain, Light, Object light, and Critter.
- All selections under the Ambient effects tab are considered Advanced functions.
(d6) Mini-map & Toggle Buttons
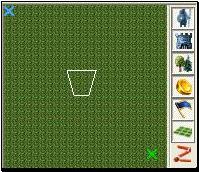
Image s1.q
Image s1.q displays the Mini-map, which is in the top right-hand corner of the Scenario Editor. Using the Mini-map view area, you can toggle on or off a variety of functions to help make your job a little easier while making your maps.
![]() - Toggles displaying of units. Enable this if
you want to see an overall view of where you've placed units on your map.
- Toggles displaying of units. Enable this if
you want to see an overall view of where you've placed units on your map.
![]() - Toggles displaying of buildings. Enable this
if you want to see an overall view of where you've placed buildings on your
map.
- Toggles displaying of buildings. Enable this
if you want to see an overall view of where you've placed buildings on your
map.
![]() - Toggles displaying of objects. Enable this
if you want to see an overall view of where you've placed objects on your map.
This is to view some objects like trees, bushes, farm crops, etc. You'll have
to experiment to see which objects are displayed in the Mini-map when O is
toggled on.
- Toggles displaying of objects. Enable this
if you want to see an overall view of where you've placed objects on your map.
This is to view some objects like trees, bushes, farm crops, etc. You'll have
to experiment to see which objects are displayed in the Mini-map when O is
toggled on.
![]() - Toggles the displaying of resources. The
Mini-map will display the same icons you have gotten use to when playing Armies
of Exigo. Like the gold sphere & the blue diamond for resources that are
placed onto the map.
- Toggles the displaying of resources. The
Mini-map will display the same icons you have gotten use to when playing Armies
of Exigo. Like the gold sphere & the blue diamond for resources that are
placed onto the map.
![]() - Toggles the displaying of the start
locations for players on the map.
- Toggles the displaying of the start
locations for players on the map.
![]() - Toggles the displaying of Terrain. Turn it
off if you want to see the other toggle selections better, depending on how you
are building your map.
- Toggles the displaying of Terrain. Turn it
off if you want to see the other toggle selections better, depending on how you
are building your map.
![]() - Toggles the displaying of the pathing (where
the units can and can't travel on the map) for units. When turned on, the pink
areas displayed on the Mini-map show where units can not pass through, or
travel on top of those sections on your map.
- Toggles the displaying of the pathing (where
the units can and can't travel on the map) for units. When turned on, the pink
areas displayed on the Mini-map show where units can not pass through, or
travel on top of those sections on your map.
(d7) Step (2)
Now on to Step 2.
First, we'll cover how to adjust the camera in the Scenario Editor so you can see your units, buildings, landscape, etc; better while building your maps from certain angles, or if you want to zoom in real close to get a good view of your armies.
(d8) Camera Control
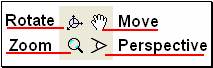
Image s2.a
- Go ahead and check out the basic flowery grassy landscape of the map that you created by completing Step 1. Hold down the middle mouse button to Move the mouse around to scroll your view across the map. Additionally, you can click and hold on the hand "grip" icon at the bottom right of the Scenario Editor screen to move over the map, as seen in Image s2.a. Right click to disable.
- To rotate your view of the map, click on the Rotate icon, as seen in Image s2.a. Next, click and hold the left mouse button over the map to change the angle by rotating the planes, or point of view of the map. Right click to disable. You can do this to see your map from a birds-eyes view, from a down low "eye" level, and other angles to help you organize and view your map. Additionally, you can also use Ctrl+Middle Mouse Button to use this function.
- To Zoom the camera in and out, click on the Zoom icon, as seen in Image s2.a. Next, click and hold the left mouse button over the landscape to zoom in or zoom out your view of the map. You can use this function to zoom in really close to check out your units or buildings up close, or you can use this function to get a better perspective view of your map for screenshots, or just to give a grand overview of your map. Using the scroll wheel on your mouse is the simple and quick way to use this function anytime. Additionally, you can use Alt+Middle Mouse Button.
The Perspective icon allows you to zoom the view in and out of your map as well, but it zooms in and out much quicker. This function is recommended if you are using the scroll wheel on your mouse and the Zoom function gets to be too tedious. Additionally, you can use Ctrl+Alt+Middle Mouse Button to use this function.
(d9) Placing Starting Locations & the Nation MainBases
for Players 1 & 3.
First, I'm going to walk you through placing the starting locations for all 4 players for creating this multiplayer map.
(Step 2) In the drop-down menu, click on Player, then click on Set start location. Notice that the 1 Blue player is selected (you are choosing Player 1's starting location).
As seen in Image s2.b .

Image s2.b
(Step 2.a) Move up to the top left-hand corner of the map. Place Player 1's Starting point in this general area. As seen in Image s2.c .
You will want to place the Starting point near the same Player's Nation Mainbase, so the starting camera view for each player starts near or over their starting base.
Once you get familiar with the functions of the Scenario Editor, you can change up the Starting points to fit the design of your custom maps.
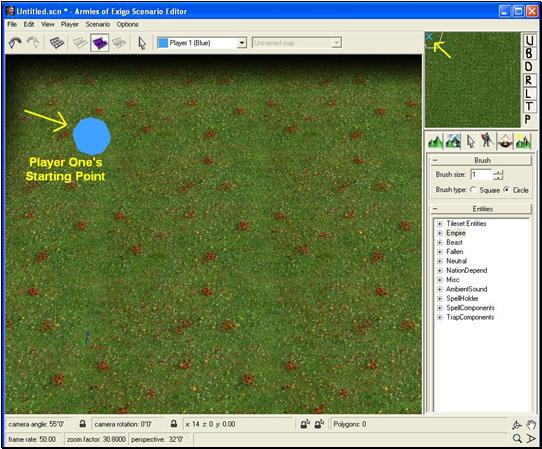
Image s2.c
- In order to save a map, each player must have a Nation MainBase to go with each Player's Starting points. Next we will place a Nation MainBase to go with Player 1's Starting point.
- Before the next Step, verify that you still have Player 1 Blue selected, which you can check at the top of the Scenario Editor near the center. Use Image s2.c for reference.
(Step 2.b) Click on the Objects/Entites tab in the Edit window (looks like a soldier). Click on the Entities button to expand it if needed. Next, expand NationDepend and click on Nation MainBase. As seen in Image s2.d .
Follow the directions in Image s2.d .
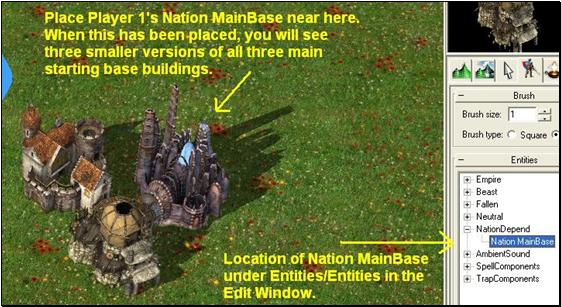
Image s2.d
- The Nation Mainbase (currently invisible when this was written) is where each Player's main basic building starts out on the map, in addition to a starting amount of resource gathering units.
- It's time to add the next player.
(Step 2.c) Move down to the bottom right-hand corner of the map. Place Player 3's Starting point in that general area. Player 3 should be Green.
- Next, place Player 3's Nation MainBase near Player 3's Starting point.
- We are going to put Player 2 and Player 4 below ground to help balance this map.
- Before we can place Player 2 and Player 4, we have to add the second level (underground) to this map.
- But first, Save your map with the following Steps.
(Step2.d) In the drop-down menu, click on Scenario, followed by clicking on Properties.
- Next, make sure you have the Info tab selected.
- Under Name, type in the name of your map.
- Under Description, type in a description of your map.
- Under Suggested Players, type in 2-4, as the map we're making is being made for 2-4 players.
- In the Author section, type in your name, your modders group name or your clan's name, etc.
- Click on OK.
(Step2.e) To name this top level of your map, in the drop-down menu, click on Scenario.
- Then click on Map properties.
- Under the Map tab, in the Map name section, type in a name for this level of the map (such as "Top Battlefield").
- Under Type, make sure Surface is selected.
Step 2.e is not required, but helps when you are working on dual layer maps, to lessen the confusion when navigating between levels and/or maps.
(Step2.f) Click on File in the drop-down menu, then click on Save As.
- In this window, you should see the information displayed that you entered in Step2.d .
- In the File name section, type in the name that you want to name your map.
- Make sure that in the Saved in section, that you have selected the directories and sub-directories that you want your maps saved to.
- Click on Save.
If you attempt to do Step2.e before Step2.d, you will be greeted with a pop-up message asking you to do Step2.d anyway. It's easier to just go ahead and complete it in this order until you get use to the Scenario Editor functions.
(d10) Step (3)
(d11) Adding a Second Level
We will be making an underground cave-like map as the second level (underground) to your map.
(Step3) To add a second level to your map, in the drop-down menu, click on Scenario.
- Next, click on Map, then click on Add Map. The settings should still have the same choices from making the top level map.
- Under Default terrain, scroll down and select cave14_0.
- Click OK.
- Repeat Step2.e and name this level something different from the top level name. Under Type select Cave.
To select views between the top and bottom levels, just press the Tab key, just as in AoX. Make sure you are on the newly created bottom level for the following Step.
Were you paying attention? As the tutorial goes along, it assumes you already know how to do a previously described Step.
(d12) Placing Starting Locations & the Nation MainBases
for Players 2 & 4.
(Step3.a) Make sure to do the following for Player 2 Yellow on the bottom level (underground).
Place a Set start location and a Nation MainBase in the bottom left-hand corner of the map.
(Step3.b) Make sure to do the following for Player 4 Orange on the bottom level (underground).
Place a Set start location and a Nation MainBase in the top right-hand corner of the map.
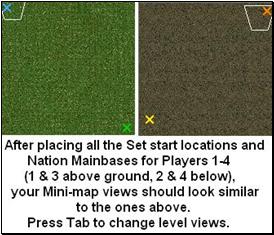
Image s3.e
(d13) Placing Cave Entrances and Exits
(Step3.c) Under the Objects/Entites tab in the Edit window, expand the Entities button.
- Expand Neutral, next expand Teleporters, then choose the Cave Entrance that looks like the one in Image s3.f.
You can see a preview of the objects in the Mini-map area when you select them, until your mouse goes back onto the main map screen area.
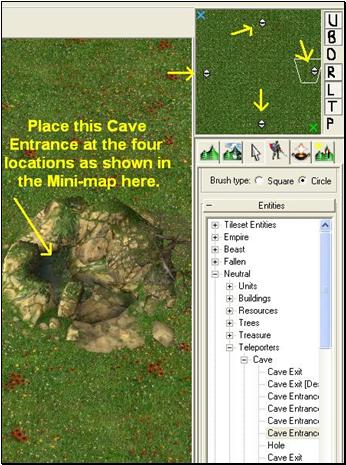
Image s3.f
- Now that you have cave entrances for the top part of your map, lets move on to adding cave exits to the bottom level map.
(Step3.d) Under the Objects/Entites tab in the Edit window, expand the Entities button.
- Expand Neutral, next expand Teleporters, then choose the Cave Exit that looks like the one in Image s3.g.
You can see a preview of the objects in the Mini-map area when you select them, until your mouse goes back onto the main map screen area.

Image s3.g
- Now that you have your Cave Entrances and Cave Exits placed above and below ground, now we need to "connect" those Cave Entrances and Cave Exits, so any Player's units can go through them freely to go above and below ground.
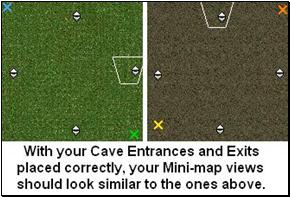
Image s3.h
(d14) Connecting Cave Entrances and Exits (aka - "Linking the levels")
Linking two levels involves using the Trigger Editor. This has to be done so a Cave Entrance knows which Cave Exit to be linked to and vice versa.
(Step3.e) Make sure you are on the top level (above ground) of your map. Go to the Cave Entrance you placed at the top & center of the map.
- In the drop-down menu, click on Scenario, then click on Trigger Editor (Or press Ctrl+T)
- Under Available trigger elements, expand Basic Commands.
- Next, expand Entity Commands and expand Actions.
- Now click on Set2WayTeleport from:
- As seen in Image s3.i
- Now click on Set2WayTeleport from:, that will copy that command over to be displayed under Scenario triggers. It will be listed under the Common tab, then under ScenarioTriggers/Trigger: "unnamed"/"Action", as seen in Image s3.j

Image s3.i
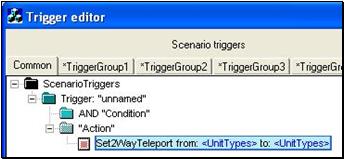
Image s3.j
This part of the Trigger Editor is where you will be telling it which Cave Entrances & Exits you want to link together as seen in Image s3.j .
(Step3.f) Under Scenario triggers under the Common tab, mouseover
Set2WayTeleport from: and observe that there are two <UnitTypes> highlighted in blue.
- Click on the first <UnitTypes> on the left-hand side.
You will notice that the Trigger Editor window has disappeared. The Cave Entrance should be in your main view, as described earlier.
- Click on the Cave Entrance object.
The Trigger Editor window will pop back up into view.
Your Set2WayTeleport from: under Scenario triggers should now look similar to Image s3.k .
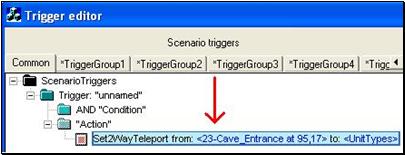
Image s3.k
The first <UnitTypes> should now be replaced with something similar to
<23-Cave_Entrance at 95,17>. This line is telling the Trigger Editor which object you want to be the first part of the 2-way teleport (to complete the link) and displays the coordinates of that object on the map.
(Step3.g) Make sure you are on the bottom level (below ground) of your map. (Press Tab go back down to the second level) Go to the Cave Entrance you placed at the top & center of the map.
- Under Scenario triggers under the Common tab, mouseover
Set2WayTeleport from: and observe that there is one remaining <UnitTypes> highlighted in blue.
- Click on the second <UnitTypes> on the right-hand side. It should still be displayed as to: <UnitTypes>.
You will notice that the Trigger Editor window has disappeared. The Cave Exit should be in your main view, as described earlier.
- Click on the Cave Exit object.
The Trigger Editor window will pop back up into view.
Your Set2WayTeleport from: under Scenario triggers should now look similar to Image s3.l . You may need to adjust the windows in the Trigger Editor to view the entire line, depending if you have the Trigger Editor window maximized or not.
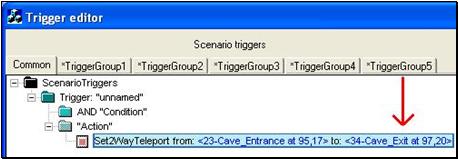
Image s3.l
- The second <UnitTypes> should now be replaced with something similar to
<34-Cave_Exit at 97,20>. This line is telling the Trigger Editor which object you want to be the second part of the 2-way teleport (to complete the link) and displays the coordinates of that object on the map.
- The Set2WayTeleport line should look similar to Images3.l.
Nice work! Now you have one completed link between your two levels, so units can pass back and forth between the levels. Later on, when you are more familiar with the Scenario Editor, go ahead and experiment with the one-way teleports, and try having different cave entrances and exits link to each other across the map!
- Now you just need to connect the other 3 pairs of Cave Entrances & Cave Exits and both levels of your map will be able to be traveled in between the four locations for some intense dual layer multiplayer mayhem!
(Step3.h) Follow Steps 3.e-3.g in order to link the other 3 Cave Entrances above ground to the correct remaining 3 Cave Exits below ground.
- Image s3.m displays the way the commands should look for your teleport links. The Cave Entrances and Exits do not have to be precisely placed in the same exact locations described in this tutorial, but just generally in the same spot. The letters and arrows displayed in this image correspond to the locations with the same letters beside them on the Mini-maps displayed in Image s3.n.
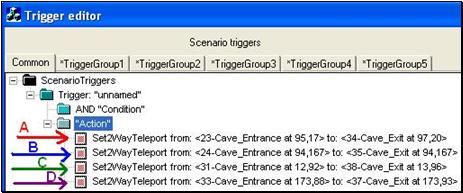
Image s3.m
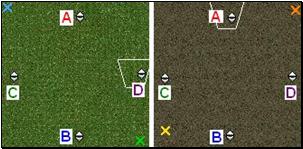
Image s3.n
Well, it seems you have survived this far. Excellent!
- Now its time for you to add resources for all the players to gather near their bases, and to fiercely fight over resources elsewhere on the map!
Did you remember to Save your map frequently?
(d15) Step (4)
(d16) Adding Resources to the Map
- Let's add some gold resources around the map first.
(Step 4) Under the Objects/Entities tab in the Edit window, expand the Entities button.
Expand Neutral, then expand Resources.
Click on Gold Field. As seen in Image s4.a.
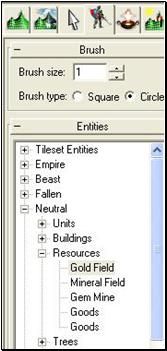
Image s4.a
(Step 4.a) Move the mouse over the main map view, you should see a gold rock object that you can place anywhere on the map.
By left clicking on the main map area, you can place 4 Gold Fields near each base above and below ground. Try to balance it fairly so the Gold Fields are in the same general areas around each Player's base. Right click if you wish to disable the object placement function.
- Place 8-10 Gold Fields near the center of both levels of the map.
These will be fought over by the players as they try to expand and control the center of both levels of the map.
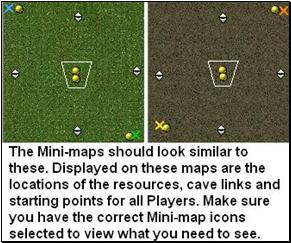
Image s4.b
- Next, let's add some gem resources to the map.
(Step 4.b) Under the Objects/Entities tab in the Edit window, expand the Entities button.
Expand Neutral, then expand Resources.
Click on Gem Mine. As seen in Image s4.a.
Place a Gem Mine near each of the 4 Player's bases above and below ground by left clicking on the main map area.
Place a Gem Mine the center of each level of the map near the Gold Fields that you placed there, to add to the resources that are available for the Player's to fight for.
- Finally, let's add some wood resources to the map.
When you are placing trees on the map, keep in mind not to block any paths on the map unless it's intentional. You will want to place the trees strategically around the Players' bases so that each player can gather the wood resources fairly easily and still move their units without encountering traffic bottlenecks around their bases.You don't have to select one certain type of trees. Really large and giant trees can not be used as a wood resource.
(Step 4.c) Under the Objects/Entities tab in the Edit window, expand the Entities button.
Expand Neutral, then expand Trees.
Click on Tree. As seen in Image s4.a.
Place 15-20 Trees near each of the 4 Player's bases above and below ground by left clicking on the main map area.
Place 25-40 Trees near the centers of both map levels where you have placed Gold Fields and Gem Mines to add to the resources that are available for the Player's to fight for.
(d17) Tutorial Follow-Up Notes
Now that you have completed making a two level map, for 4 players, with all the resources for each player, make sure you have Saved your map and exit the Scenario Editor. Copy your .scn map file over into the AoX Custom Maps directory and then start AoX and test it out!
You can apply what you have learned in Steps 1-4 to making your maps look the way you want. Add buildings, units, trees, fences, rocks, etc; much the same way as you added resources to the map.
A lot of Entity objects can be rotated before you put them onto your map to give your map a more random and natural look. After you have selected your object, mouseover the main map screen area, hold down Ctrl+Left Mouse Button and move the mouse left and right to rotate the object. Once you have it in the angle you want, let go of Ctrl and left click to place that object.
You can also sculpt your landscape to look the way you want by applying the various Terrains onto the landscape. Going over each section that you are "painting" with the Terrain textures multiple times will help add a more depth and richness to the look of your maps.
End of Step By Step Tutorial
(E) Creating a Custom Single Player Campaign Map - General Overview
One of the many features of AoX Scenario Editor, is the ability to create your own customized Single Player Campaigns.
By utilizing the trigger functions and all the creative tools in the Scenario Editor, you can create a truly unique and captivating Campaign for you and your friends (or opponents) to play on.
You can setup triggered events throughout the map, setup triggered speech as both text and .wav file audio, rename units and buildings, change units' and buildings' stats, import your own music and sound effects, and adjust the ambient effects, lighting & weather. This is just some of the things you can do when making your own custom Single Player Campaigns.
If you want to make a RPG-style Campaign, you can do it. If you want to make your own "games" within the game, you can.
Visit the Armies of Exigo website for more information.
(F) Sound Editor - General Overview
The Scenario Editor contains a Sound Editor, but not in the sense that most people may think. This Sound Editor isn't for editing the actual audio files themselves, but is for importing audio files into your map and changing the audio, (looping, fade in/fade out, min/max distance, volume, etc.) & swapping sounds for units, buildings, events, etc.
If you want a Peasant to sing your favorite song when clicked on, or a cow to sound like a chicken, the Sound Editor is what you use to do it with.
The Scenario Editor's Sound Editor supports the following formats:
- Music files must be imported in .ogg format, 44khz, 16bit stereo.
- Sound effect files must be imported in .wav format, 22khz, 16bit, mono.
Visit the Armies of Exigo website for more information.
(G) Loading, Saving, Backing Up Maps & More
(g1) Loading a Map
To Load a map that you have previously saved, or to load up one of the multiplayer maps that came with Armies of Exigo:
Click on File in the drop-down menu.
Click on Open (alternatively, press Ctrl+O).
Select the proper directory where the .scn file of your map is saved, select the .scn file, and click on Open.
(g2) Saving a Map
To Save a map that you have been working on:
1) Click on File in the drop-down menu.
2) Click on Save As (alternatively, Click on Save if you have already chosen a name for your map, or wish to save your map as a different name).
3) Select the directory where you want the .scn file of your map saved to, then click on Save.
The first time you make a new map, there are certain requirements that must be fulfilled before you can save your map. Please see the tutorial sections of this document for more information on naming your map and fulfilling the requirements needed for saving your map.
If you want your map to be selectable/visible in the AoX game (so the game can see your map's name) that you want to test out, you can save it to the My Documents\Armies of Exigo\Save\Scenario directory. This is the same default Directory that the Scenario Editor saves your maps to, unless changed.
(Or you can save to the Program Files\Electronic Arts\Armies of Exigo\Scenario\CustomMaps directory, but this is not officially supported.).
It is recommended that you create your own separate directory to save your maps to separately from the AoX directories in case you have to uninstall the game or something happens to the game directories and you don't want your maps to be lost. Then, just Copy & Paste the map over.
(g3) Backup on Save
The AoX Scenario Editor has the feature to save backup copies of your maps and you can choose the number of backup copies to have saved of your maps.
To change the settings of the Backup on save feature:
Click on Options in the drop-down menu.
Click on the General tab.
3) Under the Files section of this menu, you can change the number of Recent files in file menu and the Number of backup files that you want to enable.
Unless there is some memory restriction on your hard drive of your PC, or similarly related, you should always have this feature enabled making at least 1 backup copy of your maps, in case you accidentally permanently deleted the original file, it got corrupted, or you Cut it and Pasted it somewhere on your computer and can't find it.
The Scenario Editor saves backup copies (.bkp files) numbered sequentially (1, 2, 3, 4, 5 etc.), if you have more then one copy of back up files enabled.
Example: If you have Number of backup files set to 3, depending on where you have your .scn files saved, you will notice that once you have saved your map, there will be 3 files created in addition to your original, named exactly the same as your map, except for the file extension. So if you named your map surpremewar.scn, there will be 3 other files in the same directory named surpremewar.1.bkp, surpremewar.2.bkp and surpremewar.3.bkp .
You can choose how many backup copies you would like the Scenario Editor to save for you by changing the number in the Number of backup files.
(g4) Auto Load Last Map
At startup in the Options menu allows you to select what you want the Scenario Editor to do when it first starts up.
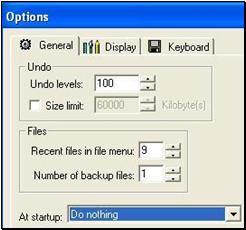
Image a.1
Do nothing should be selected if you do not want one of the other options enabled when the Scenario Editor starts up.
Load last used scenario is used to automatically load the last map you had loaded and were working on as soon as you start up the Scenario Editor next time and every time thereafter until you change it.
Show create new scenario dialog should be selected if you want the New Scenario window (as in Image s1.b) to pop up every time the Scenario Editor first begins.
Show scenario open dialog should be selected if you want the Open window to pop up every time the Scenario Editor first begins. The Open window is similar to the Save window
It is recommended that you leave Load last used scenario enabled when you are just working on one map most of the time, especially until you get use to the Scenario Editor. If you are creating multiple maps concurrently (like for a group of maps to share later), you may not want the last map you were working on to load as soon as the Scenario Editor starts up. You may want to choose a different map that you want to work on instead. In this case, disabling it may be appropriate for your development style.
(H) Trigger Editor & Advanced Functions - General Overview
With the Trigger Editor, you can really get into the wealth of customization features available in the Scenario Editor.
Within the Trigger Editor, you can setup triggered events & add/edit/delete to various Actions and Commands.
The types of Commands that you can edit are AI, Passability, Sound, Quest, Map, & Physics. There are various Transmissions commands for creating events in your maps.
Entity, Player and GUI management can be done in the Trigger Editor. You can also create separate Trigger groups, if you wanted to setup a few difficulty settings for your maps.
If you want to make an RPG campaign, you can! If you want to make a FPS campaign, you can! If you want to re-create 1980s classic games with the Scenario Editor, you can!
NOTICE:
Changing & editing things within the Trigger Editor, other then what is described to do within this document, can fatally mess up your maps if you are not familiar with some sort of scripting language, or scripting within other map editors. Problems such as a custom map not loading at all in the main Exigo game, elements of the map not performing or loading correctly, audio or graphical issues, are just some of the things that can occur. See the AoX website, forums and documents for advanced features for the Scenario Editor that covers the Trigger Editor functions. Save backup copies of your maps!
(I) Hints & Tips - End Notes
======Last minute additions.
When making your maps Melee (such as for regular multiplayer maps), you will need to add win/lose conditions to the map (thanks to Alexei Kozlenok for pointing this out).
The Part 3 Tutorial Map for Step 4 has these steps integrated.
Here is a brief outline of how to do this:
1) Use Ctrl+T to bring up the Trigger Editor.
2) Right Click on Scenario Triggers, then click on Add New Scenario Trigger
3) Click on "Action", so it is highlighted.
4) Now, in the Available trigger elements section on the right, click on and expand GameControl Commands, and then click on and expand Actions.
5) Next, click on MeleeEndGame, MeleeResources and AntiHideTheFarm. Notice that these functions are now displayed under Scenario Triggers/Trigger/Action.

This is what you should see in the Trigger Editor, when done.
These functions allow the game to know when to end, establishes default starting resources for players, and allows players to be revealed when their last remaining Town Hall, etc; is left remaining.
If you have read this far, excellent work!
Here is some advice for building your maps:
- When creating multiplayer maps, try to keep it fair for each player to be able to gather resources.
- Save your maps often
- If you can't get a cliff or other landscape object placed just the way you want, try sculpting the landscape to your liking instead.
- Think about how you make the underground level to go with your above ground level. Do you want to make it easy or hard for players to use 2 level spells?
- Check out and read the advanced documents on the Scenario Editor to find out many more features that the Armies of Exigo Scenario Editor has. Creating captivating single player campaigns and intense multiplayer maps are the mainstay of this Scenario Editor. Show the world of your fellow strategy gamers what your maps have to offer them.
Thanks for playing Armies of Exigo!
© 2004 Electronic Arts. All Rights Reserved.
|
