Autodesk Inventor: Building Solid Models from Projected Geometry
In this tutorial, we'll review a use of projected geometry that's applicable to all Autodesk InventorT versions and then examine some of the new options for projecting geometry in the part modeling environment of Autodesk Inventor 4.
Building a solid model involves creating a series of features that refine the part geometry. New features are often related to existing features-for example, two edges must align or 11311b112l two circles must be concentric-and this is one way to ensure that design intent is captured. Projecting geometry from existing features to create a new feature is a commonly performed Autodesk Inventor task.
You can project geometry from features on the same part or, when editing parts in the assembly environment, from other components. The behavior of projected geometry depends on the environment and the method you're using to project it.
|
Note: This tutorial was developed using a prerelease version of Autodesk Inventor 4. |
Projected Reference Geometry
It is good practice to fully constrain your sketches, excepting geometry that will adapt. To fully constrain a part's base sketch, you can add a Fix constraint to a point, line, or curve. A better method is to constrain or dimension to projected origin geometry (planes, axes, or center point). If you find yourself projecting reference geometry for every base sketch, open your part template files and project the origin center point in the default sketch.
Use projected reference geometry whenever possible because it:
![]() Does not move and can't be deleted.
Does not move and can't be deleted.
![]() Provides planes for
mirroring symmetric features.
Provides planes for
mirroring symmetric features.
![]() Provides default planes and axes for assembly
constraints.
Provides default planes and axes for assembly
constraints.
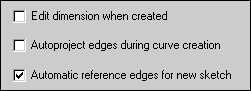
After completing the base feature, you'll typically create additional sketched features that add or remove material. Such sketching takes place on a part face or a work plane defined by existing geometry. (If you sketch on a part face, all edges on that face are projected to the sketch as reference geometry by default.) Autodesk Inventor 4 allows you to disable this automatic projection of sketch face edges, but in most cases you will want to use the default setting as shown in Figure 1.
1. Select Tools > Application Options from the menu bar.
2. Click the Sketch tab.
|
Figure 1: Automatic projection options. |
The default option "Automatic reference edges for new sketch" controls whether or not sketch face edges are projected on sketch creation. You can manually project part edges onto the sketch using the Project Geometry tool, regardless of this setting.
3. Place a check mark next to "Autoproject edges during curve creation." This option controls the ability to project any edge from the same part onto the sketch without using the Project Geometry tool. Checking this option allows you to project a part edge onto the sketch by moving the cursor over the edge, then scrubbing the highlighted edge. This setting is off by default, as it can be confusing for new users.
4. Start a new part file.
5. From the Sketch Panel Bar, click the Project Geometry tool.
6. In the browser:
![]() Expand Origin
Expand Origin
![]() Click Center Point
Click Center Point
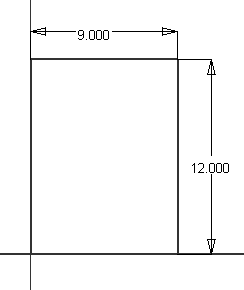
Create a Sketch
1. Click the Two Point Rectangle tool.
2. Hover the cursor over the origin point and click when a green dot is displayed.
3. Create a rectangle and dimension it as shown in Figure 2.
|
Figure 2: Sketch dimensions. |
4. Extrude the sketch one inch in the default direction.
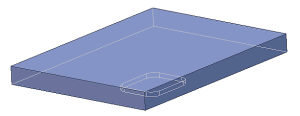
Sketch On a Face
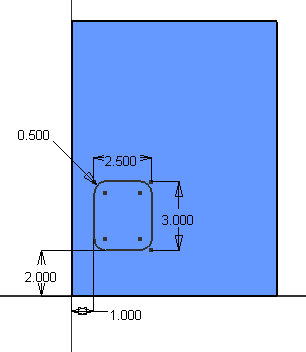
1. Start a new sketch on the large face of the block.
2. Create a rectangle and dimension it as shown in Figure 3.
|
Figure 3: Filleted rectangle sketch. |
3. Create a 0.50-inch fillet at each corner of the sketch.
4. Finish the sketch and extrude the profile to create a 0.250-inch deep cut.
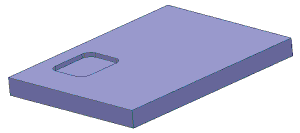
|
Figure 4: Extrusion result. |
Adjust Your View
1. Use the Rotate tool to match the view in Figure 5.
2. Select Hidden Edge Display mode from the Standard toolbar.
|
Figure 5: Reoriented view. |
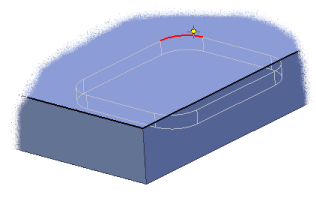
Auto-Projected Edges
1. Start a sketch on the top face of the block.
2. From the Sketch Panel Bar, click the Point, Hole Center tool.
3. Hover the cursor over one of the rectangle fillets cut on the opposite side of the block. The arc highlights in red. At this point you have not projected any geometry to the sketch.
|
Figure 6: Highlighted edge prior to projecting. |
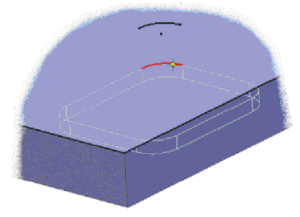
4. Without clicking, scrub the cursor along the arc. The arc is projected onto the sketch.
|
Figure 7: Projected arc. |
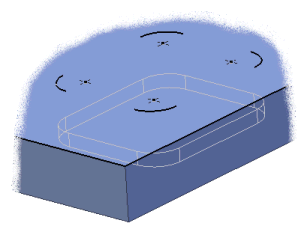
5. Move the cursor over the projected center point of the arc and click when a green dot is shown.
6. Project the other three cut arcs and place a hole center point at the center of each projected arc. Your sketch should match the one shown in Figure 8.
|
Note: If you project an unwanted edge onto the sketch, it will be discarded providing you do not create any geometric constraints involving it. |
|
Figure 8: Four projected arcs. |
Complete the Holes
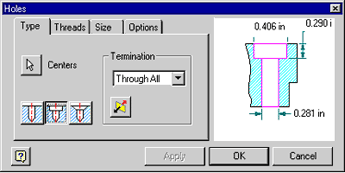
1. Press the H key to activate the Hole dialog box.
2. Select the Countersunk hole option and enter values to match Figure 9.
|
Figure 9: Hole options. |
3. Click OK to complete the holes.
Project Geometry Tool vs. Auto-Projected Geometry
Edges projected using the Project Geometry tool have some advantages over edges projected using the highlight-and-scrub method.
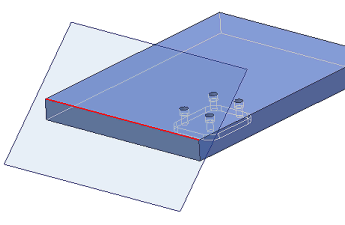
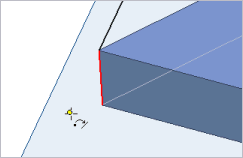
1. From the Features Panel Bar, click the Work Plane tool. Create a work plane through the edge shown in Figure 10, at -45 degrees to the top face.
|
Figure 10: Work plane creation. |
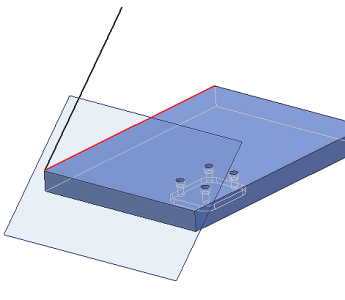
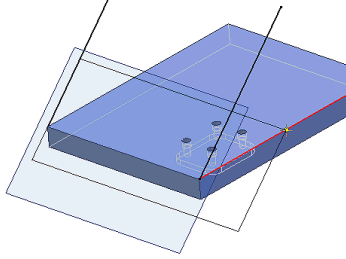
2. Start a new sketch on the work plane.
Note that there aren't any edges projected onto the sketch. Edges are automatically projected only if you sketch on a part face.
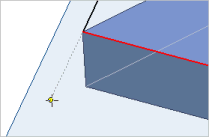
3. From the Sketch Panel Bar, click the Project Geometry tool.
4. Click the left edge of the face containing the holes.
|
Figure 11: Manually projected edge. |
Project Geometry Edge Behavior
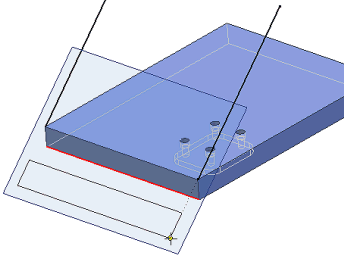
1. Click the Two Point Rectangle tool.
2. Hover the cursor over the lower endpoint of the projected line.
3. Move the cursor down from the line as shown in Figure 12.
A dotted line indicates alignment but no constraint symbol is displayed.
|
Figure 12: Alignment feedback without implied constraint. |
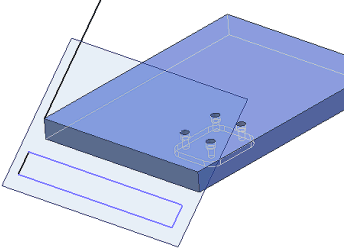
4. Hover the cursor over the projected line and scrub the line without clicking. Again, move the cursor below the projected line.
A coincident symbol is displayed when the cursor aligns with the projected line.
|
Figure 13: Implied coincident constraint. |
5. Click when the coincident symbol is displayed.
Auto-Projected
Edge Behavior
1. Hover the cursor over the right-side edge of the face containing the holes.
Scrub the line to project it to the sketch.
|
Figure 14: Auto projected edge. |
2. Move the cursor down below the top edge of the sketch rectangle.
You can align the right edge of the rectangle to the "scrub-projected" edge, but you cannot create a geometric constraint between the projected edge and the sketch.
3. Click when the dotted line indicates alignment between the sketch and the projected edge.
|
Figure 15: Alignment to auto-projected edge. |
Results
The left edge of the sketch is displayed as constrained (shown in black in
Figure 16). The right edge is not constrained and the
"scrub-projected" edge has been discarded because it was not included
in a constraint.
|
Figure 16: Completed rectangle. |
Constrain and Extrude
1. From the Sketch Panel Bar, select the Colinear constraint tool.
2. Click the right-side edge of the rectangle and click the right edge of the top face. The part edge is projected to the sketch and a colinear constraint is added.
Valid part geometry for the constraint can be selected during constraint creation. The geometry is projected onto the sketch and the constraint is applied between the projected geometry and the selected sketch geometry.
3. Add a colinear constraint between the top edge of the rectangle and the front edge of the part.
4. Finish the sketch and extrude the rectangle one inch to match Figure 17.
|
Figure 17: Completed part. |
Geometry projected from a feature within the same part remains fully associative to the feature. Try changing the nine-inch width of the original feature or the fillet radius or rectangle dimensions of the cut. The geometry related through projected edges updates automatically.
That's enough for now. Stay tuned for future discussions of projected geometry in the assembly environment and a cool tool for projecting geometry in sheet-metal parts.
|