![]()
Published March 2004
Applies To Microsoft
MapPoint Location Server, Microsoft MapPoint Mobile Locator for Pocket PC Phone
Edition
Authors Paula Flanders
Contributors Margaret Sherman
Graphic Design David Adam Edelstein
Production Margaret Sherman
Copyright
The information contained in this document represents the current view of Microsoft Corporation on the issues discussed as of the date of publication. Because Microsoft must respond to changing market conditions, it should not be interpreted to be a commitment on the part of Microsoft, and Microsoft cannot guarantee the accuracy of any information presented after the date of publication.
This document is for informational purposes only. MICROSOFT MAKES NO WARRANTIES, EXPRESS OR IMPLIED, AS TO THE INFORMATION IN THIS DOCUMENT.
Complying with all applicable copyright laws is the responsibility of the user. Without limiting the rights under copyright, no part of this document may be reproduced, stored in or introduced into a retrieval system, or transmitted in any form or by any means (electronic, mechanical, photocopying, recording, or otherwise), or for any purpose, without the express written permission of Microsoft Corporation.
Microsoft may have patents, patent applications, trademarks, copyrights, or other intellectual property rights covering subject matter in this document. Except as expressly provided in any written license agreement from Microsoft, the furnishing of this document does not give you any license to these patents, trademarks, copyrights, or other intellectual property.
Unless otherwise noted, the example companies, organizations, products, domain names, e-mail addresses, logos, people, places and events depicted herein are fictitious, and no association with any real company, organization, product, domain name, email address, logo, person, place or event is intended or should be inferred
© 2004 Microsoft Corporation. All rights reserved.
Microsoft, ActiveSync, MapPoint, Outlook and
Windows are either registered trademarks or trademarks of Microsoft Corporation
in the
The names of actual companies and products mentioned herein may be the trademarks of their respective owners.
Overview
Introducing Microsoft MapPoint Mobile Locator for Pocket PC Phone Edition
How MapPoint Mobile Locator Works
MapPoint Mobile Locator Functionality
Chapter 1
Installing and Configuring MapPoint Mobile Locator.
Installing MapPoint Mobile Locator
Starting MapPoint Mobile Locator
Configuring MapPoint Mobile Locator Settings
Uninstalling MapPoint Mobile Locator
Chapter 2
Getting Started with MapPoint Mobile Locator.
Using MapPoint Mobile Locator Icons
Minimizing and Maximizing Screen Elements
Viewing Maps in Directions Mode
Chapter 3
Using MapPoint Mobile Locator.
Finding the Address of an Outlook Contact
Finding Places Close to a Pushpin
Choosing Start and End Points for a Route
Viewing Routes and Route Points
Working with Favorite Pushpins
Chapter 4
Appendix A
Appendix B
Overview
Microsoft® MapPoint® Mobile Locator for Pocket PC Phone Edition is a business tool that works in conjunction with MapPoint Mobile Locator for PC and MapPoint Location Server to help you determine the location of coworkers whose jobs frequently take them out of the office. MapPoint Mobile Locator for PC can be used in the office to find-and show on a map screen-the location of a coworker when he or she is using a device equipped with Microsoft Windows® MobileT software for Pocket PC Phone and MapPoint Mobile Locator for Pocket PC software. Mobile personnel can use Mobile Locator for Pocket PC to locate each other and to find other places they want to visit.
Knowing the location of a coworker, or your own location, is especially helpful if you need driving directions. For instance, after MapPoint Mobile Locator finds both your location and the location of a coworker, it can display a route and driving directions that you can use to meet up with the coworker.
MapPoint Mobile Locator can find mo 757p1515h re than just the locations of your mobile colleagues. You can also view maps of and get directions to and from the following types of places:
The address of a Microsoft Outlook® contact
A street address, such as
A named place, such as Carnegie Hall or the San Diego Zoo.
Stores and services close to your own location, such as restaurants, hotels, bank machines, or dry cleaners.
Microsoft MapPoint Mobile Locator for PC User Guide
Provides installation instructions and task descriptions for the MapPoint Mobile Locator PC client. This version is somewhat different from the Pocket PC client described in this guide.
Microsoft MapPoint Location Server Administrator's Guide
Provides instructions for installing, deploying, and administering MapPoint Mobile Location Server.
Microsoft MapPoint User Administrator's Guide
Provides instructions for managing user accounts and permissions and creating mobile contacts.
Microsoft MapPoint Location Server Software Developer's Kit (SDK)
Provides tools and reference materials for developers who are creating custom applications based on MapPoint Location Server.
The technology behind the location-finding equipment that a mobile operator uses to send messages to a mobile device is the same technology that allows MapPoint Mobile Locator to pinpoint the location of a device and its user. General Packet Radio Service (GPRS) enables relatively large amounts of data, such as maps, to be sent to a wireless device. Because GPRS supports many of the same technologies that are used on the Internet, GPRS-enabled devices with a data plan from a mobile operator can be integrated with Web services.
As shown in Figure 1, MapPoint Location Server is the hub that brings together wireless devices and MapPoint Web Service, which delivers maps, driving directions, and other cartographic information to your device.
In addition to handling logons and maintaining security and privacy settings, MapPoint Location Server accesses location information from a mobile operator and retrieves cartographic information, such as a map or driving directions, from MapPoint Web Service. MapPoint Location Server then manages the sending and receiving tasks that are required to fulfill the location and direction requests from MapPoint Mobile Locator users.
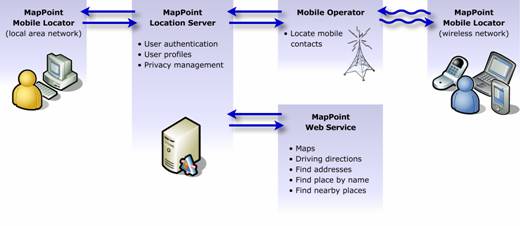
Figure 1. MapPoint Location Server architecture
It is important to note that GPRS is not related to Global Positioning System (GPS) software. Although you can use GPS to find your own location if your Pocket PC is GPS-enabled, the locations of contacts that you find with MapPoint Mobile Locator are based on the locations of the wireless carrier's cell towers and are not as precise as the coordinates supplied by a GPS device. When you locate a fixed address or a named place, that location is determined using MapPoint Web Service geographic data.
MapPoint Mobile Locator includes privacy controls for both the enterprise and the user. MapPoint Mobile Locator is a server-based product, so the server handles all user authentication and stores user information for employees within the company's own network.
To protect your privacy, anyone seeking to add you to his or her mobile contact list must have your permission to do so. Likewise, you must request permission and receive approval from any user that you want to add to your mobile contact list. In addition, you always have the option of blocking your contacts from finding your location.
This section describes the core functionality of MapPoint Mobile Locator. Reviewing the items in this section will help you understand the tasks that are described later in this guide.
Mobile Locator uses maps to display your location and the locations of various places that are of interest to you. Sometimes you'll want to see multiple places on a map in relation to one another as simple markers (also called pushpins). Other times, you will want to view directions to get from one place to another.
MapPoint Mobile Locator includes a map screen that serves both of these functions. In Find mode, MapPoint Mobile Locator displays pushpins corresponding to any place that you choose to find. By tapping a pushpin on a list, you can view details about the place and immediately zoom to it on the map. In Directions mode, the map screen displays a route and provides a list of steps (route points) to help you travel the route.
For more information, see "Using the Map Screen" and "Finding Directions" later in this guide.
You can use MapPoint Mobile Locator to find the locations of your mobile contacts, your own location, and other types of places:
Mobile contacts
Mobile contacts are other users on your network who use either a Pocket PC or another computer equipped with a wireless GPRS network card to run MapPoint Mobile Locator, and whose locations change as they go from place to place. Using MapPoint Mobile Locator, you can add these users to your mobile contact list (with their permission) and find them on a map. You can also find directions to or from their locations, as can they for yours.
Your own location
Wherever you have your Pocket PC with you and are within your mobile operator's network, you can use MapPoint Mobile Locator to view a map of your current location. This is helpful for finding nearby places of interest when you are in an unfamiliar neighborhood or city, and for finding directions from your current location to the other places you need to go. When finding your own location, you can have MapPoint Mobile Locator use your mobile operator's GPRS technology or a National Marine Electronics Association-compatible (NMEA 0183 version 2.0 or higher) Global Positioning System (GPS) receiver attached to your Pocket PC.
Other types of places
You can find addresses that you enter manually; addresses associated with your Outlook contacts; places that you identify by name (cities, monuments, parks, businesses, and so on); and pushpins (location markers) that you previously identified on a map.
For more information, see "Using the Map Screen" later in this guide.
MapPoint Mobile Locator can notify you when certain network events occur. Notifications are helpful for keeping track of who your fellow MapPoint Mobile Locator users are and for managing your overall privacy on the network. Anyone seeking to add you to his or her mobile contact list must first have your approval, which you provide through a MapPoint Mobile Locator notification and response. Likewise, you must request permission and receive approval from any user whom you want to add to contact list.
You can choose to receive a notification by means of an e-mail message or Short Message Service (SMS) text message when either of the following events occurs (your system administrator determines which form notifications take):
A mobile contact attempts to find your location.
A MapPoint Mobile Locator user adds you to his or her mobile contacts list.
For more information, see "Receiving Notifications" later in this guide.
Chapter 1
This chapter describes how to install, configure, start, and uninstall Microsoft® MapPoint® Mobile Locator.
The following hardware and software are required for installing MapPoint Mobile Locator:
The Setup.exe containing the Setup Wizard for MapPoint Mobile Locator for Pocket PC. Check with your MapPoint Location Server administrator to find out where you can get the file.
A Pocket PC equipped with the following:
Microsoft Windows® for Pocket PC 2002 or Windows MobileT 2003 software for Pocket PC 2003.
6 megabytes (MB) system memory, including 1 MB of storage space for the application files, and 5 MB of program memory for running MapPoint Mobile Locator.
Microsoft .NET Compact Framework version 1.0 with Service Pack 2 (SP2). You can download the .NET Compact Framework from the Microsoft Download Center (www.microsoft.com/downloads/details.aspx?FamilyID=359ea6da-fc5d-41cc-ac04-7bb50a134556&DisplayLang=en).
One of the following methods for receiving files on the Pocket PC:
A PC equipped with Microsoft ActiveSync® version 3.6 or later.
Removable media capable of transferring files to a Pocket PC.
When you have verified the prerequisites, you are ready to install MapPoint Mobile Locator.
MapPoint Mobile Locator for Pocket PC uses a Setup Wizard that performs the following tasks:
Prompts you to confirm your acceptance of the end-user license agreement.
Gathers information about the folder locations where you want to install MapPoint Mobile Locator for Pocket PC.
Installs MapPoint Mobile Locator files on your PC.
Installs MapPoint Mobile Locator files on your Pocket PC device using ActiveSync.
After installing MapPoint Mobile Locator, read the readme.txt file to learn about any updates to the information in this guide. You can find this file in the folder on your PC where you installed MapPoint Mobile Locator.
To install MapPoint Mobile Locator
Attach the Pocket PC to your PC.
If you do not already have it installed, install the Microsoft .NET Compact Framework version 1.0 with SP2. You can download the .NET Compact Framework from the Microsoft Download Center (www.microsoft.com/downloads/details.aspx?FamilyID=359ea6da-fc5d-41cc-ac04-7bb50a134556&DisplayLang=en).
Your system administrator can tell you where to find the MapPoint Mobile Locator files. Navigate to the Mobile Locator for Pocket PC folder and start Setup.exe. The InstallShield Wizard may take a few minutes to prepare for installation.
On the Welcome page, click Next.
Read the end-user license agreement, select the I accept the terms of the agreement radio button to continue the installation, and then click Next.
If you want to change the folder on your PC in which the MapPoint Mobile Locator files are installed, on the Destination Folder screen, click Change, and then navigate to the location that you want. When the folder that you want appears on screen, click Next.
On the Ready to Install the Program page, click Install. Setup begins copying the MapPoint Mobile Locator files.
In the Installing Applications dialog box, click Yes to install MapPoint Mobile Locator in the default application directory on your Pocket PC.
When the Application Downloading Complete dialog box prompts you to check your mobile device screen to see if additional steps are necessary to complete the installation, check to confirm that no additional steps are necessary, and then click OK.
On the Setup Wizard Completed page, click Finish.
When the installation is complete, you can test it as described in the following section. For information about errors that are related to installation, see "Troubleshooting" later in this guide.
To start MapPoint Mobile Locator
On the Start menu in the Pocket PC Today application, tap Programs.
In the Programs area, tap the Mobile Locator icon.
![]()
Figure 2. MapPoint Mobile Locator icon
The home screen lists five primary functions: Find a Mobile Contact, Find a Place, Find Directions, Manage Mobile Contacts, and Log On or Log Off.
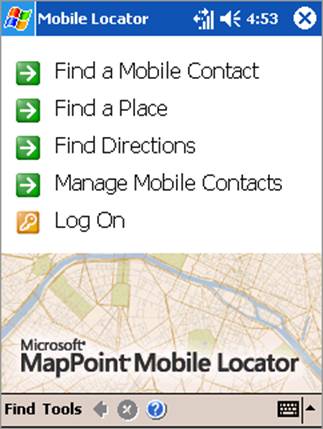
Figure 3. Home screen
Note If you were previously logged on to MapPoint Mobile Locator and did not log off, the home screen displays the Log Off option instead of the Log On option.
To log on to MapPoint Mobile Locator
On the home screen, tap Log On.
If you are logging on for the first time, MapPoint Mobile Locator might prompt you to configure your MapPoint Location Server settings. For more information, see "Configuring MapPoint Mobile Locator Settings" later in this guide.
On the Log On screen, enter the following information:
Your user name and password for MapPoint Mobile Locator. Your user name and password are the same ones you use to log on to your enterprise network. Passwords are case-sensitive.
The domain in your enterprise network in which MapPoint Location Server is located.
(Optional) Tap the Save password check box if you want your password stored on your device and entered automatically the next time you return to this screen.
Caution Activating this feature means that anyone who gains access to your Pocket PC can log on to MapPoint Mobile Locator with your credentials.
Tap OK. MapPoint Mobile Locator may pause while it verifies your credentials.
To log off of MapPoint Mobile Locator
On the home screen, tap Log Off. If you tap anywhere on the screen to perform a function, MapPoint Mobile Locator will prompt you to log on again.
To protect your device against unauthorized access to MapPoint Mobile Locator, you must use this procedure every time that you want to log off. Minimizing the application by tapping the minimize icon does not log you off of MapPoint Mobile Locator.
To use MapPoint Mobile Locator, you must configure it to point to the instance of MapPoint Location Server that is running on your enterprise network. Optionally, you can also configure regional settings, including the continent on which you plan to use MapPoint Mobile Locator and the unit of measurement (for example, miles or kilometers) in which you prefer to view data on maps and in driving directions. If you plan to use a GPS device with your Pocket PC Phone edition, you can configure the settings for that as well.
To configure your MapPoint Location Server settings
On the Tools menu of the home screen or map screen, tap Options.
Tap the Server tab.
In the https:// text box, type the full URL for MapPoint Location Server (for example, locationserver.fourthcoffee.com/mlsservice). Your network administrator can provide you with this information. Do not enter the https:// portion of the URL.
Tap OK.
To configure your regional settings
On the Tools menu of the home screen or map screen, tap Options.
On the Regional tab, tap the down icon to display the options in the Current region and Distance units lists:
In the Current region list, tap the region in which you want to view maps.
In the Distance units list, tap the unit in which you prefer to view distances.
Tap OK.
To configure your settings for a GPS device
If you choose to use GPS, MapPoint Mobile Locator defaults to retrieving your location from your GPS receiver. If this fails (for example, if the GPS device is unable to get a satellite signal), you can choose to use your mobile operator to find your location.
On the Tools menu, tap GPS to view the GPS Configuration screen.
Tap the Use GPS for my current location check box.
Tap List COM Ports.
Important If you use an infrared-beam connection to transfer data between your Pocket PC and any other device, you must disable the capability to receive incoming beams on your Pocket PC before listing the available COM ports.
Tap the name of the COM port to which you have attached the device.
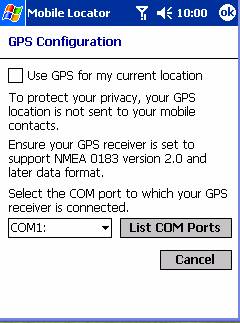
Figure 4. GPS configuration screen
Tap the name of the COM port to which you have attached the device.
If you choose to use GPS, MapPoint Mobile Locator defaults to retrieving your location from your GPS receiver. If this fails, (for example, if the GPS device is unable to get a satellite signal), you can choose to use your mobile operator to find your location.
You can uninstall MapPoint Mobile Locator at any time by using one of two methods:
If your Pocket PC device is attached to the PC that you used to install it originally, you can run Add/Remove Programs in Control Panel on the PC with the Pocket PC attached. When you remove Microsoft MapPoint Mobile Locator for Pocket PC, files on both the PC and Pocket PC are removed.
If the PC that you originally used to install MapPoint Mobile Locator is unavailable, you can uninstall MapPoint Mobile Locator by using Remove Programs (under Settings) on your Pocket PC.
Uninstalling MapPoint Mobile Locator remove alls MapPoint Mobile Locator files, including data related to Outlook and Pocket Outlook.
If you uninstall and then reinstall MapPoint Mobile Locator, you will lose the following data between installations:
Your stored user name and domain information.
Your list of saved found locations (favorite pushpins).
Your MapPoint Location Server URL.
Your default Continent and Unit settings.
Any customizations that you've made, such as Don't show me again settings in dialog boxes.
Chapter 2
This chapter describes the primary screens and controls that you will encounter while using Microsoft® MapPoint® Mobile Locator.
The home screen is the first screen that appears when you start MapPoint Mobile Locator. On this screen, you can click links to go directly to specific tasks, or you can use the toolbar icons and menus. Figure 5 shows the home screen.
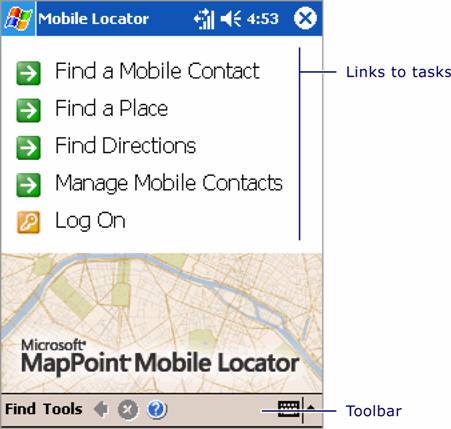
Figure 5. Home screen
Before you start using MapPoint Mobile Locator, familiarize yourself with the MapPoint Mobile Locator icons. Table 1 shows each MapPoint Mobile Locator icon and explains its function.
Table 1. MapPoint Mobile Locator icons
|
Icon |
Name |
Location |
Description |
|
|
Back icon |
On the toolbar at the bottom of the screen. |
Returns the map display to the previous screen. |
|
|
Down icon |
At the upper-left corner |
When at the upper-left corner, this icon closes the pushpin list. When at the bottom-right corner, this icon displays the pushpin or route point menu. |
|
|
Help icon |
On the toolbar at the bottom of the screen. |
Displays MapPoint Mobile Locator Help. |
|
|
Home icon |
On the toolbar at the bottom of the screen. |
Returns the display to the home screen. |
|
|
MapPoint Mobile Locator icon |
At the top of the Pocket PC Start menu. (Figure 2 shows the MapPoint Mobile Locator icon that is displayed in the Programs folder.) |
Starts MapPoint Mobile Locator. |
|
|
Minimize icon |
At the top-right corner of the screen. |
Minimizes the application, but does not log you out. |
|
|
Network activity icon |
On the toolbar at the bottom of the screen. |
Indicates and cancels network activity. |
|
|
Up icon |
At the upper-left corner of a pushpin or route point description when only one description is displayed. |
Opens the pushpin or route point list. |
|
|
Zoom icon |
On map screens, in the toolbar at the bottom of the screen. |
Displays the zoom slider so that you can change the zoom level of the map. |
The toolbar at the bottom of the home screen displays menus and icons for accessing common tasks:
Find menu-Provides an alternate interface for performing the find tasks that are listed on the home page.
Tools menu-Provides options for performing the following tasks:
Configuring MapPoint Location Server settings and regional settings
Configuring GPS
Managing contacts
Showing or hiding favorite pushpins on maps
Adjusting your privacy settings
Logging off of MapPoint Location Server
Home icon-Returns the display to the home screen.
Network activity icon-When this icon is animated, MapPoint Mobile Locator is processing a request over the network. You can cancel the request by tapping this icon. The cancellation can take a few seconds to take effect.
Back icon-Displays the map that you were viewing previously. You can view up to 10 previous map screens. This is helpful for correcting errors if you accidentally tap the wrong area on a list or map.
You can tap the help icon on the lower button bar of any MapPoint Mobile Locator screen to get Help for that screen.
For more information about common issues related to MapPoint Mobile Locator, see "Troubleshooting" later in this guide.
As with other Pocket PC applications, you can minimize MapPoint Mobile Locator when you need to use your device for other purposes. When you are ready to use MapPoint Mobile Locator again, you can maximize it and continue where you left off.
To minimize MapPoint Mobile Locator
On the home screen, tap the minimize icon at the top of the MapPoint Mobile Locator window. MapPoint Mobile Locator moves to the background of all other applications currently running on the Pocket PC device. If no other applications are running, the Today application is displayed by default.
To maximize MapPoint Mobile Locator
Tap the Microsoft Windows® flag logo at the top of the screen.
Tap the MapPoint Mobile Locator icon at the top of the list.
The MapPoint Mobile Locator window opens to display the screen that you were viewing when you last minimized the application.
Note Depending on the memory settings of your device and the amount of memory available, MapPoint Mobile Locator might require you to log on again before continuing to use the application. If you are logged on using a cellular connection, you might have to wait a few minutes while the cellular connection is reestablished.
The map screen displays maps pertaining to tasks that you perform. The map screen has two modes:
Find mode-Uses map elements called pushpins to identify relevant locations. You can put pushpins anywhere on any map and then perform tasks based on their locations. For more information, see "Working with Pushpins" later in this guide.
Directions mode-Appears when you request a route between two locations. Directions mode differs from Find mode in that a portion of the screen is reserved for viewing details about the route that MapPoint Mobile Locator has provided. For more information, see "Finding Directions" later in this guide.
In Find mode, as shown in Figure 6, the map screen contains the following components:
Map with pushpins-Numbered pushpins identify each place that you have identified as being of interest to you. Pushpins are numbered and are also displayed on the pushpin list.
Pushpin list-Displays the number, label, and description (if available) of each pushpin. For any pushpin on the list, you can tap Details to view details about it (if available) or tap Map to view the map screen centered on the pushpin. Pushpins are listed alphabetically; as you add and remove pushpins, the number assigned to each pushpin changes.
Navigation tools-You can use these tools to zoom in or out or pan around the map screen. For more information, see "Working with Maps" later in this guide.

Figure 6. Map screen in Find mode
When the map screen is in Find mode, you can perform various tasks with pushpins and the pushpin list.
The pushpin list is an alphabetical list of all pushpins currently in MapPoint Mobile Locator, with details on each one. You can keep up to 100 pushpins in the pushpin list at any time. MapPoint Mobile Locator uses several types of pushpins as shown in Table 2.
Table 2. MapPoint Mobile Locator Pushpins
|
Pushpin type |
Pushpin icon |
Description |
|
Mobile location |
|
A red circle represents the location of a mobile contact. |
|
|
A blue circle represents your mobile location. |
|
|
Fixed address |
|
A numbered red dot represents a place with an address. |
|
Nearby place |
|
An symbol representing the type of place marked by the pushpin. For example, a pushpin that represents a restaurant has a fork and a knife. |
|
Added or favorite |
Selected by user |
You select your own icon from among those available in the New Pushpin dialog box. |
To maximize the pushpin list
On the map screen, tap the up icon above the pushpin list.
The pushpin list expands to fill the map screen. The list remains maximized until you minimize it, which displays the map screen again, or until you find a new place or route.
To view the Pushpin menu with the pushpin list maximized
Tap the down icon by the lower right corner of the pushpin with which you want to work.
The Pushpin menu contains the following options:
Directions from Here-Get directions from this pushpin to another location.
Directions to Here-Get directions to this pushpin from another location.
Show Best View-See the best map view of this pushpin.
Remove from Favorite Pushpins-Delete the pushpin from your list of favorite pushpins.
Find Nearby Places-Find points of interest near this pushpin.
Details-See details about the pushpin.
To minimize the pushpin list
In the pushpin list, tap the down icon in the upper-left corner. The size of the pushpin list is reduced, and the map screen is displayed.
To add a custom pushpin to a map
On the map screen, tap the area on the map where you want to add a custom pushpin.
On the menu that appears, tap Add Pushpin Here.
Enter a label and an optional description for the pushpin, and then tap OK.
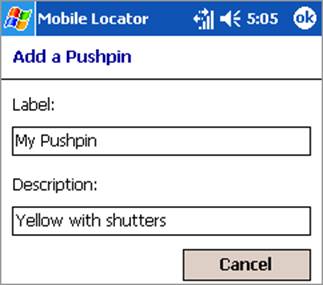
Figure 7. Label and description for a custom pushpin
The map screen and pushpin list are refreshed and the new pushpin appears in the list in alphabetical order. Other pushpins in the list and on the map screen are renumbered accordingly.
Note If you add a pushpin to a map while in Directions mode, MapPoint Mobile Locator switches to Find mode, and the route that you were viewing is no longer displayed.
To remove a pushpin from a map
On the map screen, tap the pushpin that you want to remove.
On the menu that appears, tap Remove Pushpin.
The map screen and pushpin list are refreshed. Other pushpins in the list and on the map screen are renumbered accordingly.
To view details about a pushpin
On the map screen, tap the pushpin whose details you want to view.
In the description on the pushpin list, tap Details.
MapPoint Mobile Locator displays various details, depending on the data available from the MapPoint Location Server, as well as the type of pushpin (address, place, mobile contact, Outlook contact, or custom).

Figure 8. Pushpin details
Note When the pushpin list is maximized, the Details link is not displayed. Instead, tap the down icon next to the pushpin in the list, and then tap Details.
In Directions mode, as shown in Figure 9, the map screen contains the following components:
Map showing a route-The route between the two places that you have specified. Each turn, border crossing, and road change on the route has a corresponding route point on the route point list.
Route point list-Displays detailed instructions for moving from one point to the next along the route. These instructions can include driving directions such as where to make turns, how far to travel, or when the name of a road or area changes. For any route point on the list, you can tap Details to view the distance and approximate driving time, or tap Map to view a more detailed map screen centered on the route point.
Navigation tools-Use these tools to zoom in or out or pan around the map screen. For more information, see "Working with Maps" later in this guide.
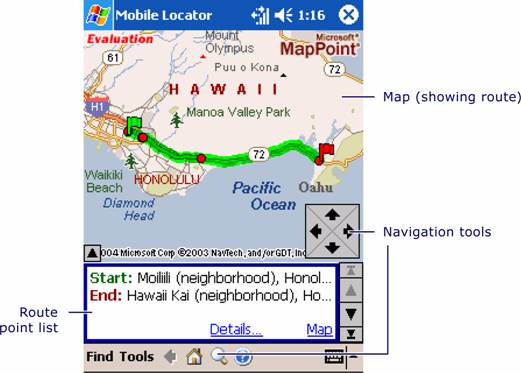
Figure 9. Directions mode
When the map screen is in Directions mode, you can perform various tasks with route points and the route point list.
The route point list is a numeric list of all route points on the map currently displayed in MapPoint Mobile Locator with details on each one.
To maximize the route point list
On the map screen with a route displayed, tap the up icon above the route point list.
The route point list expands to fill the screen. The list remains maximized until you minimize it displaying the map screen again, until you find a new place or route, or until you view a map of an individual route point.
To view the Route Point menu with the route point list maximized
Tap the down icon by the lower right corner of the route point that you want to work with.
The Route Point menu has the following options:
Show Best View-See the best map view of this route point.
Details-See details about the route point.
To minimize the route point list
On the route point list, tap the down icon in the upper left corner of the application screen. The route point list is reduced, and the map screen is displayed.
This section describes the various ways that you can change the map view. You can use the following options in either Find mode or Directions mode:
Centering-Center a map on a pushpin, route point, or other area. Centering a map does not change the scale (zoom level).
Zooming in and out-Changes the scale of the map. You can zoom in to see additional detail or out to view any map area from the street level to the continent level.
Panning-Use the pan buttons to pan a map in any direction.
To center a map on a pushpin or route point
On the map screen, tap the pushpin (in Find mode) or route point (in Directions mode) on which you want to center the current map.
On the menu that appears, tap Show Best View.
The map screen is refreshed, centered on the pushpin or route point that you chose.
To center a map on an area other than a pushpin or route point
On the map screen, tap the area where you want to center the map.
On the menu that appears, tap Center Map Here.
The map screen is refreshed, centered on the area that you chose.
To zoom in or out on the current view of a map
On the map screen, tap the zoom icon.
Slide the zoom slider in the direction that you want to zoom: left to zoom out, or right to zoom in.
![]()
Figure 10. Zoom slider
When you are finished zooming, tap Hide Zoom Slider.
The map screen is refreshed, displaying the new level of detail.
To zoom in on a specific area of a map
On the map screen, tap the area on which you want to center the map.
On the menu that appears, tap Zoom to Here. The map screen is refreshed, centered and zoomed in on the area that you chose.
To show or hide the pan buttons
On the Tools menu on any MapPoint Mobile Locator main screen, tap Show Pan Buttons.
When a check mark appears next to this menu choice, the pan buttons, shown in Figure 11, are visible on the map screen. When the check mark is absent, the pan buttons are hidden.

Figure 11. Pan buttons
To pan a map in any direction
Tap the arrow pointing in the direction in which you want to shift the map (north, south, east, or west). The map screen is refreshed with the map centered on an area that is in the direction that you chose.
Chapter 3
This chapter describes the tasks that you can perform using Microsoft® MapPoint® Mobile Locator, including finding locations, finding directions, working with pushpins, and managing mobile contacts.
With MapPoint Mobile Locator, you can find people or places. You can find your own location, the location of a mobile contact, an address that you enter, the address of a Microsoft Outlook® contact, a place that you identify by name, such as a city or park, a location you've saved as a pushpin, or places near a pushpin location.
You can find your current location in one of two ways:
With your mobile operator's GPRS technology
With a National Marine Electronics Association-compatible (NMEA 0183 version 2.0 or higher) GPS receiver connected to a COM port on your Pocket PC Phone Edition device.
To get your current location through your mobile operator
On the home screen or map screen, on the Find menu, tap My Current Location.
Note This procedure can take up to one minute to complete.
To find your current location through your GPS receiver
On the home screen or map screen, on the Find menu, tap My Current Location. MapPoint Mobile Locator displays a confirmation screen indicating that your current location will be determined using your GPS receiver.
To find your location using the coordinates supplied by the GPS receiver, tap Find. To cancel the find request, tap Cancel.
If your GPS receiver does not provide coordinates for your location, you are prompted to confirm whether you want to continue by finding your location through your mobile operator.
To find a mobile contact
On the Find menu of the home screen or map screen, tap A Mobile Contact's Location.
In the list that appears, tap the name of the mobile contact whom you want to find, and then tap Find. If the contact is successfully located, a map screen appears with the map centered on a new pushpin for the mobile contact.
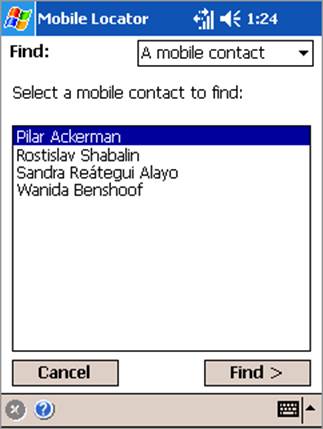
Figure 12. Finding a mobile contact
To find an address
On the Find menu of the home screen or map screen, tap An Address.
Enter the address information in the appropriate text boxes.
In the Country list, tap the name of the country/region where you want to find the address, and then tap Find.
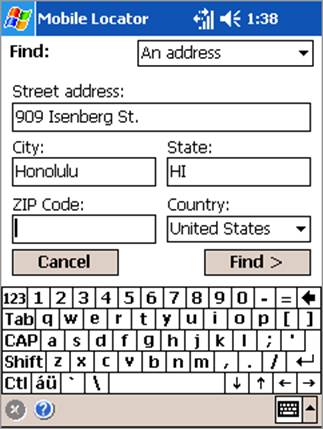
Figure 13. Finding an address
If MapPoint Mobile Locator finds more than one address matching the information that you provided, tap the address that you want, and then tap Find again.
A map screen appears, centered on a new pushpin for the address that you requested.
If no Outlook contacts are saved on your Pocket PC, you must add them by using Pocket Outlook before using this procedure.
To find the address of an Outlook contact
On the Find menu of the home screen or map, tap An Outlook Contact's Address.
In the list that appears, tap the name of the Outlook contact, and then tap Find.
Note If an Outlook contact has more than one address, MapPoint Mobile Locator displays each address as a separate item in the list.
A map screen appears with the map centered on a new pushpin for the Outlook contact that you requested.
To find a named place
On the Find menu of the home screen or map screen, tap A Place of Interest.
In the Place Name text box, enter the name of the place, and then tap Find.
If MapPoint Mobile Locator finds more than one place matching the information that you provided, tap the address that you want, and then tap Find again.
A map screen appears with the map centered on a new pushpin for the place that you requested.

Figure 14. Finding a place by name
When MapPoint Mobile Locator is in Find mode, you can perform various tasks with pushpins and the pushpin list. You can keep up to 100 pushpins in the pushpin list at any time. When you use the Find Nearby feature, pushpins are automatically added to the pushpin list based on the number of results that you request.
To find a favorite pushpin
On the Find menu of the home screen or map screen, tap A Favorite Pushpin.
In the list that appears, tap the favorite pushpin that you want to find, and then tap Find.
A map screen appears with the map centered on the favorite pushpin that you requested.
You can find places in various Find Nearby categories that are physically located near any pushpin. The list of Find Nearby categories you can search for is stored in MapPoint Location Server. The list is retrieved from the server the first time you search for nearby places and any time you tap Refresh Categories. Refresh the list occasionally to ensure that you have the most recent list.
To find places close to a pushpin
On the map screen, tap the pushpin whose nearby places you want to find.
On the menu that appears, tap Find Nearby Places.
In the list that appears, tap the type of place that you want to find.
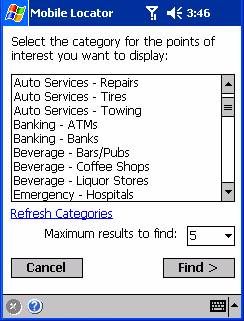
Figure 15. Selecting a Find Nearby category
In the Maximum results to find list, pick the number of places that you want MapPoint Mobile Locator to find that are close to the pushpin, and then tap Find.
The map screen is refreshed, with the requested number of places added to the pushpin list.
You can find directions between any two locations. When you find directions, MapPoint Mobile Locator displays both a map of your route and detailed driving directions.
MapPoint Mobile Locator defines all routes by a start point and an end point. You have three options for specifying these points:
Use your current location or the current location of a mobile contact as either a start or an end point, and enter information for the other point.
Use a pushpin as either a start or an end point, and enter information for the other point.
Enter information for both the start and end points.
To find directions between any two locations
On the home screen, tap Find Directions.
In the Route start drop-down list, tap the location type that you want to use as a start point.
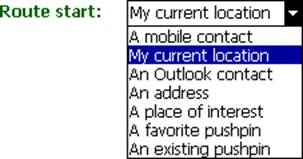
Figure 16. Selecting a location type to use as a start point
Enter the information for the start point that you tapped during the previous step, and then tap Find.
If the information that you enter produces more than one possible location, a screen appears listing these locations. Select the location that you want, and then tap Find.
In the Route end drop-down list, tap the location type that you want to use as an end point.
Enter the information for the end point that you tapped during the previous step, and then tap Find.
If the information that you enter produces more than one possible location, a screen appears listing these locations. Select the location that you want, and then tap Find.
MapPoint Mobile Locator generates a map displaying the route between the start and end points that you specified.
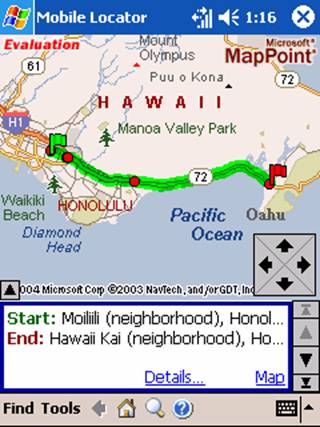
Figure 17. Route with specified start and end points
To find directions to or from any pushpin
On the map screen, tap the pushpin to or from which you want directions.
On the menu that appears, do one of the following:
To find directions from the pushpin, tap Directions from Here.
MapPoint Mobile Locator sets the pushpin as the start point and displays the end point information screen.
To find directions to the pushpin, tap Directions to Here.
MapPoint Mobile Locator sets the pushpin as the end point and displays the start point information screen.
Enter the information for the start or end point that completes the route to or from the pushpin that you tapped earlier, and then tap Find.
If the information that you enter produces more than one possible place, a screen appears listing these locations. Select the place that you want, and then tap Find.
MapPoint Mobile Locator generates a map displaying the route between the pushpin and the start or end point that you specified.
When you find directions, MapPoint Mobile Locator displays your route on a map screen in Directions mode. Instead of the pushpin list, a list of the route points to follow is displayed. You can maximize this list to view several route points at once, or you can minimize the list to show one route point at a time.
Each point in a route contains detailed driving directions for proceeding to the next route point. These route points are numbered and appear similar to pushpins on the map screen.
You can also perform basic map screen operations, such as zooming, panning, and centering. For more information, see "Working with Maps" earlier in this guide.
To view the details about a route point
In the route point list, tap the route point whose details you want to view, and then tap Details.
MapPoint Mobile Locator displays details about the route point, as shown in Figure 18, including the distance covered by the route point and the approximate driving time required.
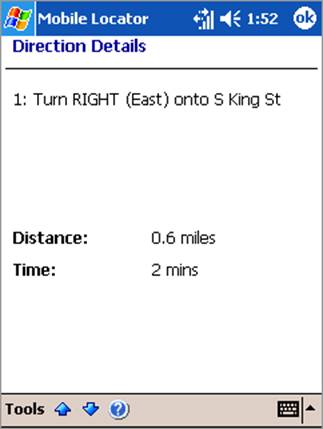
Figure 18. Route point details
Note When the route point list is maximized, the Details link does not appear. Instead, tap the down icon next to the route point in the list, and then tap Details.
(Optional) Use the arrows at the bottom of the screen to view details for the previous or next route point on the list.
When you are finished viewing the details, tap OK to return to the map screen.
To view the details about your entire route
In the route point list, scroll to the first route point, and then tap the down arrow to display the menu.
Tap Details.
MapPoint Mobile Locator displays details about the entire route, including the distance covered by the route and the approximate driving time required.
When you are finished viewing the details, tap OK to return to the map screen.
To clear a route
Tap Tools to view the Tools menu.
Tap
In the confirmation dialog box, tap OK to clear the route or Cancel to return to the map in directions mode.
You can maintain a set of pushpins that you visit often and therefore want readily accessible. Each favorite pushpin contains an optional label and description for handy reference.
To view or hide favorite pushpins on all maps
With the map screen in Find mode, on the Tools menu, tap Show Favorite Pushpins.
When a check mark is next to this menu choice, your favorite pushpins are visible on the map screen. When the check mark is absent, your favorite pushpin buttons are hidden.
To add a pushpin to your favorite pushpins
On the map screen, tap the pushpin that you want to add to your favorite pushpins.
On the menu that appears, tap Add to Favorite Pushpins.
(Optional) Enter a label and description for the pushpin. This label and description will be visible when you view the favorite pushpins list.
Tap OK.
To remove a pushpin from your favorite pushpins
On the map screen, tap the pushpin that you want to remove.
On the menu that appears, tap Remove from Favorite Pushpins.
With MapPoint Mobile Locator, you can locate and display two types of contact pushpins on maps. You can also use their locations as start and end points for finding directions:
Mobile contacts
Mobile contacts are people on your network who use MapPoint Mobile Locator; they are mobile users. To add a mobile contact to any map, MapPoint Mobile Locator finds the contact's mobile computer or Pocket PC device, wherever it might be at the time that you request it, as long as the computer is accessible by the mobile contact's cellular service provider.
You can add and delete mobile contacts through MapPoint Mobile Locator.
Outlook contacts
Outlook contacts are people whose fixed physical address information is stored in Outlook on your Pocket PC. When you add a contact using Pocket Outlook (or using Microsoft ActiveSync® to synchronize Pocket Outlook with Outlook on your PC), the contact's address information can be used by MapPoint Mobile Locator as long as the address information contains at least a city and state or province, or a ZIP Code or a postal code.
If you modify your Outlook contacts, tap Refresh Contacts on the Find an Outlook contact screen to update your list of contacts.
You can view a list of your contacts, view details about a particular contact, allow contacts to locate you or block them from locating you, and add or remove contacts.
To view your mobile contacts
On the home screen, tap Manage Mobile Contacts.
MapPoint Mobile Locator displays your mobile contacts.
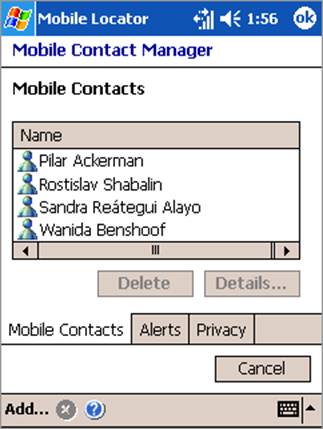
Figure 19. Mobile contacts
To view details about a mobile contact
On the home screen, tap Manage Mobile Contacts.
In Mobile Contact Manager, tap the mobile contact whose details you want to view, and then tap Details.
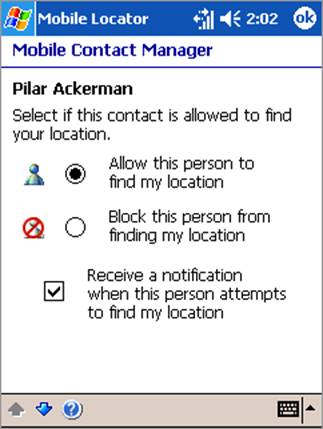
Figure 20. Mobile contact details
To add a mobile contact
On the home screen, tap Manage Mobile Contacts, and then tap Add.
On the Add a Mobile Contact screen, tap the search method drop-down list and select the method that you want to use to search for the person on your network whom you want to add as a mobile contact.
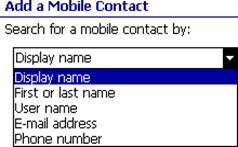
Figure 21. Selecting a search method
In the box below the list, enter the search criteria for the method that you selected in the previous step, and then tap Next.
MapPoint Mobile Locator displays a list of results matching your search criteria.
If your search was successful, tap the mobile contact whom you want to add, and then tap Next. If no users were found matching your search criteria, enter new values and try again.
Choose privacy settings for the mobile contact:
Select Allow this person to find my location or Block this person from finding my location
Note At any time, you can grant or deny all of your mobile contacts permission to find your location. When you block all users from finding your location, the Allow setting for individual mobile contacts is overridden.
For more information, see "Adjusting Privacy Settings" later in this guide.
(Optional) Choose whether to receive a notification whenever the contact tries to locate you.
For more information, see "Receiving Notifications" later in this guide.
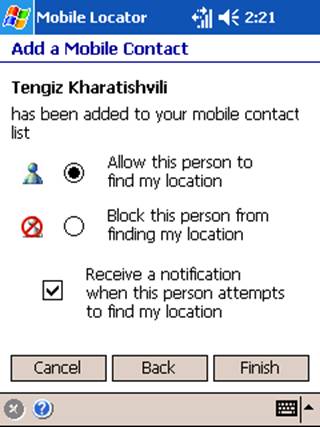
Figure 22. Privacy settings for a mobile contact
Tap Finish.
Your mobile contacts list is updated to include the new mobile contact.
Note You cannot locate this contact until the contact receives the request and approves it.
To remove a mobile contact
On the home screen, tap Manage Mobile Contacts.
In Mobile Contact Manager, tap the mobile contact that you want to remove, and then tap Delete.
When you remove a mobile contact from your list, you are also removed from his or her list. If you add the contact again in the future, you must repeat the request and approval process.
You can configure MapPoint Mobile Locator to notify you when two kinds of events occur:
A MapPoint Mobile Locator user adds you to his or her mobile contacts.
Note You can only request this notification for all users, not on a per-user basis.
A specific MapPoint Mobile Locator finds your current location.
Notifications are either sent to you in an e-mail message or a Short Message Service (SMS) message. Your system administrator chooses the way in which you're notified.
To be notified when a user adds you to his or her mobile contacts
On the home screen, tap Manage Mobile Contacts.
On the Mobile Contact Manager screen, tap the Alerts tab.
Select the Receive a notification when I am added to someone's mobile contacts check box, and then tap OK.
When you select this option and a user adds you to his or her list of mobile contacts, a confirmation dialog box appears the next time you log on to MapPoint Mobile Locator. You must approve this request, as shown in Figure 23, before the user can find your location.

Figure 23. Confirming a request
To be notified when a mobile contact locates you
On the home screen, tap Manage Mobile Contacts.
On the Mobile Contact Manager screen, tap the mobile contact for whom you want to set a notification, and then tap Details.
Select the Receive a notification when this person attempts to find my location check box, and then tap OK.
Note You will still receive notifications even if this user or all users are blocked from finding you.
Privacy control is crucial to users of mobile devices. This section describes how you can use the privacy features of MapPoint Mobile Locator to prevent unwanted interference from others regarding your physical location. MapPoint Mobile Locator allows you to set the following options:
Specify on a per-user basis which of your mobile contacts can locate you.
Grant or deny all users permission to view your location:
When you set this option to Block, no users can locate you.
When you set this option Allow, all users can locate you unless you block them on a per-user basis.
Note The Tools menu of any MapPoint Mobile Locator main screen contains a shortcut to this option. When a check mark appears next to Allow Me to Be Located, other MapPoint Mobile Locator users on your network can locate you. When the check mark is absent, other users cannot locate you.
To allow a specific mobile contact to locate you
On the home screen, tap Manage Mobile Contacts.
On the Mobile Contact Manager screen, tap the name of the mobile contact whom you want to be able to locate you, and then tap Details.
Select Allow this person to find my location, and then tap OK.
To block a specific mobile contact from locating you
On the home screen, tap Manage Mobile Contacts.
On the Mobile Contact Manager screen, tap the name of the mobile contact whom you want to block from locating you, and then tap Details.
Tap Block this person from finding my location, and then tap OK.
To allow all mobile contacts to locate you
On the home screen, tap Manage Mobile Contacts.
Tap the Privacy tab.
Select
Other MapPoint Mobile Locator users on your network can now find your location if they have added you as a mobile contact and you have not specifically blocked them on a per-user basis.
To block all mobile contacts from locating you
On the home screen, tap Manage Mobile Contacts.
Tap the Privacy tab.
Tap None of my mobile contacts can locate me, and then tap OK.
All MapPoint Mobile Locator users on your network are now blocked from finding your location.
This section describes common issues that you might encounter when using Microsoft® MapPoint® Mobile Locator and provides an explanation or resolution for each issue.
During installation, I see an error message saying I have the wrong version of the .NET Compact Framework.
MapPoint Mobile Locator requires the .NET Compact Framework version 1.0 with Service Pack 2 (SP2) or later. The version that you install must be compatible with the operating system and processor for your Pocket PC (for example, 2002 version for 2002 Pocket PC devices).
You can download the .NET Compact Framework from the Microsoft Download Center (www.microsoft.com/downloads/details.aspx?FamilyID=359ea6da-fc5d-41cc-ac04-7bb50a134556&DisplayLang=en.)
I can't locate my mobile contacts, or my mobile contacts can't locate me.
If you cannot locate your mobile contacts, make sure that the users you are attempting to locate have approved your request to add them to your mobile contacts list. Also, make sure that the users you are attempting to locate have not blocked you from finding them.
If your mobile contacts cannot locate you, make sure that you have approved their requests to add you to their mobile contacts lists and that you have not blocked them from finding you.
For more information, see "Adjusting Privacy Settings" earlier in this guide.
MapPoint Mobile Locator displays an error message when I try to log on.
This problem can have several possible causes:
Your GPRS network failed or you are outside its area of coverage. Contact your network administrator or GPRS service provider to learn about any issues related to coverage or outages in your area.
You are supplying inaccurate log-on information. Double-check your user name, password, and domain name, and then try again. Also, remember that passwords are case-sensitive.
Your network administrator has not yet provisioned (established) your account on MapPoint Location Server, or your account has been deleted.
Contact your network administrator to find out the status of your account.
MapPoint Mobile Locator has not been configured with a URL for MapPoint Location Server.
For more information, see "Configuring MapPoint Mobile Locator Settings" earlier in this guide.
MapPoint Location Server is unavailable.
Check with your network administrator to find out about any outages and when service will be restored.
MapPoint Mobile Locator doesn't show me some or all of my Outlook contacts.
Any Microsoft Outlook® contact that you want to use with MapPoint Mobile Locator must include at least a city and state or province, or ZIP Code or postal code. Results are more accurate if a street address is included as well. MapPoint Mobile Locator cannot find post office box addresses.
Also, if you have recently updated your Outlook contacts by using Outlook or Pocket Outlook, you must refresh the Outlook contacts list in MapPoint Mobile Locator before your modifications take effect.
I can't zoom in on certain areas of a map.
You can only zoom in on map areas where further details are available.
Data availability depends on your regional settings. Check your settings to make sure that MapPoint Mobile Locator is configured for the continent on which you're using it. For more information, see "Configuring MapPoint Mobile Locator Settings" earlier in this guide.
The estimated total time in driving directions seems to be inaccurate.
Estimated total time is calculated using the best information available about road types, speed limits, and density (rural or urban). It does not take current traffic and weather conditions into account, so some margin of error is assumed.
Some driving directions seem inefficient, based on my actual experience of a route.
Microsoft receives all mapping and location data from third-party services. To learn about these services or to report any inaccuracies, contact your network administrator.
MapPoint Mobile Locator doesn't show that I have any mobile contacts.
Your mobile contacts list is empty until you add mobile contacts. Each person that you attempt to add must approve your request to add him or her as a mobile contact before you can find his or her location. Your system administrator can also perform this task for you.
Can I import and export data from other mapping software programs?
MapPoint Mobile Locator does not support import or export operations with any programs other than Outlook and Pocket Outlook.
When I find my current location, MapPoint Mobile Locator displays a location that is inaccurate.
Location data is approximate and relies on the accuracy of GPRS services for finding your location and the locations of your mobile contacts. Locations found in this way are typically accurate to within a few blocks. The accuracy varies depending on the density of cell towers within the region.
When I try to use my GPS device to find my location, my Pocket PC doesn't recognize that the device is attached and functioning.
If your GPS device is functioning properly, the most likely cause of this problem is that your Pocket PC is configured to exchange information with other devices using an infrared beam. The infrared beam and the GPS use the same COM port. The COM port in use by the infrared beam won't appear in the list of COM ports on the MapPoint Mobile Locator Options screen until you disable the infrared beam. After disabling it, refresh your list of COM ports, choose the correct one, and try again.
While I am finding driving directions, MapPoint Mobile Locator shows errors.
Your GPRS connection is possibly unavailable, preventing access to MapPoint Location Server. Check with your network administrator or GPRS service provider to find out about any issues related to coverage or outages in your area.
When finding places close to a pushpin, not all categories are available.
Find Nearby categories are updated periodically on MapPoint Location Server. To view the most current list of categories, tap Refresh categories to refresh the list.
The numbering of my pushpins keeps changing.
The pushpin list is sorted alphabetically. As you add and remove pushpins from the map, a pushpin can move up or down on the list, changing its number.
Appendix A
The following tables list the icons used on North American maps and on European maps to mark geopolitical features, such as cities of different sizes, different types of roads, rivers, points of interest, and so on.
Table 3. Map
legend for
|
|||
|
Populated places |
|||
|
|
Major city |
|
Other place |
|
|
City |
|
National capital/major city |
|
|
Small city |
|
Other capital/major city |
|
|
Town |
|
Neighborhood |
|
Boundaries |
|||
|
|
International |
|
State and provincial |
|
|
Disputed |
|
County |
|
|
Treaty or cease-Fire |
|
High-detail route area |
|
|
Indefinite or unsurveyed |
|
|
|
Transportation |
|||
|
|
Interstate highway |
|
Trans-Canada highway shield |
|
|
Limited-access highway |
|
Other |
|
|
Other highway |
|
Mexican federal highway shield |
|
|
Arterial road |
|
Exit or interchange |
|
|
Street |
|
Railroad tracks |
|
|
Restricted access |
|
Railroad tunnel |
|
|
Tunnel |
|
Railroad station |
|
|
Toll Road |
|
Subway station |
|
|
Track or trail |
|
Bus station |
|
|
Route highlight |
|
International airport |
|
|
Road construction route highlight |
|
Military airport |
|
|
Road closure route highlight |
|
Other airport |
|
|
Interstate shield |
|
Seaplane landing area |
|
|
|
|
Heliport |
|
|
State highway shield |
|
Ferry |
|
|
County highway shield |
|
|
|
Park and reserves |
|||
|
|
National park or reserve |
|
Military reserve |
|
|
National or state forest |
|
Cemetery |
|
|
Other park |
|
Golf course |
|
|
Indigenous reserve |
|
Small park |
|
Points of interest |
|||
|
|
Aquariums |
|
Park and ride |
|
|
Conventions centers |
|
Police station |
|
|
Hospital |
|
School |
|
|
|
|
Stadium or arena |
|
|
Museum |
|
Zoo |
|
National park facilities |
|||
|
|
Hiking trail |
|
Ranger station |
|
Miscellaneous |
|||
|
|
River, stream, or canal |
|
Waterfall |
|
|
Intermittent river or stream |
|
Landmark |
|
|
Intermittent lake |
|
Lighthouse |
|
|
Glacier or ice field |
|
Peak |
|
|
Swamp or wetland |
|
Volcano |
|
|
Spring or well |
|
|
Table 4. Map
legend for
|
|||
|
Populated places |
|||
|
|
1,000,000+ people |
|
Other place |
|
|
500,000 - 999,999 people |
|
National capital/major city |
|
|
100,000 - 499,999 people |
|
Other capital/major city |
|
|
20,000 - 99,999 people |
|
Neighborhood |
|
Boundaries |
|||
|
|
International |
|
Indefinite or unsurveyed |
|
|
Disputed |
|
First order administrative unit |
|
|
Treaty or cease-Fire |
|
|
|
Transportation |
|||
|
|
Motorway |
|
Other route shield |
|
|
Other limited-access highway |
|
Railway |
|
|
Major road |
|
Railway tunnel |
|
|
Minor road |
|
Underground or Metro |
|
|
Street |
|
Railway station |
|
|
Restricted access |
|
Bus station |
|
|
Tunnel |
|
Ferry terminal |
|
|
Toll road |
|
Junction |
|
|
Track or pedestrian walkway |
|
Major airport |
|
|
Route highlight |
|
Minor airport |
|
|
Motorway shield |
|
Ferry |
|
|
European route shield |
|
|
|
Park and reserves |
|||
|
|
National park or reserve |
|
Cemetery |
|
|
|
|
Golf course |
|
|
Other park or reserve |
|
Business, cultural, or sports center |
|
|
Small park |
|
|
|
Points of interest |
|||
|
|
Attraction and tourist information |
|
Museum |
|
|
City or town hall |
|
Shopping |
|
|
Civic or community center |
|
Border crossing |
|
|
Convention or business center |
|
Hospital |
|
|
Golf course |
|
|
|
Miscellaneous |
|||
|
|
Landmark |
|
Intermittent lake |
|
|
Mountain peak |
|
Spring or well |
|
|
River |
|
Waterfall |
|
|
Canal |
|
Glacier or ice pack |
|
|
Intermittent river |
|
|
Appendix B
Copyright © 1988-2004 Microsoft Corp. and/or its suppliers. All rights reserved.
Portions copyright © 1990-2003 InstallShield Software Corporation. All rights reserved.
Copyright © 2003 by Geographic Data Technology, Inc. (GDT).
Certain mapping and direction data provided by Geographic Data Technology, Inc.
under license and copyright © 2002 2003 Geographic Data Technology, Inc. and
copyright © 1991-2003 Government of
MapPoint® Web Service uses Automap® routing technology.
Mapping data copyright © 2003 Navigation Technologies. All rights reserved. This data includes information taken with permission from Canadian authorities copyright © Her Majesty the Queen in Right of Canada.
Copyright © 2003 Acxiom Corporation. All rights reserved.
https://www.databyacxiom.com
Ordnance Survey® digital map data copyright © Crown 2003. All rights reserved. License number 100025500.
Compilation of certain demographic, lifestyle, and mapping data
copyright © 2002 by Claritas Group Ltd.,
Other cartographic data sources include: County High Points by Andy Martin ([email protected]). University directory data provided courtesy of Princeton Review Publishing, National Imagery and Mapping Agency, United States Geological Survey, United States Board on Geographic Names, National Transportation Atlas Database, Bureau of Transportation Statistics, World Conservation Monitoring Center, CIA World Data Base II, United States National Parks Service, United States Census Bureau, and the National Oceanic and Atmospheric Administration.
All information in this product is subject to change without notice. Microsoft makes no representation that the information in this product is absolutely accurate or complete. Microsoft does not assume and hereby disclaims any liability to any party for any loss, damage, or any potential business or travel disruption caused by errors, omissions, or inaccuracies in the product, whether such errors, omissions or inaccuracies result from negligence, accident, or any other cause. It is strongly recommended that you verify the information in this product before making final business or travel plans. The product should not be used for any purpose requiring exact measurement of distance or direction, or for precision in address location or in the depiction of geographic locating features.
WARNING: This computer program is protected by copyright law and international treaties. Unauthorized reproduction or distribution of this program, or any portion of it, may result in severe civil and criminal penalties, and will be prosecuted to the maximum extent possible under the law.
|