Premiere Pro 1.5 Tutorial, Part 3
Keyframing, motion paths and more
 Next in our
series of Premiere Pro 1.5 tutorials, we'll work with picture-in-picture
effects, learn some basic keyframing techniques and
explore a few more helpful hints. With this newest version of Premiere, we'll
take a look at pre-sets which simplify the effects-building process, and then
we'll modify them while we learn how to create motion paths, exploring many
capabilities that were previously only available in Adobe After
Effects.
Next in our
series of Premiere Pro 1.5 tutorials, we'll work with picture-in-picture
effects, learn some basic keyframing techniques and
explore a few more helpful hints. With this newest version of Premiere, we'll
take a look at pre-sets which simplify the effects-building process, and then
we'll modify them while we learn how to create motion paths, exploring many
capabilities that were previously only available in Adobe After
Effects.
First, drag a clip down to the timeline from the Project window and drop it on V2, above another clip that you already have sitting on V1. When you place that clip on V2 above the one on V1, it becomes a cutaway to the shot on V2. As you probably already know if you've worked with Premiere before, the tracks that are higher on the timeline have priority over those below them.
By the way, while we have that clip sitting there, try a neat trick you can now do with Premiere. First, select the clip on V1. Hold down Control and the plus (+) key, and track 2 will now be the target video track. Now with the Current Time Indicator (CTI) parked at the beginning of the clip on track 2, hit Control-D and the default transition (probably a cross dissolve unless you've changed it) is now added to the clip on track 2 (see graphic at left). Even though you can also drag a dissolve onto that clip in track 2, it's so quick and easy to just do the Control-D thing. I like adding cutaways like this, because it's so easy to drag them back and forth, deciding the perfect spot to insert the cutaway in a nondestructive way that appeals to me -- you might want to try this and see if it works for you, too.
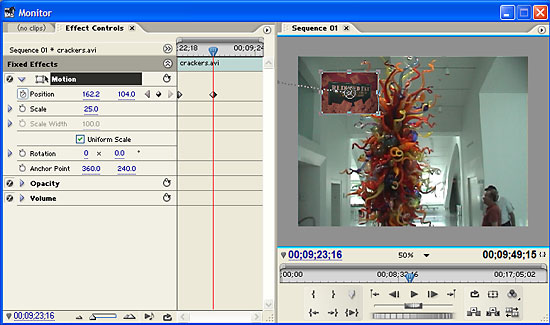
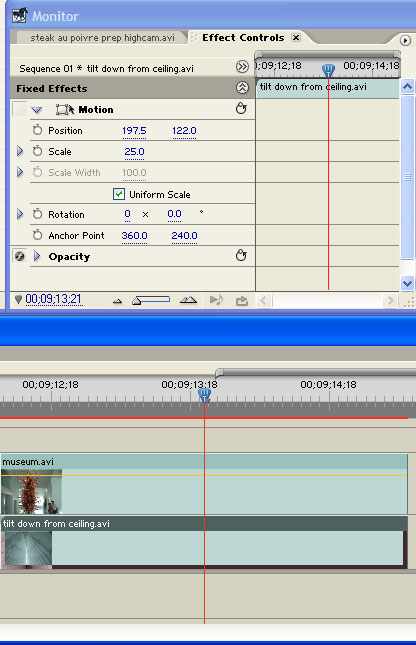
Now, let's go to the Project window and click in the Effects tab. At the top of that list, you'll see Presets, which contain lots of work-saving effects. I would encourage you to wander around those and get to know what's inside, because there are lots of useful tricks in there that can all be modified to your liking. Let's grab one and modify it. Inside that folder, you'll find a group of picture-in-picture (PiPs) effects. Inside that folder you'll see 25% PiPs, so open those and drag PiP 25% UL (upper left) and drop it onto that clip you just placed on track 2. If your CTI (current time indicator) is over the clip, you'll see the effect immediately in your Monitor window. Now in that same Monitor window, click on the Effect Controls tab and then click on the Motion "twirlie" (properly called the "disclosure triangle") -- that is, the arrow beside Motion that will drop down a list when you click on it -- you'll see that what you've done is changed the Scale property down to 25% and changed the position property to place the box in the upper left of the screen (see graphic below).
If you want to change these parameters, there are a few ways to do it. One, you can click on the hot text (the blue underlined numbers) and scrub it by dragging your cursor right or left, or click on the hot text and directly enter numbers. But by far the best way to control these parameters is by using what Adobe calls direct manipulation. To tell if an effect allows direct manipulation, look for the icon that looks like a little box with four points on each corner and a arrow next to it, next to the name of the parameter (see graphic above, just to the left of the word Motion). To access direct manipulation, click on the name of the parameter, in this case, Motion, and it will become highlighted. Then, look in the Program window and you'll see handles and a border around the frame you'd like to move. Now you can drag the frame around and adjust its size without dealing with numbers at all.
Now let's specify some keyframes. Here's where Premiere Pro gets really powerful. If you're familiar with Adobe After Effects, you're in luck because now the same effects engine is being used inside of Premiere Pro. What you're looking at inside the Effect Controls window is a miniature timeline. Inside is a CTI (Current Time Indicator) just like the bigger one on the timeline. The duration of this window is the length of the clip you're working with.
|
|
|
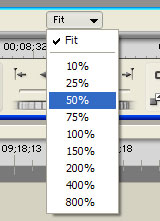
Tip: Take a look at the bottom of your program window, and you'll see the word Fit. Click on that and you're offered a number of sizes to make your program monitor. Select 50% and you can see off the edges of the screen, a handy view when you want to drag a box out of frame. |
Make sure your CTI is at the beginning of the clip, and click on the word Motion in your Effect Controls window. Now just drag the box off the screen in your Program window. That's where the box will be at the beginning of the shot. Now tell Premiere you want to start adding keyframes by clicking on the small stopwatch icon to the left of the word Position, and then move the CTI forward to the spot where you'd like to add a keyframe. As soon as you drag the box onto the screen and let go of it, a keyframe noting its position will be recorded, represented by a little diamond at the spot where the keyframe was added (see graphic below).
|
|
|
As soon as you drag the box onto the screen and let go of it, a keyframe noting its position will be recorded, represented by a little diamond at the spot where the keyframe was added. |
Play that back and you'll see the box fly on the screen and stop where you added that keyframe. Now try moving the CTI further to the right and then drag the video box in the monitor to another position. Notice that as you drag the box, there are dotted lines trailing the box. Each one of those represents a frame, showing you where the box will be located as each frame plays back. As you drop the box at its next location, notice that another little diamond has been automatically added on your mini-timeline. Scrub the CTI back to the beginning of your mini-timeline and then hit the Space bar, and you'll see the motion you've just created.
Now let's take this keyframing concept a step further, using a new feature included with Premiere Pro 1.5: Using Bezier curves to further refine keyframes. Before this new version of Premiere, the interpolation between each keyframe was a straight line. Now smoother motion paths are automatically added and you can adjust them way beyond that as well. Access this feature by right-clicking on any keyframe (the little diamond symbol), select Spatial Interpolation and you'll see choices of Linear, Bezier, Auto Bezier or Continuous Bezier. Note that Auto Bezier is on by default, automatically smoothing out the moves between all your keyframes. If you want to further control how these moves look, click on the word Motion, and take a look at the Program monitor, where you'll see that the Bezier keyframes have tangent controls that you can grab and change, giving you even finer adjustment of these parameters. If you hover your cursor over the keyframes, you'll see the cursor change slightly -- it will invert and you'll get a little pointer next to it. Be careful where you click here, because if you click on the wrong spot, you'll de-select that motion path and you'll have to click on the word Motion to bring it back. Try moving some of these curves around and notice the difference.

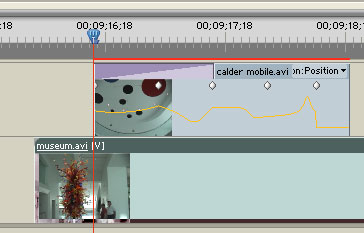
Now what about the speed of the move? That can be adjusted by temporal interpolation. Let's do this by working with the clip directly on the timeline. First, in the icons at the beginning of the track header, there's a keyframe symbol with a red line through it, indicating that no keyframes are being displayed on the timeline (see graphic at left). Click on this, and select Show Keyframes, and then you'll see indicators of the keyframes on the timeline. To better see the keyframe indicators, zoom in on the clip that contains your keyframes by hitting Alt and scrolling your mouse wheel while pointing at it. Also make things easier by adjusting your track height by dragging the top of the track on the left, right above where it says Video 2, for instance. This will make this whole operation easier to see and work with. By the way, if you hold Shift while doing this, all the track heights will be changed.
Now look at the clip with which you're working, and you'll notice that Opacity is the default keyframe displayed. Click on the area where it says Opacity, and you'll see choices of other keyframes you can display. For the purposes of this exercise, select Motion and then Position, and the keyframes you entered before will be visible on the timeline (see graphic below). This serves different purposes. For one, if you're trying to line up multiple keyframes from different clips, you can now see them all on the timeline simultaneously. And, it also allows you to directly manipulate them on the timeline. Notice as you move your cursor over each diamond-shaped keyframe marker on the timeline, the cursor changes and it also gives you a tool tip telling you the time code number of the keyframe's location.
|
|
|
(Click graphic for enlargement) Temporal keyframe adjustments can be made right on the timeline. |
Next, select the pen tool by either clicking on it in the tool bar on the left, or an easier way to way to do this is simply hit the letter P on your keyboard. Then, marquee-select all the keyframes in the clip by dragging across all of them. Now all are selected, so any adjustments you make to one will be mirrored across all the keyframes. You'll notice there are straight lines between all these keyframes -- that's because there is no speeding up or slowing down between those keyframes yet. If you now right-click on any one of your keyframes and select Auto Bezier, you'll change those keyframes from being linearly interpolated into Bezier interpolation. Leaving all of them selected, by clicking on any one of the Bezier handles -- the circular points on either side of the keyframes -- you'll immediately create a curve which now indicates that you're going to slow down as you're moving into each keyframe. So scrub to the beginning of that clip and you'll see that as you're moving in and out of those keyframes, you're speeding up and slowing down as it enters and exits each one. Of course, you can select just one of the keyframes with the pen tool and adjust it separately if you'd like as well.
These are the basic techniques of keyframing in Premiere Pro 1.5. The best part of this is, it's not a seriously difficult technique to learn. This is how all keyframing is done in Premiere and After Effects, so if you can master this, you've gone a long way toward harnessing the power that's inside Adobe Premiere Pro 1.5.
|