
Shift Planning
Interface
for Microsoft Excel® (Versions 5.0 and higher)
© 1994-1995 SAP AG
Status: 07.06.1995 - 1.00d
English Translation 09.12.1997 - 1.00e
Contents
Printing from the Shift Planning Component
Creating Your Own Templates
Software Requirements
Attachment A: Naming Conventions for Templates
Attachment B: The Download Interface
Attachment C: Changing the Macro
Attachment D: An Example
Attachment E: English Object Libraries
Attachment F: Error Messages When Using The Macro
You can format your Shift Planning data in the SAP R/3 System using the Microsoft Excel ® interface (Excel versions 5.0 and higher). You can use the format proposals included with SAP's standard R/3 system, or create your own templates and integrate them into the Shift Planning component. You can also save data as Microsoft Excel worksheets and then use Excel to edit them.
For more information on using the Shift Planning component (including the printing option), refer to the online documentation.
To create your own templates, open the WDPDDMAC.XLS worksheet in your R/3 Frontend Software directory. A dialog box appears in which you are asked to confirm your selection by choosing "OK." Make sure that you hold down the shift key when selecting "OK" to prevent the macro from starting automatically.
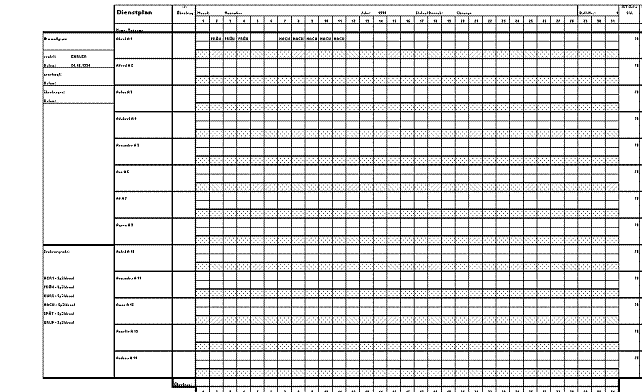
Now insert a new page in the worksheet to use for planning your shifts. Note that the areas for the character legend and the data are connected. The character legend contains 25 entries and the data area contains 36 entries of variable length (depending upon the number of persons in the plan). The character legend and the data area can be displayed horizontally or vertically and can also be "rotated" (transposed).
After you have created your formatted template, you must add the names to the document listed in Attachment A. The names must be included in this list so that the macro "knows" where and how the data should be inserted in your template.
Rename the original template and name your document "template." You thus ensure that your template, not the original, is used when you print your document.
In addition, it is important to save your changes.
In order to use the Microsoft Excel® interface you need the following: Microsoft Excel® (Version 5.0 or higher) software; an IBM-compatible computer, SAP R/3 Frontend Software (SAPGui) as well as SAP R/3 (Release 3.0 or higher) that includes the "Shift Planning" component.
In order for data to be inserted in the right place in your templates, you must use certain names (Excel naming conventions). You define the names by choosing Insert B Names B Specify in your template as follows:
Lines: Number of lines in the data area of your shift plan.
DataTranspose: True, if you want the data to be "rotated" (transposed) before insertion, otherwise False. Three lines per person and one column per day are normally used (DataTranspose=False).
AppendixTranspose: True, if you want the data to be "rotated" (transposed), otherwise False. Normally, the character legend is stored in one line and rotated before insertion so that it is displayed in one column (DataTranspose=False).
Month: Refers to the cell in which the month is displayed.
Year: Refers to the cell in which the year is displayed.
Area: Refers to the cell in which the station/area is displayed.
PageNo: Refers to the cell in which the page number is displayed.
CreatedBy: Refers to the cell in which the name of the person who created the shift plan is displayed.
CreatedOn: Refers to the cell in which the date when the shift plan was created is displayed.
ApprovedBy: Refers to the cell in which the person who approved the shift plan is displayed.
ApprovedOn: Refers to the cell in which the date the shift plan was approved is displayed.
CopiedBy: Refers to the cell in which the person who copied the data is displayed.
CopiedOn: Refers to the cell in which the date when the data was copied is displayed.
Appendix: Refers to the first cell on the left from which the character legend is to be displayed.
Data: Refers to the first cell on the left from which the data is to be displayed.
Attachment A: Naming Conventions for Templates (2)
Txt1-Txt17: Text Elements 1-17:
"Shift Plan"
"+/- Carryover"
"Month:"
"Year:"
"Station/Area:"
"Page No.:"
"ACTUAL time in hrs."
"TARGET time in hrs."
"'+/- new in hrs."
"Name"
"Created:"
"Date:"
"Approved:"
"Date:"
"Copied:"
"Date:"
"Character legend:"
Days1: Refers to the first cell in the rows or the column header of the data areas. All days are entered (max. 31) in this row or column.
Days1Transpose: True, if you want the days to be inserted vertically (column). False, if you want the days to be entered horizontally (row). In either case, the cell that is named Days1 starts the column or row.
Days2, Days2Transpose: identical to Days1 and Days1Transpose.
The Transaction PP61 (Report SAPFH5AH) writes data to the WDPDDPRT.XLS file in the R/3 Frontend Software (SAPGui) when you call up the printing function. Because this data exists only as converted text format, you must follow a certain file construction which is detailed below. Please note that the tab key is the column indicator and the enter key is the line indicator.
Row 1:
Column 1: Number of rows in the data area
Column 2: Name of the formatted template (normally "template")
Column 3: Print (0 = no, 1= yes)
Column 4: Save (0 = no, 1 = yes, 2 = ask user)
Column 5: Folder name, if you have saved it, otherwise leave blank
Column 6: Close Excel after macro is completed. (0 = close macro and data only, 1 = completely exit Excel, 2= complete editing macro, but do not save or print data)
Column 7: Number of the first page
Column 8: Name of the month (Header data for printing the plan appears after this point)
Column 9: Year
Column 10: Station
Column 11: Created by
Column 12: Created on
Column 13: Approved by
Column 14: Approved on
Column 15: Copied by
Column 16: Copied on
Column 17 to Column 46: Character legend
Column 47: Version indicators (3 at present)
Row 2:
Columns 1-17: Language-dependent text elements. Copied to the template according to Txt1-Txt17.
Row 3:
Columns 1-31: Columns and row headers (day) for the data area. Copied according to days.
Following Rows: Column1 contains the last name and first name, Column2 contains carryover from the previous month, Columns 3-33 contains the planning data and Columns 34-36 contain the actual time, target time and balance.
You can also change the macro included in the standard R/3 System for the Shift Planning component ("VBA Macros"). To do so, open the WDPDDMAC.XLS folder in the directory where your R/3 Frontend Software (SAPGui) is located. A dialog box appears in which you are asked to confirm the "Open File" command by choosing the "OK" button. Make sure that you hold down the shift key so that the macro does not start automatically. Then choose Format B Worksheet B Show to display the "VBA Macros." Now you can change the source code.
Please be advised that SAP only provides support for the original macro.
Normally, you copy the object libraries for English macros (XLEN50.OLB and VBAEN.OLB), as well as the country-specific files when installing Microsoft Excel on your computer. The SAP macro runs automatically on these systems.
However, sometimes the English object libraries do not appear in your system.
If any problem occurs when your system is searching for the English object libraries, you should implement the following changes to your system:
Copy the files WDPDXL50.OLB and WDPDVBA.OLB from the directory where your R/3 Frontend Software (SAPGui) is located to the Microsoft Excel directory. Rename the WDPDXL50.OLB file as XLEN50.OLB, and the WDPDVBA.OLB file as VBAEN.OLB. Then install the Microsoft Excel Visual Basic manual from the "Programming Code for International Installation" chapter found in the "Installing and Registering Object Libraries" section.
SAP has thoroughly tested the Excel interface and has corrected as many errors as possible. Thus, you should not expect to occur when using the macro for its intended purpose.
However, if an error does occur when using the macro, an error message appears. The following error messages have already been defined:
Error #2: "The formatted template cannot be found!". This error occurs if the name of the worksheet template has been changed. Change the name only if you want the modified macro to be used by all. Specify the name of the template in Customizing.
Error #3: "The data must be loaded before calling the format!". This error occurs if you loaded the macro but did not hold down the shift key when you confirmed the menu command (by choosing the "OK" button). The macro automatically started processing the data.
Error #4: "Outdated macro/Data has an unknown format!". The macro was probably started with a file that does not contain the data downloaded from the Shift Planning component in the SAP R/3 System. If this error occurs, however, when starting the macro within the SAP R/3 System, the macro is most likely older than the SAP R/3 software being used. Install the new macro that was included with your SAP R/3 System.
|
