
WordSurv
Version 6.0.2
Student Manual
Copyright 2006
Overview of the WordSurv Course
Module CD - Creating a Database and a Gloss Dictionary
Module CV - Creating new varieties
Module EF - Entering Forms in Varieties
Start Keyman and select a keyboard
Enter forms (phonetic transcriptions)
Module CC - Creating a Comparison
Align characters and group cognates
Module SD - Specifying Degrees of Difference
Specify Degree of Difference values
Module VC - Viewing and Interpreting Comparison Analysis Results
View and Interpret Comparison Analysis: Tally, Total, and Percent
Module VP - Viewing and Interpreting Phonostatistical Analysis results
View and Interpret Phonostatistical Analysis: Total Degree of Difference, Correspondences, and Ratio
Module VA - Viewing and Interpreting Comparativist's Assistant results
Appendix B - Reliability codes
Appendix E - Grouping by Columns
The goal of this course is to teach the basic use of WordSurv so that you can use it to help determine the genetic relationship, if any, of the languages or dialects that you are comparing as part of your survey. Check the Index to find quick reference to information in this Student manual. For additional information, you can refer to the User Helps (Appendix A describes how to access them).
Be able to do the following:
Create a new database.
Create a gloss dictionary and add entries to it.
Create a survey.
Create/duplicate varieties to associate with it and add entries to varieties
Enter forms (phonetic transcriptions) of the entries in varieties.
Create a comparison.
Align the characters in forms and then group cognates.
Specify degree of difference values to phoneme pairs.
View and interpret comparison results.
View and interpret phonostatistical analysis results.
View and interpret COMPASS algorithm results.
Add synonyms and additional groupings, while learning the differences between them.
Become aware of the User Helps, which are available in the Help menu.
A study of the science or art of how to analyze and compare phonetic transcriptions towards determining cognates is beyond the scope of this manual.
During a typical language survey, the surveyor will compile lists of glosses with phonetic transcriptions that are elicited from native speakers. These lists are analyzed to help identify potential linguistic or genetic relationships.
WordSurv (for Word Survey) was written primarily as a tool for the dialect surveyor who is concerned with gaining a present day picture of the language situation in a given area. It allows for easy entry and maintenance of word lists, and repeatable comparative analysis.
Using WordSurv consists of the general steps outlined in Course Objectives (previous page).
Menus (File and Help) are near the top of the window, just below the title bar. The tabs (Word List Management, Comparisons, Comparison Analysis, Phonostatistical Analysis and Comparativist's Assistant (COMPASS)) are below the menu bar.
Paula Anderson and a team are beginning a survey of languages. First, they will elicit and record the forms (phonetic transcriptions) for a number of words.
First, she needs to create a new database and gloss dictionary. Then, she needs to create a survey and varieties for each language. She will then populate the varieties with entries.
In this module, you will do the steps to do the following:
Create a new database to hold the survey and varieties you will create.
Create a gloss dictionary.
Start WordSurv. (Click ![]() on your desktop, or use Start.Programs.WordSurv. WordSurv.)
on your desktop, or use Start.Programs.WordSurv. WordSurv.)
![]()
![]()
![]() Create
a new database using one of these methods:
Create
a new database using one of these methods:
On the File menu, click New Database.
Press the shortcut keys Ctrl+N.
The Enter Name for New WordSurv 6.0 Database dialog box opens.
Choose the folder in which to save the new
database.
We recommend you create a folder called WordSurv
Data in your My Documents folder.
Click the File name box, and enter WordSurv Exercises.
(The Save as Type box should already read Microsoft Access Databases (.mbd), so you should not have to change it.)
Click Save.
The newly added database becomes the open (current) database, as indicted by the file name in the title bar.
Now you are ready to create a gloss dictionary. You do this in the Word List Management tab. Notice that there is a gloss dictionary called All Entries, but it has no entries.
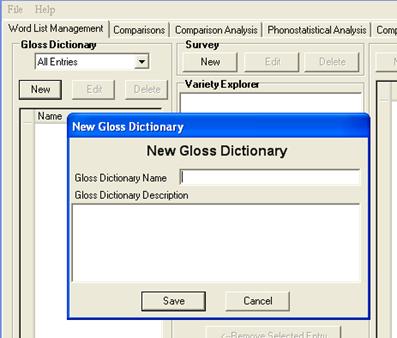
In the Gloss Dictionary pane, click New.
The New Gloss Dictionary dialog box appears.
In the Gloss Dictionary Name box, enter Practice.
Optionally, enter a brief description in the Gloss Dictionary Description box.
Click Save.
Practice becomes the current gloss dictionary, but has no entries yet.
In the Gloss Dictionary pane, click Add Entries to Dictionary
The Add Entry dialog box appears. Notice the two selectable options Add New Entry and Add Existing Entries. Because this is a new database, there are no existing entries. So the lower right pane is empty.
In the dialog box, Add New Entry is selected by default, so continue as follows:
In the Name box, enter child and then, click Add Entry (For this exercise, we will not enter a definition, language or part of speech.)
Notice that child now appears in the Entries currently in the dictionary pane (lower right pane of the dialog box), and in the Gloss Dictionary pane (main window-you may need to move the dialog box to see it.) Also, the Name box becomes empty again.
In the Name box, enter come, and then click Add Entry.
In the Name box, enter eat, and then click Add Entry.
Verify that the three entries appear in the Entries currently in the dictionary pane, and then click Done.
Course Note: In real practice, you will enter many more entries to obtain meaningful results. For this exercise, we will limit the number of entries and varieties to minimize redundancy.
Paula and her team have surveyed four communities. That is, they have elicited data in four speech varieties; some may be dialects of the same language; some may be closely related but distinct languages; some may not be closely related to the others at all. Paula needs to create four varieties, grouped under a single survey. That way, she and her team will be able to view the results that come from comparisons of each variety with all the others.
In this module, you will do the steps for the following:
Create a new survey.
(In subsequent modules, you will create varieties and add entries to them.)
In the Word List Management tab, Survey pane, click New
The Create New Survey dialog box appears.

 In the Name box, enter the name Practice Survey. The
survey must have a name.
In the Name box, enter the name Practice Survey. The
survey must have a name.
Optionally, in the Description box, enter a brief description.
![]()
![]() In
the Location box,
enter Europe and Asia.
In
the Location box,
enter Europe and Asia.
Click Save.
![]()
Practice Survey appears in the Variety Explorer pane. Next, we need to add varieties to associate with it.
Paula needs to create varieties to associate with her survey. She finds that the Variety dialog box allows her to enter various metadata about the variety. This metadata includes the surveyors, consultants and helpers, as well as geographical information including GPS coordinates.
For our purposes here, we will not enter a lot of metadata.
In this module, you will do the steps to do the following:
Create a new variety associated with survey Practice Survey.
Add entries to the varieties in two different ways, using the Add All Entries button, and using the Add New Entry button.
Duplicate and edit the content of a variety.
You do this in the Word List Management tab.
In the Variety Explorer pane, click Survey: Practice Survey.
In the Variety pane, click New to open the Variety dialog box.
In the Name box, enter the name of the variety. In this case, the first variety is Dutch, so enter Dutch Variety.
![]() The
Survey box (lower
right corner of dialog box) needs to contain Practice
Survey, the survey you just added. If it does not, select it to
associate it with the new variety.
The
Survey box (lower
right corner of dialog box) needs to contain Practice
Survey, the survey you just added. If it does not, select it to
associate it with the new variety.
Course Note: There are numerous boxes in this dialog box that hold metadata about the variety. You can add or edit this metadata at any time. For our purposes, we'll leave most boxes empty.
 In
the Surveyors box, enter Paula.
In
the Surveyors box, enter Paula.
In the Reliability box, enter E.
Tip: Appendix B discusses reliability codes.
Click Save.
Dutch Variety appears the Variety Explorer pane, subordinate to Practice Survey.
Recall that when Paula and her team surveyed the communities, they elicited data in four speech varieties, for entries in the gloss dictionary. We have only created one variety so far.
We need to copy entries from the Practice gloss dictionary to Dutch Variety. Then, in a later topic, we will duplicate the Dutch Variety, but we want to add entries first. We do this in the Word List Management tab.
Course Note: It is important to know that for the computations and analyses done in a subsequent tab, a minimum of 10 cognate entries need to be in each variety. However, we will add fewer. In real practice, you will have many more entries in many more varieties. Here, we want to minimize redundancy. Later, we will open a sample database with more content.

 In the Gloss Dictionary pane,
make sure that the gloss dictionary Practice
is selected.
In the Gloss Dictionary pane,
make sure that the gloss dictionary Practice
is selected.
In the Variety Explorer pane, click Dutch Variety.
Notice that the Add All Entries button below the Variety Explorer pane become available.
Click Add All Entries.
The Add all Entries question box appears.
As we do want to copy all the entries in the Practice gloss dictionary to Dutch Variety, click Yes in the question box.
The entries child, come and eat, are copied to the Variety pane. This is on the right side of the display. The entries will appear in that order if the Sort box below the Variety pane is set to Alphabetic.
Later, we will enter the form, which is the phonetic transcription of each entry, and note metadata about the form.
Paula decides that she wants to add the entry "cow" which is not currently in the Practice or All Glosses gloss dictionaries. She could use the Add Entries to Dictionary button in the Gloss Dictionary pane, but then she would need to also add it to the variety using the Add Selected Entry button. However, by adding it directly into the variety, it is automatically added to the All Entries gloss dictionary.
 Add New Entry
Click Add New Entry, which is near the bottom of the Variety pane.
The Add New Entry to Variety dialog box appears.
 Notice that the Add Existing Entries
features are not available, although the current entries appear there.
Only the Add New Entry
portion is available for use.
Notice that the Add Existing Entries
features are not available, although the current entries appear there.
Only the Add New Entry
portion is available for use.
 In
the Name box, enter cow.
In
the Name box, enter cow.
Notice that there are no possible entry matches in the right pane.
You may enter a definition, language, and part of speech (optional).
Click Add Entry.
Click Done.
Cow is added to the variety, and to the All Entries gloss dictionary. Notice that it is not added to the Practice gloss dictionary.
Paula now has one variety with some entries, but she needs four varieties. One way to proceed would be to repeat the steps in Create a Variety (above) three times. But, she can get the same effect using Duplicate and editing the duplicated variety. Two advantages of using this method are:
The new varieties are automatically associated with the same survey.
The metadata (surveyors, consultants, start date, and so on) for the varieties in the survey may be more consistent than if they were entered independently.
In the Variety Explorer pane, select the Dutch Variety.
![]()
 In the Variety - Dutch Variety
pane, click Duplicate.
In the Variety - Dutch Variety
pane, click Duplicate.
The Variety dialog box appears. It looks exactly like it did when you created the Dutch Variety, except the subtitle that reads Duplicate Variety instead of Create New Variety, and the Name box contains Copy of Dutch Variety.
Edit the Name box content to read English Variety.
In normal practice, you will edit some content in other boxes, such as Language or Village at this point. For this exercise, this is optional. Remember that the Survey box needs to associate the duplicated variety with the proper survey, here Practice Survey.
Click Save.
Repeat the above steps to create the Farsi Variety and the French Variety.
Your Variety Explorer pane will now appear like this.
Recall that Paula and her team surveyed four communities, eliciting data in four speech varieties. Now it is time to enter the data into the varieties she created. Here, this data includes the Form, which is the phonetic transcription of the entry as heard in the speech variety.
To enter a phonetic transcription (form), you need to use Keyman with a Unicode keyboard, such as IPA Unicode 1.0.6, and a Unicode font, such as Doulos SIL. This is the default font for columns that contain IPA data, which includes the Form column.
Any associated metadata for each entry may also be entered in the corresponding Note field.
In this module you will do the steps to do the following:
Start Keyman.
Enter forms (phonetic transcriptions).
Documentation for the Keyman keyboard is installed with WordSurv 6
at You can access these from the Start menu: On the taskbar, click Start, point to Programs and then to WordSurv 6, and then
click Unicode 1.0.6 Keyboard
Installation or readme.txt (for installation help), or Click Start, point to Programs and then to WordSurv 6, and then
click Unicode 1.0.6 Keyman
Keyboard (for keyboard layout and keying sequence charts).
Tip:
C:\Program Files\WordSurv
6\IPA Unicode 1.0.6 Keyman Keyboard
As noted above, before you can enter forms (phonetic
transcriptions) for the entries in your varieties, you need to start Keyman and select the IPA
keyboard.
Note: The process of installing Keyman and the IPA keyboard is beyond the scope of this manual. However, it is possible that when you set up Keyman, you can chose to have it start automatically when you start your computer. However, for this exercise we will start Keyman manually.
Use Start.Programs.Tavultesoft Keyman.Keyman.
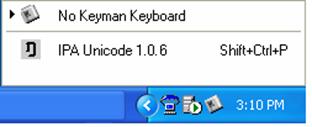
In the taskbar notification area in the lower right corner of the desktop, click the Keyman icon and select the installed keyboard, such as IPA Unicode 1.0.6 from the menu that appears.
![]()
Tip: You will not be able to enter normal text with an IPA keyboard selected. For normal text, select No Keyman Keyboard using the icon in the notification area.
Now you are ready to enter forms.
In the Variety Explorer pane, select Dutch Variety.
 Optionally,
you may click the line between the Form
and Notes column headers
and drag it to widen the Form
column
Optionally,
you may click the line between the Form
and Notes column headers
and drag it to widen the Form
column .
.
In the Variety - Dutch Variety pane, double-click the cell in the Form column for child, the first entry.
The right-arrow symbol at the left of the entry changes to a writing-pen symbol to indicate that the row is in the data-entry/edit mode. Also, the cell background color changes.
To enter the form of child, which is kHInt, type the following: kh^i= nt
Double-click the cell in the Form column for the next entry, come.
Enter its phonetic transcription, kHoum«;by typing kh^oum e=
Repeat the above steps for the remaining entries:
cow = kHu so type kh^u
 eat = EitH«n so type e< ith^e= n
If you are sure you entered the forms correctly, press Enter, and then click Commit Changes.
Your list should look like this:
Note: The entries shown here assume the Sort box is set to Alphabetic.
Now you are ready to add Form content to the entries in the other varieties. Follow the steps on the next page.
In the Variety Explorer pane, select the English Variety.
Double-click the cell in the Form column for the first entry (child).
Enter the English form tSAild for child (see the table below for keying sequence).
Optionally, click the cell in the Note column and enter a brief note (metadata about the form). You can also use the Tab key to move there from the Form column.
Repeat these steps for the remaining entries and then the remaining varieties.
Remember to press Enter and then click Commit Changes before you move to the next variety.
This table lists the forms for the varieties:
|
English Variety |
Form |
Keying sequence |
|
child |
tSAild |
ts=aild |
|
come |
kH«m |
kh^e=m |
|
cow |
kHau |
kh^au |
|
eat |
?it |
?it |
|
Farsi Variety | ||
|
child |
aulatŠ |
aulat#4 |
|
come |
bia |
bia |
|
cow |
gau |
gau |
|
eat |
mExoÈran |
me<xo}r>an |
|
French Variety | ||
|
child |
aâfaâ |
a~fa~ |
|
come |
vOni¨ |
vo>nir= |
|
cow |
vaS |
vas= |
|
eat |
manZe |
manz=e |
Note: Certain diacritics above letters may not appear in the Form column as shown in the table above because of font size. The diacritics will appear correctly in the large box above of the Sort box as a larger font is used there. However, you can right-click the Form column header and then select Change Font for This Column, to access the Font dialog box. Also, to widen the Form column, simply click the line between the Form and Notes column headers, and drag it to the right.
Paula has four varieties with forms, and is now ready to create a Comparison so she can group the elicited forms into cognate sets (descended from the same historical root word or parent)-that is, she will give entries that she presumes to be cognate the same number or letter.
For example, given the word for 'thing' in English, French, Spanish, and Farsi, the following grouping may be appropriate:
|
Form |
Variety |
Grouping |
|
PIN |
English |
a |
|
Soz |
French |
b |
|
kosA |
Spanish |
b |
|
tSiz |
Farsi |
c |
Note: The particular characters used in the Grouping column are arbitrary. Typically 1, 2, 3, A, B, C or x, y, z are used.
In this module, you will do the steps for the following:
Create a comparison
Align characters
Group cognates
Important: Be sure your Keyman keyboard is set to No Keyman Keyboard.
Click the Comparisons tab.
In the Comparisons Information pane, click New.
 If the New button is not
available, you need to click the Commit
Changes button in the Word
List Management tab.
If the New button is not
available, you need to click the Commit
Changes button in the Word
List Management tab.
 In
the Comparison dialog
box Name box, enter Practice Comparison.
In
the Comparison dialog
box Name box, enter Practice Comparison.
In the Description box, enter a brief description (optional).
In the lower pane, click ![]() to expand the survey to see its associated varieties.
to expand the survey to see its associated varieties.
Click the check box for Survey: Practice Survey, which selects all four varieties.
Click Save.
The list of entries appears in the left pane. The right pane shows the form and a copy of the form in the AlignedRendering column.
Now we need to enter "aligning characters" and group the cognates. For each entry, you need to reorder the varieties, align characters, and group cognates. (Reordering makes it easier to see where word alignments should be done.)
In the left pane of the Comparisons tab, click cow, the third entry.
Study the forms (phonetic transcriptions) for the entry, and then do following:
a. To reorder the list, click and drag the row up or down to the desired position. For cow, you would want to have French Variety at the bottom as shown here.
Discussion: Aligning words in the AlignedRendering column helps you decide if the words are truly cognates. Each column of aligned renderings in the same grouping should contain symbols that are either the same or stand for sounds that correspond across languages. If you align a g and a k in the same column (as shown below), you are positing that in one of these languages a g became a k; or a k became a g in one of these languages; or some other sound became k in one language and g in the other.
 You will probably find
symbols in some rows with no counterparts in other rows. There are two special symbols to use
when this occurs. Sometimes a sound
change doesn't involve two symbols, but the insertion or deletion of a
symbol. In this case, use the indel
("/"), so named
because it signals either an insertion or a deletion.
You will probably find
symbols in some rows with no counterparts in other rows. There are two special symbols to use
when this occurs. Sometimes a sound
change doesn't involve two symbols, but the insertion or deletion of a
symbol. In this case, use the indel
("/"), so named
because it signals either an insertion or a deletion.
![]()
![]() In
this sample picture, notice the Farsi aligned rendering. We have aligned the raised h (aspiration) and the indel because
we are positing that aspiration has developed in one language where it wasn't
before, or that it has disappeared in the other (or that some other thing has
changed the aspiration in one and no observed sound at all in the other). In short, the indel
is used to signal a correspondence between a sound and the absence of a sound.
Similarly, we gave the Dutch aligned rendering an indel for the a (which here also makes each u into phoneme pairs).
In
this sample picture, notice the Farsi aligned rendering. We have aligned the raised h (aspiration) and the indel because
we are positing that aspiration has developed in one language where it wasn't
before, or that it has disappeared in the other (or that some other thing has
changed the aspiration in one and no observed sound at all in the other). In short, the indel
is used to signal a correspondence between a sound and the absence of a sound.
Similarly, we gave the Dutch aligned rendering an indel for the a (which here also makes each u into phoneme pairs).
Some symbols or strings of symbols stand for prefixes, suffixes, extra words, repetitions, and so on. In this case, there is no sound correspondence to be made and the "extra columns" in rows without these words or parts of words should be filled with dots (periods). An example with dots is shown below.
Aligning words is especially necessary if you wish to take advantage of the Phonostatistical Analysis and Compass features of WordSurv. Notice that editing in the AlignedRendering column is done just as in the Form column.
Continue with the following steps to make your database look like the picture shown above.
b. Double-click the Aligned Rendering column for the Dutch Variety, and then type an indel " " before the u. Then, click the cell for the Farsi Variety, and then type an indel before the a.
c. Click the cell in the Grouping column for the first variety, and enter a in the cell.
d. Enter a in the Grouping column for each variety that you determine to be cognate with the first variety. (In this example English, Dutch and Farsi).
e. Click the cell in the Grouping column for the next variety that does not have a grouping character, and enter a (In this example, French.).
f. Click the cell in the Grouping column for the next variety that does not have a as its grouping character, and enter a (In this example, French.).
g. Repeat these steps for the remaining entries (child, come, and eat) until all cognate varieties share grouping characters, and non-cognates each have unique grouping characters.
See Example below for eat,
but use your own judgment for child and come.
(Optionally, add Notes
column metadata about your alignments and groupings.)
h. Click Commit Changes.
i. Repeat the above steps for the other entries.
Example: For the entry eat, notice we've used both indels and dots in the English aligned rendering "?it". Dots were used in this case because the en is a verb suffix in Dutch and so only five columns of the seven in the alignment (grouped as ) contain symbols to compare.
Course
Note: Although we have described the process steps as reordering,
aligning and grouping, in actual practice, you will be doing all three
simultaneously in your mind.
For example, before reordering the list, you probably have a general idea of
which words are cognates and should therefore be together. Reordering and
aligning the words can then help you decide if in fact they should be grouped
as cognates.
Sample:
Below is a longer more complex comparison for the entry eat. Notice that six varieties are presumed to be cognates and share the same grouping character (here ), while French and Farsi have no cognates for this entry.
Notice also, that the font used in the picture below is not a mono-spaced font, so the aligned characters are not actually vertically aligned. However, WordSurv is able to identify the phoneme pairs by their positions.
Course
Note: Later you will open a larger sample database for the training
module about the Comparison
Analysis tab.
Optional: You can also click the Comparison
Analysis tab, and then select Practice
Comparison in the Comparison
Information box to see the results of your alignments
and grouping. (If the Comparison
Information box is not available, you need to click Commit Changes in the Comparisons tab.)
Paula sees that in the Phonostatistical Analysis tab , with a comparison selected in the Comparison Information pane, the left pane shows the list of all phoneme pairs that resulted from the aligned rendering of the forms. Along with the phoneme pairs she sees a column with the abbreviation DD in the column header. DD is short for Degrees of Difference.
In this module, you will do the steps to
review and specify the DD column values.
Click the Phonostatistical Analysis tab.
In the Comparison Information box, select the comparison called Practice Comparison. (Even if it is already displayed there, you need to select it to refresh and display the results.)
The initial degrees of difference values are calculated and displayed in the left pane, and the right pane shows preliminary results.
Tip: When the Degree of
Difference values are initially displayed, WordSurv assigns the default
value of to identical phoneme
pairs and a to all non-identical
phoneme pairs.
You need to review each phoneme pair and as needed, manually enter an
appropriate degree of difference value. The more different the sounds, the
higher the value should be.
The User Helps, included with this program, has a discussion
regarding how degree of difference values should be determined.
![]() In the left pane, for a phoneme pair that has
an incorrect initial Degree of Difference value,
double-click that Degree of Difference Options
value. For our purposes here, double-click the phoneme pair of the indel and
the aspirated, that is h .
In the left pane, for a phoneme pair that has
an incorrect initial Degree of Difference value,
double-click that Degree of Difference Options
value. For our purposes here, double-click the phoneme pair of the indel and
the aspirated, that is h .
The degree of difference value is now selected (highlighted) and a writing pencil symbol appears in the left-most column.
While the writing pencil symbol is displayed, enter the appropriate value; say , for the phoneme pair. Then, click any other row to save that change.
For practice, repeat the last two steps above for any other phoneme pair that you decide has an incorrect initial DD column value.
(If you see a phoneme pair that should not be set as pair, you need to return the Comparisons tab and change the associated aligned renderings.)
Refresh the results in the right pane. To do this, reselect the current comparison in the Comparison Information box.
Course Note: In a subsequent module, we will view and interpret the results in the right pane using a larger sample database.
When Paula selects the Comparison Analysis tab and selects her comparison in the Comparison Information pane results appear almost instantaneously. In the Show In Grid pane, she sees three options that she can select.
To help you understand the three options, do the following:
In the Comparison
Information pane, select Practice
Comparison, even though there is not enough data for meaningful results.
(You will open a larger sample database as you work through this module.)
The three options are as follows:
Tally
This calculation is based on the number of entries for which the varieties have cognate data.
Total
This calculation is based on the number of entries for which the varieties both have data, whether they are cognate or not.
Percent
This calculation is Tally divided by Total. On the diagonal of the grid, the row and column represent the same variety. In this diagonal set of cells, Tally equals Total, so the Percent is .
(If necessary, click the Match Diagonal check box to align the diagonal cells.)
A moment's reflection will show that Tally may be as small as zero (if no cognates are found) or as great as Total (if all the data compared are cognate). It can't be greater than the Total. So Percent is between 0% and 100%.
In this module, you will do the steps to do the following:
Open another database.
Review some sample calculations that
should match your display for each of the Show
In Grid option.
Now, let's open a larger sample database for our
discussion about the Phonostatistical
Analysis tab. (This is not normally required
to see your results.)
![]()
 Do one of the following:
On the File menu, click Open Database.
Press the shortcut keys Ctrl+O.
The Open WordSurv Database dialog box appears.
![]() In the Choose
WordSurv 6.0 Database to Open dialog box, click WordSurv
Exercises2
In the Choose
WordSurv 6.0 Database to Open dialog box, click WordSurv
Exercises2  (It is found at C:\Program Files\WordSurv 6\Training\
WordSurv Exercises2.)
(It is found at C:\Program Files\WordSurv 6\Training\
WordSurv Exercises2.)
Click Open.
View and Interpret Comparison Analysis: Tally, Total, and Percent
With the Training Exercises2 database open, click the Comparison Analysis tab.
In the Comparison Information box, select the comparison named Sample, even if it is already displayed in the box. Reselecting it refreshes the results pane.
In the Show In Grid area, Tally should already be selected, but select it if it is not.
Your display should look similar to this (columns have been narrowed for this picture), showing the tally, or number, of cognates in the selected comparison.
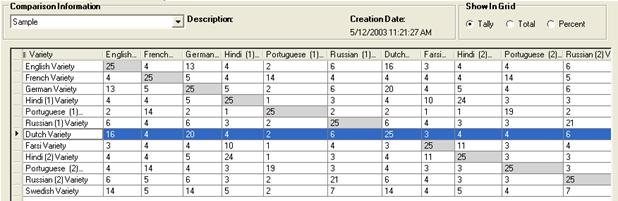
Observe the following: There are Dutch-to-English cognates, French-to-Dutch cognates, Farsi-to-Dutch cognates, and so on. You can read these numbers horizontally along the rows or vertically in the columns.
Tip: For these exercises, if the Match Diagonal check box is cleared, click it. Then each intersection of each variety to itself appears diagonal, not randomly. (It would actually only be random if you used the drag-and drop feature reorder the columns or rows.)
In the Show in Grid area, click Total.
 Your
display should look like this, showing the total number of words in
each variety in the comparison. You can use this display to verify that you
have compared the intended number of words.
Your
display should look like this, showing the total number of words in
each variety in the comparison. You can use this display to verify that you
have compared the intended number of words.
Observe the following: There are a total of entries for all varieties in the comparison. If one or more variety had fewer, or did not have a form or aligned rendering, or if Exclude was selected for an entry in the Comparisons tab, then the values would reflect that.
In the Show in Grid area, click Percent.
Your display should look like this, showing the ratio of tally (of cognates) to total (common entries) as percentages.
You determine the genetic relationship of the languages primarily using this
display.
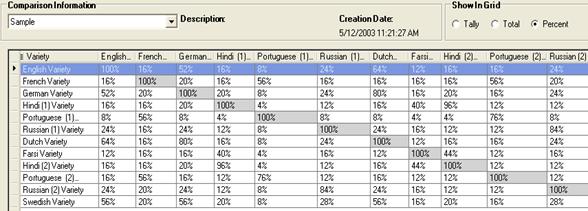
Observe the following: In the Tally display examined previously (above), we saw that there were Dutch-to-English cognates. In the Total display examined subsequently (above), we saw that Dutch and English have common glosses. The ratio of cognates per glosses is as indicated here.
Note: Some claim, as a general rule if your results indicate a cognate-to-gloss ratio of 80% or higher those languages or dialects likely descended from the same parent. However, each set of languages or dialects may have unique criteria so universal rules do not exist.
Tip: You can use the drag-and-drop feature to move rows and columns, and save the new order using the Save New Matrix Order button. To do this, simply click and drag a row or a column header to a new position and then click the button.
When Paula selects the Phonostatistical Analysis tab and selects a comparison in the Comparison Information pane results may take a short while to calculate. A progress indicator appears and shows the progress.
In the Show In Grid pane, she sees the following three options:
Total Degree of Difference
This option calculates and displays the summation of all the degree of difference values specified in the DD column for all phoneme correspondences in all the cognate words between the two varieties that intersect in the results grid.
Correspondences
This option calculates and displays the number of corresponding phonemes in all the cognate words between the varieties in the comparison that intersect in the results grid.
For additional information, see the topic Correspondences Example in the User Helps, which are available on the Help menu.
Ratio
This option calculates and displays the average degrees of difference per correspondence. This is calculated as 100 times the degrees of difference values divided by the correspondences value. This average is the indicator by which pairs of varieties may be compared to assess their relative phonetic divergence. Unlike cognate percentages, the lower the ratio the closer the similarity between the two varieties.
In this module, you will do the steps to
display each these results, and
review some sample calculations that should match your display for each of the Show In Grid options.
If it is not already open, open the database Training Exercises2.
Click the Phonostatistical Analysis tab.
Select the Sample comparison in the Comparison Information box.
The progress indicator appears to show the progress of the calculations.
Your display should look like the sample below. If necessary, in the Show In Grid pane, select Total Degrees of Difference
Observe that English-to-English shows degrees of difference (which may suggest that some DD column values are suspect). Other varieties have significant degree of differences, such as Dutch-to-English with .
Tip: For these exercises, if the Match Diagonal check box is cleared, click it. Then each intersection of each variety to itself appears diagonal, not randomly. (It would actually only be random if you used the drag-and drop feature reorder the columns or rows.)
In the Show In Grid pane, click Correspondences
Your display should look like this:
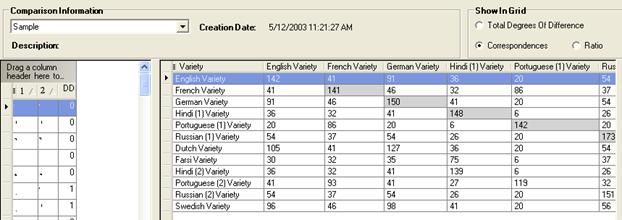

Observe, for example, that Portuguese-to-German shows correspondences and Dutch-to-English shows .
In the Show In Grid pane, click Ratio
 Your
display should look like this:
Your
display should look like this:
![]()
![]()
Observe the following: In the Total Degree of Difference display examined previously (above), we saw that Dutch-to-English had total degrees of difference. In the Correspondences examined subsequently (above), we saw that Dutch-to-English had . In the Ratio display (shown here), we see that Dutch-to-English shows .
This value of 44 resulted from total degrees of difference for correspondences. That is, (46/105)100=44%.
When Paula selects the Comparativist's Assistant (COMPASS) tab and then selects two varieties in the Available Language Pairs pane various columns appear after she clicks Display.
In the Show In Grid pane, she sees the following three options:
Phoneme Correspondences
This option calculates and displays the strength index value for each correspondence. (Correspondences are those pairs of phoneme that were aligned in the Aligned Rendering column of the Comparisons tab.)
Cognate Strengths
This option calculates and displays the average correspondence strength
Word-Pair Strengths
This option calculates and displays a summary table showing the number of word pairs within the given ranges of strength
In this module, you will do the steps to do the following:
Display COMPASS algorithm results for two varieties.
Review some sample calculations that should match your display for each of the Show In Grid options.
The COMPASS algorithm requires at least 10 cognate pairs between the two varieties. In this sample database (Training Exercises2), the Hindi-H and English varieties do not have 10 cognate pairs. Therefore, we will use German and English for this module.
Again, no claims are made to the accuracy of the data in the sample database, which was developed for training purposes only.
Tip: The User Helps, available in the Help menu, provide additional explanation of these calculations in topics and also in the Glossary of Terms.
If it is not already open, open the database Training Exercises2.
Click the Comparativist's Assistant (COMPASS) tab.
Tip: The language pairs
available for selection here are those in the comparison currently selected in
the Phonostatistical Analysis
tab.
Therefore, if you have not selected a comparison in that tab, a
warning box will appear and instruct you accordingly. When you click OK
to close that warning box, the Phonostatistical
Analysis tab is automatically displayed so you can select a
comparison.
In the Available Language Pairs pane, select German for Variety 1, and English for Variety 2.
In the Show In Grid pane, the Phoneme Correspondences option should be selected. If not, select it now.
Click Display.
Your display should look similar to the sample screen shot on the next page (only the results grid shown). One difference is that the data is sorted differently than the default sort.
In this example, observe the following:
The results grid is sorted by the Phoneme1 column. This is indicated by the triangle in the column header.
Click the column header to sort on a column . Click the column header again to reverse the sort (ascending to descending). Click it a third time to remove the sort and resume the default sort. For a secondary sort , use Shift+click on a different column header while another sort currently exists.
The Occurrences column shows the number of entries that use the phoneme pair in its aligned rendering (see Comparisons tab) for the current varieties. One occurrence is shown in the Example Entries column for each phoneme pair.
For the selected phoneme pair, notice the Occurrences column indicates , and that they are both displayed in the drop-down list. To display a drop down list, simply double-click the cell, and then click the down arrow that appears.
When Phoneme Correspondences is selected, the Strength column shows the numerical value called the strength index.
The strength index is a number ranging from +1.00 to -1.00 and represents the likelihood that the correspondence is the result of a regular sound change. A value of +1.00 represents that maximum confidence that it is regular; a value of -1.00 represents the maximum confidence that it is not regular. Values between the two extremes represent intermediate degrees of likelihood. These values are computed using the number of times each correspondence occurs and list thresholds values by way of a formula (discussed in List Thresholds Values in the User Helps).
The Degrees of Difference column shows the same values as you set in the Phonostatistical Analysis tab.
Tip: Refer to Appendix
E for a discussion about the statement
"Drag a column header here to group by that column," which appears
above the column headings.
Refer to the User Helps to learn about the List
Thresholds pane features.
In the Show in Grid pane, click Cognate Strengths (It is not necessary to click Display, unless you change one or more variety.)
Your results grid should look like this:

In this example, observe the following:
Instead of phoneme pairs, now you see the Name column and the aligned rendering columns of those entries for the current varieties, here German and English.
With Cognate Strengths selected, the Strength column shows the average correspondence strength . The average correspondence strength is computed by adding the strength index values (discussed above) for each correspondence in a given word pair, and then dividing by the number of correspondences in that pair.
The Degrees of Difference column shows the sum of the degrees of difference of the aligned phoneme pairs for the current varieties. (The phoneme pair degrees of difference values are specified in the DD column in the Phonostatistical Analysis tab.)
Tip: Refer to Appendix E for a discussion about the statement "Drag a column header here to group by that column," which appears above the column headings.
In the Show in Grid pane, click Word-Pair Strengths
Your display should look like this:

In this example, observe the following:
With Word-Pair Strengths selected, the results grid provides a summary table showing the number of word pairs in the current varieties within the given ranges of strength. You previously saw the average strength value for each individual word pair while Cognate Strengths was selected in the Show In Grid pane. Here, they are collected in ranges in the Strength column.
The computed strength values depend very much on the list threshold values. If the values in a summary are skewed too much to one end of the scale or the other, then the list thresholds should be changed to counteract the skewing. You probably need to experiment with these values. Refer to the User Helps for more information.
You can click a column header to sort the data differently. Click the same header again to reverse the sort (ascending versus descending). Click it a third time to remove that sort.
Tip: Refer to Appendix E for a discussion about the statement "Drag a column header here to group by that column," which appears above the column headings.
These two situations may happen during your survey work:
You may elicit more than one valid form (phonetic transcription) for an entry.
You may determine that multiple cognate groupings exist across the varieties in your comparison, even for the single form of an entry.
In the first case, use the Add Synonyms feature on the Word List Management tab. The synonym is added in the Varieties pane and appears in the Comparison tab so you can enter alignment characters and group it independently from the original entry.
In the second case, use the Add Additional Grouping feature on the Comparisons tab to copy the entry, complete with its form and aligned rendering, for the variety. You can then enter appropriate grouping characters for each. The duplicate entry does not appear in the Variety pane of the Word List Management tab because it has the same form, unlike a synonym.
In this module, you will do the steps to do the following:
Add a synonym
Add an additional grouping
Open the WordSurv Exercises database, which is the first database you created when you began following these training materials.
 In the Variety Explorer pane, expand
Survey: Practice Survey.
In the Variety Explorer pane, expand
Survey: Practice Survey.
![]() The
varieties under this survey are displayed.
The
varieties under this survey are displayed.
Click English Variety.
That variety appears in the Variety pane (right pane).
In the Variety pane, click the entry child.
Click Add Synonym.
A progress indicator appears as the selected entry is duplicated. The duplicated entry appears in the Variety pane. The Name column contains "child" but the Form and Notes cells are empty.
Select the Keyman IPA keyboard (on the taskbar notification area).
In the Form column, double-click the cell, and then enter the form tSAilt (key sequence is ts=ailt).
It is recommended that normally you would enter Note column metadata to help distinguish the original entry from its synonym (optional for this exercise).
Click Commit Changes.
The synonym is available in subsequent tabs, under the same variety.
To see this synonym, click the Comparisons tab, and then select Practice Comparison. Click child in the left pane, and notice that there are now two rows in the right pane for English Variety.
At this point during real survey work, you will need to enter an aligned rendering with aligning characters as needed. Then you would need to a grouping character.
Tip: To remove a synonym, click the synonym, and then click Remove Synonym. This button is only available when an added synonym is selected.
Click the Comparisons tab.
In the Comparison Information pane, select Practice Comparison, the first comparison you added to the WordSurv Exercises database when you began following this training manual.
In the left pane, click the entry cow.
That entry appears in the right pane, with a form and aligned rendering for each variety.
 In the right pane, click
the Dutch Variety row, if it is not already selected.
In the right pane, click
the Dutch Variety row, if it is not already selected.
![]() Click
Add Additional Grouping,
which is to the right of the Comparison
Information pane.
Click
Add Additional Grouping,
which is to the right of the Comparison
Information pane.
If the Add Additional Grouping button is not available, you need to click Commit Changes, either on this tab or on the Wordlist Management tab, to continue.
Another row for the Dutch Variety appears with the same form and aligned rendering, but with an empty Grouping column.
Normally, you would enter a grouping
character that sets this variety is a cognate of another variety, in addition
to the original grouping.
However, no valid alternate grouping candidate exists in this database.
So, for this exercise, just enter a , press Enter, and then click Commit Changes as
practice to see how simple the process is.
Tip: To remove an additional grouping, click the added grouping, and then click Remove Grouping. This button is only available when an added grouping is selected.
For a much more complete glossary, refer to the Glossary of Terms in the User Helps, which is available in the Help menu.
|
Aligned Rendering |
A phonetic transcription (based on the form) that includes alignment characters, such as an indel (slash"/") or a dot (period). This alignment helps you visualize the comparison of entries between language groups, and determines the phoneme pairs for subsequent analysis. You enter aligned renderings in the Aligned Rendering column on the Comparisons tab. |
|
Cognate |
A word or morpheme related by derivation, borrowing, or
descent (Webster). The affect of these groupings is shown in Comparison Analysis tab. |
|
Comparison |
A named set of two or more varieties. In WordSurv, you compare (manually) the forms across the varieties for each entry and identify cognates, if any, in the AlignedRendering column. |
|
Grouping Character |
An identifying character you use to indicate cognate glosses. Using letters (A, B, C .) or numbers ( .) you can identify sets of cognates. You enter them in the Comparisons tab, Grouping column. |
|
Keyman |
Tavultesoft Keyman is a keyboard management utility that allows you to define multiple keyboards for typing different languages in almost any Windows application. You need to use Keyman to enter phonetic forms of entries in your varieties. |
|
Phonetic Transcription |
A written representation of language data using phonetic symbols. You enter these in the Forms column. |
From the WordSurv program, press the F1 key, or click Help on the Help menu to open the WordSurv User Helps.
You can use the Contents, Index, or Search tabs to find the desired help information. These User Helps also contain a sub-book called Using Help that can help you navigate the topics and to use the Favorites tab.
The Reliability codes in the table below were previously recommended for use in earlier versions of WordSurv.
|
Definition |
|
|
A |
Data are the result of many years of field work in the language. |
|
B |
Data are the result of a short, intensive period of field work in the language. |
|
C |
Average survey situation with good bilingual informants and satisfactory opportunity to double check. |
|
D |
Average survey situation, but difficulties in bilingual elicitation and not satisfactorily double checked. |
|
E |
Below average survey situation, for example, with monolingual elicitation. |
You can assign a reliability code to each variety using the Variety dialog box when you add the variety.
As the variety matures, you can change the reliability codes. You access the Variety dialog box using the Edit button on the Varieties pane (Word List Management tab).
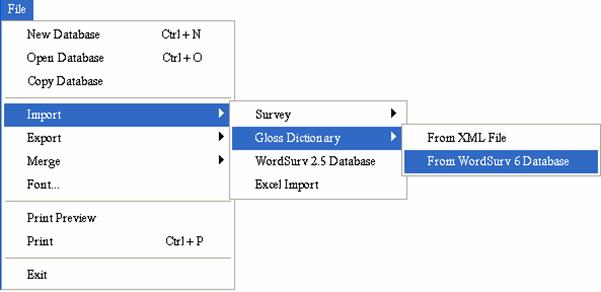
You can import data into WordSurv 6 from various sources (surveys or gloss dictionaries from either XML files or from another WordSurv 6 database, WordSurv 2.5 data, and Excel data).
The File menu has a series of cascading menus that allow you to select what to import and the source. The User Helps, available on the Help menu, has topics to help you import your data.
Here is an example of the cascading options on the File menu:
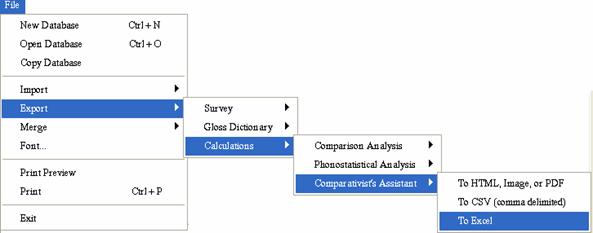
From WordSurv 6, you can export surveys, gloss dictionaries, and calculations. The File menu has a series of cascading menus that allow you to select the item to export and the format in which to export it into. The User Helps, available on the Help menu, has topics to help you export your data.
Here is an example of the cascading options on the File menu:
Some tabs have panes that allow you to use the drag-and-drop feature to group (organize) the columnar data by content in one or more column.
Important: This is not to be confused with entering grouping characters in a Grouping column to put cognates into groups.
When this is possible, the area above the column headers displays this statement: "Drag a column header here to group by that column." (See Example 1: Default on the next page.)
To group data, do the following:
Click a column header (Variety, DD, Example Entries, and so on), and drag that header up to the area above the columns where the statement mentioned above displays.
(See Example 1: Grouped on the next page.)
Release the mouse button to drop that column header there.
A duplicate column header appears in the area above the columns, and the data becomes grouped by the content in that column.
For a secondary grouping, click and drag another column header to the same area, and then drop it to the right of the existing duplicate header.
For tertiary or subsequent groupings, drag and drop additional column headers into the same area.
As necessary, drag and drop any of the duplicated column headers to the left or right of any other duplicated header to change the grouping order accordingly.
As necessary, to expand or collapse any item,
click the applicable ![]() button.
button.
To remove a grouping, do the following:
Click the duplicate column header and hold the mouse button down.
Drag the header back into the pane with that column, and then release the mouse button.
That grouping is removed from the pane, and the data reorganizes accordingly.
The grouping(s) you set remains in the pane until you change the content in the pane (such as selecting a different Show In Grid pane option), or you exit the program.
Example 1: (Comparisons tab data shown here, but other tabs are similar)
 Default
 Here,
the Grouping column
header was dragged up, so now the data is grouped by that column.
Notice Grouping 5, which
as 2 items, is collapsed (
Here,
the Grouping column
header was dragged up, so now the data is grouped by that column.
Notice Grouping 5, which
as 2 items, is collapsed (![]() was clicked). This feature can help you focus on particular aspects of the data
and to use screen space effectively.
was clicked). This feature can help you focus on particular aspects of the data
and to use screen space effectively.
Remember, you can group on one or more columns, not limited to the Grouping column. Another example is shown on the next page.
In this example, notice that the data is grouped by Phoneme1, and this column is also the primary sort. The data has a secondary sort on the Strength column. The user collapsed all but four of the phonemes.
WordSurv allows you to print data in a number of different ways.
For calculation data (Comparison Analysis, Phonostatistical Analysis, and Comparativist's Assistant grid contents), Export on the File menu allows you to specify which calculation data to print and customize it with a customizable report style. Then, you can print that data as a styled report. You can have any number of report styles as well as access to a Page Setup dialog box so specify page properties, such as orientation and margins.
You can export data in various file formats, and then print the data from the applicable application, such as Excel or PDF.
To do a quick print of the data that you see in any displayed grid (gloss dictionary, variety grid, comparison entry list, comparison grid, degree of difference, and so on), on the File menu, you can use Print or Print preview and then use the print feature from the preview window.
Add
Add All Entries, 13
Add Entries to Dictionary, 9
Add New Entry button, 14
additional grouping, 44
entries to a variety, 13
synonym, 43
AlignedRendering column, 22
Appendix
Appendix A, 4
Appendix A, User Helps, 47
Appendix B, 12
Appendix B, Reliability codes, 48
Appendix C, Importing Data, 49
Appendix D, Exporting Data, 50
Appendix E, 39
Appendix E, Grouping by Columns, 51
Appendix F, printing data, 54
Cognate results, 29
Cognate Strengths, 40
Cognates
grouping, 22
Column
AlignedRendering, 22
column header, 31
DD, 25
Degrees of Difference, 39
Form, 18
Grouping, 23
Notes, 19
Occurrences, 38
Phoneme1, 38
secondary sort, 38
sort, 38
Strength, 38
Comparing varieties, 20
Comparison (new) dialog box, 21
Coordinates
GPS metadata, 11
Copying
varieties, 15
Correspondences, 32, 34
Create a new survey, 10
Create new varieties, 11
Data
exporting, 50
printing, 54
Database
create new, 7
DD column, 25, 26
Degree of Difference, 26
Dialog box
Choose WordSurv database, 28
Comparison(new), 21
Dots symbol, 23
File menu
new database, 7
open database, 28
Forms (phonetic transcriptions), 18
Glossary, 45
GPS coordinates, 11
Grouping by columns, 51
Grouping cognates, 22
Grouping column, 23
Grouping, add additional, 44
Importing Data, 49
Indel symbol, 22
IPA Unicode 1.0.6, 17
Keyman, 17
Match Diagonal, 27
Menu
File Export, 50
File Import, 49
Help, 49, 50
New
database, 7
gloss dictionary, 8
survey, 10
varieties, 11
Open database, 28
Open WordSurv database dialog box, 28
Percent, 27, 31
Phoneme Correspondences, 36, 37
Phonostatistical Analysis, 25
Print, 54
Ratio, 32, 35
Reliability, 12
Reliability codes, 48
Save New Matrix Order button, 31
Sort, column, 38
Strength
average correspondence strength, 36
Average Correspondence Strength, 40
Cognate Strengths, 36
strength index, 38
strength index value, 36
summary table, 36
Word-Pair Strength, 41
Word-Pair Strengths, 36
Surveyors, 12
Symbols
dots, 23
indel, 22
Synonym, adding, 43
Tally, 27, 29
Tavultesoft Keyman, 17
Total, 27, 30
Total Degree of Difference, 32
Total Degrees of Difference, 33
User Helps, Appendix A, 47
Varieties
copy, 15
creating a comparison, 20
Variety
add forms, 18
duplicate, 15
Variety Explorer pane, 12
Viewing
cognate results, 29
Writing pencil symbol, 26
Keyman (Tavultesoft Keyman) is a keyboard management utility that allows you to define multiple keyboards for typing different languages in almost any Windows application. For more details, see: www.tavultesoft.com.
No claims are made to the accuracy of the data in this sample database. It was developed for training purposes only.
No claims are made to the accuracy of the data in this sample database. It was developed for training purposes only.
No claims are made to the accuracy of the data in this sample database. It was developed for training purposes only.
No claims are made to the accuracy of the data in this sample database. It was developed for training purposes only.
No claims are made to the accuracy of the data in this sample database. It was developed for training purposes only.
No claims are made to the accuracy of the data in this sample database. It was developed for training purposes only.
No claims are made to the accuracy of the data in this sample database. It was developed for training purposes only.
No claims are made to the accuracy of the data in this sample database. It was developed for training purposes only.
|
