https://www.windowsecurity.com/articles/Windows_Server_2003_IPSec_Part1.html
What's New in Windows Server 2003 IPSec
|
Date Launched: |
Jul 29, 2003 |
|
Last Updated: |
Jul 23, 2004 |
|
Section: | |
|
Author: |
In today's increasingly security-conscious business world, more and more organizations are concerned with protecting the confidentiality of their data as it travels over the network, and are implementing the industry standard IP Security protocol, IPSec, to do so. Beginning with Windows 2000, Microsoft's operating systems have included built-in support for IPSec communications, making it easy to implement on your network.
Back in February, I did an article that provides an overview of the history of IPSec, what it does, basic concepts behind it, and how it works in Windows. That article showed you how to configure a Windows 2000 computer to use IPSec. Now, with the release of Windows Server 2003, Microsoft has made improvements to a number of their operating system security features, including several new features for IPSec. In this two part article, we'll focus on what's new for IPSec in Windows Server 2003, and show you how to use its new features to make it even easier for you to ensure secure communications across your network. Part One covers the IP Security Monitor, which has a brand new look and added functionality.
Windows 2000 administrators are familiar with the IP Security Monitor tool, used to view and analyze IPSec, ISAKMP and Oakley statistics and help you confirm that your IPSec transmissions were successful. Although the monitor provided some useful information, it was limited in functionality. To invoke it, you used the ipsecmon.exe command (you could also use the command with a computer name to monitor a remote system), and the interface appeared as shown below in Figure A.
Figure A
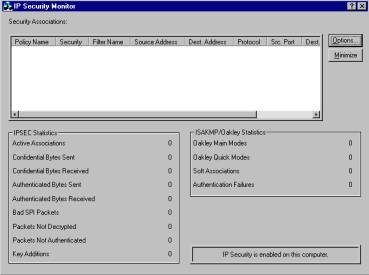
Windows Server 2003 has improved greatly on the IP Sec Monitor. 454c222e First, they've changed the interface to the standard Microsoft Management Console (MMC), and they've added a number of enhanced features that increases the functionality.
To use the IPSec Monitor, you need to follow these steps:
Create an empty MMC by clicking Start | Run and typing mmc, then clicking OK.
On the File menu for the console, select Add/Remove snap-in, click Add, and select IP Security Monitor from the list of available snap-ins.
Click the Add button, then click Close, then click OK.
The console will open, as shown in Figure B.
Figure B
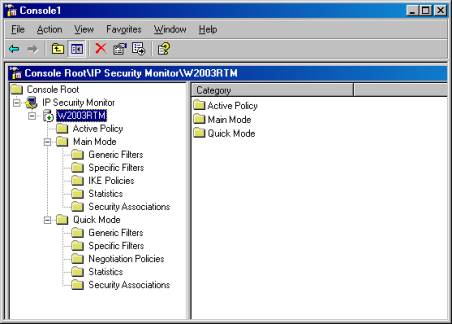
As before, you can monitor IP Sec traffic on remote computers as well as the local one. To monitor a remote system, right click the IP Security Monitor node in the left console pane, and select Add Computer from the context menu. You can then type in or browse for the computer you wish to add to the console, and that computer will show up as another node in the console, as shown in Figure C.
Figure C
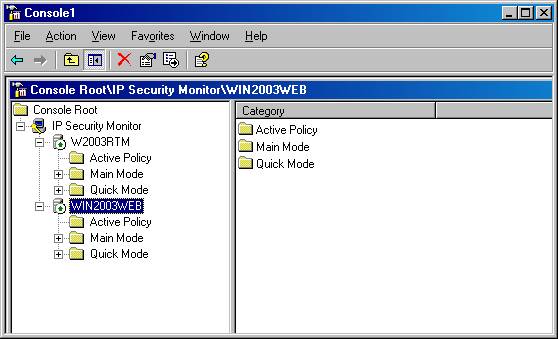
You can view information about the active policies that includes such data as a description of the policy, the date the policy was last modified, the policy store where it is located, the LDAP path to the policy and the OU, and the name of the GPO to which the policy is applied, as shown in Figure D.
Figure D
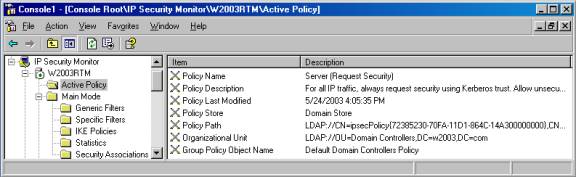
You can also now view information about main mode and quick mode generic and specific filters, as well as separate statistics for main mode and quick mode IPSec negotiations.
NOTE: Main mode negotiation is also called Phase I negotiation; this is the part of the process during which the two IPSec enabled computers establish an authenticated channel through the main mode Security Association (SA) that is provided by IKE. Phase II is called quick mode, wherein the IPSec driver's SAs are negotiated, is the stage at which the computers negotiate the primary protocols (AH and/or ESP), the hash algorithm and the encryption algorithm to use for data transfer. Main mode uses a single SA; quick mode uses two SAs, one for inbound and the other for outbound communication.
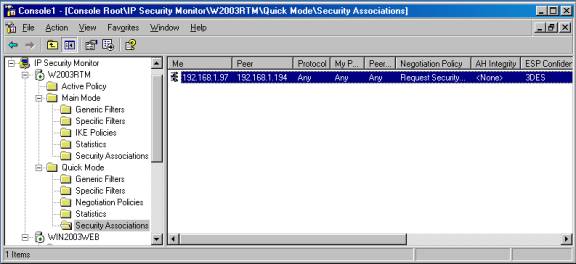
Even though there are actually two separate SAs established for quick mode, the Monitor only shows it as one. You can view the information about each SA that is established for either mode, including the IP addresses of both participating computers (notated as "Me" for the local computer and "Peer" for the computer with which it is communicating using IPSec), protocols, ports, the negotiation policy, and the algorithms used for AH and ESP Confidentiality and Integrity, as shown in Figure E.
Figure E
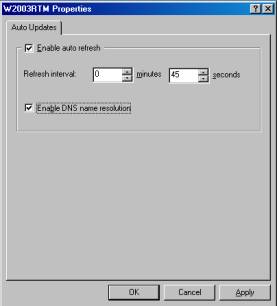
You can select whether the Monitor should autorefresh the information, and configure the auto refresh interval (by default, refresh is enabled and the interval is every 45 seconds). Additionally, you can specify whether DNS name resolution should be used (by default, it is not; you'll see only the IP addresses to identify the computers). To configure these settings, right click the name of the computer in the left console pane of the IP Sec Monitor and select Properties. This will display the dialog box shown in Figure F.
Figure F
With the IP Sec Monitor, you can search for specific main or quick mode filters by various criteria (source or destination IP addresses). To do this, double click either Main mode or Quick mode in the left console pane, depending on which type of filter you want to find. This will expand the node, and allow you to right click either Specific filters or Generic filters, depending again on the type you want to find. Then you can select Find matching filters to invoke the dialog box shown in Figure G.
Figure G
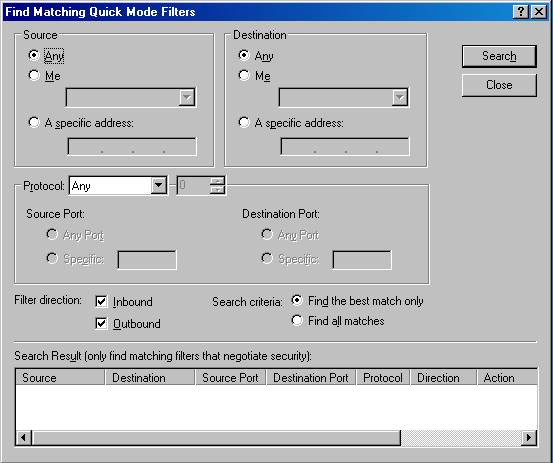
As you can see, you can get pretty specific with your search criteria. You can name the source address to look for (any IP address, "me" (the computer you're monitoring), or a specific address you enter. You can do the same with the destination address.
You can specify which protocols to filter for, including EGP, GGP, HMP, ICMP, PUP, RDP, RVD, TCP, UDP, or XNS-IDP. You can also select "Any" to filter all protocols, or you can select "Other" and specify a number from 0 to 255.
You can specify a source and/or destination port, and choose whether to filter inbound traffic only, outbound traffic only, or both. Finally, you can direct that all matches be displayed, or only the best match.
Filters that match your criteria will be shown in the results field at the bottom of the dialog box.
The enhanced IP Security Monitor is one of the most useful and dramatic improvements to IP Sec in Windows Server 2003, but it's not the only one. In Part 2 of this article, we will discuss the new ipsec context for the command line netsh utility, stronger cryptography for Diffie-Hellman, the new startup security feature, and other security enhancements that make IP Sec better than ever.
With earlier versions of Windows, there was a "security" gap during computer startup, before the IPSec policy was applied. Now, with Windows Server 2003, stateful filtering is used to prevent unsecured traffic from crossing the network. With this enabled, the computer only permits outbound traffic that it initiates during startup, inbound traffic that is a direct response to that outbound traffic, and DHCP traffic (which is necessary for the computer to obtain an IP lease and TCP/IP configuration information if it is a DHCP client). This increases security because other unsolicited inbound traffic is not allowed.
However, this doesn't limit you if there is specific inbound traffic that you do want to allow during startup. You can specify exempt traffic types. For even greater security, you can block all inbound and outbound traffic during startup. Configuration is done via the netsh command in ipsec context, which we will discuss a little later in the article.
IKE negotiates the Diffie-Hellman "group" to be used for cryptographic operations during main mode (or phase 1) of the IPSec negotiation process. The group determines the strength of the master key used in the key exchange process. Windows 2000 supports only Diffie Hellman groups 1 and 2. Windows Server 2003 supports a third group, called group 2048.
The key strength of each group is as follows:
Obviously, group 2048 provides the best security. Now, when IPSec communications take place between two members of the Windows Server 2003 family, they can be secured with a 2048 bit key. Note, however, that Windows 2000 and XP do not support group 2048. If you configure the Windows Server 2003 computer to use group 2048, the IKE negotiation will fail and the two computers won't be able to communicate using IPSec (they might or might not be able to communicate at all, depending on whether the IPSec policy settings require or only request secured communications).
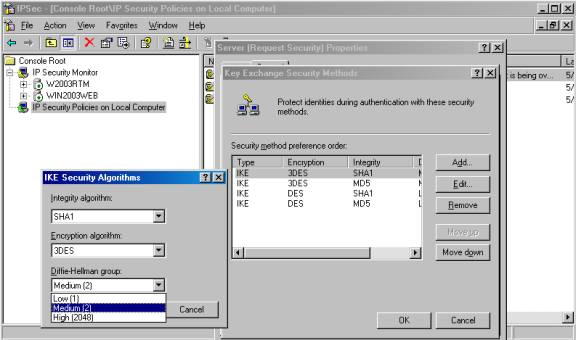
The Diffie-Hellman group is set via the IP Sec Policy Management console. You double click the policy for which you want to set the group, click Settings on the General tab, click Methods on the Key Exchange Settings dialog box, then select a security method and click Edit. In the Diffie-Hellman group field, select Low (1), Medium (2) or High (2048) from the drop down box, as shown in Figure A, and click OK to close each dialog box.
Figure A
Probably one of the most welcome improvements in Windows Server 2003 IPSec is its support of NAT traversal, a technology that allows ESP packets to work with Network Address Translation (NAT) devices that allow UDP traffic. With Windows 2000, IPSec and NAT were incompatible. This was quite a problem at times, since NAT is an increasingly popular method of providing Internet access to local area networks.
Now, IKE can detect that a NAT is present and encapsulate ESP packets in UDP so the IPSec traffic can go through the NAT. This also means clients behind NATs can now use L2TP/IPSec for VPN connections.
There's nothing that you have to configure for your Windows Server 2003 system to support NAT traversal; this functionality is built in and solves many problems related to IPSec-NAT incompatibility that administrators encountered in the past.
The netsh utility was provided for use with Windows 2000, and allowed administrators to configure such OS services as routing, remote access services, WINS and DHCP at the command line. The tool works by calling "helper files" (dll files) that are used for placing netsh in a specific "context" according to the service to be configured or managed (for example, the DHCP context).
New to Windows Server 2003 is the IPSec context for netsh, which allows you to configure and administer IPSec from the command line. This not only makes it possible for you to use scripting to configure IPSec, it also provides some functions that you can't do with the IPSec Policy Management console (the GUI interface for configuring and administering IPSec). These tasks include:
To use the tool for managing IPSec, you must first put it in ipsec context. To do so, open a command prompt window (Start | Run and type cmd), and enter: netsh ipsec.
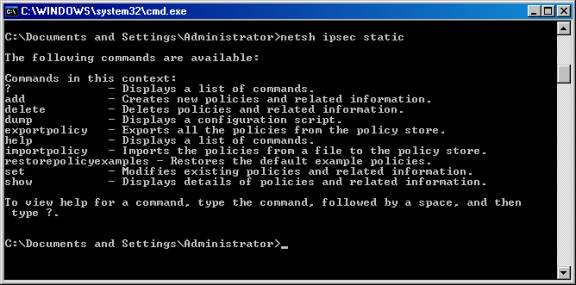
Within the ipsec context are two subcontexts: dynamic and static. IPSec static commands are used to perform the same functions you can do with the IPSec Policy Management and the IPSec Monitoring MMCs. Static commands don't immediately affect the configuration of whatever IPSec policy is currently active. Static commands allow you to do such things as view, add, set or delete filters, filter lists and filter actions and policies and rules, or export and import policies. For a list of available static commands, type netsh ipsec static at the command prompt, as shown in Figure B.
Figure B
If you want to make immediate changes to the active policy, you can use the dynamic commands. The changes you make are lost, however, when the IPSec service is stopped. With dynamic commands, you can add, delete, set or view main mode and quick mode policies, rules and filters and show statistics.
NOTE: Netsh ipsec is only supported on Windows Server 2003. You can, however, configure IPSec on XP computers by using a different utility, Ipseccmd.exe. It's not installed by default; you'll find it on the XP installation CD in the \Support\Tools directory.
These are only some of the new features for IPSec that Microsoft has included in Windows Server 2003. Others include:
It all adds up to increased security and usability - two of the goals Microsoft had in mind when developing Windows Server 2003.
|
