WinOnCD 3.6
User's Manual
Table of Contents 121s187b 121s187b 121s187b
Product License Agreement 121s187b
Getting Started 121s187b 121s187b 121s187b
Welcome 121s187b 121s187b 121s187b 121s187b
System Requirements 121s187b 121s187b 121s187b
Computer 121s187b 121s187b 121s187b 121s187b 121s187b
Temporary Storage Space 121s187b 121s187b 121s187b 121s187b
Harddisk 121s187b 121s187b 121s187b 121s187b 121s187b
SCSI Controller 121s187b 121s187b 121s187b 121s187b 121s187b
ATAPI/EIDE Interface 121s187b 121s187b 121s187b 121s187b
CD Recorder 121s187b 121s187b 121s187b 121s187b 121s187b
ASPI Device Driver 121s187b 121s187b 121s187b 121s187b
SCSI Setup 121s187b 121s187b 121s187b 121s187b
SCSI Devices 121s187b 121s187b 121s187b 121s187b 121s187b
SCSI Termination 121s187b 121s187b 121s187b 121s187b
Cabling 121s187b 121s187b 121s187b 121s187b 121s187b
Parity 121s187b 121s187b 121s187b 121s187b 121s187b
Installation Procedure 121s187b 121s187b 121s187b
Installing WinOnCD on Your Harddisk 121s187b 121s187b 121s187b
Deinstallation 121s187b 121s187b 121s187b 121s187b 121s187b
CD Recording Basics 121s187b 121s187b
General Information 121s187b 121s187b 121s187b
Tracks and Sessions 121s187b 121s187b 121s187b 121s187b
CD-R 121s187b 121s187b 121s187b 121s187b 121s187b
CD Capacity 121s187b 121s187b 121s187b 121s187b 121s187b
File Systems 121s187b 121s187b 121s187b 121s187b
ISO 9660 121s187b 121s187b 121s187b 121s187b 121s187b
Joliet 121s187b 121s187b 121s187b 121s187b 121s187b
Recording Methods 121s187b 121s187b 121s187b
Track-at-Once 121s187b 121s187b 121s187b 121s187b 121s187b
Disc-at-Once 121s187b 121s187b 121s187b 121s187b 121s187b
CD Formats with WinOnCD 121s187b 121s187b
CD-ROM 121s187b 121s187b 121s187b 121s187b 121s187b
Audio CD 121s187b 121s187b 121s187b 121s187b 121s187b
Mixed Mode CD 121s187b 121s187b 121s187b 121s187b
CD-Extra 121s187b 121s187b 121s187b 121s187b 121s187b
Video-CD 121s187b 121s187b 121s187b 121s187b 121s187b
The WinOnCD User Interface 121s187b
The WinOnCD Editors 121s187b 121s187b 121s187b
The Menu Bar 121s187b 121s187b 121s187b
File 121s187b 121s187b 121s187b 121s187b 121s187b 121s187b
Edit 121s187b 121s187b 121s187b 121s187b 121s187b 121s187b
View 121s187b 121s187b 121s187b 121s187b 121s187b
Tracks 121s187b 121s187b 121s187b 121s187b 121s187b
Options 121s187b 121s187b 121s187b 121s187b 121s187b
CD-ROM-Editor 121s187b 121s187b 121s187b 121s187b
The Source Window 121s187b 121s187b 121s187b
The Details View 121s187b 121s187b 121s187b 121s187b
The Browser View 121s187b 121s187b 121s187b 121s187b
Selecting Files 121s187b 121s187b 121s187b 121s187b 121s187b
The Source Window Button Bar 121s187b 121s187b 121s187b
The Destination Window 121s187b 121s187b 121s187b
The Destination Window Button Bar 121s187b 121s187b 121s187b
The Destination Window Main Buttons 121s187b 121s187b 121s187b
The Artwork Editor 121s187b 121s187b 121s187b
Printing the Artwork 121s187b 121s187b 121s187b 121s187b
The Record Dialog 121s187b 121s187b 121s187b
The Status Bar 121s187b 121s187b 121s187b
The ISO 9660/Joliet Project 121s187b 121s187b
The ISO 9660/Joliet Destination Window 121s187b
The ISO 9660 Context Menu 121s187b 121s187b
New Directory 121s187b 121s187b 121s187b 121s187b 121s187b
Rename 121s187b 121s187b 121s187b 121s187b 121s187b
Properties 121s187b 121s187b 121s187b 121s187b 121s187b
Filter 121s187b 121s187b 121s187b 121s187b 121s187b
The ISO 9660 Button Bar 121s187b 121s187b 121s187b
Edit ISO Properties: ![]() 121s187b 121s187b 121s187b 121s187b
121s187b 121s187b 121s187b 121s187b
Import Session ![]() 121s187b 121s187b 121s187b 121s187b
121s187b 121s187b 121s187b 121s187b
Check CD
![]() 121s187b 121s187b 121s187b 121s187b
121s187b 121s187b 121s187b 121s187b
Verify CD
![]() 121s187b 121s187b 121s187b 121s187b
121s187b 121s187b 121s187b 121s187b
Edit Placement: ![]() 121s187b 121s187b 121s187b 121s187b
121s187b 121s187b 121s187b 121s187b
Move Up/Down in Placement: ![]() 121s187b 121s187b 121s187b
121s187b 121s187b 121s187b
Move to Start/End: ![]() 121s187b 121s187b 121s187b
121s187b 121s187b 121s187b
Multisession Recording 121s187b 121s187b 121s187b
ISO Multisession Options 121s187b 121s187b 121s187b 121s187b
Adding new files 121s187b 121s187b 121s187b 121s187b
CD-ReWritable 121s187b 121s187b 121s187b
File Placement with WinOnCD 121s187b 121s187b
The Audio CD Project 121s187b 121s187b
The Track List 121s187b 121s187b 121s187b
The Audio Editor 121s187b 121s187b 121s187b
Context Menu 121s187b 121s187b 121s187b
The Audio Editor Button Bars 121s187b 121s187b
The "General" Button Bar 121s187b 121s187b 121s187b 121s187b
The "Edit" Button Bar 121s187b 121s187b 121s187b 121s187b
The "Play" Button Bar 121s187b 121s187b 121s187b 121s187b
The "Effects" Button Bar 121s187b 121s187b 121s187b 121s187b
CD Text 121s187b 121s187b 121s187b 121s187b
Creating a CD Text Audio Disc 121s187b 121s187b 121s187b
Importing Audio from CD 121s187b 121s187b
Supported File Formats 121s187b 121s187b 121s187b
Recording an Audio CD 121s187b 121s187b 121s187b
Adding Audio Tracks 121s187b 121s187b 121s187b 121s187b
CD-ReWritable Features 121s187b 121s187b 121s187b 121s187b
The CD-Extra Project 121s187b 121s187b
Audio Tracks 121s187b 121s187b 121s187b
The ISO Data Track 121s187b 121s187b 121s187b
The CD-Extra Editor 121s187b 121s187b 121s187b
Valid for the entire CD 121s187b 121s187b 121s187b 121s187b
Valid for the selected track 121s187b 121s187b 121s187b
CD-Extra Track Properties 121s187b 121s187b 121s187b
The Video-CD Project 121s187b 121s187b
The Video-CD Part 121s187b 121s187b 121s187b
CD-i 121s187b 121s187b 121s187b 121s187b 121s187b
The "ISO Data Part" 121s187b 121s187b 121s187b 121s187b
Suitable Source Material 121s187b 121s187b 121s187b 121s187b
The CD Copy Project 121s187b 121s187b
Copying a CD 121s187b 121s187b 121s187b
Quick Reference 121s187b 121s187b 121s187b
WinOnCD Guide 121s187b 121s187b 121s187b
Creating a Data CD 121s187b 121s187b 121s187b
Starting WinOnCD 121s187b 121s187b 121s187b 121s187b
Choosing a Layout 121s187b 121s187b 121s187b 121s187b
The Main Window of WinOnCD 121s187b 121s187b 121s187b
Selecting Files 121s187b 121s187b 121s187b 121s187b
ISO/Joliet Properties 121s187b 121s187b 121s187b 121s187b
Burning the CD 121s187b 121s187b 121s187b 121s187b
Creating an Audio CD 121s187b 121s187b 121s187b
Selecting a Project (CD format) 121s187b 121s187b 121s187b
Selecting Files 121s187b 121s187b 121s187b 121s187b
Adding More Tracks 121s187b 121s187b 121s187b 121s187b
Writing the CD 121s187b 121s187b 121s187b 121s187b
Creating a CD copy 121s187b 121s187b 121s187b 121s187b
CeQuadrat's CD Recorder Support 121s187b
A Short Guide to CD 121s187b 121s187b
Introduction 121s187b 121s187b 121s187b 121s187b 121s187b
Production of a CD 121s187b 121s187b 121s187b 121s187b
Optics 121s187b 121s187b 121s187b 121s187b 121s187b
CAV and CLV 121s187b 121s187b 121s187b 121s187b 121s187b
The Coding of the Disc 121s187b 121s187b 121s187b 121s187b
Error Detection and Correction 121s187b 121s187b 121s187b
Compact Disc - Digital Audio (CD-DA) 121s187b 121s187b
CD-ROM 121s187b 121s187b 121s187b 121s187b 121s187b
Mixed Mode CD 121s187b 121s187b 121s187b 121s187b
CD-ROM/XA 121s187b 121s187b 121s187b 121s187b 121s187b
CD-i 121s187b 121s187b 121s187b 121s187b 121s187b
CD-i Ready 121s187b 121s187b 121s187b 121s187b 121s187b
Multisession CD 121s187b 121s187b 121s187b 121s187b
CD-Extra 121s187b 121s187b 121s187b 121s187b 121s187b
Bridge Disc 121s187b 121s187b 121s187b 121s187b 121s187b
Compact Disc - Recordable, CD-R, CD-MO and CD-RW 121s187b
Mini Disc 121s187b 121s187b 121s187b 121s187b 121s187b
ISO 9660, HFS, and Joliet 121s187b 121s187b 121s187b
CD Text 121s187b 121s187b 121s187b 121s187b 121s187b
DVD - the high density format 121s187b 121s187b 121s187b
The Universal Disk Format (UDF) 121s187b 121s187b 121s187b
Spelling Convention 121s187b 121s187b 121s187b 121s187b
CD Recording Glossary 121s187b 121s187b
AIFF 121s187b 121s187b 121s187b 121s187b 121s187b
ASPI 121s187b 121s187b 121s187b 121s187b 121s187b
Bridge Disc 121s187b 121s187b 121s187b 121s187b 121s187b
Buffer Underrun 121s187b 121s187b 121s187b 121s187b
CDDA 121s187b 121s187b 121s187b 121s187b 121s187b
CD-EXTRA 121s187b 121s187b 121s187b 121s187b 121s187b
CD-i 121s187b 121s187b 121s187b 121s187b 121s187b
CD-PLUS 121s187b 121s187b 121s187b 121s187b 121s187b
CD-ROM 121s187b 121s187b 121s187b 121s187b 121s187b
CD-XA 121s187b 121s187b 121s187b 121s187b 121s187b
Disc-at-Once 121s187b 121s187b 121s187b 121s187b 121s187b
ECMA 121s187b 121s187b 121s187b 121s187b 121s187b
GreenBook 121s187b 121s187b 121s187b 121s187b 121s187b
IFF 121s187b 121s187b 121s187b 121s187b 121s187b
ISO 121s187b 121s187b 121s187b 121s187b 121s187b
ISO 9660 121s187b 121s187b 121s187b 121s187b 121s187b
Lead-In 121s187b 121s187b 121s187b 121s187b 121s187b
Lead-Out 121s187b 121s187b 121s187b 121s187b 121s187b
Mixed Mode 121s187b 121s187b 121s187b 121s187b 121s187b
Multisession 121s187b 121s187b 121s187b 121s187b 121s187b
On-The-Fly Writing 121s187b 121s187b 121s187b 121s187b
OrangeBook 121s187b 121s187b 121s187b 121s187b 121s187b
PhotoCD 121s187b 121s187b 121s187b 121s187b 121s187b
"Raw"-File 121s187b 121s187b 121s187b 121s187b 121s187b
RedBook 121s187b 121s187b 121s187b 121s187b 121s187b
RIFF 121s187b 121s187b 121s187b 121s187b 121s187b
SCSI 121s187b 121s187b 121s187b 121s187b 121s187b
Session 121s187b 121s187b 121s187b 121s187b 121s187b
Termination 121s187b 121s187b 121s187b 121s187b 121s187b
Thermal Recalibration (tcal) 121s187b 121s187b 121s187b
Track-at-Once 121s187b 121s187b 121s187b 121s187b 121s187b
Unicode 121s187b 121s187b 121s187b 121s187b 121s187b
Video CD 121s187b 121s187b 121s187b 121s187b 121s187b
Volume 121s187b 121s187b 121s187b 121s187b 121s187b
Wave (.WAV) 121s187b 121s187b 121s187b 121s187b 121s187b
WhiteBook 121s187b 121s187b 121s187b 121s187b 121s187b
YellowBook 121s187b 121s187b 121s187b 121s187b 121s187b
Index 121s187b 121s187b 121s187b 121s187b
YOU SHOULD CAREFULLY READ THE FOLLOWING TERMS AND CONDITIONS BEFORE OPENING THE PACKAGE. BY OPENING YOU ACKNOWLEDGE ACCEPTANCE OF THESE TERMS AND CONDITIONS. IF YOU DO NOT AGREE WITH THEM, YOU SHOULD PROMPTLY RETURN THE UNOPENED PACKAGE AND YOUR MONEY WILL BE REFUNDED.
This product (which includes the documentation and all other related material) is licensed solely for your internal use. You may use the product on a single machine and make one copy of the software itself for backup purposes, provided that all proprietary notices are reproduced on such backup copy. Disassembly and other reverse engineering of the product is strictly prohibited. If permitted in the documentation, you may incorporate all or part of the product in other software or documentation, in which case such other software or documentation must contain all proprietary notices.
YOU MAY NOT USE, COPY OR TRANSFER THE PRODUCT OR ANY COPY, EXCEPT AS EXPRESSLY PERMITTED BY THIS LICENSE. IF YOU DO SO, YOUR LICENSE IS AUTOMATICALLY TERMINATED.
TERM
This license is effective until terminated. You may terminate it at any other time by destroying the product and backup copy. This license will also terminate upon conditions set forth elsewhere in this Agreement or if you fail to comply with any term or condition. Upon such termination you agree to destroy the product and all copies.
LIMITED WARRANTY
CeQuadrat warrants only (a) that the media on which the product is furnished will be free from defects in materials and workmanship under normal use for a period of 90 days from the date of delivery to you and (b) that the product will operate substantially as described in the user manual during that 90 day period.
YOU MUST ASSUME FULL RESPONSIBILITY FOR THE SELECTION OF THE PRODUCT TO ACHIEVE YOUR INTENDED PURPOSES, FOR THE PROPER INSTALLATION AND USE OF THE PRODUCT AND FOR VERIFYING THE RESULTS OBTAINED FROM USE OF THE PRODUCT. CEQUADRAT DOES NOT WARRANT THAT THE FUNCTIONS CONTAINED IN THE PRODUCT WILL MEET YOUR REQUIREMENTS, THAT THE PRODUCT IS FIT FOR ANY PARTICULAR PURPOSE OR THAT THE OPERATION OF THE PROGRAM WILL BE UNINTERRUPTED, ERROR FREE OR VIRUS FREE.
Should you discover a defect in the recording medium or an error in the product within the 90 day warranty period, then return the defective item to where you obtained it. Include a copy of your receipt or other proof that the warranty period has not expired. Upon verification of the defect or error, the defective item will be either repaired or replaced.
THIS LIMITED WARRANTY IS IN LIEU OF ALL OTHER WARRANTIES, WHETHER ORAL OR WRITTEN. ANY IMPLIED WARRANTIES, INCLUDING IMPLIED WARRANTIES OF MERCHANTABILITY AND FITNESS FOR A PARTICULAR PURPOSE, ARE EXPRESSLY EXCLUDED.
GENERAL
IN NO EVENT WILL CEQUADRAT BE LIABLE TO YOU FOR ANY LOST PROFITS, LOST SAVINGS OR OTHER INCIDENTAL, INDIRECT, SPECIAL OR CONSEQUENTIAL DAMAGES, ARISING OUT OF YOUR USE OR INABILITY TO USE THE PRODUCT OR THE BREACH OF ANY EXPRESS OR IMPLIED WARRANTY EVEN IF CEQUADRAT HAS BEEN ADVISED OF THE POSSIBILITY OF SUCH DAMAGES.
In the event the Federal Acquisition Regulations ("FAR") or DFARS is applicable to this Agreement, the product is commercial computer software and provided only with the rights specified in this Agreement.
You are responsible for paying any sales or use tax imposed at any time whatsoever on the license of the product.
YOU ACKNOWLEDGE THAT YOU HAVE READ THIS AGREEMENT, UNDERSTAND IT AND AGREE TO BE BOUND BY ITS TERMS AND CONDITIONS. YOU FURTHER AGREE THAT IT IS THE COMPLETE AND EXCLUSIVE STATEMENT OF THE AGREEMENT BETWEEN YOU AND CEQUADRAT RELATING TO THE USE OF THE PROGRAM.
If you have any questions, contact CeQuadrat at:
CeQuadrat GmbH (Germany) +49-241-94902-0
CeQuadrat (USA), Inc. +1-650-843-3780
This section explains how to setup and install this software on your computer.
Welcome to CeQuadrat's WinOnCD, the Windows® '9X/NT version of our award winning software.
This manual guides you through the functions of the WinOnCD package so that you can quickly and easily create your own CDs of many different formats.
The self explanatory interface and the unique CeQuadrat assistant simplifies the use of our software.
WinOnCD 3.6 CD recording software requires the following minimum configuration:
An IBM® Personal Computer, or one strictly compatible, with at least an Intel Pentium (or compatible) microprocessor and 32 Mbytes of RAM is needed.
On your computer you need to be running Microsoft® Windows® 95 or Windows® NT version 4.0, or higher. The computer also needs a 3.5 inch floppy-disk drive, since this is the format of the driver diskette.
A 256-color VGA graphics board is a minimum requirement, a sound card is recommended.
Installation of the software requires approximately 20 Mbytes of harddisk space. You can make CDs with or without the creation of so-called image files an exact replica of the data to be recorded to the CD-R in the appropriate format). Making an image file has the advantage that the recording software does not need to retrieve data from wherever it may be located and convert it to CD format while, at the same time, trying to send the data to the recorder. This can provide additional performance during the recording process, though time is needed to prepare the image file.
If you decide to write CDs using an image file, or for other reasons it is necessary to create image files, an amount of hard disk space equal to the size of the data to be written to the CD-R must be available for temporary storage.
Thus, if, for example, you wish to write a CD containing 300 Mbytes of data, you need to have this amount plus a little overhead (approx. 5 MB), altogether 305 MB, of free space on your harddisk for temporary storage. As the largest amount of data you can put on a CD is about 650 MB, a harddisk with about 700 Mbytes (750 MB for audio) of space free is recommended.
If you write without creating image files (a method known as on-the-fly recording), only a small reference file is stored onto the harddisk. Thus, virtually no free harddisk space is needed for temporary storage.
We recommend using a fast harddisk, which typically has an average access time of 15 ms or less and a sustained data transfer rate of 1 Mbytes per second or better.
CD recording places special demands on the data stream to the recorder. The data must arrive at the recorder in one continuous and constant stream, and if at any point during writing there is no data in the buffer of the recorder, what is called a buffer underrun error occurs and the CD is ruined.
Since CD recording has this requirement of a certain minimum data transfer rate from the source, not every harddisk is suitable for CD recording. A slow harddisk or a harddisk that executes a thermal re-calibration of long duration during the CD recording process may be a reason why buffer underruns occur. This problem has no easy solution, except to replace the harddisk with a faster one, or one that does not execute thermal recalibration or does it so fast that it does not interfere with the recording.
In case you have a SCSI recorder, it is possible to record CDs using either one or two SCSI controllers, the choice depends largely on the overall performance of your system. If you have a fast harddisk or a recorder with a large buffer (about 500 Kbytes for double-speed recording or 1 Mbyte for quadruple-speed recording), one controller is probably sufficient. However, if the harddisk is not very fast or the buffer is smaller, we recommend using a dedicated controller for the recorder.
If there is
only one controller, both the SCSI device(s) you are writing from, as well as
the recorder, are hooked up to this controller. The recorder should be placed last in the SCSI chain.
In this configuration, the controller has to take data from the harddisk and send data to the recorder simultaneously. This may reduce transfer speed below the minimum required. This especially applies to SCSI controllers not capable of overlapped or multithreaded input/output. If you are not sure of the performance of your system, you should use the full performance test capabilities of this software to simulate the recording process before you actually start writing the first few CDs. (That is, when you are ready to record, check either "Simulate only" or "Simulate, then write if successful".)
If there are two controllers available, all devices except the recorder should be connected to the first controller (Host 0), while the recorder alone should be connected to the second controller (Host 1). If you are using two different types of controllers, the faster one should be used as Host 0. Thus, the first controller can read data from the harddisk while the second controller simultaneously writes the data to the recorder, avoiding a controller bottleneck.
Using only one SCSI controller may be another reason for experiencing buffer underrun errors. If this is the case you may wish to add a second controller.
In general, PCI controllers provide a better performance than IDE models.
More recently there are CD recorders with EIDE interface on the market. This is advantageous as no extra SCSI host adapter has to be installed in the system. Today, most PCs come standard with an EIDE interface. "EIDE" stands for "Enhanced Integrated Drive Electronics". Older PCs usually only have a simple "IDE" (without the "E") interface, which is not suitable for use with CD recorders as they just implement the "ATA" (AT Attachment) protocol. CD recorders, however, require the "ATAPI" (AT Attachment - Packet Interface) protocol which is only available with EIDE interfaces. The expressions "EIDE" and "ATAPI" are often used synonymously.
For the software there is no distinction between SCSI or ATAPI interfaces. Necessary transformations usually are carried out by OS components or with drivers provided by the hardware manufacturers.
There are several options when installing an ATAPI CD recorders: The EIDE interface provides up to four channels (i.e., cables coming from the main board or the interface card) each of which can be connected with up to two devices. Generally one device must be configured for each channel as "Master", the other one as "Slave".
We recommend that you have the recorder as the only device on one channel. Please read carefully the installation instructions of your CD recorder.
To record CDs you also need a CD recorder supported by this software package. For an up-to-date list of recorders supported, and information regarding their connection, please refer to either the README file that is copied to your installation directory or visit our Internet homepage.
Note: As all CeQuadrat software products use our modular General Recorder Interface, updating the software for new recorders is easy. We will provide drivers for new CD recorders when they become available, and the easiest way to obtain them is to download the latest driver from our website (https://www.cequadrat.com).
The buffer size of the recorder is another variable that affects the probability of a buffer underrun occurring. The smaller the buffer of the recorder, the higher the probability of buffer underruns occurring. Buffer sizes for different recorders nowadays range from 256 Kbytes to 32 Mbytes. To calculate how long the flow of data can be interrupted before the buffer is completely empty, use the following formula:
Interruption Time = <Buffer Size> / <Writing Speed>
<Buffer Size> : Size of the internal buffer of the recorder.
<Writing Speed> : Speed at which the recorder writes data, i.e. 300 Kbytes/sec (typical of a double speed).
For example, if you have a recorder with a 2 Mbytes buffer and a writing speed of 300 Kbytes/sec, the interruption time is 2 Mbytes/300 Kbytes/sec 6 sec. This means that the data coming from the harddisk can be interrupted for up to 6 seconds before a buffer underrun occurs and the CD-R is ruined.
The SCSI controller, devices, and the SCSI cabling are the hardware components of device communications, while the ASPI device driver is the software component. This driver provides the command set for communication between the different devices. Its name is an acronym for Advanced SCSI Programming Interface.
WinOnCD provides its own ASPI (C2ASPI.DLL), which is automatically installed.
A correct SCSI setup is crucial for writing CDs. This section gives some general guidelines about correct SCSI setup.
SCSI (pronounced "scuzzy") is an acronym for Small Computer Systems Interface, and is a special interface for communication between a computer and its peripherals, i.e. harddisks, floppy disks, CD-ROM drives, or, as in this case, CD recorders. In comparison to the IDE interface, SCSI devices typically provides a higher data throughput rate while enabling a greater number of devices to be connected.
The interface is provided by your SCSI controller, which is usually an expansion card that fits into one of the expansion slots of your computer. All SCSI devices, including the controller, are assigned a unique ID number, usually by setting some DIP switches on the device.
The SCSI controller usually has a factory preset ID number of 7. Internal harddisks are usually assigned ID 0 or 1, while all other device IDs are decided by you.
It is important that the SCSI chain is properly terminated, i.e. the first and last device in the chain must have a terminator. Some recorders may already be internally terminated, while others require a terminator to be plugged into the free SCSI port at the back of the device. Check your recorder manual, as well as the controller manual, for proper termination of the chain.
Please remember that the SCSI adapter is "in the middle" of the SCSI bus when there are external devices as well as internal devices connected to it.
If so, disable the host adapter termination. Refer to your SCSI host adapter manual for instructions. When you are using either internal or external devices only, the host adapter termination must be enabled.
Some devices also offer a "termination power" feature. One, and only one, device in the SCSI chain must supply termination power. This is usually provided by the host adapter. If so, termination power must be disabled at all other devices.
Note: An incorrectly configured/terminated SCSI bus may cause numerous problems with writing, often resulting in unreadable CD-Rs and strange errors, such as time-out errors during writing.
For external connections, you should use standard SCSI cables. For best performance, all cables should have the same impedance. The total length of one SCSI bus should not exceed 6 meters (20 feet) from the first (internal) to the last (external) device. Each cable should be a minimum of 30 centimeters (12 inches).
For internal connections it is advisable to use ribbon cable.
There are different values depending on the SCSI adapter (especially with Fast-, Ultra- or Wide-SCSI). Please ask your dealer for the special requirements for your particular SCSI adapter.
Note: Be especially careful in cabling UltraWide controllers, as not all of the connectors may be used at once.
Virtually all SCSI devices and SCSI host adapters offer a parity feature. This is usually enabled for SCSI-2 devices by default and often disabled for SCSI-1 devices. It is important that all devices on the SCSI bus have the same parity setting, where enabling parity is preferred. Thus, if all devices offer a parity option (usually jumper or DIP switch), enable parity on all devices and the host adapter.
After correctly setting up your SCSI configuration, the next step is to install the CeQuadrat software. Please read this chapter carefully before installing the software.
Before you start the installation please check the connection of the CD Recorder to your host adapter.
Insert the CD into the CD-ROM drive. Usually the installation program should now start automatically. If not, you can either use the Windows tool "Software" from the control panel or Select the option "Run" from the Windows task bar. and start the installer by typing
"D:\install.exe" (where D:\ stands for the drive letter of your CD-ROM drive)
and pressing "Enter".
You will be greeted by the CeQuadrat software setup program, and asked to specify the destination directory for the software:
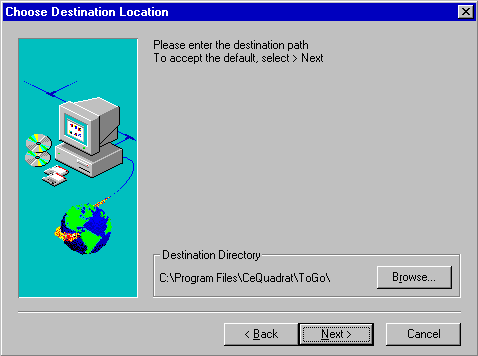
Selecting the Destination Directory
After you have specified the destination directory you are asked to enter your name, company, and serial number which is printed on your registration card and/or the CD package.
The software is then installed on your harddisk, and an icon is added to your Programs group. At this point you are asked to restart the computer now or do so later. After your computer has been restarted you can select the icon from your taskbar to start the CeQuadrat software.
Please remember to send in your registration card!
For deinstallation of CeQuadrat software, simply use the Windows standard uninstall procedure. Launch the Control Panel and double-click the Add/Remove Programs icon. Then select the software from the list of programs and press the Add/Remove Programs button. All files and folders relating to the software will be deleted from your harddisk.
This section covers some of the important topics related to CD Recording in general.
These two terms will be used frequently in this manual, so an explanation is necessary:
Tracks - A CD is physically separated into individual tracks. This division is used, for example, to separate songs from one another on Audio CDs, or to separate different MPEG streams on a Video CD. An Audio CD contains one song per track, while a CD-ROM has just one track for all the computer data. A Mixed Mode CD contains one track (the first) for the computer data, and subsequently one song per track for the audio recordings.
Sessions - Each time you record to a data CD is called a session. A session is also a physical division on the CD, just as tracks are a physical division. Each session is marked by a so-called lead-in at the physical start of the session, and a lead-out at the physical end of the session.
There are CD types that have to be written in one session, (i.e. Audio CDs,) and there are types of CDs that can consist of more than one session. The former are called singlesession CDs, while the latter are multisession CDs.
To create a multisession CD, all sessions, even the first one, have to be recorded in the multisession mode.
Note: We recommend using the multisession recording only for CD-ROMs. Audio CDs which are written in multisession mode often can not be read back completely by CD players.
Each session can have several tracks, and each CD can have several sessions. To illustrate the relationship between tracks and sessions we shall look at a Mixed Mode CD with two sessions: one data track and two songs in the first session, and a data track in the second session. The CD will have the following physical layout:
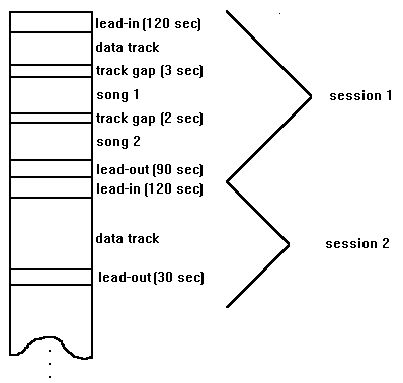
CD Layout Example
Note: With WinOnCD you are also able to create CDs that are not compliant with the Multisession standard. However, CDs created this way may not read back correctly on some CD-ROM drives, so this is not recommended.
The various sessions on a multisession CD are usually not apparent to the user, as all tracks appear to be written in one session, i.e. all computer data are together just as if you had written to a harddisk twice. A directory listing of the CD's contents will usually show both the files of the first session and the files of the second session together.
The length of the gap between two tracks depends on the track mode of the two tracks. If the track mode of both tracks is the same, the gap is 2 seconds. Otherwise the gap is 3 seconds. The length of each session lead-in is 120 seconds.
The lead-out of the first session is 90 seconds long. Each additional session has a lead-out length of 30 seconds.
CD-R is short for CD-Recordables. In contrast to pressed CDs, these discs contain a special layer which is burned in during the recording process.
A few older CD-ROM drives may have problems reading these CDs correctly, i.e. they may not be able to mount CD-Rs at all, or may only be able to mount the first session correctly. Should your CD-ROM drive not recognize the CD-R you have written, you should try a different brand of CD Recordable disc. In fact, since CD-R manufacturers often sell the same media under different labels, it is advisable to try a CD-R media made with a different manufacturing process altogether. The different processes product CD-Rs with different coatings. At the moment three different CD-R coatings are available: gold, green or blue.
To test whether a CD is written correctly, try the following:
Your CD is written correctly when it is readable in one or more CD-ROM drives.
When it is readable in the CD recorder, the data has been written correctly.
To find out whether your CD has been closed correctly, open "Disc Info" in WinOnCD. If you have created a data CD and you have closed the disc (Disc Info does not show any free storage space on the disc), the number of sessions must be the same as the number of tracks (each session holds one data track). For a CD that is not yet closed, the number of sessions equals the number of tracks plus one (each session holds one track and a new session is already opened).
If you have checked your CD like this and it is not readable on some CD-ROM drives nevertheless, this is presumably a problem of the CD-ROM drive's ability in dealing with CD-Rs.
Recordable CDs come in three sizes: 18, 63, and 74 minutes. The amount raw space available on a CD can be calculated in the following way:
18 minutes - (2352 bytes/sector) x (75 sectors/second) x (60 seconds/minute) x (18 minutes) = 190,512,000 bytes = 182 Mbytes
63 minutes - (2352 bytes/sector) x (75 sectors/second) x (60 seconds/minute) x (63 minutes) = 666,792,000 bytes = 636 Mbytes
74 minutes - (2352 bytes/sector) x (75 sectors/second) x (60 seconds/minute) x (74 minutes) = 783,216,000 bytes = 747 Mbytes
This raw space is not all available for user data. Different logical sector sizes are used on a CD, e.g. leaving only 2048 bytes/sector for computer data. In addition to this, CD formats such as ISO 9660 require various overhead information like the directory tree and volume descriptor and the CD has a different logical cluster size than the hard disk.
Since some of
this overhead varies from CD to CD, it is not possible to calculate exactly how
much space is available for user data. A rough estimate of the amount of space
available for user data is about 150 Mbytes for 18 minute CDs, 540 Mbytes for
63 minute CDs, and 680 Mbytes for 74 minute CDs. The only way to find the limit
of a particular CD is by trial and error. If there is not enough space
available, the formatter aborts with an appropriate error message before any
actual writing to the CD takes place.
As a native Windows® '9X/NT program, WinOnCD supports long filenames according to the Joliet file system, the ISO-9660 CD-ROM extensions for Unicode, created by Microsoft , as well as pure ISO 9660 files. Thus, long filenames of up to 64 characters are now possible.
ISO 9660 is a data format, introduced in 1984 by the International Standards Organization. Since then it has succeeded in becoming a widely accepted cross-platform standard, and the most important CD data format for DOS/Windows PCs. ISO 9660 is the "lowest common denominator", and therefore has even more restrictions than the file system commonly found with DOS/Windows-based PCs. Filenames are not only limited to "8.3", but can also only contain the upper-case letters 'A' through 'Z', the numerals '0' through '9', and the underscore character '_'. Special characters like '$' or ' ' are not allowed. Filenames without an extension must still have a dot/period.
Directory names have a maximum length of 8 characters and cannot have an extension.
The directory cannot be more than 8 levels deep.
It is important to know that the file system on the harddisk of a PC-based computer differs from this file system, which is the most used system for CD-ROM. The differences are as follows:
Many CDs produced today do not comply with the ISO 9660 standard, e.g. it has become quite common to allow for directories with more than 8 levels. Many CDs also contain non-ISO characters like '$' and '-'. Creating ISO CD-Rs with non-ISO characters may cause the CDs to behave strangely, and files and directories might not be opened.
Note: If the CD is for use on multiple platforms (e.g., Macintosh, UNIX) it is advisable to respect the ISO 9660 standard for the ISO part of the CD.
As the
restrictions of ISO 9660 are quite limiting with modern operating systems, such
as Windows® '9X or the Macintosh
OS, Microsoft and Apple have each defined proprietary extensions to ISO 9660.
Of course, the advantages of these extensions can only be fully exploited by the OS they were intended for. Other systems may not even be able to read the CD at all.
The Microsoft CD-ROM recording specifications, known as "Joliet", are an extensions to ISO 9660 which allow filenames of up to 64 Unicode characters. Every Joliet CD actually contains two file systems: One complying to ISO 9660 to ensure full compatibility to all other systems, the second one Joliet, currently only readable by Windows® 9X and Windows NT. All other platforms will only recognize the ISO part.
With WinOnCD CDs can be written in two different recording methods, "Track-at-Once" or "Disc-at-Once".
While all CD-Recorders work in the "Track-at-Once" mode, "Disc-at-Once" is not supported by all recorders.
The question of whether to record a CD in "Track-at-Once" or "Disc-at-Once" mode is only relevant when creating an Audio CD. It makes no difference for a data CD which mode you record in. When recording "Track-at-Once" the recording process will be interrupted after each track and can be continued immediately or sometime later. This makes "Track-at-Once" recording more flexible, as you are, for instance, able to stop the recording after each track and read out a new track from the CD recorder. However, with Track-at-Once the 2-second gap is always inserted, which may be unwanted for recording live music. The Track-at-Once mode of recording may also have little clicks between tracks when reading from ordinary CD players.
Some recorders
allow to record "Track-at-once zero gap", allowing to avoid the 2-second gap.
Data CDs written as multisession CDs are recorded "Track-at-Once".
Using the Disc-at-Once recording method, all the blocks of the CD-R are written by the recording software. This is especially useful when producing Audio CDs, as only Disc-at-Once allows the user full control over the gap between tracks and the ability to edit the PQ-channel. This might be important when mastering the CD later.
It may, however, be a problem that the entire CD has to be written at once.
"Disc-at-Once" recording allows for specifying the length of pauses between tracks as desired while the "Track-at-Once" mode only support a 2 second gap or zero gap (if "Track-at-once/zero gap" is supported by the recorder at all).
With WinOnCD, the professional CD recording software from CeQuadrat, it is possible to write all standard CD formats.
Computer Data CD - This CD is often called CD-ROM. It contains computer data in the same way as your harddisk, and is usually recorded in the ISO-9660 format.
Audio CD - This is probably the type of CD people are most familiar with. This CD contains music, and can be played in CD-ROM drives on the computer, or in any CD player at home, in the car, etc.
Mixed Mode CD - A CD which contains both a data track and audio tracks is called a "Mixed Mode CD". The data is stored in the first track, while the audio is in subsequent tracks. Modern audio CD players will mute the first track when played, but older players will try to play the computer data, which usually results in a loud, high pitched tone which in some cases may damage speakers.
The term CD-Extra (formerly called "CD PLUS") actually describes a physical as well as a logical format and is defined in the "Blue Book"
Like a Mixed Mode CD, a CD-Extra contains a data and one or more digital audio tracks. To avoid the problem of the data track being "played" on an audio CD Player (possibly damaging it), a CD-Extra contains all audio tracks in the first session and the data track in the second session. As all Audio CD players are single session drives and can only recognize the first session of a CD, they will always play what they find in the first session.
A CD-Extra capable CD-ROM drive will first look into the last session of the CD ( the data part of a CD-Extra) and read this prior to doing anything with the audio first session.
Note: Not all multisession capable CD-ROM drives are able to read a CD-Extra. There are many drives that handle every CD holding Audio data in the first session as a RedBook Audio CD (single session), and will not look for additional sessions.
The BlueBook standard requires certain data that must be on a valid CD-Extra. In addition, a CD-Extra can contain standard ISO-9660 data for computers.
WinOnCD can produce CD-Extra discs complying with the current Blue Book standard.
WinOnCD can write Video-CDs according to the WhiteBook 2.0 standard. A Video-CD contains MPEG full-motion video in a special format, so that it can be played back with MPC3 computers, CD-i players or Video-CD players.
An MPEG encoder is integrated with WinOnCD, so AVI files can be converted to the Video-CD format. Of course, WhiteBook compatible system streams can also be used as input.
More sophisticated, interactive Video-CDs including still-MPEG slide shows, MPEG files, hotspots, and menus can be created with professional Video-CD authoring tools, such as VideoPack from CeQuadrat.
This section explains the user interface which the professional line of CeQuadrat products have. The basic layout of this interface is explained in this section and, in the following section, the interfaces for the individual editors.
After starting CeQuadrat's software, a window with the various types of CD projects appears.
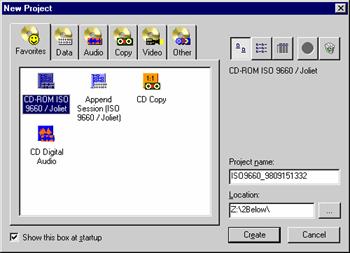
Project Selection Dialog
The icons displayed represent the various kinds
of CDs that can be created with WinOnCD. The projects are grouped into
categories, which can be selected with the tabs above the icons. The first
group, which is displayed at startup, contains a selection of commonly used CD
types. The other groups (Data, Audio, Copy, Video, Other) contain icons for the
various possible CD projects, which are described in detail later in this
manual. In the upper right corner, the three left buttons allow to change the
view of the icons, and the two right buttons allow you to customize the
"Favorites" group: Selecting a project (which is not currently in the
favorites) and pressing the ![]() (add) button will add this icon, selecting an
icon in the "Favorites" group and pressing
(add) button will add this icon, selecting an
icon in the "Favorites" group and pressing ![]() (delete) will delete this icon from this group
(it will retain the icon in its original group).
(delete) will delete this icon from this group
(it will retain the icon in its original group).
After you have worked with WinOnCD and saved project files, these project files will also be listed in the project selection dialog. Using the delete button will delete the file from the history (the original file will remain untouched).
For the remainder of this chapter you can choose any CD format by double clicking its icon. A window similar to the following appears:

The basic user interface is divided into five parts:
The menu bar
The menu bar near the top contains the main commands.
The Button Bars
The button bars in WinOnCD 3.6 can be used like toolbars or pop-up menus. Clicking the bar icon (marked with an arrow pointing right) once will expand or collapse the button bar. If the bar is collapsed, you can click the bars icon, hold and select the desired icon. After this the bar will automatically collapse. Clicking the right mouse button in a button bar activates the context menu:
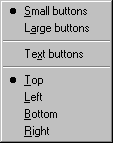
Here the size and the location of the button bar can be set. Choosing "Text buttons" will give you a description of each button next to it.
The source window button bar
The source
window button bar (icon ![]() ) provides a
shortcut for most functions used, which are described later in this manual.
) provides a
shortcut for most functions used, which are described later in this manual.
The source window
This window displays the source material for making CDs. The source window view can be set to your individual taste using the View->Source menu. The source window is linked to the Windows® 9X/NT Explorer, and has much of the same functionality.
The destination window
This window in the bottom half of the screen displays the current project. Depending on the CD type to be created different representation views are available. The views are explained in the next section of this manual. A destination window toolbar may be available, depending on the view selected.
The source window main button bar
Here you can toggle between the different editing data of your CD project.
The destination window button bar
WinOnCD makes available tools according to the different editor.
The status bar
The status bar displays information about the process currently running or the commend currently selected, and can be toggled on or off using the View->Status Bar switch.
This section explains each menu item on the menu bar in order from left to right.
New -
Opens the WinOnCD project selection dialog. The icons displayed represent the
various kinds of CDs that can be created with WinOnCD, and a history of
recently saved files. The projects are grouped into categories, which can be
selected with the tabs above the icons. The first group, "Favorites", which is
displayed at startup, contains a selection of commonly used CD types. The other
groups (Data, Audio, Copy, Video, Other) contain icons for the various possible
CD projects. In the upper right corner, the three left buttons allow to change
the view of the icons, and the two right buttons allow you to customize the
"Favorites" group: Selecting a project (which is not currently in the
favorites) and pressing the ![]() (add) button will add this icon, selecting an
icon in the "Favorites" group and pressing
(add) button will add this icon, selecting an
icon in the "Favorites" group and pressing ![]() (delete) will delete this icon from this group
(it will retain the icon in its original group).
(delete) will delete this icon from this group
(it will retain the icon in its original group).
Using the delete button will also delete file references from the history (the original file will remain untouched).
Hint: You can also create projects to serve as templates for your more complex projects and keep them in the project selection dialog.
Open - Load a project from a file. Project files have the extension CPJ. The following dialog box is displayed:
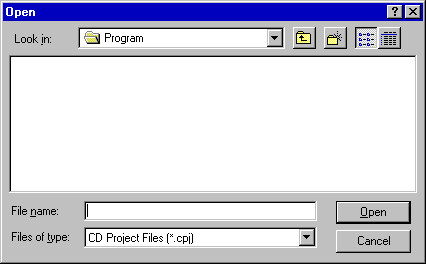
Open File
Save - Save the current project as a file. The following dialog box appears if the file has not been previously saved:
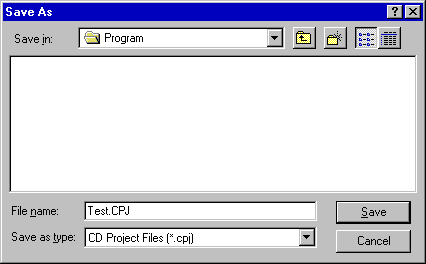
Save File
Save as ... - Save the project under a specified/different name.
Print - In the artwork editor, this command prints the currently selected item (i.e. label, booklet, inlay card)
Print Preview - Shows a preview of the items which will be printed (available in the artwork editor only).
Recent Files - The last files which were edited with WinOnCD are listed here.
Exit - Exit the CeQuadrat software. If the current project has not been saved you will be prompted.
Delete - This command will delete the selected object(s) from the destination window.
Insert - A new object will be inserted into the destination window. This can be a track, a new folder, etc.
Insert Into CD - Copy the object currently selected in the source window to the destination window.
Cut - Like the next two items, this menu item represents standard clipboard functionality for the destination window. An object marked in the destination window can be cut out of the project and stored in the clipboard using this function.
Copy - An object marked in the destination window can be copied into the clipboard.
Paste - Paste objects from the clipboard into the destination window.
Properties - Edit the properties of the currently selected object.
Select all - Selects all items in the source or destination window, depending on the current input focus.
Invert Selection - This command selects all (and only) items not currently selected.
Find - Searches for the specified text in the destination window.
Refresh - Updates the source and destination windows. This may be necessary if a removable disk (e.g. floppy) has been changed.
Source - The view of the source window can be specified here. These options are explained in the "Source Window" section in detail.
Icons
Small Icons
List
Details
Browser
Additionally you can show or hide several WinOnCD button-bars, toolbars or status bars in this menu.
Move Down/Up - In the Track List mode, these commands move a track up or down if possible. They are disabled in the Track Edit mode and can also be found in the toolbar.
CD Settings
Choose a directory for image/temporary files
During the installation process WinOnCD will preset the drive with the greatest amount of available free space as default. This can be altered, of course.
Choose Recorder
If you have more than one recorder in your system, you can select a recorder here.
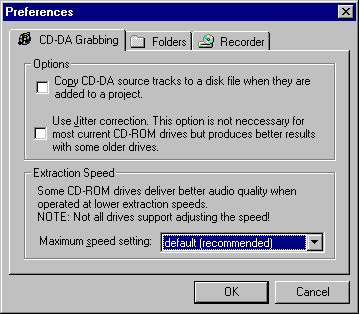
CD-DA Grabbing
If you use Audio data from an existing CD for your project, you can decide here
the speed the Audio data are to be read out. (Please also refer to the chapter "Import Audio Data from Audio CD").
whether your Audio data are to be read out with "Jitter Correction" which can result in a higher quality of the read out data (especially with older CD-ROM drives) but may take a little more time.
whether Audio tracks from an Audio CD shall be copied to the harddisk when dragging them to the destination window. Generally, this is not necessary when a compilation shall be recorded "On-the-fly".
The features of this menu are described in the ISO 9660/Joliet Project.
The source window is used to select files and directories. It is located in the top half of the WinOnCD window, and works similarly to the Microsoft Explorer. It is split in half, and on the right side a "Tree" displays all harddisks, network disks, SCSI controllers and other devices connected to the computer.
The Source Window
The tree can be expanded by clicking the "+" icons to show directories or connected SCSI devices. After expanding, the "+" is transformed into a "-", and clicking it collapses the branch.
Clicking on an item in the tree displays the contents of the item (appearing to the right of the item) in one of several formats .
The format for this view can be set using the View Source menu file. The Small/Large Icons and List view only display the items, the two other view modes give more information:
The details view lists all files and directories in the object selected together with their size, attributes (Directory, Archive, Read-Only, Hidden and System), and modification dates.
Column width can be varied by dragging the divider between two column headings. The list is arranged in the column in ascending (single-click) or descending order (double-click) by clicking on a column heading.
This view is especially useful for multimedia files because it displays thumbnails of images, and information about sample rate and sample size is given for sounds.
However, only appropriate input files (e.g. images and sounds) are displayed.
Double-clicking a file will play it, or display its contents full size.
Irrespective of CD format, files are selected as input by dragging them from the source window or from the Windows ExplorerT into the destination window in the lower half of the WinOnCD window.
Files can be selected in the right section of the source window in the standard Windows way: a single click selects one file, while multiple files can be selected using shift-clicks (consecutive files) or control-clicks (non-consecutive files), or by drawing a rectangle around the desired files or directories with the mouse.
The selected files are highlighted, and can be dragged to the destination all at once.
The following
functions can be accessed directly via the buttons on the source window button
bar (Icon ![]() ):
):
![]() New - This button opens the project
selection dialog.
New - This button opens the project
selection dialog.
![]() Open - This button brings up the
dialog box to open an existing project.
Open - This button brings up the
dialog box to open an existing project.
![]() Save - This button saves the current
project.
Save - This button saves the current
project.
![]() Cut - This button activates the
clipboard cut function for objects marked in the destination window.
Cut - This button activates the
clipboard cut function for objects marked in the destination window.
![]() Copy - This button copies objects
marked in the destination to the Windows clipboard.
Copy - This button copies objects
marked in the destination to the Windows clipboard.
![]() Paste - This
button inserts objects from the Windows clipboard.
Paste - This
button inserts objects from the Windows clipboard.
![]() Move Down/Up - In the Track List, these
buttons move a track up or down if possible.
Move Down/Up - In the Track List, these
buttons move a track up or down if possible.
![]() Preferences - Opens the preferences
dialog (for description, see the Options
menu section)
Preferences - Opens the preferences
dialog (for description, see the Options
menu section)
![]() Make CD - This
button will open the "Make CD" dialog to record the CD
Make CD - This
button will open the "Make CD" dialog to record the CD
![]() Disc Info - Shows information (such as
previously recorded sessions and free space) about a CD-R in the CD recorder.
Disc Info - Shows information (such as
previously recorded sessions and free space) about a CD-R in the CD recorder.
![]() CD Guide - Opens the CD Guide
CD Guide - Opens the CD Guide
The destination window contains the current project. There are different views available for a project. The Track List is a general view of the current project, while each editor has its view for showing track content.
This Button Bar (which works like the other button bars) varies with the type of CD created, and all destination window toolbars are explained in the WinOnCD Editors section.
To the left of the Destination Window there are four buttons:
![]() The "Tracks" button
The "Tracks" button
switches to the track list view of the CD. A red/green signal lamp at the beginning of each line informs you whether the data of this track can be written correctly.
![]() The "Editor" button
The "Editor" button
switches to the editor view of the CD. A description of each single editor is given under the respective editors.
![]() The "Artwork" button
The "Artwork" button
switches to the artwork view. Here you can create and print labels, booklets etc.
![]() The "Record" Button
The "Record" Button
switches to the "Record" window.
In the artwork editor, you can create labels, booklets and inlays for your CDs.

The "Artwork" Editor
The Artwork Editor button bar contains the following commands:
![]() Switches to the booklet editor
Switches to the booklet editor
![]() Switches to the inlay card editor
Switches to the inlay card editor
![]() Switches to the CD label editor
Switches to the CD label editor
With the following commands, you can create graphic objects. To do this, click the desired icon and drag the mouse within the canvas to create a box which encloses the object. After creating the object, the settings dialog for it will automatically open. Later just double click the object to edit its preferences.
![]() Inserts a text object .
Inserts a text object .
![]() Inserts a round
text object (label editor only).
Inserts a round
text object (label editor only).
![]() Inserts a track list object.
Inserts a track list object.
![]() Inserts a directory tree object (For
ISO/Joliet projects only).
Inserts a directory tree object (For
ISO/Joliet projects only).
![]() Inserts a placeable artwork object. Images
in BMP, JPG and WMF format can be imported.
Inserts a placeable artwork object. Images
in BMP, JPG and WMF format can be imported.
![]() Allows to specify the background image.
Images in BMP, JPG and WMF format can be imported.
Allows to specify the background image.
Images in BMP, JPG and WMF format can be imported.
![]() Edits the audio track list (For audio
projects only).
Edits the audio track list (For audio
projects only).
Note: You can get back from the track list view by using the Escape or Return key.
To print the selected artwork, choose File Print
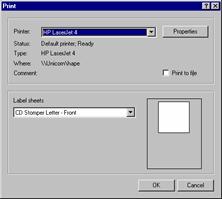
The Artwork Print Dialog
Depending on the layout you have chosen (the shown example is for labels), different paper settings will be offered.
To add your own custom paper style, just double click on the paper sheet, just above the "OK" and "Cancel" buttons. A dialog box to select, modify, add, or remove an new paper style will open:
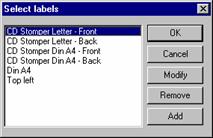
Label Selection Dialog
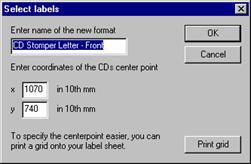
The "Add" and "Modify" buttons opens a box in which the parameters for the new style can be set. To determine these parameters, simply print a grid onto the new custom paper and copy the appropriate numbers.
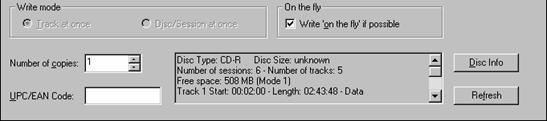
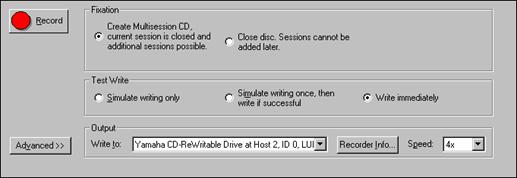
Here you can determine how the selected data shall be written. Depending on the type of project you can only set options that result in a valid CD. If for whatever reason you need to get around that, you can select the project type "User Defined", then all settings are allowed.

Settings in the Record Window
Define type of finalization:
For Audio CDs
"Do not close CD"
An Audio CD written with this option cannot be read by a CD-ROM drive or an Audio CD player. Only CD recorders are able to read these CDs. However, this option allows you to come back and add more tracks at a later time.
"Close Disc"
Only if you are sure that you do not want to add more tracks to an Audio CD later, write the last track(s) using this option. After it has been closed, this CD-R is readable by CD-ROM drives and Audio CD players.
For all other types of CD:
"Create a Multisession CD"
CDs, created as multisession CDs can be read from every CD-ROM drive. You can, however, add data later with another session.
"Close Disc"
Select this option when you are sure you will not add more data to this CD-R.
Define test mode:
Simulate only
CD recorders have a special emulation mode. Using this, you can very exactly test the performance of the entire system, as data are actually sent via the interface to the recorder.
Simulate writing, then write to CD when successful
Here, the emulation is performed, and then immediately does the actual recording if the emulation went correctly.
Write directly to CD
Choose this option if you are already familiar with CD recording using WinOnCD, and your system has been reliable.
The test mode is not available for all types of CDs (e.g. not for CD Extra).
Write to ....:
If more than one recorder is in the system, check here which one you want the data to be written to or if you want the project data to be written to an image file.
Write speed:
If supported by the installed CD recorder, you can set different write speeds here.
Advanced
The "Advanced" window offers additional options which are usually only required for professional applications.
The "Advanced" Window"
Recording mode
"Disc-/Session-at-once"
The entire CD is written in the "Disc-at-once" or "Session-at-once" mode. Using this mode allows the formatter software to write additional information (PQ channel) to the CD. Press plants require CDs written "Disc-at-once as a master for mass replication.
"Track-at-once"
If the demands listed under "Disc-at-Once" are not made, "Track-at-Once" is the recording mode of choice. Even when you write your CDs "On-the-fly" you only need space for one track on your harddisk.
Number of copies
Here you can set the number of copies you want to record.
UPC/EAN Code
The UPC Code (Universal Product Code) identifies products and manufacturers. The address where the code can be obtained depends on the country.
This is for the USA at the
Uniform Code Council, Inc.
8163 Old Yankee Street, Suite J
Dayton, OH 45458
Phone: +1-937-435-3870
and for Germany at the
Centrale für Coorganisation GmbH
Maarweg 133
50825 Köln
Phone: +49-221-94714-0
Fax: +49-221-94714-990
Write "On-the-fly" if possible
Yes
Mostly you can write your CD "On the fly", that means the data will not be copied to the harddisk first. If you are uncertain about the performance of your system, you should simulate the write process first.
No
A track image will be created. This is useful when the source data is coming from a slow drive or when very many small files are to be written on the CD with an ISO 9660/Joliet project.
Here you can obtain the following information:
Length of the current CD
A short description of the selected menu command
A red or green signal light informs you whether your project can be written successfully
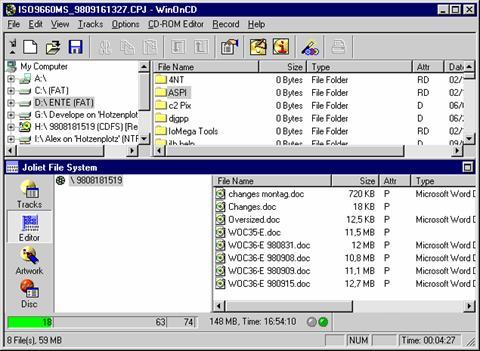
ISO 9660 is the basic data structure for many types of CDs. Therefore, the ISO 9660 editor is used not only for pure Joliet and ISO 9660 data CDs, but also Mixed Mode CDs, CD-Extra, Hybrid CDs and Video CDs. These other CD types usually have one track or partition with an ISO 9660 file system.
The ISO 9660 editor always allows for the option to create a Joliet file system. At the start of WinOnCD you will see the Project selection dialog. Double clicking on the ISO 9660/Joliet icon (which is always in the "Favorites" and in the "Data" group) creates a new data CD project. In the "Data" group you can also select "Append Session", which will automatically import data from a previously written CD.
After selecting a project WinOnCD will open with its main window which is divided into the upper source window and the lower destination window.
On the left side of the destination window of the ISO 9660/Joliet project, four buttons are shown:
Tracks
The total number of tracks on the CD is shown; for an ISO 9660/Joliet CD there is only one track per session.
Editor
Files and directories on the CD can be edited.
Artwork
Opens a graphics editor for the easy creation of customized booklets, inlay cards and labels for the new CD.
CD
Opens the "CD Properties and Recording Settings" window.
CD Properties and Recording Settings
In the editor view of the ISO 9660/Joliet project, the destination window has two sections. The left section shows a tree of the directories and files to be included on the new CD project. You can simply drag items to here from the source window to layout the CD.
The right-hand section shows individual files from one folder. These are listed with detailed information, such as size, modification date and the ISO and Joliet names.
You can modify the content of the ISO 9660 CD by dragging items into the destination window, or moving around the items in the window. To modify the properties of files or directories to be written, a context menu can be used by opening with a right mouse click.
The tree view will show how the finished CD looks, and you can edit the tree irrespective of the source. Thus, for example, deleting a file in the tree view will not delete the original file.
Selecting an item in the destination window and pressing the right mouse button opens the corresponding context menu. It contains the following commands:
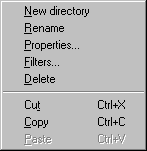
The context menu for files (right-hand section) does not contain the New directory and Filter commands, but contains an additional Autorun submenu.
Creates a new directory in the ISO 9660 tree. The new directory can be used like any other directory in the destination window. The newly created directory will be burned to the CD, but will not be created on the harddisk.
Choose this item to change the ISO 9660 or Joliet name of the item.
With the Edit Properties dialog, you can edit the file or directory properties applying to either the ISO 9660 or the Joliet file system or completely exclude a file from either file system.

Directory Properties: Common
On the "common" page, a file or directory can be excluded from either the ISO 9660 or the Joliet image. If the selected item is a directory, filters (as explained in the chapter "Filters") can also be set here.

File Properties: Joliet
Filenames and modification dates can be set independently for the ISO and the Joliet partition of the CD.
How the "Hidden" attribute is handled depends strictly on the read-back software. Using the Windows Explorer or the DIR command, hidden files on an ISO 9660/Joliet CD are shown if selected as such in the options.
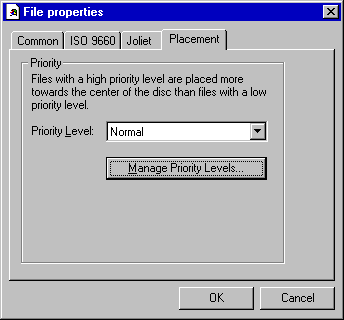
File Properties: Placement
The last property page contains options for file placement. A dedicated sections explains ISO 9660 file placement, and how to use it with WinOnCD.
This command applies filters to, or removes filters from, a tree branch.
Local filters are valid only for the directory they are applied to and do not apply to the subdirectories of that directory.
Global filters are valid for the directory selected and all its subdirectories.
Filters are used to include and/or exclude files with certain attributes, date settings and wildcard patterns. Filters are saved with the project and therefore their settings are taken into account whenever the project is processed.
Using Filter... opens up a dialog box for specification of the filter conditions:

Filter
The following types of filters can be set:
Name filter
Attribute Filter
Date filter
Size Filter
Delete
Deletes the currently selected item(s) in the tree window. The original source item(s) will not be deleted.
Cut, Copy, Paste
Provides the standard functionality for items in the ISO/Joliet destination window.
Autorun
This submenu contains two commands: Set as Autoplay. and Set as Icon. . These commands select an executable (*.exe) to be automatically run , or an icon contained in an executable (*.exe), dynamic library (*.dll) or icon (*.ico) file to be displayed as the CDs icon by a Windows 9X/NT system when the CD is inserted. They automatically open the Autorun settings in the Properties. dialog:

ISO 9660/Joliet Properties: Autorun
This page allows to generate or edit an Autorun file, which is used by Windows 9X/NT systems to automatically run a file when the CD is mounted, and to display a custom icon for the CD.
The easiest way to specify autorun settings is to use the context menu in the destination window, which are a shortcut to the "Review Autorun Settings." dialog:

Autorun Settings: AutoPlay
Here the file to be started when the CD is mounted can be specified, relative to its position on the CD. If the context menu command Set AutoPlay is used, the file name is automatically entered here. Additional parameters can be specified in the appropriate box.
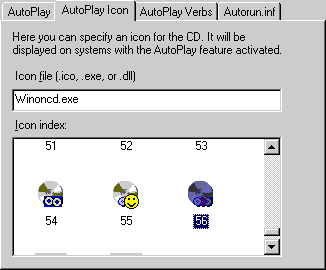
Autorun Settings: AutoPlay Icon
The icon specified on this page will be used as the custom icon for the CD. Any "*.exe", "*.dll" or "*.ico" file can be used. By default, the icon at index 0 will be used. If the Set as Icon. command from the destination window context menu is used, the file is automatically entered here.
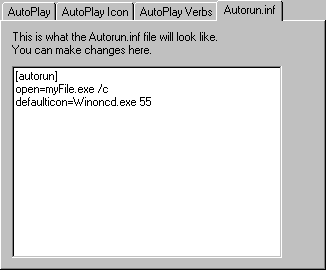
Autorun Settings: Autorun.inf
For expert users, the Autorun.inf file can be reviewed and edited here.
The ISO 9660 Destination window contains a Button Bar, whose commands are also available from the "ISO 9660" menu in the main menu bar. If it is not visible, select View CD-Rom Editor Toolbar. It contains the following commands:
In the dialog brought up by this button, properties which affect the whole CD rather than single files can be edited.
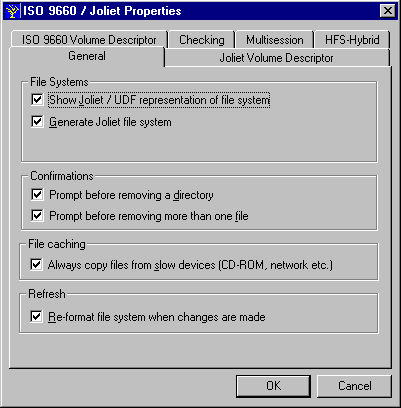
File System Properties: General
· Show Joliet representation of file system - Toggles the display of the Joliet file system specific information. Even if the Joliet file system is not displayed, it is still written.
· Generate Joliet file system - Toggles the creation of a Joliet file system for the CD currently in the layout. If this option is off, the CD will only contain an ISO 9660 partition.
· Prompt before removing a directory/more than one file - Toggles the safety boxes in the ISO/Joliet editor.
Always copy files from slow devices - With this option set, files which are on slow devices (e.g. CD-ROMs, networks) will be copied to an image file independent of other settings. This allows you to create a CD "partly On-the-fly": Files from fast drives will be written On-the-fly, while files from slow devices (which might cause buffer underruns) are copied to a fast drive as an image first.
Reformat file system when changes are made - Refreshes the size estimation for the CD project.

ISO 9660/Joliet Properties: Volume Descriptor
The pages for the ISO 9660 (Primary Volume Descriptor, PVD) and Joliet Volume Descriptors (Secondary Volume Descriptor, SVD) look identical and serve identical purposes. The Joliet volume descriptor can be edited independently, and can use long filenames.
The data in the Volume Descriptors is purely informational, and can be left out.
The volume descriptors are special sections on ISO 9660- and Joliet file system CDs which contain pointers to the root directory of the CD. More importantly for the author of the CD, however, they contain content, copyright, and publishing information that the author can specify. The ISO 9660 fields are contained in the Primary Volume Descriptor, while the Joliet fields are contained in the Secondary Volume Descriptor.
The Volume Descriptor information, with the exception of the volume ID, which most computer systems display as the name of the CD, cannot easily be made visible.
However, the Volume Descriptor information can be seen by reading certain blocks of the CD, i.e. block 16 for the PVD. It should be filled out in accordance with ISO 9660 and Joliet standard for subsequent identification of the CD.
The ISO 9660 fields have to be filled out using the characters "A" through "Z", "0" through "9", and "_" only (for more information see description of the ISO 9660 standard). The Joliet fields can contain long (Unicode) filenames.
Here is a description of the fields:
The volume identifier should state the name of the volume, a volume being a single CD or a set of related CDs. On most computer systems this field is displayed as the name of the CD.
This field is 32 (Joliet: 16) characters long.
The system identifier should specify an identification of the system able to deal with the first 16 blocks of the CD. These first 16 blocks can contain special system-specific information.
This field is 32 (Joliet: 16) characters long.
The volume set identifier field is used on sets consisting of multiple CDs. If you are making a CD set you may wish to define the order of the CDs by giving each CD in the set one volume set ID according to its position in the set.
This field is 128 (Joliet: 64) characters long.
The application identifier field contains information about the application used to work on the data on the CD. For a Bridge Disc, for example, this field has to represent the complete pathname of the CD-i Application program.
CeQuadrat's WinOnCD will automatically override this field with correct information if necessary for the CD type to be written.
This field is 128 (Joliet: 64) characters long.
The copyright field contains the copyright statement for this CD. Although this information is not visible on most computer systems it can be made visible by specifically reading block 16 of the CD. You should fill out this field to identify the CD.
This field is 37 (Joliet: 18) characters long.
The information in this field can be stored in two different ways:
1. The field contains the information itself. The length of the field must not exceed the maximum length as described above.
2. The field contains the name of a file in the root directory of the CD and the information is stored in this file.
The publisher identifier field contains information about the publisher, i.e. your company.
This field is 128 (Joliet: 64) characters long.
The information in this field can be stored in two different ways, exactly as in the Copyright field.
The abstract description field contains information on the current volume of this volume set.
This field is 37 (Joliet: 18) characters long.
The information in this field can be stored in two different ways, exactly as in the Copyright field.
The bibliographic file identifier field contains information about the bibliography of the CD. This information is stored in a format that the publisher and the recipient of this CD have agreed on.
This field is 37 (Joliet: 18) characters long.
The information in this field can be stored in two different ways, exactly as in the Copyright field.
Activating this button will make an exact copy all entries of the ISO 9660 VD to the Joliet VD.
This page allows the override of certain rules of the ISO 9660 standard.

ISO 9660/Joliet Properties: Checking
The character set for ISO names can be strictly ISO, MS-DOS legal, or unrestricted. Unless "Allow long names for NT" is chosen, filenames are limited to a length of "8+3" characters.
Usually, only eight nested directories on an ISO 9660 CD are allowed. This restriction can be disabled to allow any depth of nested directories.
Although it is usually safe to use MS-DOS legal characters in ISO names, any deviation from the ISO 9660 standard might cause problems when reading the CD. These options must be used with caution.
These options can only be set or changed while the ISO file system is empty.
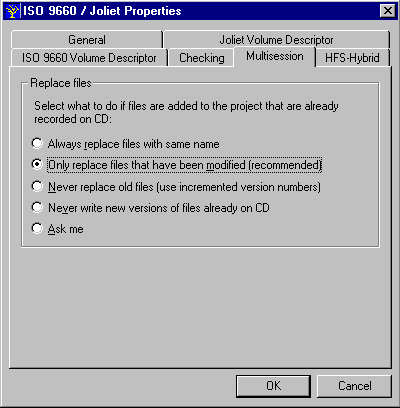
ISO 9660/Joliet Properties: Multisession
The options on this page control how WinOnCD handles multisession writing.
Multisession recording is described in detail later in this manual.
When creating a multisession CD, choosing this menu item will read the CD currently in the CD Recorder and import its contents into the destination tree. You can edit, re-arrange and delete the imported items just like any other items from the source window.
These files will re-appear on the CD after writing, but are only written once.
Files which are imported from previous session(s) on the CD are marked in the ISO editor with a special icon.
Multisession recording is explained in detail later in this manual.
This command tests the CD for errors relating to naming conventions and directory depth.
This command will check the data written to a CD by comparing it to the source.
The following options can be set:

Verify Dialog
Specifies the drive letter of the CD-ROM or recorder that the CD-R is in.
Please insert here where the log file holding the information about the verification process is to be saved.
This command will toggle between the standard file system view and a placement list of the files which are to be written to CD.
File placement, and how to use it with WinOnCD, is explained in the dedicated "Placement" section.
These two commands are only available in the placement list and assign placements to files and directories.
A click on this button moves the selected object to the start and the end of the session respectively.
The ability to do multisession writing is an important feature of ISO-9660. While CD-Recordables are write-once media, the multisession technique allows data to be written to the CD several times, in multiple "sessions".
Files can not physically be deleted from a CD-R and space which has been used up can never be recovered, but files can be added and the directory structure can be altered. The later feature is useful to move files to a different subdirectory, or to hide ("delete") them.
New: Using one of the recently available CD-ReWritable (CD-RW) recorders and special CD-RW media it is also possible to delete data from a disk and re-write it. WinOnCD supports that type of recorders.
In order to use the multisession feature, a multisession capable recorder is needed to write the disk, and a multisession capable CD-ROM drive is needed to access a CD-R so written.
Besides simply adding data to a CD-R, WinOnCD can also keep track of files and file changes, (i.e. if desired, files will only be written to the CD if they have actually changed.)
Creating a multisession CD is simple: The first session of a multisession CD is created in the same way as any other ISO 9660 CD with the ISO Editor. The write option "Multisession" must be set.
Note: Do not use the "Close CD" option when creating a CD for multisession use, as no further writing would be possible to that CD-R.
When data is to be added at some later time, open a new project again. Choose "Append Session (ISO 9660/Joliet)". A dialogue box opens where the earlier sessions are displayed. Usually the last session will now be checked and imported.
Previously recorded session(s) can also be imported by choosing the "Import Session" command from the ISO Editor menu or the toolbar.
In the dialog box that appears, any previous session can be selected. By doing this, you can "revert" CDs to a prior status or "Undo" a recording session.
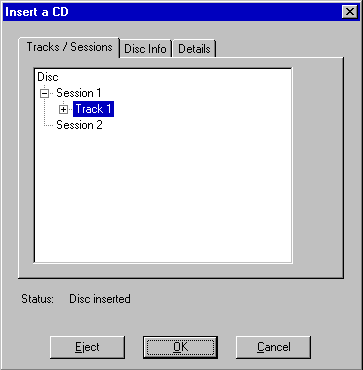
Session Selection Dialog
All files and folders on the CD will now be listed in the destination window and can be modified like all other files.
Destination Window with Imported Session
When recording multisession CDs, it is important to make sure the correct options are set. To access these options, choose "ISO" from the toolbar of the ISO Editor and click the "Multisession" tab.
ISO 9660 Multisession Properties
Any files
selected will always be written to the CD, and all previously recorded files with the same name will be replaced.
With this option set, files will only be written to the CD if they are newer (date of modification) than the file on CD. This saves CD space, as only the reference to the file in the old session will be written to the new session.
This option will append a version number to the old file (e.g. "Test.txt;2"). However, under Windows the old files will be visible, but not accessible, as Windows does not honor version numbers.
On other systems (e.g. MacOS), files will be listed with their version number and all versions of a file can be accessed.
CeQuadrat does not recommend using this option for Windows/MS-DOS CD-Rs
This makes sure that only actually new files (new file name) are written to the CD. Old versions of files will not be replaced, and will still be accessible.
This option opens a dialog box for each new file with the same name as a previously recorded file.
After importing old files, new files can be added to the destination as mentioned before. It is important to have the correct option for replacing old files set before doing so, as replacement will be determined when the files are dragged into the destination window.
If existing folders are dragged into the destination window, files contained therein will be checked individually.
In the following example, the complete original structure has been dragged into the destination tree.
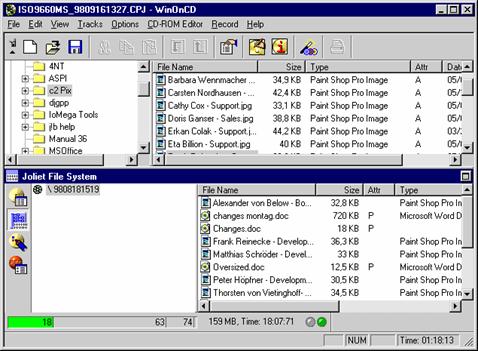
ISO Destination Window with Imported and New Files
Note that imported files have a different icon than the other files. The origin are listed as "Previous Session". This means, only the reference to this file will be kept. New or changed files will actually be written to CD.
All files in the "Subdir" folder have been checked as well and will be handled in the same manner.
Remember that imported files can be handled like all other files, and can even be renamed.
To erase a CD-RW, please choose "Disc-Info" from the "Recorder" menu. Then select the "Erase" page offering different erasing functions depending on the type and model of CD recorder you are working with:
Quick Erase (TOC only): In that case only the "Table of Contents" TOC of your CD will be erased. WinOnCD will recognize this CD as an empty disc which can be overwritten. Only by overwriting the data are actually erased. The erasing process takes not more than a few seconds.
Erase whole disc: With this function the area that has been written to will be completely erased, i.e., the data will be erased physically. This erasing process takes up to 40 minutes.
Erase Last Track: This command will erase the last track of a CD-RW. This is useful for audio CDs or multisession recordings. It might be necessary to Un-Close the CD first (see below).
Un-Close: Will remove the Lead-In and Lead-Out from a CD-RW, e.g. enabling you to write more audio tracks to a previously closed CD-RW disc.
Especially the later two commands are currently supported only by a limited number of CD-RW Recorders.
Please note:
CD-RW media recorded with WinOnCD can only be erased completely. The ISO file system does not allow to delete single files. Selective deletion requires special software packages such as CeQuadrat's PacketCDT version 2.0 or higher.
WinOnCD offers a very simple way to assign physical placement on the CD-R. This allows the most often used files to be placed where they can be accessed most quickly.
On the Placement page of the properties dialog, a placement level can be assigned from a pop-up menu. By default, all files have Normal priority.

File properties: Placement
To add or delete priority levels, press the "Manage Priority Levels..." button. Files and directories in levels with high values are placed closer to the center.
By placing files that are accessed very often close to the center of the CD where the Path Tables are located, you can speed up access time. Especially when access is mostly limited to these files, the read-head of the CD-ROM only has to travel a very short distance to read them.
Generally, you should only override the default file placement when you are sure about how you (or the users of the CD) will benefit from this non-standard placement. Also, remember that you should only assign placement for a few files. It is not appropriate or necessary to place every single file to a new position.
This section explains the creation of an Audio CD (according to the "Red Book" standard) with WinOnCD.
The Audio CD project has two different views:
- the Track List - where all tracks of the new CD are displayed and
- the Audio Editor - where sounds from each track can be edited individually
To create a new Audio CD project, choose File New and open an Audio CD project. A standard audio project is always found in the favorites section, other audio project types can be found under "Audio"
To create a CD with CD Text , the appropriate icon must be chosen.
The current project can be shown as a list of all existing tracks. Just press the Tracks button to get this view.
Moving or deleting Audio tracks is possible in this view. Double clicking on a certain track or pressing the Editor button will change the view to the Audio Editor where the sound can be edited.
You can create a new Audio track with the command Edit Insert Into Project.
Some settings, which can be useful in an Audio project, can be
reached by pressing the ![]() button in the main button bar or using the
Options Preferences menu.
button in the main button bar or using the
Options Preferences menu.
Press the Editor button to see the Editor view of the CD.
The Audio Editor is used to view and edit sound files. Parts of sounds can be deleted, sounds can be inserted, and index marks can be set.
Note When writing CDs "Track-at-Once" a two second gap is added between the tracks. However, some recent CD recorders (especially those with an IDE interface) are also able to write in the "Track-at-Once" mode without a gap.

The Audio Editor Destination Window
Information about the current selection is given at the bottom of the destination window. The selection can be changed either with the mouse or by entering start and end points in the Mark From and Mark To edit fields.
To add sound or music to a track in the Wave Editor, drag a sound from the source window or the Explorer to the destination area. If the editor already has content, the new sound is inserted at the current mark.
Above the waveform (marked with "T" and "I") are track and Index bars. To create a new track or index, Control-Click in the respective bar where you would like the new track or index to start. Alternatively, you can set the selection mark and choose "Insert Track" or "Insert Index" from the context menu (right mouse button). To change these items, click and drag the number of the track or index you wish to change. To delete a track or index, highlight it by clicking it once and choose "Delete" from the context menu. This insertion of track marks into a piece of music is also called "PQ-Editing ".
Shift-clicking a track or index will select the waveform for that area.
Note: Only recorders with "Disc-at-Once" or "Track-at-Once without gap" support can write CDs which contain track marks anywhere within a sound file. If the recorder only supports "Track-at-Once" writing, a two second pause will be added by the recorder before each track.
The bar below the waveform can be toggled
between volume adjustment and effects by clicking on the icon on the left ( ![]() or
or ![]() )
)
By control-clicking in the volume adjuster, you create a new handle which can be dragged to change the volume. The results are shown automatically in the waveform. To delete a handle, select it and choose "Delete" from the context menu (right mouse button).
The effect bar works much like the track bar, displaying which effects are applied to the sound. To add a new effect to the current selection, choose the appropriate effect from the "Effects" button bar. Double clicking in the on the description in the effect bar will open the respective properties box. The use of effects is explained in detail in a separate section.
You can hide the track/index bar, and change the waveform view to mono by clicking the icon in at the left of the respective bar.
The context menu in the wave editor is used to set or delete track and index marks.
To create a new track or index within the currently displayed sound, set the mark and choose Insert Track (or Insert Index) from the context menu (click the right mouse button).
Also, handles in the volume adjuster can be deleted with the context menu.
The Wave Editor has four movable Button Bars (located at the top by default), "General", "Edit", "Play" and "Effects". They contain the following tools:
This dialog allows you to change the properties of each track in the current editor window. How to set the options of this box is explained below.
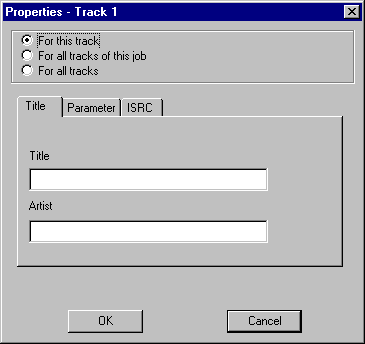
Track Properties
Title, Artist
Here the song title and the artist can be entered. This information will be used in the artwork editor and - if selected - as the CD Text information.
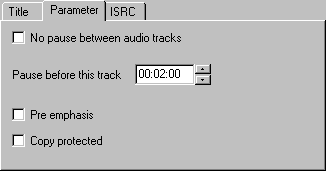
Track Properties - Parameter
Copy Protection
Sets the "Digital Copy Prohibited" flag for this track. This is a request for digital recording systems not to copy the track in question. This flag is rarely checked by modern CD recording software.
Pre-Emphasis
This flag indicates that this track has been recorded with pre-emphasized treble. This flag is checked by quality CD players to avoid treble falsifications.
If a CD track is added to an audio CD project, this flag is carried over from the original track.
Note: If the track is inserted into another (non empty) track using the audio editor, the pre-emphasis setting of the existing track is kept.
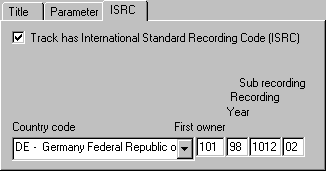
Track Properties - ISRC
Track has ISRC
This option enables the "International Standard Recording Code" for the track. Leave this box unchecked if you do not have an ISRC number (described in ISO 3901) for the recorded material. In order to assign an ISRC you need an ISRC Owner Code.
To learn more about the ISRC and to obtain an ISRC Owner Code, please write to:
International Federation of the Phonographic Industry (IFPI)
54 Regent Street
London W1R 5PJ, United Kingdom
Fax: (44) 1-71-439 9166
Pause before this track
If your recorder supports "Disc-at-Once" writing, this option allows you to set the length of the pause before the track in this editor window. If the recorder does not support "Disc-at-Once", there will always be a pause of two seconds before each track.
Recent CD recorders (especially those with an IDE interface) are also able to write in the "Track-at-Once" mode without a gap.
This command opens a dialog which allows you to copy a track from an Audio CD to your hard disk in wave (.wav) format.
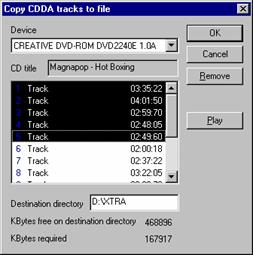
Using shift- or control-clicks, several tracks can be selected.
These files can later be used as input for WinOnCD.
Cancels the last action in the Editor.
Erases everything in the current editor window
Deletes the current selection.
Inserts a determinable amount of silence at the current mark.
Selects the leading or trailing silence of the sound currently in the editor window. This is most useful for selecting and deleting unwanted silence in a sound file.
Selects everything in the current editor window.
Useful when using .wav files which contain more than one song (e.g. recorded from a LP), this command will search the active waveform for pauses, and automatically sets a new track mark.
Enlarges the wave form. An area of the wave form is selected, and is sized to fit the window.
Reduces the size of the wave form so that more of it can be displayed.
Increases the volume of the current selection from a start level to a limit level. New adjustable volume handles will be added to the volume rubberband below the waveform.
Turns the volume level up/down in the selected area. The volume can also be adjusted using the volume "rubber band" under the waveform
Decreases the volume of the current selection from a start level to a limit level. This command also adds adjustable volume handles to the rubberband below the waveform.
WinOnCD 3.6 can perform a frequency analysis and display a real time visualization of the playing sound.
This analysis is especially helpful in conjunction with the effects (e.g. equalizer) or to find out more about the nature of noise in recordings.
The "Real Time Analysis" opens a separate window, in which the visualization is displayed whenever a sound is playing:
Real Time Analysis of a Movie Monster Scream
Using the "Next view" and "Previous view" buttons, you can toggle between the 3D and other 2D views:
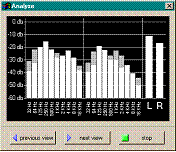
2D views of the real time analyzer
This command performs a frequency analysis for the actual selection of the wave file:

Analysis Snapshot
The above picture shows a good example of a broad banded pop/click of an LP recording (in the front), which can be reduced using the "declick" effect.
The picture can be rotated using the left and right mouse buttons.
Plays the current selection, including all selected effects and other modifications.
This button will write the current selection including all changes (e.g. volume adjustment, effects) to hard disk.
Opens a records dialog to record audio from external sources with your sound card.
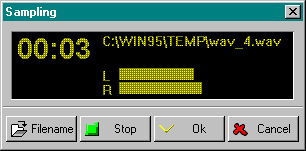
To apply an effect to the current selection, choose one of the effect buttons below. To access the settings of the effect, double click its description in the FX bar under the waveform.
While changing the settings for an effect, you can choose the "Play" or "Real Time Analysis" button from the "Play" button bar to play and analyze the sound.
Hint: For various selections in your waveform, you can set different effects, or the same effect with different settings.
Do not use effects on MPEG 1, Layer 3 (.mp3) compressed source files. Due to the compression used in these files, the effects might produce unwanted results.
To delete an effect, select it in the FX bar, and choose click the "Delete FX" button.
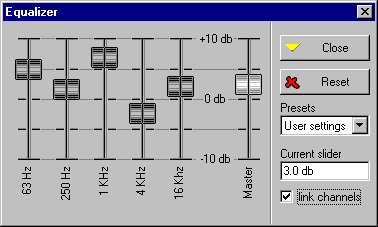
Equalizer Settings
The equalizer effect mimics a stereo, 5 band equalizer. With each slider, the desired frequency can be amplified or softened by -10 to +10 dB. If Link Channels is selected, the same settings will be applied to both the left and right channel, otherwise they are handled individually: The left channel using the upper, and the right channel using the lower sliders. The Reset button will return all sliders to the zero setting.
The pop-up menu contains predefined settings which you may find useful.
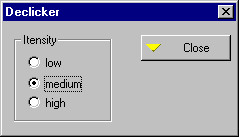
Declicker Settings
With the declicker you can reduce cracks and pops (broad-banded, short noise), especially with LP recordings. It may be useful to apply the declick effect only to those areas which contain clicks, or to apply it to different parts of the waveform with different settings.
CD Text is a feature added to the conventional CD Digital Audio format by Sony and Philips. CD players equipped with CD Text decoding capability can display information such as album title, artist and song title.
Currently, only a very limited number of CD Recorders are able to write CD Text information.
To create a CD Text disc, you must choose the CD Text (Digital Audio) project, located in the Audio group, in the project selection dialog (File New
For CD Text, the information entered using the Track Properties ![]() or the artwork editor will be used.
or the artwork editor will be used.
With WinOnCD you can use the data coming from an Audio CD read out, whether from a SCSI or EIDE CD-ROM drive, as source material.
Due to the nature of Audio data, you may, however, encounter quality problems with the transferred material sometimes.
Addresses of sectors
Unlike Data CDs, sectors on Audio CDs don't have any addresses. For that reason a CD-ROM drive is not always able to continue at the same sector when the data stream has been interrupted. Interruptions can be caused as the data transfer rates of the CD-ROM drive and the harddisk are not the same. This is also true for the transfer rates of CD-ROM drive and CD recorder when writing "on-the-fly".
Using an overlapping reading scheme and some kind of pattern recognition WinOnCD makes for a perfect fitting of the tracks.
On the other hand, some CD-ROMs take internal measures to ensure the continuity of tracks.
Basically Audio quality at this point is dependent on the type CD-ROM drive and on the read-out speed (the slower, the better).
Error correction
Another reason for the loss of quality may be in the error correction. Audio CDs do not have the same sophisticated error correction as data CDs. Some errors, especially the ones caused by physical damages, cannot always be corrected entirely. The resulting transfer of incorrect data is called drop outs, which WinOnCD can repair. In other cases, it may be helpful to use the declicking tool (as described in the effects section.)
In order to get the best results, check the CD-DA Grabbing settings in the main Preferences dialog, which is located in the Options menu).
WinOnCD supports the two audio file formats:
Audio Interchange File Format (AIFF): ".AIF"
Windows Wave: ".WAV"
These two formats are supported with sample rates of 11, 22 or 44 kHz, 8 or 16 Bit sample size, mono or stereo.
MPEG 1 Layer 3: ".MP3
The MPEG files are decoded and written to the audio CDs as Red Book audio, playable on standard audio CD players. On slower systems it might not be possible to write MP3 files on the fly.
We also recommend not to use any effects on MP3 files, as they may produce unwanted result due to the compression used in these files.
Raw files can also be written, but these files are not checked for their contents. To avoid errors, raw files must have a specific extension to specify the byte ordering in the source file:
Raw (Pulse Code Modulation), Intel byte order: ".RAW" or ".PCL"
Raw (Pulse Code Modulation), Motorola byte order: ".PCM"
If a raw file contains music, it will contain a 32-bit word for each sample, with the first 16 bits for the left, and the rest for the right channel. The sample rate is 44.100 kHz.
Recording an audio CD generally works just like described in the chapter "The WinOnCD User Interface".
A new feature in WinOnCD 3.6 makes recording audio CDs in multiple "sessions" easier:
If a CD already containing audio tracks is in the CD-Recorder when the Record button is clicked, WinOnCD will check if the tracks already on the CD are identical to the corresponding tracks in the project. If so, WinOnCD will only write the new tracks.
This means, you can record the first set of audio tracks to a CD-R or CD-RW (remember to choose Do not close in the record options), and save the project. When you are ready to add more tracks, simply open the existing project, add the new tracks, and record. WinOnCD will only record the added tracks.
Of course, it is not necessary to save the project in order to add tracks to a not closed audio CD.
Remember to close the CD after the last track has been added in order to make it readable by a standard CD-Player.
With selected CD-RW recorders, WinOnCD 3.6 allows to Un-Close the disc, and to delete the last track (which can be done repeatedly). To find out more about these features, please refer to the CD-ReWritable section in the User Interface chapter.
According to the BlueBook standard the CD-Extra consists of CD Extra specific information, an ISO 9660 data track, and one or more Audio tracks
The CD-Extra specific information can be information about the song or piece of music, copyright, lyrics, and a picture.
This information can be given in several languages if desired.
CDs without these specific information are not valid CD-Extras.
Multimedia PCs, MacOS computers with the appropriate software or specific CD-Extra players are capable of playing CD-Extra discs.
To create a new CD-Extra project, choose File New and then select the CD-Extra project in the "Audio" section.
To create audio tracks, switch to the "List View" by pressing the "Tracks" button. Tracks Insert will insert a new digital audio track, which can be edited using the Audio Editor by double-clicking on the track number or by pressing the "Editor" button.
Please refer to the Chapter "Audio CD Project" for details about the "Audio Editor".
You will find
an extra "CD Extra" button ![]() in the button bar of the Audio Editor. How to
choose the correct settings is explained below.
in the button bar of the Audio Editor. How to
choose the correct settings is explained below.
To edit the ISO 9660/Joliet track of the CD, click on the CD-ROM track in the list view and press the Editor button.
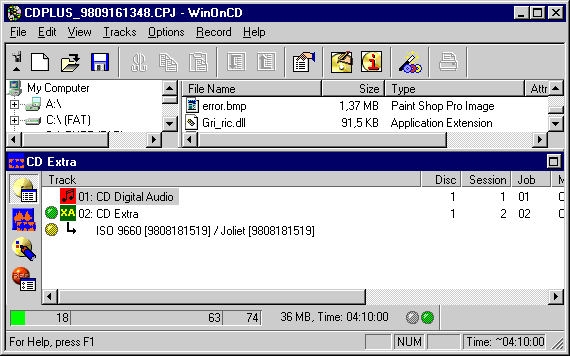
The ISO/Joliet Editor
The ISO File System can then be edited with the ISO 9660/Joliet Editor which is explained in details in the ISO 9660/Joliet project.
Multisession recording, however, is not possible with CD-Extra.
WinOnCD will always add files with specific CD-Extra information to the CD. The following structure is an example for information in English (US) and German (DE):
Directory: CDPLUS
INFO.CDP
SUB_INFO.US
SUB_INFO.DE
To edit the CD-Extra specific features, select the CD-ROM track in the list view and press the Editor button.
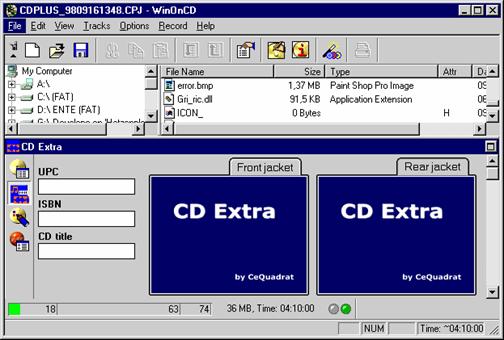
The CD-Extra window consists of two parts:
The Destination area for a CD Extra contains the pictures associated with the CD (CD cover). To add a CD cover, just drag the images of the front and rear jacket into the respective sector.
You can also enter the ISBN (International Standard Book Number) and UPC/EAN (Universal Product Code) for the CD.
One picture per audio tracks for each language and particular information can be assigned to each Audio track of a CD-Extra.
These can be added using the "Default" button in the status bar. You can also edit these track-properties by pressing the "CD-Extra" button in the Audio Editor tool bar.
Pictures and information can also be assigned to the tracks by dragging them into the respective part of the destination window. When doing this, however, you must have one language checked, and the audio part of this track must already exist.
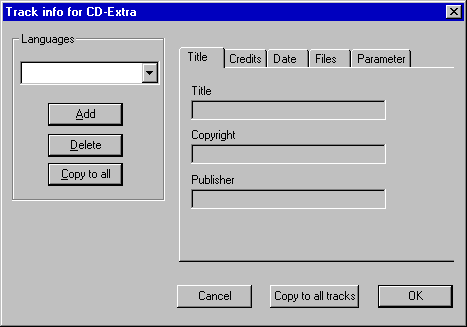
CD-Extra Track Properties
The information for the audio tracks can be supplied for a variety of languages. To add information in a specific language, it has to be added to the list using the "Add" button.
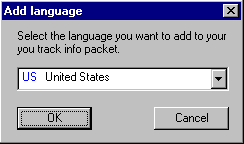
Add Language Dialog
Now the information for the languages in the list can be edited independently.
Here the general information about a title (Composer, Artist, etc.) can be entered.
There is no specific standard for these fields.
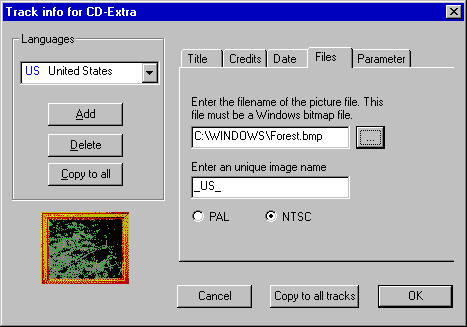
CD-Extra Track Properties: Files
Here one bitmap file per language can be assigned to the audio track. A unique name (in the example _US_) is assigned to each picture. Only change this name if you are very familiar with the CD-Extra format.
If the picture format is correct, a preview will be displayed in the lower left corner (a tree in our example above).
Please choose under PAL or NTSC the size of the image that is to be stored in Still MPEG format on the CD-Extra.

CD-Extra Parameter Properties
The Genre, Key and Tempo fields are purely informational and do not affect playback of the tracks.
A Video-CD compliant to the WhiteBook 2.0 standard is a CD-i Bridge-Disc, containing a CD-i application, an ISO-9660 file system and one or more MPEG video tracks.
These CDs can be played on personal computers equipped with an MPEG playback card (MPC3), on CD-i players with a Digital-Video cartridge or on Video-CD players. The ISO-9660 file system can be used to store additional information, retrievable on personal computers.
The WinOnCD Video-CD editor only supports MPEG video tracks. CeQuadrat's VideoPack 4.0 authoring tool can create interactive Video-CDs, including menus, still MPEG slide, and hotspots.
To create a new Video-CD project, select File New, and choose "Video-CD" project from the "Video" section.
The first track of a Video-CD always contains Video-CD specific data(for example the CD-i application). As WinOnCD will take care of all necessary selections, you have nothing to do at this point.
Apart from a Digital-Video cartridge, a CD-i player needs software to play a Video-CD. This software must be supplied on the Video-CD itself.
WinOnCD includes the royalty-free CeQuadrat CD-i player application. There is no limitation on the number of titles or copies you can produce with the CeQuadrat CD-i application, provided the CD was written with CeQuadrat software.
The CeQuadrat
CD-i application program is Video-CD 2.0 compliant. As it is designed for
Video-CD players, it does not support the full functionality of CD-i players.
If you need all features on the CD-i page, we recommend that you use a CD-i
specific software package.
It is illegal to use any part of the CeQuadrat CD-i application with software from other vendors or to distribute the CD-i application program other than as part of a Video-CD title created with CeQuadrat software.
To edit the ISO Part of the project, mark the ISO entry in the track list and click the "Editor" button.
The Video-CD editor supports MPEG or AVI files as input. The MPEG files must be WhiteBook compliant system streams (i.e. multiplexed, with a video bit rate of 1,151,929.1 bits/sec and an audio bit rate of 224 kbit/sec).
AVI files are encoded and multiplexed by the integrated encoders and multiplexer.
Note: This can take a while. Encoding 1 minute of Video can take between 10 and 50 minutes, depending on your system.
The CD Copy module will create an exact copy of most types of CD, with the exception of CDs not corresponding to the CD standards such as RedBook, YellowBook etc.- which is often the case with CDs for game consoles. Usually CDs intended to be played on regular CD-ROM drives, are compliant with the standards. However, some manufacturers intentionally put a defect Error Correction Code (ECC) for a certain sector onto the CD as a special copy protection. When the application tries to read this sector, a read error message will come up, which means that the original CD is in the drive. If there is no error message, a copy of the CD is inserted.
Note: WinOnCD may not be used for making illegal copies. CeQuadrat trusts you. We are sure you will respect the copyrights of others.
To create the copy of the source CD as nearly identical as possible, CD Copy will write the CD "Disc-at-Once", if this is supported by the recorder.
To enter the CD Copy module, choose File New and select CD Copy project from the "Favorites" or "Copy" group. If a CD is in the drive, this will be analyzed immediately and copied to the track list.
Otherwise the Track List will open empty, and you can select the source CD.
If the CD to be copied is not yet in the source drive when you start CD Copy, please insert the source CD and drag the drive symbol to the destination (In CD Copy mode, only suitable devices will be listed in the source tree).
The Source View Tree
Now the tracks will be analyzed and displayed in the destination window.
When copying CDs in On-The-Fly mode, be sure that the source CD is physically clean and undamaged. Otherwise copying might fail due to reading problems.
Technically, the capacity of CD-R media is not limited by the size reported as the outermost lead-out from the recorder (e.g. 74 minutes). Most CD-R media on the market can be recorded onto beyond this mark.
Warning: Recording beyond the media size reported by the recorder is a violation of the Orange Book standards.
If copying CDs with a size exceeding 74 minutes, WinOnCD will issue a warning, and attempt to copy this CD. This may result in a CD not containing the standard 90 second lead-out, which possibly is not readable in all CD-ROM drives.
This section contains a quick reference on how to make a CD-ROM and an Audio CD with WinOnCD. Also, the CD Copy module is explained here. It should be used if you already know how to use WinOnCD but want to make sure you have not forgotten any steps.
This section will use short examples to demonstrate the features and the user interface of WinOnCD. The examples are designed so that you can recreate them easily with your software and follow along.
If you want to
familiarize yourself with the CD recording topic first, please choose the WinOnCD Guide ![]() from the main button bar or by selecting the File Wizard
command. You will be guided
step by step through the production an ISO 9660/Joliet CD, an Audio CD, a
Video-CD, or a CD-Extra and be introduced to the use of the CD Copy module. Use
the Guide as long as you feel you need this special support.
from the main button bar or by selecting the File Wizard
command. You will be guided
step by step through the production an ISO 9660/Joliet CD, an Audio CD, a
Video-CD, or a CD-Extra and be introduced to the use of the CD Copy module. Use
the Guide as long as you feel you need this special support.
In this example, we deal with a data CD according to the ISO 9660/Joliet standard. You can easily follow along with your own files and, if desired, actually burn a CD.
Provided that WinOnCD has been properly installed, it can be started using the "Start" menu or with the Explorer by double-clicking the "WinOnCD" icon.
Usually, WinOnCD will start up with the project selection window by default. Double clicking the CD-ROM ISO9660/Joliet icon will open the WinOnCD main window which is divided into the source window above and the destination window below.

The Main WinOnCD Window
Except for the menu bar, there are three areas in every WinOnCD layout window: The button bars (under the menu bar), the source window (in the middle) and the destination window (at the bottom).
In addition you will find four buttons in the destination window of the ISO 9660/Joliet project.
Tracks
The total number of tracks on the CD is shown; for an ISO 9660/Joliet CD there is only one track per session.
Editor
Files and directories on the CD can be edited.
Artwork
Opens a graphics editor for the easy creation of customized booklets, inlay cards and labels for the new CD.
CD
Opens the "CD Properties and Recording Settings" window.
To put together the data for your ISO 9660/Joliet CD (Data CD) simply click the Editor button.
The horizontal divider between the source and destination windows is adjustable, as are the vertical dividers separating the left and right halves of the source and destination windows.
The source window works just like the Windows Explorer. The structure is shown on the left, while files and their attributes are shown on the right. Open and close a few directories to get a feel for the Source Window
As long as there are no files or directories assigned for the CD, only the empty root folder will be in the destination window.
Next, simply drag a directory from the browser (source)
The Source Window
onto the icon of the CD root folder. It will appear in the destination window:
The Destination Window Tree
You can also drag files directly form the Windows Explorer to the source window.
The new directory will be in the root directory of the CD, and all of its subfolders, if any, will be included. Other directories or files can be added to any directory in the destination window.
The items in the destination window can be modified without affecting the originals on the harddisk by using the context menu (click the right mouse button):
The ISO 9660 Editor Context Menu
Most of these options are self explanatory, just select an item in the Destination Window and try. All options are explained in the "ISO 9660 Layout" section of this manual.
Some properties (e.g. naming conventions) have to be set before files are added. To do this, select CD-ROM Editor Properties.
To find out more about each of the individual options, please consult the ISO-9660/Joliet Editor section of this manual.
When the layout is complete (or you just want to continue), select the "RECORD" button.
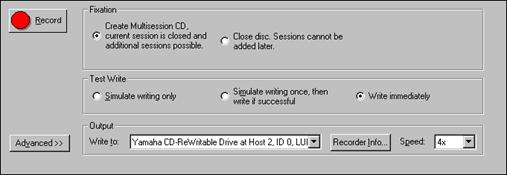
CD Properties and Write Options
For now, check the options as shown above to allow a safe operation. If you do not wish to write the CD, check Simulate Writing Only. If the latter option is set, the recorder will go through the motion as if it were writing, but no actual writing will occur.
Obtain some information about your recorder by pressing the Into... button.
When ready, press OK. A dialog will prompt you to insert a CD, and clicking the "Record" (REC) button starts writing or emulating the CD.
This example builds on the first one, so some basic elements will be skipped. It shows what is required to build a RedBook audio CD.
After starting WinOnCD, choose CD Digital Audio from the project selection box (If WinOnCD is already running, select File New). A new audio layout will open:
The Main Window of WinOnCD
Open the audio editor by double-clicking the track. You can return to the track view by clicking the Tracks button left to the editor window .
To insert music or sounds into a track, use the Browser to find an audio file( you can find some .WAV files in the Windows directory) and drag it into the destination area. Its wave form will be displayed, and parts of it can be selected.
Several sounds can be inserted into one track by dragging them into the destination window. They will be inserted at the current selection.
Also, CD sounds can be copied by dragging an icon for a CD-ROM containing an audio CD into the editor window.
A short explanation for all icons in the Audio Button Bar can be displayed by selecting Text Buttons from the context menu (Click the right mouse button while over the button bar). ToolTips are also available when moving the mouse pointer over the buttons.
To add more tracks, just click the "Tracks" button. All the tracks of the CD are listed.

Audio Tracks
A new track will be inserted into the list by selecting Edit->Insert, or by dragging a sound file into the list. The new track can be edited with the wave editor by double-clicking it in the track list.
The CD is written exactly like the data CD. However, audio CDs are usually recorded in "Single session mode" (closed) to ensure compatibility with older CD Players.
If you want to create a CD without any pauses between the tracks (e.g.: life music) or you want to use the CD-R as a master for mass replication, you should check the "Disc-at-Once" option. The CD-R will be closed in that case.
With the CD Copy module of WinOnCD you can make a backup copy of your frequently used software or of important data easily and comfortably The CD Copy module virtually copies all types of CDs.
Just insert the CD to be copied into the read drive, start WinOnCD (or choose File New if already running) and select the "CD Copy" project. WinOnCD will now analyze the tracks of the source CD and display them in the destination window.
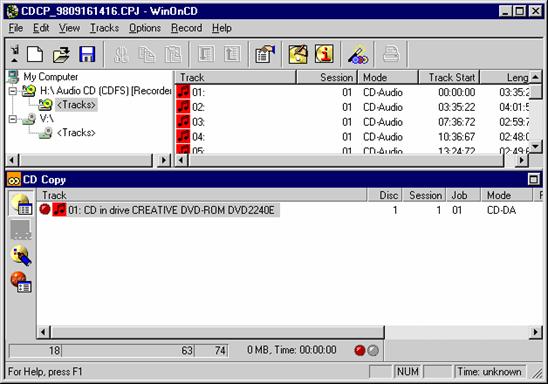
Read-in Track in the destination window
Please note, that dirty or defective source CDs can cause "buffer underrun" errors because of too many re-tries at reading your CD-ROM drive.
Warning: WinOnCD may not be used for making illegal copies. CeQuadrat trusts you. We are sure that you respect the copyright of others.
Please refer to the chapter "The CD Copy Project" for more details.
To record CDs you also need a CD recorder supported by this software package. For a list of supported recorders and information regarding their connection, please refer to the README file copied to your installation directory.
As all CeQuadrat software products use our modular General Recorder Interface, updating the software for new recorders is easy. We will provide drivers for new CD recorders when they become available, and the easiest way to obtain them is to download them from our web site (https://www.cequadrat.com).
In this chapter you find a brief description of some features Compact Disc provides to today's users, as well as those which will be available in the future.
This chapter is provided courtesy of Dr. Bernd Steinbrink.
"Who needs that new silver disc?" Mr. Jan Timmer, CEO of Philips, was asked this in 1982 at a conference in Athens which brought together representatives of the consumer electronics industry. The great success of the audio CD in consumer markets was a clear reply to this question. Soon the computer industry recognized that the large amount of digital audio data could also be replaced by digital computer data. That was the birth of the CD-ROM. Based on the RedBook (Philips/Sony 1982) which defines the Audio CD (CD-DA), the specifications of the CD-ROM were given by Philips and Sony in the YellowBook (1984). But for the use of audio, video and animation in programs (what we now call multimedia) for the consumer electronics market these specifications had to be extended. So the Compact Disc-Interactive (CD-i) was defined in the GreenBook (1987) by Philips and Sony. To run interactive programs, a computer board is integrated in the CD-i player, which looks like a CD audio player - but of course interactive programs can also run on personal computers.
The Photo CD was developed by Kodak and Philips and is a bridge disc. The disc can be read by special Photo CD players, some consumer players, for example CD-I players, and a CD-ROM drive in conjunction with a computer. The CD-ROM drive has to be able to read CD-ROM/XA sectors and multiple sessions. But nearly all drives in the market meet these requirements.
Video CD too requires CD-ROM/XA drives, This disc can store more than 70 minutes of video. The Video CD standard was first defined in 1993 by Philips, Sony and JVC in the WhiteBook in the version 1.1. This standard is the successor of JVCs Karaoke CD, and since early 1994 Philips produces titles containing linear video for CD-i in Video CD format instead of CD-i movie format that was used the time before. In 1994 Philips, Sony, Matsushita, and JVC defined the Video CD version 2.0. This specification allows more interactivity than version 1.1 and is not only suitable for linear video but also for interactive applications.
Another new format that was introduced in 1996 is called CD-Extra. During the time of development the disc was variously called CD-Plus, Enhanced CD, or stamped multisession. This new disc target the multimedia market and is fully compatible with the Audio CD. Running on an Audio CD player only the disc's audio titles can be played back, but when read by a CD-ROM drive the user can access additional data on the disc, for example pictures or a complete multimedia application. CD-Extra is defined in Sony's and Philip's BlueBook. The final specifications were established in consultation with the Recording Industry Association of America (RIAA), the Recording Industry Association of Japan (RIAJ), Microsoft Corporation and Apple Computer, Inc. The disc could primarily be regarded as an audio CD that takes advantage of the unused space available on most audio CDs to add information that can be interpreted using CD-ROM drives and multimedia computers. One minute on an Audio CD is equal to approximately 9 MB in terms of data capacity. So CD-Extra disc could contain for example 50 to 60 minutes of audio with the rest of the disc's capacity - 150 to 200 MB - dedicated to an interactive multimedia program.
Since 1995 many multimedia CDs have been produced for multiple platforms using one single CD to enlarge the installed base of systems for reading the disc. Most of these CDs are for the Windows and the Apple Macintosh platform and are called Hybrid CDs because they support ISO 9600 as well as Apple's Hierarchical File System (HFS). The data track of such Hybrid CD can also be packed on a CD-Extra. By putting additional CD-i data on this CD-Extra the disc can be played back by Audio CD players, PCs, Apple Macintosh Computers, and CD-i players. This special kind of CD-Extra is called Rainbow CD.
The Photo CD was the first disc based on a new write once technology. The definition of the CD-R (CD-WO) and the CD-MO (magneto optical) is laid down in the "Orange Book" (November 1990). Since 1995 CD-R writers became more and more affordable, and a broad market opened. CD-R devices are no longer used just to prepare discs for CD mastering or to test prototype applications but also for backing up computer data. Sometimes files need to be backed up frequently. It would not make sense to create a session to store small amounts of data onto a CD-R each time when the space needed to create each session lead-in and lead-out can be larger than the data itself. So the newer CD-R devices now support incremental packet writing. Using this mode, data can be transferred to the CD-R without finalizing a session or a disc. More data can be added at any time, and no space is wasted. The disadvantage to this is that a disc that is not closed can only be read by the recorder. Current CD-ROM drives do not have the application capable of reading open CD-Rs.
For the purpose of backup data Philips and Sony specified in 1995 a new disc called CD-Erasable (CD-E), nowadays known as CD-ReWritable (CD-RW). CD-RW devices allow erasing and re-writing data to a disc. The CD-RW media are based on phase-change-technique which is a pure optical solution and allows some thousands of re-writing cycles. The disadvantage is that the phase-change CDs cannot be read by standard CD-ROM drives because of the different reflection of the disc. Modification of the laser pickup unit is necessary to lower the threshold values of the optical evaluation system, and new CD-ROMs devices are on the market today which can read CD-RW media (MultiRead CD-ROMs). Also, second generation DVD players can read CD-RW media. The first CD-RW writers came out in 1997. These devices are backward-compatible with CD-Rs. They are able to read all existing CD formats, and they can write and read CD-R media. And of course they can read, write, and rewrite CD-ReWritable discs. The specifications of CD-RW is part III of the Orange Book.
Another new disc format that was announced in 1995 is a high density format that stores about 4.7 GB and up to 17 GB. The first application of this disc is the distribution of movies on disc. This disc is called DVD (Digital Versatile Disc) and is supported by Sony, Philips, Toshiba, Matsushita, Time Warner, and the major companies of the computer and consumer electronics industry. DVD devices first became available in late 1996. The first write-once devices (DVD-R) are currently on the market, offering the possibility to create small series of DVDs. While DVD-R is fully compatible to DVD-ROM players, the new emerging standards for DVD-RAM are not usually not. DVD-RAM discs are truly random-access rewritable, and therefore leave the area of classic recording applications.
Even with the introduction of the new disc formats, the current CD and CD-R formats will dominate the market for the next few years because of the broad installed base that can access these discs.
So now there are many different ways of producing and formatting a CD. The following chapters are an introduction to the different formats.
A compact disc is 120 mm (about 4.72 inches) or 80 mm (approx. 3.15 inches) in diameter, and 1.2 mm thick. The hole in the center has a 15 mm diameter. The disc is made of polycarbonate and the data is molded onto one surface. The surface is coated with a thin aluminum layer. The thin metal coating reflects light and allows the laser in the CD player to read the information molded on it. The information is stored in a pattern of microscopic pits molded in a spiral running from the center of the disc outwards. To avoid damaging the metal coating, a protective lacquer is applied to the disc.
Producing a disc is a very complex task. Before the mastering of the disc the data have to be prepared. The various files and data are formed in logical structures and formatted according to industry standards. A genuine image of the CD-ROM is generated. Sync bytes, header information and error detection and correction codes are added. While producing a CD-i title, the timing of the compact disc can be emulated by a computer with a large harddisk. This emulator can also be used for writing a CD-R (to produce a test disc) and for generating the master tape. For all information to be stored on the compact disc an image file is created and written on the master tape. The tape may be a 3/4 inch U-matic tape, a 9 track tape, or an 8 mm tape. The information on the tape matches the pattern of pits and lands on the disc subsequently produced. The most convenient way to test a CD before it is produced in large numbers of pieces is to produce a CD-Recordable. The CD-Recordable can be the base for the production of the CD.
In the process of mastering, the information is transferred by a Laser Burn Recorder (LBR) to the photosensitive surface of a glass disc called "glass master". This special process is called "imaging". Immediately after the laser exposure, the glass master is developed. Developer is applied to the surface of the glass master and the pattern of pits is etched. The glass master is prepared for the next step in production by putting a silver coat on the photosensitive surface. Finally, the glass master has three layers: a glass plate, photoresistant with a pattern of pits, and a silver coat. In an electroplating bath the glass master is coated with layers of nickel. The nickel build-up creates the "father part" which is separated from the glass master. The father is a mirror image of the glass master. Instead of pits there are tiny rises on the surface. From this father part the mother is produced, from the mother come the sons, which are themselves images of the father part. The stamper for the production of the CDs is the father part or a son. The stamper is placed on the molding machine and polycarbonate is molded by the surface of the stamper. Then, the clear disc is coated with a metal layer so that the pattern of pits and lands is created onto the polycarbonate surface. The protective lacquer is then applied and a label can be printed on this side of the disc. Finally, the disc is packed in a plastic box called a jewel box, or in bags of flexible synthetic material lined with fleece.
These are the various stages in producing a CD:
application development
data preparation
pre-mastering
mastering
duplication
printing the label
packaging
All optical storage devices use a laser beam for reading the information on the disc. This beam is generated by a small gallium arsenate semiconductor laser. To read the information the laser beam is focused on the spiral with the pattern of pits. The light is reflected in different ways by the pits and the flat land between the pits. On striking a pit the light is diffracted, while light hitting the land is reflected and can be evaluated by a photo detector. To read the pits on the disc the laser must be focused on a tiny circular spot. The pits are 0.6 mm wide and 0.12 mm deep, the length of the pits and lands may run from 0.833 mm to 3.56 mm. Thus, the track density is about 16,000 tracks per inch (tpi). In comparison: a floppy disc has 96 tpi and a hard disc several hundred. The length of track on a 120 mm disc is about 4 miles. To give the reader a better idea of what these figures mean: if the diameter of the disc were 120 meters (about the length of an American football field instead of 12 cm, the tracks - correspondingly enlarged - would still only be about 0.5 mm wide. And the total length of the track would stretch across the United States.
There are different techniques for writing and reading the information for optical storage. These techniques are called CLV and CAV. They are used for two different kinds of video disc.
CAV stands for Constant Angular Velocity. The CAV video disc rotates at a constant speed of 1,800 rotations per minute (rpm.) for NTSC (1,500 rpm. for PAL and SECAM). Thus, 36 minutes of video can be stored on each side of the laser disc. The CAV-track does not run continuously from the center outwards in one line. The tracks are arranged in a large number of concentric rings increasing in size from the center outwards. Each track stores one video picture. The CAV video disc is used for interactive applications (Computer Based Training/CBT, POS applications, etc.).
CLV stands for Constant Linear Velocity. The disc does not rotate at constant speed. However, the laser pick-up reads the information at a constant velocity. The disc revolves at a higher speed when the laser pick-up is located near the center of the disc, and it rotates more slowly when it moves to the outside because the circumference of the disc is larger at the outer sections of the track than near the center. Thus, the velocity varies between 500 and 1,800 rpm. depending on the actual location of the laser pick-up (the spectrum from the lowest to the highest speed also depends on the video system, NTSC, PAL or SECAM). CLV allows the producer to record about 60 minutes of video on one side of the video disc. This is good for films. However, there are some disadvantages: no random access to each single picture, no slow or quick-motion, and no still pictures.
Analog signals are recorded on a video disc. In contrast, the information on a compact disc is stored completely digitally. Thus, the capacity advantage of the CLV method can be combined with random access to all information on the disc. All compact discs operate with CLV. The rotation speed varies from 200 to 500 rpm. The average access time of a compact disc is quite slow (by comparison with a harddisk) because it takes some time to adjust the rotation speed to the location of the laser pick-up. Good CD-ROM drives have an average access time of less than 300 milliseconds.
The lead-in is located on the first 4 mm of the compact disc. The table of contents (TOC) is located on the lead-in. The next 33 mm (maximum) contain the Program area. The lead-out is on the outer 1 mm.
At first sight one might think that the coding of a compact disc is very simple: 1s for pits and 0s for lands or vice versa. However, this is not the case. Pits as well as lands represent logical 0s. On the other hand, 1s are represented by the transition from a pit to a land or from a land to a pit. The length of the pits and lands indicates the number of 0s.
The representation of bits by a pattern of pits and lands creates so-called channel bits. By coding a bit string using pits and lands it is impossible to represent adjacent 1s. Even by using the shortest pits and lands possible (by the specification), there will always be two 0s between two 1s. If the transitions were closer together they could not be read by the laser beam or would lead to the risk of error. For this reason 1 byte of information cannot be represented by 8 channel-bits. However, you know that 1 byte of information can represent 28 =256 different values. To obtain about 256 different bit patterns for the representation of 256 values you need 14 channel-bits. 14 channel-bits are the minimum for representing 8 user bits on a CD. Therefore, there must be a lookup table for converting the pattern of 14 channel-bits to 8 user bits for 1 byte, and on the other hand, when producing the disc, 8 bits of one byte have to be transformed into 14 channel-bits. This transformation is called Eight to Fourteen Modulation (EFM).
One problem remains, however. If you represent one byte with 14 channel bits and there is a 1 at the end. This 1 could be too close to the next bit string of 14 channel bits, which might begin with 1. Therefore, there have to be some bits between the 14-bit symbols. There are 3 merge bits used to solve this problem. In all, 14 + 3 channel-bits are necessary to represent 1 byte on a CD.
There are always 24 user bytes in one "packet" called a "frame". Frames are the basic storage units on the disc. 98 of these frames form a sector. However, a frame does not only consist of these 24 user bytes. There is a sync pattern for alignment consisting of 24 channel bits plus 3 merge bits.
In 1 frame there is 1 byte of information for the control bytes and the so-called subchannels, and 8 more bytes for error detection and correction.
Thus, one frame consists of
- sync pattern 24+3 channel-bits
- subchannel code 1x (14+3) channel-bits
- user data 24x (14+3) channel-bits
- error detection and correction 8x (14+3) channel-bits
A total of 588 channel-bits are used for 1 frame. When reading the information on the compact disc, the drive first strips off those 27 bits of sync. The remaining 561 channel-bits are converted by an inverse Eight-To-Fourteen-Modulation (EFM) into 33 bytes [561/(14+3)=33]. One of these bytes, the subcode byte, is sent to a special decoder, and 8 bytes are used for error detection and correction. Each CD player and each CD-ROM drive has special error detection and correction hardware for these 8 bytes. If there are no errors, or after correcting the data, these 8 bytes are discarded. Thus, there are 24 bytes user data remaining from one frame. 98 frames make one sector (block) with 2,352 bytes (98 frames x 24 bytes). However, there are more data for one sector: 98 bytes for the subchannel (98 frames x 1 byte) and 784 bytes for error detection and correction (98 frames x 8 bytes). A sector is the basic logical segment of the CD. Most of the CD formats differ in the subdivision of the sectors. Sectors occur 75 times per second. The information on the disc is addressed in minutes, seconds and sectors (mm:ss:ss).
All CD formats, whether CD-DA, CD-ROM, CD-ROM/XA, CD-i, etc., use 9 bytes of the 33-byte frame (as described above): for control bytes of the subchannel (1) and for error detection and correction (8).
Two different kinds of errors may occur on a CD. Firstly, errors may be produced during the production process: tiny air bubbles or microscopic dirt in the polycarbonate may interfere with the laser beam. The RedBook allows 250 errors per second.
Other errors may be caused by fingerprints, scratches or soiling. The errors are suppressed by a special error correction system. All error correction methods are based on redundant information, in conjunction with specific mathematical algorithms for detecting the errors and for reconstructing the original data values. The detection and correction schemes are called EDC (error detection code), ECC (error correction code), and EDAC (error detection and correction code). The error correction code for the CD is based on a well-known error correction called the Reed Solomon Code. Audio CD players, as well as CD-ROM drives, use an internal correction scheme called the Cross Interleaved Reed Solomon Code (CIRC). The decoder is integrated into the hardware. This error correction is very powerful: as a result there is a maximum of one un-correctable error per 109 bytes on an audio CD. For storing computer data on CD-ROM an additional error correction is needed. It is called Layered ECC, and it is transmitted together with the sector's user data. The Layered ECC is decoded by the firmware of the CD-ROM drive or by a software driver.
The CD-DA was defined in 1982 in the RedBook by Philips and Sony. A CD-DA sector has 2,352 bytes of user data. The sectors are addressed by minutes, seconds and sectors. The address information is stored in the subchannel (Q). The maximum running time of a 12-cm CD is 74 minutes, an 8-cm single CD has a running time of about 21 minutes. There are two time measurements for addressing a CD audio: by ATime, which means "Absolute Time", and is measured from the start of the disc; and by Track Relative Time, which is measured from the start of a track. 99 tracks on one disc can be accessed directly by a CD-DA player. A track is a continuous data sequence. Each track must contain at least 4 seconds (i.e. 300 sectors, since 1 second is divided into 75 sectors). A maximum of the entire CD can be used for one track. A single tune or musical sequence on CD-DA refers to one track.
On a CD-DA all 2,352 bytes of a sector are user data, thus 2,353 bytes multiplied by 75 sectors equals 176,400 bytes, which are transferred per second. This equals about 1.41 Mbit/sec. A cross-check: CD-DA works on a sampling rate of 44,1 kHz and 16 bit samples for 2 stereo channels, i.e. 44,100 x 16 x 2=1,411,200 bit/sec or 176,400 bytes of audio data per second.
For each sector and 2,352 bytes of user data, 882 additional bytes are stored on the disc for the 2 layers of error detection and correction code of CIRC (784), and the Control Bytes (98). Each bit of the control byte is given a letter, "P", "Q", "R", "S", "T", "U", "V", and "W". The first bit is designated as "P", the second "Q", and so on. The data stream resulting from all first bits of the 98 control bytes is called "P" subchannel, the stream of all second bits "Q" subchannel. The third subchannel combines the bits "R", "S", "T", "U", "V" and "W" to a 6-bit word, and the data stream of these bits, resulting from the 98 control bytes, is called "R thru W" subchannel. The "P" subchannel has a flag that indicates when the audio data in a track is beginning. "Q" subchannel gives the time code, ATime and Track Relative Time. In the lead-in of the disc this subchannel contains the Table of Contents (TOC). 72 of the 98 bits of the "Q"-subchannel are used for information, the others for synchronization, control and error correction (for the subchannels). Beside sync, control and error correction bits, the "R thru W" subchannel may include user data (64 6-bit words per sector) for additional information. Only the RedBook allows this (for CD-DA), while the "YellowBook" specifies that these bits are set to 0. On an Audio CD, the "R thru W" subchannel is sometimes used for graphic or MIDI data. (MIDI stands for Musical Instrument Digital Interface and means a standard protocol for communication between electronic musical instruments and computers. MIDI files contain messages which refer to the MIDI specification and which can be interpreted by MIDI devices).
These discs are called CD+G (Compact disc plus graphics) or CD+MIDI, and can be displayed by a special player in conjunction with a TV and hi-fi set.
This subchannel can also be used for user-defined data CD+G titles can be read by CD-i players and some special Japanese consumer players. CD+G and CD+MIDI can be interpreted by Tandy's VIS player (VIS stands for Video Information System) and Commodore's CDTV player. However, these formats are rare.
Soon after the definition of the Audio CD people noticed that this storage medium for huge amounts of audio data could also be used for storing computer data. However, it had to be modified. Thus, in 1984 the "YellowBook" by Philips and Sony defined the CD-ROM for storing computer data.
Two new kinds of sectors were defined: Mode 1 for storing computer data and Mode 2 for compressed audio or video/graphic data.
First of all, computer data need a more precise access than the tracks of the Audio CD. On a Compact Disc, 99 tracks are to be accessed, but on a CD-ROM there may well be thousands of data files which have to be addressed. Thus, both formats, Mode 1 and Mode 2, make use of some bytes at the beginning of the sector for precise addressing. The first 12 bytes are sync bytes for sector separation. However, the sync pattern of these bytes might accidentally also occur in the user bytes. Thus, both sync bytes and length of the sector are used for identifying the sector. The next four bytes are header bytes. Three of them are used for addressing, while the 4th is the mode byte which marks the mode used by the sectors of the track.
Mode 1 sectors have 2048 bytes of user data. The sector can be divided into logical blocks. Different logical blocks might be used on different CD-ROMs: blocks of 512, 1024 and 2048 bytes.
The logical block size cannot be larger than the sector size.
Sectors are the smallest addressable part of the CD-ROM that can be accessed independently of other addressable parts of the recorded area. However, smaller logical blocks can be accessed via a sector. The address of the header bytes indicates minutes, seconds and additional information for the blocks. The Logical Block Number (LBN) can be identified by this information. The first physical sector that can be accessed is sector 00:02:00. This sector contains the first Logical Block, LBN 0. If you have 512 byte blocks, 18,000 blocks make a minute, 300 make a second and 4 make a sector. Thus you can obtain the logical block address by a simple algorithm. However, in that case you have to subtract 600 blocks because of the starting address of the first sector is 00:02:00. These 2 seconds equal 600 blocks.
CD-ROM Mode contains the CIRC error detection and correction of the Audio CD. However, because computer data need a higher level of data integrity, an additional error detection and correction is set up on CIRC, called Layered EDC/ECC. This additional error detection and correction needs some bytes of the sector behind the user data: 4 bytes for error detection and 276 bytes for error correction. Between the error detection and the error correction are 8 unused bytes. These unused bytes are redefined by CD-ROM/XA and CD-i.
CD-ROM Mode 2 has no additional error detection and correction scheme, and thus all 2,336 bytes behind the sync and header bytes are user bytes.
The sectors of CD-DA, CD-ROM Mode 1 and Mode 2 are the same size, but the amount of user data that can be stored varies considerably because of the use of sync bytes, header bytes, error correction and detection. The Audio CD uses all bytes of a sector (2,352) for user data, CD-ROM Mode 1 blocks have 2,048, Mode 2 blocks 2,336 user bytes. Therefore, there are different data transmission rates for Mode 1 and Mode 2 (about 1.22 Mbit/sec for Mode 1 and about 1.4 Mbit/sec for Mode 2). Although Mode 2 has a higher data rate and more space for data, it is not used very often except in conjunction with CD-ROM/XA and CD-i (which are always Mode 2).
Mode 2 can be read by normal CD-ROM drives but special software drivers have to be used.
If high-level audio sequences are needed, CD-ROM tracks and Audio CD tracks may be mixed on a compact disc. A Compact Disc has frames, sectors and tracks. It is true that one track cannot contain different kinds of sectors, but the CD can have different kinds of tracks.
Usually, the first track of a Mixed Mode CD is a CD-ROM Mode 1 track, and the following tracks are CD-DA tracks. A well-known example for such a Mixed Mode CD is a title produced by the Voyager Company and Microsoft called Multimedia Beethoven. The Ninth Symphony. This CD has 6 Tracks, the first being a CD-ROM Mode 1 track, and the following five are Audio CD tracks as laid down in the specifications of the RedBook.
The disc contains the following tracks:
|
|
ATIME |
TRACK RELATIVE TIME |
|
|
Track 1: CD-ROM Mode 1 |
from |
00:00:00 |
|
|
data |
to |
01:06:00 |
|
|
Track 2: audio |
from |
01:06:00 |
|
|
Allegro ma non troppo, |
to |
17:43:00 |
|
|
un poco maestoso |
|
|
|
|
Track 3: audio |
from |
17:43:00 |
|
|
Molto vivace |
to |
27:53:00 |
|
|
Track 4: audio |
from |
27:53:00 |
|
|
Adagio molto e cantabile |
to |
43:45:00 |
|
|
Track 5: audio |
from |
43:45:00 |
|
|
Presto |
to |
69:29:00 |
|
|
Track 6: audio |
from |
69:29:00 |
|
|
Comments |
to |
70:37:00 |
|
Tracks 2 to 5 are RedBook audio tracks identical to those on a normal Audio CD of Beethoven's Ninth Symphony.
Track 6 contains some audio recordings of comments for a game on this CD ("Ludwig´s answers"). Track 1 is a CD-ROM Mode 1 track containing an application program and some data files. Some MIDI sound sequences with examples of musical themes, parts, and variations are stored in a sub-directory.
In general, there is one important limitation for Mixed Mode CDs. A CD-ROM drive can only read one track at a time, and, when reading the RedBook audio track, no other data can be transmitted from the CD-ROM drive. There are two common methods to solve this problem. The first method is to use the CD-ROM drive as an Audio CD player, and to transfer the application program and data to the harddisk beforehand. The computer can now read the program information in the memory, and access the audio data continuously.
To do this, the computer must have enough memory and free space on the harddisk. The Beethoven CD uses this method.
The alternative is to read the program information into the computer's memory before accessing the audio data. But this method entails the audio being interrupted when the next portion of data has to be read.
The audio tracks on a Mixed Mode CD can be addressed in two different ways: by using ATime and by using Track Relative Time. Most programs use Track Relative Time, because when addressing by ATime all audio calls will require re-synchronizing if the data volume of the CD-ROM Mode 1 track has changed during the production process.
Even though the audio tracks could be played back by an Audio CD player, Mixed Mode CDs should not be used on such a device. Even though some newer Audio CD players will mute the CD-ROM tracks, others will not. And playing a CD-ROM track could damage the hi-fi set.
CD-ROM/XA stands for Compact Disc-Read Only Memory/eXtended Architecture.
The first release of the XA-specification was introduced by Philips, Sony and Microsoft in September 1989, with the "Final System Description" following in March 1991. However, that will probably not be the final description because CD-ROM/XA level 3 has to integrate MPEG motion video and some further specifications on the identification of the host operation system (GOE, Generic Operation Environments). Since CD-ROM/XA is not really a new standard but an extension of the YellowBook and the definitions for CD-ROM, the specification is sometimes called Extended YellowBook. The extensions are related to the CD-i specifications of the GreenBook. Because of that relationship, and the fact that CD-ROM/XA may form a bridge between computer systems based on XA and consumer players based on CD-i, this standard is often regarded as the missing link for publishers to produce discs running on different platforms for industrial and consumer markets.
XA-tracks can contain binary code as well as video and graphic data, text data as well as compressed audio data. Other CD formats use only one sector format in one track. XA can use two different sector formats in a track and interleave them into the bargain. Thus, one sector may be followed by a different one. The two XA-sector formats are called Form 1 and Form 2. The use of the sectors depends on the content. Form 1 sectors are used for computer data. Like CD-ROM Mode 1 sectors they have an additional Layered Error Detection and Correction Code. They also use the first 12 bytes for a sync pattern and the following 4 bytes for header data (addressing and mode description). Like CD-ROM Mode 1 each Form 1 sector contains 2,048 user bytes. However, unlike Mode 1, a subheader is added to Form 1 sectors behind the header bytes, and unlike Mode 1 there are no more unused bytes between the error detection and the error correction code.
EDC and ECC are moved together and the previously unused 8 bytes can thus be used for the subheader bytes. CD-ROM/XA Form 1 sectors contain computer data.
Form 2 sectors are arranged in the same way as Form 1 sectors, except that there is no additional Error Correction Code (ECC). At the end of the sector's user data a field of 4 bytes is reserved. This field can be employed for quality control during the disc production process. In that case it is recommended to use the same EDC algorithm as for Form 1 sectors. Otherwise the reserved bytes are set to zero (0).
Both Form 1 and Form 2 sectors use 8 bytes for a subheader that specifies the following user data. Because different sectors with different contents can be stored in interleaved fashion, the first byte of the subheader is a file number for identifying the interleaved sectors belonging to one and the same file.
However, an interleaved file may contain different pieces of information that can be played back in combination or separately. Thus, the second byte gives a channel number for the real-time selection of this information. The Channel Numbers 0 to 15 are used for ADPCM audio sectors, channel number 0 to 31 for video or data sectors.
The next byte defines global attributes of a sector and is called the submode byte. Each bit can be set as a flag, for example, to indicate the kind of information: video, ADPCM audio, Data, to mark the last sector of a file (EOF) or a record (EOR) and to set a real-time mode. Using real-time sectors means that the timing of the data reading is more important than data integrity, so that error correction is only carried out as long as correct timing of the data is not affected. This is an important feature when using time-based data, such as audio data streams. It would be more annoying for the listener if the data stream were interrupted than if a wrong bit were transmitted. Transmitting a wrong bit which remains uncorrected would probably not be noticed.
The submode byte is followed by a byte for the Coding Information which defines the details of the type of data located in the user area of the sector: the kind of ADPCM audio, whether stereo or mono, and the video resolution and coding, etc.
To avoid data losses the information in the first four bytes of the subheader is repeated in the bytes 5 to 8.
It is possible to mix CD-ROM/XA tracks on a CD with Mode 1 tracks and Audio CD tracks. In that case, the Mode 1 track should be the first track on the disc, followed by one CD-ROM/XA track and an Audio CD track.
CD-ROM/XA offers a number of advantages in comparison with CD-ROM Mode 1. These advantages become important when using time-based data in multimedia applications because computer data and compressed audio data could be read out of the same track.
How does a system based on a normal CD-ROM work? Using Mode 1 tracks some files are read and "stocked up" in the computer's memory or swapped on the harddisk before the application can start. During this time a symbol is shown, a watch, an hour-glass or similar, and it takes at least several seconds, and sometimes even minutes, before the user gets the first information.
When using CD-ROM/XA discs, interleaved files can be read in parallel at the same time. Only those parts are read which are currently needed. The user obtains the information "just in time", and long waiting periods are not necessary. Audio data can be separated by the controller when reading the disc, decompressed and played out through the audio jacks. Only the data that is needed gets on the computer bus.
Like CD-ROM Mode 1, Form 1 sectors admit a data rate of 1.2 Mbit/sec. However, by using Form 2 sectors the data rate increases to about 1.4 Mbit/sec, because the sector is read in 1/75 second and has 276 byte more of user data.
This means that more than 20 Kbytes user data per second can be transmitted.
For the production of CD-ROM/XA, special software is required which supports the interleaving of files in different sectors. On the other hand, a special controller is needed for reading the interleaved information on the disc.
CD-ROM/XA supports some ADPCM audio and some video formats of the CD-i specification, ADPCM Level B and C, as well as the video modes based on Color look-up tables (CLUTs) as described below in the chapter about CD-i.
The CD-i standard was described in 1987 by Philips and Sony in the "GreenBook" (a year before CD-ROM/XA). The sectors of CD-i are identical with CD-ROM/XA, and there are also Form 1 and Form 2 sectors. CD-i permits the interleaving of sectors and files in the same way that CD-ROM/XA does.
In many ways one could say that CD-i is a special kind of CD-ROM/XA for use in products of the consumer electronics industry. Therefore, the specification does not only describe the format of the sectors, but also the operating system called CD-RTOS that CD-i is based on. This operating system is a derivative of OS-9. CD-i players run on a 68070 microprocessor from Motorola.
CD-i players are placed in a hi-fi rack and are connected to the TV set and amplifier. They can play Audio CDs, as well as PhotoCDs, CD+G titles and, of course, CD-i titles using interactive structures and different media: text, audio, graphics, animated cartoons, still video and full motion video.
The CD-i standard specifies audio and video formats. There are three different levels of ADPCM audio which can be used. Level B and Level C are also supported by CD-ROM/XA. RedBook-Audio can only be stored in CD-DA tracks.
CD-i Audio Formats:
|
|
RedBook-Audio |
Level A |
Level B |
Level C |
|
Sampling rate |
|
|
|
|
|
Mode |
PCM |
ADPCM |
ADPCM |
ADPCM |
|
Bits |
|
|
|
|
|
Compression rate |
no compression |
|
|
|
|
Mono/Stereo |
Stereo |
M/S |
M/S |
M/S |
|
Time |
|
|
|
|
There are three video resolutions for CD-i: normal, double and high. The normal resolution for NTSC 525-line TVs is 384 x 240 (horizontally x vertically, for PAL 625-line systems 384 x 280). Double resolution has twice the horizontal resolution but normal vertical resolution. In high resolution mode both horizontal and vertical resolution are doubled. The different video formats support different purposes and contents of the image.
CD-i Video Formats
|
Type |
RGB555 |
DYUV |
DYUV+QHY |
|
Resolution |
normal |
normal |
high |
|
Colors |
|
16.8 mill. |
16.8 mill. |
|
Bits/pixel |
|
|
|
|
Content |
detailed images |
"natural" images |
"natural" images |
|
Description |
5 bits for each R, G, B |
Delta YUV |
Delta YUV + Quantified High Y |
|
Type |
CLUT8 |
CLUT7 |
CLUT4 |
RLE7 |
RLE3 |
|
Resolution |
normal |
normal |
double |
normal |
double |
|
Colors |
256 of |
128 of |
16 of |
128 of 16.8 |
7 of |
|
|
16,8 mill. |
16,8 mill. |
16,8 mill. |
16,8 mill. |
16,8 mill. |
|
Bits/pixel |
|
|
|
|
|
|
Content |
graphics, |
graphics |
graphics |
animated |
animated |
|
|
natural images |
|
|
cartoon |
cartoon |
|
Description |
8 bit Color |
7 bit Color |
4 bit Color |
Run-Length |
Run Length |
|
|
LookUp Table |
LookUp Table |
LookUp Table |
of CLUT 7 |
of CLUT 4 |
For CD-ROM/XA the CLUT formats can be used. Both CD-i and CD-ROM/XA will support the MPEG standard for motion video associated audio for digital storage media up to about 1.5 Mbit/s.
A disc called CD-i Ready is (virtually) a normal Audio CD with additional features. However, these features can only be displayed by CD-i players.
The RedBook allows the producer to set indices on a CD-DA. If this is supported, the player may skip to the marked points on the track. Usually only two indices are in use: index 0 and index 1.
Index 0 is located before the pregap of audio silence at the beginning of a track, while index 1 marks the beginning of the audio on the track. The silence of the pregap lasts 2 or 3 seconds. Index 0 on track 1 is never used by Audio CD players. On the first track at the beginning of the disc, Index 1 is always skipped to. CD-i Ready uses the pregap between index 0 and index 1 and enlarges the distance. In this enlarged pregap before track 1 a CD-i Ready hides a CD-i track which can only be recognized by a CD-i Player which skips to index 0. Normal Audio CD players will ignore the pregap and the data so that the disc will run on such a device as a normal Audio CD. CD-i players can identify the disc by the start address. If the address of the first track is less than 30 seconds, a normal audio CD is identified. Otherwise, the place where the CD-i files can be read is written in the data sector 00:02:16. The information is loaded into the player's RAM-memory before the audio starts, and can be displayed while playing the songs and music sequences. In this way CD-i Ready might be regarded as a Mixed Mode CD using CD-i and CD-DA, where the CD-i track is hidden so that it can be played on Audio CD players.
One of the first CD-i Ready discs published was the "American Songbook" featuring Louis Armstrong. While playing the songs, the words can be displayed on the TV screen; but from the CD-i track the player can display still videos and give an introduction to the life and music of Louis Armstrong and some of his contemporaries.
The term multisession CD was first used for Kodak Photo CD. Photo CDs store images from films. So in a first session the images of the first film can be stored on the Photo CD.
If there is free space left it can be used to store new images in further sessions. Every session has its own lead in, program area, and lead out. The benefit of multisession CDs is that this way to write a disc allows appending of new data at various points of time, and that all addressing of these data is done over all sessions.
Adding closed sessions allows user to read the discs like CD-ROMs in current CD-drives. But to write a lead in and a lead out for each session requires storage capacity (about 20 MB). With such high overhead, it may be more advantageous to write "Disc-at-Once" rather than multiple sessions. But "Disc-at-Once" can also be used to write sessions on multisession CDs. This means that the session is written continuously from the lead in to the lead out with the advantage that the P and Q sub channels are available.
Other ways to transfer data to the CD-R is to write "track by track" or "sector by sector". But whereas the disc data are available after finishing the disc or the session, the data that have been written "track by track" or "sector by sector" can only be accessed by the particular publishing application during the process of building the disc. At the moment of finalization the ISO 9660 structures are added to make "track by track" written discs readable for current CD drives. It takes 14,336 Bytes to write each block "track by track", but this is not as wasteful of capacity as writing multiple small sessions.
Writing "sector by sector" is called "incremental packet writing". Only newer CD-R drives support incremental writing with packets of fixed or variable length. The discs can only be written and read by these newer CD-R devices and the appropriate CD software. A playback system will need a re-director to read the disc.
The advantages of multisession discs have been used early by CD-I ready. The method described above was only one way to produce CD-I ready. The disadvantage of this method was that the user could possibly access the CD-i data by using the rewind function of the audio player. Playing back these data the hi-fi set could be damaged. So a second approach was to use two sessions, the first one for Audio tracks, a second one for CD-i data. Because Audio CD players cannot read multiple sessions they can only access the first session. There is the same problem when using Mixed Mode CDs. The first track is a data track that should not be read by Audio CD players. To avoid problems the concept of the multisession CD was transferred to the Mixed Mode CD resulting in a new product called CD-Extra. Technically CD-Extra combines normal CD audio tracks with CD-ROM/XA data tracks on a 12 cm disc, and is similar to the Mixed Mode CD.
But Audio players can only access the first session including the audio tracks, whereas multisession CD-ROM drives can read the further information in the second session that is located in the outer perimeter of the disc. Such information could be video clips of the band, album lyrics, artist biographies, liner notes, photographs, animation, text, and complete multimedia applications. Utilizing the bridge disc concept the second session may also contain CD-i data in addition. CD-Extras that run on Audio CD and CD-I players as well as on PCs and Apple Macintosh computers are called "Rainbow CDs" because they contain tracks according to the specifications of the "RedBook" (Audio CD), "YellowBook" (CD-ROM) and the "GreenBook" (CD-I).
CD-Extra discs may contain a file called AUTORUN.INF located in the root directory. This file gives information about the various computer platforms that can execute the applications on the disc, and it is designed to start the CD-title when the disc is inserted in the CD-ROM drive.
CD-Extra is supported by Microsoft's Windows 95 and by the Apple Macintosh OS.
Bridge Discs are discs containing information which can be read by computer systems in conjunction with CD-ROM/XA drives, as well as CD-i players. Because of the identical character of the sectors and some identical ADPCM audio and video formats, Bridge Discs can store data accessible by both systems (although different application programs are necessary, depending on the different operation systems). All data tracks on Bridge Discs must be Mode 2 tracks. The specification for Bridge Discs, which is sometimes called WhiteBook, was created in October 1991. To produce Bridge Discs, special software tools are required. A well-known example of a Bridge Disc is Kodak's Photo CD, which runs on a CD-i player as well as on an XA system (and, of course, also on a Photo CD player).
All Compact Discs we have talked about in the preceding chapters were "read only discs". This means that they can only be read by the CD players and CD-ROM drives but information cannot be written and stored on these discs except by special production facilities. There are advantages in producing these Read-Only-Discs with molding machines when a great number of copies are required. In that way they can be produced very quickly and at a low price.
But there are disadvantages if the number of copies is low. In that case one copy becomes very expensive, and the production process is too awkward and time-consuming. So for a low number of copies it would be advantageous to write on a disc.
Some methods of writing on optical storage media have been developed. In general there are two kinds of discs. On WORM-discs (stands for Write Once-Read Many) information can be written once. However, this process is not reversible. MO-discs (stands for Magneto Optical) are rewritable so that information can be written, erased, and replaced.
The most well-known technology for WORM-discs was invented by the Japanese company Taiyo Yuden. The build-up of this WORM is similar to that of normal CDs. On a disc made of polycarbonate a thin layer of organic dye, cyanide or phthalocyanine, is applied. The laser beam causes the dye to change its properties of absorbing light. The next layer is a reflective golden metal coating (which is supposed to guarantee better properties than aluminum). The metal coating is covered with a protective lacquer.
The disc is preformatted. A thin spiral of 0.7 mm is molded on the polycarbonate disc and "shows the way". However, there has to be some information about the velocity of the CLV disc too because the rotation speed depends on the place where the laser writes. Thus, the track has tiny defined wave forms. Their frequency has to be kept at 22.05 kHz during recording. There is also a frequency modulation which indicates the position of the laser and gives a time code information (ATIP, Absolute Time in Pregroove). At the beginning of the disc before the Lead-In there is a zone called Power Calibration Area (PCA) for alignment, and the Program Memory Area (PMA) that contains the track numbers of the recorded titles, including their absolute start and stop times. The PMA is used for partially recorded discs. But there is no user data on the disc before recording.
A WORM disc that corresponds to the CD standard was defined by Philips and Sony in November 1990 in the Orange Book. Thus, a CD-R or CD-WO can be read by a standard CD-ROM drive or an Audio CD player. However, because a CD-R can only be written once, the Orange Book permits the presence of multiple sessions on the CD, each having its own Lead-In, Program area, and Lead-out. So after storing the data and finishing the first session, another session with additional data may be recorded later. In each Lead-In a TOC (Table of Contents) is written, the last Lead-In contains the updates for the whole disc. Since fall 1992 most of the CD drives on the market are able to read multiple sessions.
One of the most well-known CD-Rs is Kodak's Photo CD. If you want different films to be stored in different sessions on a Photo CD, you need such a multiple session CD-ROM/XA drive to read them.
However, there is another way to write on a disc. Magneto-optical discs (MO) have an alloy of terbium ferrite, and cobalt. The MO method also changes the characteristics of some points on the disc's surface so that the reading laser beam is reflected there in a different way. The reading of an MO disc is based on the Kerr effect which means that linear polarized light is deflected when it is influenced by a magnetic field, and the plane of polarization is twisted. Thus, by writing on the disc a powered-up laser beam is focused on a very tiny spot where the alloy is heated up to a temperature where the ferromagnetic properties of the aligned elementary particles are lost. This temperature is called the Curie point. An electromagnet is positioned on the other side of the disc changing the polarity depending on the data to be written. Therefore at the point where the disc was heated up to the Curie point the polarity of the elementary particles is changed by magnetic influence. When reading the disc with a low-energy laser, the laser beam's polarization direction is changed by matching these points, and the changes are evaluated by a photo sensor.
Many different MO formats have been introduced in the market which are not compatible. To standardize these MO formats the "Orange Book" laid down the specifications of the CD-MO. However, because of the different techniques of optical storage, CD-MOs cannot be read by normal CD-ROM drives or CD-players. Although prototype devices have been shown at exhibitions that can record music sequences on CD-MOs as well as play normal Audio CDs this type of disc will not be launched to market. Sony's MiniDiscs are based on MO but they are not compatible with CDs.
CD-RW, or rewritables, launched in 1997, are based on phase change technique. Although current CD-ROM drives cannot read CD-RW media, new drives will be able to read them with only a minor modification in electronics (laser pickup) that can be easily implemented by the drive manufacturers. While the reflectivity of CD-Recordables and CD-ROM media is defined to be at least between 65 to 70 %, CD-RW media's reflectivity will be between 15 to 20 %. When reading these media the threshold value to distinguish between reflecting and non-reflecting zones has to be lowered.
The information layer of the disc is based on an alloy of silver, indium, antimony, and tellurium (Ag-In-Sb-Te). In it's initial phase the information layer is in an amorphous state. Heating a small zone of the surface with high energy laser changes the amorphous material into a crystalline state. To read data on the disc, a low-intensity laser beam is reflected by these zones and scattered by the amorphous areas between the zones. Reflected and non-reflected light is registered by a photo diode. The crystalline state can be changed back to an amorphous state when the laser heats it up to a different temperature.
The capacity of CD-RW is about 680 MB. Although Matsushita has demonstrated phase-change media with more than 1 million rewriting cycles, this technique suffers from limited cycle-ability. Depending on the complexity of the alloy, data can be rewritten a limited number of times. Improving the alloy increases the costs of manufacturing. To keep the costs at a reasonable level CD-RW media will be produced allowing 10,000 rewriting cycles. But CD-RW requires more than new hardware. To allow erasing and re-writing of files, changes in the logical structure of the ISO 9660 have to be specified and new software drivers or additions to MSCDEX are also necessary.
The Mini Disc, launched on the market by Sony in 1992, is sometimes designated as a CD but it is not a CD. It is an MO disc which does not conform to any CD standard, not even to the MO specification of the "OrangeBook". This disc is 2.5 inches in diameter and covered by a plastic package, like 3.5-inch floppy disks. It is used for audio recording and playing in consumer electronics devices, and this disc is likely to be used in future as a data storage medium especially for multimedia purposes.
In the preceding chapters CD formats have been described. However, when a CD is used as a data storage medium, a file system for file and data access is needed permitting the organization of the files in directories and subdirectories. At the inception of CD-ROM technology there was no standard file system for a CD-ROM which permitted file access under different operating systems. Therefore, producers created their own, modified existing file systems, or transferred these existing systems like MS-DOS or Macintosh's HFS (Hierarchical File System) onto CD-ROM. In that case the discs could only be read by the special target operating system, and when using those special CD-ROM file systems may be necessary for the user to switch off and restart the computer in order to read another CD-ROM.
Thus the need
for a cross-platform file system was soon recognized. So representatives of the
computer and the consumer electronics industry formed a group which was called
"High Sierra Group" (HSG), named after the hotel in Nevada where the
group met first in November 1985. In 1986 the HSG proposal was laid down and
given to the ISO (International Organization for Standardization). In 1988
international standard ISO 9660 concerning "Information processing -
Volume and file structure of CD-ROM for information interchange" was
released. Some minor difference exist between ISO 9660 and the preceding HSG
proposal.
The software that allows a MS-DOS computer to read ISO 9660 discs is called MSCDEX.EXE (standing for Microsoft CD-ROM Extensions). This program is called from the AUTOEXEC.BAT file, but there has to be another hardware specific driver for the CD-ROM drive in the CONFIG.SYS file. MSCDEX version 1.0 can only read High Sierra, not ISO 9660 files. A CD-ROM drive for a multimedia PC requires at least MSCDEX version 2.2. A special driver is also needed for the Apple Macintosh. However, for the Macintosh family there are many discs using HFS. To permit a complete support of ISO 9660 by UNIX systems at the start of the 90s the Rock Ridge Group of representatives from the industry was formed. It laid down the RRIP (Rock Ridge Interchange Protocol). Discs conforming with the Rock Ridge standard are fully compatible with ISO 9660.
The advantage of ISO 9660 is that this standard permits the data on one CD to be accessed by different computer systems. Of course there must be different executable programs for different operating systems on the disc (for example, one program for UNIX, one for Apple and another for MS-DOS), but when running these programs the same data files may be accessed by different systems. Obviously the executable program file may be accessed but cannot be executed by the wrong operation system.
ISO 9660 is a hierarchical file system like MS-DOS and defines directories, subdirectories and paths. The depth of the directory hierarchy is not to exceed 8.
For File and Directory Identifiers capital letters from "A" to "Z", digits from "0" to 9", and the underscore "_" are to be used. The length of the name may be 8, the length of the file extension may be 3 letters. These restrictions are laid down for Interchange Level 1 which is mostly used by ISO 9660 discs. There are also the Interchange Levels 2 and 3 without these restrictions for naming the files, but level 2 and 3 discs are very rarely used.
Most of today's discs conform with ISO 9660. Also the extensions and further developments of CD-ROM described in the preceding chapters are based on the file system defined by ISO 9660, although there had to be some modifications and adaptations, for example for the multiple session CD-R.
In recent years many multimedia applications have been published as Hybrid CDs for use on more than one operating system, for example Apple's HFS and the ISO 9660 file system. In that case two applications with all their data could be stored on the same disc. The data files that can be interpreted under different operating systems, for example TIFF-, JPEG- and MPEG-Files, can be stored only once on the disc and be shared by the applications for the different operating systems.
Modern Operating Systems have File Systems that allow long filenames. Microsoft's Joliet File System enhances the ISO-9660 specifications and allows files names with up to 64 characters. Characters from any language are allowed. The length of the full file name including the directory path is limited to 120 characters.
New specifications for file systems like ISO 13490 have to be developed to support new features of CD writing like incremental packet writing, drive letter access, and so forth.
New standards have also been proposed to support bootable CDs allowing the developers of CD-ROM titles to package the application and the environment of the operating system on the disc, so that the disc can run using all necessary information from the CD. The bootable CD-ROM Format Specification proposed by the CD/OS Association in 1995 is called "El Torito".
CD Text is a feature added to the conventional CD Digital Audio format (appended as chapter 5.8 of the Red Book) by Sony and Philips, which enables the delivery of text information to the users.
The new feature has been requested by record companies to facilitate the management on multi-CD changer models, which represent a growing sector in the CD player market, and future CD players will be equipped with CD Text decoding and displaying capability.
Text information can be such data as album title, artist name, track titles, messages, genre information, songwriters, performers, composers, arrangers, POS code, etc., and can be applied in combination with other CD formats like CD-Extra and CD-Graphics (CD+G) which has CD-DA data in the first session.
The application of CD Text are:
Disc management on multi-changer CD players
Promotion at the record stores by displaying album name, artist name, message etc.
Source for text information at FM multiplex broadcast stations or digital satellites ("Radiotext")
Text information is recorded into the unused portion of the Lead-In Area (subcode r-w) of the disc, which typically may contain up to approximately 5,000 characters (in single-byte character code). Text information may be extended into the Program Area, should more text information be required for enhanced application such as lyrics or still pictures.
CD Text maintains forward and backward compatibility with existing audio CDs, enabling all conventional CD players to playback the music portion of the CD Text disc.
Version 1.0 of the specification has been distributed to CD licensees in October '96.
In September 1995 a proposal for a single format of the next generation high-density optical disc format was accepted. Prior to that time there were two competing proposals for high-density discs: the Multimedia CD (MMCD) supported by a group of companies lead by Philips and Sony, and the Super Density Disc (SDD) that was introduced by a consortium called SD Alliance lead by Toshiba, Matsushita, and Time Warner.
A look at the technical details of DVD shows that the main features of this disc have been adopted from the SD proposal. The disc is formed by back-to back bonding of two 0.6 mm-thick 12 cm discs. The advantage of the doubled 0.6 mm disc is an improvement of the values for birefringence due to the thinner disc, and greater tilt margins, both resulting in reduced optical aberration of the read out spot. To increase the density of the tracks and to allow smaller pits the wavelength of the read-out laser had to be changed from 780 nm found on current CDs to at least 650 nm for high-density discs. On the other hand the optical system had to be modified. The value for the numerical aperture had to be improved substantially from 0.45 to 0.60. These modifications are resulting in a four to five times higher density for the information on the disc. Compared to the current CD, the header structure was changed, the subcode was dropped, and less parity bits are used. The high-density disc has a more effective error correction scheme than current CDs, and uses another modulation. CDs are based on an Eight-to-Fourteen Modulation (EFM). Due to the way information is stored, 8 bits are represented by 14 so-called channel bits on the CD and an additional 3 merge bits, resulting in 17 channel bits that represent 8 bit of information. There are more effective ways to code the information now with rates of 8:16 and 8:15 that have been proposed by Philips and Toshiba for the high-density disc. The result of all these modifications is a capacity more than seven times higher than those of current CDs. Toshiba's first Super Density Disc (SDD) proposal of bonded 0.6 mm discs had a storage capacity of 5 GB on one information layer using 8:15 modulation. Considering the request of the computer industry to enhance the reliability in the worst case, the new DVD changed to the 8:16 method that sets aside 1 bit for reliability improvement, but decreases the capacity from 5 GB to 4.7 GB per information layer.
The DVD system is backwards compatible with existing CDs using special dual focus pick-up to read the disc. The first application is to distribute movies on these discs using MPEG-2 compression technique. Solutions on recordable and erasable discs based on organic dye coating and phase-change technique are expected by the end of 1997 or 1998 The storage capacity will be significantly reduced compared to that of stamped discs.
UDF, the Universal Disk Format, is a logical format for almost any optical disc. While the current standard for Windows CD-ROMs, ISO 9660, was designed to be simple enough for almost any operating system to read, UDF is flexible enough to handle the demands of modern operating systems, including very large capacity drives and files, long filenames, foreign character sets, security attributes, and more.
UDF is based on the European Computer Manufacturers Association (ECMA) "Volume and File Structure for Write-Once and Rewritable Media using Non-Sequential Recording for Information Interchange" standard, ECMA 167. In a way, this standard is a peer to ISO 9660, but it differs in two important ways. Firstly, it offers much more functionality, mainly because of user needs for increased character set support and for more powerful file system features. Secondly, it acknowledges the separate concerns of booting, volume structure and file system structure. Rather than bundling these different functions together, ECMA 167 carefully segregates these functions into separate parts and describes in detail how those parts fit together. Future volume and file structure standards can fit into this framework, rather than building other distinct and incompatible formats. ECMA 167 was later adopted by the International Standards Organization as ISO 13346.
ECMA 167 is public, and it can be found on the Internet at https://www.ecma.ch
The Optical Storage Association's (OSTA) Universal Disk Format (UDF) specification is an implementation of ECMA 167/ISO 13346, which actually defines those fields in the ECMA standard which are left to an agreement between originating and receiving systems. OSTA is group with more than 30 members, among them Hewlett-Packard, Toshiba, and other very notable manufactures. The primary goal of the OSTA UDF is to maximize data interchange and minimize the cost and complexity of implementing ISO 13346.
To accomplish this task, Domains are defined. A domain defines rules and restrictions on the use of ISO 13346, and OSTA UDF defines the "OSTA UDF Compliant" domain.
OSTA UDF attempts to answer questions for the structures of ISO 13346 on a per operating system basis, such as If the operating system does or does NOT support the data in certain structures, then how should the field be interpreted under this operating system? For example, there is a defined algorithm how a system like MS-DOS should translate long filenames, or foreign character sets. This ensures compatibility with a wide range of operating systems.
OSTA UDF also clarifies sections of ISO 13346, and therefore simplifies the task of creating truly compatible, yet efficient and full featured software products.
OSTA UDF was designed especially with DVD, CD-R and CD-RW in mind, and there already is a wide acceptance for UDF in the computer industry. New operating systems (e.g. Windows 98 or MacOS 8.1) already contain native UDF support.
Currently, two versions of the UDF standard are used for different purposes. Version 1.02 is used for mass replication, especially DVD-ROM and DVD Video. Consumer DVD Players and some implementations of UDF on personal computers will read only version 1.02.
Version 1.5 defines additional specifications for incremental packet writing on CD-R and CD-RW, as well as defect management of CD-RW. Incremental Packet Writing means, that CDs are no longer written in units of tracks, but in very small portions. This allows the creation of software which uses CD-R or CD-RW recorders as online storage, i.e. actually enabling to write to the recorder from the Windows Explorer or any other application. In contrast to older software, which mimics this behavior, Incremental Packet Writing does not store the data intermittently on the hard disk, but actually writes it to the recorder in real time. Also, finalizing the disk (which always takes up about 20 MB of space) is only necessary if the CD is to be read in normal CD-ROM.
The dreaded "Buffer Underrun" error is also virtually eliminated. Even if a buffer underrun occurs, only a small portion (a few kilobytes) of CD space is lost, marked "unusable" and the data is simply written again.
IPW itself has nothing to do with UDF. However, UDF enables different software vendors to develope products (such as CeQuadrat's PacketCD), whose discs can be read and written to by other OSTA UDF compliant software.
In this field, CeQuadrat takes great care in ensuring this compatibility. This will undoubtedly lead to a greater acceptance of CD-R and CD-RW as an online storage medium for day-to-day backup or data interchange, as ease of use is greatly increased, overhead is minimized, and interchangeability is ensured.
However, CDs written in this standard are not suitable for pre-mastering.
Note: For Incremental Packet Writing use CeQuadrat's PacketCD, as WinOnCD does not use these features. For availability of PacketCD please consult our web site at https://www.cequadrat.com
Note: Disc with "c" is always used when talking about optical or magneto optical discs, while disk with "k" is used for magnetic storage media.
AIFF means Audio Interchange File Format. It is an IFF based format to transfer audio data from one computer to another. It is the most common audio file format. WinOnCD can read AIFF files. These files should have the extension ".AIF"
ASPI stands
for Advanced SCSI Programming Interface and defines an interface for the access
to SCSI and ATAPI devices. WinOnCD works with a special ASPI which has been
developed by CeQuadrat exclusively for CD recording. This exclude the influence
of other ASPI-using software, and thus improve performance. Generally other software use the standard
ASPI provided by Windows.
A Bridge Disc is a special form of CD-XA disc containing an ISO 9660 file system. On this disc, a CD-i application program enables CD-i players to access the data on these discs. On other systems you need a special application program to handle the data. The Video CD is an example for a Bridge Disc.
Each track on a CD has to be written without interruption. To achieve this, every CD recorder has a built-in buffer, to compensate for reductions in the transfer rate from the computer. If the transfer speed is too slow, the buffer is not filled fast enough and runs out of data. This is called "buffer underrun". Depending on the CD recording options, the commenced track or the entire CD-R will be unusable if this happens.
Digital Audio is the familiar standard for audio data from an audio CD player, as defined in the RedBook.
The audio information is stored in frames of 1/75 second length. There are 44.100 samples per second stored. Each sample occupies two bytes (16 bit) and there are two channels (left and right) stored on the CD-DA. This gives a sector size of 44.100 * 2 * 2 / 75 = 2352 bytes per frame, which is the total size of a physical block on a CD. WinOnCD can edit and write CD-DA disks.
The CD-Extra
is a format which combines audio and data. This CD type holds two sessions with the audio track being the first and the
data track being the second. As audio players will just play the first track of
a CD, the data track will not be opened.
The second data track contain additional information, such as song lyrics and still pictures, playable on multimedia PCs and special CD-EXTRA players.
CD-i means Compact Disc-interactive and is a multimedia playstation designed by Philips. A Video CD, being a bridge disc, contains a CD-i application enabling playback in CD-i players.
This format is now called "CD-Extra".
The Compact Disc Read Only Memory was invented by Philips and Sony for computer data. The YellowBook of the CD inventors, Philips and Sony, contains only the standard for the physical record medium.
The complete data of the CD-ROM are stored in one track, the user block size being 2048 bytes. As a physical block contains 2352, there remain 304 bytes left in the physical CD frame. These bytes are used for extended low-level error correction and additional information bytes.
The information of the CD can be stored in a variety of formats, including the ISO 9660 standard. Some computers support their native file system on a CD-ROM (i.e. Macintosh or most UNIX systems).
XA means Extended Architecture and is a standard defined by Philips and Sony to record multimedia CDs containing audio, video and program data. CD-XA is recorded in mode 2 (2336 Bytes) and uses two logical block sizes:
2048 bytes per block for data (the so-called mode 2, form 1)
2324 bytes per block for audio/video information (the so-called mode 2, form 2)
An additional difference to mode 1 (CD-ROM) is the subheader. These 8 bytes, unused in mode 1, are used in mode 2 for storing additional information for readback devices. For example, it is possible to generate an interrupt message when reading a specified sector.
Disc-at-Once is one of the methods of writing CDs which is not supported by all CD recorders. With this method, all the blocks of the CD-R are written by the recording software, including the track gaps. This is especially useful when producing audio CDs, as only Disc-at-Once allows full control over the gap between tracks and the PQ-channel, necessary for mastering the CD.
The European Computer Manufacturers Association (ECMA) has published many standards in the field of CD and CD-Recording. Some of them are reprints of the original "colored books".
The GreenBook contains the definition for CD-interactive
(CD-i).
IFF stands for Interchange File Format and is an object-oriented file-format to transfer all kind of data from one computer to another.
The International Standards Organization (ISO) defines standards for all areas of technology and business. For example, ISO 9002 is a quality standard for production processes.
ISO 9660 is an internationally standardized file system adapted by most operating system manufacturers. This standard is also known as ECMA 119. The use of this file system enables many systems to access files recorded conforming to this file system. The disc has to be read back on MS-DOS, Apple Macintosh, UNIX or VMS systems and must meet all the restrictions of these various file systems.
ISO 9660 is usually recorded in CD-ROM mode.
The lead-in contains the table of contents of a session, which holds information about the track layout of the current session. It is always written together with the lead-out at the end of a session. Each lead-in takes up 4500 sectors (about 9 Mbytes) on the CD.
The lead-out indicates the physical end of a session, but contains no actual data. It is always written together with the lead-in at the end of a session. The first lead-out written to a disc takes up 6750 sectors (about 13 Mbytes) on the CD, while subsequent lead-outs take up 2250 sectors (about 4 Mbytes).
A Mixed Mode CD contains one data track, and after this a number of digital audio tracks. WinOnCD can write Mixed Mode CDs.
A multisession CD-R is a CD-R with more than one session on it. However, multisession is more commonly used in conjunction with the ISO 9660 file system, where it describes the process of adding information to an ISO 9660 CD after its initial creation.
When writing CDs, a constant data rate has to be maintained. Therefore, it is sometimes advantageous to assemble the complete CD as an image file on the harddisk.. When this image file is written to the recorder, it will be read linearly which guarantees an optimum read performance. This process is safe, but requires more harddisk space and is more time consuming than "On-the-fly" writing.
If the overall system speed is sufficient, the image can be assembled while the CD is being written (on-the-fly), not producing an intermediate file. Because of increased search times, this may lead to problems (Buffer underrun) on slower systems.
In the OrangeBook Philips and Sony have defined the CD-Recordable and the CD-MO (magneto optical). Multisession is included in the OrangeBook. And the standards for CD-RW is set out in OrangeBook III.
The PhotoCD, introduced by Kodak, is a medium for storing picture information on a CD. The PhotoCD is a multisession Bridge Disc.
A raw file is a file that can be written to the CD Recorder without further modifications, and the data contained in the file is already in CD format. One raw file represents one track. For example, an audio raw file can be used as input for a CD-DA track. Image files are raw files.
The RedBook by Philips and Sony is the basic definition of the CD. It includes only the physical characteristics of a CD and the normal Audio CD. All other books, however, use the same physical medium and low-level data format described in the RedBook.
RIFF is an acronym for Resource Interchange File Format. This format was developed by Microsoft and IBM as a new multimedia file format standard. An example of RIFF files are the MS-Windows Wave files. These files (Extension ".WAV") can be read by WinOnCD
The Small Computers System Interface (SCSI) is an interface standard for high-speed mass storage, such as harddisks, CD-ROMs, etc. SCSI is used with a variety of computer systems.
CDs are divided into tracks and sessions. A CD can hold several sessions. Each session can hold one data track, but more than one audio or video track. Audio tracks have to be in the first session of a CD.
If you want to write a data CD in several steps, you have to write a dedicated session each time. This is what is called a multisession CD consisting of a Lead-in area, a data track, and a Lead-out area, repeated any number of times. You will need about 15 MB of CD space for each Lead-in and Lead-out overhead which does not contain any useful data. If you write an Audio CD in several steps, you will only add a track each time and close the CD after the last track. This is a so-called "Track-at-Once, single session CD".
The high speed of information on an SCSI cable may lead to errors if the ends of the SCSI chain are not terminated with resistor packs, so-called "terminators". Proper termination is important for successful CD recording.
When a harddisk is in operation for a certain length of time the read and write heads of the disk need re-calibrating to take account of heat expansion. During recalibration, harddisks cannot read or write data. If this procedure is done during the writing process, the data stream is interrupted, possibly resulting in a "buffer underrun" error. So-called AV (Audio/Video) harddisks has been specially designed to postpone tcal and thus maintain a constant data rate during reading and writing. Although these drives are not required, they are best suited for CD writing.
Track-at-Once is a recording method where every track is written separately. Between the tracks the CD recorder can control the recording process. There is no difference in data CDs written "Disc-at-Once" or "Track-at-once". For Audio CDs the "Track-at-Once" recording method is significantly more flexible. An Audio CD can, for example, be recorded in several steps and with most recorders an Audio CD can be continued after a "buffer underrun" error. If, however, the CD shall be used as a master CD for mass replication, it must be written "Disc-at-Once". Also, with "Track-at-Once" CDs, clicks are sometimes heard between the tracks. This will never happen with CDs written "Disc-at-Once".
For some CD recorders "Track-at-Once" is the only way to record CDs.
Like the American Standard Code for Information Interchange (ASCII), Unicode is a standard for the representation of characters. In contrast to ASCII which uses 8 bits for one character, Unicode uses 16 bits. Therefore, with Unicode not only the standard Latin characters but also Kanji, Arabic and other scripts can be represented.
The Video CD is a special Bridge Disc, which contains MPEG-1 compressed, full-motion video. Video CDs can be played back with properly-equipped multimedia PCs (MPC3) or CD-i players, as well as with special Video CD players.
A volume is a set of one or more related CDs, e.g. three CDs published as a part of a series of classical composers are considered as one volume. The information given in the Volume Descriptor fields refer to the whole set of CDs.
This is a RIFF audio file format. These files can be read by WinOnCD, and some editing is possible.
The WhiteBook is a definition document for the Video CD standard agreed upon by Philips, Sony, Matsushita, and JVC. There are two main versions, version 1.1 and version 2.0.
In the YellowBook, also known as ECMA-130, Philips and Sony defined the extensions from the RedBook audio CD to the data CD (CD-ROM).
The YellowBook defines two data "modes": mode 1 contains 2048 bytes of user data (like CD-ROM), mode 2 contains 2336 bytes of user data. The remainder of the physical block (2352) is used for error correction and sync information.
A
Abstract description 78
AIFF 111; 177
Artwork-Button 53
ASPI 19; 177
ATAPI
Interface 17
Audio CD 36; 93
Audio Editor 95
Audio Editor Button Bar 99
AutoPlay 72
Autorun 70
Autorun.inf 73
AV harddisk 184
AVI 120
B
BlueBook 141
Bridge Disc 164; 177
Browser 51; 133
Buffer underrun 19; 177
Button Bars 41
C
CD Capacity 31
CD Copy 123
CD Erase 89
CD menu 47
CD Menü 49
CD Plus 141
CD Text 93; 99; 109; 171
CD-DA 149; 178
CD-Extra 36; 113; 141; 162; 178
CD-i 158; 178
CD-i Files 120
CD-i Ready 160
CD-MO 164
CD-PLUS 178
CD-R 30; 164
CD-ReWritable 89; 112
CD-ROM 36; 151; 178
CD-ROM Mode 1 156
CD-ROM/XA 155; 179
CD-RW 164
Check CD 81
Compact Disc-Recordable 164
Creating a CD copy 135
Creating a Data CD 127
Creating an Audio CD 132
D
Destination window 42; 53
Destination Window Button Bar 43
Details View 50
Digital Audio 149
Disc-at-once 59
Disc-at-once writing 179
DVD 172
E
ECMA 180
Edit menu 46
Edit Placement 82
Editor-Button 53
Emulation 131
Error Correction 148
European 173
Exit WinOnCD 46
F
File menu 44
File Placement 90
File Systems 32
Filter 69
Form 1 sector 156
Form 2 sectors 156
G
General Recorder Interface 137
GreenBook 140; 180
GRI 18; 137
H
Harddisk 15; 16; 184
HFS 168
I
IFF 180
Import Session 81
Installation 13; 23
ASPI device driver 19
ATAPI/EIDE-Interface 17
Cabling 21
CD Recorder 18
Deinstallation 25
Harddisk 15
Recorder setup 20
SCSI controller 16
SCSI devices 20
SCSI Parity 21
SCSI termination 20
ISO 180
ISO 9660 32; 168; 180
ISO 9660 Button Bar 74
J
Joliet 33; 168
Joliet Volume Descriptors 76
L
lead-in 29; 181
lead-out 30; 181
M
Main buttonbar 42
Menu bar 41
Mini Disc 168
Mixed Mode 36; 153; 181
MP3 111
MPEG 37; 111; 120
Multisession 28; 80; 83; 181
Multisession CD 161
N
New project 44
O
On-the-fly writing 181
Open project 44
Options menu 48
OrangeBook 182
P
Performance test 17
PhotoCD 182
PQ-Editing 96
Pre-Emphasis 100
Primary volume descriptor
Abstract description 78
System ID 77
Print 45
Project Selection Dialog 40
Q
Quick Refence 125
R
Raw/PCL 111
Raw/PCM 111
RAW-File 182
Record Dialog 57
Record-Button 53
Recorder setup 20
Recording an Audio CD 112
Red Book 93
RedBook 132; 140; 154; 161; 182
RIFF 182
S
Save project 45
Save project as 45
SCSI 183
Cabling 21
Controller 16
Devices 20
Parity 21
Termination 20
Selecting Files 51
Session 28; 183
Source menu 47
Source window 42; 50; 129
Source window Button Bar 52
Source Window Toolbar 42
Status bar 43
System requirements 15
T
Tcal 183
temporary files 48
Termination 20; 183
The Artwork Editor 54
The ISO 9660/Joliet Project 63
The Menu Bar 44
Thermal re-calibration 16
Thermal recalibration 183
Track 28
Track-at-once 34; 59; 95; 184
Tracks-Button 53
U
Universal 173
User interface 40
V
Verify CD 81
Video CD 184
Video-CD 37; 119
Volume 185
Volume descriptor 77
Volume Descriptors (PVD/SVD) 76
Volume ID 77
W
WAV 111
Wave 185
WhiteBook 140; 185
WinOnCD Guide 126
Y
YellowBook 140; 185
© CeQuadrat 1992 - 1998 - All rights reserved
Printed in Germany
|
