XVID TWO PASS ENCODING (Internal Linear Scaling)
Run VirtualDub, go to "File" menu, choose "Open video file" and load your avs script. Then go to "Audio" menu and select "No audio". After that, go to "Video" menu and select "Fast recompress". Next, under the same menu, go to "Compression", which brings up the "Select video compression" window.
1st Pass:
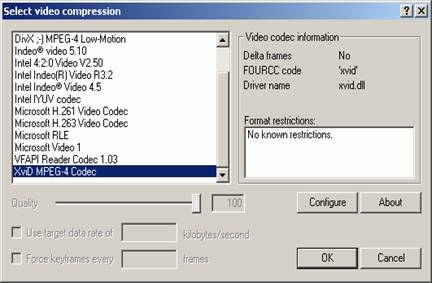
Here, select "XviD MPEG-4 Codec" and click the "Configure" button, which brings the "XviD Configuration" window.
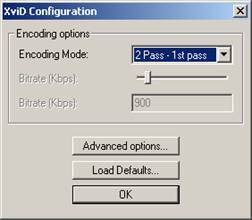 Assuming you're going to do a Two Pass encode to
achiev 414j915e e the best results for your desired target size, select "2 Pass - 1st
pass" for the first pass. Then click "Advanced options" button, which brings
the "XviD Configuration" window below.
Assuming you're going to do a Two Pass encode to
achiev 414j915e e the best results for your desired target size, select "2 Pass - 1st
pass" for the first pass. Then click "Advanced options" button, which brings
the "XviD Configuration" window below.
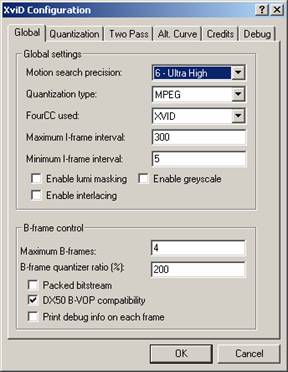
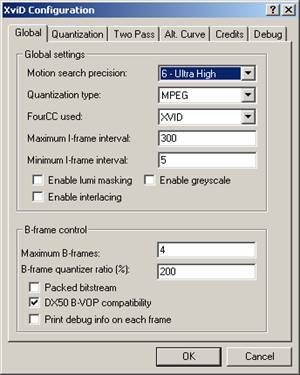 In the "Global" tab choose "6 - Ultra High"
for "Motion search precision" to get best quality. As for quantization type,
select either "MPEG" or "H.263" here for the first pass. Leave "Maximum I-frame
interval" as is with the default value of 300. You can set a value of 5 for "Minimum
I-frame interval" (default: 1) in order to prevent the use of too many
consecutive I-frames. Leave "FourCC used" as "XVID". I personally do not check "Enable lumi
masking" since it 'may' cause some artifacts and degrade the quality of the
encode, though it might as well do the opposite in some cases, increasing
compressibility and improving the look of overall encode by taking bits from
very dark and very bright scenes. Use it at your own risk, or do not use it at
all! ;-) If your source is interlaced and you want to keep it interlaced, you
can check "Enable interlacing". If you want to encode in greyscale, you can
check the "Enable greyscale" option. (In 'dev. builds', "Motion search
precision" of "6 - Ultra High" enables
the use of Qpel.)
In the "Global" tab choose "6 - Ultra High"
for "Motion search precision" to get best quality. As for quantization type,
select either "MPEG" or "H.263" here for the first pass. Leave "Maximum I-frame
interval" as is with the default value of 300. You can set a value of 5 for "Minimum
I-frame interval" (default: 1) in order to prevent the use of too many
consecutive I-frames. Leave "FourCC used" as "XVID". I personally do not check "Enable lumi
masking" since it 'may' cause some artifacts and degrade the quality of the
encode, though it might as well do the opposite in some cases, increasing
compressibility and improving the look of overall encode by taking bits from
very dark and very bright scenes. Use it at your own risk, or do not use it at
all! ;-) If your source is interlaced and you want to keep it interlaced, you
can check "Enable interlacing". If you want to encode in greyscale, you can
check the "Enable greyscale" option. (In 'dev. builds', "Motion search
precision" of "6 - Ultra High" enables
the use of Qpel.)
"B-frame control" section is not active in stable builds, but if you are using a 'dev. build' it is active. Here make sure you check "DX50 B-VOP compatibility" and choose the number of "Maximum B-frames" to be allowed in a row (i.e. 1, 2, 3, 4, etc.) Default is -1 which disables the use of B-frames. You can also enter the desired "B-frame quantizer ratio (%)" (i.e. 100, 150, etc.), the default of which is 200. Remember Qpel and B-frames are very experimental features, though they already seem to work well, but might also cause some crashing, incompatibility, or decoding problems for the time being! If you use these features, decode your rips with Nic's DSF, since ffdshow is reported to cause problems.
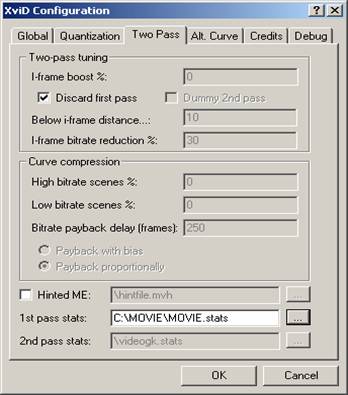 Options in "Quantization" tab are inactive for
the first pass. Go to "Two Pass" tab and specify the name and location of your
1st pass stats file. Leave the rest as is and do NOT check Hinted ME.
Options in "Quantization" tab are inactive for
the first pass. Go to "Two Pass" tab and specify the name and location of your
1st pass stats file. Leave the rest as is and do NOT check Hinted ME.
 Do NOT change anything in the "Alt. Curve" tab
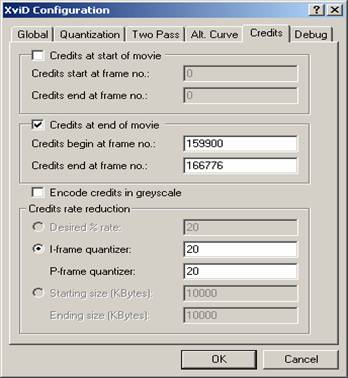
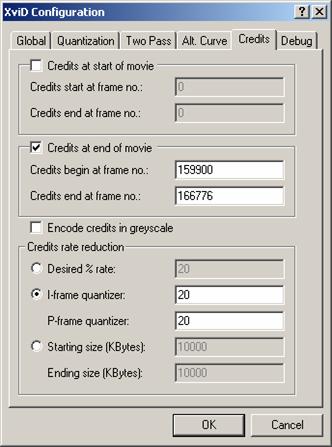
and go to "Credits" tab. Here you can type in the credits range (start and end
of credits) for your movie and specify the quantizer values for encoding credits
(I-frame quantizer and P-frame quantizer). You can go up to I-frame quantizer:
31 and P-frame quantizer: 31 here. In the example a quantizer of 20 is used for
both.
Do NOT change anything in the "Alt. Curve" tab
and go to "Credits" tab. Here you can type in the credits range (start and end
of credits) for your movie and specify the quantizer values for encoding credits
(I-frame quantizer and P-frame quantizer). You can go up to I-frame quantizer:
31 and P-frame quantizer: 31 here. In the example a quantizer of 20 is used for
both.
(Do NOT change anything in the Debug tab.)
Click "OK" three times and go back to VirtualDub.
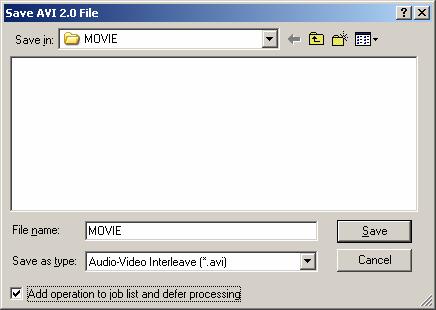
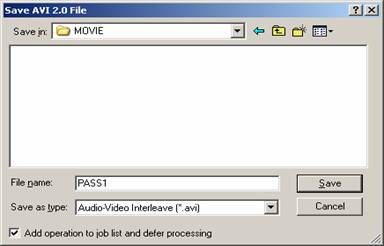 Press F7 in VirtualDub and this window
appears:
Press F7 in VirtualDub and this window
appears:
Here, select the folder and type in the name of the small avi file to be produced during the first pass and check "Add operation to job list and defer processing". Click "Save" and go back to VirtualDub.
If you want to run two passes together (without any interruption and second pass immediately after the first pass) you can jump to and go on with the 2nd Pass: part of this document.
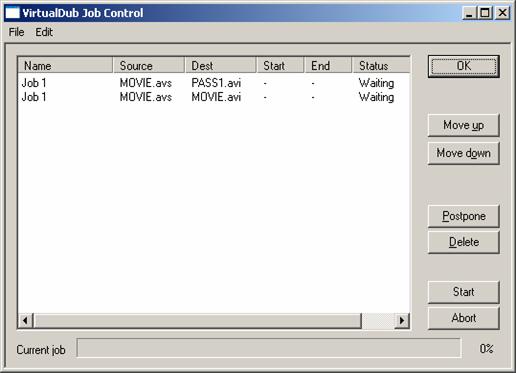
If you want to run only the first pass now and then analyze the stats file for compressibility and thus specify your target size, click F4 which brings up the VirtualDub Job Control window.
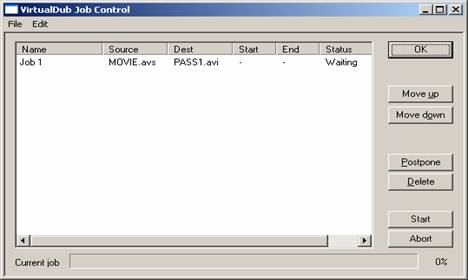
To start your first pass, click the "Start" button.
When your first pass is finished and you're ready for the second pass, open your avs script in VirtualDub again, or if you haven't closed VirtualDub and your script is already loaded go on with the 2nd Pass: part of this document.
2nd Pass:
Under "Video" menu, choose "Compression" again. Select "XviD MPEG-4 Codec" and click the "Configure" button.
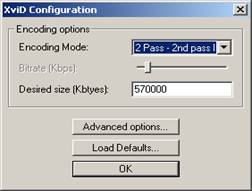 In "XviD Configuration" window, select "2 Pass
- 2nd pass Int." and enter your target file size (in Kbytes). Then click the
"Advanced options" button, which brings the XviD Configuration window below.
In "XviD Configuration" window, select "2 Pass
- 2nd pass Int." and enter your target file size (in Kbytes). Then click the
"Advanced options" button, which brings the XviD Configuration window below.
In the "Global" tab, do NOT change any settings and leave everything as it was in the first pass.
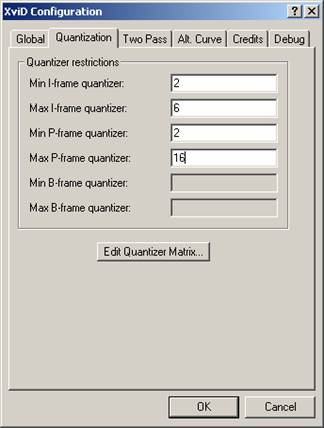 In the "Quantization" tab, cap the I-frame and
P-frame quantizers as shown.
In the "Quantization" tab, cap the I-frame and
P-frame quantizers as shown.
Min - Max I-frame quantizer: 2 - 6
Min - Max P-frame quantizer: 2 - 16
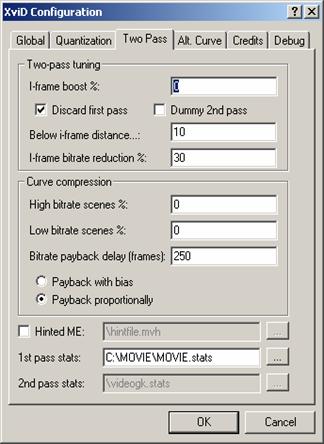 In the "Two Pass" tab, do NOT touch anything
in "Two-pass tuning" area.
In the "Two Pass" tab, do NOT touch anything
in "Two-pass tuning" area.
In the "Curve compression" area, set both "High bitrate scenes %" and "Low bitrate scenes %" to 0 (to get a linear-scaled curve).
"Bitrate payback delay (frames)" default 250 is fine here.
Also, you can choose either "Payback with bias" or "Payback proportionally". I prefer to use "Payback proportionally".
Leave the rest as is and again do NOT check Hinted ME.
In the "Two Pass" tab, do NOT touch anything in "Two-pass tuning" area.In the "Curve compression" area, set both "High bitrate scenes %" and "Low bitrate scenes %" to 0 (to get a linear-scaled curve). "Bitrate payback delay (frames)" default 250 is fine here. Also, you can choose either "Payback with bias" or "Payback proportionally". I prefer to use "Payback proportionally". Leave the rest as is and again do NOT check Hinted ME.
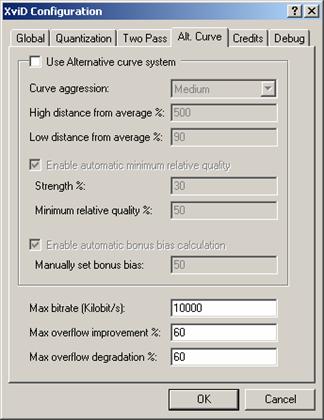
In the "Alt. Curve" tab, simply disable "Use Alternative curve system" and do NOT touch anything else.
 In the "Credits" tab, leave everything as it
was in the first pass.
In the "Credits" tab, leave everything as it
was in the first pass.
(Do NOT change anything in the Debug tab.)
Now, click "OK" three times and go back to VirtualDub. Then press F7, which brings the window below.
 Here, type in the name of your avi file and
check "Add operation to job list and defer processing". Click "Save" and go
back to VirtualDub.
Here, type in the name of your avi file and
check "Add operation to job list and defer processing". Click "Save" and go
back to VirtualDub.
Press F4 to bring up the VirtualDub Job Control window (If you are doing two passes together without interruption, it will be like that):
Press "Start" button and go get some sleep until your encode is finished ;-).
iago
|
