Windows XP Memory Tweak guide
Last Updated on November 19, 2001 by Thomas McGuire
 Windows XP, much like its
predecessor Windows 2000 offers superior Memory management to Windows
Millennium Edition & earlier. That said, both also
require more memory to run efficiently. This guide will take you through
configuring your system for optimal use of your memory subsystem - both RAM
& the Pagefile. NOTE - This guide is based on Windows XP Professional,
although should Home Edition raise any differences they will be included in the
future.
Windows XP, much like its
predecessor Windows 2000 offers superior Memory management to Windows
Millennium Edition & earlier. That said, both also
require more memory to run efficiently. This guide will take you through
configuring your system for optimal use of your memory subsystem - both RAM
& the Pagefile. NOTE - This guide is based on Windows XP Professional,
although should Home Edition raise any differences they will be included in the
future.
Initially you should ensure you have logged in as a User with Administrative privileges, many of the tips in this guide will require such rights be available in order to successfully apply them.
Check Windowsupdate & our OS Updates page for any relevant XP updates, along with CNET Catchup for other updates. In many instances these may fix memory leaks which may occur in Windows XP. If available a BIOS update for your Motherboard may also help resolve some memory issues.
You should also check our Drivers page for links to the Drivers page of many Hardware manufacture 24524v217y rs & ensure you have the latest XP Driver installed for similar reasons.
One commonly overlooked factor when optimizing your memory subsystem is the BIOS. The BIOS for your Motherboard will normally contain several important settings which can affect how well your RAM performs. For information on Memory settings in the BIOS check out our BIOS Tweak guide (Skip onto this page for where the Memory settings begin).
In order to ensure your memory subsystem is performing as best it can you need to have your Hard Drive configured to perform similarly, this is because the Pagefile resides on the Hard Drive also. As a result improving your Hard Drives performance will also improve memory performance.
Right click on My Computer & select Properties, then the Hardware tab, followed by the Device Manager button. Expand the Disk drives tree & highlight (select) your Hard Drive (If you have multiple Hard Drives installed apply the following steps to each of them). Right click on the selected drive & select Properties then the Policies button.
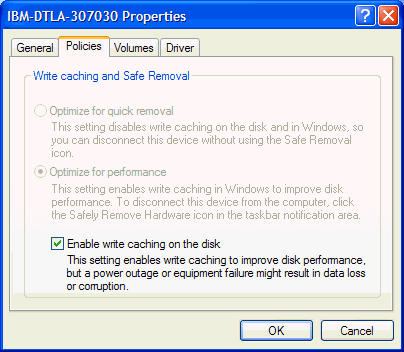
Enable write caching on the disk. Ticking this setting can improve hard drive I/O performance by enabling the use of the hard drive write-back cache. This could cause data corruption in the event of the PC shutting down unexpectedly, e.g. through power failure. If your PC is prone to this sort of failure then Untick this setting to ensure data integrity, although it would be wisest to find the source of this problem & get it fixed of course. Those without such problems should leave this Ticked for best Hard Drive performance.
NOTE - If you have a SCSI Hard Drive the following options will be available in the SCSI Properties tab.
Disable Tagged Queuing. Tagged queuing is performed by the SCSI controller & Driver to increase the speed of completing I/O tasks. This is accomplished by sorting the commands so the order of the commands issued to the Disk Drive to read/write results is in the most efficient movement of the physical read & write heads. You should only Tick this setting if you are experiencing problems with the Hard Drive as performance is lowered when Tagged queuing is disabled. Leave this setting Unticked at all other times for best performance.
Disable Synchronous Transfers. There are 2 methods of transferring data over SCSI cables, Synchronous & Asynchronous mode. Asynchronous mode transfers use an interlocked handshake method where a device cannot perform the next data transfer operation until it receives positive acknowledgment that the other device received the last data transfer properly. Synchronous transfer mode permits the sending device to send multiple data packets without receiving acknowledgment that the receiver actually received every data packet sent. As a result, more data can be sent/received before acknowledgement is required. Similar to the previous setting you should only Tick this setting if you are experiencing problems with the Hard Drive.
Next you should ensure DMA is enabled for all IDE devices on your PC. As described earlier, load Device Manager, expand the IDE ATA/ATAPI controllers tree & highlight (select) Primary/Secondary IDE Channel (NOTE - If you've updated your IDE Bus Mastering Drivers this may be re-named, or the options shown beneath unavailable). Right click on the highlighted item & select Properties, then the Advanced Settings button. The following should be completed for both Primary & Secondary IDE Channel.
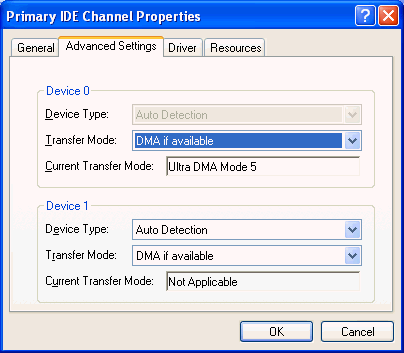
Device Type Set this to Auto Detection (default) to enable Windows XP to detect any IDE devices attached to the IDE Channel (Master or Slave). Setting this to None will disable checking for IDE devices on the Master &/or Slave IDE Channel, which will improve system startup time a few seconds. Do not set this to None if there is an IDE device attached to that particular Channel or it will be disabled.
Transfer mode. For optimal IDE device performance set this to DMA if available. Only if you are using a rather old or slow IDE device should you need to set this to PIO Only (Be sure to attempt using DMA if available first of course though).
Click Ok & Restart your system for the changes to take effect.
Configuring Recovery options
Modifying what Windows XP does in the event of a critical (STOP) error is important as this also limits to some extent the Pagefile you can set. Right click on My Computer & select Properties, then the Advanced tab, followed by the Startup & Recovery Settings button.

Write debugging information. Options available for this setting are;
(none). Should a STOP error occur no debugging information will be recorded, as such you aren't required to set a minimum Pagefile value (If any at all).
Small memory dump (64KB). This options records a minimal amount of information to the memory dump file. This requires a minimum Pagefile of 2MB to be set on the boot partition (Whichever partition Windows XP is installed onto).
Kernel memory dump. This option records only kernel memory in the event of a STOP error. This requires a minimum Pagefile of 50 MB of the boot partition, although to be safe set this to about 1/3 to 1/2 RAM installed.
Complete memory dump. This option records the full contents of memory in the event of a STOP error. For this option to work successfully the Pagefile on the boot partition should be set to a minimum of RAM installed + several MBs, e.g. if you have 128MB RAM in your system you should set a minimum size of 133MB or thereabouts.
Click Ok & restart your PC for the changes to take effect. NOTE - Those of you with multiple Hard drives (Not partitions) are not quite as limited by the choice made above, although I'll go into more detail on this later.
Advanced performance options
Right click on My Computer & select Properties, then the Advanced tab & the Performance Settings button, followed by the Advanced tab.
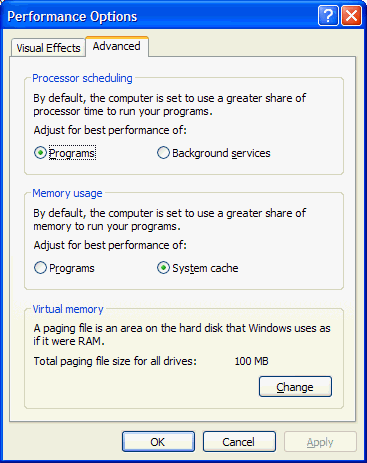
Processor scheduling This setting specifies how CPU time is divided between running processes. When set to Programs more CPU time will be allocated to the foreground Application, e.g. this could be a Game, Internet Explorer or Word, etc. Background services divides CPU time equally between all running processes. I'd recommend setting this to Programs unless the system is used as a Server (Not a Game server though), or similar such tasks.
Memory usage When set to System cache Windows XP uses RAM less 4MB for disk caching purposes (Disabled by default). On PCs with a good deal of RAM (256MB or more preferably) installed this should result in best system performance, although for those with less RAM available setting this to Programs will result in best overall system performance. NOTE - This is the same option as the LargeSystemCache entry in the registry (covered next).
Click Ok & restart your PC for the changes to take effect.
The registry contains several settings which allow you to further configure memory management features in Windows XP. Used properly this can further improve your PCs memory performance.
Click on Start, Run. Type in regedit & hit Enter. Go to [HKEY_LOCAL_MACHINE\SYSTEM\CurrentControlSet\Control\SessionManager\Memory Management]. You can edit the following entries as you see fit for your PC.
ClearPageFileAtShutdown For the more paranoid Users out there this option will be of some use. Right click on this entry & select Modify. A value of 1 specifies that the Pagefile(s) are to be wiped of content during the shut down process. This will result in system shut down times taking longer, although you can be confident that no data stored in it will be able to be accessed as a result (As it will be empty upon shutting down). Setting this to 0 will disable clearing the Pagefile(s) & result in fastest system shut down.
DisablePagingExecutive Right click on this entry & select Modify. When set to 1 this disables pageable code (Drivers, executables, etc.) from being sent to the Pagefile, rather being kept in RAM instead. This can greatly improve performance given that RAM is a great deal faster than any Hard Drive. That said this requires a great deal of RAM installed to be of any benefit, as such I'd recommend leaving this set to 0 unless you have 256MB RAM or more.
LargeSystemCache. This setting specifies whether or not the XP uses RAM less 4MB for disk caching purposes. This will be disabled by default. On PCs with a good deal of RAM (256MB or more preferably) installed setting this to 1 (enabled) should result in best system performance, although for those with less RAM available setting this to 0 will result in best overall performance. This is the same as the Memory usage option in System Properties.
IoPageLockLimit. This DWORD value limits the maximum amount of kilobytes that can be locked for I/O operations. Right click on this setting & select Modify, then select the Decimal button. The default value for this is 512 & on some systems you may find increasing this value to improve system performance. The maximum value for this setting is RAM less pad. Pad being based on the amount of RAM installed in the system, e.g. Pad is around 64MB with 512MB RAM installed. This is a more useful setting if your system is used for file sharing, or server tasks.
PagingFiles. This option contains the location of the Pagefile & the Initial & Maximum size values. This is useful should you wish to rename the Pagefile, e.g. pagefile.sys to win386.swp, to do so select this entry, Right click on it & select Modify.
SecondLevelDataCache. For those of you with older CPUs (Pre-Pentium 2 basically), this DWORD Value specifies the amount of L2 (Secondary) Cache on your CPU. Normally this amount will be determined via the HAL, although with older CPUs with off-die L2 Cache this may not be the case. Those with semi-modern CPUs (Pentium 2 or newer) should leave this set to 0 (As should those with Multiple CPUs). If you have greater than, or less than 256KB of L2 Cache on your (old) CPU then Right click on this entry & select Modify. Select the Decimal button & enter in the amount of L2 Cache available, e.g. If you have 512KB L2 Cache then enter in 512. Thanks Ojatex. Where Windows XP in unable to determine the L2 Cache available & this is set to 0 it will default to assuming 256KB L2 Cache is available.
Using the registry it is possible to disable POSIX (Portable Operating System Interface) support in Windows XP. While perhaps this may not yield much, if any, savings to memory usage, disabling this subsystem will of course lead to an overall more efficient Operating System. First of all be sure to check whether or not any Applications you use actually require support for this subsystem - in most instances you probably will be well aware of whether or not this is the case. Those of you who have applied the Windows NT4 method of deleting/renaming files to disable POSIX will need to follow these steps as Windows File Protection will simply re-create the files deleted.
Click on Start, Run, type in regedit & hit the Enter key (NOTE - Be sure to backup the following registry key if you are uncomfortable about making the following changes).
Open the following registry key [HKEY_LOCAL_MACHINE\SYSTEM\CurrentControlSet\Control\SessionManager\SubSystems] & Delete the Optional & Posix entries. Reboot your system for the change to take effect.
Monitoring & calculating Pagefile size
Before you can set your Page File you'll want to get an idea of what to actually set it too. Some recommend using a general formula, e.g. RAM x 2.5 (By default Windows XP sets uses RAM x 1.5). This is incorrect however. Using that formula, a person with 32MB RAM should set 64MB, while a person with 256MB RAM would set 512MB. Obviously the person with little RAM will need a greater amount of Virtual memory than the person with a lot of RAM.
To find a more optimal Pagefile size you will need to monitor its usage. To do this you should first set a relatively high Pagefile size to get a good idea of what's required. Right click on My Computer & select Properties, then the Advanced tab, followed by the Performance Settings button. Now select the Advanced tab then the Change button. Use a Custom Pagefile setting & set a value of Initial size = Maximum size. A good value to consider using for the monitoring process would be 300, for 2 reasons - 1. It's unlikely you'll require a greater Pagefile than this. 2. It will be easier to calculate later on. Click Ok & restart your PC for the changes to take effect. In my case I used 200 as I felt I had a good deal of RAM installed (256MB DDR).
Click on Start, Control Panel, Administrative Tools, then the Performance utility. Expand the Performance Logs & Alerts tree & select the Counter Logs option. Right click in the right hand pane & select New log settings. Enter in a Name as requested & select Ok.
In the General tab select the Add counters button.
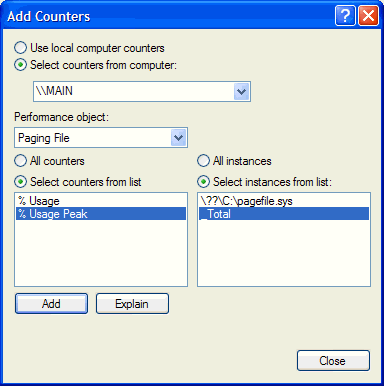
From the Performance object drop-down menu select Paging File & then Select counters from list option, select % Usage Peak & for Select instances from list select _Total. Hit the Add button & then Close. Make a note of the Current log file name, as later on you will need to check the performance log(s) saved in this directory, e.g. C:\Perflogs.
Now select the Log Files tab. For the Log file type I'd recommend selecting Text File (Comma delimited). Click Ok to finish. To ensure the log is running highlight & Right click on the log & select Start (If available, if not it will already have started).
Over the next few hours/days you can use your PC as normal, perhaps running your most resource intensive Applications/Games to get an idea of the greatest amount of Pagefile usage that was required (Although don't get too excessive in this regard, you want to monitor more regular usage). Once you're satisfied you can stop the monitoring & check your performance logs. Should you have saved it in the format recommended earlier use Notepad. In my case this is some of what was recorded for my Pagefile usage.
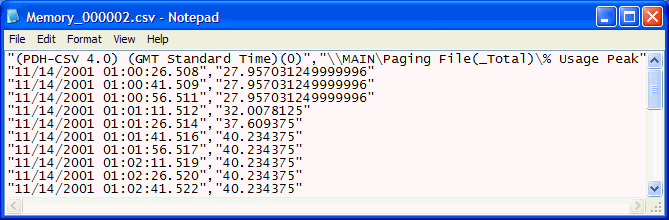
The first thing to remember is that the values are recorded in percentage (%) format, not in MBs (The values on the furthest right will be the ones to check). Checking your logs you should write down the highest value recorded in each one, rounding up/down as necessary. Once you have all these values average them to get the final percentage value to use (Although you can just stick with the highest of these if you wish), e.g. across a few logs the highest values obtained were 40, 28, 36 & 30. Averaging these resulted in a value of 34.5%.
To get a Pagefile value from this divide the Pagefile size by 100 & multiply it by the value you've just calculated. As I mentioned earlier I set my Pagefile to 200 for testing purposes. So my final Pagefile size as a result will be calculated as follows - 200/100 * 34.5 = 2 * 34.5 = 69MB.
Now that you have calculated a basic Initial size for the Pagefile its time to consider what to set for the Maximum size & how to set it in the first place.
Setting the Pagefile
Now that you have calculated your Pagefile it's time to decide how to set it up. The first thing to consider is whether to use a permanent Pagefile, permanent being defined as Initial size = Maximum size. The other route being a semi-permanent one, defined as Maximum size is larger than Initial size.
The one thing to remember is that for both options problems (Of varying degrees) only arise should greater than the Initial size be required. In the case of the Permanent Pagefile your system/Application could crash in the event that your Pagefile is of inadequate size to meet Virtual memory requirements. Conversely, the permanent Pagefile may help to reduce disk fragmentation as it will not be able to dynamically increase/decrease. For the Semi-permanent Pagefile should the virtual memory requirements exceed the Initial size for the Pagefile it can dynamically increase in size (Up to the Maximum size) until the virtual memory needs are met (After which it can decrease). As regards the Maximum size you should probably set it to about twice the Initial size. The main disadvantage being that should this resizing occur it can cause disk fragmentation. Personally I'd recommend going with the Semi-permanent option.
If choose the Permanent option I'd also recommend increasing the Initial & Maximum size by a few dozen MBs, say 30 or so, given the possibly more serious effects of running out of Virtual memory.
Now that you've determined which option to use there are a few things to consider before finalising your settings.
If you have multiple Hard Drives installed & selected the Small, Kernel or Complete memory dump option for the Write debugging information setting, you can set the Pagefile needs as monitored & calculated on the other Hard Drive (Windows XP is automatically more aggressive in using the Pagefile located on the least used Hard Drive than the one on the boot partition), e.g. Were you to have selected Complete memory dump you may require a Pagefile size of 260MB on the boot partition, while based on monitoring you may only need one of 80MB. You can therefore set the Pagefile on the boot partition to 260MB & create another Pagefile on another Hard Drive of 80MB, as the one on the other Hard Drive will be used more.
Similar to point 1 you should place the Pagefile onto another Hard Drive than Windows XP is on if possible. This will improve performance, although you should be careful that the other Hard Drive is not greatly slower than the one Windows XP is on, e.g. If Windows XP is installed on an ATA100 capable Hard Drive you aren't going to gain any benefit by placing the Pagefile onto an ATA33 capable Hard Drive, this would be a sub-optimal approach.
Try not to locate the Pagefile on mirrored Hard Drive(s), e.g. RAID 1/5 array. This kind of fault tolerance & backup isn't required for the Pagefile & in most instances the performance is lowered over a non-mirrored Hard Drive.
While the Pagefile can (beneficially) be split amongst different Hard Drives, the same is not true of splitting it amongst multiple partitions.
Should you only have a single Hard Drive then locate the Pagefile onto the partition where Windows XP is installed onto.
Bearing those points in mind, right click on My Computer & select Properties, then the Advanced tab, followed by the Performance Settings button. Now select the Advanced tab then the Change button.
If you are going to setup the Pagefile on a single partition then set it as follows, with the screenshot beneath to be taken as an example.
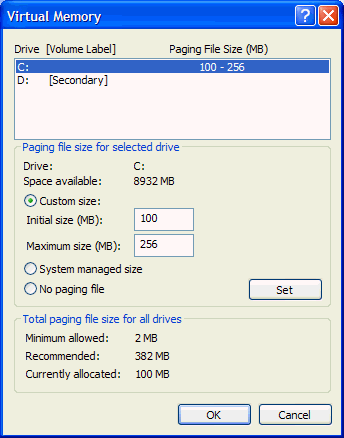
Select the Drive to locate the Pagefile on, then select the Custom size & enter in the Initial size & Maximum size values you have calculated previously. Click the Set button to confirm your changes. If you have (mistakenly) set a Pagefile set for other drives too they can be removed by selecting the Drive then selecting the No paging file option & the Set button.
In the case you intend to split the over several Hard Drives, e.g. due to having selected Small, Kernel or Complete memory dump option for the Write debugging information setting your Virtual Memory settings may appears as follows. For the purposes of this example I've selected Complete memory dump (256MB RAM installed), although based on monitoring Pagefile usage I only required 100MB on average.
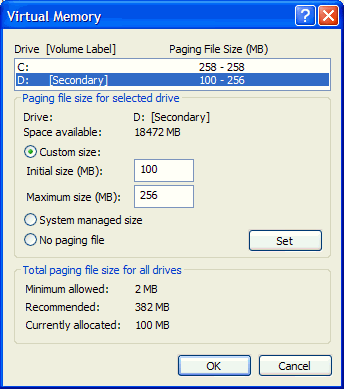
In this case I've set the Pagefile to 258MB on the bootable partition (C:\ in this case), while on my other Hard Drive (D:\) I've selected Custom size & configured the Inital size & Maximum size as appropriate. Hit the Set button after adjusting the Pagefile setting for any partition.
Once you've made your changes click Ok & restart your PC for the changes to take effect. Now that you've configured your Pagefile & other memory related settings appropriately there are some other ways you can ensure you keep your system running in good condition.
By default Windows XP can have several Performance counter DLLs active at any given time, monitoring a variety of Hardware or Services. It is possible however to disable these which is of most use if the information they track is of no use to you. This can also improve overall system performance as a result by disabling more background tasks. Using the Extensible Performance Counter List Overview utility from Microsoft you can do this easily. Download now from Microsoft. Once installed load the utility.
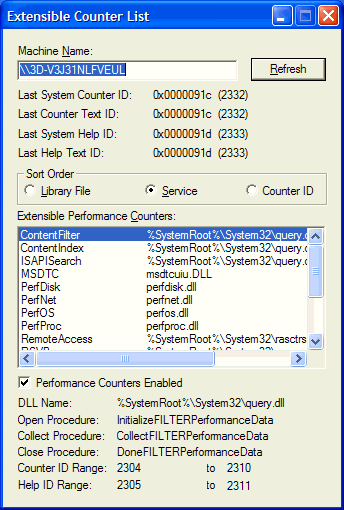
This utility lists all performance counter DLLs on the system & whether they are enabled, or disabled. Simply select a counter, & Untick Performance Counters Enabled to disable them being used. NOTE -The Performance utility in Administrative Tools will be limited in what can be monitored should you disable items here (Which is why it's best to only disable these after the monitoring has been done).
Using SysInternals PageDefrag you can optimize the system Registry, Event logs, Hibernation files & the Pagefile by defragmenting them the next your system boots up. This can improve performance on systems with highly fragmented files as you can guess. Download now at SysInternals.

Run every week or so this will keep down the fragmentation level to a minimum. Be sure to run some form of Disk Defragmenter on your Drives regularly as well of course.
For optimal Pagefile defragmentation your Disk Defragmenter should be able to allow you to place the Pagefile on the outer edge of the Hard Drive, which can be accessed the fastest. Although you may require a 3rd party Disk Defragmenter to gain such a feature.
Conclusion
By now you should have successfully optimized the memory subsystem of your Windows XP system. The final thing to remember is that having more RAM will always be of greater benefit than having a highly tuned Pagefile. Should you be experiencing any problems check out our Software/OS Forum or you can email me with any suggestions you may have. Be sure to check back in the future for further XP guides.
|
