Zoomifyer Authoring Program
User's Guide
Zoomifyer Photoshop Plug-in & Standalone Droplet
Version 1.6
Copyright © 2001-2002 Zoomify, Inc.
Table of Contents
Zoomify unleashe 24524j91y s unlimited resolution
How Zoomify's technology works
Zoomifyer delivers one-step image prep
Installing the Zoomifyer Authoring Program
Converting your images to stream
Publishing streaming images on your site
Taking your creation for a spin
Chapter III. Using the Zoomifyer Authoring Program
Special interactive media types
Implementing Java with firewall support
Implementing Zoomify Clientless viewing
Compiling "zoomify.c" for non-Windows platforms
Using Zoomify content within LiveStage Professional 3+
Zoomify Viewer speed and quality
Complementary Zoomify products - available at www.zoomify.com
Complementary 3rd party products
Zoomify makes high-resolution images useful on the Web. The Zoomifyer Authoring Program easily converts images of any size or quality to stream for fast initial display and on-demand viewing of fine details!
Zoomify enables publishing of gigabyte photos that can be viewed without any large download! Web site visitors can interactively zoom-in and explore huge, 3D image objects and cubic panoramas - of ultra-high quality - in real-time!
How does Zoomify work? The Zoomifyer Authoring Program intelligently converts any image for incremental access. The Zoomify Viewer is then able to display any view of the image - close or far, left or right, up or down - without delivering any unneeded, undisplayed image data.
Zoomifyer begins by copying an image several times at different resolution levels - from the original source resolution down to a thumbnail. Zoomifyer cuts each of these levels into many small tiles. All the tiles from all the levels are then combined into one new file - along with an index of the exact location in the file. This file is pyramidal - that is, like a pyramid, stacked from thumbnail down to high-resolution, level upon level.
Figure 1: Pyramidal Tiled Multi-Resolution Image
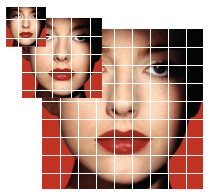
When the new file is viewed, the Zoomify Viewer uses the index to request the lowest resolution tiles from the Web server and displays the thumbnail. Each pan and zoom causes a request for only a small additional number of tiles -those for the part of the image panned to, at the level of zoom desired. No tiles are ever delivered unless required for the current display - or for a display that is anticipated to immediately follow (intelligent pre-fetching).
How Zoomify works (continued)
These requests for image data are all made via standard HTTP 1.1 Internet protocol - so no special server software is needed. In fact, converted images can be hosted on any Web server - it's just like serving JPEGs! The only difference is that the Web server is providing parts of image files rather than entire image files.
Zoomify's image streaming approach is complementary to compression because compression reduces the size of data delivered while Zoomify ensures that no unnecessary data is delivered. In fact, Zoomify leverages the complementary benefits of compression by applying JPEG compression to the image tiles within a converted file (other compression algorithms could easily be applied as well - please email [email protected] for further information).
Compression alone is inadequate for publishing high-quality images. A 32 megabyte image licensed from a stock photo house - even if compressed 100-fold with wavelet technology to approximately 320k - is impractical for Web viewing. It's entirely unreasonable to attempt to publish a 100 megabyte file without image streaming.
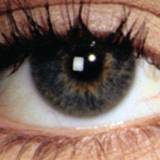
Figure 2: Image Streaming Illustrations
|
|
|
|
|
Example Image |
Enlarged Low-Res Image |
Zoomify Image |
The Zoomifyer Authoring Program enables creative professionals to convert images to stream from within their favorite editing tool (Photoshop, of course!) or directly on the desktop with the Zoomifyer Droplet. Whether working with photographs, 3D image objects (also referred to as a object movies), or panoramic images, Zoomifyer presents a single, end-of-workflow step to prepare content for publishing on the Web. Simply set a few intuitive parameters - filename, background color, display size, etc., - and click OK. Zoomifyer does the rest.
This Guide describes the features of the Zoomifyer Authoring Program. Users new to imaging, the Web, or Adobe Photoshop will most likely prefer to follow the chapters in the order presented. If you are a seasoned imaging pro, feel free to skip to the Using Zoomifyer chapter, and, if you like, delve into the chapter entitled 'For the Brave Only.'
For additional help Zoomify's outstanding Support Team is standing by. Simply email [email protected] - every effort is made to respond promptly. Please be sure to first review relevant portions of this Guide prior to contacting us. Standard business hours are 8 a.m. to 5 p.m. Pacific Time. Don't forget to check www.zoomify.com regularly for the latest Zoomify news, viewer updates, and more. For additional help, please be sure to visit our support pages at www.zoomify.com/support/.
If reporting a problem with the product, please provide the following information to the best of your ability:
Description: Area of product affected. Application,
browser, and operating system behavior.
Errors: Exact wording of any error message displayed.
Steps to reproduce: Exact order of actions leading up to the problem
including every menu and button choice.
Reproducibility: Is the problem 100% repeatable or intermittent?
Configuration: Platform and model, operating system and version,
browser and version, and Zoomifyer version.
We are committed to your successful use of Zoomifyer. Thank you for your business.
The Zoomify Team
After downloading the Zoomifyer Authoring Program, you'll have a ZIP or SIT file. On the Mac your browser will likely extract the SIT file automatically. On windows you'll need a program called "WinZip" - a free trial is available at www.winzip.com. Once you've decompressed the files from your ZIP or SIT you'll have a folder entitled "Zoomifyer Win" or "Zoomifyer Mac".
To install the Photoshop Plug-in, simply double-click the installer icon (on Windows machines it will have an extension ".exe"). The installation program automatically places a folder named 'Zoomify' in the Photoshop Plug-ins folder. The Zoomify folder contains the necessary files for the Zoomifyer Authoring Plug-in to work within Photoshop. If you have installed a trial version of the software, please first delete the "Zoomify" folder from your Photoshop plug-ins directory before installing.
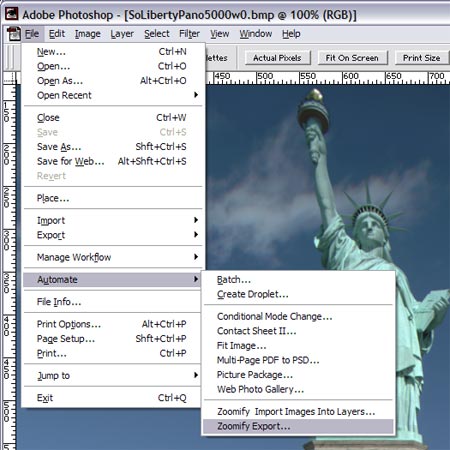
Open Photoshop and choose File | Automate. You'll see two choices labeled 'Zoomify Import Images Into Layers' and 'Zoomify Export' respectively. The former choice is only used for creating 3D image objects and is discussed in Chapter III, Using Zoomifyer Authoring Program in the section titled 'Special interactive media types.' The latter choice, 'Zoomify Export.,' is disabled until an image is open in Photoshop and available to export.
To use the Zoomifyer Droplet, simply drag the "Zoomifyer Droplet" folder onto your desktop (or into another directory) - that's it! You may wish to make a shortcut from the program for your desktop to make it easier to drag images on for conversion. To get started, just drag an image onto the Droplet target icon and the Zoomifyer dialog will appear. You may also double-click the Droplet icon to select images. The Droplet handles objects differently than the Photoshop Plug-in. Just drag multiple files onto the Droplet icon and select the "Object" tab.
Beginning the image conversion process is as simple as choosing File | Open from within Photoshop and selecting an image to convert (for the Photoshop Plug-in) or dragging an image onto the Droplet icon. The Zoomifyer Authoring Program supports BMP, GIF, and JPEG files natively. If you have QuickTime installed the Zoomifyer can convert any file format supported in QuickTime, such as PICT, TIFF, PNG, etc. QuickTime is available for free from www.apple.com.
Because the Zoomifyer Photoshop Plug-in is integrated within Photoshop you have complete access to all your familiar Photoshop features. An image can be cropped, rotated, sharpened, and edited in infinite ways. When all edits are complete, save the image, then select File | Automate | Zoomify Export.
One-step prep (continued)
It is important to note that Zoomify's conversion process is designed to work with raster image data, that is, pictures made of pixels. To accommodate special Photoshop image layers containing text or other non-raster content, simply choose Layer | Flatten Image, and save it with a new filename prior to Choosing File | Automate | Zoomify Export.
If you prefer to use the Droplet, you can first edit your image data in Photoshop and then save it, preferably to an uncompressed file format such as BMP, TIFF, or a lossless compressed format such as PNG. You may also save and convert JPEG and other lossy compressed formats that offer very high compression ratios. It is important to note that the conversion process itself will apply JPEG compression to the final zoomable content. Depending on the level of compression you select, applying JPEG compression twice could result in a noticeable loss of quality. As a general rule of thumb, Zoomify the best quality source image you have to achieve the best quality zoom.
Figure 3: Zoomifyer Authoring Program Photoshop Menu
The Zoomifyer Export dialog provides all the settings needed to exactly control the conversion and presentation of your streaming image content. The settings present enable specification of file characteristics including:
Output Files: Folder and File Set naming*
Basics: Presentation characteristics such as background color
Initial View: Media-specific settings controlling initial display
Support Files Generation: Automatic template creation options
The default settings are appropriate for common publishing needs. Simply click 'OK' to begin conversion!
Figure 4: Zoomifyer Authoring Program Export dialog
(Screenshot
from Droplet)

The Zoomifyer Authoring Program is much more than a streaming image conversion utility. Zoomifyer provides full support for converting interactive media to stream. The Zoomifyer Plug-in Export dialog presents tabs to access options relevant to each supported media type.
Figure 5: Interactive Media Tabs

Media types currently supported include Images, Objects, Animations, Slideshows, and Panoramas (cylindrical, spherical, cubic, and cube faces). Complete coverage is provided in Chapter III, 'Using Zoomifyer Authoring Program,' in the section titled 'Special interactive media types.' (Zoomify is dedicated to rapid innovation - visit www.zoomify.com regularly for news about additions and enhancements!)
The Zoomifyer Authoring Program makes publishing your converted, streamable images easy. Zoomifyer creates template HTML based on your preferred viewing approach. Simply copy the converted file to your Web server, paste the template HTML into your Web page - and your image is live!
Zoomify provides every possible viewing alternative to ensure that creative professionals have the options they need to meet the viewing requirements of their audience. Detailed coverage of each viewing approach - including Zoomify Clientless (simply HTML and JavaScript) - is provided in Chapter III, Using The Zoomifyer Authoring Program. Regardless of your choice, Zoomifyer automatically creates exactly the HTML required.
The HTML automatically generated by Zoomifyer Authoring Program includes several simple statements that vary only slightly depending on the viewing alternative selected. These statements specify display parameters. For example:
Editing your Web page (continued)
Z_myImage.width = 350 sets the Viewer display width
Z_myImage.height = 350; sets the Viewer display height
Z_myImage.backColor = "#ffffff"; sets the Viewer background color
Z_myImage.maxZoom = 100; sets the maximum zoom limit
These HTML parameters can be changed at any time. Zoomifyer's automatic template generation simply provides a convenient starting point. Please see the section entitled "Advanced parameter information and modification" in Chapter 4 for more information. The latest list of parameters can be found online at www.zoomify.com/support/.
You can copy the lines right out of the text box conveniently located on each template. Please note: you should refer to the "zoomifyViewer.js" file located on Zoomify's server when publishing content on the Web - this ensures that your audience always receives the latest version of the Viewer. While the conversion process does provide a local copy of the "zoomifyViewer.js" file, it is intended for local testing purposes only. Now you're ready to copy the files to your server!
Regardless of your viewing choice, Zoomifyer provides a converted image to copy to your Web server - just as you would copy a JPEG. The converted image has the file extension ".PFF".
For the ActiveX / Plug-in display alternative, you'll need to copy over the HTML file and the PFF only.
If you plan on using QuickTime to display your PFFs, you'll need to copy over 4 files: the PFF, the HTML file, the .MOV file, and the .TXT file.
If your content includes hotspots you will need to copy the hotspot text file to your server as well.
If you are using Java, you'll need to copy over the HTML file, the PFF, and the "zjview.cab" and "zjview.zip" files. You place the .cab and .zip files in a directory such as "java" at the root and have all your HTML files using Java to display PFFs refer to them. Just be sure to update the Java parameters to refer to them there:
<APPLET CODE="ZImageApplet.class" ARCHIVE="/java/zjview.zip" WIDTH= 350 HEIGHT=350 >
<PARAM NAME = "file" VALUE="myImage.pff">
<PARAM NAME = "cabbase" VALUE="/java/zjview.cab">
If you are planning on implementing firewall support for Java, please see the section entitled "Implementing Java with firewall support" in Chapter 4.
Copying files to your Web server (continued)
If you'd like to implement the Zoomify clientless viewing alternative, please see the section entitled "Implementing Zoomify Clientless viewing" in Chapter 4.
Each file has a simple purpose. Having converted your image and copied the generated files to your server, you're ready to view the results!
Viewing a Zoomify image on any Web site is completely automatic and no different than viewing any other interactive content - in fact it's simpler. All Zoomify Viewer versions are vastly smaller than typical video players and far less complex than MP3 tools. Most Zoomify Viewing alternatives are available automatically with no install or setup - no barriers to immediate use!
Zoomify Viewer versions are available for every audience. These include Java, ActiveX, plug-in, QuickTimeT component, and Zoomify Clientless (comprised simply of HTML and JavaScript).
Depending on the Web designer's choice, a first-time site visitor will be presented with:
A simple progress indicator as the Java applet automatically loads.
A one-step prompt to accept the ActiveX or QuickTime component.
Instructions to install the plug-in (last resort / fail-safe alternative).
As quickly as the Viewer is in place, a progress indicator is displayed and image data begins streaming to the screen. Zoomify prevents processing bottlenecks by progressively resolving screen display. Site visitors see an initial preview as additional data is received and applied. This direct approach ensures that, even over low-bandwidth connections, immediate visual results and immediate interactivity are achieved.
It's easy to explore an image with the Zoomify Viewer - panning and zooming are very intuitive! Additionally, mouse and keystroke behavior is common across many interactive viewers such as QuickTime as well as 'virtual tour' solutions now frequently seen on real estate Web sites.
The following table describes how to use the mouse and keyboard to view an image using the Zoomify Viewer.
|
Action |
Function |
|
Zoomify Viewer Button
|
Opens your default browser to a Zoomify help page (similar to this list) that tells your audience how to interact with Zoomify content. |
|
"SHIFT" or "A" KEY |
Zooms into an image. |
|
"CONTROL" or "Z" KEY |
Zooms out of an image. |
|
LEFT-CLICK and DRAG or ARROW KEYS |
Pans an image or panorama up, down, left or right. Rotates an object, advances an animation. |
|
RIGHT CLICK and DRAG |
Moves an object or animation up, down, left or right. |
|
"X" KEY and CLICK and DRAG |
To pan an image in the QuickTime component only. |
|
"S" KEY |
Restarts animation. |
|
"H" KEY |
Displays hotspots. |
|
"ESCAPE" KEY |
Resets Viewer to initial point of view of an image. |
Creating, publishing, and viewing streaming image content is easy with Zoomify! The following chapter provides detailed explanations for every Zoomifyer Authoring Plug-in feature.
The Zoomifyer Photoshop Plug-in is designed to provide unique streaming image conversion capabilities - directly in Adobe Photoshop. Benefits include:
Powerful Photoshop filters, tools, and functions directly accessible
No new user interface to learn
Increased productivity, quality, and satisfaction
The Zoomifyer Droplet is a great complement to the Zoomifyer Photoshop Plug-in. Benefits include:
Drag-and-drop simple - just drop your images onto the Droplet icon
Optimized conversion times for large images
Batch conversion
The Zoomifyer Authoring Program primary interface is the Export dialog. The Export dialog allows specification of general conversion parameters as well as parameter specific to particular media types, which are presented each on a separate tab. The use of the Export dialog is simple: select the preferred settings, modify any default field entries as desired, and click 'OK'
The Output Files settings govern the naming and placement of the converted image as well as of all associated files.
Figure 6: Output File Parameters
(screenshot from the Droplet)

Folder: The location within which to place the converted file and its associated files. The default setting for this field is the desktop. Subsequent defaults are based on prior use and stored on the local machine.
File set: The name to apply to the converted file
and its associated files (only available in the Photoshop Plug-in).
The Basic parameters include key display settings that will be assigned in the template HTML automatically generated by the Zoomifyer at the completion of image conversion. Also included, copyright meta-tag fields the data from which will be embedded (invisibly) in the image file.
Figure 7: Basic Parameters
|
|
Max zoom %: constrains image magnification in the viewer in Photoshop terms (100% represents 1:1 correspondence between image pixels and screen pixels). Max zoom out %: constrains image zoom out level. 100% will constrain zoom-out level to the size of the display window. |
|
Display width: defines horizontal size of HTML view area. Display height: defines vertical size of HTML view area. Background: defines the color that will appear in the viewing space when not covered by your Zoomify content. |
Compression: opens a dialog that allows you to set the JPEG compression level to be used during conversion Copyright: meta-tag to be embedded (invisibly) in image files. Comments: meta-tag to be embedded (invisibly) in image files. |
The Zoomifyer Authoring Program Export dialog allows the content author to choose automatic generation of HTML and support files for a specific viewing alternative, several viewing alternatives, or even all of the viewing alternatives. See 'Zoomify Viewing Alternatives' for additional information.
Figure 8: Support Files Generation Parameters
|
|
Java: creates HTML templates and the Java files necessary for Java applet viewing. ActiveX/Plug-in: creates appropriate HTML templates including pointer to JavaScript for browser and operating system auto-detection to support automatic provision of ActiveX or Plug-in as appropriate. |
|
Generate support files only: prevents image conversion. HTML and other files are created based on choices selected. This option provides a means to quickly create or recreate support files. Slideshow preview: creates a JPEG/JavaScript slideshow that can be used in your Web page in place of traditional thumbnails. Zoomify Clientless: creates HTML templates supporting Clientless viewing (HTML and JavaScript). |
Auto-detect: Zoomify Auto-detect viewing solution implements the most sophisticated auto-detection support and provides the greatest assurance that the smallest possible download will occur with the least chance of any installation requirement. We highly recommend that you implement this as it will deliver ActiveX to Windows / IE users and the QuickTime component to Mac users - ensuring that you reach the widest audience possible! |
QuickTime Options
Filename points to Zoomify content: creates a .MOV file that points to the .PFF file whose name matches it's own. To publish one or many PFF files for QuickTime viewing simply copy the .MOV file as many times as necessary and ensure that one copy is named to match each PFF file.
Movie track points to Zoomify content: creates a .MOV file that points to a PFF file internally. This approach creates .MOV content that, using any QuickTime track-editing tool, can be used to integrate multiple Zoomify
images in a single QuickTime file. This approach also supports integration of Zoomify images with other media types supported by QuickTime!
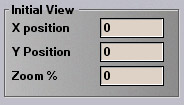
Figure 9: Initial View Parameters
|
|
X position: specifies horizontal center-point of image when first displayed. Y position: specifies vertical center-point of image when first displayed. Zoom %: specifies degree of magnification to be applied when image is first displayed. |
To get precise results with this feature, you may create the PFF without modifying these numbers. While viewing your PFF in a Web browser, move it to the location you'd like displayed when others first view the image, and press the "S" and "I" keys simultaneously. This will create a text file with values that represent the image's position and zoom level. Simply copy the values out of the text file and into the parameters of the HTML page as follows:
<Script Language=JavaScript>
//Set up the prefs
Z_myImage = new ZoomifyViewer();
Z_myImage.name = "Z_myImage";
Z_myImage.file = "myImage.pff";
//used for enhanced viewing
Z_myImage.width = 350;
Z_myImage.height = 350;
Z_myImage.backColor = "#000000";
Z_myImage.maxZoom = 100;
Z_myImage.useActiveX_Plugin = true;
Z_myImage.zoomifyParamsFile = "myImage.txt";
Z_myImage.initialZoom = 11.576712
Z_myImage.xOffset = 0.126743
Z_myImage.yOffset = 0.027524
//insert the viewer
Z_myImage.InsertViewer();
</script>
If you have a parameters file as well (in the above case it would be called "myImage.txt") you can also copy the values into that file rather than insert them into the HTML of the page. For QuickTime, you must use the parameter file.
Zoomify's tiny 20K Java applet delivers zoom without plug-ins! No install required! The Zoomify Java Viewer provides optimal 2D streaming image access. Firewall compatible (with simple server side byte-range retrieval scripts), cached per session.
Trusted access to Zoomify image streaming for Microsoft Internet Explorer / Windows users - 88% of Web surfers! One-click, no install access. Complete support for high-quality photos, 3D object movies, 360 degree cubic panoramas, hotspots, and more.
Tried-and-true client technology enables image streaming viewing for audiences preferring alternatives to Java, ActiveX, or QuickTime-based viewing. Complete support for high-quality photos, 3D object movies, 360 degree cubic panoramas, hotspots, and more.
Complete support for Zoomify image streaming - right in QuickTime! No resolution limits! View high-quality photos, 3D object movies, 360 degree cubic panoramas, hotspots, and more. 100k component automatically delivered directly from Apple on first use - no install required!
Zoomify Auto-detect implements the most sophisticated auto-detection support and provides the greatest assurance that the smallest possible download will occur with the least chance of any installation requirement. Ensure that your Zoomify content reaches the widest possible audience! We highly recommend this approach.
Plug-in free, Java free, install free. Zoomify Clientless provides Zoomify's simplest, lightest weight viewing alternative. Web TV friendly 2D streaming image access.
In the Zoomifyer Photoshop Plug-in the Zoomifyer Import Object Frames menu enables direct import of multiple images to layers within a single Photoshop file. This path is essential to preparing the frames of a 3D image object for conversion to a streaming object. Simply select File | Automate | Zoomify Import Object Frames. A standard file selection dialog is presented that allows for the selection of multiple images. If images of varying sizes are selected, the canvas will be automatically resized to accommodate larger images and all images will be centered in each layer.
In the Zoomifyer Droplet, just drag the images that will comprise your complete Zoomify object onto the Droplet icon (or select them after double-clicking the icon).
Be sure you've named your images sequentially!
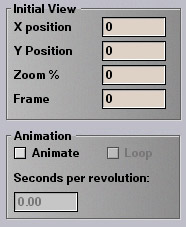
Export dialog additions: The Object, Animation, and Slideshow tabs of the Zoomifyer Export dialog have several addition fields relevant to time-based media types.
|
Figure 10: Export Dialog Additions
|
Initial ViewFrame: specifies the image frame to be presented first or 'in front.' AnimationAnimate: Binary. Determines whether object will auto-rotate, and whether animation or slideshow will auto-advance. Seconds per revolution: specifies speed of animation relative to total number of frames. |
Export dialog additions: the Panorama tab of the Zoomifyer Export dialog displays several addition fields relevant to panoramic images.
|
Figure 11: Export Dialog Additions
|
Panorama parameters Auto-calculate: specifies that the Zoomifyer Authoring Program will determine Panorama parameters based on analysis of image aspect ratio. NOTE: selection of projection type required. Min and max settings: constrain pitch (forward/backward tilt) and yaw (side to side pan). Specified in degrees. Pitch range: -90 to 90. Yaw range: 0 to 360 |
Initial ViewPitch: specifies the forward or backward tilt desired when the panorama is first displayed Yaw: sets the side-to-side pan of first display where 180 degrees will display an initial view directly in the center of the panorama. Zoom %: specifies the amount of magnification in Photoshop terms (100% represents 1:1 correspondence between image pixels and screen pixels). |
Projection typesCylinder: select if source image contains panoramic image represented in cylindrical form. This is the panorama type created by all standard QuickTimeT VR tools including QuickTime VR Authoring Studio*. Cube strip: select if source image contains panoramic image represented as 6 cube faces aligned in a vertical strip. Cube faces: select if source data is comprised of 6 cube faces in separate files (as used by Helmut Dersch's PanoTools and Apple's MakeCubic utility). Sphere: select if source image contains panoramic image represented in spherical 'equirectangular' form. This is the default panorama type created by MGI Software's PhotovistaT. |
*QuickTime VR Authoring Studio saves out cylindrical panoramas with a vertical orientation. You will need to rotate the panorama in Photoshop to a horizontal orientation before converting into a Zoomify panorama.
Note: the current release of Zoomifyer Authoring Program supports full 360-degree panoramas. Support for partial panoramas is in development.
Zoomifyer enables creative professionals to easily create powerful hotspots in images and panoramas! Hotspot creation is implemented directly in ImageReady, the companion product Adobe ships with every copy of Photoshop. (Note: ImageReady 3.0 or higher required.)
Adobe Photoshop and ImageReady are presented as integrated products. From Photoshop, simply choose File | Jump to | Adobe ImageReady to open ImageReady along with the image file currently open in Photoshop. (To conserve available memory, you may want to close Photoshop and open ImageReady directly.)
The Zoomifyer Photoshop Plug-in leverages ImageReady's image map creation capabilities to deliver simple, powerful hotspot authoring. Hotspots are clickable areas, defined in 3D space. Leveraging Adobe's familiar interface means no learning curve and reliable results!
Figure 12: Hotspot Creation In ImageReady
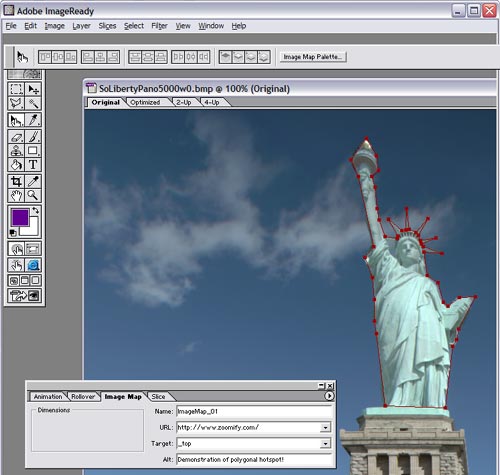
Creating a hotspot using ImageReady is easy! Three simple steps are all that is required:
ImageReady's Image Map Tool provides a simple means to specify the location of a hotspot. Choose from rectangular, circular (not yet supported), or polygonal hotspots. Click-and-drag on the image to create a hotspot. (Note: the Image Map Tool is the third tool from the top on the left.)
Set 4 simple parameters. These specify the type of hotspot, URL to jump to, target frame or window, and hotspot tool tip text.
Save the file (in Photoshop's .PSD format). Reopen the file in Photoshop and select File | Automate | Zoomify Export. That's it!
Zoomify hotspots are stored in an XML-format text file with the same name as the image file and the extension .TXT. This 'parameters' file should be copied to the server along with the image file. It can be directly edited at any time - or even generated dynamically! Please note: this text file will also contain your display parameters.
Zoomifyer Photoshop Plug-in leverages entries in four ImageReady image map fields to capture hotspot parameters:
Name: The Name field is used to specify the type of hotspot being created.
Alternatives include opacity hotspots and thumbnail hotspots.
Opacity hotspots require the specification of a color in standard Web form. For example #000000 represents a black colored semi-transparent region.
Thumbnail hotspots require identification of the image to be presented via entry of a URL. Absolute and relatives references are supported. GIF and JPEG formats are supported natively and are recommended. Animated and transparent GIFs are also supported and present great design possibilities!
URL: The URL field holds the Web page to jump to upon a hotspot mouse-click.
Target: The Web page specified in the URL field will be opened in the frame or window specified in the Target field. Standard HMTL designations such as "_top" are supported.
Alt: The Alt tag accepts up to 72 characters for use as the hotspot tool tip. (Double-byte entries are not currently supported.)
When the site visitor interacts with an image containing a hotspot, the hotspots appear to be attached to the image. As the user zooms, the hotspots zoom, as the user pans, the hotspots move with the image. Because hotspots can be any shape, they can accurately outline anything in an image or panorama!
You can always find the most up-to-date information at Zoomify's Web site: www.zoomify.com/support/.
Due to security restrictions within Java, users behind firewalls may not be able to view Zoomify images with the Zoomify Java Viewer. This can be remedied through the use of a small Perl file or a 32kb helper application that resides on your server in the CGI-BIN. Copy the HTML files and Java viewers as you normally would, and also copy the Perl file (with an extension ".pl") or the executable file "ZACGI.exe" and place either in your CGI-BIN.
The file "ZACGI.exe" was compiled for Windows server environments. If you are using a different server platform you will have to compile the executable for the platform. Please see the section entitled "Compiling "zoomify.c" for non-Windows platforms" for more information.
To use Perl, you must install a Perl interpreter. There are many versions of Perl currently available, and many are free. Please visit https://www.perl.com/ for more information on Perl. At Zoomify we use ActivePerl found at https://www.activeperl.com/. Once you've installed Perl, you must enable scripting on your web server. Please consult your server software manual for information on how to do this.
You must several lines in the parameters of the HTML page that calls the Java viewer and displays the Zoomify image. Your Java viewer insertion call might look like this:
<APPLET CODE="ZImageApplet.class" ARCHIVE="zjview.zip" WIDTH= 350 HEIGHT=350 >
<PARAM NAME = "file" VALUE="myImage.pff">
<PARAM NAME = "cabbase" VALUE="zjview.cab">
<PARAM NAME = "usecgi" VALUE="0">
<PARAM NAME = "backColor" VALUE="#000000">
<PARAM NAME = "zoomSpeed" VALUE="0.20">
<PARAM NAME = "maxZoom" VALUE="100">
<PARAM NAME = "infoPage" VALUE="">
</APPLET>
For the executable, you should modify this line:
<PARAM NAME = "file" VALUE="myImage.pff">
to read instead:
<PARAM NAME = "file" VALUE='/cgi-bin/ZACGI.exe/MyContent/myImage.pff'>
Also, modify this line:
Implementing Java with firewall support (continued)
<PARAM NAME = "usecgi" VALUE="0">
to read:
<PARAM NAME = "usecgi" VALUE="1">
This example presupposes that your cgi-bin is located at the root of your Web site, and that the image "myImage.pff" is located in a directory called "MyContent" which is also located at the root of your Web site.
If you wish to use the Perl file instead of the executable, modify the line:
<PARAM NAME = "file" VALUE="/MyContent/myImage.pff">
to read:
<PARAM NAME = "file" VALUE='/cgi-bin/zoomify.pl?file=/MyContent/myImage.pff">
There are two ways to implement Zoomify's Clientless viewer on your Web server. If you have Perl installed on your server, you can use Zoomify's Perl file (zoomify.pl). If you have a Windows server, you can use Perl or the "ZACGI.exe" version. Please see the section above entitled "Implementing Java with firewall support" for information relevant to Clientless viewing (such as installing Perl, etc.)
To implement Perl for Clientless viewing, modify this line:
Z_ myImage.zaPerlFile="zoomify.pl";
to read:
Z_ myImage.zaPerlFile="/cgi-bin/zoomify.pl?file=/MyContent/myImage.pff";
This example presupposes that your cgi-bin is located at the root of your Web site, and that the image "myImage.pff" is located in a directory called "MyContent" which is also located at the root of your Web site.
You can also use the executable for Clientless viewing. If you're running a Windows OS on your server and have a cgi-bin, copy the file "ZACGI.exe" into your cgi-bin. Then, alter one line in the parameters of each HTML page that displays the PFF image:
Z_myImage.zaPerlFile="/myContent/myImage.pff";
Implementing Zoomify Clientless viewing (continued)
to read:
Z_myImage.zaPerlFile="/cgi-bin/ZACGI.exe/MyContent/myImage.pff";
Please note that you'll need to add the full path to the "ZACGI.exe" file and also the full path to the image file (appended as shown in the example).
If you have selected either "Zoomify Clientless" or "Java" in the "Support Files Generation" section of the dialog box, the export process will create a cgi-bin folder that contains 3 files. The first, "ZACGI.exe," is used for either Clientless or Java viewing on Windows servers only (running, IIS, Apache, etc.). The second is "zoomify.pl" which is used for Perl implementations of Zoomify's Clientless viewer. If you are running a different server, such as Solaris, Linux, or Macintosh, you'll need to compile the file "zoomify.c" to run on your server. Once you have done this, follow the same steps as above to implement for either Java or Clientless viewing.
Totally Hip Software has implemented support for Zoomify content in the latest release of LiveStage Professional. When creating Zoomify content, be sure to select either "QuickTime" or "Auto-detect" from the "Support Files Generation" section of the Zoomifyer Export dialog. Under "QuickTime" options, select the radio button for "Movie track points to Zoomify content". This will create a Zoomify MOV file with a track you can add to a LiveStage Pro QuickTime movie.
For more information on using Zoomify content with LiveStage Pro, visit www.zoomify.com/support/ and consult the readme that comes with LiveStage Professional 3.1+.
The following features are not fully documented, tested, or supported by Zoomify for general use. They are presented here to support customer and partner experimentation and input regarding future Zoomify development. Your comments and suggestions are welcome at [email protected].
Zoomify hotspots are implemented via an XML-formatted text file and, although only limited features are surfaced at the current time, are robust enough to support numerous triggers (mouse down, up, over.) and events (links, view changes such as zoom, pan, or rotate), and more. See www.zoomify.com for additional information soon.
Zoomify includes exciting support for 'skins' - images 'on the display screen' - that can be used to create toolbars, display logos, or modify the look and feel of a display to match your site's design.
Skins are just like hotspots with one exception: they are 'attached' to the viewing screen rather than being displayed in the image or in 3D space. During user-interaction a skin is stationary. The image being viewed pans and zooms 'behind' the skin.
While HTML can be used to create many interesting presentations, integrating HTML interface designs with interactive Viewer displays is hampered by browser limitations and inconsistent implementations. Zoomify's skin support will enable creative professionals to design interactive displays involving multiple images, mouse events, and more - with confidence that consistent accessibility will exist for all audiences on all browsers and on all operating systems.
Numerous useful and entertaining hotkey functions exist in Zoomify. These are typically used for product testing or are features in development.
|
Hotkey |
Function |
|
Numeric keypad |
With num lock on, enables navigation on multiple axis even in 2D images. Demonstrates 3D imaging capabilities of Zoomify's ActiveX, plug-in, and QuickTime component (3D Java coming soon). |
|
RT - Remove textures |
Displays tiles without image data applied. In panoramas, displays tiles and interior 3D cube surfaces without image data applied. |
|
SI - Save Initial View |
Creates text file containing coordinates for current view to enable specification of initial view within parameters file. |
|
FG - Frame Grab |
Saves current view as a JPEG file - does not work in QuickTime. |
|
GL - OpenGL |
Toggles between OpenGL renderer with hardware acceleration and Zoomify software renderer (automatic toggle occurs on operating systems where OpenGL is not present). |
Zoomify makes every effort to provide a fast, high-quality, viewing experience. To accomplish this, many sophisticated capabilities are applied in combination:
Status communication: Zoomify strives to clearly communicate progress to keep your site visitors informed and prevent confusion or frustration. For example, on low-bandwidth connections the Zoomify Viewer automatically presents status information as an image is loaded. A progress indicator will fill left to right along the bottom of the display area, with the text "Initializing Image" clearly displayed. Additionally, the Z-Help logo serves to indicate when network traffic is in progress via a colorful animated effect.
Real-time display: Image data at the earliest moment it is available. As soon as the first image tiles are received they are used to fill the display area. As additional data is received it is quickly applied to make the display more and more clear until all necessary data is present.
Intelligent pre-fetching: Viewer idle time is utilized to request and receive tiles in anticipation of immediate subsequent display requirements.
Multi-level caching: every aspect of the Zoomify viewing experience is architected to avoid redundant data downloads. Disk memory, and server caches are all expertly leveraged.
One of the most exciting features of Zoomify's technology is its highly interactive display. This high degree of interactivity is due, in part, to leading edge application of SGI's OpenGL hardware acceleration technology.
Zoomify leverages OpenGL to transparently accelerate image processing on any system including OpenGL-compatible video support. The near universal presence of OpenGL support enables Zoomify to deliver full-screen displays while maintaining compelling, real-time 3D interactivity.
OpenGL (continued)
Special note: Zoomify includes a second, software-only renderer to support display on older systems that do not incorporate OpenGL support. These include Microsoft Windows 95 Release 1 and Apple Macintosh Systems prior to version 8.6. Zoomify ensures that easy viewing access and maximum performance are available to your entire audience.
|
|
Zoomify's Optimizer Business Systems provide complete imaging solutions for businesses where images matter. Enjoy seamless integration of critical image management features - carefully tailored to meet the needs of specific businesses such as: E-Store builders Online auctions Criminal justice Classifieds |
|
|
Zoomify's Peer-to-Peer Image Sharing delivers an all-inclusive photo sharing system designed to scale. Combining image streaming with peer-to-peer networking to provide fast viewing and easy sharing. Designed for easy integration into any Web site, includes easily modified branding and look and feel! |
Digital Media
Authoring Tools
LiveStage Professional www.totallyhip.com
iShell www.tribeworks.com
Adobe Photoshop www.adobe.com
Adobe ImageReady www.adobe.com
REALVIZ Stitcher www.realviz.com
QuickTime VR Authoring Studio www.apple.com
VR Toolbox VR Pano Worx www.vrtoolbox.com
MGI Software PhotoVista www.mgisoft.com
Panorama Tools PTSTitcher www.fh-furtwangen.de/~dersch
QuickTime VR Authoring Studio www.apple.com
VR Toolbox VR Object Worx www.vrtoolbox.com
MGI Software Object Modeler www.mgisoft.com
Adobe GoLive www.adobe.com
Macromedia Dreamweaver www.macromedia.com
MGI Zoom Image Server www.mgisoft.com
Lizard Tech Content Server www.lizardtech.com
Panoscan, Inc. www.panoscan.com
Kaidan, Inc. www.kaidan.com
SpinPic, Inc. www.spinpic.com
Compression: Sophisticated means to reduce file size while retaining file information by substituting representations or approximations of the file data for the actual data.
Cubic panorama: Storage and/or presentation of image data presenting a full 360 degree horizontal by 180 degree vertical field of view.
Image object: Multiple frames of an item captured from surrounding perspectives. Presented as a 'flip book' on screen, creates the illusion of an actual 3D object.
Object movie: Image object presented in QuickTime.
Panorama: Wide image, often spanning a full 360 degrees. Useful for interactive display to create an illusion of pivoting in place to look in all directions.
Pixel: The smallest unit of screen display. A point of color.
Pre-fetching: Intelligent retrieval of data from a Web server in anticipation immediately subsequent use.
Pyramidal image: A data file format containing multiple levels of resolution.
Resolution: The amount of image data available for display. One measure of image quality. Screen equivalent of printer 'dpi' (dots per inch).
Texture map: Application of image data to a tile surface for display and manipulation on screen. Potentially supporting 3D views.
Tile: 64x64 pixel piece of image at a given resolution.
Multi-resolution: Data file containing many levels of quality.
VR: Virtual reality, simulation of reality in a realistic, interactive way.
Wavelet: Highly effective image compression approach enabling maximum reduction in file size while preserving image quality.
Apple Macintosh: PowerMac
Intel: Pentium class
Apple Macintosh OS: Versions 8.5 or higher, including OS X
Microsoft Windows: 98, NT 4.x, 2000, ME, XP
Adobe Photoshop: Version 5.5 or higher
Adobe ImageReady: Version 3.0 or higher
QuickTime: Version 4.0 or higher
International QuickTime VR Association www.iqtvra.org
Content Arts www.contentarts.com
Davo Photographic www.davo.com
EPOP, Inc. www.epop.com
PlayBox Media www.playboxmedia.com
|