Table Of Contents
Forewords
The basics
Notation
Timing
When is timing needed?
Building bricks
Checksums
8 bit negative checksum
8 bit paramblock checksum
16 bit negative checksum
32 bit negative checksum
How much delay shall be done after outs?
How much delay shall be before ins?
Waiting for SDA
Sending a byte
Sending a byte during update of the flash
Writing a 16bit word
Sending a bytestream
Sending a bytestream during update of the flash
Reading a byte
Reading a 16bit word
Reading a bytestream
Communication in general
Execution of commands
Initialization of test mode
Sending the bootstrap and the flash loader
Parameters of the bootstrap
Parameters of the flashloader
Retrieval of the phone information
Flash loader commands
Terminate flashloader (0x07)
Read phone information (0x03)
Read command status (0x04)
Erase block (0x00)
Erase whole flash (0x08)
Read from flash (0x0C)
Write to flash (0x0B)
This document is for supplying the appropriate information regarding communication with a Nokia phone. This is based upon researching and using the original "Dejan" flasher. Note that the document does not describes the "basics", i.e. what is a bootstrp loader, what is the flash id, what are the flash loaders, etc.
To flash a Nokia phone you need a simply I2C device with 3 wires (don't be surprised that "normal" I2C implementation use the same wires for outputting and inputting, we're not doing that). I2C uses only clock (SCL) and data (SDA) to transmit signals. For more information about I2C check phillips.com. The following wires are used:
Fbus RX - SDA in
Fbus TX - SDA out
MBUS - SCL out
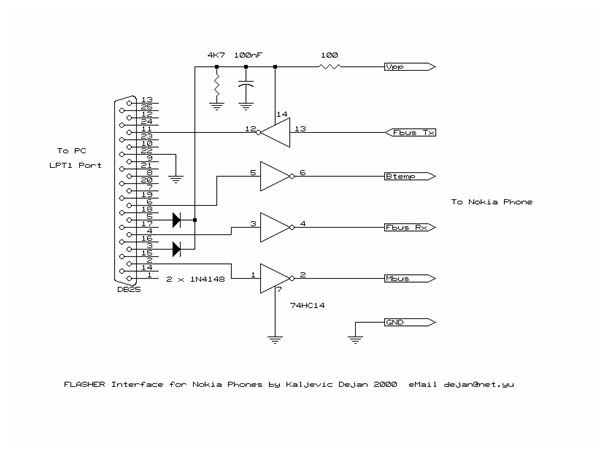
Note that you can't retrieve the status of the clock (i.e. there is no SCL in).
The following acronyms are used:
base port: it is the port where the outputs are connected to (i.e. 378h for "common" LPT1)
status port: it is the port where the input is connected (i.e. 379h for "common" LPT1)
Timing is the most critical part of any I2C specific
software. I2C times at microsec resolution so you need to have a "selfmade"
solution, since "off-the-shelves" solutions in the compilers does not exist. To
have a briefing on timing check:
https://www.ibiblio.org/pub/Linux/docs/HOWTO/mini/other-formats/html_single/IO-Port-Programming.html
It has some advices on timing. Anyway if you don't have internet connection here's a sum-up of the content:
if you read from a port or write to a port it normally takes about 1 microsec
a 'xchg bx,bx' shall take exactly the same clock-cycles on any 'Pentiums'
there is 'rdtsc' for the Pentiums to retrieve the clock-cycles
Basically after every 'out' to the base port. The only exception from that is when you update the flash content. At that time you must NOT wait at all, must transfer the bytestream as fast as you can to the phone.
To "drive" the I2C you should have commands for them. The following will be used:
SDALOW (to set data low)
SDAHIGH (to set data high)
SCLLOW (to set clock low)
SCLHIGH (to set clock high)
All of the ones above does the very same job; sets or clears
the appropriate bits on the base port (0th or the 3rd).
After outputting the value to the base port, a delay is made as well. To check
which wires are connected to which bits on the ports, take a look at:
https://www.beyondlogic.org/spp/parallel.htm
Note that there might be some misunderstanding about SDA. Sadly (or luckily) the original "Dejan" interface connects the input of the SDA to the 7th bit of the status port. This bit the 'busy' flag of the status port originally, which is INVERTED by the hardware itself. Thus when reading the SDA the high bit is actually a low one and vica-versa. For the very same logic, the meaning of SDAHIGH and SDALOW has been swapped (i.e. the make SDA high, the bit must be cleared).
And we have four defines to have "the the ones without waiting after outputting.
SDALOWNODELAY (to set data low)
SDAHIGHNODELAY (to set data high)
SCLLOWNODELAY (to set clock low)
SCLHIGHNODELAY (to set clock high)
And one is created for the data input:
SDAINNODELAY (to read the SDA)
Some data that are sent by the phone is secured with checksums. Let's sum up the type of checksums a NMP uses.
The algorythm is as follows:
read each and every byte
sum them up
at the end substract the sum from 0 or -1 (it depends where it used)
The algorythm is as follows:
start from -1
read each and every byte
substract them one bye one from the sum
The algorythm is as follows:
read each and every word
swap them
sum them up
at the end substract the sum from 0
swap the result
The algorythm is as follows:
read each and every dword
swap them
sum them up
at the end substract the sum from 0
swap the result
This is quite the cornerstone of the communication (just as generally timing). It turned out by tests that at around 10 microsec must be done after each and every outs (i.e. 10 read from a port or around 1800 clock cycles)
There shell be no delay at all when reading the SDA.
There is two kinds of "delays" implemented with a specific reason. During communication commands and transfers are acknowledged. Algthough there is no specific "time" when the acknowledge comes, thus must wait for them for a specific time. According to I2C specifications the acknowledge must be stable for two times within one clock cycle. That means that you must sample the SDA 2 times and if both sample is the same then you can say that the data line become high or low. The 2 building block is called:
WAITUNTILSDAISLOW (because of hardware inversion, SDA is low when the appropriate bit is HIGH)
WAITUNTILSDAISHIGH (because of hardware inversion, SDA is high when the appropriate bit is LOW)
The general algorythm (at least according to the I2C specification) is:
must out each and every bit in the byte as follows:
q Start with the 0th bit
q Set SDA high or low according to the incoming bit (i.e. if incoming bit is high do SDAHIGH if it's low then SDALOW
q Pull clock high, i.e SCLHIGH
q To detect the acknowledge on the bit, SDAINNODELAY must be done (i.e. read the 7th bit from the status port)
q Pull clock low, i.e. SCLLOW
So the commands described above must be done 8 times (to out each and every bit)
After completion the data line must be cleared, i.e. SDALOW must be done
To read the acknowledge of the whole byte the same method can be used as described in the loop (i.e. SCLHIGH, SDAINNODELAY, SCLLOW) - This acknowledge is not used (not even read) in the current flasher implementations)
The only difference is the during write to flash no delay must be done, i.e. the appropriate functions must be used (SDALOWNODELAY, ..)
When writing a word, note that communication is done on a "Motorola" basis (big endian), i.e. first the high byte must be written and then the low byte.
To send more than one byte is not a problem actually you must send the bytes one after each other to the phone. The only difference is that during bytestream transfer (let it be input or output) the interrupts must be disabled (i.e must do a 'cli' before the start of transfer and must do a 'sti' after the last byte). Note that after enabling the interrupts WIATUNTILSDAISHIGH is issued, i.e. to wait for the acknowledge from the phone (that it accepted the byte stream).
There is no difference from the "common" version, only that you must execute the "fast" byte writer function (the one with no delay).
The general algorythm is as follows:
must out each and every bit in the byte as follows:
q The first incoming bit will be the 7th
q Pull clock high (i.e. SCLHIGH)
q Read the SDA (i.e. SDAINNODELAY)
q Pull clock low (i.e SCLLOW)
must do it 8 times
must low clock (i.e. SCLLOW)
must ackonwledge the read-in byte. If it was the last one a high bit must be sent to the device (i.e. SDAHIGH, SCLHIGH, SDAINNODELAY, SCLLOW) otherwise a low bit (i.e. SDALOW, SCLHIGH, SDAINNODELAY, SCLLOW). - Note that currently this acknowledging is not used at all in the current flasher implementation
After that both clock and data must be pulled low - Note that currently this acknowledging is not used at all in the current flasher implementation
If you wish to implement the mentioned acknowledging, please note that it is known that the communication does not "tolerate" SDAHIGHs during read.
Note: currently for safety reasons a delay is issued before reading a byte (it is actually ten times the delay used after 'out's (i.e. around 100 microsec).
When reading a word, note that communication is done on a "Motorola" basis (big endian), i.e. first comes the high byte and then the low byte.
It is quite the same as the one described for write a bytestream. I.e. must read each and every byte one after each other and must disable interrupts before and must enable interrupts after reading.
Generally the access to the flash starts with a bootstrap upload. After execution the bootstrap loader, (mostly) the phone information (like firmware version, flash ID, etc.) can be retrieved. When flash id is detected the appropriate flash loader can be selected and sent to the phone. After the execution of the flash loader, flash commands can be sent to the phone.
Generally the following is done when a "command" (let it be bootstrap upload, flash loader upload, flash commands execution) is issued to the phone:
must send the bytes connected with the command (i.e. the bootstrap loader, the flash loader or the command blocks)
must wait until SDA gets high (i.e. WAITUNTILSDAISHIGH; check Chapter 8 for explanation)
must send a zerobyte to the phone (to "execute" the command)
must wait until SDA gets low (i.e. WAITUNTILSDAISLOW , so that the command is executed)
After detecting that SDA got low we can say that the specific command has been executed.
The start of the communication is done by requesting test mode for the phone. When a Nokia is powered off but the power-on button is pressed for a very short time, test mode is issued. It means that the phone gets in a special mode, where it accepts communication modules. This is done as follows:
must pull SDA low (i.e. SDALOWNODELAY)
must wait until it surely gets low (i.e. WAITUNTILSDAISLOW)
must pull SDA high (i.e. SDAHIGHNODELAY)
must wait until it surely gets low (i.e. WAITUNTILSDAISHIGH)
If any of the two WAIT.. fails (times out) it means that:
the power-on button has not been pressed
the power on button is not working
the I2C interface is not working
After entering test mode, it must be prepared, so that it will accept commands. This is done according to this:
must pull SDA low (i.e. SDALOW)
must pull SCL low (i.e. SCLLOW)
must pull SCL high (i.e. SCLHIGH)
must pull SCL low (i.e. SCLLOW)
The last three comands are actually a clock-pulse.
After that the phone is ready for communication
Execution of the two blocks are quite the same. It is done as follows:
must send a word containing the number of bytes that are to be sent to the phone (i.e. the size of the loaders)
must wait until SDA gets low (i.e. WAITUNTILSDAISLOW)
must send the byte stream (please read Chapter 8 for information)
must execute the bootstrap (or the flash-) loader (check Chapter 12.1 for information how to do this)
The bootloader has one parameter. It is the type of the communication (what hardware will the bootstrap communicate with). It is located on the 9th byte (starting from zero). Note that you must recalculate the checksum of the bootstrap (which is the last 16 bit) if you change it. The checksum calculation is a 16 bit negative checksum).
The flashloader has three parameters. The first two is the hardware type (like 65 05) the other is the flash id. The parameterblock of the flashloader is not fixed, the flashloader points to it. You must read the word starting on the 14th (zero based) byte (don't forget to swap it after read). The parameterblock is at the offset given by this word. The first parameter ("65") is at the 1st byte of the paramblock (zero based), the second parameter ("05") is at the 4th and the flash id is located starting from the 8th byte (don't forget to make it Big Endian (swap the id) if needed). Note that you must recalculate the checksum of the flashloader (which is the last 16 bit) if you change it. The checksum calculation is a 16 bit negative checksum).
After the bootstrap is working the information from the phone can be retrieved. It is done as follows:
must execute the null command (this is mostly the one and only command the bootstrap accepts- for more information check Chapter 12.1)
Read 36 bytes
Read bytes until you get a zero (or maximum 101 bytes) - this will be the firmware version
Read 9 bytes - this will hold the flashid
Thus the size of the phoneram will be 36+9+the number of bytes your read when reading the firmware version
Wait until phone finishes settles (wait until SDA gets free (WAITUNTILSDAISLOW))
The 1st byte is always a 0x90
The last byte is always the checksum of the read in phone info (a 8 bit negative checksum, this time the result must be substracted from -1)
The flash id (32bit) starts from the last minus 8 bytes
This section deals with the (identified) commands of the flash loader. Here is the flow how to send commands to the flashloader:
send the identifer of the command
send the parameterblock of the command (-1 if there are no parameters) - note that this is a bytestream write (i.e. you must wait after the last byte until the phone settles (WAITUNTILSDAISLOW) - Note that the last byte of parameterblock is always the checksum on the parameterblock (8 bit paramblock checksum)
Must execute the command (check Chapter 12.1 for information how to do this)
If you have incoming info for the command you must read it otherwise you're finished, you can send the next command
This command has no parameterblock at all, and the goal is to finish the session.
This command has no parameterblock at all, and the goal is to read the phone information (which has the very same layout as the one we get after executing the boot loader)
This command has no parameterblock at all, and the goal is to read the status of the last write command (it can be erase as well). The returned structure is as follows:
the status byte (must 0x91 if the command is successfully executed)
a information byte, if it's other than zero a 6 byte long byteblock follows
a terminator byte
This command has the following layout of parameterblock:
a 24 bit start address (Big Endian, i.e to write 0x200000 you must store exactly, 20 00 00)
a 24 bit end address (same as above)
This command will erase the flash by the given addresses.
This command has no parameterblock at all, and the goal is to erase the whole flash.
This command has the following layout of parameterblock:
a 24 bit start address (Big Endian, i.e to write 0x200000 you must store exactly, 20 00 00)
a 0
a 24 bit count (how much shall we read - Big Endian)
After executing the command the given number of bytes shall be read from the phone. After the and of the bytestream a 16 bit word must be read as well. If it's other than 0x00FF (after swapping it) it means that there was an error during the execution of the command.
This command has the following layout of parameterblock:
a 24 bit start address (Big Endian, i.e to write 0x200000 you must store exactly, 20 00 00)
an 8 bit negative checksum on the given data (this time substracted from 0) - the "given data" means the data I wish to write to the flash
a 24 bit count (how much shall we read - Big Endian)
After executing the command the given number of bytes shall be written to the phone. After the and of the bytestream a 16 bit word must be read as well. If it's other than 0x00FF (after swapping it) it means that there was an error during the execution of the command. Please don't forget that the flash update actually sends WORDs to the phone and inverts the ACKs of the bits each an every time (i.e. get a ZERO ack on the high byte, and then a ONE ack on the low byte).
|
