Overview and Acknowledgments: |
This PCI Audio Adapter offers a new generation PCI audio solution: it utilizes the state-of-the-art CRL® 3D Audio technology(HRTF 3D positional audio), and supports Microsoft® Direct Sound ® 3D and Aureal®'s A3D® interfaces. Better yet, it supports two / four speakers and DLS based (Down Loadable Sound) wave table music synthesizer which supports the Direct Music®. Besides being legacy audio SB16® compatible and providing professional SPDIF IN/OUT non-distortion digital interface, it also supports MPU-401 interface, dual game ports, etc. What we provide at the side of the sound card are line-in/rear speaker jack, microphone jack, audio output jack, SPDIF/OUT jack, and 15pin D-SUB multiplexed joystick/MIDI connector.
Trademark Acknowledgments
Microsoft, Windows, Direct Sound 3D, and Direct Music are trademarks of Microsoft Corporation. Sound Blaster is a trademark of Creative Technology, Ltd. Aureal is a trademark of Aureal Inc. A3D is a registered trademark of Aureal Inc. All other trademarks and registered trademarks mentioned in this manual are the property of their respective holders and are hereby acknowledged.
Information in this manual is subject to change without notice.
FCC Compliance Statement
Certified to comply with the limits for a Class B computing device according to Subpart J or Part 15 of FCC rules.
Product Features: |
. Special Features
PCI Plug and Play (PnP) bus interface, 32 bit PCI bus master.
Full duplex playback and recording, built-in 16 bits CODEC.
HRTF 3D positional audio, supports both Direct Sound 3D® & A3D® interfaces, supports earphones, two and four channel speakers mode.
Support Windows 3.1 / 95 / 98 and Windows NT 4.0.
Built-in 32 OHM Earphone buffer and 3D surround.
MPU-401 Game/Midi port and legacy audio SB16 support.
Downloadable Wave Table Synthesizer, supports Direct Music®.
. Digital Audio (SPDIF IN/OUT)
Up to 24 bit stereo 44KHz sampling rate voice playback/recording.
Full duplex playback and recording, 120dB audio quality measured.
Auto detectable SPDIF/IN signal level from 0.5V to 5V.
. Stereo Mixer and FM Music Synthesizer
Stereo analog mixing from CD-Audio, Line-in
Stereo digital mixing from Voice, FM/Wave-table, Digital CD-Audio
Mono mixing from MIC and software adjustable volume
OPL3 FM synthesizer (4 operators)
Up to 15 melody sounds and 5 rhythm sounds (20 voices)
. Game and
Fully compatible with MPU-401 Midi UART and Sound Blaster Midi
mode/ Standard IBM PC joystick/game port (dual channels)
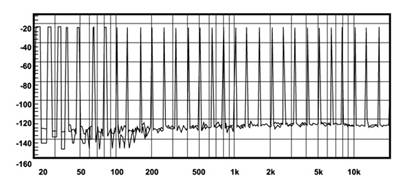
120dB audio quality in playback, recording, and bypass modes.
Connectors and Jumper setting informations
|
Connector |
Function |
|
J1 |
SPDIF/OUT signal level: ( Open: 0.5V, Short: 5V ) |
|
J4 |
SPDIF/IN Port ( 5V/0.5V signal auto detectable ) |
|
J2 |
AUX_IN Port ( Signals: L - G - G - R ) |
|
J3 |
Analog CD/IN Port ( Signals: L - G - G - R ) |
|
J5 |
Analog CD/IN Port ( Signals: G - R - G - L ) |
|
J6 |
PC Speaker_IN Port |
|
LINE_IN/REAR |
(LINE_IN) Connect with the audio output port of stereo (REAR) Connect to the rear speakers while four chennel speakers mode enabled, used as AUX LINE_OUT |
|
MIC |
Connect with the Microphone ( Mono ) |
|
LINE_OUT |
Output to speakers with the amplifier or earphones or Audio_IN of home stereo |
|
SPDIF_OUT |
Connect with Mini Disk, LD Player or AC3 Amplifier |
|
GAME/MIDI |
Connect
with Joystick or devices that use |
DOS Installation |
Before beginning the installation, please make sure that your
hard disk has sufficient space(min. 4MB). Insert the Driver CD into the
Change directory to PCI audio DOS drivers folder (ex. D:\DOSDRV) at DOS prompt, and type:
INSTALL [Enter]
Type DOS utilities path which you want to install.
Program will expand the file to the path which you've specified.
4. Install program will add initial drivers into AUTOEXEC.BAT file.
Win95/98 Installation |
We recommend that you install Microsoft Windows before you install this PCI sound card, and you not install any other sound card device drivers in your current system.
1. Power off your system, install the PCI sound card, audio cable, speaker, microphone, and insert driver CD into the CD-ROM drive
2. Turn on the computer, and enter the Microsoft Windows 95 / 98.
3. You will see a windows prompt like this:
"New Hardware Found
CMI8338 Audio Adapter ( PCI Multimedia Audio Device )
Windows has found new hardware and is installing the software for it", then the dialog box shown.
4. Select "Driver form disk provided by hardware manufacturer", click "OK".
When system requests for CMI8338/C3DX PCI Audio drivers disk, please make sure the drive and path are pointed to the place where the installation driver is in, and then click "OK".
Now, system is installing device drivers automatically. After a while, the system will finish the installation includs the following device drivers.
CMI8338/C3DX PCI Audio Device
CMI8338/C3DX PCI Audio Joystick Device
CMI8338/C3DX PCI Audio Legacy Device
DOS mode MPU-401 Emulator
8. Click "start" key
9. Select "Run"
10. Key in the drive and path for Windows application installation program, for example, "D:\W95-98\APP\SETUP.EXE"
Click "OK" to start the installation procedure, and follow the on-screen instructions to finish the installation. When all the application softwares have been installed, please shut down Windows 95/98 system, and reboot your system.
Win95/98 Un-installation |
If you install Win95/98 and a sound card at the same time, you might experience some technical difficulties(the device might not function properly). It is suggested that you proceed with the un-install procedure:
Click "start" button.
Select "run" item.
Find UINSTDRV.EXE in driver disk under Win95/98 drivers folder.
Run it.
5. Follow the on-screen instructions to re-install the hardware.
If you want to completely remove the drivers, you can also run the un-install procedure as described previously. Remove the sound card from the slot, and then reboot the system.
Windows NT 4.0 Installation |
We recommend that you install Windows NT 4.0 before you install this PCI audio card, and you not install any other sound card device drivers in your current system.
1. Click "Start" button, move the highlight bar to "Setting" item, and select the "Control Panel".
2. Double-click "Multimedia" icon.
3. Select "Devices" page, and press "Add" button.
4. Select "Unlisted or Updated Driver" item in "List of Drivers".
5. Specify the drive and the path where NT drivers are in (such as D:\NT40\DRV).
6. Select "C-Media CM8338" item and press "OK" button.
7. Select proper I/O value.
8. Press "OK" button.
9. Restart the system when being asked.
Now, you have already installed the PCI Audio Adapter under Microsoft Windows NT 4.0 successfully. if you want to install the Windows applications, continue the following steps:
Click "start" key.
Select "Run" item.
Key in drive and path for Windows NT application installation program, for example, "D:\NT40\APP\SETUP.EXE"
Click "OK" to start the installation procedure, and follow the on-screen instructions to finish the installation. When all of application softwares have been installed, shut down the Windows NT system, and then reboot your system.
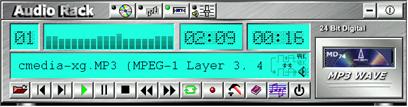
Windows Appc. (The Audio Rack) |
By means of a user-friendly interface(as easy as operating your home stereo system), this PCI audio rack provides you with the control over your PC's audio functions, including the advantage of four speakers mode enable/ disable, and perfect digital sound ( SPDIF ) input / output control.
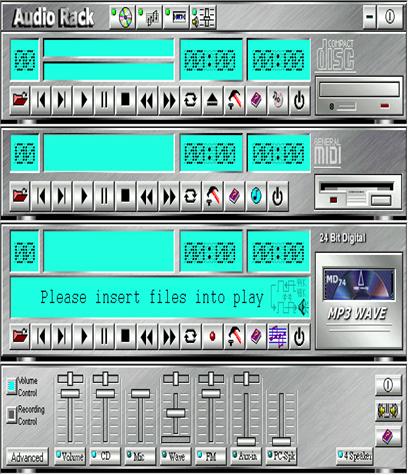
This Audio Rack consists of several major components:
![]()
MIDI Player: Plays
Wave Player: Records and plays digital audio (wave) files. Allows you to create wave file playlists, and playback the wave files.
CD Player: Plays standard audio CDs. Allows you to create your favorite song playlists.
System Mixer: Controls the volume level of your audio inputs and outputs.
Showing or Hiding Audio Rack Components
To
remove or add a component from the display, click on the component's button on
the
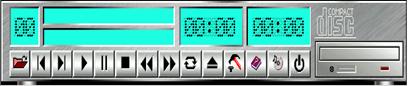
CD Player (above, similar to MP3/Wave Player
and
Sel (or Trk) field: If you have multiple selections in your playlist, this shows the number of the current selection or CD track.
Current File or Track: The name of the current
Total Length field: displays the total length of files or tracks in minutes and seconds.
Current Time field: displays the current time of files or tracks in minutes and seconds when playback or recording.
Please refer to the help screen for more detail button function
descriptions. (click on help "![]() "
button on the player)
"
button on the player)
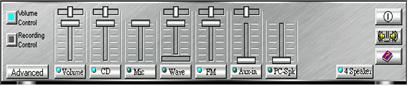
System Mixer allows you to control all the audio output and input levels.
System Mixer displays the volume controls which your audio drivers make available. The names for these controls may vary.
 Mixer
panel while the four speakers mode is enabled.
Mixer
panel while the four speakers mode is enabled.
 Mixer
panel while the four speakers mode is disabled.
Mixer
panel while the four speakers mode is disabled.
Volume Control: Clicking on this button shows and allows you to use the output level controls.
Recording Control: Clicking on this button shows and allows you use the input level controls.

Input and Output Level Sliders and Buttons: For each input or output signal type, the control slider controls the loudness whereas the horizontal slider controls the balance between the two speakers. The mute button temporarily stops input or output without changing slider positions.
Control types and names might vary. The common types are listed below:
Vol: The master control for all outputs. The strength of an output signal is determined by both the Vol slider and the slider for the individual output. To affect all outputs, move the Vol slider. To change the output of an individual output type, move its slider.
Line-in/Rear: Controls the audio hardware's Line In or Line Out levels. Line levels might be for an externally attached cassette player, for instance, while the four speakers mode is enabled, this control becomes the Rear speaker volume control.
Mic: Controls the microphone input level.
Wave: Controls wave (voice) playback or the recording levels.
FM: Controls the FM music playback or the recording level.
Aux-in: Controls the Aux-in music play or the recording level.
PC-SPK: Controls the external PC speaker input level.
CD: Controls the CD drive output level, for CD drives configured to play their audio output through the PC's audio hardware.
4SPK: Turn on or turn off the Rear speakers effect.
Surround: Turn on or turn off the 3D surround sound effect.
SPDIF-in: Turn on or turn off the SPDIF digital signal input.
Advanced: Check the SPDIF status, HRTF 3D sound CPU Utilization, turn on th Microphone Booster.

Mute Buttons: Toggle between muting and enabling the signal. A button with a lit LED is enabled, and when it is not lit, it means it is mute. Several output signals can usually be enabled at once.
MP3 player can play both wave files and MP3 files.
MP3 player while the loop function enables.
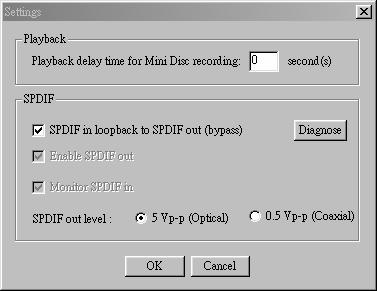
The settings' window while one of the SPDIF functions is enable.
The 4 Speakers System |
This Audio Adapter provides 2 wave channels(front/rear), known as the 4 speakers system. When games or application programs via DirectSound® 3D or A3D® interface locate the sound sources to the listener's back, the two rear speakers will work to enhance the rear audio positional effect, so as to complement the insufficiency of using only two front speakers to emulate the
audio effect. The following is the hardware installation and the software setups:
The speaker installation.
Connect the front pair speakers to the Line-out jack of the audio adapter, and then connect rear pair speakers to Line-in/Rear jack of the audio adapter. The original Line-in can be moved to Aux-in.
The positions of the speakers
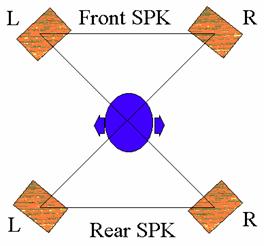
Put your speakers the way the following picture suggests, so as to avail yourself
to the best audio result.
The mixer setup
There is a 4 speakers option in the volume control of the mixer, and when you enable this option, it means the rear speakers are connected to Line-in/Rear jack. When Line-in/Rear jack is connected to other external Line-in sources, please DO NOT enable this option in order to avoid hardware conflicts. Regarding rear speaker option, you can turn on or turn off the output of the back speakers, and adjust the volume, to have the rear/front speakers have the same volume.
The demo
Execute the "Helicopter" demo within the C3D HRTF Positional Audio Demos of this audio adapter. When the helicopter flies behind you, the rear speakers will work.
|
