|
|
|
|
What You Must Know About Shelving |
|
|
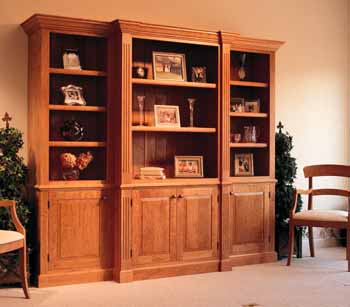
Learn the simple but important rules to building sturdy shelves. Building
shelves for muddy boots or a Chippendale secretary seems deceptively simple.
First you install a horizontal surface between two sides. Then you load up
your newly built shelf with Then one day you decide to put encyclopedias on your shelf after you grow weary of the kitties. The shelf sags. The books don't fit under the shelf above, and the books' spines hang over the front edge. And you wish you 12412i822m had used a more rigid material and some sort of adjustable shelf pins so you could change your shelves to fit your needs. Shelves, as you might have guessed, are not as simple as they appear. That's not to say they're hard to build. It's just that there's a whole set of rules to properly design bookshelves or display shelves that ensures they will hold a wide variety of common objects. This shelving unit is the perfect tutorial for etching these rules on your brain. You'll see how I followed the rules to design this project, and you'll get a down-and-dirty lesson in how to build shelving units that are quick, easy, rock solid and good-looking. First, here are a couple rules of thumb when you're putting your design on paper. It's accepted practice to build your cabinets in 3" increments. For example, the side units are 24" wide. If I wanted to make them wider, I'd jump to 27" wide, then 30". Another rule of thumb is that whenever a cabinet gets 42" wide, it needs a vertical support in the center. My cabinets are less than that, so that was no problem for me. Where to Begin: Face First This large wall unit is essentially six plywood boxes with solid wood face frames on front. The part of the back that is visible behind the shelves is solid wood. The back behind the doors is plywood. When building shelves, it's tempting to begin with the case because it goes together really fast. Resist this temptation. Begin your project by building your solid wood face frames. Your entire project is based off your face frame, so if you've got a problem with your design (or how you milled your parts) you're most likely to find out about it when you build the face frame. And I'd rather throw away a skinny piece of solid wood than a sheet of ply. I make my face frames using ¾" material (which is the standard) and mortise-and-tenon construction. First I cut my tenons on the rails, then I use those to lay out my mortises on my stiles. When working with ¾" material, I always make my tenons 3/8" thick and 1" long. Usually I'll cut a ½" shoulder on the width of the tenon, but if the stock is narrow (less than 3") I'll use a ¼" shoulder. I cut my tenons on my table saw using a dado stack. Now lay out your mortises using your tenons. Cut your mortises (I use a hollow chisel mortiser) about 11/16" deep so your tenon won't bottom out in the mortise. Put glue in the mortises, clamp and set your face frames aside. Plywood Boxes Make the cases out of ¾" plywood. Cut ¾" x ¼"-deep dadoes on the sides to hold the bottom pieces. These should be flush to the top edge of the bottom rail. Cut ¾" x ¼" rabbets in the top edge of the side pieces to hold the top. This is also the time to cut the grooves in the sides of the center cabinet to line up all three cases. Read "Another Face Frame Trick" on a previous page for details. Now cut rabbets on the sides to hold the back. The size of the rabbet is determined by whether it's a plywood back or a solid back. Now drill your adjustable shelf holes. I use a commercial jig, but you can make a template yourself from plywood. I drill my holes every 1" or 2" on center, which will allow a lot of adjustment. (The standard is to drill them every 2" on center or less and within 6" of the top and bottom of the cabinet.) For years I used shelf pins that required ¼" holes. Then I switched to metric 5 mm because they're less conspicuous. Now sand the inside of your case pieces with 180 grit sandpaper to knock off the fuzz and splinters. Be careful not to cut through the veneer face. Go ahead and put your cases together. Put glue in the dadoes and rabbets and nail through the outside of the cases into the top and bottom. Putty the nail holes. You don't need to clamp the case. Now attach your face frames using glue and nails. Trim the face frames flush (see "Perfectly Flush Face Frames" on a previous page) and putty your nail holes. Now sand your face frames. I begin with 100 grit, then 120, 150 and finally 180. Sand the outside of the plywood case beginning with 120 grit and work up to 180. If you're going to add columns to your center case, cut the details using a fluting bit in your router and attach the columns to your face frame with glue. Finally, screw all the top units together and then screw all the bottom units together. Then turn your attention to the moulding. Many Mouldings There are five types of moulding: . The crown mould. Buy it pre-made from a hardwood supplier. . The ½" cap on top of the crown mould. This is simply square stock with a 3/8" roundover cut on one edge. . The waist mould. This covers the seams between the upper and lower units. You can buy stuff like this off the rack, or you can make it. First cut your stock to size. Then use a beading bit to cut the center bead. Then use a ½" cove cutter in your router to cut the coves on the top and bottom. Be wary that as you make the second cove cut the moulding won't be as steady. . The base mould. This is flat stock with a ½" cove cut on one edge. . Shelf moulding. This goes on the front edge of the plywood shelves (which you'll make later). I used a rail and stile bit to make this mould in two passes. You also could use a Roman ogee bit and get the same effect. Cut a shallow rabbet on the back as shown in the photo at right. Hand sand all your moulding before applying it. Attach the moulding with glue and nails. Start from the center and work out. One word about the waist mould. Position it so it sticks up ½" above the lower case (see photo at right) and nail it to the lower case. Doors Build the doors the same way you built the face frames with one exception. You'll need to cut a 3/8" x 3/8" groove on the rails and stiles for the solid wood panel. That also means you'll need to cut haunches on your tenons to fit into the grooves. With raised panels I allow a 1/8" gap on each side so the panel can expand and contract in the groove. To "raise" the panel, first cut the approximate angle on the panel's edge using your table saw. Then use an 8-degree raised panel cutter in your router to raise the panel. This way you'll only need to make one pass on your router table. Sand the panel, assemble the doors, then sand the rest of the door. Peg the tenons, cut the pegs 1/16" proud and sand them smooth but not flush to the doors. Attach the pulls and fit your doors so there's a 1/16" gap all around. I use Amerock adjustable non-mortise hinges. These hinges are pricey (about $3 each) but they are worth every penny because they are simple to install and are adjustable. See the Supplies box at the end of the story for details. Back and Shelves I used a shiplapped and beaded ½"-thick back on the top part of the case, and a plywood back on the lower section. Cut your ¼" x ½" shiplaps, then cut the bead on the edge using a ¼" beading bit in your router. Fit the back, being sure to leave space for seasonal expansion and contraction. Don't nail the back in place until after finishing. Cut your shelves from plywood. Nail the moulding to it. Sand the shelves. Finishing I used a clear finish on this piece, sanding between coats with 3M sanding sponges (fine grit). Nothing gets into moulding and raised panels better. When everything's dry, nail your back pieces in place and hang your doors. |
Drill your shelf pin holes before you assemble your case. I like to put mine on 1" or 2" centers. Depending on what you're going to put on your shelves, you might not need that many holes.
Get a friend to help you stack the cases on top of one another.
Then use spring clamps at the back to hold everything together as you screw the upper cabinets together and the lower cabinets together. Be sure to screw right behind the face frame so the screw is less visible.
Attach the waist mould using nails. Nail it to the lower case and allow the top edge to cover the seam between the upper and lower cases.
Here you can see what the shelf moulding looks like close up. Nail and glue the moulding to your plywood shelves. |
|