Here is a list of ZX12R modifications to
Gain 13-17 hp for 170 RWHP with the "stock exhaust".
Note: these modifications are Not EPA legal. They may also void your factory warranty! This is at your own risk, so read this whole page before you decide to do these modifications. You should also be familiar with working on your own bike or cars, if you are going to do these modifications yourself. If you are not totally comfortable doing it yourself have a bike shop (not the dealer!) do it for you. Remember this is at your own risk! Have fun!
1. Removing the Catalytic converter.
2. Modifying the stock CAN.
3. Removing the Clean Air System.
4. Modifying the Air Filters.
5. Advancing the Ignition Timing.
6. Setting the TPS.
7. Fitch Fuel catalyst.
Some stuff you will need:
10 feet of .020 stainless safety wire.
5mm x .8mm x 12mm socket head cap screw
4" of 3/8" fuel line
beveled wooden plug about 5/8" dia
rubber cement
drill with 1/2" chuck
1/16" drill bit
5/8" drill bit
chisel
1/8" rat tail file
flat file
#25 Tamper Proof Torx bit
basic hand tools
1. Removing the Catalytic converter.
(1-2 hp at revlimiter)
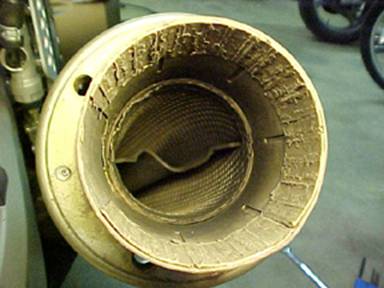
1) Remove the stock exhaust can and set it aside for later. You will see the catalyst in the end of the mid pipe.
2) Take a hammer and chisel and start driving it into the catalyst about 2-3 inches in. Wiggle and pry it each time you drive it into the catalyst element. After several times you will see that its not very strong. Start chiseling around the edges and working it away from the edge of the pipe. Take out the big pieces as you go. After you get all of the big pieces out use pliers and pull off the remaining pieces of element stuck to the midpipe. (SEE PICTURE)
3) Aim the exhaust towards an open garage door. Or better yet do this outside. Start the bike and blow out the crap that fell into the pipe. You don't need to go to redline. Just several quick blasts to 6 grand will do fine. The neighbors will love you for this.
2. Modifying the stock CAN.
(6-8 hp at revlimiter 2-3 at peak hp when done with the Airfilter mod)
1) Look inside
the inlet of the can and you will see a perforated titanium plate. Get a STRONG
drill with a 1/2" chuck and a long (six inch) 5/8" drill bit, and
drill 4 holes above the resonator tube right to gather in a circle pattern.
(SEE PICTURE) That's the tube that is about 1.75" dia. just under the
perforated titanium plate. These holes are for lower deeper sound mostly. Remove the hanging sharp pieces if titanium
mesh between the drilled holes.
This is looking into the inlet of the can, the flashlight is shining in the outlet.
You can see the light shining thru the outlet pipe.

2) Take a
flashlight and aim it in the OUTLET of the can and look into the INLET of the
can. You will see the light come through two or three 5/8" dia holes in
the plate below the perforated titanium mesh. You need to add five or six
5/8" holes through the perforated titanium mesh AND that titanium plate.
PLAN a pattern before you drill the first hole so you can drill as many as
possible in that area and not drill into each other. This is to reduce can back
pressure and gives the engine a few more peak hp but more importantly several
more hp at redline past peak.
5) Shake out the can good and put it back on.
3. Removing the Clean Air System.
(1-3 hp)
1) Look above the cam cover and you will see a large valve with 3 large and 1 small hose going to it. Remove that valve assy. Its just held in by the hoses so tug it out of there. But leave the elbows going into the cam cover.
2) Plug the small vacuum line that goes to the throttle body's that used to go to the valve.
3) Take a 3" or so piece of 3/8" fuel line and use it to connect the two elbows on the cam cover. Make them point towards each other.
4) Buy or make a beveled plug out of wood to plug the hole going into the airbox/frame where one of the large hoses went. Make sure it cant push all the way through into the airbox. This is very important. You don't want anything going into the airbox and getting caught in the throttle bodies!! When you have tested the plug so you know it fits good and tight, with out being able to push through into the airbox/frame then put a small amount of rubber cement around it to make sure it stays put. Remember it should not be able to fit all the way through anyway!! The only thing that can happen then, is it falls out. That's what the glue will stop. Now read this part #4 again!
4. Modifying the Air Filters.
(6-8 hp at revlimiter 2-3 at peak hp when done with the CAN mod)
NOTE: you must safety wire the filters if you remove the screens from them or the foam will balloon out when the engine draws a lot of air. This could rupture the foam and render the filter useless. Also the pieces could enter the intakes!
1) Remove the screens from the stock airfilters by GENTLY pushing on the screen around the edges. You will see it start to pull free and separate from the plastic in some areas, once it starts to separate STOP pushing. Grab the edge of the screen and bend it back then tear it like tearing a rag with a swift motion.
2) Clip all small stubs of wire and the wire strands that remained behind. Finger nail clippers work well here.
Time to safety wire the filters.
3) Drill 9 holes
1/16" dia. on each side of the plastic beveled frame, on the SCREEN side,
aprox. 1/2" apart. (SEE PICTURE) Be
careful not to tear the black foam when the drill bit goes through the plastic
frame) Drill on the bevel above the glued
foam.
4) Cut off 5 feet of .020 stainless safety wire and run it threw the center 2
most holes on each side and then run it back and forth threw all the holes.
(don't pinch the yellow edge foam, with the wire.
5) Take the two ends and run them diagonally back to each other wrapping them
LOOSELY to the center of the center most wire.
6) Tighten the wires by plucking them a little and working them so there's no
slack and gently tug on the ends.
7)Twist the wire ends several revolutions to lock them to the center of the
center wire, right in the middle of the airfilter. (safety wiring pliers work
best, or needle nose)
8) Clip the safety wire ends off so there's 1/4" of twisted wire. Then
bend the clipped end in towards the element so it wont catch the frame when
putting the airfilter back in the frame.
The AIRFILTER

You can have www.themotorhead.com modify yours by replacing the factory elements with foam if you don't want to do this mod yourself.
5. Advancing the Ignition Timing.
(6-8 hp at all rpms, driveability, mileage)
1) Remove the RH fairing half and the RH engine cover.
2) Stuff a rag in the case to block any passages into the crank case.
3) Un bolt the Ignition Pick-up Coil from the bike, the pickup is the black device with the 2 wires going to it. And disconnect the electrical connector.
4) You will notice that the mount for the pickup has 2 built-in "dowels" on the backside. These need to be filed or ground off flat. You are going to move the pickup coil CCW or UP from its old position. So carefully elongate the bolt holes with a rat tail file or a dremmel tool or have Eastern Cycle Performance (203-756-7019) www.easterncycleperf.com do it for you. They will turn it around in one day and its less than $30 to have them do it, nice. Remember to elongate the holes in the correct direction so as to allow you to be able to push the pickup coil "UP" when installed on the engine. Elongate the slot and leave about .032 wall to the edge of the black plastic portion on the metal base in which it is mounted. Slot the other end the approximate same amount. Now clean off ALL the metal chips and filings. Its a magnetic coil so they stick to it. After you clean it off nice. Clean it one more time!! You will notice, the factory screw will interfere and hit the black coil housing and limit the amount of travel that you now have for adjustability. Go to a metric hardware supplier and buy a 5mm x .8mm x 12mm socket head cap screw or allen bolt and use it on the top mounting hole. If you want to be conservative just move the coil up a small amount. For the best performance move it all the way up.
5) Set the rotor to coil clearance. That's a measurement between the tooth of the ignition rotor and the pickup coil. It should be about .015"-.020" You may have to "bump" the engine over a little with the starter to get a tooth aimed at the coil for measurement. Bump the engine over before bolting up the coil. And leave the coil connector unplugged, the engine wont start without the coil plugged in. Once the coil is moved up and the rotor to coil clearance is set, REMOVE THE RAG, and put the side cover back on along with the RH fairing half.
6. Setting the TPS. (Driveability)
This mod should be done after the timing and other mods because it will effect this setting.
#25 Tamper Proof Torx bit (with center hole) needed.
Theres 2 ways to adjust the TPS.
The first way is dynamicaly with the bike running.
Adjusting the TPS this way you dont need a digital volt meter.
Each bike is slightly different and this may be a way to adjust for those differences without relying on a set voltage or movement amount.
1- Warm up bike until the
fan is starting to cycle, engine hot.
2- Loosen TPS adjustment screws.
3- Raise idle to 2000 rpm with idle adjustment screw.
4- Move TPS until highest idle speed above 2000 rpm is achieved.
5-Tighten down screws and readjust idle to 1000 rpm.
The second way is using a digital volt meter.
1)Take two 2" pieces of a strong THIN wire(I use .020 stainless safety wire) and backprobe the terminals on the TPS connector. Slide the thin probe wire between the rubber seal and the TPS wire. This will not damage the wires or connectors at all. Go across the Yellow/White and Brown/Black wires with a DIGITAL volt ohm meter, set to DC volts.
2)Turn the ignition on and tap the TPS with your finger CCW till it gets to the desired reading of 1.16 vdc. Dont ever use an analog volt meter when dealing with any computerized cars bikes whatever. (analog meters are the ones with a sweeping needle indicator)
You can always return the TPS to the stock 1.084vdc - 1.086vdc setting if the change is not an improvement in drivability.
The TPS: 
7. Fitch Fuel catalyst. (2-3 hp, driveability, higher mileage.)
This is the easiest one of all. Just drop them in the tank. This mod isn't free but it is more HP per dollar that a header. And it can go from bike to bike with you. Driveability is smoother and gas mileage goes up. www.fitchfuelcatalyst.com
Your end results will vary depending on where your cam timing is and how much power you DIDN'T have when you started.
It seems that there can be a several HP margin between one bike and another.
The best part is, you can put a pipe on before or after doing these mods and you will still get good gains from them.
Good luck!
|
