ALTE DOCUMENTE
|
|||
![]() Creating
Reports
Creating
Reports
After you and your students add information to the Shipwrecks database, you may want your students to report on some aspect of the data they've collected. Reports let you customize the display of information from the database. You can select the data you want to include-for example, a particular query-and then select the report layout from a variety of design and 141d316b format options. You can insert pictures; add headers, footers, and page numbers; group the information; and change the background colors, among other things.
You can create different types of reports quickly by using wizards. For example, the Label Wizard creates mailing labels, the Chart Wizard creates charts, and the Report Wizard creates a standard report. For your first report, use the Report Wizard. The Report Wizard asks you a series of questions to help you design the data exactly as you want. After you create the report, you can open it in Design view to modify its structure.
To create a report
This procedure is the quickest way to access the Report
Wizard. To see the other report options, follow step 1. Then, on the database
window toolbar, click the New
button.
In the Shipwrecks database window, under Objects,
click Reports.

Double-click Create report by using wizard.
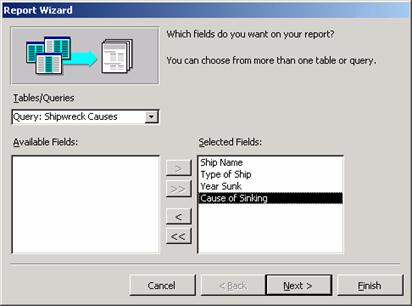
In the Tables/Queries list box, click the table or query from which you want to generate a report. For example, select the Shipwreck Causes query from the list.
Select the fields that you want your report to include. To base the table on the full Shipwreck Causes query, select all the fields by clicking the double forward arrow. Click Next.
Note If you want to include fields from multiple tables and queries in your report, don't click Next after selecting the fields from the first table or query in the Report Wizard. Repeat the steps to select a table or query, and pick fields that you want to include in the report, until you have selected all the required fields.
Create a hierarchy for the records, if appropriate, and then click Next.
Select a sort order for the fields. For the Shipwrecks database, a logical way to order records is alphabetically by ship name. To do this, in the first list box, click Ship Name (the Ascending button is selected by default). Click Next.
Click the option buttons to view the different options for the layout and orientation of your report. Decide which ones you want, and then click Next.
In the list, click the style that you want for the report, and then click Next.
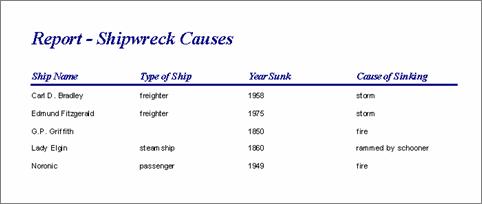
Type a title for the report, click Preview the report, and then click Finish.
The report window opens in Print Preview. To modify the design-for example, to add a picture-switch to Design view.
|
