ALTE DOCUMENTE
|
||||||||
ActiveX Servers
In this chapter, you'll get an in-depth look at the different types of ActiveX servers, including embeddable servers and automation servers. Included are three distinct examples, which I spent quite a bit of time working on to give you a good understanding of the concepts I'm going to discuss.
After finishing this chapter, you should have a clear understanding of the purpose of each type of ActiveX server as well as a good base for building your own. Hopefully, some of you might even decide to enhance and extend the OpenGL server example I've included.
For those of you looking for some tips and tricks, check out the GLServer example. This little gem is embeddable and returns a bitmap to the container through the metafile device context.
This chapter discusses the three types of ActiveX servers.
First is the full servernot that great a term because it might lead you to believe that it is a fully functional ActiveX server. In fact, it's not. Rather, a full server means that the server is both an ActiveX server and a fully functioning application. For example, in Microsoft Word you can run the application (as I am doing while writing these words), create a document or brochure, and then save the contents to a .DOC file. Or, you can open an application such as WordPad and actually include content that you've created using Microsoft Word.
The second type of server is the opposite of a full server and is also poorly named. It's called a mini-server. What this really means is that the server can be used only to include content into another application. As an example, Microsoft Word comes with a whole myriad of applets that can help you produce professional-looking documents. One of these is called Microsoft WordArt. If you attempt to run the WordArt program, you'll get a message telling you that the application can be run only when launched from inside another application.
Now we'll veer off
in a totally different direction and talk about the third type of server. This
is where things get a bit confusing for some folks. The third type of
serverautomationdoesn't act or appear to be anything like the full server or
mini-server 141c27b . In fact, you can't include content in an application with it.
Instead, this type of server exposes special objects, methods, and properties
to enable you to tell it what to do. For example, suppose I wanted to take a mail-merge
document that I created in Microsoft Word and merge it with a mailing list
stored in a Microsoft Access database. Sure, I could open up Microsoft Word and
select the mail-merge menu item (along with about half a dozen other steps) and
manually achieve my goal. Or, I could write an application in Visual Basic (or
any other language that supports automation) and remotely control Microsoft
Word. That way, for instance, the program could be set up in such a way that it
runs every day at
There are two flavors of automation servers: in-process and out-of-process servers.
In a nutshell, an in-process server is created from a class stored in a DLL, which is loaded and runs in the same process space as the application that created it. All instances share the same code; however, each has its own independent data area.
An out-of-process server runs in its own address space. This type of server is built as an EXE application (such as for Microsoft Word and Excel) and can either manage multiple instances or launch a new copy of the EXE each time a server object is created.
Okay, I know, it's a lot to grasp right now. Don't worry though, because by the time you get through this chapter I'm sure you'll have a much better grasp of how these different types of servers work. And believe me, with the direction the industry is moving, the most important of these three types of servers will undoubtedly be the ActiveX automation servers.
Traditionally, when we refer to the term client/server, we are talking about an application that runs on a PC and connects to a database running on a server somewhere. This is fine for small- to medium-sized businesses with anywhere from 5 to 50 users. However, it really becomes a hassle when you've got 500 or more users. Every time a fix is made to an existing application, you need to distribute the new application to every desktop and ensure it gets properly installed. This process is both time consuming and costly as far as ensuring software and component compatibility on all desktops.
What about Internet and intranet applications? These need to be browser-based applications, but if you attempt to furnish thousands of users with simple CGI scripts, you end up spending a lot of time making sure that you're not getting deadlocks on files or databases.
|
NOTE |
|
So, how do we handle large numbers of users? The term scalability is used to refer to the process of increasing the number of users from one user to hundreds of thousands of users. |
To date, Microsoft has been pushing OLE and ActiveX technologies (which are really synonymous terms), including something called remote automation. Basically, remote automation permits an application running on PC 1 to connect to and create automation objects on PC 2. What is most significant about this is not the fact that you can now do distributed development without requiring in-depth knowledge of TCP/IP or NetBEUI, but rather that you're getting a glimpse of the world of three-tier development using Microsoft products.
The big problem with remote automation is that it doesn't have any security, it doesn't have a server to manage resources or database connections, and it was never designed to be used with the Internet or intranets.
Microsoft later released distributed COM (DCOM), which improves on the distributed aspect of COM objects, including support for Internet and intranet applications, but doesn't really address security issues or resources.
So, Microsoft announced the availability of the Microsoft Transaction Server (MTS). Not only does it address all of the problems mentioned earlier, it also supports transaction processing. Basically, you can now design ActiveX automation servers as small, simple components that don't need to know anything about the outside world.
Let's look at an example of how MTS could be useful. Given a bank account number, you could build two automation servers: one that performs a debit and a second that performs a credit. Now, all you need to do is tell MTS about these two components (ingrain that word components into your brain) by installing them on the server that is running MTS instead of on the client workstation.
You now need to do little more than write a small applet that attaches to the MTS server, starts a transaction, calls the debit component, calls the credit component, and completes the transaction. It is now MTS's responsibility to commit the processing steps these two components performed. If either one fails, MTS will automatically roll back the transaction.
I know this seems weird. I had quite a bit of trouble understanding it myself when I was first introduced to the idea. MTS performs a series of component-based transactions. We're used to doing this at the SQL level, which isn't required anymore. MTS is smart enough to provide a complete transaction handler using something called MSDTC.
That's all I'm going to say about MTS. I just wanted to give you something to think about. After all, this is a chapter on ActiveX servers. Watch carefullyin the next couple of years you're going to see a lot more of MTS.
The point is, we're moving away from the client/server (two-tier) way of thinking. Instead, we're moving to a three-tiered model, wherein the client application is very thin (commonly called a thin client), because it has only minimal functionality to call these automation servers and display results for the user (which can be done by a thin-client application or through a Web browser). The second tier is where the bulk of the work is done. It's an application server with hundreds, even thousands, of these tiny components installed. The third tier is the database tier.
Before we get into the meat and potatoes of actually coding some of these servers, it's important to understand at least a few of the reasons why Microsoft has released a set of templates for developing ActiveX components (which includes automation servers, full and mini-servers, containers, and controls).
MFC is a great class hierarchy, but it can get somewhat bulky at times. This is especially true when you're creating small ActiveX components that you want to display on your Web site.
It's a real annoyance spending 20 minutes downloading support DLLs that don't need to be there. If you decide to statically link an MFC control or component, the end result is a very large DLL, EXE, or OCX.
So, after much debate, it was decided that a newer, leaner API (which really isn't the correct term for it, but I like to call it that) was released with Microsoft Visual C++ 4.2 and called the Active Template Libraries (ATL).
Now, for those of you who have ever done any programming with standard templates, you'll appreciate the beauty of this API (there I go again). It's a great solution for creating tight DLL or EXE components because it doesn't make use of MFC at all (unless you specially include it).
The drawbacks to ATL are there aren't a lot of people out there who can answer questions about it, and there aren't a lot of examples to help you along the way. A friend of mine is trying to implement licensing using ATL and has found it quite difficult and confusing. Also, you can't use the Class Wizard to develop your application, so you're on your own. Luckily, though, you do get an ATL COM Wizard and a couple dialogs for adding classes, methods, and properties.
It's up to you to decide which way to go, but I strongly recommend that you at least consider ATL because it has many good pointssuch as the ease involved in creating your automation servers.
To demonstrate the building of an embeddable server, we will be implementing a fairly simple server but with a slight twist. Most books I've read about ActiveX servers choose to embed silly phrases like HELLO WORLD and such. I decided to approach things a little differently. Instead, we'll design a simple OpenGL-embedding server that embeds a three-dimensional, square-shaped object into the container.
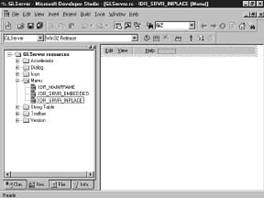
Begin by selecting File | New from the Developer Studio menu and taking a quick peek at the list of projects you can create. (See Figure 14.1.)
Of particular interest to us are the three types of projects we're going to build:
The first project will be an ActiveX mini-server, which we will build as an EXE application. To begin, choose MFC AppWizard (EXE) and, in the Project Name: edit box, type GLServer.
Figure 14.1. List of Project AppWizards
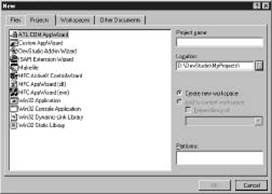
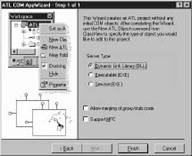
Figure 14.2 shows the first step in creating a mini-server. For our example, we'll create an SDI application.
Figure 14.2. AppWizard: Step 1 of 6
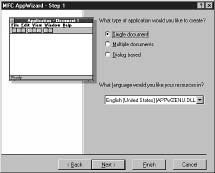
Here, we have the option of including database support, but we'll simply choose None for our example.
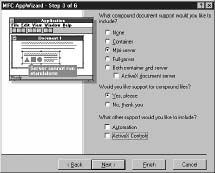
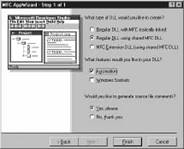
Now things get a little more interesting. Figure 14.3 shows the required parameters. You won't require automation, because you'll tackle that in the MFCAuto example later.
You might be wondering about compound files. Basically, they give you the ability to update separate sections of the document when sending visual representation of your data back to the container. GLServer will always repaint the entire window, so you don't really need this supportbut leave it set to Yes anyway.
You also don't need support for ActiveX controls. On the other hand, this could be desirable for a full server to enhance the appearance of the application and provide more functionality to the user.
Figure 14.3. AppWizard: Step 3 of 6
The only thing to change here is to uncheck the Printing and Print Preview option. Because a mini-server needs to support printing itself, this is usually left up to the container application.
Don't change any options in step 5. It is better to use MFC in a DLL rather than to statically link the libraries, because it makes the application much larger and wastes disk space.
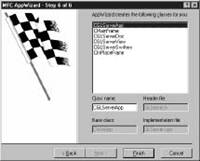
You've reached the final step in the wizard. Notice that there are a couple of new classes that you might or might not have seen before (see Figure 14.4), specifically CInPlaceFrame and CGLServerSrvrItem. These new classes are required to provide functionality for the server.
Also, note the base class for CGLServerDoc; it's no longer CDocument but rather COleServerDoc (which is a subclass of CDocument).
Figure 14.4. AppWizard: Step 6 of 6
Now let's open up the GLServer project in the workspace window and take a closer look at the classes AppWizard generated.
Notice that in the declaration section for CGLServerApp a few things are slightly different.
A special constant is now being used for multiple inclusion detection. It includes the name of the server along with its unique CLSID.
More important, notice the addition of a new variable. (See Listing 14.1.)
Listing 14.1. The new data member for CGLServerApp.
// ImplementationThis is probably the most important object that your project will create. This object is the basis for in-place editing/activation (which will be explained in detail in the section 'CInPlaceFrame') and provides the functionality used by full servers, mini-servers, and automation servers.
Now let's take a look at the implementation of the CGLServerApp class.
Listing 14.2 looks at the CLSID, or ClassID. When the class is registered with the Windows 95/NT registry, the value is used to uniquely identify this class from other COM classes.
Listing 14.2. The CLSID source for this application.
The InitInstance() method shown in Listing 14.3 is really the only new method so far. The first thing to note is that we call AfxOleInit() to initialize the OLE libraries.
The document template is the same as before except that the CGLServerDoc class is now derived from COleServerDoc instead of CDocument.
Notice the call to SetServerInfo(), which lets the framework know what type of activation is available when the user requests to edit the data. Our server will provide in-place activation.
Lastly, notice that we check to see if we are in embedding mode, and if so we call RegisterAll(), which actually creates the object that the container will use. Notice also that we do not support stand-alone execution. (Remember, this is a mini-server that must be embedded into a container application.) If the user attempts to start the application stand-alone, a message box explains that the application must be launched by inserting an object into a container.
Listing 14.3. The source code for CGLServerApp::InitInstance.
BOOL CGLServerApp::InitInstance()The COleServerDoc document class is the heart of the embeddable server and is ready to roll without any modifications. (You'll want to add some customization to make it useful.)
Although not necessary for our particular application, to enable compound files for storage and data display, we simply call the EnableCompoundFile() method during the construction of this document.
Listing 14.4. The CGLServerDoc constructor.
CGLServerDoc::CGLServerDoc()The OnGetEmbeddedItem() notification is called by the class factory to create a new CGLServerSrvrItem item. (See Listing 14.5.)
Also listed is the Serialize() method, which can be enhanced to automatically serialize data to the container's persistent storage, as required, to save the state of this server.
For example, if your server has special options that were configured, such as font size and color, you could easily add serialization code so that this information gets saved to persistent storage when the user selects Save As in the container application. The data is then serialized with the container's data, not in a separate file, so that when the container is opened in a future editing session and the server is invoked, it can serialize its data and continue where it left off.
Listing 14.5. Source code for OnGetEmbeddedItem() and Serialize().
When a GLServer item is embedded into a container (such as WordPad or MS Word), a new instance of CGLServerSrvrItem is created and passed to the container. The OnGetExtent() method is called by the container to determine the size of the object being embedded. The default implementation created by the AppWizard uses a hard coded 3000 x 3000 HIMETRIC unit extent. (See Listing 14.6.)
Listing 14.6. The OnGetExtent() implementation code.
BOOL CGLServerSrvrItem::OnGetExtent(DVASPECT dwDrawAspect, CSize& rSize)GLServer will also paint into a special device context, provided by the container, called a metafile device context (which can contain any GDI objects, including bitmaps and brushes) when the container calls the nonfiction OnDraw(), as shown in Listing 14.7.
The container uses this metafile representation to display the item when the server is not active. This way, the container doesn't need to start the GLServer application in order to see this embedded data. The GLServer application will not be loaded unless the user specifically requests it.
By default, the AppWizard does not provide any painting; so, if you build this project as is, the embedded object will not contain any data whatsoever.
Listing 14.7. The OnDraw() implementation code
BOOL CGLServerSrvrItem::OnDraw(CDC* pDC, CSize& rSize)When the container wants to store a document with a GLServer-embedded item, it will call Serialize() to save any modifications. The basic implementation simply calls the CGLServerDoc's default implementation of Serialize(). (See Listing 14.8.) The data is not serialized to a file, but to a persistent storage object provided by the container.
There are some cases in which calling the default implementation isn't the correct way to handle storage. For example, suppose that you didn't want to save the data to the container's storage but would rather store it to a separate file and link that file to the container. Microsoft Word has this option. Instead of saving a picture inside the document, you can optionally link to a separate file, thus saving document storage and retrieval time.
Listing 14.8. The Serialize() implementation code
void CGLServerSrvrItem::Serialize(CArchive& ar)This class requires a little bit more explanation than the others did. First, let me explain the term in-place activation. Basically, in-place activation means that when the user invokes an embedded server by double-clicking the object in the container, instead of bringing up a separate window for editing the server data, the server actually uses the container's window. Figures 14.5 and 14.6 provide examples of in-place activation.
In Figure 14.5 is a WordPad application with an embedded bitmap in it. Currently, the WordPad application is active, allowing you to change the WordPad text.
By double-clicking the bitmap image (remember this is an embedded Paintbrush bitmap), the Paintbrush program is activated in-place. This means that it takes over the client area of the WordPad application. Notice that the toolbars on the top have disappeared and have been replaced by the Paintbrush toolbar on the left side. Not visible here is the fact that the menus have also changed.
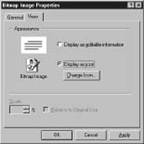
Remember, though, that in-place activation is not the only way to edit embedded objects. You can also use out-of-place activation if you embed an icon representation of the image instead of the image itself. This is done either when you first insert the object by choosing the Display as Icon checkbox or by right-clicking the object inside of WordPad, selecting Object Properties, changing to the View tab, and selecting the Display as Icon radio button. This is illustrated in Figure 14.7.
FIGURE 14.5. WordPad with an embedded bitmap
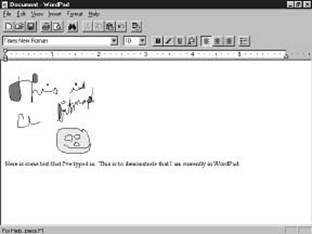
FIGURE 14.6. Paintbrush in-place activation inside of WordPad
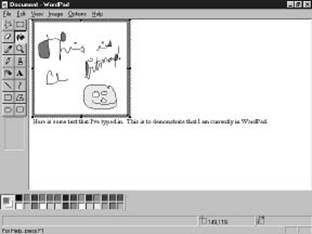
FIGURE 14.7. Setting the server item to out-of-place activation inside of WordPad
If you look carefully at the in-place activation session (refer to Figure 14.6), you'll notice a funny rectangle around the object with sizers around the edges. This is called the resizer bar. You can use this to resize the embedded object during in-place activation. Listing 14.9 includes the default implementation for this resizer bar.
Drag-and-drop support is registered, although the default implementation does nothing. (See Listing 14.9.)
Listing 14.9. The OnCreate() member function
int CInPlaceFrame::OnCreate(LPCREATESTRUCT lpCreateStruct)The AppWizard generates a toolbar that will appear during in-place activation and will temporarily replace the container's toolbars. Listing 14.10 shows the code used to register the toolbars. Although this is an embedded toolbar, it can still have all the properties of a regular toolbar, including the dockable characteristic.
Listing 14.10. The OnCreateControlBars() member function.
// OnCreateControlBars is called by the framework to create control bars on theLast but not least is the View class. The only real difference is the addition of a special notification to cancel the embedded session. This is required for keyboard processing only (such as the use of the Esc key), because the mouse handler goes to the container instead of the server (by clicking outside of the embedded server area).
Listing 14.11. The OnCancelEditSrvr() member function.
As you might have noticed in Figures 14.6 and 14.7, when you start in-place activation, the server's menus were combined with the container's menus.
You won't be modifying this functionality in the example, but I want to give you an understanding of just how these two menus are combined.
Both the container and the server provide partial menus. When the server is activated, the two sets of menus are merged together to form the new in-place activation menus. (See Figure 14.8.) The container menus can be merged with this menu before Edit, between View and Help (the two separator bars help to determine this), or after Help.
FIGURE 14.8. The GLServer in-place activation partial menus
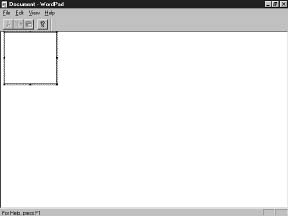
Before adding customization, try compiling the GLServer example the way it is right now and use WordPad to embed it. It won't do much, but you should be able to embed the server and see an empty window inside of the sizer bar (as in Figure 14.9). To register this example, you'll have to run the application. You should get a message from GLServer telling you that the application can only be run from a container. Just click OK. Your GLServer is now registered, and you can insert it into WordPad.
Figure 14.9. The GLServer skeleton
Now let's start adding some customized methods, data members, and so on, and make this server sing.
Our document class will hold the methods and data members used for this example. Therefore, most of the code that actually draws the OpenGL shape will be stored in this class, and rightly so. Change the CGLServerDoc declaration, as indicated by the bold text shown in Listing 14.12.
Listing 14.12. Modifications to the CGLServerDoc class
class CGLServerDoc : public COleServerDocNow, change the CGLServerDoc implementation as shown in Listing 14.13.
Listing 14.13. Modifications to the CGLServerDoc implementation
// GLServerDoc.cpp : implementation of the CGLServerDoc classI know a lot of additions are here, but trust me, the result is worth the effortespecially if you decide to add your own enhancements later (such as choice of shapes, colors, lighting, textures, and so on), but I'll leave that to your imagination.
I'm not going to spend a lot of time explaining how OpenGL works, but I will tell you that the only method you will need to call is the GLDraw() method. Pass it a device context to draw in and a rectangle for the size.
|
NOTE |
|
OpenGL can only draw to overlapped child windows, so don't try passing it a metafile device context or a memory device context. The call to SetPixelFormat() will always return FALSE. |
During in-place activation, you'll want the shape to appear in the view window that the server creates; therefore, you'll need to override the OnDraw() method of the view class. Please add the changes shown in Listing 14.14 to your code.
Because OpenGL can draw only to an overlapped window, I've fooled the system a little bit here. After calling the GLDraw() method with the view window's HDC, I copied its contents (using the palette that GLDraw() created) into a memory device context (in the CGLServerSrvrItem::OnDraw() method). That way, the server item will be able to copy the image to the metafile device context.
Notice the call to UpdateAllItems(). This tells the document to inform all server items that they need to redraw themselves. (A call to CGLServerSrvrItem::OnDraw() is made.)
To ensure that you always have the correct window size, each time you perform a draw, delete the previous memory DC and bitmap, and re-create the bitmap based upon the new window size.
It's really important to remember to realize the palette (the process of selecting the palette into the device context) into the memory DC; otherwise, you'll get an ugly-looking shape.
Listing 14.14. Modifications to the CGLServerView implementation.
void CGLServerView::OnDraw(CDC* pDC)As I stated earlier, the OnDraw() for this class draws to a metafile device context that the container uses to display the server data when the server is not activated.
Use the memory DC created in the CGLServerView class and copy it to the metafile DC. Here we'll also need to realize the palette.
Listing 14.15 shows contains the required modifications to OnDraw().
Listing 14.15. Modifications to the CGLServerSrvrItem implementation.
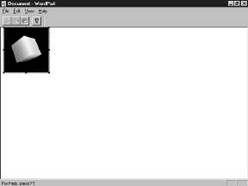
BOOL CGLServerSrvrItem::OnDraw(CDC* pDC, CSize& rSize)Compile the GLServer example and embed it into WordPad as before. You should see a 3D, square-shaped object inside of the sizer bar (as in Figure 14.10). Now click the container, and the exact same image should be inside of the container as a metafile bitmap.
FIGURE 14.10. The GLServer example in action
This section shows you how to create your own automation server with MFC. You'll use the AppWizard and ClassWizard to quickly and easily create the necessary class and methods for the demonstration.
The example is an in-process DLL server that will expose a class called SimpleMFC. You'll create four methodsAdd, Subtract, Multiply, and Divideto see how a server works. The first three methods accept two long numbers and return a long (the result of the calculation). The fourth method will also accept two long values, but will instead return a double precision number.
Select File | New from the Developer Studio menu, choose MFC AppWizard (DLL), and in the Project Name: edit box, type MFCAuto.
AppWizard will present a single-step process to create the server. Select the Automation checkbox and press Finish. (See Figure 14.11.)
FIGURE 14.11. Step 1 of 1
The AppWizard used to generate this project is very simple. The only code it generated is the required CLSID (because you chose the Automation checkbox) and the registration of the DLL in the InitInstance() method, as shown in Listing 14.16.
Listing 14.16. Registration code for the automation server.
BOOL CMFCAutoApp::InitInstance()In order to make the server usable, you'll need to create a class derived from CCmdTarget. This is the root automation class provided by MFC.
Now do the following:
The values for the new class are shown in Figure 14.12.
FIGURE 14.12. Adding the CSimpleMFC class
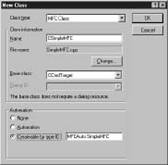
Notice the addition of a new entry in the workspace window. The ISimpleMFC node is actually a COM interface that has been created for you, along with an ODL (object definition language) file. This will be used to create a type library to expose a SimpleMFC class to other applications. To see this ODL file (shown in Listing 14.17), double-click the ISimpleMFC node. Included in this file is the UUID for the class. After we finish coding this example, it will also include our user-defined methods Add, Subtract, Multiply, and Divide.
Listing 14.17. The object definition language (ODL) for MFCAuto
// MFCAuto.odl : type library source for MFCAuto.dllThe CSimpleMFC class that was generated is fairly simple; however, note the OnFinalRelease() method generated as a result of choosing Automation support. As the code documentation states, this notification is called when the last instance of this class is deleted. You can optionally implement this code to perform special cleanup.
Listing 14.18. The OnFinalRelease() notification
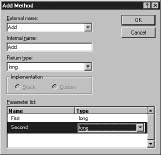
void CSimpleMFC::OnFinalRelease()Listing 14.19 shows the prototypes for the four methods you will be adding. This will come in handy in just a moment.
Listing 14.19. CSimpleMFC instance method prototypes.
long Add(long First, long Second);Now, add these prototypes as follows:
Repeat these steps for each of the four methods and select Double as the Return type: for the Divide method. You can use Figure 14.13 as a guideline.
FIGURE 14.13. Using ClassWizard to add methods to MFCAuto
|
NOTE |
|
The MFCAuto example does not use any propertiesbut as you might have already guessed, if you need to add one or more properties, you can add them with ClassWizard under the Automation tab by using Add Property. |
Now change the implementation code for these methods, as shown in Listing 14.20.
Listing 14.20. Implementing the CSimpleMFC instance methods
Take another look at the declaration for the CSimpleMFC class, shown in Listing 14.21. ClassWizard has added prototypes for the methods to the ODL file. When this class is registered, the methods will automatically be visible as part of the SimpleMFC COM class.
Listing 14.21. ClassWizard changes to the ODL file for new methods
methods:Compile the server example and then choose Tools | Register Control, which will register this automation server with the operating system. You can test the example using any application that can create automation servers.
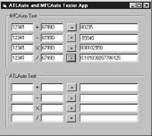
For the test, I've included an application called AutoTest.EXE, written in Visual Basic 5.0, that can be used to call the server. This test application drives both the MFCAuto example discussed here and the ATLAuto example discussed later in this chapter. See Listing 14.22 for the source code.
Listing 14.22. The Visual Basic application to test MFCAuto.DLL
Private Sub Command1_Click(Index As Integer)AutoTest.EXE is shown in Figure 14.14. Use three control arrays in this example, one for each of the columns. The first number in each calculation is a called Text1, the second number is Text2, and the result is Text3. I wrote this driver using late binding so that you can see that we are creating the object using the name MFCAuto.SimpleMFC. The object could also be created using the CLSID, or you can optionally use the References option in Visual Basic to include the class (an example of using early binding).
FIGURE 14.14. The AutoTest application
In this section, I show you how to create your own automation server using the newer and more compact Active Template Libraries. This demonstration will show you that reduced size is the main reason why ATL is preferable to MFC, but there is the price of ease of development. Simple applications are fairly straightforward; it's the complicated ones that pose the bigger problem.
As with the MFCAuto server, this example is an in-process DLL server that exposes a class called SimpleATL. Once again, you'll create four methodsAdd, Subtract, Multiply, and Divideto see how the server works. The same prototypes will be used as were used in the previous example. See Listing 14.23 for a quick reminder of what they looked like.
Listing 14.23. CSimpleATL instance method prototypes.
long Add(long First, long Second);Select File | New from the Developer Studio menu, choose ATL COM AppWizard, and in the Project Name: edit box, type ATLAuto.
As before, AppWizard will present you with a single-step process to create the server. Use the default settings, as shown in Figure 14.15, and select Finish.
FIGURE 14.15. Step 1 of 1
This AppWizard does even less than did the MFC AppWizard (DLL). No classes have been created, only the globals required for the DLL. You'll need to do the rest.
Simply put, you'll have to do all the work here. ClassWizard will not be able to help, so you're on your own. Let's proceed as follows:
FIGURE 14.16. The ATL Object Wizard dialog
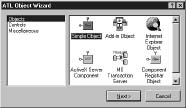
You now have two new nodes under ATLAuto in the workspace window. The first node is CSimpleATL, which is a class derived from several different interfaces (shown in Listing 14.24).
Listing 14.24. The CSimpleATL declaration.
class ATL_NO_VTABLE CSimpleATL :The second node is the ISimpleATL interface itself, which is derived from IDispatch. The ATL Object Wizard automatically generates an Interface Definition Language (IDL) file for this project. (See Listing 14.25.) This file is also used to produce the type library for one or more COM interfaces.
Listing 14.25. The IDL (Interface Definition Language) file ATLAuto.
// This file will be processed by the MIDL tool toIf you haven't already done so, open the CSimpleATL class. You will notice that the ISimpleATL interface is listed as one of its subnodes. This is an indication that the CSimpleATL class implements at least the ISimpleATL interface, if not any methods or properties of this interface.
Next, add methods to this interface. To do this, follow the procedures listed here:
FIGURE 14.17. Adding a method to the ISimpleATL interface
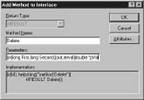
Before I give you the implementations code, let me explain the parameters. ATL implementations must return an HRESULT for all methods and propertiesthus, the need for a strange new parameter format. As you might have guessed, the [in] notation means that the parameters following it are input parameters; the [out] notation means that the parameters are output parameters (such as setting the value of a passed string or number); and the [out, retval] notation means that the parameter following (only one is permitted here) is a return value.
Thus, a method called Add defined as
[in] long First, long Second, [out, retval] long *pValmeans that the prototype must look like
HRESULT Add(long First, long Second, long *pVal)and the type library will expose a prototype as follows:
long Add(long First, long Second)Let's take a look at the method portion of the IDL file now and see what it produced. (See Listing 14.26.)
Listing 14.26. The modified Method section of the IDL file for ATLAuto.
interface ISimpleATL : IDispatchTake a peek at the prototypes added to the CSimpleATL class. (See Listing 14.27.)
Listing 14.27. The modified Method section of the CSimpleATL class.
// ISimpleATL|
NOTE |
|
There is a big difference between adding methods to the interface and simply adding methods to the class. Methods added to the class will not automatically be exposed to external applications; they require a special macro called STDMETHOD() to expose them. By using the Object Wizard, this is done automatically and the methods will be exposed to external applications. |
Finally, add the implementation code for the methods, as shown in Listing 14.28.
Listing 14.28. The method implementations for CSimpleATL.
STDMETHODIMP CSimpleATL::Add(long First, long Second, long * pVal)As before, compile the server example and then choose Tools | Register Control, which will register this automation server with the operating system. Remember, you can test the example by using any application that can create automation servers.
As mentioned earlier, the test I've included is the application AutoTest.EXE, written in Visual Basic 5.0 that can be used to call the server. Now that both servers are created, you can run the tests side by side because both the MFCAuto and ATLAuto examples can be tested using this tool. Refer to Listing 14.22 for the source code.
There are so many more things that I would like to be able to tell you about automation servers and so many more examples I would like to give you, but unfortunately, there is a limit to the size that this chapter can be. Therefore, let's quickly recap what you've learned in this chapter and move on.
ActiveX servers come in three flavors:
The embedded server can run in-place or out-of-place, depending on its implementation and eventual use. It can support Persistent Storage by serializing data to either the container's storage or a separate file. The server provides a mechanism to display its data in activation (by directly painting the server's view) and while inactive by providing the container with a metafile representation of its data.
The automation server can run in-process (meaning it runs in the same process space as the application that created it) or out-of-process (meaning it runs in its own process space). It can be designed using either the Microsoft Foundation Classes (MFC) or, if size is an issue, the Active Template Libraries (ATL) provide a tighter, less cluttered alternative.
|
