ESTHETIC PROBLEMS OF INDIVIDUAL TEETH
CHAPTER 16. STAINS AND DISCOLORATIONS
- Van B. Haywood, DMD, W. Frank Caughman, DMD, MEd, Ronald E. Goldstein, DDS
INTRODUCTION
Each year, millions of individuals change toothpaste, purchase ineffective
preparations, and even change their dentists in their quest for "whiter
teeth." Many an attractive smile is marred by some discoloration or stain,
either on an individual tooth or on all teeth (Figures 16-1A, and 16-1B). There are many causes and
corresponding treatments for these stains and discolorations. The dentist needs
to be able to both diagnose and treat the various discolorations. Some treatments
must be performed in the dental office, some can be performed at home by the
patient, and some are a combination of office and home treatments.
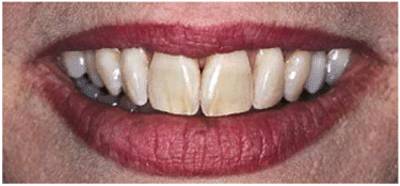
Figure 16-1A: An otherwise attractive smile is marred by discolored teeth.
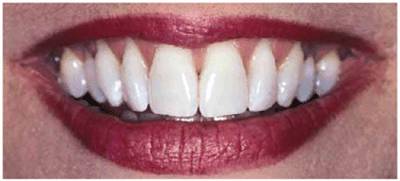
Figure 16-1B: After tooth lightening, the smile is much more pleasing.
Some of the clinical appearances of discolorations have been described in
Volume 1, Second Edition. Generally, stains can be divided into extrinsic
(located on the outside of the tooth) and intrinsic (located within the tooth).
Moreover, extrinsic stains can become intrinsic over time. Hence, stains can
originate from the outside in or from the inside out. The clinical appearance
can be in a variety of colors. Table 16-1 provides a summary of tooth
discolorations and associated conditions.

Some examples of these different discolorations can be seen in Figures 16-2A
and B 16-8A and B 16-11A and B 16-12A and B, and ,. Additionally, the discoloration
can either be of a generalized nature or specific to one tooth or one location
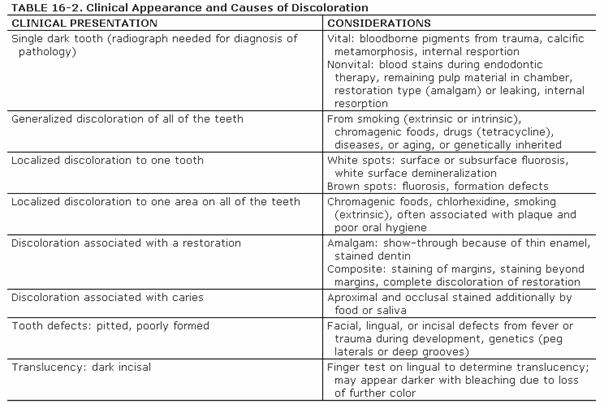
on a tooth (Table 16-2).
A number of treatment options should be considered, in order of increasing
aggressiveness (Table 16-3

Figure 16-2A and B: Total neglect resulted in severe staining
of this patient's teeth.
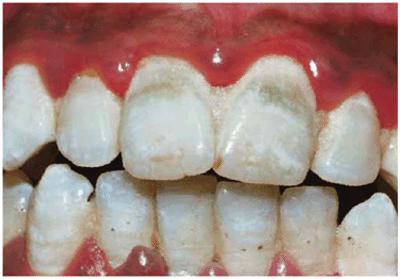
Figure 16-3: Green stain associated with poor oral hygiene and gingival inflammation.

Figure 16-4:

Figure 16-5: Orange-brown stain may cover more of the facial area from poor oral hygiene and ingestion of chromagenic foodstuffs.
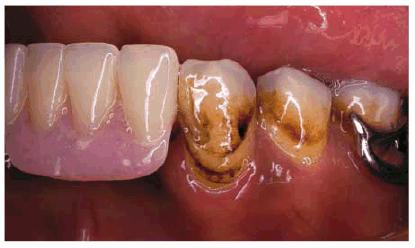
Figure 16-6: Black tobacco stain from dipping snuff for 15 years.
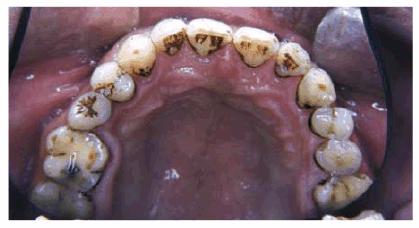
Figure 16-7: Black stain from chewing betel nuts.
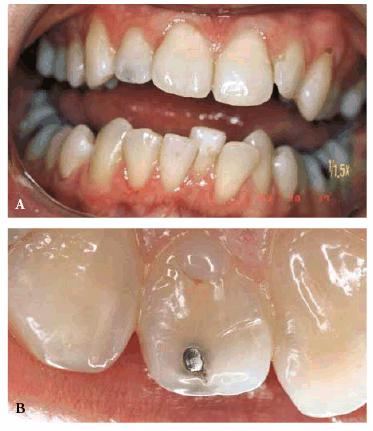
Figure 16-8A and B: Gray stain on lateral incisor (A) is a result of an amalgam restoration on the lingual surface of the tooth (B).
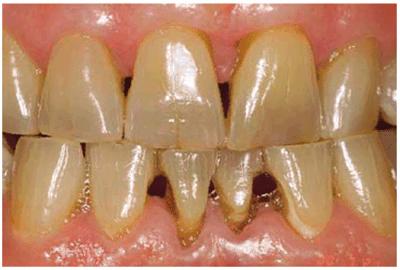
Figure 16-9: Brown stain and overall discoloration of teeth from 20 years of pipe smoking.

Figure 16-10: Staining can occur in tooth defects such as the vertical crack line on the central incisor.
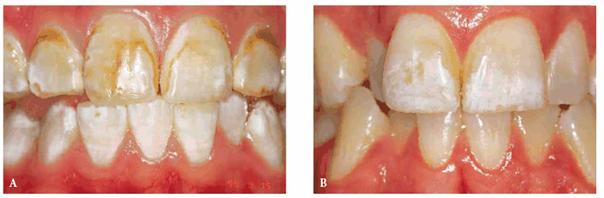
Figure 16-11A and B: Enamel fluorosis can be seen as either mostly brown (A) or mostly white (B) discolorations.

Figure 16-12A and B: Trauma to primary teeth can result in a large white-spot discoloration (A) or a less noticeable white and brown defect (B).
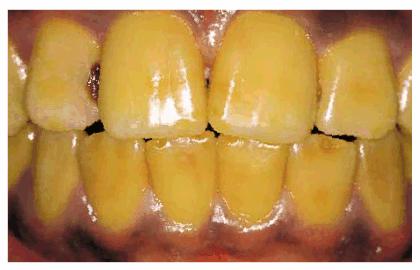
Figure 16-13: Yellow teeth caused by ingestion of iron over a long period of time.
EXTRINSIC STAINS
Prior to final diagnosis of the stain or discoloration, a complete prophylaxis
should be performed to remove minor surface staining. Occasionally, an air
polisher will be used on the posterior occlusal surfaces to help diagnose
whether the grooves are stained or carious. The diagnosis of occlusal decay is
better done by visual means rather than by tactile sensation with an explorer.
Proponents of the visual method explain that some grooves will not
"stick" but will have decay, whereas others will stick mechanically
due to their surface topography but will contain no decay.
Diagnosis for decay is difficult in deep groves. If there is a possibility,
first use an air-abrasive or some other method to remove the organic pellicle
and any caries present and then either fill or seal the tooth rather than
merely watch the area.80 Patients who complain about discolored
grooves will be better served with a highly filled tinted or opaque sealant
rather than a clear sealant through which the groove can be seen. Additionally,
clear sealants that were chemically cured may exhibit an amber or yellow
discoloration over time and require replacement (Figure 16-14). Prior to the placement of a
sealant, the grooves should be cleaned of organic matter.107 The
cleaning of grooves can be mechanically accomplished by use of a 1/4
round bur in a high-speed handpiece or air abrasion. Placing 3% hydrogen
peroxide in the grooves is a chemical option to debride the grooves.17
If peroxide is used, the cessation of bubbling will indicate that the grooves
are clean. A caries detection agent (Seek Caries Indi 313k1019d cator, Ultradent Products,
Figure 16-14: Clear sealants that were chemically cured tend to yellow over time, becoming unesthetic.
Another extrinsic stain is one caused by the use of a mouthrinse containing
chlorhexidine. This product is often prescribed to promote gingival health. The
dark stain resulting from the product's use is a major disadvantage to an
otherwise very beneficial product. Some patients are able to overcome this
disadvantage by employing 10% carbamide peroxide in a bleaching tray
periodically (Figures 16-15A, and 16-15B). This approach is possible only if
the patient is a reasonable candidate for bleaching or if his or her teeth are
already as light as they can become. Otherwise, more frequent prophylaxis is
required for esthetics.
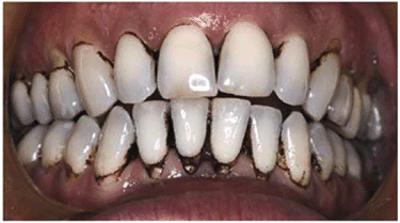
Figure 16-15A: Patient on regular use of chlorhexidine rinse for gingival treatment shows marked staining of teeth.
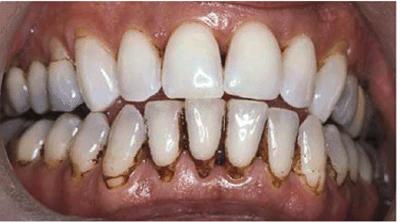
Figure 16-15B: Stains were removed, and the patient continued with chlorhexidine use while simultaneously bleaching the maxillary arch. After 3 months of treatment, there is markedly less staining on the maxillary teeth.
TOOTHPASTES
Once the dental office has removed the extrinsic stains, the patient can use a
toothpaste to maintain the whiteness of his or her teeth.
There are a number of toothpastes on the market advertised for whitening, and
patients are always seeking something that they can use at home to obtain
whiter teeth. The U.S. Food and Drug Administration allows any toothpaste that
removes stains to make claims as a whitening toothpaste. However, the mechanism
of action of the different toothpastes is generally divided into three
categories36,48:
. Abrasive toothpastes. The original whitening toothpastes, commonly
referred to as the "smoker's toothpaste," remove extrinsic stains by
mechanical abrasion, which can make the tooth appear whiter. However, overuse
of these toothpastes will eventually reduce enamel, causing the teeth to appear
more yellow due to the show-through of the dentin. These toothpastes are not
recommended, especially in persons who are aggressive with their toothbrushing
technique or use a hard toothbrush.
. Chemical toothpastes. Some toothpastes attempt to remove stains by
changing the surface chemistry of the tooth so that plaque and tarter will not
adhere. These types of "tarter control" toothpaste act much like
teflon on a frying pan, and if there is no plaque or tarter on the tooth, there
is less substrate to be stained. One of the problems with this approach is
that, in some patients, these types of toothpastes cause marked sensitivity. Another
class of chemical toothpastes that have become popular since the advent of
bleaching are those that contain peroxide. Many of these products also contain
baking soda. Baking soda is a mild abrasive, but the peroxide acts by chemical
means. The problem with the use of a peroxide dentifrice for whiter teeth is
that the contact time on the tooth is too short to produce any noticeable
whitening. However, a peroxide-containing toothpaste may be useful in color
maintenance after the dentist has whitened the teeth.
. Cosmetic toothpastes. Most of the whitening toothpastes should be
classified as a cosmetic, in that they apply something to the surface of the
tooth. Most whitening toothpastes contain titanium dioxide, which is
essentially a "sticky white paint." This "paint" then
adheres to the cracks and crevices on the tooth and to the embrasures, giving
the illusion of whiter teeth. However, cosmetic toothpastes are only temporary
and do not change the inherit tooth color.
The color of make-up, lipstick, or clothes can also impact the perceived color
of a patient's teeth. Just as certain colors of clothing make the complexion
look either whiter or more tanned, so do certain redder colors of lipstick make
the teeth appear whiter. In the same manner, a whiter complexion (or white
make-up, as used by a circus clown) makes the teeth appear more yellow. Some
patients may wish to consult with a color or make-up specialist to improve
other aspects of their appearance than their teeth.65 Improvements
in areas of the face and head will, in turn, have an impact on the color of the
teeth. Generally the color of the teeth should closely match the color of the
sclera (white part) of the eye for a natural appearance.8,49,53
INTRINSIC STAINS
Much of the etiology of internal stains has been discussed in the first volume
of this textbook. Typically, bleaching with 10% carbamide peroxide in a
custom-fitted tray easily treats discolorations due to aging, smoking, or
chromogenic foods, and beverages (Figures 16-16A 16-16B 16-17A, and 16-17B). Although these types of stains
generally require only 2 to 6 weeks of bleaching treatment, some are more
stubborn. Nicotine staining of long-term duration may require as long as 3
months of nightly treatment (Figures 16-18A, and 16-18B).48 Tetracycline
staining may take anywhere from 2 to 12 months of nightly treatment.49
Patients must be counseled regarding realistic expectations for the outcomes of
bleaching. Long-term treatment is best presented as one that is worthwhile but
may not produce the desired results.8
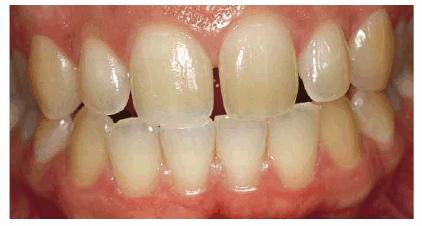
Figure 16-16A: Some teeth darken over time from chromagenic foods. Some patients' teeth are just naturally yellow.
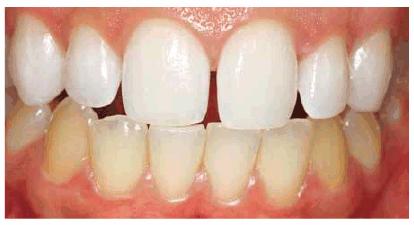
Figure 16-16B: Whitening of the maxillary teeth using 10% carbamide peroxide in a custom tray results in a more pleasing smile. This patient is now interested in closing the spaces.
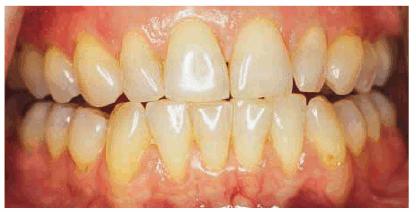
Figure 16-17A: Some teeth darken through natural aging.
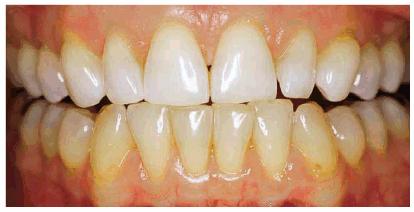
Figure 16-17B: Whitening of the maxillary teeth using 10% carbamide peroxide in a custom tray produces a normal progression of color from gingival to incisal edge but offers a more pleasing, younger look to the patient.
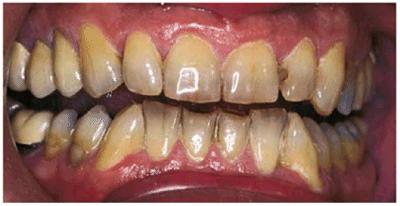
Figure 16-18A: Years of pipe smoking have caused the extrinsic nicotine stain to become intrinsic.
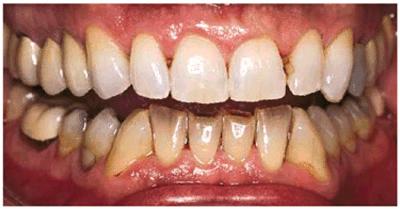
Figure 16-18B: Whitening, using at-home treatment of 10% carbamide peroxide in a custom-fitted tray, was necessary to remove the stubborn nicotine stains.
TRAY DESIGN OPTIONS FOR AT-HOME
BLEACHING
The original tray design for bleaching was a thin, somewhat rigid material that
extended onto the gingival tissue. The rigidity and extent of the tray often
caused gingival irritations and tooth sensitivity. The newer tray materials are
much softer and have eliminated many of the mechanical gingival irritation and
tooth sensitivity problems (Figure 16-19). Another addition to tray design
is to scallop the tray so that there is minimal or no gingival contact. This
design minimizes the chemical gingival irritation experienced by some patients.
However, the scalloped design requires the use of a viscous, sticky, somewhat
insoluble material that adheres to the tooth and tray, or there is the
potential for saliva to wash the material from the tray. The final addition to
tray design is the use of reservoirs or spacers to avoid the tightness of the tray
on the tooth and to allow better seating of the tray when loaded with a thick
viscous material. This design may also supply additional material for bleaching
but, conversely, may waste additional material or lessen the comfort of the
tray if not properly fabricated.53
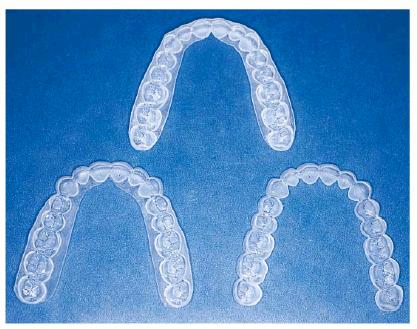
Figure 16-19: Tray design can be scalloped or nonscalloped, with or without reservoirs. The choice depends on the bleaching material used and patient and clinical issues.
The choice of the type of tray design used must include consideration of the
type of bleaching material used, the gingival characteristics of the patient,
the concerns of the patient, and the arch to be treated.55 Some
runny, low-viscosity bleaching materials are best applied with a nonscalloped
noreservoir tray, which is the easiest to fabricate and the most comfortable to
wear. However, if the patient has thin facial gingival tissue, the facial side
of the tray may be scalloped to avoid gingival irritation. If the patient does
not like the taste, the lingual may be left unscalloped since rarely does
gingival irritation occur on the palate. Concern for contact of peroxide with
any soft tissue would warrant a tray scalloped on the facial and lingual
surfaces.52
In the same manner, reservoirs are not required for successful bleaching with
any material,61 but reduce the tightness of the tray to aid in the
seating of the tray with the thick viscous materials.33 However, on
the mandibular arch, the shape of the teeth and the facial occlusal contacts
make the placement of reservoirs impractical or provide very little benefit.
Since most mandibular teeth are slightly malaligned, a no-reservoir tray can be
used with any material on the mandible. Scalloping is also more irritating to
the patient on the mandibular arch due to the small narrow teeth. Both the
tongue and lips may be irritated by the edges, so often a nonscalloped design
is preferable for all materials on the mandible. The nonscalloped design helps
overcome the influence of gravity, salivary glands, and the tongue for
retention of the material in the tray. Only highly viscous materials can be
retained in the scalloped, reservoired mandibular tray design.
With the nonscalloped tray design, the dental office still has the option of
scalloping the tray if the patient experiences gingival irritation. Chemical
irritation may be related more to the base vehicle of the bleaching material
than the carbamide peroxide. Current bleaching materials vary greatly in base
vehicles, flavoring, stabilizers, thickeners, and ingredients other than
carbamide peroxide. If the material is more water soluble, it is less likely to
cause gingival irritation. Also, less viscous materials require better tray
adaptation, which can be better accomplished with a nonscalloped tray.
Another variation in tray design concerns the patient with temporomandibular
dysfunction. For patients in this category, any alteration of the occlusal
surfaces of the arch could precipitate some discomfort or pain. One solution is
to make a scalloped reservoired tray that does not extend beyond the facial
cusp tips.69 This approach avoids changes in the occlusion. This
design must be used in conjunction with a thick sticky material because that
can help retain the tray in the mouth.
SINGLE DARK TEETH
A single tooth may become dark either from trauma, after completion of
endodontic therapy, or from internal resorption. The first step in the
treatment of this tooth is to take a radiograph to determine if there is any
periapical pathology and to pulp test the tooth for vitality.57
If the single dark tooth tests vital, there are two options for treatment. One
option is when the patient wishes to lighten the other teeth as well. The other
option is when the patient only wants to bleach the single tooth. If the
patient wants to lighten all teeth, a conventional bleaching tray is
fabricated, and carbamide peroxide is placed on all of the teeth. When the
unaffected teeth cease to lighten, treatment is continued by placing the
material only on the darkened tooth until it matches the color of the other
teeth (Figures 16-20A, and 16-20B
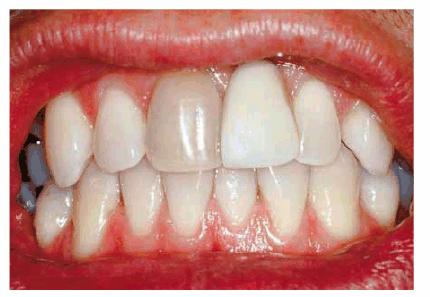
Figure 16-20A: Because of trauma, one central incisor was lost and was replaced by an acrylic removable partial denture. The other single right central incisor is discolored. Photograph courtesy of Dr. Kevin Frazier.
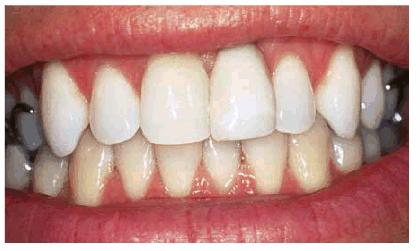
Figure 16-20B: The patient may start with the dark tooth followed by lightening of all of the teeth or continue placing bleaching material in the single dark tooth mold after the remaining teeth have lightened. The artificial tooth is also polished to match the texture of the natural teeth. Photograph courtesy of Dr. Kevin Frazier.
There are several techniques for those patients who only wish to lighten the
single tooth. The fabrication of a single-tooth bleaching tray has been
previously described.46 The single-tooth bleaching technique
involves the use of a nonscalloped tray, with or without reservoirs. In this
tray design, the tooth-imprint areas on either side of the darkened tooth are
removed to allow the bleach to contact only one tooth. Other techniques for
single dark teeth involve a scalloped tray with adjacent teeth molds removed23
or use of a polycarbonate crown former to carry the material.108 The
more conventional treatment of a single dark tooth would be the use of an
in-office power bleaching technique as described in Chapter 12, Esthetics in
Dentistry, Volume 1, 2nd Edition. This procedure uses 35% hydrogen peroxide
on the single tooth isolated with a rubber dam. However, it is not possible to
predict the number of visits required, thus making the total cost unknown. The
patient must be informed that treatment may take two to six visits to achieve a
successful lightening, with a fee necessary for each visit that may be comparable
to the total at-home whitening fee.8 Also, the dangers to both the
dentist and the patient of burns from handling the high concentration of
peroxide are a concern. In-office bleaching does offer some shortening of time
but not necessarily a better outcome due to the tendency to terminate treatment
prematurely because of cost concerns. Another popular approach is to initiate
treatment with in-office bleaching, followed by at-home bleaching until the
process is completed.39
If a single dark tooth does not test vital, the radiograph is negative for
periapical pathology, and the patient has had no symptoms, the treatment can be
the same as a single dark vital tooth without initiation of endodontic therapy.
However, the patient should be informed that there is a chance that the tooth
may need a root canal should symptoms eventually occur. There has been only one
report in the literature of a nonvital tooth requiring endodontic therapy after
bleaching, but that situation used 35% hydrogen peroxide for in-office
bleaching, not 10% carbamide peroxide for home bleaching.40 Other
options listed in the first volume of this textbook include intentional
endodontic therapy and the walking bleach technique or in-office power
bleaching. Additionally, when successful endodontic therapy cannot be
accomplished due to a calcified canal, some reports describe the creation of an
artificial pulp chamber for the subsequent walking bleach technique.2
Other situations for dark teeth occur after the tooth has received endodontic
therapy. If the tooth has not been restored, or if the treating dentist is not
certain that all of the remaining pulp material has been removed from the
tooth, then some form of inside bleaching should be performed. This would
involve removal of the restoration and debridement of the pulp chamber. The
traditional walking bleach technique has been described previously,86
as well as the thermocatalytic technique.32 Both techniques were
popular until reports were published of external root resorption.42,69,75
There are many hypotheses for this resorption. A review of the literature on
root resorption since 1979 indicates several common themes between the case
reports37: no sealer over the gutta-percha, heat, and trauma.45
Other speculations include a lack of cement-enamel junction (CEJ) in 10% of
teeth where a dentin gap between cementum and enamel is present and alteration
of the pH of the surrounding bone from peroxide exit or cellular damage from
overheating. In addition to the concern for potential external resorption,
general concerns exist with both bleaching techniques. Common concerns include
the possibilities of chemical burns from handling 35% hydrogen peroxide
clinically, the need for fresh solutions to be effective, the unknown number of
office visits required, and the possibility of overlightening the tooth. The
walking bleach technique also presents the difficulty of maintaining the
provisional seal between appointments. The difficulty with the thermocatalytic
technique is determining and controlling the proper heating temperature.
Some suggestions have been offered to avoid these concerns.104 These
include the use of sodium perborate alone for walking bleach,64 the
use of calcium hydroxide powder postbleaching to neutralize the pH,4
and a catalase after internal bleaching to inactivate the peroxide.96
All options stress the importance of placing a sealer over the gutta- percha
and avoidance of the use of heat. If heat is used, the temperature should not
exceed that which would cause discomfort on a vital tooth. Probably the safest
treatment options are the use of sodium perborate alone and the use of 10%
carbamide peroxide sealed in the pulp chamber in the walking bleach fashion.105
INSIDE-OUTSIDE BLEACHING TECHNIQUE
In 1996, a technique was described (company product catalogue, Ultradent
Products) using 10% carbamide peroxide applied in a tray to a tooth prepared
for conventional walking bleaching but not sealed.77 In this
situation, the outside and the inside of the nonvital tooth are lightened using
a fresh solution applied daily. For this approach to be indicated, the vital
teeth and the open nonvital teeth must require lightening or the adjacent vital
teeth must exhibit a light shade already. Other recent articles have described
or researched the technique.13,14,73,101 The advantage of leaving
the tooth open for multiple applications is that the patient does not have to
return to the office to apply fresh solution if one treatment is insufficient.
This ease of continual treatment at home avoids the uncertainty of cost to the
patient and the number of office visits. In difficult discolorations, this
technique can afford both a reduction in time and fee and avoid the safety
concerns to the tooth from the higher concentrations of peroxide. Ten percent carbamide
is approximately equal to 3% hydrogen peroxide.
The technique for use with a thick, sticky whitening material and scalloped
tray design is as follows: a radiograph is taken to ensure the adequacy of the
endodontic therapy and the level of the CEJ. Written consent is obtained, and
photographs are taken. Alginate impressions are made, and stone casts are
generated. Bleaching trays are fabricated of the scalloped, reservoired design,
according to the manufacturer's instructions, from a thermoplastic tray
material.52 The bleaching tray is fitted, observing carefully that
the gingivae will not be irritated by contact with the tray.
In the nonvital tooth, access is made through the lingual endodontic opening
and the pulp chamber contents are removed. Gutta-percha is removed 2 to 3 mm
apical to the CEJ. The remaining gutta-percha is sealed using glass ionomer (or
composite or resin-ionomer) 2 to 3 mm in thickness (Figure 16-21). After the glass ionomer has set,
the chamber is cleaned by etching with 35% phosphoric acid for 2 minutes and
then rinsing with water. No other restorative material is placed above the glass
ionomer base so the access orifice is not sealed. Bleaching material will be
placed both in the tooth orifice and in the bleaching tray to apply the
material from the inside and the outside simultaneously in the following
manner.
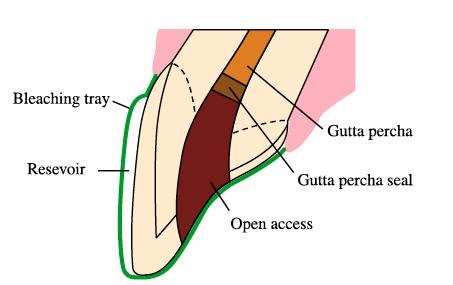
Figure 16-21: Schematic drawing of preparing the nonvital tooth for inside-outside bleaching using 10% carbamide peroxide when more rapid results are desirable.
Patients are instructed in the technique for inserting a cotton ball into the
opening in the tooth during the day when the bleaching tray is not being used.
This is done to prevent accidental packing of food into the orifice. The cotton
ball is removed after each meal by means of twisting a toothpick inserted into
the cotton. The coronal orifice is irrigated with a water syringe to ensure the
removal of debris, and a fresh ball of cotton is inserted. At bedtime, the
cotton is removed again, and the tooth is irrigated as before. The 10%
carbamide peroxide is loaded into the bleaching tray and injected into the tooth
orifice. The tray is seated, and excess material is removed with a finger or
toothbrush. The patient then wears the loaded tray during the night. On removal
of the tray in the morning, the internal chamber of the tooth is irrigated
again with water using a syringe, and a cotton ball is inserted into the
chamber by the patient. Patients bleach their teeth until the vital teeth no
longer change color and the nonvital tooth matches the color of the vital
teeth. Patients are cautioned not to bite with the front teeth during the
duration of the treatment. The disadvantage of this technique is that it
requires excellent patient compliance and skills for treatment and a
responsible patient who will return to the office in a timely manner to have
the orifice closed with a restoration on completion of treatment. There is no
concern for caries during the active treatment phase since carbamide peroxide
is anticariogenic and the pH is elevated beyond the level of carious activity.71
However, once treatment is complete, the orifice must be restored.
CLOSURE OF INTERNAL BLEACHING
On return to the office after completion of the inside-outside or conventional
walking bleaching technique, the orifice to the nonvital tooth is debrided and
temporarily sealed for 2 weeks with a noneugenol-containing temporary cement. A
noneugenol-containing material is used to avoid future contamination of the
acid-etched composite restoration, which will be used to close the orifice to
the canal and make any final minor color adjustments by varying the composite
color internally. Placement of the final restoration is delayed for 2 weeks to
allow the oxygen generated during bleaching to dissipate from the tooth and the
shade to stabilize. The presence of residual oxygen in the tooth results in a
reduction of bond strengths79 and an artificially light shade. Two
weeks after termination of bleaching, the bond strength potential will have
returned to normal,82 and the shade will have stabilized.5
This shade stabilization (a slight darkening) is thought to occur from the
change in optical qualities of the tooth after the residual oxygen generated
during the oxidation process of bleaching has diminished. Two weeks after
completion of bleaching, the temporary stopping is removed, and the orifice is occluded
using an acid-etched composite.
If the tooth needs any further lightening, a slight modification of the shade
can be accomplished by the selection of a lighter composite to restore the
internal root and coronal portions of the tooth. For years, the lightest shade
of composite available was a B1 on the Vita shade guide (Vident,
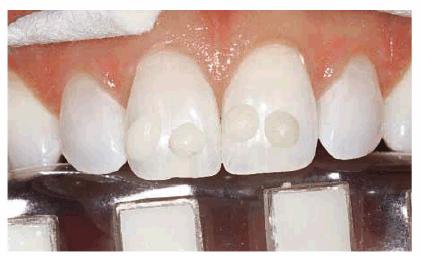
Figure 16-22: The darkest sample of composite in this photograph is a B1 shade. Shades lighter than B1 are necessary for some bleached teeth.
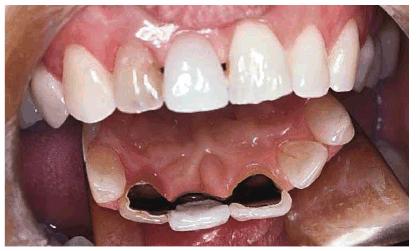
Figure 16-23: Some nonvital teeth are inaccessible to retreatment by internal bleaching due to subsequent restorative treatment but can be lightened again from the outside.
WHY IS BLEACHING OF ANTERIOR
ENDODONTICALLY TREATED TEETH BECOMING MORE PREVALENT?
There has been an increase in the opportunities to bleach endodontically
treated anterior teeth due to research on the longevity of other treatment
options.102 At one time in dentistry, all teeth that had received
endodontic therapy subsequently received a post and core followed by a full
crown. However, it has been found that the use of the post and core did not
strengthen the tooth as originally thought, but often the preparation of the
post space weakened the tooth. The best method to obtain strength for an
endodontically treated tooth is to maximize the amount of remaining dentin and
have a 2-mm ferrule of tooth structure internally above the margins. The
current opinion is that an anterior endodontically treated tooth does not
automatically require crowning but should be restored with an acid-etched
composite if possible. A crown should be used only if indicated on a vital
tooth in the same condition. A post and core is used only if there is a need to
generate a core form to retain the crown. Hence, there are more teeth that are
sound structurally, but discolored, and for which bleaching is the treatment of
choice. Posterior teeth receiving endodontic therapy continue to require
full-coverage restorations in almost all situations to avoid vertical tooth
fracture.
TOOTH SENSITIVITY DURING VITAL
BLEACHING
Tooth sensitivity during bleaching is the most prevalent side effect to
treatment, and the dental office should be prepared to offer different
treatment options. Tooth sensitivity experienced during bleaching can be
treated actively or passively by the dentist (Table 16-4). Passive treatment consists of
reducing either the duration of each treatment (fewer hours) or the frequency
of treatment (skip days).44 Originally, the only active treatment
cited was the use of a neutral fluoride gel placed in the tray at the onset of
sensitivity. One early report of a laboratory bleaching experiment on the use
of stannous fluoride during bleaching had suggested that fluoride was
contraindicated.41 However, this recommendation may have been a
result of the staining nature of the stannous fluoride used in the study. Some
current bleaching products now incorporate a neutral fluoride with no apparent
compromise of the bleaching process (15% Opalescence with Fluoride, Ultradent
Products). One report has also indicated a reduction in sensitivity by having
the patient apply the neutral fluoride for 3 weeks nightly prior to initiation
of the bleaching process.100 The mechanism of action of fluoride is
as a tubular blocker.

Another active approach to treating sensitivity involves the use of 5% or less
concentrations of potassium nitrate applied in the bleaching tray.50,56
Potassium nitrate is generally found in desensitizing toothpastes,103
which are applied via brushing. This application technique generally takes 2
weeks to see results. However, a recent report has shown that the application
of the material for longer periods of time (1-8 hours) via a tray is effective
in relieving tooth/root sensitivity.66 Because the application of
toothpaste in a bleaching style tray can cause gingival irritations in some
patients, dental companies have now introduced products of potassium nitrate
with and without fluoride in a base carrier (Desentize, DEN-MAT, Santa Monica,
CA; UltraEZ, Ultradent Products; Relief, Discus Dental, Culver City, CA). The
mechanism of action of potassium nitrate is different from that of fluoride.
Potassium nitrate is thought to act in one of two ways: to chemically
depolarize the nerve to inhibit refiring63,76 or to release the
nitric oxide radical, which reduces sensations to the nerve.78
Whatever the mechanism, it is a good adjunct for any type of chronic
sensitivity, as well as bleaching sensitivity.
LOCALIZED BROWN DISCOLORATION
Typically, brown discoloration is associated with high fluoride ingestion.22
The discoloration is generally localized to sporadic areas on the tooth.
Usually, microabrasion is considered the primary treatment.3
Microabrasion is the application of acid and pumice to selectively remove the
enamel surface discolorations.20 However, nightguard vital bleaching
has been shown to successfully remove brown discolorations.58,72,88
It is estimated that 80% of these brown discolorations are amenable to
bleaching with 10% carbamide peroxide.54 Recent articles have shown
removal of brown discoloration after 4 to 6 weeks of bleaching, with no return
or need for additional treatment at 7 years recall (Figures 16-24A 16-24B, and 16-24C).59 Certainly,
attempting bleaching first avoids the removal of the fluoride-rich enamel
layer, and microabrasion19 or macroabrasion62 can be
attempted (Figures 16-25A, and 16-25B) should bleaching not be
successful.18,47 When time is of the utmost importance to the
patient, a combination approach can be most effective.
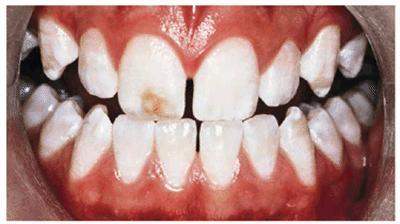
Figure 16-24A: A single dark brown spot, possibly from trauma to the primary tooth, is present in this 13-year-old male. The remaining teeth are already very white.
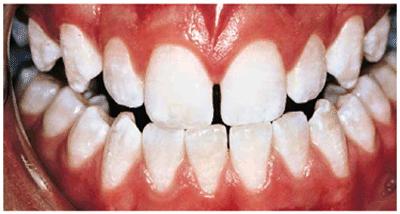
Figure 16-24B: The teeth are treated for 5 weeks nightly with 10% carbamide peroxide, resulting in the removal of the brown area without changing the surface characteristics or removing the fluoride-rich layer of enamel.
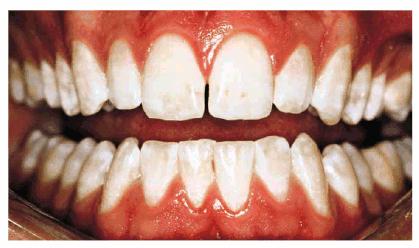
Figure 16-24C: With no further whitening treatment, the brown spot has not returned for 7 years.
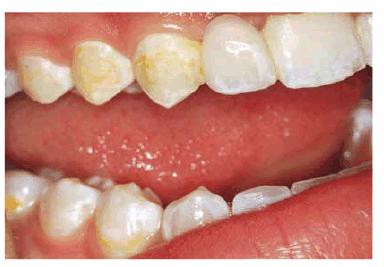
Figure 16-25A: Yellow-brown stain that appears rough adjacent to a resin-bonded fixed partial denture.
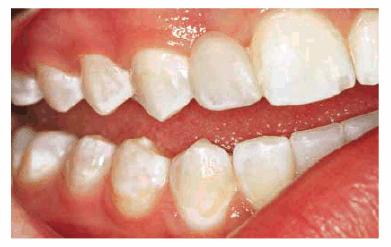
Figure 16-25B: Microabrasion is used to remove the stain and smooth and polish the surface of the tooth without altering the shade of the adjacent teeth.
LOCALIZED WHITE DISCOLORATION
As with brown discolorations, white discolorations are often associated with
high fluoride ingestion, high fever, or other disturbances during enamel
formation. Bleaching does not remove white spots and may occasionally make them
lighter during treatment, but it does lighten the surrounding tooth so as to
make the white spot less noticeable (Figures 16-26A, and 16-26B).44 During bleaching,
the white spot may get whiter, but on termination of the bleaching, it
generally returns to its original color. It is thought that these white spots
are differently formed portions of enamel that respond differently to the
bleaching material. Teeth with white spots undergoing bleaching often develop a
"splotchy look" during the first week or two of bleaching. However,
patients should be encouraged to continue through this stage so that the darker
portions of the teeth can "catch up." Often, malformed parts of
enamel below the surface of the tooth contribute to this splotchy appearance.
On termination of bleaching, the white spots return to their original color.
Bleaching with 10% carbamide peroxide is still the first treatment of choice
because it can lighten the other portions of the tooth so that the white spot
is no longer as noticeable.

Figure 16-26A: White spots on the incisal edges are accentuated by the yellow of the teeth.

Figure 16-26B: After 5 weeks of nightly treatment with 10% carbamide peroxide, the white is less noticeable because the yellow has been removed.
CHOOSING MICROABRASION OR BLEACHING
Historically, micro- or macroabrasion has been recommended for removal of white
spots. These treatments should be considered as the second level of treatment
only if bleaching is unsuccessful. The only time microabrasion is considered as
the first treatment is when the teeth have a soft, chalky appearance rather
than hard, shiny enamel, or the discoloration is obviously unnatural and known
not to respond to bleaching, such as stark white discolorations. If
microabrasion is attempted first on a single white spot, the white spot can
become whiter as the operator progresses subsurface, requiring removal of more
tooth structure and replacement of loss tooth structure with a composite (Figures 16-27A 16-27B, and 16-27C). If bleaching has not previously
been performed, the shade of the composite will have to match the current shade
of the teeth, which may be undesirable. Also, if generalized whitish areas on
the teeth are removed, the teeth often appear more yellow, requiring bleaching
afterward. Again, it is more efficient to leave the fluoride-rich layer of
enamel intact and attempt bleaching first, and then try microabrasion followed
by composite resin bonding with the new shade if necessary. Patients should be
informed of the different treatment options and procedures that may be
necessary rather than only one treatment.
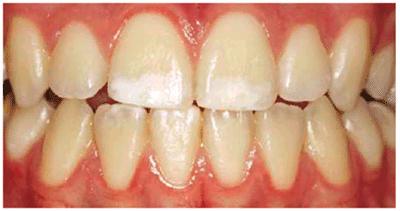
Figure 16-27A: White spots may be considered for microabrasion, but the depth of the discoloration is unknown. Bleaching is generally the first treatment of choice.
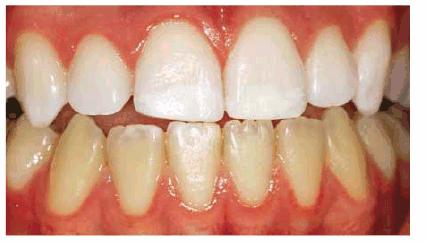
Figure 16-27B: After bleaching for 6 weeks with 10% carbamide peroxide, the white is less noticeable but still a distraction.
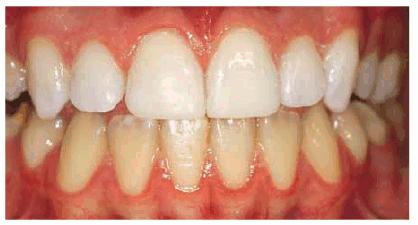
Figure 16-27C: On initiating removal of the white areas, they became whiter and extended deeper into the tooth, requiring removal and composite bonding.The composite bonding is completed using the shade of the bleached teeth to restore a natural coloration.
TETRACYCLINE STAINING
Tetracycline is considered one of the most difficult tooth stains to remove.
In-office bleaching is a possible treatment method but generally is
contraindicated due to the number of treatments required and the concurrent
high fee and patient discomfort. With the advent of at-home bleaching, these
tetracycline stains can be managed more easily.49,51,60 Treatment
times may vary from 2 months to 1 year (Figures 16-28A 16-28B 16-28C 16-29A 16-29B 16-30A 16-30B 16-31A, and 16-31B). Patients are seen monthly to
replenish solutions and evaluate for continuing color change. Patients should
agree to a minimum of 2 months of nightly treatment before deciding to proceed
to more aggressive treatment. Fees are generally the cost of a monthly office
recall visit and additional material. Once lightening is observed, patients
should continue treatment until a month has passed with no obvious color
change. Dark tetracycline stains located in the gingival third of the tooth or
dark blue or gray stains have the least favorable prognosis. However, even in
these situations, there can be some improvement. This improvement may be
sufficient for the patient's esthetic demands. However, compliance by the
patient is necessary for success. Patients with tetracycline staining often
view the at-home bleaching regime similar to a weight loss or an exercise
program. Application of the bleaching material at night becomes a regular part
of their routine. There is no increase in side effects with this long-term
bleaching since most side effects occur in the initial weeks of treatment.
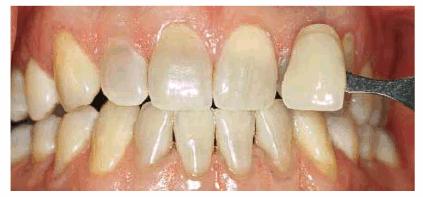
Figure 16-28A: Patient with moderately tetracycline-stained teeth is considering bleaching or veneers. Bleaching is initiated to either resolve the issue or provide a lighter base onto which the veneers can be placed.
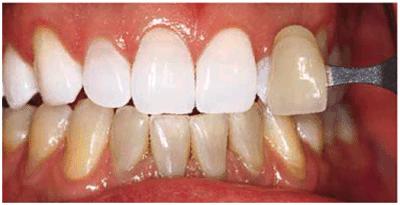
Figure 16-28B: Four months of bleaching of the maxillary arch using 10% carbamide peroxide produces a remarkable shade change.
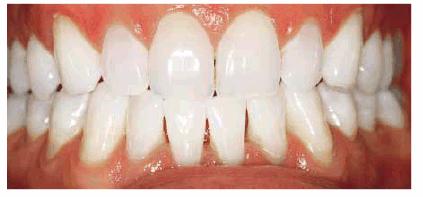
Figure 16-28C: The mandibular arch is subsequently lightened.
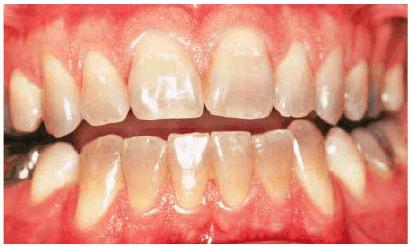
Figure 16-29A: Moderately tetracycline-stained teeth.

Figure 16-29B: In a research study, these teeth were bleached for 6 months nightly with a 10% carbamide peroxide. Not all results will be this good, especially if the discoloration is blue/gray or at the gingival third.

Figure 16-30A: Moderately tetracycline-stained teeth.
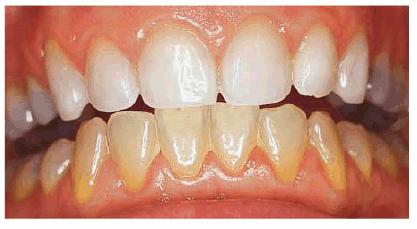
Figure 16-30B: After only 2 months of treatment, the results are satisfactory. Patients with tetracycline-stained teeth should commit to at least 2 months of treatment.
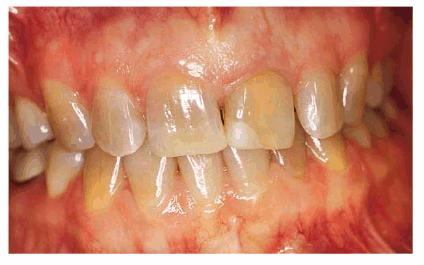
Figure 16-31A: Moderately tetracycline-stained teeth, with one nonvital central incisor with a Class IV composite needing replacement.
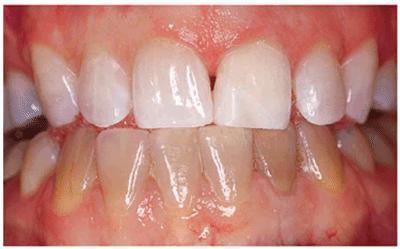
Figure 16-31B: Teeth are bleached with 10% carbamide peroxide in a tray for 12 months nightly. The Class IV composite is removed, and the pulp chamber is cleaned. A lighter than B1 composite is used to restore the root portion, followed by a tooth matching the Class IV composite.
BLEACHING AND PORCELAIN VENEERS
Bleaching may not produce an acceptable result on all tetracycline-stained
teeth, but it can provide the patient with a better idea of how his or her
smile will appear with whiter teeth. Often, bleaching is the stepping stone to
veneers. Once the patient has seen what a little color change will do for his
or her appearance, he or she is often more excited about completing the
restorative process. Even when veneers are the ultimate goal, bleaching
lightens the underlying tooth, decreasing the masking needs of the veneers,
which results in a more vital final restoration. If the tooth shade regresses
after the placement of the veneers, the teeth can be rebleached through the
lingual surfaces (Figures 16-32A 16-32B 16-32C, and 16-32D
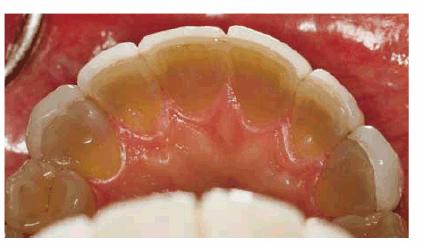
Figure 16-32A: Extent of the discoloration is evident from the lingual view of the maxillary teeth and the unrestored mandibular teeth.
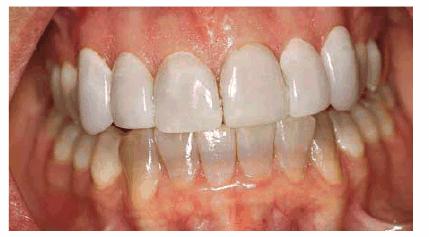
Figure 16-32B: Porcelain veneers were placed over tetracycline-stained teeth, but the appearance of the teeth is still gray due to show-through of the tooth discolorations.
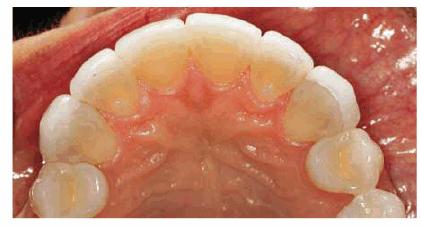
Figure 16-32C: After bleaching the tetracycline-stained teeth for 9 months, the lingual view demonstrates the extent of tooth color change.

Figure 16-32D: A facial view of the veneers shows that they appear lighter because the underlying tooth is lighter.
Bleaching and Other Restorations
Bleaching does not change the color of other restorations. In fact, existing
restorations tend to appear darker as the adjacent teeth lighten. Patients
should be informed of the possible need for replacement of restorations in the
esthetic area should there be a color mismatch post-treatment (Figures 16-33A, and 16-33B). However, the color stability of
restorations can also be a benefit to the clinician. Usually, crowns that match
adjacent natural teeth are placed. Over time, the teeth may have darkened to
the point where they no longer match the crowns. Rather than replace the
otherwise acceptable crown with a darker shade crown, bleaching is the
treatment of choice. In these instances, the patient can carefully bleach the
teeth until the natural teeth return to the shade they were when the crowns
were fabricated (Figures 16-34A, and 16-34B). To avoid overbleaching the teeth,
patients are instructed to apply the whitening solution for only 1 to 2 hours a
day until they see how responsive the natural teeth will be to the process.
This avoids a color mismatch, where the teeth become lighter than the crowns
from bleaching, which would require replacing the crowns with a lighter shade
to be esthetic.
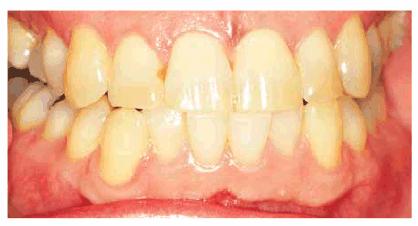
Figure 16-33A: The composite on the mesial of the lateral incisor is somewhat discolored but not markedly noticeable.
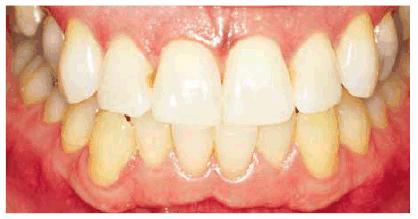
Figure 16-33B: After bleaching, the composite restoration is much more noticeable.
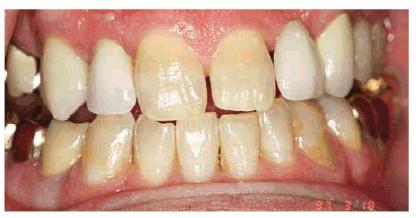
Figure 16-34A: All of the maxillary teeth except the central incisors had porcelain-fused-to-metal restorations placed 17 years previously. The natural teeth no longer match the restorations.
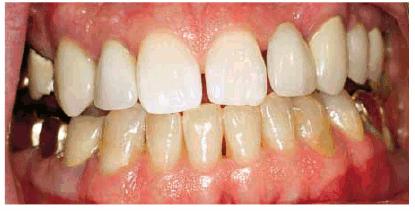
Figure 16-34B: The teeth are lightened until the natural teeth return to the shade that originally matched the porcelain, providing an esthetic smile again with minimal expense.
COMPOSITE RESIN RESTORATIONS
Discoloration of Composites
Stains to composite resin restorations can occur in the body of the composite,
on the surface of the composite, or at the restoration margins. Bulk
discoloration of chemically cured composites was common before the advent of
light-curing. Benzoyl peroxide, which is the chemical initiator in all
chemically cured composites, is not color stable and will cause the restoration
to darken over time. This phenomenon may necessitate the replacement of many
otherwise serviceable restorations. Darkening of light-cured composites is a
result of extrinsic stains from food, drink, or oral habits. Orange stain can
be the result of chromagenic bacteria. If these stains recur after thorough
prophylaxis, refer the patient to an oral pathologist for culture, which will
help determine a specific antibiotic to help prevent the recurrence of the
bacteria (Figures 16-35A
and B).
These stains can often be removed by merely repolishing the restoration. Care
must be taken not to use certain aggressive cleaning devices during prophylaxis
(ie, Prophy-jet air polisher, DENTSPLY Professional,
It is not uncommon for staining to occur at the margins of composite
restorations as the restorations age. If the staining is superficial, it can
often be removed by bleaching, air abrasion, or the use of diamond or finishing
burs. After stain removal, the composite's margins should be etched for 15
seconds with 32 to 37% phosphoric acid, rinsed, and resealed with a bonding
agent or surface sealant. When a marginal stain is not easily removed by
conservative finishing techniques, the affected area should be mechanically
removed because of the possible presence of recurrent decay. If on penetration
and exploration the stain is found to be superficial, the restoration's margins
can be repaired with fresh composite. If the stain is extensive, the entire
restoration should be replaced. The postfinish application of a surface sealant
(Fortify, Bisco,

Figure 16-35A and B: This orange stain on the surface of these composite resin veneers was caused by chromagenic bacteria.
USING COMPOSITE TO MASK EXISTING
AMALGAMS
Occasionally, a patient may present with an otherwise satisfactory amalgam
restoration and either a fractured cusp in an esthetic area or discoloration of
the tooth from the amalgam. Complete removal of the amalgam may jeopardize the
status of the tooth, but esthetics remains a consideration. In these cases,
composite may be used to mask the discoloration of the existing amalgam or
replace the missing tooth structure (Figures 16-36A 16-36B, and 16-36C). These procedures can provide a
conservative alternative to crowns or at least an intermediate treatment option
until the crowns can be initiated.
Show-through of the discoloration is often seen on the mesiofacial surface of a
maxillary first premolar or molar. In this situation, the operator would remove
the amalgam to the proximal contact, providing for 1- to 2-mm bulk of
composite. Mechanical retention can be placed in the amalgam, or a chemical
approach for bonding can be adopted. The surface of the amalgam is cleaned and
roughened using an air abrasive with 50- to 60-micron aluminum oxide particles.
Next, any adjoining tooth structure is etched with 32 to 35% phosphoric acid.
The prepared surface of the amalgam and etched tooth is covered with a
universal bonding system or a thin layer of Panavia cement (J. Morita USA,
Irvine, CA).15 An appropriate opaque shade of composite resin is
applied, shaped, and cured before final contouring and polishing.
Still another question that routinely arises is the patient who desires his or
her posterior good amalgam restorations replaced with tooth-colored restorations.
Some dentists have advocated leaving part of the old but serviceable amalgam in
and resurfacing the restorations with composite resin. The major problem with
this technique is the initial or eventual show-through of the old amalgam,
making it virtually impossible to diagnose future potential caries.
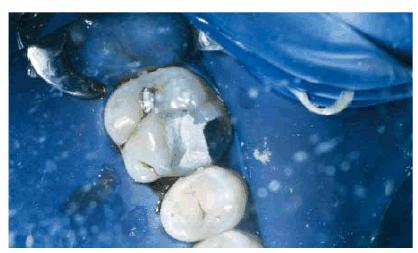
Figure 16-36A: Fractured tooth structure in an esthetic area reveals an unacceptable display of amalgam. From the occlusal view, the amalgam is acceptable and would require extensive removal for replacement.
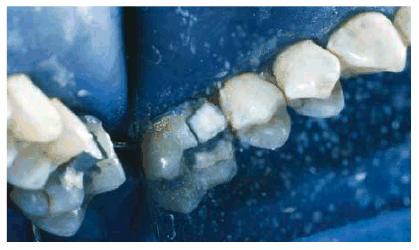
Figure 16-36B: The amalgam is masked using opaque composite and adhesive technology.
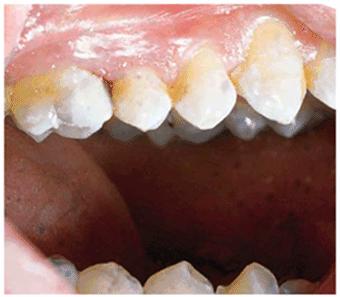
Figure 16-36C: The facial view exhibits the minimal need for composite to retain the success of the amalgam restoration.
DISCOLORATIONS AROUND PORCELAIN VENEERS
Marginal staining of porcelain veneers may necessitate the replacement of
otherwise acceptable restorations. Marginal staining can result from any of
three clinical situations, as follows:
1. The cement line may become obvious after several years if a dual-cured or
chemically cured composite luting agent was used instead of a more color-stable
light-cured resin cement. Also, unsightly margins may develop when extensive
stains accumulate on improperly polished margins. However, the eventual esthetic
failure of laminates may be due to advance marginal staining. The final
potential cause of unsightly margins is marginal leakage. This occurs when the
tooth-composite bond becomes compromised. Whereas the first two margin
discolorations present only an esthetic concern, staining as a result of
leakage may signal a problem with decay under the restoration. As stated
earlier, nightguard bleaching with 10% carbamide peroxide may be helpful as
both a therapeutic and a diagnostic procedure. If the stain around the veneer
is removed by the at-home bleaching, the margin can be refinished58
and/or resealed and the veneer salvaged.
2. Discoloration can be microleakage due to failure of the adhesive cement or
an inadequate bond at virtually any part of the laminate. Because of the
physiologic problems associated with maintaining an adequate bond in the
cervical area, this leakage is most often seen associated with the cervical
portion of the laminate. Treatment of this problem generally consists of
replacement of the laminate. However, it is sometimes possible to repair the
gingival aspect with composite resin (Figures 16-37A 16-37B 16-37C 16-37D, and 16-37E). If this treatment option is
selected, it is advisable to use an abrasive technology device to avoid any
unnecessary trauma or injury to the remaining porcelain. Often, jet-black stain
caused by chromogenic bacteria is found underneath the defective part of the
laminate.

Figure 16-37A: These porcelain laminate veneers have been in this patient's mouth for over 10 years and are now showing signs of gingival leakage.
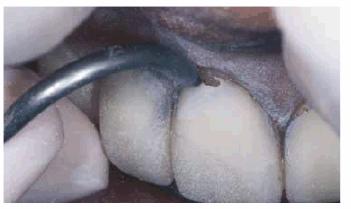
Figure 16-37B: Air abrasion is used instead of a bur to remove the portion of the porcelain over the leakage to avoid potential damage to the remaining portions of the well-bonded laminate veneer.
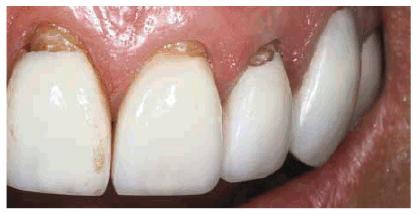
Figure 16-37C: The preparations have now been completed on the three incisor teeth, and they are ready for repair using composite resin bonding.
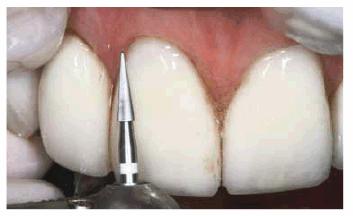
Figure 16-37D: A 30-bladed carbide bur (ET6UF,
Brasseler,
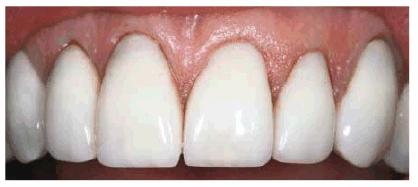
Figure 16-37E: The completed repairs show a close color match of composite to the porcelain.
3. Both
vital and endodontically treated teeth under veneers may darken over time.
Bleaching may be a conservative treatment for this condition. In this instance,
the bleaching material is applied to the surface of the tray that contacts the
lingual surface of the tooth. The bleaching of the underlying tooth may return
the veneered tooth to an acceptable shade.
ESTHETIC CONSIDERATIONS FOR FACIAL
COMPOSITE RESTORATIONS
There are several factors that should be kept in mind when esthetically
restoring the Class V restoration:
1. Color match. For most patients, the objective will be to correctly
match the present tooth shade. If using composite resin, a microparticle
restorative material is preferred rather than a hybrid composite since there
will usually be no occlusal force with which to deal and the polishability of a
microfilled composite will be of benefit to the patient. Generally, a slightly
darker shade should be applied first at the cervical-most portion of the
restoration, followed by either a blending body tone or translucent shade to
help create a natural look to the tooth. If the patient is bleaching his or her
teeth first, wait 2 to 3 weeks following termination of bleaching before
appointing the patient for the restorative procedures.
2. Gingival seal. Perhaps the most difficult procedure to accomplish is
obtaining an effective gingival seal when bonding the Class V restoration.
However, failure to obtain proper gingival adhesion will eventually result in
either the restoration becoming debonded or the subsequent microleakage can
result in a gray-black stain that can, in time, be detected. Use of a rubber
dam is the best way to avoid contamination. If a rubber dam is not used, then
the placement of a gingival retraction cord 10 to 15 minutes prior to restoring
the tooth may help prevent crevicular contamination.
3. Shape. After color, the shape of the restoration becomes the most
important element of an esthetic restoration. Using the overlay technique (see
Chapter 13, Esthetics in Dentistry, Volume 1, 2nd Edition), be sure to
slightly overbuild the restoration so that sufficient material remains to
finish and polish the restoration. Both building up and contouring of the
restoration should be accomplished by viewing the tooth not only from the
facial aspect but also occlusally and laterally to best obtain the correct
silhouette form.
Although the patient may tend to focus on specific discolorations or stains, it
is important for the dentist to remain objective and view the stains in the
context of the entire smile and face. In other words, will removal of the stain
truly satisfy the patient's quest to look better, or will a more comprehensive
approach not only improve the tooth color but also provide a smile that would
better improve his or her self-image? The answer to this question may be found
in esthetic computer imaging. Actually showing your patient the difference in
just removing the stains and changing the smile provides the truest form of
informed consent.
SUMMARY
The staining or discoloration of teeth can be indicative of a variety of
clinical situations, ranging from severe systemic conditions that may be life
threatening to the mere build-up of extensive stains as a result of oral
habits. Therefore, the first step in the treatment of a patient whose chief
complaint is stains or discolorations is the diagnosis of the cause of the
discoloration. The diagnosis will dictate the appropriate treatment options from
which to choose. It is incumbent on the dentist to select the most conservative
treatment option for the specific stain, while preparing the patient for
subsequent treatments should the selected one not be effective.
REFERENCES
1. Addy M, Moran J. Extrinsic tooth discoloration by metals and chlorhexidine.
II. Clinical staining produced by chlorhexidine, iron and tea. Br Dent J
1985;159: 331-4.
2. Albers HF. Home bleaching. ADEPT Rep 1991; 2(1):9-17.
3.
4. Baratieri LN, Ritter AV, Monteiro S Jr, et al. Nonvital tooth bleaching:
guidelines for the clinician. Quintessence
Int 1995;26:597-608.
5. Ben-Amar A, Liberman R, Gorfil C, Bernstein Y. Effect of mouthguard
bleaching on enamel surface. Am J Dent
1995;8(1):29-32.
6. Berger RS, Mandel EF, Hayes TJ, Grimwood RR. Minocycline staining of the oral
cavity. J Am Acad
Dermatol 1989;21:1300-1.
7. Blacharsh C. Dental aspects of patients with cystic fibrosis: a preliminary
clinical study. J Am Dent
Assoc 1977;95:106-10.
8. Blankenau R, Goldstein RE, Haywood VB. The current status of vital
toothwhitening techniques. Compendium
1999;20:781-94.
9. Borrman H, Du Chesne A, Brinkmann B. Medico-legal
aspects of postmortem pink teeth. [Review] Int J Legal Med 1994;106:225-31.
10. Bublitz A, Machat E, Scharer K, et al. Changes in dental development in
paediatric patients with chronic kidney disease. Proc Eur
Dialys Transpl Assoc 1981; 18:517-23.
11. Budtz-Jorgensen E. Hibitane in the treatment of oral candidiasis. J Clin
Periodontol 1977;4:117-28.
12.
13. Carrilo A, Trevino MVA, Haywood VB. Simultaneous bleaching of vital teeth
and an open-chamber nonvital tooth with 10% carbamide peroxide. Quintessence
Int 1998;29:643-8.
14. Caughman WF, Frazier KB, Haywood VB. Carbamide peroxide whitening of nonvital
single discolored teeth: case reports. Quintessence
Int 1999;30:155-61.
15. Caughman WF, Kovarick RE, Rueggeburg FA, Snipes WB. The bond strength of
Panavia EX to air-abraded amalgam. Int J
Prosthodont 1991;4:276-81.
16. Chan KC, Hormati AA, Kerber PE. Staining calcified dental tissues with
food. J Prosthet
Dent 1981; 46:175-8.
17. Christensen GJ. Fluoride made it: why haven't sealants? J Am Dent
Assoc 1992;123:89-90.
18. Coll JA, Jackson P, Strassler HE. Comparison of enamel microabrasion
techniques: Prema Compound versus a 12-fluted finishing bur. J Esthet Dent
1991; 3:180-6.
19. Croll TP. Enamel micro abrasion: the technique. Quintessence
Int 1989;20:395-400.
20. Croll TP, Cavanaugh RR. Enamel color modification by controlled
hydrochloric acid-pumice abrasion. I. Technique and examples. Quintessence
Int 1986;17: 81-7.
21. Croll TP, Sasa IS. Carbamide peroxide bleaching of teeth with
dentinogenesis imperfecta discoloration: report of a case. Quintessence
Int 1995;26:683-6.
22. Dean HT. Chronic endemic dental fluorosis. JAMA 1936;107:1269-73.
23. Denehy GE, Swift EJ Jr. Single-tooth home bleaching. Quintessence
Int 1992;23:595-8.
24. Di Benedetto DC. Tetracycline staining in an adult. J Mass Dent
Soc 1985;34:183-217.
25.
26. Donoghue AM, Ferguson MM. Superficial copper staining of the teeth in a
brass foundry worker. Occup Med
1996;46:233-4.
27. Ellingsen JE, Eriksen HM, Rolla G. Extrinsic dental stain caused by
stannous fluoride. Scand J Dent
Res 1982;90(1):9-13.
28. Eriksen HM, Jemtland B, Finckenhagen HJ, Gjermo P. Evaluation of extrinsic
tooth discoloration. Acta Odontol
Scand 1979;37:371-5.
29. Eriksen HM, Nordbo H. Extrinsic
discoloration of teeth. [Review] J Clin Periodontol 1978;5:229-36.
30. Eriksen HM, Nordbo H, Kantanen H, Ellingsen JE. Chemical plaque control and
extrinsic tooth discoloration. A review of possible mechanisms. J Clin
Periodontol 1985;12:345-50.
31. Fayle SA, Pollard MA. Congenital erythropoietic porphyria-oral
manifestations and dental treatment in childhood: a case report. Quintessence
Int 1994;25: 551-4.
32. Feinman RA, Goldstein RE, Garber DA. Bleaching teeth.
33. Fisher DE. Dental bleaching compositions and methods for bleaching teeth
surfaces. US Patent #5,376,006, Dec 27, 1994.
34. Formicola AJ, Deasy MJ, Johnson DH, Howe EE. Tooth staining effects of an
alexidine mouthwash. J Periodontol
1979;50:207-11.
35. Frazier KB. Aesthetic dentistry.
36. Frazier KB. An overview of tooth whitening procedures. J Pract Hygiene
1998;7:32-33.
37. Friedman S. Internal bleaching: long-term outcomes and complications. J Am Dent
Assoc 1997;128: 51S-5S.
38. Funakoshi Y, Ohshita C, Moritani Y, Hieda T. Dental findings of patients
who underwent liver transplantation. J Clin Pediatr
Dent 1992;16:259-62.
39. Garber DA, Goldstein CE, Goldstein RE, Schwartz CG. Dentist monitored
bleaching: a combined approach. Pract
Periodont Aesthetic Dent 1991;3:22-6.
40. Glickman GN, Frysh H, Baker FL. Adverse response to vital bleaching. J Endod
1992;18:351-4.
41. Golub J. Home bleaching may lure new patients. DENTIST Mag 1989;1, 35, 43.
42. Harrington GW, Natkin E. External resorption associated with bleaching of
pulpless teeth. J Endod 1979;5:344-8.
43. Hayes PA, Full C, Pinkham J. The etiology and treatment of intrinsic
discolorations. J Can Dent
Assoc 1986;52:217-20.
44. Haywood VB. Nightguard vital bleaching: current information and research.
Esthet Dent Update 1990; 1(2):7-12.
45. Haywood VB. Bleaching of vital and nonvital teeth. Curr Opin Dent
1992;2:142-9.
46. Haywood VB. History, safety, and effectiveness of current bleaching
techniques and applications of the nightguard vital bleaching technique. Quintessence
Int 1992;23:471-88.
47. Haywood VB. Bleaching and microabrasion options. Esthet Dent Update
1995;6:99-100.
48. Haywood VB. Achieving, maintaining, and recovering successful tooth
bleaching. J Esthet Dent
1996; 8(1):31-8.
49. Haywood VB. Bleaching tetracycline-stained teeth. Esthet Dent Update
1996;7(1):25-26.
50. Haywood VB. Bleaching of vital teeth. Current concepts. Quintessence Int
1997;28:424-5.
51. Haywood VB. Extended bleaching of tetracycline-stained teeth: a case
report. Contemp Esthet Restor Pract 1997;1(1):14-21.
52. Haywood VB. Nightguard vital bleaching: construction of NGVB prosthetic. Dent Today
1997;16:86-91.
53. Haywood VB. Nightguard vital bleaching: current concepts and research. J Am Dent
Assoc 1997;128: 19S-25S.
54. Haywood VB. Whitening teeth by nightguard vital bleaching. Pract Rev
Pediatr Dent 1998;8(6):1.
55. Haywood VB. Current status and recommendations for dentist-prescribed,
at-home tooth whitening. Contemp Esthet Restor Pract Suppl 1999;3(1):2-10.
56. Haywood VB, Caughman WF, Frazier KB, Myers ML. Tray delivery of potassium
nitrate-fluoride to reduce bleaching sensitivity. Quintessence Int
2001;32:1005-9.
57. Haywood VB, Heymann HO. Response of normal and tetracycline-stained teeth
with pulp-size variation to nightguard vital bleaching. J Esthet Dent
1994;6: 109-14.
58. Haywood VB, Heymann HO, Kusy RP, et al. Polishing porcelain veneers: an SEM
and spectral reflectance analysis. Dent Mater
1988;4:116-21.
59. Haywood VB, Leonard RH. Nightguard vital bleaching removes brown
discoloration for 7 years: a case report. Quintessence
Int 1998;29:450-1.
60. Haywood VB, Leonard RH, Dickinson GL. Efficacy of six-months nightguard
vital bleaching of tetracycline-stained teeth. J Esthet Dent
1997;9(1):13-19.
61. Haywood VB, Leonard RH, Nelson CF. Efficacy of foam liner in 10% carbamide
peroxide bleaching technique. Quintessence
Int 1993;24:663-6.
62. Heymann HO, Sockwell CL, Haywood VB. Additional conservative esthetic
procedures. In: CM Sturdevant, ed. The art and science of operative dentistry.
3rd edn.
63. Hodosh M. A superior desensitizer-potassium nitrate. J Am Dent
Assoc 1974;88:831-2.
64. Holmstrup G, Palm AM, Lambjerg-Hansen H. Bleaching of discolored
root-filled teeth. Endod Dent
Traumatol 1988;4:197-201.
65. Jackson C. Color me beautiful.
66. Jerome CE. Acute care for unusual cases of dentinal hypersensitivity. Quintessence
Int 1995;26:715-6.
67. Jordan RE, Boksman L. Conservative vital bleaching treatment of discolored
dentition. Compend Cont
Educ Dent 1984;5:803-5.
68. Kirkham WR, Andrews EE, Snow CC, et al. Postmortem pink teeth. J Forensic Sci
1977;22:119-31.
69. Lado EA. Bleaching of endodontically treated teeth: an update on cervical
resorption. Gen Dent
1988;36:500-1.
70. Leard A, Addy M. The propensity of different brands of tea and coffee to
cause staining associated with chlorhexidine. J Clin
Periodontol 1997;24:115-8.
71. Leonard RH,
72. Levin LS. The dentition in the osteogenesis imperfecta syndromes. Clin Orthop
1981;159:64-74.
73. Liebenberg WH. Intracoronal lightening of discolored pulpless teeth: a
modified walking bleach technique. Quintessence
Int 1997;28:771-7.
74. Lokken P, Birkeland JM. Dental discolorations and side effects with iron
and placebo tablets. Scand J Dent
Res 1979;87:275-8.
75. Madison S, Walton R. Cervical root resorption following bleaching of
endodontically treated teeth. J Endod
1990;16:570-4.
76. Markowitz K. Tooth sensitivity: mechanism and management. Compend Dent Educ
1992;14:1032-46.
77. Materials and procedures manual.
78. McCormack K, Davies R. The enigma of potassium ion in the management of
dentine hypersensitivity: is nitric oxide the elusive second messenger? Pain
1996;68:5-11.
79. McGuckin RS, Thurmond BA, Osovitz S. In vitro enamel shear bond strengths
following vital bleaching. J Dent Res 1991;70:377.
80. Mertz-Fairhurst EJ, Smith CD, Williams JE, et al. Cariostatic and ultraconservative
sealed restorations: six-year results. Quintessence
Int 1992;23:827-38.
81. Meyboom RH, Verduijn MM, Steenvoorden MG, et al. Reversible tooth
discolorations during oral use of antibiotics. Ned Tijdschr
Geneeskd 1996;140:207-9.
82. Miles PG, Pontier JP, Bahiraei D, Close J. The effect of carbamide peroxide
bleach on the tensile bond strength of ceramic brackets: an in vitro study. Am J Orthod
Dentofac Orthop 1994;106:371-5.
83. Morisaki I, Abe K, Tong LS, et al. Dental findings of children with biliary
atresia: report of seven cases. ASDC J Dent
Child 1990;57:220-3.
84. Ness L, Rosekrans D
85. Nordbo H. Discoloration of dental pellicle by tannic acid. Acta Odontol
Scand 1977;35:305-10.
86. Nutting EB, Poe GS. A new combination for bleaching teeth. J
87. Okafor LA, Nonnoo DC, Ojehanon PI, Aikhionbare O. Oral and dental
complications of sickle cell disease in Nigerians. Angiology
1986;37:672-5.
88. Parkins FM, Furnish G, Bernstein M. Minocycline use discolors teeth. J Am Dent
Assoc 1992;123:87-9.
89. Poliak SC, DiGiovanna JJ, Gross EG, et al. Minocycline-associated tooth
discoloration in young adults. JAMA 1985;254:2930-2.
90. Primosche RE. Tetracycline discoloration, enamel defects, and dental caries
in patient with cystic fibrosis. Oral Surg Oral
Med Oral Pathol 1980;50:301-8.
91. Reichart PA, Lenz H, Konig H, et al. The black layer on the teeth of betel
chewers: a light microscopic, microradiographic and electronmicroscopic study. J Oral Pathol
1985;14:466-75.
92. Reid JS, Beeley JA, MacDonald DG. Investigations into black extrinsic tooth
stain. J Dent Res
1977;56:895-9.
93. Rendall JR, McDougall AC. Reddening of the upper central incisors
associated with periapical granuloma in lepromatous leprosy. Br Oral Surg
1976;13:271-7.
94. Rosen T, Hoffmann TJ. Minocycline-induced discoloration of the permanent
teeth. J Am Acad
Dermatol 1989;21:569.
95. Rosenthal P, Ramos A, Mungo R. Management of children with
hyperbilirubinemia and green teeth. J Pediatr
1986;108:103-5.
96. Rotstein I. Role of catalase in the elimination of residual hydrogen
peroxide following tooth bleaching. J Endod
1993;19:567-9.
97. Salman RA, Salman DG, Gilckman RS, et al. Minocycline induced pigmentation
of the oral cavity. J Oral Med
1985;40:154-7.
98. Scanlon N, Wilsher M, Kolbe J. Imipenem
induced dental staining. [Letter] Aust N Z J Med 1997; 27:190.
99. Schiodt M, Larsen V, Bessermann M. Oral findings in glassblowers. Community Dent
Oral Epidemiol 1980;8:195-200.
100. Schwartz AG, Dunkel CE. The use of neutral sodium fluoride as a
pre-bleaching treatment regime and its effect on dentinal sensitivity.
[Abstract] National Dental Hygiene Association Meeting,
101. Settembrini L, Gultz J, Kaim J, Scherer W. A technique for bleaching
nonvital teeth: inside/outside bleaching. J Am Dent
Assoc 1997;128:1283-4.
102. Shillingburg HT, Hobo S, Whitsett LD, et al. Fundamentals of fixed
prosthodontics. 3rd edn.
103. Silverman G, Berman E, Hanna CB, et al. Assessing the efficacy of three
dentifrices in the treatment of dentinal hypersensitivity. J Am Dent
Assoc 1996;127:191-201.
104. Trope M. Cervical root resorption. J Am Dent
Assoc 1997;128:56S-9S.
105. Vachon C, Vanek P, Friedman S. Internal bleaching with 10% carbamide
peroxide in vitro. Pract Periodont Aesthet Dent 2000;10:1145-54.
106. Van der Burgt TP, Plasschaert AJ. Tooth discoloration induced by dental
materials. Oral Surg Oral
Med Oral Pathol 1985;60:666-9.
107. Waggoner WF, Siegal M. Pit and fissure sealant application: updating the
technique. J Am Dent
Assoc 1996;127:351-61.
108. Wahl MJ. At-home bleaching of a single tooth. J Prosthet
Dent 1992;67:281-2.
109. Wolfe ID, Reichmister J. Minocycline hyperpigmentation: skin, tooth, nail,
and bone involvement. Cutis 1985;33:457-8.
110. Zaia AA, Graner E, de Almeida OP, Scully C. Oral changes associated with
biliary atresia and liver transplantation. J Pediatr Dent
1993;18:38-42.
ADDITIONAL RESOURCES
Goldstein RE. Esthetics in dentistry.
Goldstein RE. Diagnostic dilemma: to bond, laminate or crown. Int J Periodont
Restor Dent 1987;87:9-30.
Goldstein RE. Solving tooth color problems in esthetic dentistry. Presented at
Hinman Dental Meeting, Clinical Topics in Dentistry,
Goldstein RE. Change your smile. 3rd edn.
Goldstein RE, Feinman RA, Garber DA. Esthetic considerations in the selection
and use of restorative materials. Dent Clin
North Am 1983;27:723-31.
Goldstein RE, Adar P. Special effects and internal characterization. J Dent
Technol 1989;17:11.
Goldstein RE, Garber DA. Complete dental bleaching. Chicago:
Quintessence, 1995.
Goldstein RE, Garber DA, Goldstein CE, et al. The changing esthetic dental practice. J Am Dent
Assoc 1994;125:1447-57.
Goldstein RE, Goldstein CE. Is your case really finished? J Clin Orthod
1988;22:702-13.
Haywood VB. Current status of nightguard vital bleaching. Compendium
2000;21(Suppl 28):S10-7.
Haywood VB. Supervised at-home bleaching is safest, most effective. Dent Prod
Rep 2000;May:82-91.
Haywood VB. Tooth whitening in your practice: treatment time and fee schedules.
Contemp Esthet Restor Pract 2000;4(11):12-5.
Haywood VB, Heymann HO. Nightguard vital bleaching. Quintessence
Int 1989;20:173-6.
Robinson FG, Haywood VB. Bleaching and temporomandibular disorder using a half
tray design: a clinical report. J Prosthet
Dent 2000;83:501-3.
Wolfe YL. Turn the white on: your healthy smile. Prevention
1997;May:49.
|
