Mental ray Renderer
Mental Ray Rendering is one of the types of rendering process in 3ds max
The default scan line renderer and the mental ray renderer each have their own capabilities. In general, for each scene, you wil 919p1512j l decide which renderer you want to use.
The advantages of mental ray rendering are
Quality controls to adjust the quality of a rendering.
Trace Depth to control reflections (multiple reflection)
Simulating a camera by using the mental ray renderer's version of motion blur and depth of field.
Creating the indirect illumination effects of caustics and global illumination.
Final Gather to improve the quality of indirect illumination.
Mental ray area lights, which generate soft-edged shadows.
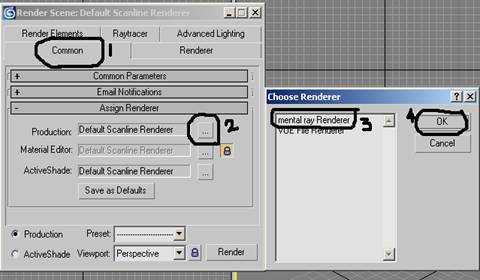
Steps for Mental Ray rendering
Rendering menu => Render => Common => Assign Renderer => Production => change default scan line to Mental Ray Renderer
Press F9 and Check the rendering. Rendering will be like square & square
Exercise 1 -Quality
1.Open the file quality .max
2. Press F10 Render Scene dialog > Renderer Panel > Sampling Quality rollout, control the quality of the finished rendering. The most important settings are Samples Per Pixel > Minimum and Maximum, which essentially determine the degree of antialiasing, but also affect resolution. Change the maximum value to 16. Then Render.


Maximum Quality value 1.0 (See in side the circle)


Maximum Quality value 16.0 (See in side the circle)
1.Open the file GI 1-Start.max
2.Press F9 to render.
3.Press F10 and click indirect illumination Tab. Switch on Enable in caustic.
4.Select Lens and Ball- Right click - properties- Click mental Ray Tab -Switch on Generate Caustic option- click ok.
 5.Select
light - modify -go to mental Ray Indirect illumination parameter- increase the
Energy to 150. Press render to see the Caustic.
5.Select
light - modify -go to mental Ray Indirect illumination parameter- increase the
Energy to 150. Press render to see the Caustic.
See the caustics as light dots.
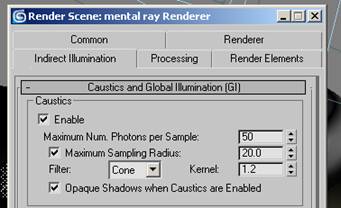 6.
Press F10 and click indirect illumination Tab and change the value as shown
below
6.
Press F10 and click indirect illumination Tab and change the value as shown
below
.
 7.Now
Press F9 and see the result.
7.Now
Press F9 and see the result.
|
